IN THIS CHAPTER
All businesses, whether small or large, need to perform regular backups of their computer systems and business data, and routinely test those backups.
Unfortunately, many businesses have no backup procedures in place or perform a backup only when there’s a known threat, such as an approaching hurricane. The consequence of not implementing a backup plan is only realized when it is too late: When you need to recover lost data, restore a down server, or recover from a catastrophic disaster.
Backing up your data should be as routine as locking your office at night. In both cases, you are being proactive, not reactive, in safeguarding the business assets of the company.
Backup and recovery processes need to be viewed within the broader context of business continuity planning and disaster recovery. Rotating backups offsite is good, but if no one has been trained on verifying that those backups are readable, then those backups are not very useful.
SBS 2008 provides new, easy-to-use backup and recovery tools that offer comprehensive data protection from unexpected events, such as the following:
![]() Disasters (fire or theft)
Disasters (fire or theft)
![]() System failures (power outage, disk crash)
System failures (power outage, disk crash)
![]() Data loss (user error, virus attack)
Data loss (user error, virus attack)
These are events that can lead to a partial or total loss of critical company data. Businesses must plan and anticipate such events and situations. A backup of company data files, for example, is of little use if the backup itself has been destroyed or stolen.
A risk assessment of data protection and recovery options might identify the need for new solutions. Although any type of backup is better than no backup, implementing multiple backup solutions may be deemed necessary to address your business continuity plans. With today’s high-speed Internet connections, complementing a local backup of data with online remote backups is now feasible.
Technology continues to make advancements that seem mind-boggling at times, and that is certainly true in the area of storage and backup devices. When SBS 2003 was first released, 18GB hard disk drives were commonplace, and tape devices were the desired method for backing up data.
Today, we have disk drives with a storage capacity of 1TB or more, and external hard drives replacing tape as the preferred media for backups. Unlike tape, which is slow because it must be accessed serially, external disk backup devices offer both the speed and capacity to keep up with today’s storage demands.
The backup and data protection features in SBS 2008 are based on the new Windows Server Backup utility that is implemented across the entire Windows Server 2008 platform.
NOTE
SBS 2008 enhances the Windows Server Backup platform with additional wizards, built-in support for backing up both Exchange and SharePoint, and a new user interface within the Windows SBS Console.
Backups are no longer file-based, but block-level based (also referred to as incremental snapshots), which provides for faster backups and easier recovery of business data.
This section covers many of the new features and changes to the Windows Server Backup (WSB) in SBS 2008.
NTBackup, the backup utility that has been part of Windows since the days of Windows NT 3.5, is finally gone.
SBS 2008 uses Windows Server Backup, which is a robust new data protection utility that has been designed from the ground up to address the backup and recovery needs of small business customers; it offers the following:
![]() Faster backups—Most backups are completed in minutes, not hours.
Faster backups—Most backups are completed in minutes, not hours.
![]() Reduced cost—External USB and Firewire drives offer increased data storage capacity at a lower cost than tape media.
Reduced cost—External USB and Firewire drives offer increased data storage capacity at a lower cost than tape media.
![]() Improved recovery—Bare metal recovery of the server, and files, folders, and volumes can be restored from a previous point in time.
Improved recovery—Bare metal recovery of the server, and files, folders, and volumes can be restored from a previous point in time.
![]() Easier management—SBS wizards designed to simplify managing backups and backup disk media.
Easier management—SBS wizards designed to simplify managing backups and backup disk media.
Windows Server Backup is not intended to be a feature-for-feature replacement of NTBackup, nor can it be used to recover data from a backup created with NTBackup.
NOTE
A special version of NTBackup is available for the Windows Server 2008 platform that can recover data from backups created using NTBackup.
This version of NTBackup is designed for reading backups only, and cannot be used to create new backups. To download this special version of NTBackup, go to http://go.microsoft.com/fwlink/?LinkId=82917.
Windows Server Backup has several design considerations that are consistent across all Windows 2008 Server platforms, including SBS 2008. These design features are listed in Table 18.1.
Windows Server Backup uses Volume Shadow Copy Service (VSS) and block-level backup technology to efficiently back up files, folders, volumes, and applications. VSS functionality ensures that open files and data from VSS-aware applications, such as Microsoft Exchange and SQL Servers, are properly backed up and protected.
Block-level backup speeds up backups by copying only those blocks that have changed since the last backup. After the initial full backup to a backup device, regularly scheduled incremental backups should only take several minutes to complete.
The SBS 2008 Configure Server Backup Wizard is used to configure and set up a recurring daily backup schedule. By default, backups are set to occur twice daily, at 5 p.m. and 11 p.m. However, backups can be scheduled more frequently, even every hour or every 30 minutes!
System volumes are automatically included in all scheduled backups to ensure protection against disasters. Backups can be saved to multiple disks in a rotation, enabling you to rotate backup devices to and from an offsite location.
The SBS Configure Backup Wizard requires the use of dedicated external disk drives directly attached to the server (USB or Firewire) for scheduled daily backups.
This is to encourage customers to take backup drives offsite for safety, and designed with the goal of making the backup process easier to set up and easier to manage for the small business.
CAUTION
External disk drives selected as backup devices with the SBS Backup wizard will be reformatted and relabeled. Previous data on those drives will be lost.
Once a drive is designated as a backup device, it will no longer show up on the SBS Console as an available drive. It is recommended to configure more than one backup drive, so that one is always attached while the other is taken offsite.
The Windows Server Backup console supports backing up to either external or internal hard drives, optical media (DVD), or network shares.
SBS 2008 will backup and restore both Exchange stores and SharePoint databases. Exchange transaction log files will be truncated if the backup successfully completes.
The VSS-based Exchange plug-in for Windows Server Backup is included in SBS 2008.
NOTE
Although SBS 2008 already fully supports Exchange backup out of the box, you may read that other versions of Windows Server 2008 are not Exchange-aware and currently cannot back up Exchange 2007.
Microsoft has announced their intent to release an Exchange plug-in for Windows Server Backup that will be available for these other versions of Windows Server 2008.
The SBS 2008 Recovery wizard can be used to recover specific files, folders, volumes, or VSS-aware applications such as Exchange and SharePoint. Simply choose the desired backup period and select the items to be restored.
Windows Server Backup supports bare-metal restores using the Windows Recovery Environment (WRE), which is included on the SBS 2008 installation DVD.
The initial release of SBS 2008 does not provide client PC backup functionality, such as the one built into the Windows Home Server product. Microsoft might consider adding this feature to a future version of SBS 2008.
User data files should be stored or redirected to the server, and backed up from there. Also, there is no built-in functionality for automatically backing up member servers from SBS 2008. Member servers should be backed up on their own.
A backup plan is one part of a larger business continuity and disaster recovery strategy. Consideration of business needs and statutory requirements, for example, should be addressed prior to server installation and implementation. Disaster recovery planning can be a complex undertaking, and the analysis of risk versus cost may indicate the need for more than one type of backup solution or schedule.
Backups are generally viewed as insurance against data corruption or human error that results in the loss of critical data or e-mails. There is a business value associated with loss of data or loss of productivity of employees. In addition to the monetary value (cost to replace software, operating system, data), the overall impact to the business if information is lost or destroyed must not be ignored or marginalized.
It is important to have more than one solution to a problem. This is true for data recovery. In addition to performing daily backups, SBS 2008 offers three user-level recovery solutions that can be made available to SBS users from their desktops.
The Volume Shadow Copy Service (VSS) feature in SBS 2008 stores copies of files and folders on a volume at specific intervals to the local server hard drive. Administrators and end users with proper permission can browse and retrieve previous versions of files directly from their desktop without having to restore from a backup device. The size of the shadow copy file can be managed by administrators, and can be enabled or disabled on each volume.
The Exchange Deleted Item Retention feature provides users with the capability to recover recently deleted e-mails directly from Outlook. The default retention period in SBS 2003 was 7 days, but has been increased to 14 days for SBS 2008.
A new feature in SharePoint 3.0 for SBS 2008 is the Recycle Bin, which is actually a twolevel recycle bin. If a SharePoint document is accidentally deleted, the user can restore it from the Recycle Bin. Removing the deleted item from the user’s Recycle Bin moves it to the Site Collection Recycle Bin, where a server administrator can recover the document, if necessary.
NOTE
For all three file recovery solutions, keep in mind that as the retention period or recovery area is increased, more disk storage will be required on the server, and this will directly impact the storage capacity requirement of your backup media.
Shadow Copy, Exchange Deleted Item Retention, and SharePoint Recycle Bin should be considered as a first line of protection against users deleting an important file or e-mail. They are not a substitute for regularly scheduled backups that are an insurance against physical disk loss, damage, disasters, or corruption due to application error or malware attacks.
It may be necessary to keep permanent or long-term copies of data for legal, financial, historic, or auditing purposes. Compliance with legislation, such as HIPAA, SarbanesOxley, and Gramm-Leach-Bliley in the United States, may dictate the need to add an archiving strategy to your backup plans.
Beyond speed and convenience, consideration must be made for the type of media and devices used for long-term archival storage. Will the device, drivers, and software be available when the business needs to recover the archived data? A vault full of backups is useless if there is no way to access them.
Use of tape backup might be the better solution in cases where archiving requirements demand a rotation of backup media to be retained for one to ten years. Consider using Windows Server Backup for daily backups and a third-party tape solution for archival/tape rotation requirements in such cases.
For many small businesses, the SBS platform is an ideal entry into a server-based solution. The ability to run a variety of services (mail, application, Internet, printer, fax) and centralize business data on a single hardware platform is very appealing.
Because SBS 2008 does not support clustering or trusts, it can also become a single point of failure for all those services and data. When the server is down, users are left unproductive. Without access to e-mail, Internet, and line-of-business applications, communications with clients and vendors are disrupted. Should an outage continue for some considerable time, the harm done may be irreparable and may even be a terminal event for the business.
Restoring an SBS server to new hardware in the past was difficult at best, especially if the new hardware was significantly different than the original. With SBS 2008, a bare-metal restore of the server is not only possible, but easily performed.
The choice of backup hardware and media has changed significantly in the years since the release of SBS 2003. Back then, tape drives were the preferred medium for backing up the server. Purchasing decisions compared the features/benefits of DAT vs. DLT, and single tape loader vs. auto tape loader.
With SBS 2008, we enter a world of storage media with terminology such as USB, Firewire, SATA, eSATA, and storage solutions such as DAS (Direct Access Storage), NAS (Network Access Storage), and SAN (Storage Area Network).
Consideration of the reliability, portability, and expandability of each potential solution is critical in designing a backup and recovery strategy.
There are too many true stories of businesses that faithfully made backups of their data on a regular basis only to discover that when the time came to retrieve data from a backup, all of their backups were either unreadable, incomplete, or completely blank.
A detailed backup plan must be developed and documented, and then routinely tested and reviewed. Such a plan should include random testing of backup media on a regular basis. Backup and offsite logs should be reviewed, and training of users responsible for performing backup and recovery functions (and their backup counterpart) should be performed and documented.
Securing your system goes beyond implementing strong passwords for users. Care and consideration must be given to the location of your server(s) and where you store your backups, and the security surrounding them.
There are many businesses where their server and communication equipment are located in an unlocked, converted closet that happens to be right next to a lounge or restroom. Anyone could walk in, grab a USB backup disk, and walk out. Keep in mind that in many cases, such backups might contain the entire intellectual property of the business.
Access to the server and backup equipment must be controlled and restricted. Consider a combination lock on the door. Pay careful attention to the temperature of the room or area where your server and data equipment is located.
Take the case of fire prevention. Many businesses store their backup disks and tapes in a fireproof safe purchased at a local retail store. This might seem like a reasonable place to store them. But in the case of a real fire, where temperatures can rise to 1,200 degrees or more, the inside temperature of a fireproof safe may quickly rise to 350 degrees.
However, most backup disk drives and tapes are only warranted for reliability in a temperature range under 125 degrees. There are fireproof safes that will keep the inside temperature below 125 degrees, but such safes cost several thousand dollars.
The off-site location you use to store your backup devices should meet the same scrutiny and requirements. With today’s technology and Internet speeds, you should consider remote online backup services as an adjunct to the SBS 2008 backup solution.
There have been many books and articles written on the merits of tape rotation methods, most based on either the Grandfather-Father-Son process or the Tower of Hanoi process. And if you still incorporate a tape backup methodology, such tape rotations are invaluable.
With image-based, block-level backups, we need to adjust how we view and plan our backup rotation.
Because we are only backing up blocks that have changed, each backup disk device might contain backup versions of the server stretching back to several days or weeks. The actual number of versions on each backup device will depend on (a) how frequently the backups occur each day, (b) the storage capacity of the backup device, and (c) the amount of data that is actually changed or modified between backups.
Monitoring your backup device for a week will give you a good indication of how much data you can expect each backup device to hold.
Assume we run two backups a day, and we calculate that each backup disk can easily hold a week’s worth of changes. If you rotate between two backup disks, you have a two-week window for recovering a missing or deleted file. By simply adding in two additional backup disk devices, you now expand your protection window to four weeks.
However, this does not address the fact that some data is only changed monthly, quarterly, or annually. If you have a requirement to retrieve a file from that far back, some form of a Grandfather-Father-Son backup rotation is required.
For example, you might decide to use four backup disks in rotation for your daily backups. Then, at the end of each month, you purchase an additional backup disk, perform a onetime backup of your entire server, label it with the month and year, and store that device offsite. At the end of a year, you will have twelve monthly backup disks offsite, plus your four daily disks.
SBS 2008 provides a variety of tools and interfaces for performing backup and restore operations and manage backup media. These options are listed in Table 18.2.
Windows SBS 2008 includes the Windows SBS Console for managing and configuring your SBS 2008 network (see Figure 18.1).
From the Getting Started Tasks pane on the left, you will use the Configure Server Backup link to help you initially assign backup media and schedule daily backups of the SBS server.
From the Backup and Server Storage tab along the top, you can access tasks and wizards to manage your backup storage and perform backup and recovery operations.
The Configure Server Backup wizard in SBS 2008 is used to set up and schedule server backups. The wizard consists of three steps, as follows:
1. Select the backup destination(s).
2. Select the volume(s) to be backed up.
3. Select the backup schedule.
Before starting the Backup wizard, be sure to have at least one external (USB or Firewire) disk device attached to your server that will be dedicated for backups:
1. Go to the Home tab in the Windows SBS Console.
2. Under Getting Started Tasks, click the Configure Server Backup link.
3. Review the information in the Change Server Backup page to make sure you have the information needed to schedule a backup, and click Next.
4. In the Specify the Backup Destination page, a list of available external disk drives to be used for backup purposes is displayed (see Figure 18.2).
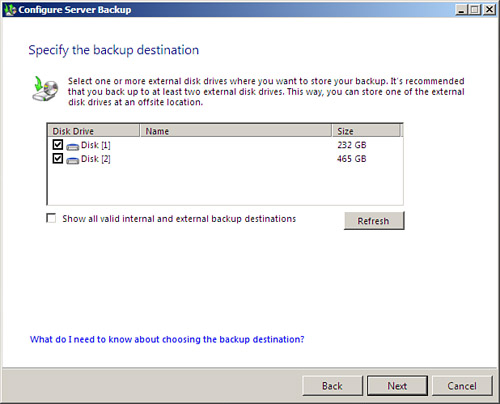
Select the drives to be dedicated for backup use, and click Next.
NOTE
Additional external disk devices can be assigned to the backup pool at any time. Use of multiple backup devices is encouraged, not only for offsite rotation, but as a preventive measure in case of a failure with a backup disk.
5. In the Label the Destination Drives page, enter a unique name for each backup device selected, and click Next.
NOTE
Be sure to place a physical label on the backup device and record the unique name assigned to the device. A good practice would be to also record the date this disk was first used as a backup device.
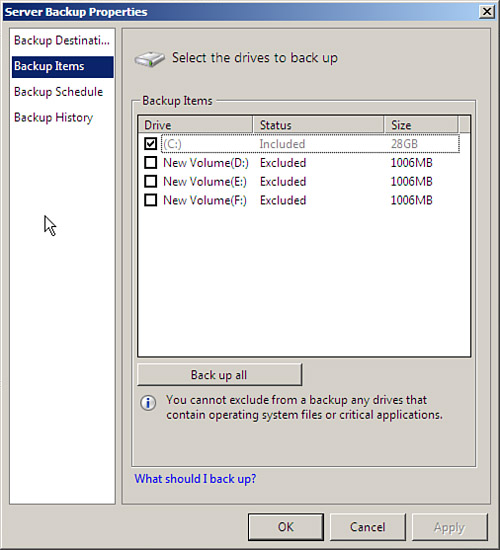
6. In the Select Drives to Backup page, a list of all internal hard drives that can be backed up is displayed. Uncheck any drives that you do not want to back up, and click Next (see Figure 18.3).
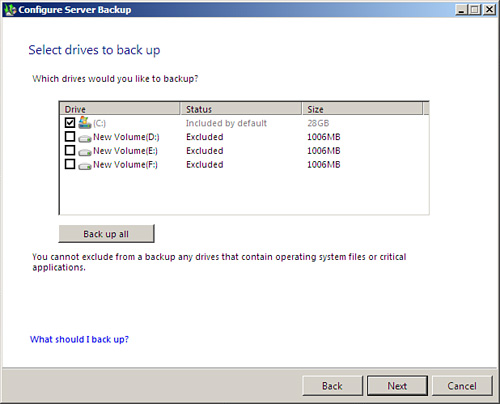
The system drive (typically, drive C) must be backed up. Other drives that hold business critical information (such as Exchange, SharePoint, SQL databases, user’s shared, or redirected folders) must also be backed up.
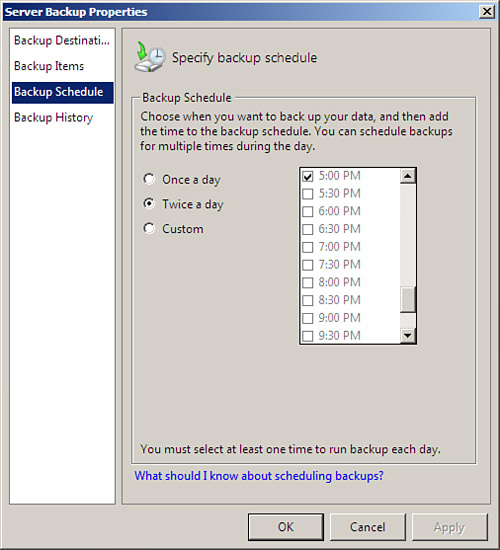
7. In the Specify the Backup Schedule page, select how often a backup should occur, and click Next (see Figure 18.4).
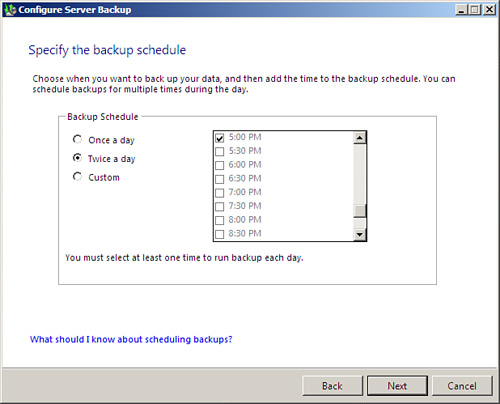
By default, the wizard schedules backups to occur twice a day, at 5 p.m. and 11 p.m. The Once a Day option schedules the backup to run at 11 p.m. The backup schedule can be customized to meet your specific business requirements. The Custom option enables you to select when backups should occur every day.
NOTE
Windows Server Backup will complete quickly (in minutes as opposed to hours) and does not significantly impact server performance.
More frequent backups can be scheduled (up to every 30 minutes, if necessary). Be aware that increasing the number of daily backups might require the use of backup disks with larger storage capacity in order to retain the appropriate number of days of backups per your business continuity plan.
8. In the Confirm Backup Details page, verify that your backup plan is correct, and click Next.
9. A warning message appears, indicating that the backup device(s) selected will be formatted. Click Yes to proceed.
10. When the backup device(s) have been formatted and labeled, the Server Backup Configured page will display. Click Finish to end the wizard.
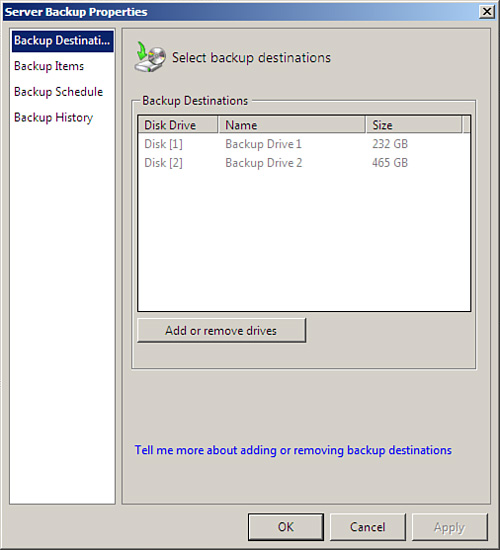
Use this task to assign or remove an external storage drive as a dedicated backup storage device by SBS 2008 (see Figure 18.5):
Use this task to include or exclude specific disk drives from being backed up by the scheduled backup operation (see Figure 18.6):
1. From the Backup and Server Storage tab, click the Add or Remove Backup Items task link.
2. Click the adjacent checkbox next to the disk drives to be added or removed from the backup schedule, or click the Back Up All button to select all drives, and then click OK.
Use this task to adjust the backup schedule (see Figure 18.7):
1. From the Backup and Server Storage tab, click the Change Backup Schedule task link.
2. Select the appropriate backup option: once a day, twice a day, or custom.
3. Select the appropriate checkboxes by each time of day that you want your backup to run. Clear the checkbox for any time that you do not want it to run, and click OK.
Use this task to pause (or resume) the scheduled backup:
1. From the Backup and Server Storage tab, click the Pause Backup Schedule task link.
2. Click Yes to pause your currently scheduled backup.
3. Once the backup has been paused, the link on the Backup and Server Storage page will change to read: Resume backup schedule.
After configuring a daily backup schedule for your SBS 2008 server, use this task to perform an incremental backup of your server at any time from the SBS Console.
Consider running such a backup just prior to installing an upgrade or hot-fix to a software application suite or the operating system:
Use this task to completely disable the server from running the currently scheduled backup:
This task is covered in detail later in this chapter, in the section, “Disaster Recovery with SBS Backup Tools.”
Windows Server Backup is the new backup and recovery system that is part of the Windows Server 2008 platform, which includes SBS 2008.
SBS 2008 also comes with the Windows SBS Console and the Backup and Server Storage module. This is an SBS-designed front-end to Windows Server Backup and offers an easy-to-use user interface and wizards for performing many of the routine backup and recovery tasks.
Thus, you might see some similar or equivalent backup and recovery tasks in both consoles. For example, when you click the Recover Server Data Backup task link from the Windows SBS Console, it actually starts up the Windows Server Backup console.
To access Windows Server Backup, click Start, Administrative Tools, Windows Server Backup.
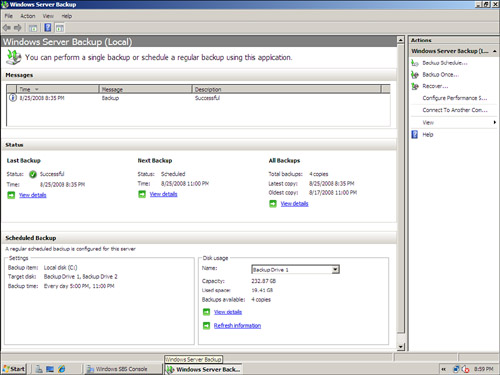
The Windows Server Backup console, shown in Figure 18.9, offers you a quick snapshot view of your backup operations, including a viewable log of recent backup and recovery activities, and details of current and scheduled backup tasks.
In this section, we specifically look at two unique tasks that are found in Windows Server Backup, but are not accessible from the Windows SBS Console:
![]() Perform a custom one-time backup.
Perform a custom one-time backup.
![]() Configure backup performance setting.
Configure backup performance setting.
The Backup Once wizard is used to perform one-time backups to supplement your automatic backups. This backup is different than the Backup Now option found in the Windows SBS Console in two ways, as follows:
1. The Backup Once wizard enables you to direct your backup to an internal hard drive, an optical drive, a separate USB external drive, or to a network shared folder, whereas the Backup Now option only backs up to the designated backup devices.
2. The Backup Once wizard enables you to select which volume(s) you want to back up, whereas the Backup Now option always backs up the same volumes that are designated in the scheduled backup process.
Reasons for using the Backup Once wizard might be to create an end-of-year backup for archival purposes, or a full backup to be sent offsite due to an approaching hurricane.
1. From the Windows Server Backup console, click the Backup Once link from the Action pane on the right side of the screen.
2. In the Backup Options page, select what type of backup to create. You have two choices:
![]() Same options—This will perform an immediate backup using the same options and parameters that the scheduled backup uses, and functions exactly like the ondemand quick backup. If this option is selected, proceed to step 7 (Confirmation screen).
Same options—This will perform an immediate backup using the same options and parameters that the scheduled backup uses, and functions exactly like the ondemand quick backup. If this option is selected, proceed to step 7 (Confirmation screen).
![]() Different options—This provides the ability to select which volumes should be backed up and where the backup should be stored.
Different options—This provides the ability to select which volumes should be backed up and where the backup should be stored.
3. If you selected the Different options, the Select Backup Configuration page displays. You can select to back up the Full Server (recommended) or choose the Custom option, which enables you to exclude some volumes from this backup.
After making your selection, click Next.
4. If the Custom option is selected, in the Select Backup Items screen page, select which volume(s) should be backed up, and click Next (see Figure 18.10).

5. In the Select Destination Type page, select the type of backup destination you want to use to store the backup image to be created, and click Next. You have two options: Local Drives or Remote Shared Folder. Use Local Drives to direct a backup to an optical DVD drive or to another hard drive.
If Local Drives is selected, the Select Backup Destination page displays (see Figure 18.11). Click the drop-down backup destination field and select a drive from the list of available drives, and click Next.

If Remote shared folder is selected, the Specify remote folder page displays (see Figure 18.12). Enter the full UNC path name of the shared folder where the backup is to be stored (for example: \ServerNameFolderName).
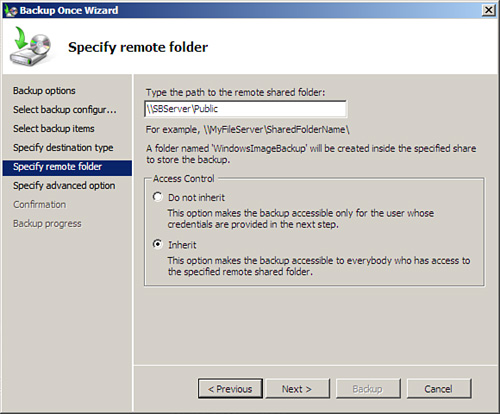
The Access Control field is set to Inherit by default, and should normally not need to be changed. Click Next to proceed.
NOTE
If you want to restrict access to a single user, click the Do Not Inherit option for the Access Control field, and then enter the username and password credentials of the user on the next screen.
6. From the Specify Advanced Option page, choose what type of VSS backup you want to create: VSS Copy Backup (default) or VSS Full Backup, and click Next.
CAUTION
Unless otherwise required, leave this option set to the default selection (VSS Copy Backup).
The VSS Full Backup option is designed to truncate the log files for applications such as Exchange. If you are using a third-party backup application, you should not use VSS Full Backup because it will delete the logs at the end of the backup. If the third-party application relies on those logs to take incremental backups, it would take full backups all the time.
7. In the Confirmation page, review your selection, and click Backup to start the backup. Click Close once the backup is completed.
The Windows Server Backup console contains a screen for adjusting the performance of server backups.
Start up Windows Server Backup; then click the Configure Performance Settings link from the Action pane on the right. This opens the Optimize Backup Performance window (see Figure 18.13).
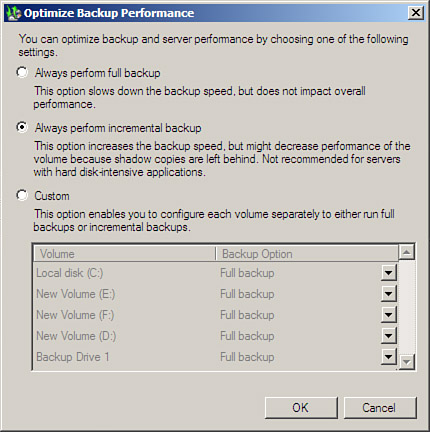
This screen enables you to select whether to always do full or incremental backups, or to specify full or incremental backups for each disk volume separately.
For SBS 2008, these settings should not normally need to be changed.
The WBADMIN command-line interface contains a set of commands for performing backup, restore, and query operations. In order to use WBADMIN, it must be started from an elevated command prompt. (Right-click Command Prompt from within the Start menu and select Run as Administrator.)
NOTE
WBADMIN commands can also be used in a batch file or scheduled as a recurring task from Windows Task Scheduler.
For an example of scheduling a WBADMIN task, see http://technet.microsoft.com/en-us/library/cc732850.aspx
Table 18.3 includes a full list of all the WBADMIN commands available. Visit http://technet.microsoft.com/en-us/library/cc754015.aspx to view the full syntax of each command and parameters available.

One example of using Wbadmin is to create a System State backup of the server. Because SBS 2008 creates image backups, the need for a backup of the System State is not as critical as in the past, but knowing how to prepare such a backup is still important.
The command to create a System State backup looks like this:
wbadmin start systemstatebackup –backuptarget:E: -quiet
where E is the local hard drive where the backup catalog will be stored and -quiet is the parameter used to not ask for confirmation.
The SBS 2008 DVD includes the Windows Recovery Environment (WRE), which is a set of tools to help diagnose and recover from serious errors that might prevent your server from booting successfully.
Later in this chapter, in the section labeled, “Disaster Recovery with SBS Backup Tools,” we discuss how to use the Windows Recovery Environment to perform a full “bare-metal” restore of the SBS server from backup.
The Premium edition of SBS 2008 includes a copy of Windows Server 2008 Standard for use on a second, member server. This second server may be used, for example, as a line-of-business application server running SQL 2008. However, there are two issues that must be addressed, as follows:
![]() Windows Server Backup is not automatically installed on this second server.
Windows Server Backup is not automatically installed on this second server.
![]() The Windows SBS Console on SBS 2008 server does not automatically back up this second server.
The Windows SBS Console on SBS 2008 server does not automatically back up this second server.
The following steps should be performed from the console of the second server:
1. Click Start, Server Manager.
2. In the Server Manager, click Features in the left pane and then click Add Features in the right pane.
3. Expand Windows Server Backup Features, and select the checkbox for Windows Server Backup. (The command-line tools are not required.)
4. Click Add Required Features, and then click Next.
5. Click Install from the Confirmation page.
After the installation is finished you can access Windows Server Backup by clicking Start, Administrative Tools, Windows Server backup.
After installing Windows Server Backup, you must decide how you want to back up this second server. Two choices you might consider are as follows:
1. Use a separate set of external USB/Firewire drives and back up this second server separately from the SBS 2008 server.
2. If your SBS 2008 server has available space on an additional volume, create a network shared folder on that volume, and then configure Windows Backup Server on the second server to back up to that network shared folder. Then configure the SBS 2008 backup to include that volume in its daily backup.
Creating, implementing, and testing a backup and recovery plan is a vital part of a larger disaster recovery (DR) plan for any business. A complete DR plan must address and identify critical business issues, in addition to the technical issues of recovering servers and data.
From a backup and recovery point of view, it is important that clear step-by-step instructions for recovering files, an application, or the entire server are part of your disaster recovery plan.
Backups must be regularly tested (at least monthly) by restoring some or all of the data to verify that created backups are both readable and usable. The Recovery Wizard in SBS 2008 is used to restore both data files and applications (Exchange and SharePoint).
On a more infrequent basis, a full “bare-metal” restore of a backup to a test server should be performed. The Windows Recovery Environment that ships on the SBS 2008 boot DVD is used to perform a full restore.
Best Practice—Document, Document, Document!
Besides creating and testing a backup and recovery plan, there are many other pieces of information that you should collect, review and document as part of an overall business continuity plan, such as:
![]() Maintain an itemized inventory of all hardware and software (including serial numbers and replacement cost). This inventory should be reviewed and updated quarterly and a copy stored offsite with your backup plans.
Maintain an itemized inventory of all hardware and software (including serial numbers and replacement cost). This inventory should be reviewed and updated quarterly and a copy stored offsite with your backup plans.
![]() Review your business insurance coverage against this inventory list to make sure that it covers the replacement cost of all your assets.
Review your business insurance coverage against this inventory list to make sure that it covers the replacement cost of all your assets.
![]() Prepare a list of emergency contacts of your providers—insurance, phone, Internet, building maintenance, hardware, and software—and keep a copy with your backup plans.
Prepare a list of emergency contacts of your providers—insurance, phone, Internet, building maintenance, hardware, and software—and keep a copy with your backup plans.
![]() Contact your hardware and software vendors to find out what they might provide in the case of a disaster or emergency (replacement hardware, software, and so on).
Contact your hardware and software vendors to find out what they might provide in the case of a disaster or emergency (replacement hardware, software, and so on).
The key to a successful plan is to “document, document, document”!
Document your plans.
Document whenever you test your plans.
Document that employees have been trained.
Document that backups taken offsite have been returned.
Document when problems occur and how they were resolved.
Document changes to your system.
The Recovery Wizard is used to recover files, folders, applications, or an entire volume from a backup device. To access the Recovery Wizard:
1. Click the Backup and Server Storage tab of the Windows SBS Console.
2. In the Backup task pane on the right, click Restore server data from backup. This opens up the Windows Server Backup console.
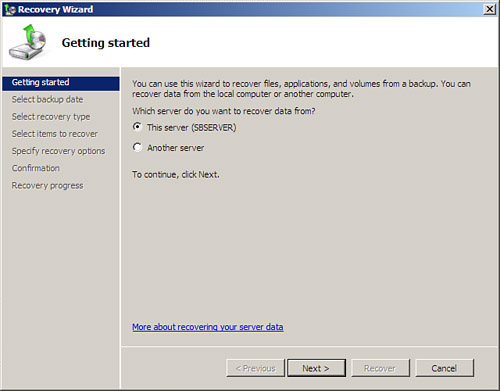
3. From the Action pane on the right side of the screen, click Recover to start the Recovery Wizard (see Figure 18.14).
NOTE
Backup destinations may include assigned external USB/Firewire drives, other internal drives, optical DVD drives, or network-shared folders. The following examples assume you are recovering from one of the designated SBS backup drives.
The Recovery Wizard allows you to recover files or folders from any prior backup, and to restore those files either to their original location or to a different location. If the files being restored already exist, you can choose to rename the existing file or overwrite it.
1. the Recovery Wizard’s Getting Started page, leave the option set to This Server, and click Next.
2. The wizard scans the backup history log, and displays the Select Backup Date page. The most recent completed backup is selected by default.
If you need to restore a file or folder from a prior point in time, use the Calendar to locate the desired backup to use. After selecting the appropriate backup to restore, click Next.
3. In the Select Recovery Type page, the Files and Folders option is selected by default. Click Next to continue.
4. In the Select Items to Recover page that displays, drill down to locate the file(s) or folder(s) that you want to recover. When all items to be restored have been selected, click Next.
5. In the Specify Recovery Options page shown in Figure 18.15, you have the chance to change what happens during the recovery process:
![]() Recovery destination—You can select to restore files and folders to a location other than their original location.
Recovery destination—You can select to restore files and folders to a location other than their original location.
![]() Files/folders already exist—During the recovery process, you can decide what to do if any of the files/folders being recovered already exist in the recovery destination.
Files/folders already exist—During the recovery process, you can decide what to do if any of the files/folders being recovered already exist in the recovery destination.
![]() Security settings—You can select whether or not to restore the security settings for each recovered file/folder.
Security settings—You can select whether or not to restore the security settings for each recovered file/folder.
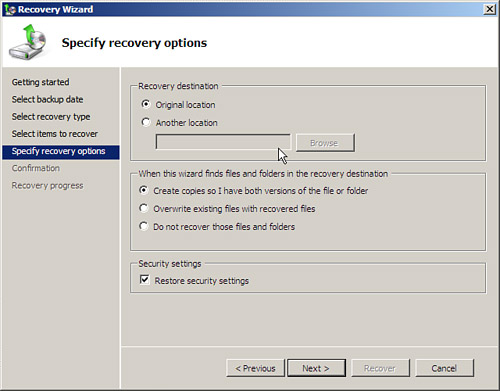
The default options work just fine in most cases. If so, click Next to continue.
6. Review the Confirmation page, and if all is correct, click Recover to proceed. When the recovery operation is finished, click Close.
SBS 2008 makes restoring the Exchange or SharePoint databases a simple task because Windows Server Backup is a VSS-based backup: Keep in mind that these are full data restores, meaning that you cannot restore just a single mailbox from Exchange or restore a particular document or folder from SharePoint.
NOTE
When restoring either Exchange or SharePoint, SBS 2008 will automatically dismount/mount the Exchange stores and stop/start any required services for you.
1. In the Recovery Wizard’s Getting Started page, leave the option set to This Server, and click Next.
2. In the Select Backup Date page, click Next to recover from the most recent backup.
3. In the Select Recovery Type page, click the Applications option, and click Next.
4. In the Select Application screen, select which application (Exchange or SharePoint) you want to recover, and click Next (see Figure 18.16).
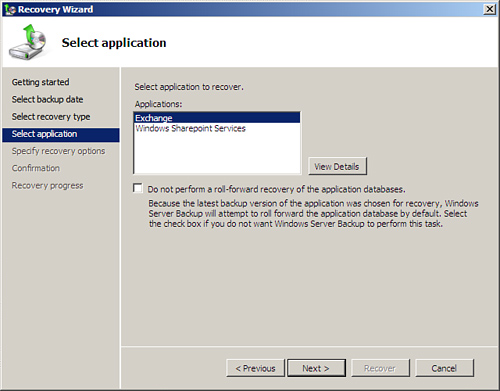
5. In the Specify Recovery Options page, you might select to restore the application to the original location (default) or to another location. Click Next to restore to the original location.
6. Review the Confirmation page, and if all is correct, click Recover to proceed. When the recovery operation is finished, click Close.
Recovering an entire volume might be required if an entire drive or data on the volume has been compromised or corrupted. Unlike recovering files, folders, or applications, you cannot restore a volume to its original location. It must always be directed to a different volume:
1. In the Recovery Wizard’s Getting Started page, leave the option set to This Server, and click Next.
2. In the Select Backup Date page, click Next to recover from the most recent backup.
3. In the Select Recovery Type page, click Volumes and click Next.
4. In the Select Volumes page, shown in Figure 18.17, you can select from a list of volume(s) that might be restored (source volume), and specify the volume you would like to recover to (destination volume). Click Next to continue.
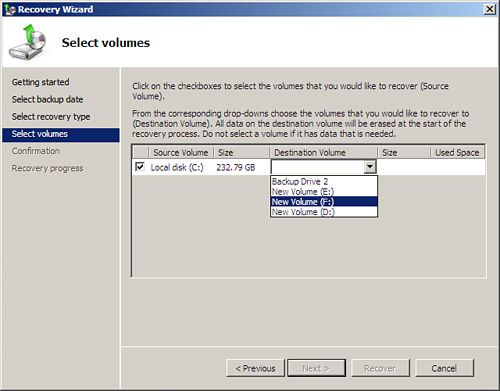
5. After specifying your source and destination volumes, a warning message displays, warning that any data on the destination volume will be lost when you perform the recovery. Click Yes to proceed, or No to return to the previous step.
6. Review the Confirmation page, and if all is correct, click Recover to proceed. When the recovery operation is finished, click Close.
Restoring a complete server is a far less complicated task with SBS 2008 than with previous versions of SBS or Windows Server products.
In the past, any discussion of a full system restore would require installing the core operating system files, and then any service pack files or other patches, before you could restore the data from backup tape using NTBackup.
Restoring a complete SBS 2008 server from backup, on the other hand, can be accomplished with just the SBS 2008 installation/boot DVD and your external backup disk, at a minimum.
NOTE
The term “bare-metal” refers to a computer that does not have an operating system loaded on it. That is, it is nothing but “bare metal”—no files, no data, no operating system.
A bare-metal restore refers to the process of restoring data to an empty (“bare metal”) disk drive. Bare-metal recovery of an SBS 2008 server is now possible because of the imaging backup techniques used.
Prior to starting a full recovery of a server, be sure the following items are available:
![]() SBS 2008 boot DVD.
SBS 2008 boot DVD.
![]() Your USB backup disk device.
Your USB backup disk device.
![]() If your server is configured with hardware disk controllers, you might need to obtain the appropriate .inf driver file from your hardware vendor for the disk subsystem. Store the .inf file onto a USB disk drive or thumb drive.
If your server is configured with hardware disk controllers, you might need to obtain the appropriate .inf driver file from your hardware vendor for the disk subsystem. Store the .inf file onto a USB disk drive or thumb drive.
NOTE
Be sure to keep a copy of your current disk drivers offsite, along with your offsite backup disks and disaster recovery manual.
We are now ready to begin a full recovery of a server:
1. Boot up the server using the SBS 2008 boot DVD and get to the Install Windows page.
2. Confirm the Language, Time & Currency, and Keyboard or Input Method, and click Next.
3. Click Repair Your Computer (lower-left corner).
4. In the System Recovery Options page, confirm that your disk drives are listed. If not, you need to load the appropriate drivers for your disk subsystem, as follows:
a. Plug in the USB drive that contains the appropriate .inf file.
b. Click the Load Drivers link.
c. A message window “Insert the installation media for the device” displays. Click OK to continue.
d. Browse to your USB drive, locate your driver’s .inf file, and click Open.
e. A message window to confirm drivers to be loaded displays. Click the Add Drivers... link. A progress window displays while the driver is installed.
5. On the next screen, select the operating system (Windows Server 2008) to repair, and click Next.
6. In the Choose a Recovery Tool page, select option 1 (Windows Complete PC Restore).
7. In the Restore Your Entire Computer from a Backup page, confirm that the correct backup disk was found, and click Next.
8. In the Choose How to Restore the Backup page, click the Format and Repartition Disks option. When you do this, the Exclude Disks option is enabled.
9. Click the Exclude Disks link and select which disk drives should be excluded, and click OK. An Advanced button is available to override some options, but the defaults are acceptable as is.
10. Confirm information and click Finish to proceed.
11. A message window displays to confirm that you want to format the selected drives and restore the backup. Click OK to proceed.
As much as we might want it to be otherwise, scheduled backups may fail from time to time for various reasons. That is why it is so important to do random tests of your backups, and execute a test recovery of your server on a scheduled basis.
CAUTION
SBS 2008 does not have a way to send out an e-mail alert if the scheduled SBS backup fails or does not complete successfully. The Windows SBS Console home page will flag a backup failure with a large red X.
In any troubleshooting scenario, it is always helpful to narrow down the scope of the failure in order to isolate and resolve the problem. This is true for diagnosing backup failures and errors.
Here are several places to begin troubleshooting backup or restore issues:
1. Collect information on the situation by reviewing event logs, the SBS Console, and the Windows Server Backup console.
2. Check the physical backup device and cable connection. A backup device with no power or with a disconnected USB/Firewire cable can be easily fixed!
3. Attempt a recovery of a single file from the backup device. If the recovery process cannot find the backup device, or has problems recovering the specified file, the backup device might need to be reformatted or replaced.
4. Attempt a manual backup to both the current backup device and to a second backup device. If either fails, this may indicate an issue with a specific backup device.
5. Rerun the Configure Backup Server and see if any errors are reported.
6. Check the Microsoft SBS newsgroups for any recently reported problems with the backup process.
7. If using a third-party backup solution, check the vendor’s support web site.
8. A reboot of the SBS server, as a last resort, may clear up an issue with locked files or conflicts with running processes.
Although this is not an exhaustive list, hopefully it provides a starting point for diagnosing a failure with the backup process. As with most troubleshooting situations, resolving such problems is one part luck, one part experience, and one part magic!
A sure-fire recipe for failure is to not plan for one. Problems occur when you least expect them. Systems will go down at the worst time, such as when you are on vacation, or a critical business deadline is at hand.
A well thought-out backup and recovery plan needs to be tested, practiced, and revised on a regular basis. When a business cannot quickly recover from a disaster or system failure, the odds are good that they will be out of business completely within a year.
There are a variety of backup solutions, and the type of backup selected depends on many factors. That is why a risk analysis of a business and its data is so important. Operating without e-mail for several days is one thing. But losing recently entered contracts and invoices, or not being able to review current shipping inventory, is a death blow.
A properly backed-up server may be of help if a disk drive crashes or a user deletes an important file. But such good efforts go out the window if your office is vandalized, and your server and all your backup devices are stolen, as you did not implement keeping some backups offsite.
A disaster does not need to turn into a catastrophe.
![]() Developing a Backup Plan—Create a written backup and recovery plan that contains step by step instructions, and keep a copy of this plan offsite. Make sure that more than one person is trained and responsible for each task. Test your backups on a regular basis.
Developing a Backup Plan—Create a written backup and recovery plan that contains step by step instructions, and keep a copy of this plan offsite. Make sure that more than one person is trained and responsible for each task. Test your backups on a regular basis.
![]() Offsite Backups—Use two or more external disk devices for your daily backups and implement an offsite rotation schedule of your backup devices.
Offsite Backups—Use two or more external disk devices for your daily backups and implement an offsite rotation schedule of your backup devices.
![]() Document, Document, Document!—Keep an up-to-date inventory of your hardware and software for business insurance purposes. Compile a list of emergency contacts, and establish an emergency recovery plan with each of your vendors. Document everything—document your plans, document that you tested your plans, document that your employees are trained, document when things go wrong and document how they were resolved.
Document, Document, Document!—Keep an up-to-date inventory of your hardware and software for business insurance purposes. Compile a list of emergency contacts, and establish an emergency recovery plan with each of your vendors. Document everything—document your plans, document that you tested your plans, document that your employees are trained, document when things go wrong and document how they were resolved.