

Writing nroff and troff Macros
The nroff and troff formatters include a powerful macro definition and substitution capability. As we suggested when macros were first discussed in Chapter 4, they are a good way to combine frequently used sequences of formatting requests into a single instruction. But after working with the ms and mm macro packages, you must know that macros are more than that.
Macros are an essential part of nroff and troff—you cannot escape them if you want to make serious use of the formatter. Precisely because macros are so essential, many users never learn to fully use them. The most obviously useful macros are already included in the existing macro packages, whose complex internal control structures make them difficult to understand and modify.
The purpose of this chapter is to introduce the fundamental nroff and troff requests that are used for creating macros. You’ll learn the basics in this chapter. Then, in later chapters we can examine how to write macros for specific purposes, without having to make continual asides to introduce a new request.
Chapter 15 describes additional requests for creating special effects (such as pictures) with your macros, and Chapters 16 through 18 discuss how to go beyond writing individual macros and how to develop or extend an entire macro package.
▪ Comments ▪
Before we start, we’ll introduce the syntax for inserting comments into your macro definitions. Macros can get quite confusing, so we advise you to put in comments that explain what you are doing. This will help immensely when you go back weeks or months later to modify a macro you have written.
A line beginning with the sequence:
."
will not be interpreted or printed by the formatter. Any part of a line following the sequence " will be treated the same way. For example:
." O'Reilly & Associates, Inc. custom macro set

." Last modified 4/25/87

.de IZ " Initialization macro

             .

             .

             .
Note that there is an important difference between:
." A full line comment
and:
" A partial line comment
If you simply start the sequence " at the margin, the formatter will insert a blank line into the output, because this sequence by itself does not suppress newline generation.
(Note that comments can be used at any time, not just in macros. You can write notes to yourself in your input file and they will never appear in the output. But if you accidentally type the sequence " in your file, the remainder of the line on which it appears will disappear from the output.)
▪ Defining Macros ▪
As we’ve already discussed, use the .de request to define a macro:
.de AB " Define macro ABRequests and/or text of macro here
..
There are also requests to remove or add to existing macros. The .rm request removes a macro:
.rm PQ " Remove macro PQ
You may sometimes want to define a macro for local use, and remove it when you are done. In general, though, this is an advanced request you will not use often.
The .am request appends to the end of an existing macro. It works just like .de but does not overwrite the existing contents:
.am DS  " Append to the existing definition of DS

.ft cw

..
At first, you may think that this request has only limited usefulness. However, as you work more with macros, you will find unexpected uses for it. We’ll mention a few of these in later chapters.
▪ Macro Names ▪
A macro name can be one or two characters, and can consist of any character(s), not just alphanumeric characters. For example:
.de ^(      " Macro used internally whose name, we hope,

              " never has to be remembered
You can even use control characters in macro names. Names can be uppercase or lowercase, or any combination of the two, and uppercase and lowercase are distinct. For example, the four names .gm, .GM, .gM, and .Gm can all be used without conflict.
If you are starting from scratch, you can use whatever macro or number register names you like except for the names of existing formatter requests. However, if you are adding macros to an existing package, you have to work around the existing names, because creating a new macro with the same name as an old one will discard the previously read-in definition.
This is not as easy as it sounds, because macro packages include internal macro, string, and number register definitions that are not visible to the casual user. You may be surprised when your new macro makes some other part of the package go haywire. (In an attempt to forestall this problem, most macro developers give odd, unmnemonic names to internally called macros. However, collisions still can and do occur.)
Finding the Names of Existing Macros
Before you start adding macros to an existing package, it’s a good idea to print the names of all existing macros.
There are two ways to do this. The .pm request will print (in blocks of 128 characters) the names and sizes of all macros defined in a given run of the formatter. So, for example, creating a file containing the single request:
.pm
and formatting it like this:
$ nroff -ms pmfile
will print on the screen a list of all the macros defined in the ms macro package. (The output could also be redirected to a file or printer.)
However, macro names are drawn from the same pool as string names (see the next example), so it might be better to search for macro or string definitions using grep et al, like this:
$ grep ’^.d[esia]’ macrofiles | cut -f1,2 -d’ ’ | sort | uniq
(grep will select all lines beginning with either .de, .ds, .di, or .da; cut will select only the first two space-separated fields on each of those lines; sort and uniq together will produce a sorted list consisting of only one copy of each line. Note that for -mm, which does not use a space before the macro name, you would need to specify cut -fl only. You will also need to substitute for macrofiles the actual filenames containing the macros of interest.)
You should do the same for number registers:
$ sed -n -e ’s/.*.nr * (. . ).*/1/p’ macrofiles | sort | uniq
here, because we can’t rely on number registers being set at the start of a line, as we can with macro definitions. The one-line sed script included here saves the first two nonspace characters (..) following the string .nr, and substitutes them for the rest of the line (i.e., it throws away the rest of the line).
You could also just grep for an individual macro, string, or number register name before you use it! Or you could take the easy way, and check Appendix B, where we’ve listed all the names in each of the packages.
In addition to looking for conflicting names, you may also need to look for conflicting usage, or to understand in detail the operation of a macro you are intending to call within a new macro you are writing.
To do this, you can simply read in the entire macro definition file with the editor and search for what you want. However, to make things easier, we use the getmac shell script described in Chapter 12 to print out the definition of the desired macro. The script prints the result on standard output, which can easily be redirected into a file, where it can become the basis for your own redefinition.
Renaming a Macro
If you do find a conflict, you can rename macros that have already been defined. The .rn macro renames an existing macro:
.rn ^( H1 " Rename ^ ( to H1; easier to remember
The old name will no longer work. You must use the new name to invoke the macro.
A good trick that you can sometimes pull off with .rn is to temporarily redefine a macro (without ever modifying its contents). For example, the ms macros include a macro to draw a box around a paragraph; however, these macros do not leave any space above or below the box. We can add some like this:
.rn B1 b1      " Rename B1 to b1

.de B1         " Now redefine B1

.sp .5         " Add some space before the box is drawn

.b1            " Execute the old definition

..

.rn B2 b2      " Rename B2 to b2

.de B2         " Now redefine B2

.b2            " Execute the old definition

.sp .5         " Add some space after the box is drawn

..
This only works for adding extra control lines before or after the current contents of the macro. Remember it, though, because this trick may come in handy if you don’t want to (or can’t) directly modify a macro in one of the existing packages, but do want a slightly different effect.
▪ Macro Arguments ▪
The simplest kind of macro is a sequence of stored commands, starting with a .de request and ending with the two dots (..) at the beginning of a line.
However, as you’ve seen when you’ve used mm and ms, macros can take arguments, and can act differently depending on various conditions. It’s also possible for a macro to save information and pass it to other macros to affect their operation. An understanding of how to do these things is essential if you plan any serious macro design.
A macro can take up to nine arguments and can use them in any way. Arguments are described positionally by the character sequences \$1 through \$9*.
For example, we could define a very simple .B macro to boldface a single argument:
.de B        "   Macro to boldface first argument

fB\SlfP

..
Or, we could write a simple paragraph macro that, instead of having a fixed indent, might take a numeric argument to specify the depth of the indent:
.de PI         "   Simple paragraph macro

.SP

.ne 2          "  Prevent widows

.ti \$1       "  Indent to the depth specified by first

..             "  argument
As you can see in the first example, you can print an argument in your text. Or, shown in the second example, you can use it inside the macro as an argument to one or more of the requests that make up the macro.
Notice that there is nothing intrinsic about a macro that causes a break. The .B macro, for instance, can be placed in the input file as in the following example:
As long as filling is in effect, it will produce exactly the same output as:
There are a number of ways to fBemboldenfP text.
Macro arguments are separated by spaces. If you want to include an explicit space in an argument, you should enclose the entire string in quotation marks, like this:
___________________
*Actually, the sequences are $1 through $9, with only a single backslash. But for reasons to be described shortly, you always need at least two backslashes.
There are a number of ways to

.B "make text stand out."
If you didn’t enclose the phrase make text stand out in quotation marks, a single word, make, would have been interpreted as the first argument, the next word, text, as the second argument, and so on. This wouldn’t cause a program error—there is no requirement that arguments to a macro be used by that macro—but the unused arguments would simply disappear from the output. As shown here, the entire phrase is treated as a single argument.
To actually print a quotation mark inside a macro argument, double it. For example:
.B "The Quote ("") Character"
will produce:
The Quote (") Character
You’ve probably recognized that the syntax for specifying arguments by position is very similar to that used with shell scripts. You might wonder, though, about backslashes, which are used in the shell to prevent interpretation of a special character. In fact, they serve the same function in troff.
The nroff and troff formatters always read a macro at least twice: once when they read the definition (and store it away for later use), and once when they encounter it in the text. At the time the macro is defined, there are no arguments, so it is essential to prevent the formatter from doing any argument substitution.
When the macro definition is read, the formatter operates in what is referred to (in the Nroff/Troff User’s Manual) as copy mode. That is, none of the requests are executed; they are simply copied (in this case, presumably into memory) without interpretation. The exception is that various escape sequences that may have a different value at macro definition time than at macro execution time (most notably
, for interpolating number registers, *, for interpolating strings, and $, for interpolating arguments) are executed, unless you suppress interpretation with a preceding backslash. (Other escape sequences are also interpreted, but because they have fixed values, this makes no difference to the action of the macro.)
A backslash prevents interpretation of the character that follows it by sacrificing itself. The backslash tells the formatter: “Take me but let the next guy go.” Each time the character sequence is read, the backslash is stripped off—that is, is actually stored as . (You can think of as saying “I really mean. . . . ” So in the shell, for example, if you want to use an asterisk literally, rather than as a filename expansion metacharacter, you write *—that is, “I really mean *.” In a similar way, \ says “I really mean backslash.”)
When macro definitions are nested inside one another, you will need to add additional backslashes to get what you want. The true argument interpolation escape sequence is $n, rather than \$n; the extra backslash is needed because the first one is stripped when the macro is interpreted in copy mode. The same rule applies when you want to interpolate the value of a number register or a string in a macro definition. Think through the number of times the definition will be read before it is executed, and specify the appropriate number of backslashes, so that you get the actual value used at the point where you need it. A failure to understand this will cause more frustration than almost any other error when you are writing macros.
In the example of the .B macro, the sequences fB and fP did not need to be escaped, because troff could just as easily interpret them at the time the macro is defined. However, the macro would also work if they were specified with double backslashes—it is just that the interpretation of the codes would take place when the macro was used.
▪ Nested Macro Definitions ▪
We said previously that a macro definition begins with a .de request and ends with two dots (. .). This is a simplification. The .de request takes an alternate terminator as an optional second argument. This feature allows you to create nested macro definitions.
.de M1         " Start first macro

.de M2 !!      " Start second macro

. !!           " End second macro

..             " End first macro
You can also nest macros by delaying interpretation of the . . on the second macro:
.de M1          " Start first macro

.de M2          " Start second macro

\..            " End second macro

...             " End first macro
For example, a group of related macros for producing a certain type of document might be nested inside a “master” macro. A user would have to invoke the master macro, indicating document type, to make the other macros available for use. Nested macros could be used to provide alternate versions of the same set of macros within a single macro package.
▪ Conditional Execution ▪
One of the most powerful features of nroff and troff’s macro programming language is its facility for conditional execution. There are three conditional execution requests: .if, .ie (if else), and .el (else). The .if request is used for a single condition. (“If the condition is met, do this; otherwise, simply go to the next line.”) The .ie and .el requests are used as a pair, testing a condition and then performing either one action or the other. (“If the condition is met, do this; otherwise, do that.”)
Predefined Conditions
There are a number of different conditions that can be tested with .if and .ie. The simplest looks to see if a predefined condition is true or false. There are four predefined conditions, as listed in Table 14-1.

For example, in a page bottom macro, to print the page number in the outside corner, you might write:
.if o .tl '''%' " If odd, put page number in right corner

.if e .tl '%''' " If even, put page number in left corner
(The .t1 request prints three-part titles, at the left, center, and right of the page. And, within this request, the % character always prints the current page number. We’ll explain these two items in detail later, when we look at how to write a complete page transition macro. For right now, we just want to understand how the conditions themselves work.)
Because the two conditions, odd and even, are mutually exclusive, you could also write:
.ie o .tl '''%' " If odd, put page number in right corner

.el .tl '%'''   " Otherwise, put it in left corner
Notice that you do not specify a condition to be tested in the .el request.
Arithmetic and Logical Expressions
A closely related condition simply tests for a nonzero number or a true arithmetic expression. This is generally used with number registers, but it could also be used to test the value of numeric arguments to a macro. For example, we could write a paragraph macro that was either indented or flush left, depending on the value of its argument:
.de P

.SP

.ne 2

.if \$l .ti \$I   "If there is an arg, use it for indent

..
That is, if there is a nonzero numeric argument, do a temporary indent to the distance specified by the value of the argument.
Rather than using the simple presence of a numeric argument to satisfy the condition, you could also use an arithmetic expression to test for a value. Used in this way, the argument can simply be a flag telling the macro what to do.
.de P

.sp

.ne 2

.if \$1=1 .ti 5n     " If first arg = 1, indent 5 ens
The operators shown in Table 14-2 can be used in constructing an expression.
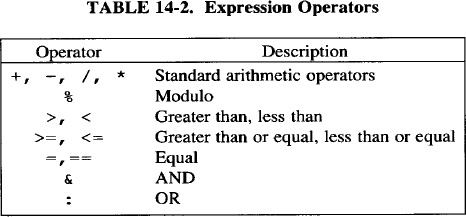
Expressions are evaluated from left to right, except where indicated otherwise by the presence of parentheses. There is no precedence of operators.
Frequently, you will see numeric conditions involving number registers. Here are a few simple examples:
.if \nb

.if \nb>l

.if \nb<\nc

.if \nb+\nc>l
(Be sure to note the double backslash before each number register invocation: we are assuming that these requests are made within a macro definition. If they were made outside a macro, you would use only a single backslash.) The first of these conditions is commonly used in the existing macro packages. It takes a little getting used to—it is not always obvious to new users what is being tested in an expression like:
.if \nb
A condition of this form simply tests that the specified expression (the number register b in this case) has a value greater than 0. A more complex expression that does the same thing might be:
.if \nb–1
Comparing Strings
Another frequent test that you can use as the basis of a condition is whether or not two strings are equal—for example, whether an argument contains a particular string. The syntax is simply:
.if "string1"string2"
(Note that there are a total of three quotation marks—either single or double will do—and no equals sign. A frequent error among beginners is to use an equals sign to compare string arguments, which will not work.)
For example, suppose you are writing a macro to center the output if the second argument is the letter C. You could write:
.if "\$2"C" .ce " If 2nd arg is C, center the next line
You can also test for a null argument in this way:
.if "\ $1"" do something
Use of this condition or its inverse, the test for a non-null argument (described in the next section), allows the user to skip over an argument by supplying a null string ("").
Executing Multiple Requests as a Result of a Condition
All of the examples we’ve shown so far consist of a single request executed on the basis of a condition. But often you’ll want to execute more than one command when a condition is met. To do so, you enclose the sequence to be executed in backslashes and braces, as in this example:
.if o  {

.PO + . 25i

.tl '''%' }
The initial sequence is terminated with an additional backslash to “hide the newline.” You could also type:
.if o  { .PO +.25i

.tl '''%*}
However, the syntax shown in the first example is almost always used, because it is easier to read. There is one caveat! You can’t put any other characters, even a comment, following the slash. For example, if you type:
.if o { " If odd...
you won’t be escaping the newline, you’ll be escaping the spaces that precede the comment. If you want to include a comment on a condition like this, use the alternate syntax, and follow the brace with a dot, just like you would if the comment started on a line of its own:
.if o { . " If odd ...
The concluding } can appear on the same line as most requests. However, we have found a problem when it immediately follows a string definition or a .tm request. For some reason:
.ds string }
appends a ^Q character to the end of the string, at least in our version of troff. The concluding } should be put on the next line, after an initial . to suppress newline generation in the output:
. }
Another convention followed in multiple-line execution is to separate the initial request control character ( . or ' ) from the body of the request with a tab. This greatly enhances readability, and can be used to show nesting of conditions:
.if o  {

.     PO +.25i

.     tl '''\n%'}
Conditions can be nested within each other using this syntax. However, you might wonder if a nested condition could instead be expressed using one of the logical operators & or : in an expression. Suppose, as described previously, you want to put page numbers on the outside corners of each page, except on the first page, where you want it in the center. You might put the following requests in the page bottom macro:
.ie \n%>l  {         "If pageno >1

.       if o .tl '''%'

.       if e .tl '%'''}

.el .tl ''%''
You might think to achieve the same result with the following requests:
.if \n%>l&o .tl '''%'   "If pageno > 1 and odd

.if \n%>l&e .tl '%'''   "If pageno > 1 and even
.if \n%=l .tl ''%''     "If pageno = 1
Unfortunately, however, this example will not work. The & and : operators can only be used to construct arithmetic expressions. For example, in the case of:
.if \nX&\nY do something
something will be done only if both register X and register Y are non-zero. (Notice that there are no spaces surrounding the ti operator.)
You can construct an else if clause by following an . el with another . if, and then the request to be executed if the condition is met.
.ie condition      do something

.el .if condition  do something else if
Inverse Conditions
The meaning of any of the condition types described can be reversed by preceding them with an exclamation point (!). For example:
.if !e        " If the page number is not even

.if !\nc=l   " If number register c is not equal to 1

.if !"\$1""  " If the first argument is non–null
It may not be immediately obvious what this adds to your repertoire. However, we will encounter many cases in which it is easier to detect when a condition is not met than when it is. In particular, negative conditions can be more comprehensive than equivalent positive conditions. For example, the condition:
.if !\nc=l
tests not only for the cases in which number register c has been set to some number larger than 0, or explicitly to 0, but the case in which it has never been set at all.
The test for a non-null argument is also useful. For example, in the sequence:
.if ! " \$3 " " {    "  If there is a third argument

.ce                     "  center it

\$3}
you only want the .ce request to be executed if there is an argument to be centered. Otherwise, the request will cause unexpected results, perhaps centering the line of text following the macro. Saying “If the third argument is non-null, then it exists” may be the inverse of the way you think, and will take some getting used to.
If you are reading through the definitions for the ms or mm macros, you may also encounter a construct like this:
.if \n{.$–2
The .$ is a special predefined number register (more on this topic in a moment) that contains the number of arguments that have been given to a macro. If there are two or fewer arguments, the value of the conditional expression shown will be 0. However, it will evaluate true if there are more than two arguments. It is used in mm's .SM macro because a different action is taken on the second argument if there are three arguments instead of two.
.if \n(.$–3 \$1s–2\$2s+2\$3

.if \n(.$–2 s–2\$ls+2\$2
▪ Interrupted Lines ▪
Occasionally, when writing a complex macro—especially one with multiple conditions—you may find yourself writing a request that is too long to fit on a single 80-character line.
You could simply let the line wrap on your screen—UNIX recognizes lines much longer than the 80 columns usually available on a terminal screen. However, you need not do this. Simply putting a backslash at the end of a line will “hide the newline” and cause the next line to be interpreted as a continuation of the first.
▪ Number Registers ▪
To set a number register, you use the .nr request. Like macros, number registers can have either one- or two-character names consisting of any character(s), not just alphanumeric characters. For example:
.nr ^( 1
sets a number register called ^( to 1. Number register names are stored separately from macro names, so there is no conflict in having a number register with the same name as a macro. Thus, you can create mnemonic number register names, which helps to make macros that use those number registers more readable.
(If you are writing your own macro package, you can name registers from scratch. If you are adding to an existing package, check the number registers used by that package.)
To use the value stored in a number register, use the escape sequence
x for a one-character number register name, and
(xx for a two-character name. (In the standard nroff and troff documentation, this is referred to as “interpolating” the value of the number register.) The point made previously, about using backslashes to delay the interpretation of an argument, applies equally to number registers. In macros, you will usually see the invocation of number registers preceded by a double backslash, because you don’t want to interpolate the value until the macro is executed.
The values stored in number registers can be literal numeric values (with or without scaling indicators), values from other number registers (whose value can be interpolated at a later time), or expressions. You can also increment or decrement the value placed in a number register by preceding the value with a plus or minus sign. For example:
.nr PN 1     " Set number register PN to 1

.nr PN +1    " Add 1 to the contents of number register PN
When you add scaling indicators to the value supplied to a number register, be aware that values are converted to basic units before they are stored, and that when you increment the value of a number register, it is incremented in basic units. So, in the previous example, in which no units were specified, the value of PN after incrementing is 2, but in the following case:
.nr LL 6.5i

.nr LL +1
the value initially stored into LL is converted into units (i.e., for a 300 dpi output device, it contains the value 1950); after incrementing, it contains the value 1951 (again, assuming a 300 dpi device). If you want to increment LL by 1 inch, append the proper scaling indicator. Likewise, when interpolating the value of a number register, specify that the value is in units. For example, the construct:
will produce unexpected results. What you are really writing is:
.in 300m
(assuming a 300 dpi device) because the default scaling for an indent request is ems. The proper usage is:
.in \n(INu
Number Registers as Global Variables
Number registers can be used in different ways. First, and probably most important, they can generalize a macro package. For example, in ms, the default line length is stored in a number register called LL.
Periodically, macros in the package may muck with the line length, and then reset it to its default state. Requests to reset the line length to its default value thus have the form:
.ll
(LLu    " Single backslash within the body of text
or
.ll \n(LLu " Double backslash within a macro definition
Because the line length is not “hard coded” in the document, users can change the line length throughout simply by changing the default value stored in the number register.
You might wonder why this is necessary. After all, you can simply set an initial line length, and then increment it or decrement it as necessary. And many macros take this approach. But there are other cases where the line length is a factor in another calculation.
For example, the output text can be centered horizontally on the physical page regardless of the line length if the page offset is set not absolutely, but in terms of the line length:
.PO  (8.5i-
 (LLu)/2u
In general, it is good programming practice to place values that are used at many different places in a program into globally accessible variables. To change the action of the program, it is only necessary to change the value of the variable. It is the same in nroff and troff. When we look at the overall design of a macro package in Chapter 16, we’ll return to this subject in more detail.
Number Registers as Flags
In the chapters on the existing macro packages, you’ve also seen number registers used as flags-signals to a macro to act in a certain way. For example, in mm, paragraphs are flush left by default, but if the user sets the Pt number register to 1, all paragraphs will be indented.
Within the paragraph macro, there is a line that tests the Pt register, and acts accordingly:
.if \n (Pt=1 .ti +\n(Pin
This line actually uses number registers in both ways. If the number register Pt is set to 1, the macro indents by the value stored in another register, Pi.
One-character number register names can also be set from the command line, with nroff or troff’s –r option. This gives you the ability to construct macros that will act differently depending on command-line options. We’ll show some examples of this in Chapter 16, when we discuss how to print a document on either an 8½-by-11 inch or a 6-by-9 inch page, simply by specifying a single command-line switch.
Predefined Number Register Names
In addition to number registers set by the various macro packages, or set by macros you write, there are quite a few number registers whose usage is predefined by the formatter. You’ve already seen one of these—%, which always contains the current page number. Table 14-3 (and Table 14-4) list some of the most important preset registers, and Appendix B includes a complete listing. Not all of these registers will be meaningful at this point, but we’ll tell you more about them as we go on.

The registers in Table 14-3 can be reset. For example, if you want to arbitrarily reset the page number to 1, you can type:
.nr % 1
The formatter will keep incrementing the register on each new page, but will count from the new baseline. (You might want to do this, for example, if you are following the convention used in many technical manuals, which number pages on a chapter-by-chapter basis, with a number made up of both the chapter number and the page number. In this case, the page number is reset to 1 at the start of each new chapter.)
Note that % is a true number register name, and don’t let the special use of the % character in the .tl request confuse you. In .tl, % alone will interpolate the current page number; however, in any other place, you must specify the full number register interpolation
%.
The set of registers in Table 14-4 cannot be modified. In reading their names, be sure to note that they are two-character names beginning with . (dot). If you are reading through one of the existing macro packages, it is easy either to confuse them with macros or requests, because they begin with a period, or to miss the period and read them as one-character names.

The registers in Table 14-4 are particularly useful when you want to temporarily change some value (for example, the font) and then restore it, without having to know what was there before.
For example, if you print an italicized footer on each page, you might include the following requests in your page bottom macro:
.nr FT //n(.f

.ft I

         .

         .

         .

.ft \n(FT
This is safer than simply using the .ft request without an argument to restore the previous font, which can create havoc if a user makes a font change within a definition of the footer string.
Be aware that registers with scaled values (e.g., .l for the line lengths or .v for the current vertical spacing) contain those values as basic machine units (as do all number registers containing scaled values). As described previously, this means you should append a u whenever you want to use the contents of one of these registers as an argument to a request.
Autoincrementing Registers
We’ve described how to increment the value stored in a register by prefixing the value you supply to the .nr request with a plus sign (+), and how to decrement it by specifying a minus sign (-).
You can also autoincrement or autodecrement a register whenever you interpolate its value. To make this work, you must supply two values to an initial .nr request: the starting value and the increment value. For example:
.nr TE 1 1

.nr ST 10 3
Then, when you interpolate the contents of the register, instead of using the standard
x or
(xu, specify a plus or a minus after the
and before the register name. The value that is interpolated will be the original contents of the number register plus (or minus) the increment (or decrement) value. At the same time, the value in the register will be updated by the increment value. For example, assuming the initial definitions in the previous example:
+(TE " Increment TE by 1, and interpolate the new value


−(ST " Decrement ST by 3, and interpolate the new value
Number register interpolations of the normal sort can still be used and will, as always, simply give you the value currently stored in the register.
Altering the Output Format
As we’ve seen, sometimes number registers are simply used to supply values to requests, or to pass information between macros. But there are many cases in which the value of a number register is actually interpolated into the formatter output and printed. The page number register % is a good example. Although it might be used as the basis to test conditions in macros, it is usually printed as well.
The .af (alter format) request allows you to specify the format in which to express the value of a number register. This request takes two arguments, the name of the register to be affected and the format:
.af register format
The format codes are given in Table 14-5.
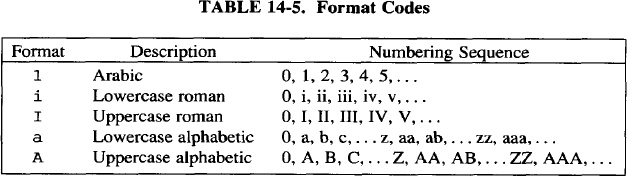
In addition to the numbering sequences in Table 14-5, an arabic format having additional digits (e.g., 001) will result in a numbering sequence with at least that many digits (e.g., 001, 002, 003,. . .).
For example, to change to lowercase roman page numbering in the front matter of a book, you could write:
.af % i
(Note that, depending on exactly how a macro package implements page numbering, this may or may not work exactly as shown. Some macro packages interpolate % into another register and print the contents of that register. For example, ms stores the page number in the register PN and the request would be .af PN i.)
Alphabetic formats are generally used in macros for automatically numbered (or lettered) lists. We’ll take a close look at some of these macros in Chapter 17.
Removing Registers
With the very large number of possible register names (nearly 10,000 names are possible, given all one- and two-character combinations of the printing character set), it is unlikely that you will run out of number register names.
However, if your macros create a very large number of registers, the formatter can run out of internal storage space. For this reason, it may occasionally be necessary (or at least wise) to remove temporary registers that you no longer need, using the .rr request. For example:
.rr TE " Remove register TE
▪ Defining Strings ▪
In addition to macros and number registers, nroff and troff allow you to define character strings that will be stored and can be re-invoked at will. This is not intended as a general-purpose abbreviation function, although in certain cases it can be used that way. Rather, it is designed to allow you to store global string variables for use throughout a package, in much the same way that number registers provide numeric variables.
For example, in both ms and mm, you can define headers, footers, or both that will be printed on every page. To do this, the header or footer macro contains a reference to a predefined string. All the user has to do is give the string a value. The user doesn’t have to modify the macro itself.
As we’ve already seen, to define a string, use the .ds (define string) request. For example:
.ds RH Tools for Building Macros " Define right header
String names, like macro and number register names, can have either one or two characters. However, unlike number registers, string names are drawn from the same pool as macro and request names, so you have to be careful not to conflict with existing names.
To interpolate the value of a string, use the escape sequence *x for a one-character name, or * (xu for a two-character name. For example, our page top macro might include the lines:
.if o .tl '\*(RH''%'    " Print header string then page #

.if e .tl '%''\*(RH'    " Print page # then header string
Another good example of how to use this request (as well as how to use predefined number registers) is given by the technique used in ms and mm to build a date string.
The troff program reads in the date from the system clock into the predefined number registers mo (month), dy (day), and yr (year). To set a complete date string that users can easily reference, we might write the following requests in our macro package:
.if
(mo= 1 .ds MO January

.if
(mo= 2 .ds MO February

.if
(mo= 3 .ds MO March

.if
(mo= 4 .ds MO April

.if
(mo= 5 .ds MO May

.if
(mo= 6 .ds MO June

.if
(mo= 7 .ds MO July

.if
(mo= 8 .ds MO August

.if
(mo= 9 .ds MO September

.if
(mo=10 .ds MO October

.if
(mo=11 .ds MO November

.if
(mo=12 .ds MO December

.ds DY *(MO
(dy, 19
(yr
(Note that these requests do not need to be executed from within a macro. The register values can be interpolated when the macro package is first read in. For this reason, the string and number register interpolations shown here are not escaped with an additional backslash.)
Another request, .as (append [to] string), also allows you to add to the contents of an existing string. The last line of the previous sequence could also have been written:
to append the day and year to whatever value had been stored into MO. Here, this is a little contrived—it is better to maintain the month and the date as a whole in separate strings. However, the technique of appending to a string is used appropriately in the definition of a macro to produce numbered section headers, as we’ll see in Chapter 17.
▪ Diversions ▪
So far, we have discussed macros that you define in advance as a sequence of stored requests. There is also another class of macros that are created by a process called diversion.
A diversion consists of temporary storage of text into a macro, which can be saved and output at a later time. In reading the chapters on ms or mm, you might have wondered how troff manages to move footnotes embedded anywhere in the text to the bottom of the page, or how it “floats” a figure, table, or block of text to the top of a succeeding page, after filling the current page with text that comes later in the input file.
The answer is simple: the formatter stores the text (or other output) in a macro created by diversion. (Such a macro is often called simply a diversion.) The size of the diversion is stored into number registers that you (your macros, that is) can test to see if the diversion will fit on the current page, and how much space you need to allocate for it. The macro package can then make decisions about how and where to place the contents of the diversion.
To create a diversion, use the .di (divert) request. This request takes as an argument the name of a macro. All subsequent text, requests, etc. will be processed normally, but instead of being output, they will be stored into the named macro. A .di request without an argument ends the diversion.
The output that has been stored in the diversion can now be output wherever you like, simply by invoking the macro named in the initial .di request. For many purposes, this invocation will be performed automatically by a page transition macro. We will look at this in more detail in succeeding chapters, but just to get the idea, let’s look at a simple definition for a pair of keep macros.
(In general, diversions are handled by pairs of macros—ne to start the diversion, the other to end it. However, there are other cases in which we will see that this is not necessary.)
Both ms and mm use diversions in their display macros. In ms, the display macros handle text positioning, and call lower-level macros called keep macros to make sure the text in the display stays on the same page.
The purpose of the keep macros, in case you are not familiar with this concept from earlier chapters, is to make sure that a block of text is not split across two pages. A typical example of a block that should not be split is a figure—whether it is reserved space for a figure, or an actual picture created with pic or some other graphics tool.
A simple macro to start a keep might look like this:
A simple macro to end a keep might look like this:
.de KE         " Keep End

.br

.di

.ne \n(dnu

.nr fI \n(.u

.nf

.KK

.if \n(fI .fi

..
In both macros, the .br requests are extremely important; they flush any partial lines that have not yet been output. In the .KS macro, the break makes sure that the keep begins with the text following the macro; in .KE, it makes sure that the last partial line is included in the diversion.
It is also important to output the diversion in no-fill mode. If you don’t, the text contained in the diversion will be filled and adjusted a second time, with unpredictable results. (Consider, for example, when the diversion includes an already formatted table. The table would be scrambled by a second pass.)
You can’t just switch back to fill mode after you output the diversion, though. What if the body of the text was meant to be in no-fill mode? To get around this problem, you should save the value of troff’s read-only register .u, and test the saved value to see whether or not filling should be restored.
There are a few times when you might not want to follow this rule. For example, what should you do if there is a chance that the diversion will be output on a page where the line length is different? You still want to avoid processing the text twice. You can put the text into the diversion in no-fill mode, and can embed any formatting requests into the diversion by preceding them with a backslash (e.g., .in 5n). Any requests treated in this way will be acted on when the diversion is output.
As always, it is important to specify the correct units. In the previous example, the value in dn is stored using basic device units (as is the case with all scaled values stored in a number register), so you must add a u on the end of the interpolation. For example, on a 300 dpi device, after a diversion 2 inches high, dn will contain the value 600. The request:
.ne \n(dn
will always result in a page break because (in this example) what you are really writing is:
.ne 600
What you want to write is:
Any text and requests that are issued between the initial .KS and the terminating .KE will be stored in the macro called .KK. The height of the last-completed diversion is always stored in the number register dn. We can simply say that we need (.ne) at least that much space. If the size of the diversion is greater than the distance to the bottom of the page, we simply start a new page. Otherwise, we output the text and continue as if the diversion had never happened.
The case of a floating keep, in which text that follows the keep in the source file floats ahead of it in the output, and fills up the current page, is more difficult to handle than the simple example just shown. However, this example should give you an idea of how to use diversions.
There is also a .da (divert append) request that adds output to an existing diversion. (A second .di given the same macro name as the first will overwrite the diversion’s previous contents, but .da will add the new material to the end.)
The .da request has numerous applications. For example, consider footnotes. To calculate where to place the first footnote, you need to calculate the size of all the footnotes you want to put on the page. That’s easy—just append them to the same diversion.
However, there are other far less obvious applications for appended diversions. For example, you can divert and append section headings or index entries to macros that will be processed at the end of the file to produce a table of contents or an index.
▪ Environment Switching ▪
The nroff and troff formatters allow you to issue many requests that globally affect the format of a document. The formatter is generally quite thorough in providing ways to change and restore the value of various parameters. This makes it relatively easy to change values such as the line length or fill/no-fill mode in order to treat certain blocks of text differently and then restore the original values.
Nonetheless, if you want to make major changes to a number of values, it can be awkward to save and restore them all individually. For this reason, nroff and troff provide a mechanism called environment switching. By default, text processing takes place in what is considered to be environment 0. The .ev request allows you to switch to either of two additional environments, referred to as environment 1 and environment 2.
For example, to change to environment 2, you would enter
.ev 2
To restore a previous environment, you simply issue an .ev request without an argument. Environments are stored in a “push down stack.” So if you are using multiple environment switches, a sequence of .ev requests without arguments won’t toggle you between two environments, but will actually backtrack the specified number of environment switches. That is:
do something
.ev 2
do something
.ev        " Go back to ev 1

.ev        " Go back to ev 0
If you use .ev with an argument, you will not pop the stack. For example, the requests:
.ev 2

.ev 0
will leave both environments on the stack. You might get away with this on one occasion, but if you do this in a macro that is used with any frequency, your stack will keep getting deeper until it overflows and the formatter fails with the message “Cannot do ev.”
Within each environment, settings made with the following requests are remembered separately:
.c2 .cc .ce .cu .fi .ft .hc .hy .in .it .lc .ll .ls .lt

.mc .nf .nh .nm .nn .ps .sp .ss .ta .tc .ti .ul .vs
Number registers, macros, and strings are common to all environments. However, any partially collected lines are part of a given environment. If you switch environments without causing a break, these partial lines will be held till the environment that contains them is restored.
What this means is best shown by example:
.           "  Set parameters for environment 0

.ll 4.5i

.ad b

.ev 1       " Switch to environment 1

.ll -10n    " Set parameters for environment 1

.in +10n

.ad 1

.ev         " Restore previous environment (ev 0)

This text will be formatted using the parameters for

environment 0. Notice that part of the last input

line appears to be lost when we switch environments.

It reappears when the environment is restored.

.ev 1

.SP        " The break caused by this request is in ev 1

Now we’ve switched to environment 1.  Notice how the text

is now formatted using the parameters for environment 1.

Also notice that this time, we’re going to issue an .sp

request after this sentence to cause a break and make sure

the last partial line is output before we leave this

environment.

.SP
.ev        " Back once more to environment 0

This sentence will be preceded by the remainder of input

left over from the last time we were in this environment.
Here’s the resulting output (from nroff):
This text will be formatted using the

parameters for environment 0. You’ll notice

that part of the last input line appears to

be lost when we switch environments. It
Now we’ve switched to environment 1. Notice

how the text is now formatted using the

parameters for environment 1. Also notice

that this time, we’re going to issue an .sp

request after this sentence to cause a break

and make sure the last partial line is output

before we leave this environment.
reappears when the environment is restored.

This sentence will be preceded by the

remainder of the input left over from the

last time we were in this environment.
Environments are very powerful and versatile. The example given previously could have been handled more appropriately with a macro. However, as you will find, there are tasks that are best handled by an environment switch.
Printing footnotes is a primary example. Footnotes are usually collected in a diversion, which must be output at the bottom of the page without causing a break or other interference with the text.
Unfortunately, you must use environment switching with caution if you are working within one of the existing macro packages, because they may use different environments internally, and changing parameters in an environment may affect the operation of the package. For example, it was necessary to process the preceding example independently with nroff, and then read the resulting output into the source file, because the use of environments by the macro package that produced this book was incompatible with what we were trying to show.
▪ Redefining Control and Escape Characters ▪
There are special requests to reset the control characters that begin requests (. and ') and the escape character:
.eo       "Turn escape character off except for comments

.ec !     !" Set escape character to !

.ec      " Set escape character back to

.cc #     " Change control character from . to #

.c2 ^     " Change no-break control character from ' to ^
As far as we can tell by experiment, turning the escape character off entirely with .eo does not affect the comment sequence "; however, if you change the escape character with .ec, comments must be introduced by the new escape character.
We have not found a significant use for these requests in our own work, or in macros we’ve studied, although there are no doubt cases where they are precisely what is needed.
One application that immediately suggests itself is the representation of control and escape characters in the examples shown in this book. However, in practice there are many problems.
For example, if you use these requests in a pair of macros to frame examples, the closing macro must be invoked with the appropriate control character, creating inconsistencies for the user. Even more seriously, if control character translations are in effect during a page transition (something that is difficult to control) or other macro invoked by a trap, they will render that macro inoperable, unless it has been designed with the same control and escape characters.
Our preferred solution to this problem is to use the .tr request, which is discussed in the next chapter.
▪ Debugging Your Macros ▪
When using a markup language as complex as that provided by nroff and troff, it is easy to make mistakes, particularly when you are designing complex macros.
To limit the number of mistakes you make, you can take lessons from programmers in more general-purpose languages:
- Start by writing and testing small pieces of a complex macro. Then, after you know the pieces work, put them together. It is much easier to find a problem in a simple macro than in one that is already very complex.
- Be aware of interactions between the macro you are writing and other macros in the package. Initialize variables (number registers and strings) that might also be used by other macros.
- Include extensive comments, so you can reconstruct what you were trying to do when you go back to the macro later. (Errors often arise unexpectedly after the macro has been in use for a while, and you have a chance to exercise it fully. Be sure you can follow what you originally wrote.)
- Test each macro thoroughly before you put it into general use.
However, even with the best of intentions, you are likely to make mistakes. This short section is intended to give you a few pointers on how to track them down.
The term debugging is familiar even to nonprogrammers. In general, it refers to the process of finding errors in programs. I would like to suggest an alternate definition that may give you better insight into how to go about this process: Debugging is the process of finding out what your macro really does, instead of what you thought it should do.*
When you write a program or a macro, you have an idea in your mind of what you want to accomplish. When it doesn’t do what you expect, you consider it an error.
But as we all know, computers are very literal. They generally do just what they are told. (The exception being when there is an error in some underlying layer of software that causes problems on a higher layer.) Therefore, the essence of debugging is to compare, on a step-by-step basis, exactly what the program or macro is actually doing with what you expect it to do.
There are several tools that you can use in debugging macros. First, and most obviously, you can look carefully at the output. Try to reconstruct the sequence of instructions and text that have been executed to produce the (presumably) undesirable result. Often, this will be all you need to do—think like a text formatter, and go through the requests that have been executed, in the order that they are executed.
You will often find that problems are due to an incorrect understanding of the action of one of the requests or escape sequences, so it may be advisable to consult the bible of macro programming, Joseph Osanna’s extraordinarily dense but thorough Nroff/Troff User’s Guide.
Secondly, you can use nroff or troff interactively. If you simply type:
$ nroff
or:
$ troff -a
the program will take standard input from the keyboard and send its results to standard output (the screen). The troff –a command creates an ASCII approximation of what the troff output would be; if you are using ditroff, you can also save the normal output in a file and look directly at the output. However, this output is in an obscure format and takes considerable time to learn.
With troff -a, special characters (such as underlines) are represented by their special character names. For example, underlining will show up as a sequence of (uls. Because proportional type is considerably more compact than the characters that appear on a terminal screen, lines will appear too long, and will wrap around on the screen. However, what you see does represent how troff will break the lines.
_____________________
*I am indebted to Andrew Singer of Think Technologies for this definition. Andrew used similar words in describing to me the debugging philosophy of his company’s innovative Pascal compiler for the Macintosh, Lightspeed Pascal.
Now, by typing in your macros (or reading them in from existing files with the .so request), you can reproduce the environment of the formatter, and watch the results as you type in text. As each line is completed in the input buffer, the formatted result will be output. You can force output of a partially completed line with the .fl (flush) request, which was designed for this purpose.
This method has definite limits, but has just as definite a place in pinning down what the commands you type are doing.
Another debugging tool that you may find useful is the .ig (ignore) request. It tells the formatter to ignore subsequent input, up to a specified terminator (. . by default). The .ig request acts like .de, only the input is discarded. (The only exception to this is that autoincremented registers whose values are interpolated within the ignored block will still be incremented or decremented.)
This request is useful when you are trying to pin down exactly where in an input file (or a long macro definition) a fatal error (one that causes the formatter to stop processing) occurs. By successively isolating parts of the file with .ig, you can locate the problem more closely.
This request is also useful for “commenting out” extensive blocks of macro definition or input text that you don’t want in your output. It is much easier to bracket a large block of input in this way than it is to insert comment characters at the beginning of each line.
Because you may want to “ignore” more than one macro definition, you may want to get in the habit of specifying a special delimiter for the .ig request, so that the “ignore” is not accidentally terminated by the end of the first macro definition. This will also make it much easier to find the end of the ignored section. For example, if you insert the line:
.ig ++
anywhere in your input, the formatter will ignore the input until it sees the request:
.++
The final tool provided for debugging is the .tm (terminal message) request, which prints a message on standard error. This is particularly useful for tracking down errors involving number registers. For example, if you have set a condition based on the value of a number register, and the condition never seems to be satisfied, you might want to insert .tm messages to print out the value of the number register at certain points in your file. For example:
.tm Before calling B1, the value of BC is
 (BC

.B1

.tm After calling B1, the value of BC is
 (BC
(Note that there are no double backslashes before the number register interpolations, because these requests are not made while you’re inside a macro definition. From inside a macro, be sure to double the backslashes, or you will get the value of the number register at the time the macro was defined.)
A read-only number register that is useful in this regard is .c, which contains the number of lines read from the current input file. This allows you to create messages that will help you (or the user of your macros) find out where in the input file an error (or other event) occurs:
.tm On input line \n(.c, the value of BC was \n(BC
(Here, there are double backslashes, because this example is intended to be inside a macro definition.) Sometimes it is helpful to follow just how far the formatter has gotten in a file. The most difficult errors to track are those that cause the formatter to quit without producing a block of output. A series of messages of the form:
.tm At top of page \n%, I've processed \n(.c input lines
inserted into the page top macro will help you determine how far the formatter has gotten, and can thus help locate an error. If the formatter is processing standard input rather than an individual file, the .c register will be empty.
Another register that you may find useful in printing error messages is .F, which contains the name of the current file. (Yes, the filename is a string, even though it’s stored in a number register.)
The .R register is also useful. It contains the number of free number registers. You can print its value to see if you are running out of number registers or coming close to the limit. (tbl and eqn use many dynamic number registers, and it is possible to run out if you use a lot in your macros as well.)
Although we use the tools described here to debug our macros, we know that they don’t always help you deal with the complexity of a macro package. The relationships among different macros are not always apparent. For instance, you can usually tell from looking at your output what macro is causing a problem; however, when you look at the macro definition, you might find that this macro is calling several other macros or testing registers that have been set elsewhere in the macro package. It soon leads to the wish for a debugging tool that traced the interpretation and execution of macro definitions.
At least one version of troff does support a trace facility. Users of SoftQuad’s SQtroff can enable a trace mode to show the invocation of each request, diversion, trap, and macro call. For instance, suppose that a macro tests the value of a number register to determine whether a request should be executed. In trace mode, you can see at what point the .if request was invoked, whether it was evaluated as true or false, and determine the actual value of the number register at that point. SoftQuad has also taken another step to make debugging easier by improving troff’s obscure error messages. In general, SoftQuad has enhanced standard troff in other ways that aid the process of macro writing and debugging, such as allowing longer names (up to 14 characters) for macros, requests, strings, registers, and fonts.
▪ Error Handling ▪
There are many different ways that users can get into trouble while coding documents, and your macros can help them identify and recover from problems. The three most common classes we have encountered are:
- A user fails to properly understand the action of the formatter itself. For example, he or she begins a text line with a single quote or period, or defines a special character (such as %) as an
eqndelimiter. This problem becomes more pronounced as users try out more advanced capabilities without really understanding them. - A user fails to properly understand the macro package. For example, he or she gives the wrong argument to a macro or specifies the wrong units.
- A user temporarily resets some condition, either directly or by failing to close a set of paired macros. This causes undesirable effects to propagate through the document.
The mm macros attempt to solve the first problem by creating so comprehensive a macro package that users never need use many low-level formatter requests. However, in doing so, its developers have created an environment that is in many ways more complex than the raw formatter environment itself. And in our opinion, no macro package is comprehensive enough to meet all user needs. Over time, users come up with formatting problems that they need to know how to solve on their own. There is no solution to this problem except better user education.
To some extent, you can compensate for the second problem by testing for arguments and printing error messages if a macro is misused. For example, if a macro requires an argument, consider printing a message if the user fails to supply it:
.if "\$1"" .tm Line \n(.c: .Se requires section

number as first argument
Of course, by the time the user sees the error message, he or she has already formatted the document, and it is too late to do anything else but repair the damage and reprint. However, messages can sometimes make it easier for users to find errors and can give them warning to look more closely at their printout.
The .ab request takes things one step further—it lets you terminate processing if the formatter encounters a condition you don’t like. For example, you could write a macro that aborts if it is called without a necessary argument:
.if !\n(.$ .ab You forgot the argument!
The .ab request prints its argument as an error message, just like .tm. It just takes the further, definite step of quitting on the spot.
Probably more suitable, though, is a separate tool for checking macro syntax. Such a tool exists for mm in the mmcheck program. A program like this checks the syntax of macros and requests used in a document and reports possible errors.
This kind of approach is especially suitable for the third kind of error—the failure to close a set of paired macros.
▪ Macro Style ▪
As you develop more of your own macros, you might begin thinking about overall macro style. Developing macros that behave in a consistent, reliable way becomes all the more important as the number of new macros you have increases along with the number of people using them. Recognizing different styles of macro writing helps to suggest alternatives and improvements in the way a macro works.
If you have read the chapters on ms and mm in detail, or if you are already familiar with both of these packages, you have probably noticed that they embody somewhat different text-processing philosophies.
For example, ms generally attempts to recover and continue when it encounters a serious error, but mm aborts the formatting run. And although ms allows a certain amount of user customization (generally by providing a few number registers and strings that the user is expected to modify), it has nowhere near the complexity of mm in this regard. An mm user is expected to set up various number registers that affect the operation of many different macros.
In writing your own macros (especially ones that will be integrated with one of the existing packages), you should take some time to think about style, and how you want users to interact with your macros. This is most easily shown by comparing several different paragraph macros:
.de P             " A very simple paragraph macro

.br

.ne 2v

.ti 2P

..


.de LP            " An ms style flush left paragraph

.RT

.ne 1.1

.sp \n(PDu

.ti \n(.iu

..


.de PP            " An ms style indented paragraph

.RT

.ne 1.1

.sp \n(PDu

.ti +\n(PIu

..

.deP               " An mm style variable paragraph

.br                " Note that this is much

.sp (\n(Ps*.5)u   " simplified from true mm code

.ne 1.5v
The first example shows a very simple paragraph macro using a fixed indent value.
The second and third examples are adapted from ms. They show the use of an embedded reset macro (discussed in Chapter 16) and the specification of values such as indents and interparagraph spacing by means of number registers so that users can change them without rewriting the macro. The different types of paragraphs (flush left or indented) are handled by defining two different macros.
The fourth example is adapted from mm. It shows how a macro can be controlled in a number of different ways. First of all, the size of the paragraph indent can be controlled by the user, as in ms. Second, though, users can specify whether they want an indent for a particular paragraph by specifying an argument to the macro. Finally, they can specify whether all paragraphs are to be indented or flush left by setting the Pt (paragraph type) register.
Although you may not want to go as far as mm in giving different ways to affect the action of a macro, it is good to realize that all of these options are available and to draw on them as necessary.
However, it does make sense to be consistent in the mechanisms you use. For example, suppose you create macros to put captions on figures, tables, and examples. If you allow the user to control the amount of space before the caption with an optional argument, you ought to do so in all three analogous macros.
As much as possible, a user should be able to infer the action of a macro from its name, and should be able to guess at its arguments by analogy to other, similar macros in the same package. If you are capricious in your design, other users will have a much greater burden to shoulder when it comes time for them to learn your macros. Even if you are the only user of macros you develop, consistency will help you keep out of trouble as you gradually extend your package.
The issue of macro style really comes up as you begin to develop your own custom macro package, as you will see when we examine the elements of a macro package in Chapters 16 and 17.