

What’s in a Macro Package?
In Chapters 4, 14, and 15, you’ve seen almost all of the individual formatting requests that nroff and troff provide, and many examples of groups of requests working together in macros. However, writing individual macros is still a far cry from putting together a complete package.
In Chapters 5 and 6, you’ve seen the features built into the ms and mm macro packages, so you can imagine the amount and complexity of macro definitions. Perhaps you have even looked at a macro package and determined that it was impossible to decipher. Nonetheless, it is possible even as a beginner to write your own macro package or to make extensions to one of the existing packages.
In this chapter, we’ll look at the structure of a macro package—the essentials that allow you to handle basic page formatting. Then, in the next chapter, we’ll look at a macro package with extensions for formatting large technical manuals or books. Even if you have no plans to write a new macro package, this chapter will help you understand and work with existing packages.
▪ Just What Is a Macro Package, Revisited ▪
When considering what a macro package is, you might think only of the visible features provided by macros in existing macro packages. But a macro package is more than a collection of user macros that implement various features. Failing to understand this fact might cause someone to import an mm macro into an ms-based macro package, and never understand why this macro fails to work.
Individual macros are dependent upon other elements of the macro package, which sometimes makes it hard to isolate a particular macro, even for purposes of understanding what it does. These interdependencies also make it difficult to understand what a macro package is doing. That is why we want to look at the underlying structure of a macro package, and not just the obvious features it provides. We want to look first at what a macro package must do before we look at what it can do.
A macro package is a structure for producing paged documents. The nroff and troff formatters do the actual collecting and formatting of lines of text, as steadily as a bricklayer placing bricks in a row. But they do not define the structure that is so obvious by the end result. Fundamentally, it is the macro package that defines the placement of lines on a page. At a minimum, a macro package must set traps and create macros to handle page transitions. It usually also defines the layout of the physical page.
A macro package may also provide a way to arrange the parts of a documents and affect their appearance. Remember the distinction we made earlier between formatting and formats. A format reflects the type of document being produced, just as a floor plan reflects the functions of rooms in a building. For instance, a technical manual might consist of chapters and sections that require headings. Other elements might be bulleted lists and numbered lists, a table of contents, and an index. These elements help readers to identify and to locate important parts of the document. But these features—so obviously important to users—are really not the essential elements in a macro package.
Page formatting is the foundation of a macro package, and this foundation must be solid before you can build a variety of custom document formats.
New or Extended?
The first question to ask when you contemplate writing a whole new package is whether you need to do it all yourself or can simply build on an existing package.
There are benefits to either approach. The existing macro packages are quite complex (especially mm). It can be easier to start over, writing only the macros you need, than to learn the intricate internals of ms or mm. A custom macro package can be quite small, including only macros for page transition (which can be minimal, as we shall see) and whatever other macros you want. This is the best approach if you have something specific in mind.
As with all programming projects, though, you may find your package growing larger than intended, as your needs and understanding grow and you start to add features. A macro package begun haphazardly can also end that way, without any consistent structure.
If you do find yourself wanting to create an entire macro package, rather than just a few macros, you should think about modular programming techniques. Modular programming suggests that you break the tasks to be performed by a program into the smallest possible functional units, then build up larger tasks with each of these smaller units. This not only helps with debugging and testing of new macros, but also makes it much easier to write macros, because you end up with a library of low-level general-purpose macros that perform important functions. You don’t have to reinvent the wheel for each new macro.
There are numerous advantages to building on the existing packages, especially if you want to have a general-purpose package:
- They already contain a wide range of useful macros that you not only can use directly, but can call on within new macros.
- They are tested and proven. Unless you are very experienced at text processing, it is difficult to foresee all of the kinds of problems that can arise. When you write your own package, you may be surprised by the kinds of errors that are filtered out by the design of
msormm. - If you are familiar with
msormm, adding a few extended macros to your repertoire is easier than learning an entire new package. - It can be easier than you expect to modify or add to them.
In our own work, we have chosen to extend the ms macro package rather than to build an entirely new package. In this chapter, though, we’re going to take a hybrid approach. We’ll build a minimal ms-like package that illustrates the essentials of a macro package and allows users who don’t have access to the full ms package to make use of some of the extensions described in this and later chapters.
In this “mini-ms” package, we have sometimes pared down complex macros so it is easier to understand what they are doing. We try to uncover the basic mechanism of a macro (what it must do). As a caveat to this approach, we realize that simplifying a macro package can reduce its functionality. However, we see it as part of the learning process, to recognize that a macro in a certain situation fails to work and understand the additional code needed to make it work.
Implementing a Macro Package
As discussed in Chapter 4, the actual option to nroff and troff to invoke a macro package is –mx, which tells the program to look in the directory /usr/lib/tmac for a file with a name of the form tmac.x. This means you can invoke your own macro package from the command line simply by storing the macro definitions in a file with the appropriate pathname. This file will be added to any other files in the formatting run.
If you don’t have write privileges for /usr/lib/tmac, you can’t create the tmac.x file (although your system administrator might be willing to do it for you). But you can still create a macro package. You will simply have to read it into the formatter some other way. You can either
- include it at the start of each file with the
.sorequest:.so /usr/fred/newmacros - or list it on the command line as the first file to be formatted:
$ nroff /usr/fred/newmacros myfile
Nor do the macros need to be stored in a single file. Especially if you are using a package as you develop it, you may want to build it as a series of small files that are called in by a single master file. You may also want to have different versions of some macros for nroff and troff. So, for example, the mh (Hayden) macros used to format this book are contained in many different files, which are all read in by .so requests in /usr/lib/tmac/tmac.h:
.so /work/macros/hayden/startup

.so /work/macros/hayden/hidden

.so /work/macros/hayden/ch.heads.par

.so /work/macros/hayden/display

.so /work/macros/hayden/ex.figs

.so /work/macros/hayden/vimacs

.so /work/macros/hayden/lists

.so /work/macros/hayden/stuff

.so /work/macros/hayden/index

.so /work/macros/hayden/cols
Or, like mm, you might have two large files, one for nroff and one for troff. In /usr/lib/tmac/tmac.m, you find:
.if n .so /usr/lib/macros/mmn

.if t .so /usr/lib/macros/mmt
In extending an existing macro package, you are not restricted to creating a few local macro definitions that must be read into each file. You can make a complete copy of one of the existing packages, which you can then edit and add to. Or even better, you can read the existing package into your own package with .so, and then make additions, deletions, and changes. For example, you might create a superset of ms as follows:
." /usr/lib/tmac/tmac.S - superset of ms - invoke as -mS

.so /usr/lib/tmac/tmac.s     " Read in existing package

.so /usr/macros/S.headings

.so /usr/macros/S.examples

.so /usr/macros/S.toc

           .

           .

           .
▪ Building a Consistent Framework ▪
One of the chief factors that distinguishes a macro package from a random collection of macros is that the package builds a consistent framework in which the user can work.
This consistent framework includes:
- Setting traps to define the top and bottom of each page. This is the one essential element of a macro package, because it is the one thing
nroffandtroffdo not do. - Setting default values for other aspects of page layout, such as the page offset (left margin) and line length. (The default page offset in
nroffis 0, which is not likely to be a useful value, andtroff’s default line length of 6.5 inches is really too long for a typeset line.) - Setting default values for typographical elements in
troffsuch as which fonts are mounted, the point size and vertical spacing of body copy and footnotes, adjustment type, and hyphenation. - Giving the user a method to globally modify the default values set in the macro package, or temporarily modify them and then return to the defaults.
In a very simple macro package, we might set up default values for troff like this:
.po li     " Set page offset to one inch

.11 6i     " Set line length to six inches

.ad 1      " Adjust left margin only

.hy 14     " Hyphenate, using all hyphenation rules

.wh 0 NP   " Set new page trap at the top of the page

.          " (see below for details)

.wh -1i FO " Set footer trap
(We are assuming here that troff’s default values for point size and vertical spacing are acceptable. In otroff, we also need to mount the default fonts with .fp, as described in Chapter 4; in ditroff, a default set of fonts is already mounted.)
Simply setting up explicit default values like this will do the trick, but for a more effective and flexible macro package, you should take the further step of storing default values into number registers. This has numerous advantages, as we’ll see in a moment.
Using Number Registers to Increase Flexibility
Writing troff macros is essentially a kind of programming. If you pay heed to the principles learned by programmers, you will find that your macros are more effective, if at first somewhat more complex to write and read.
One important lesson from programming is not to use explicit (so called “hard-coded”) values. For example, if you supply the indent in a paragraph macro with an explicit value, such as:
.in 5n
you make it difficult for users to change this value at a later time. But if you write:
.in \n(INu
the user can change the indent of all paragraphs simply by changing the value stored in number register IN. Of course, for this to work, you must give a default value to the IN register.
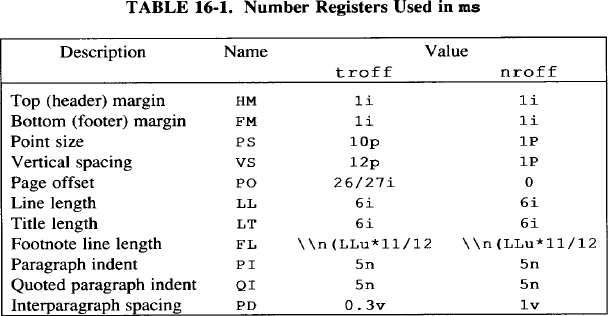
In programming, the process of setting variables to a predefined starting value is called initialization. To give you an idea of the kinds of variables you might want to initialize, Table 16-1 lists the values stored into number registers by the ms macros.
The mm package uses many more number registers—in particular, it uses number registers as flags to globally control the operation of macros. For example, in addition to registers similar to those shown for ms in Table 16-1, there are registers for paragraph type, numbering style in headings, hyphenation, spacing between footnotes, as well as counters for automatic numbering of figures, examples, equations, tables, and section headings. (See Appendix B for a complete listing.) However, the registers used in ms should give you a sufficient idea of the kinds of values that can and should be stored in registers.
An Initialization Sequence
In the ms macro package, a major part of the initialization sequence is performed by the .IZ macro.* This macro is executed at the start of a formatting run; then it is removed. Let’s take a look at a much simplified version of the initialization sequence for an ms-like package:
.de IZ                    " Initialization macro

.                         " Initialize Number Registers

.nr HM 1i                 " Heading Margin

.nr FM 1i                 " Footing Margin

.nr PS 10                 " Point Size

.nr VS 12                 " Vertical Spacing

.nr PO li                 " Page Offset

.nr LL 6i                 " Line Length

.nr LT 6i                 " Length of Titles for .tl

.nr FL \n (LLu*11/12     " Footnote Length

.nr PI 5n                 " Paragraph Indent

.nr QI 5n                 " Quoted Paragraph Indent

.nr PD 0.3v               " Interparagraph Spacing

.                   " Set Page Dimensions through requests

.PS \n(PS

.vs \n(VS

.po \n(POu

.ll \n(LLu

.lt \n(LTu

.hy 14        " Specify hyphenation rules

.             " Set Page Transition Traps

.wh 0 NP

.wh -\n(FMu FO

.wh -\n(FMu/2u BT

..

.IZ                 " Execute IZ

.rm IZ              " Remove IZ
As you can see, the initialization sequence stores default values into registers, then actually puts them into effect with individual formatting requests.
A number of the points shown in this initialization sequence will be a bit obscure, particularly those relating to trap positions for top and bottom margins. We'll return to the topic of page transitions shortly.
A Reset Macro
After you have initialized number registers, the next question is how to make use of the default values in coding. Some registers, like a paragraph indent, will be used in a paragraph macro. But where, for example, might you use the LL register?
First of all, as suggested, putting default values into number registers allows users to change values without modifying the macro package itself. For instance, a user can globally change the interparagraph spacing just by putting a new value into the PD register.
However, the package itself can use these registers to periodically reset the default state of various formatting characteristics.
The ms package defines a macro called .RT (reset), which is invoked from within every paragraph macro. The .RT macro
- turns off centering—.
ce 0; - turns off underlining—.
ul 0; - restores the original line length—.
ll \n(LLu; - restores the original point size and vertical spacing—
.ps \n (PSand.vs \n(VS; - restores the indent that was in effect before any
.IP,.RS, or.REmacros were called (too complex to show here); - changes back to the font in position 1—
.ft 1; - turns off emboldening for font 1—
.bd 1; - sets tab stops every 5n—
.ta 5n 10n 15n 20n...; - turns on fill mode—
.fi.
This is part of the ms error recovery scheme. Rather than aborting when it encounters an error, ms frequently invokes the .RT macro to restore reasonable values for many common parameters.
If you have used ms for a while, and then switch to another package, you may find all kinds of errors cropping up, because you’ve come to rely on this mechanism to keep unwanted changes from propagating throughout a document. For example, suppose you create a macro that decrements the line length:
.ll -5n
but you forget to increment it again. You may never notice the fact, because ms will restore the line length at the next paragraph macro. Other packages are far less forgiving.
Unless you plan to explicitly test for and terminate on error conditions, it is wise to implement a reset facility like that used by ms.
A simple ms-like reset macro follows:
.de RT " Reset

.ce 0          " Turn off centering, if in effect

.ul 0          " Turn off underlining, if in effect

.ll \n (LLu   " Restore default line length

.ps \n (PS    " Restore default point size

.vs \n (vS    " Restore default vertical spacing

.ft 1          " Return to font in position 1

.ta 5n 10n 15n 20n 25n 30n 35n 40n 45n 50n 55n 60n 65n 70n

.fi            " Restore fill mode

..
The ms version of .RT also ends any diversion invoked outside of the standard ms macros that create diversions. Thus, a reset may occur within a keep (.KS, .KE), footnotes (.FS, .FE), boxed material (.B1, .B2), and tables (.TS, .TE) without ending the diversion.
If you look at the actual ms reset macro, you will see that it calls another macro, named .BG, the very first time it is itself called. The .BG, macro removes the macros associated with the unused Bell Labs technical memorandum formats (because the format has already been determined at that point). Like .IZ, the .BG macro is only called once during a formatting run. In our emulation, we don’t make use of the Technical Memorandum macros so we have not implemented the .BG macro. However, one could easily apply the idea behind the .BG macro: to execute a macro before we begin processing the body of a document. This can be useful if a format requires a number of preliminary or header macros that supply information about the document.
▪ Page Transitions ▪
A single page transition macro is the only macro that must be implemented for nroff and troff to produce paged output. An example of this simplest of all possible macro packages follows.*
.de NP    " New Page

'bp

'sp 1i

'ns

..

.wh -1.25i NP

.br

.rs

.sp |1i
The page transition is triggered by a trap set 1.25 inches from the bottom of the page. When output text reaches the trap, the .NP macro is executed, which breaks the page (but not the line), spaces down 1 inch, and enters no-space mode. The three lines following the macro and trap definition take care of the special case of the first page, for which the .NP macro is not invoked.
The .wh request, which sets the location of the traps used for page transition, interprets the value 0 as the top of the page. Negative values are interpreted relative to the bottom of the page. So, for example, assuming that the page length is 11 inches, the requests:
.wh 10i BT " Bottom Title Macro
and:
.wh -1i BT " Bottom Title Macro
are equivalent. The second form is the most common.
This simple “package” provides only one macro for page transition. The bottom margin of the text portion of the page is determined by the trap location; the top margin by a spacing request in the macro executed at the trap. However, it is far more common to work with at least two page transition macros: one for the page top and one for the bottom.
An example of a two-trap, two-macro macro package is given below:
.wh 0 NP

.wh -1i FO

.de NP                        "New Page

'sp li

.tl 'Top of Page \n%'''  ".tl does not cause break

'sp |2i

'ns

..

.de FO                        "Page Footer

'sp .25i

.tl ''Page Bottom''

'bp

..
A trap is set at the top of the page (.wh 0) to execute the .NP macro. This macro provides a top margin and outputs a title in that space. The formatter begins processing lines of text until the bottom of the page trap is encountered. It invokes the .FO macro, which supplies a footer margin and outputs a centered title. The .FO macro then causes a page break, which in turn invokes .NP at the top of the new page. It is important that both of these macros avoid causing a break, so that text in fill mode will continue smoothly onto the next page.
By setting traps for both the top and bottom of a page you have more control over the size of the bottom and top margins, the placement of headers and footers, and advanced features like footnotes and multiple-column processing.
Take some time to experiment with this bare bones macro package. If you place it in a file, such as pagemacs, you can use it to format text files, as in the following example:
$ nroff pagemacs text
No-Space Mode in Page Transitions
No-space mode is often used in a page transition macro to keep space from being output at the top of a page. It is standard page makeup for the top line of each page to begin at the same point. Without no-space mode, a spacing request (such as prespacing in a paragraph macro) that falls just before the page transition would result in space being output at the top of the page, causing uneven positioning of the top line of the page.
Any output text lines restore space mode, so you don’t have to explicitly turn it back on. However, if you explicitly want to put space at the top of the page (to paste in a figure, for example), use .rs (restore spacing) before the spacing request. The following sequence can be used to start a new page and space down 2 inches below the top margin:
'bP

.rs

'sp 2i
This works in all cases, except on the first page. You must force a break on the first page before you can restore spacing. An .fl request will do the trick:
.fl

.rs

.sp 3i

.ce

A Title on a Title Page

.bP
The .fl request is useful when you want to flush the line buffer and cause a break.
The First Page
As you might expect from the previous example, the first page is unlike others that follow it. That is because there is no automatic transition to the first page. To get around this, the formatter causes a “pseudo-page transition” when it first encounters a break or begins processing text outside a diversion.
For the top of page trap to be executed on the first page, you must set the trap and define the top of page macro before specifying any request that causes a break or initiates processing. You can test this with the sample macros by putting an explicit .br request before the .NP macro definition. After that test, try replacing .br with a .tl request. Even though this request does not cause a break, it does initiate processing of text, and so the .NP macro is not executed.
▪ Page Transitions in ms ▪
Let’s take a closer look now at the trap positions we set in the initialization sequence for our ms-like package, together with the definitions of the macros placed at those positions:
.de IZ

     .

     .

     .

.                  " Set Page Transition Traps

.wh 0 NP

.wh -\n(FMu FO

.wh -\n(FMu/2u BT

.                  " Define Page Transition Macros

..

.de NP             "     New Page Macro

'sp \n(HMu/2u

.PT
'sp |\n(HMu

'ns

..

.de FO             "     Footer Macro

'bP

..

.de PT             "     Page Top Title Macro

.tl '\*(LH'\*(CH'\*(RH'

..

.de BT             "     Bottom Title Macro

.tl '\*(LF'\*(CF'\*(RF'

'sp .5i

..
You’ll notice a couple of differences from our earlier example. Instead of specifying “hard-coded” values for trap locations, we have set up a top margin value in the register HM (header margin) and a bottom margin value in FM (footer margin).
Now we have three trap locations and four page transition macros. In the simplified form shown here, you may wonder why so many macros are used for this simple task. We’ll look at that later, as we show some of the additional things that are done in these macros. But for the moment, let’s focus on what these macros are. Their trap locations are shown in Figure 16-1.
.NP(new page) is invoked by a trap at the top of each page (.wh 0 NP). It spaces down½the distance specified in theHMregister, calls thePTmacro, and then spaces down the full distance specified by the header margin..PT(page title) prints out a three-part title consisting of user-definable stringsLH,CH, andRH(left header, center header, and right header)..FO(footer) is invoked by a trap at the distance from the bottom of the page specified by theFMregister (.wh -\n(FMu FO). This macro causes a break to a new page. Note the use of'bprather than.bpso that any partially filled line is not output, but is held till the next page..BT(bottom title) is invoked by a trap at½the distance from the bottom of the page specified by theFMregister (.wh -\n(FMu/2u BT).
Although this sequence is different than our earlier example, it is about as easy to understand. The main difference, however, is that there are two traps at the bottom of the page. The first (FO) causes a page break, and the second (BT) places the footer. Even though the first trap caused a page break, the formatter keeps going till it reaches the true bottom of the page specified by the page length. On its way, it passes the second trap that invokes .BT.
The use of the four page transition macros is slightly inconsistent in ms; .PT is invoked from .NP, but .BT, which could just as well be invoked by .FO, is instead invoked by a trap.

Headers and Footers
Most books, and many shorter documents, include headers and footers. In books, headers often include the title of the book on the left-hand page, and the title of the chapter on the right. The footer typically includes the page number, either centered or in the lower outside comer, alternating from left to right. (Although all three elements are usually present, they can be in different positions depending on the book design.)
As previously mentioned, the .tl request was designed specifically for producing the three-part titles used in headers and footers. The ms package uses this request in both the PT and BT macros, filling the three fields with symmetrically named string invocations. If the string is undefined, the field is blank.
The macro package itself may define one or more of the fields. The .IZ macro from ms contains this piece of code:
.if "\*(CH"" .ds CH "- \\n(PN -

.if n .ds CF "\*(DY
The ms macros define the center header as the page number set off by hyphens. For nroff only, the center footer is set to the current date. (An nroff-formatted document is assumed to be a draft, but a troff-formatted document is assumed to be final camera-ready copy.)
The ms macros transfer the page number from the % register to one called PN. Note the number of backslashes required to get the page number output at the proper time—not in the string definition, nor in the macro definition, but at the time the title is output.
If you don’t like this arrangement, you can simply redefine the strings (including redefining them to nothing if you want nothing to be printed). As a developer of macros built on top of ms, you could, for example, have a chapter heading macro automatically set the chapter title into one of these strings. (More on this later.)
Headers and footers are often set in a different type and size than the body of the book. If you are using a standard macro package, font and size changes can simply be embedded in the header or footer strings:
.ds LH "fIAn Introduction to Text ProcessingfP
Or, if you are writing your own macros or redefining an underlying package like ms, you can embed the changes directly into the .tl request:
.tl 's-2\*(LF'\*(CF'\*(RFs0'
Another point: it is often desirable to alternate headers and footers on odd and even pages. For example, if you want to put a book title at the outside upper comer of a left-hand (even) page, and the chapter title at the outside upper corner of a right-hand (odd) page, you can’t really work within the structure ms provides.
To do this properly, you could use a construct like the following within your .PT macro:
.if e .tl '\*(TI'''

.if o .if \n%-1 .tl '''\*(CH'
where the string TI holds the title of the book, and CH holds the title of the chapter. If it’s an odd page, we also test that it’s not the first page. By invoking specific strings, you do lose the generality of the mechanism provided by ms.
Page Numbers in Three-Part Titles
Inasmuch as the chief application of three-part titles is in producing header and footer lines from within page transition macros, there is a special syntax for including page numbers. A % character anywhere in a title will be replaced with the current page number. This saves the trouble of having to do a proper number register interpolation and makes it easier for unsophisticated users of ms or mm to include page numbers in header and footer strings.
Whenever nroff or troff makes use of a character in a special way, you can be sure there is a back door that allows you to change that character. The .pc (page character) request allows you to specify that some other character than % should perform this function:
.pc ^ "Use ^ instead of % to print page # in .tl
This does not change the name of the % number register, which also contains the page number.
Title Length
The other thing you can adjust is the length of the three-part title produced by .tl. Usually it is set to the same length as a text line, but this need not be so. Title length is specified independently of line length with the .lt (length [of] title) request. For example:
.lt 6.5i
The title length is not independent of the page offset, so if you want a title that is longer than the line length, yet centered on the page, you will need to muck with the page offset as well. (Note that this is most likely to occur within a page transition macro.)
.po li                        " Page layout Defaults

.il 6.5i

    .

    .

    .

.lt 7i

.tl 'Alcuin User's Guide''%'  " Title will extend 1/2 inch

    .                         " past right margin

    .

    .

.PO -.25i

.lt 7i

.tl 'Alciun User's Guide''%' " Title will extend 1/4 inch

.po +.25i                    " on either side
An .lt request without an argument will restore the previous title length.
▪ Some Extensions to the Basic Package ▪
Thus far, we’ve looked at what it will take to implement a small ms-like macro package. Now let’s look at some extensions to the basic structure of the package that will make it more flexible. These extensions could be added to the minimal package shown earlier in this chapter, or they could be added to a full ms package, as we have done at our own site.
Changing Page Size
As mentioned earlier, the initialization sequence usually sets up default values for line length, page offset, and the placement of the top and bottom traps. In the standard ms package, all of these values are set up to produce an 8½-by-11 inch page.
This is fine for nroff, but with troff, one might well want to produce a different page size. For example, many books are typeset for a 5½-by-8½ inch page.
The most obvious move is to change the page length:
.pl 8.5i
and then reset the line length, title length, and page offset using the standard registers ms provides.
This may not work if your output device uses continuous-roll paper, such as a typesetter. However, in nroff, or when using troff with a sheet-fed laser printer, this may split your formatted output pages across physical sheets of paper. (Some devices translate a .bp into a page eject code or formfeed; others simply add blank lines to push text onto the next physical page. For this reason, it is perhaps preferable to think of .pl as the paper length rather than the page length.)
In addition, when you are printing a small page, it is nice to print cut marks to show the location of the page boundaries. If you change the page length, any cut marks you place will be off the page that troff knows about, and will not be printed.
For both of these reasons, we took a different approach. We modified the ms .IZ macro so that changing the header and footer margins would effectively change the page size, instead of just the margins. (In standard ms, you can change the size of the top and bottom margins, but this doesn’t change the page size, because the placement of the footers is fixed after the initialization macro has been called. The trap position for FO is reset at the top of every page, thus taking into account changes in the value of the FM register. But the trap position for BT is never touched after .IZ has been executed.)
In our package, we decided to set up some standard page sizes as part of .IZ. In our business, writing and producing technical manuals, we often print books in both sizes. Early drafts are printed on the laser printer in 8½ by 11 format; later drafts and final camera-ready copy are produced in 5½ by 8½ format. We also produce quick-reference documents in a narrow 6-panel card or pamphlet. The user selects the size by specifying a command-line switch. This approach has the advantage of letting the user change all of the parameters associated with a given size with one easy command.
The .IZ macro in our mini-ms package now looks like this:
.de IZ                  " Initialization macro

.                       " Initialize Number Registers

.                       " Quick Reference Card size

.if \nS=2 {

.       nr pW 3.5i      " Page Width

.       nr tH 1.25i     " Trim Height adjustment

.       nr LL 2.8i      " Line Length

.       nr LT 2.8i}    " Title Length

.                       " 5 1/2 b y 8 1/2 size

.ie \nS=1 {

.       nr pW 5.5i      " Page Width

.       nr tH 1.25i     " Trim Height adjustment

.       nr LL 4.25i     " Line Length

.       nr LT 4.25i}   " Title Length

.                       " 8 1/2 by 11 size

.el {

.       nr pW 0         " Page Width
.       nr tH 0         " Trim Height adjustment

.       nr LL 6i        " Line Length

.       nr LT 6i}      " Title Length

.                  "Values independent of page size

.nr FM li               " Footer Margin

.nr HM li               " Header Margin

.nr PO li               " Page Offset

.nr PS 10               " Point Size

.nr VS 12               " Vertical Spacing

.nr FL \n(LLu*11/12    " Footnote Length

.nr PI 5n               " Paragraph Indent

.nr QI 5n               " Quoted Paragraph Indent

.nr PD 0.3v             " Interparagraph Spacing

.               " Set Page Dimensions through requests

.ps \n(PS

.vs \n(vs

.po \n(POu

.ll \n(LLu

.lt \n(LTu

.ft 1

.hy 14                  " Specify hyphenation rules

.                       " Set Page Transition Traps

.wh 0 NP                " Top of page

.wh -(\n(FMu+\n(tHu) FO      " Footer

.wh -((\n(FMu/2u)+\n(tHu) BT " Bottom titles

.if \nS .wh -\n(tHu CM       " Position of bottom mark

..
The .NP macro has been modified as follows:
.de NP                    " New Page Macro

'sp \n(tHu               " Space down by trim height

.ie \nS {

.      CM                 " If small format, print cut mark

'      sp \n (HMu/2u-lv}" Correct baseline spacing

.el 'sp \n(HMu/2u        " Space down by half HM

.PT

'sp |\n(HMu+\n(tHu      " Space to HM plus adjustment

'ns

..
By simply setting the S (size) register from the command line, the user can choose from one of three different sizes. For example:
$ ditroff -Tps -rS1 textfile | devps | lp
will choose the 5½-by-8½ page size.
What we’ve done here is to assume that the paper size is still 8½ by 11. We’ve defined a fudge factor, which we’ve called the trim height adjustment, and stored it in a register called tH. If the user has set the size register from the command line, we use this adjustment factor to:
- shift the location of the footer trap:
.wh - (\n(FMu+\n(tHu) FO - shift the location of the bottom title trap:
.wh - ((\n(FMu/2u)+\n(tHu) BT - place a new trap to print cut marks at the true bottom of the page:
.if \nS .wh -\n(tHu CM - space down at the start of the
.NPmacro:'sp \n(tHu
.ie \ns {
. CM
' sp \n(HMu/2u-lv}
.el 'sp \n(HMu/2u
.PT
'sp |\n(HMu+\n(tHu
Note that in .NP we need to adjust for the extra line spacing that occurs as a result of printing the cut marks. Otherwise, the .PT macro would be invoked one line lower on a page with cut marks than on one without.
Cut Marks
We’ve mentioned that if you are producing typeset or laser-printed copy on less than an 8½ by 11 page, it is usually desirable to place marks showing the actual page boundary. The paper is then cut on these marks in preparation for pasteup on camera-ready boards.
As you’ve seen in the preceding discussion, we print the cut mark at the top of the page from the .NP macro, after spacing down by the desired trim height. The cut marks at the bottom of the page are printed by calling the cut mark macro with a trap placed at the trim height from the bottom of the page.
As you’ll notice, the execution of the cut mark macro is conditioned on the presence of the S register, which indicates that the user has requested a small page.
Here’s a simple version of the actual cut mark macro:
.de CM                     " Cut Mark macro

'po -(\n(pWu-\n(LLu/2u)  " Center cut mark around text

.lt \n(pWu                " Set title length for cut mark

'tl '+''+'                 " Print cut mark
.lt \n(LTu                " Reset title length

'po +(\n (pWu-\n(LLu/2u) " Reset page offset

..
As with all activity that takes place during the page transition, it is very important that nothing in the cut mark macro causes a break. For this reason, all break causing requests are started with the no-break control character ('), and the cut marks themselves are printed with .tl, which doesn’t cause a break. (The other way to avoid breaks is to do all of your page transition work in a different environment, but doing this uses up one of the environments, which might be better used for another purpose.)
We’ve specified the width of the page in the pW register. To center the cut marks around the text, we adjust the page offset by the difference between the page width and half the line length. Then we set the title length to the page width, and actually print the cut marks with .tl. Then, of course, we reset the original page offset and title length.
In the implementation shown, we use simple plus signs to create the cut marks. This creates a slight inaccuracy, because the page width will be from end to end of the plus signs, and the height from baseline to baseline, rather from the center of the plus as we’d like.
There are two ways that we could deal with this. One is to fudge the height and the width to account for the character widths. The other is to use a specially drawn mark that will put the actual cut lines at the edge rather than the center of the figure.
A very simple way to do this is to use the box rule, the root-en, and the underrule. Because the cut marks are no longer symmetrical, though, we’ll need to give the cut mark macro an argument to specify whether we’re at the top or the bottom of the page:
.de CM                     " Cut Mark macro

'po -(\n(pWu-\n(LLu/2u)  " Center cut mark around text

'lt \n(pWu                " Set title length for cut mark

.ie "\$1"T" 'tl '(br(rn''(rn(br'  " Print cut mark

.el 'tl '(br(ul''(ul(br'

'lt \n(LTu                " Reset title length

'po +(\n(pWu-\n(LLu/2u)  " Reset page offset

..
When we invoke .CM from within .NP, we’ll just have to add the argument T to specify we’re at the top.
The cut marks will look like this:
▪ Other Exercises in Page Transition ▪
We’ve looked at the basic mechanism for page transition, and shown one way to extend that mechanism to allow the user to select different page sizes. We have not exhausted the topic of page transition, however. Before we begin to discuss the development of macros that prescribe document formats, rather than basic page formatting, we will briefly consider these topics:
- Footnotes
- Multicolumn processing
- Page top resets
- Handling widows and orphans
Footnotes
Footnotes make page transition an even more complex exercise. Anyone who has typed footnotes on a typewriter knows the problem. Because the presence of a footnote shortens the space available on the page for regular text, you need to know the size of the footnote before you know if its reference will fit on the bottom of the current page, or will be pushed to the top of the next. There is always the possibility of a classic Catch-22: a footnote whose reference falls at the bottom of the page only if the footnote itself isn’t printed there.
Let’s look first at a very simple footnote mechanism—one that has a reasonable chance of failure in the face of heavy demand, but nonetheless illustrates the basic mechanism at work.
The first thing we need to know is the position of the page bottom trap for a normal page—one without any footnotes. For example, in ms, we know that its location is -\n(FMu. (Now ms has a perfectly good footnote mechanism, but for purposes of argument, we’re going to pretend we need to add one.)
All we really need to do, on the simplest level, is to save footnotes in a diversion, measure them, then move the footer trap back up the page by a distance equal to the size of the diversion.
In the new page macro, we initialize (reset to 0) a counter (fC) that will tell us if there are any footnotes on the page and how many. (We want to handle the first footnote differently than others on that page.) We also initialize a bottom position for printing footnotes (Fb) and initialize it with the value of the standard footer margin. (This will be the starting point that will be decremented as footnotes are encountered.) Last, we provide a reset that restores the page footer trap at the standard footer margin if it has been changed because of footnotes on a previous page.
.                    " Add to .NP

.nr fC 0 1           " Initialize footnote counter

.nr Fb 0-\n(FMu     " Initialize footnote position

.ch FO -\n(FMu      " Reset normal footer location
Now, a pair of foomote macros are required to open and close a diversion:
.de FS           " Footnote Start

.nr fC 1         " Set flag that there are footnotes

.ev 1            " Use environment 1

.da FN           " Divert text of footnote

.if \n(fC=l { " If first footnote

l'li'           " Print 1 inch line before it

.br}

..

.de FE           " Footnote End

.br

.di              " End diversion

.ev              " Restore environment

.nr Fb -\n(dn   " Decrement footnote position by

.                " size of diversion;

.                " note that Fb is already negative.

.                " Reset footer trap

.ie (\n(nl+lv)>(\n(.p+\n(Fb) .ch FO \n(nlu+lvu

.el .ch FO -\n(Fb

..
The footnotes are processed in a separate environment. This environment needs to be initialized, perhaps as part of the .Iz macro, or as part of the .FS macro the very first time it is called. The latter method makes it easier for users to change settings for this environment. It is recommended that you preserve a separate environment (either 1 or 2) for footnote processing. Here is a sample initialization sequence:
.ev 1       " Initialize first environment for footnotes

.ps 8

.vs 10

.ll \n(FLu " FL was initialized to 11/12 of LL

.ev
The .FS macro opens a diversion (.da FN) into which we append the text of the footnote. Before the first footnote on a page, the .FS macro adds a one-inch reference line to mark the beginning of footnotes. After we have closed the diversion in the .FE macro, we obtain the size of it from the read-write register .dn. This amount is used to increase Fb (two negatives amounts are added together) and change the location of the footer trap further up the page.
Before changing that trap, the footnote end macro has to find out if the new footer trap will be placed above or below the current location. If the new trap location is below where we are, all is well; the page trap is moved up to that location. However, if the current footnote places the location above the current position, there’s going to be trouble. In this case, we need to execute the footer macro immediately.
The troff formatter keeps the current page position in the nl register, and the page length in the register .p. As a result, we can set the trap position based on a conditional:
.ie (\n(nl+lv)>(\n(.p+\n(Fb) .ch FO \n(nlu+lvu

.el .ch FO -\n(Fb
If the footnote won’t fit, this code puts the trap one line below the current position; otherwise, the footer trap location is moved up the page.
Now we’ll have to redefine the footer macro to print the diverted footnotes, if there are any:
.de FO           " Redefine FO

.if \n(fC{

.ev1             " Invoke first environment

.nf              " Good practice when outputting diversions

.FN              " Print diversion

.rm FN           " Remove printed diversion

.ev}

'bP              " Now break page

..
Because the footnote macros are complicated, it might be a useful aside to look at the process of debugging these macros. We used several .tm requests to report (to standard error) on the sequence of events during a formatting run of a file that included footnotes. What we wanted to know was the location of the footer trap and when it was sprung. Inside the .FE macro, we inserted .tm requests to show which of the conditional .ch requests were executed.
.ie (\n(nl+lv)>(\n(.p+\n(Fb) {

.tm !!!!!! FE: Change trap to current location (\n(nl+lv)

.ch FO \n(nlu+lvu }

.el {

.tm !!!!!! FE: Move trap up the page (\n(Fbu)

.ch FO -\n(Fb )
Then, inside the .FO macro, we inserted messages to locate two positions on the page: where the footer macro is invoked by the trap and where the footnotes have been output.
.de FO

.tm !!!! FO: position is \n(nl (\n(.p+\n(Fb) BEFORE

.

.

.

.tm !!!! FO: position is \n(nl AFTER footnotes

'bP

..
To see these terminal messages without the formatted text, we invoke nroff and redirect output to /dev/null. (tmacpack is a small macro package used for testing these macros.)
$ nroff tmacpack textfile > /dev/null

!!!!!! FE:  Move trap up the page (-360u)

!!!!!! FE:  Move trap up the page (-440u)

!!!!!! FE:  Move trap up the page (-520u)

!!!!!! FE:  Move trap up the page (-680u)

!!!! FO:  position is 1980 (2640+-680) BEFORE

!!!! FO:  position is 2420 AFTER footnotes

!!!!!! FE:  Move trap up the page (-360u)

!!!!!! FE:  Move trap up the page (-440u)

!!!!!! FE:  Move trap up the page (-520u)

!!!!!! FE:  Change trap to current location (2100+lv)

!!!! FO:  position is 2140 (2640+-640) BEFORE

!!!! FO:  position is 2580 AFTER footnotes

!!!!!! FE:  Move trap up the page (-320u)

!!!! FO:  position is 2320 (2640+-320) BEFORE

!!!! FO:  position is 2400 AFTER footnotes
Part of the reason for making this aside is the difficulty of writing effective footnote macros. It requires a fair amount of testing to make sure they work in all cases. When we spring the footer trap for the second time, the messages alert us to a problem—the Catch-22 we mentioned earlier. The formatter encountered a footnote on the last input line. The only way to fit both the footnote reference and the footnote on the same page was to ignore the footer margin and let the footnote run into it.
Standard ms provides a better way of handling this overflow. In addition, the Nroff/Troff User’s Manual describes a similar mechanism. Our simplified version, adequate only for demonstration of this mechanism, will borrow from both of these sources. (It might be said that a “working” version requires several empirically discovered fudge factors or, as Joseph Ossanna called them, “uncertainty corrections”.)
The problem is how to split the footnote overflow if it extends beyond where we want the bottom of the page to be. The solution is to put two trap-invoked macros at the original (standard) page bottom location. The trap mechanism in troff allows only one macro to be executed by a trap at a given location. If you write:
.wh -\n(FMu M1   "Place first macro

.wh -\n(FMu M2   "Overwrite first macro at this location
all you will succeed in doing is wiping out the first placement with the second.
However, you can move a trap location to an occupied position. The second trap “hides” the first and renders it ineffective, but the first is still in place and is restored if the second subsequently moves off the spot.
So here’s what we do in our trap initialization:
.wh 16i FO       " Put regular footer out of the way

.                " (way off the page)

.wh -\n(FMu FX  " Place footnote overflow macro

.ch FO -\n(FMu  " Hide footnote overflow macro
The .FX (footnote ovegow) macro will be invoked only if the FO trap is moved (as it will be whenever there are footnotes on the page) In .FX, all we do is start another diversion, so that excess footnote text that would overflow at the bottom of the page is saved for the next:
.de FX              " Footnote overflow

.if \n(fC .di eF   " Divert extra footnote

..
(We’ll explain the reason for the test in a moment.)
Odd as it may seem, this diversion can be terminated from the footer macro .FO, even though that macro is invoked before the footnote overflow macro! Because the .FN diversion inside the .FO macros springs the footnote overflow trap and starts the overflow diversion, we can close that diversion by a request in .FO following the diversion.
The code in .FO now looks like this:
.nr dn 0                      " Reset diversion size register

.if \n(fC {                " If there are footnotes

.ev 1

.nf

.FN

.rm FN

.if'\n(.z' eF'.di            " End diversion opened by FX

.ev

.nr fC 0 }                   " Done with footnotes

'bp
There are several things here that need further explanation. The number register .z always contains the name of the last completed diversion. (Don’t ask us how they manage to put a string into a number register!) If our overflow diversion was this last completed diversion, we terminate it:
.if '\n(.z'eF'.di
Then, we must take care of another eventuality. If we get this far without triggering the overflow trap—that is, if .FN did fit on the page—we want to disable the overflow macro, which we can do by zeroing our count register fC.
Now on the next page we have to handle any footnote overflow. We write a new macro that invokes .FS and .FE to output the overflow diversion (.eF) into the normal footnote diversion (.FN).
.de Fx            " Process extra footnote

.FS

.nf               " No-fill mode

.eF               " Overflow diversion

.fi

.FE

.rm eF

..
In the new page macro, we add a test to check if the last diversion amounted to anything, and if it did, we invoke the .Fx macro.
.              " added to .NP

.if \n(dn .Fx

.
To test this new feature, we might add messages inside .FX, the macro invoked by a hidden trap to open a diversion that collects any footnote overflow, and inside .Fx, the macro that redirects the overflow back into the normal footnote diversion. You should be able to accomplish this part on your own, as well as to venture into areas that we did not cover (such as automatic numbering or marking of footnotes.) Before implementing a footnote mechanism, we urge you to study the mechanisms in one of the existing macro packages. However, following the chain of events from when a footnote is encountered to when it is output in the footer macr—on the current page or on the next—may seem like a troff exercise equivalent to what Alfred Hitchcock called a MacGuffin: a hopelessly complicated plot not meant to be figured out but that supplies a reason for many entertaining scenes.
Multicolumn Processing
While we—re still on the subject of page transition, we should look briefly at how multicolumn processing works.
Multiple columns are generally produced by using the mark and return mechanism—.mk and .rt—and by manipulating the line length and page offset for each successive column. The basic trick is to have the page bottom macro check if multiple columns are in effect, and if so, whether or not the current column is the last one.
A simple macro to initiate two-column processing might look like this*:
.de 2C

.mk                     " Mark top position

.nr CL 0 1              " Initialize column count flag

.ie \$1 .nr Cw \$1    " Test arg 1 for Column Width

.el .nr CW 2.75i        " or set default CW

.ie \$2 .nr GW \$2    " Test arg 2 for Gutter Width

.el .nr GW .5i          " or set default GW

.                       " Save current one-column settings

.nr po \n(.o           " Save current page offset

.nr 1L \n(LLu          " Save original line length

.nr LL \n(Cwu          " Set line length to Column Width

.ll \n(LLu             " Set line length to Column Width

..
(We must save the default line length in a new register and redefine LL, or else a paragraph macro, or any other macro that calls .RT, will interfere with two-column processing.)
The page footer needs to include the following requests:
.de FO                " New footer macro

.ie \n+(CL<2{      " If incremental column count < 2

'Po+(\n(CWu+\n(GWu) " then increase page offset

'rt                   " Return to mark

'ns }                " Enter no-space mode

.el {               " Otherwise

'po \n(pOu           " Restore original page offset

'bp }                " Start a new page

..
Because two-column processing is likely to continue beyond a single page, we need to modify the page top macro to mark the top of the page and initialize (set to zero) the column count register. The two requests at the bottom of the definition have been added:
.de NP                "New Page Macro

'sp \n(HMu/2u

.PT

'sp |\n(HMu

'ns

'mk                   "Mark top of page

.if \n(CL .nr CL 0 1 "Reset autoincrementing column count

..
After the CL register has been created by .2C, it can also be used as a flag that two-column processing is in effect. The page top resets it to 0 to start the first column on a new page.
The macro to return to single-column processing looks like this:
.de 1C

.rr CL          " Remove column count register

.po \n(POu     " Reset original page offset

.nr LL \n(1Lu

-ll \n(LLu     " and line length

.bP             " Start a new page

..
The column count register is removed, and the original page offset and line length are restored. Unfortunately, using this mechanism, you cannot return to single-column mode on the same page, without resorting to extensive use of diversions. If the first column has already gone to the bottom of the page, there is no way for a prematurely terminated second column to “go back” and fit the text into two even-sized columns on the same page.
Page Top Resets
We’ve already discussed the use of a reset macro from within paragraphs to deal with common errors. Page transitions are also a convenient place to put some different kinds of resets. Like paragraphs, you can rely on their regular occurrence and can therefore trap certain conditions.
In particular, you can use them when you want an effect to take place for only one page and then stop. For example, in our business, we are often required to produce not just complete manuals, but replacement pages to be inserted into an existing manual. Sometimes the update page will be exactly the same size as the original, but often it is longer, and requires additional space.
To avoid changing the numbering on subsequent pages, additional full or partial pages are inserted with a special numbering scheme. For example, if a page is numbered 3-4 (section 3, page 4), and changes to that page run on to an additional page, the new page will be numbered 3-4a.
In this situation, we need to temporarily change the way page numbers are handled, then change back when the page is done. We’ve defined a macro called .UN, which looks like this:
.de UN               " Update page numbering macro

.nr Un 1             " Set flag to test on page break

.nr % -1

.ie !"\$1"" .as NN \$1

.el .as NN a

..
Our extended ms macro package normally puts the section number (sE) and the page number (PN), separated by a hyphen, into the string NN. In this macro, we simply append a letter to that string. By default we add the letter a, but we give the user the option to specify another letter as an argument to the macro, so pages can be numbered 3-4, 3-4a, 3-4b, and so on. To use the macro, the user simply enters it anywhere on the update page. Voilá! The page number now has an a on the end.
Notice that the original page number register (%) was first decremented, so that this new page will have the same number as the previous one. More to the point of this discussion, notice that the macro sets the Un number register to 1 as a flag that update numbering is in effect.
This flag is tested in the page top macro for the next page, and if it is set, the original page numbering scheme is restored as follows:
.if \n(Un=1 {

.     ds NN \\n(sE-\\n(PN

.     nr Un 0}
(Note that four backslashes are required in the number register interpolations used in defining NN because the string definition will be interpreted twice, once when the macro is defined, and once when it is executed.)
Keep this trick in mind because there are many cases in which you can use the page bottom or page top macro to reset conditions that you don’t want to carry across more than one page. We’ll see another in just a moment.
Handling Widows and Orphans
Widows and orphans are the bane of any markup language—the one real advantage of current wysiwyg systems. A widow is a single or partial line from the end of a paragraph left over at the start of the next page. An orphan is a single line from the start of a paragraph left alone at the bottom of a page. Both of these are considered poor page layout.
As we’ve discussed, a macro package can take care of orphans simply by including an .ne request in the paragraph macro. Widows are much harder to take care of, because you don’t know where the end of the paragraph will fall until you reach it.
In nroff and troff, the only way you can handle this problem is to process each paragraph in a diversion, find out how long it was, then go back and break it up if necessary. This greatly increases processing time, and is probably not worth the effort.
You could limit the extra work by testing the position on the page and only diverting paragraphs that occur within range of the page bottom. However, even so, this is a difficult problem you may not want to attempt.
It may be satisfactory to give users an increased capability for dealing with widows when they do occur. Normally, the solution is to print out the document, find any offending widow lines, then go back and manually break the pages a line earlier. However, sometimes it is inconvenient to break the paragraph earlier—it would be better to add the line to the bottom of the current page.
In standard ms, the location of the footer trap is reset to –
(FMu in the .NP macro at the top of every page. The user can get extra length on a page just by changing the value of FM on the preceding page.
We could also write a macro that would let the user make the change on the offending page. For example, in ms:
.de EL                  " Extra Line macro

.nr eL 1                " Set flag

.ch FO -(\n(FMu-1v)u   " Put trap one line lower

..
All the user has to do is to introduce this macro anywhere on the page to be affected. It is your job as macro developer to reset the normal page length—and the most likely place is in the page top macro for the next page:
.if \n(eL=l {

.ch FO -\n(FMu     " Reset to normal location for ms

.nr eL O}          " Clear flag
___________
*There’s no real reason why this sequence needs to be put in a macro at all, other than the consistency of putting two backslashes before number registers when they are read in.
*This “package” was contributed by Will Hopkins of VenturCom, Inc.
*Despite similar macro and number register names, this is not the two-column macro used in ms. The ms package provides a more general multiple column macro, .MC, of which .2c is a specialized call.