Chapter 2. Preparing for Testing
This chapter aims to implement your first end-to-end test using the Selenium WebDriver API with Java language. First, we will review the technical requirements in terms of previous knowledge, hardware, and software. Every example I present in this book is available in an open-source GitHub repository. This chapter also provides a detailed overview of this repository regarding its content and configuration. Then, we will set up a Java project to include our Selenium WebDriver tests. To that aim, we will look at two different build tools: Maven and Gradle. Finally, we will create a basic end-to-end test with Selenium WebDriver, i.e., our hello world test. We will implement this test in several flavors: using different web browsers (such as Chrome, Edge, or Firefox) and unit testing frameworks (JUnit and TestNG).
Requirements
The first obvious requirement to start using Selenium WebDriver with Java is to work on the Java language and object-oriented programming. It is not necessary to be an expert in them, but you need to have a basic knowledge about it. The second obvious requirement is to have a computer. We can use Selenium WebDriver in any mainstream operating system: Windows, Linux, or Mac OS. Therefore, you can select the computer type you prefer. In principle, there are no specific requirements about its hardware in terms of memory, CPU, hard disk, etc., so any average computer will do.
Next, we need a Java Virtual Machine (JVM) installed on our computer. As you probably know, there are two types of distributions for the JVM. The first option is the Java Runtime Environment (JRE), which includes the JVM and the Java standard API. The second option is the Java Development Kit (JDK), which is the JRE plus a Software Development Kit (SDK) for Java (such as the javac compiler and other tools). Since we are developing in Java, I recommend using JDK (although some IDEs also incorporate an SDK for Java). Regarding the Java version, I recommend using at least JDK 11 since it is the Long Term Support (LTS) version used in Selenium 4.
To code our Java tests, we need a text editor or IDE. IDEs provide an excellent experience for development because they have a full-featured environment (for coding, running, debugging, auto-completing, etc.). Nevertheless, you can get a similar practice using any text editor you like, used in conjunction with command-line tools (for running, debugging, etc.). Overall, it depends on your personal preferences to choose one or another. Some popular alternatives for text editors are Sublime Text, Atom, Notepad++, or Vim, among others. Regarding IDEs, we can use Eclipse, IntelliJ IDEA, NetBeans, or Visual Studio Code.
Another important component is the build tool. These tools are software programs that automate different stages of software development from the source code. For example, some of the steps automated with build tools are dependencies management, compilation, packaging, test execution, and deployment. In the example repository, I use two different build tools: Maven and Gradle. Both tools are top-rated in the Java community, and they offer similar features to create and maintain Java projects. Again, the final choice to use one or another depends on your preferences. The recommended versions are Maven 3+ and Gradle 6+.
Note
If you plan to use an IDE for developing and running your tests, a build tool is not strictly necessary. Nevertheless, I recommend installing at least one of these tools in your computer to replicate the same environment typically used in build servers (e.g., Jenkins, GitHub Actions, etc.).
An initial way for carrying out automation with Selenium WebDriver is to use local browsers. For this book, I consider the following browsers: Chrome, Edge, and Firefox. I refer to them as main browsers for several reasons. First, they are very popular worldwide, and because we are testing web applications with Selenium WebDriver, we probably want the use the same browser as our potential users. Second, these browsers are evergreen (i.e., they upgrade themselves automatically). Third, these browsers are available for the major operating systems: Windows, Linux, and Mac OS (unlike Safari, which is also a popular browser but is only available on Mac OS). Lastly, these browsers are available in the CI environment used in the GitHub repository (i.e., GitHub Actions).
The last requirement for controlling web browsers with Selenium WebDriver is the driver binaries: chromedriver (for Chrome), msedgedriver (for Edge), and geckodriver (for Firefox).
Manual Driver Management
As discussed in Chapter 1, driver management involves three steps: download, setup, and maintenance. To avoid the potential problems explained in that chapter, I strongly recommend automating this process. For this reason, all the examples I show in this book use WebDriverManager. Nevertheless, and just in case you need it for some reason, I explain how to make this process manually next.
Download
The first step for driver management is to download the proper driver. Table 2-1 shows the online websites to obtain the drivers for the main browsers. You need to find the correct driver version and platform (Windows, Linux, Mac OS) for the browser you plan to use. Regarding the version, the Chrome and Edge (although not Firefox, unfortunately) maintainers follow the same versioning schema for drivers and browsers to ease this process. So, for instance, if you use Chrome or Edge 91.x, you also need to use chromedriver and msedgedriver 91.x. You will find the specific driver version in the documentation provided on the websites above. For instance, to use Chrome 91, you need to download ChromeDriver 91.0.4472.19.
| Browser | Driver | Download website |
|---|---|---|
Chrome/Chromium |
chromedriver |
|
Edge |
msedgedriver |
https://developer.microsoft.com/en-us/microsoft-edge/tools/webdriver/ |
Firefox |
geckodriver |
Setup
Once you have the required driver for your WebDriver script, you need to set it up correctly. There are two ways to carry out this process. The first one is adding the driver location (the full path or the parent folder which contains the driver) to your PATH environmental variable (env). The PATH env is standard in Unix-like (e.g., Linux and Mac OS) and Windows operating systems. This environmental variable allows specifying a set of folders in which the operating system locates executable programs. The way we configure PATH (and other environmental variables) depends on the specific operating system. For example, in Windows systems, we can do it using its GUI
(Control Panel → System → Advanced → Environment Variables). In a Unix-like system, we can use the command line to carry out this process, for instance, using the following command (or equivalent):
exportPATH=$PATH:/path/to/drivers >> ~/.profile
The second way to set up the driver is using Java system properties, which are configuration attributes (in the form of name/value) passed to the JVM. Table 2-2 summarizes the names for the main drivers in Selenium WebDriver. The value for these properties is the full path of a given driver (e.g., /path/to/drivers/chromedriver).
| Browser | Driver | Java system property name |
|---|---|---|
Chrome/Chromium |
chromedriver |
|
Edge |
msedgedriver |
|
Firefox |
geckodriver |
|
There are two ways to configure these properties: the command line (passing the system property using the -Dname=value syntax) or Java code. For example, Example 2-1 shows the Maven and Gradle commands to execute all the tests of a given project while passing the properties to set up the drivers for Chrome, Edge, and Firefox. Then, Example 2-2 shows how to make the same configuration, but this time using Java.
Example 2-1. Maven and Gradle commands to configure system properties in the command line
mvntest-Dwebdriver.chrome.driver=/path/to/drivers/chromedriver mvntest-Dwebdriver.edge.driver=/path/to/drivers/msedgedriver mvntest-Dwebdriver.gecko.driver=/path/to/drivers/geckodriver gradletest-Dwebdriver.chrome.driver=/path/to/drivers/chromedriver gradletest-Dwebdriver.edge.driver=/path/to/drivers/msedgedriver gradletest-Dwebdriver.gecko.driver=/path/to/drivers/geckodriver
Example 2-2. Java commands to configure system properties
System.setProperty("webdriver.chrome.driver","/path/to/drivers/chromedriver");System.setProperty("webdriver.edge.driver","/path/to/drivers/msedgedriver");System.setProperty("webdriver.gecko.driver","/path/to/drivers/geckodriver");
Maintenance
Last but not least, the final step of driver management is to maintain these drivers. This maintenance is necessary because evergreen browsers (such as Chrome, Edge, or Firefox) upgrade themselves automatically. Although appealing from a user perspective, this automated upgrade is problematic for Selenium WebDriver scripts where the driver management is manual. In this case, the driver and browser compatibility is not guaranteed in the long run.
A specific driver (e.g., chromedriver version 84.0.4147.30) is typically compatible with a given browser version (e.g., Chrome 84). Eventually, and because of the automatic upgrade, this compatibility is not guaranteed. As a result, a Selenium WebDriver script based on this driver stops working. In practice, Selenium WebDriver developers experience this problem when tests fail because of driver and browser incompatibility. For instance, when using Chrome as a browser, a decayed test due to driver incompatibility reports the following error message: “this version of chromedriver only supports chrome version N” (where N is the latest version of Chrome supported by a particular version of chromedriver). To illustrate this problem, Figure 2-1 shows the worldwide search interest of that error message on Google during 2019 and 2020, together with the release date of the different Chrome versions in this period. As you can see, the interest over time concerning this error message is related to some Chrome releases.

Figure 2-1. Worldwide relative interest overtime of the search term “this version of chromedriver only supports chrome version” in Google Trends together with the release dates of Chrome during 2019 and 2020
Warning
As you can see, manual driver management is costly in terms of effort and problematic in terms of maintenance. For this reason, I use WebDriverManager to carry out this process in an automated and auto-maintained manner in all the examples of this book.
Optional Software
In addition to the software already explained, some other additional programs are convenient to make the most of this book. First, you can use Git for source code management. Since the test examples presented in this book are available on GitHub, you can use Git to fork (or clone) and update this repository.
The second optional tool is Docker. In this book, I show you how to use Docker to execute containerized browsers (see Chapter 6). For this reason, I strongly recommend you installing a Docker Engine on your computer (it is available for Linux, Mac OS, and Windows 10).
Finally, you can use different web browsers if you need them. In addition to the main browsers (Chrome, Edge, and Firefox), it is possible to use other browsers with Selenium WebDiver, such as Safari in Mac, or Opera, and Chromium in any operating system.
Examples Repository
You can find all the code examples of this book in the following GitHub repository: https://github.com/bonigarcia/selenium-webdriver-java. This repository is open-source, released under the terms of the Apache 2.0 license. The aim of this repository is multiple. First, it is a convenient way to group all the examples in a single site. Besides, you can use its setup (Maven or Gradle) as a skeleton for your projects. Finally, it uses several services provided by GitHub, such as:
-
GitHub Pages is a service offered by GitHub that allows hosting public websites configured straight from a repository. I use a simple website linked to the examples repository to showcase web pages used as SUT in the Selenium WebDriver test examples. You can manually navigate this website in the following URL: https://bonigarcia.dev/selenium-webdriver-java/. As you can see, it contains different HTML pages using Bootstrap as CSS (Cascading Style Sheets) framework.
-
GitHub Actions is a CI/CD build server for GitHub repositories. I use this service to build and test the whole repo with each new commit. You can see the details about the workflow configuration at the end of this section.
-
Dependabot is a bot that allows updating the project dependencies automatically. When this bot detects a new version for any Maven and Gradle dependencies (see the following subsection for more details), it creates a pull request with the corresponding update.
The following subsections present a fine-grained description of the different configurations of this example repository.
Dependencies
The dependencies of a software project are the required libraries or plugins. This section explains the Java dependencies I use in the examples repository. First, of course, we need Selenium WebDriver to carry out browser automation. This dependency is the only one strictly mandatory. Then, I recommend using additional dependencies for automated driver management utility, unit testing framework, fluent assertions, and logging. The remainder of this section explains the motivation and basic usage of each one of these utilities.
Selenium WebDriver
This subsection does not present the complete characteristics of Selenium WebDriver yet (you need to keep reading the rest of the book for that). For the moment, I introduce some fundamental notions of Selenium WebDriver to implement our first end-to-end test.
One of the most relevant concepts of Selenium WebDriver is the WebDriver hierarchy, which is a collection of classes aimed to control different web browsers. As you can see in Figure 2-2, this hierarchy follows the object-oriented programming paradigm. On the top, we find the WebDriver interface, which is the parent of the whole structure. The lower part of the hierarchy corresponds to Java classes that allow driving single browsers. For instance, we need to use an instance of the class ChromeDriver to control a locally installed Chrome browser, namely:
importorg.openqa.selenium.WebDriver;importorg.openqa.selenium.chrome.ChromeDriver;WebDriverdriver=newChromeDriver();

Figure 2-2. Hierarchy of the WebDriver object
Table 2-3 shows a comprehensive summary of the main classes of the WebDriver hierarchy and their corresponding target browsers.
| Package | Class | Browser |
|---|---|---|
|
|
Chrome |
|
|
Edge |
|
|
Firefox |
|
|
Safari |
|
|
Opera |
|
|
Internet Explorer |
|
|
Remote browsers (see Chapter 6) |
Automated Driver Management
Before instantiating an object of the WebDriver hierarchy, it is mandatory to resolve its corresponding driver. For example, to control Chrome with ChromeDriver, first, we need to manage chromedriver. If we manually make this management, our Java code will look like the following:
System.setProperty("webdriver.chrome.driver","/path/to/drivers/chromedriver");WebDriverdriver=newChromeDriver();
Nevertheless, and to avoid the problems related to manual driver management, I recommend you to carry out the whole driver management process (download, setup, and maintenance) in an automated manner. Concerning Java, the reference implementation is WebDriverManager, a Selenium WebDriver helper library that allows driver management in an automated fashion.
We can use WebDriverManager in different ways: as Java dependency, as a Command Line Interface (CLI) tool (from the shell), as a server (using a REST-like (Representational State Transfer) API), as an agent (using Java instrumentation), or as a Docker container. In this book, I show you how to use WebDriverManager as a Java dependency. To that aim, first, we need to resolve its dependency (see next section to learn how to do it with Maven and Gradle). Then, we can use the WebDriverManager API to manage drivers. This API provides a set of singletons (called managers) to download, set up, and maintain drivers. These singletons are accessible through the WebDriverManager class. For instance, we need to invoke the method chromedriver() to manage the driver required by Chrome, i.e., chromedriver, as follows:
importorg.openqa.selenium.WebDriver;importorg.openqa.selenium.chrome.ChromeDriver;importio.github.bonigarcia.wdm.WebDriverManager;WebDriverManager.chromedriver().setup();WebDriverdriver=newChromeDriver();
Table 2-4 summarizes the basic WebDriverManager calls for all the supported browsers. In addition to these basic calls (i.e., the method setup()), WebDriverManager exposes a fluent API for advanced configuration capabilities. You can find the complete description of the WebDriverManager API in its documentation. For example, the following command shows how to set up a proxy for the network connection:
WebDriverManager.chromedriver().proxy("server:port").setup();
| WebDriverManager basic call | Browser | Driver |
|---|---|---|
|
Chrome |
chromedriver |
|
Edge |
msedgedriver |
|
Firefox |
geckodriver |
|
Opera |
operadriver |
|
Chromium |
chromedriver |
|
Internet Explorer |
IEDriverServer |
|
PhantomJS |
phantomjs |
WebDriverManager Methodology
WebDriverManager internally executes a resolution algorithm to manage the drivers required by Selenium WebDriver. This algorithm aims to discover, download, set up, and maintain these drivers automatically. Figure 2-3 represents this algorithm in the context of the methodology implemented by WebDriverManager. You can find the details of this methodology next.

Figure 2-3. WebDriverManager methodology
For a given manager (e.g., chromedriver()), the most relevant parts of the resolution algorithm are:
-
WebDriverManager tries to find the browser version (e.g., Chrome) installed in the local machine. For that, it uses an internal knowledge database called commands database. This database contains a list of shell commands (in different operating systems) that allow discovering the browser versions (e.g.,
google-chrome --versionin Linux). -
Using the found major browser version (e.g., Chrome 89), WebDriverManager determines the correct driver version (e.g., chromedriver 89.0.4389.23). I call this process version resolution. To ease this process, several driver maintainers (i.e., chromedriver and msedgedriver) publish the specific driver version in their online repositories using simple text files (e.g., https://chromedriver.storage.googleapis.com/LATEST_RELEASE_89). Unfortunately, this information is not available for other drivers, such as geckodriver or operadriver. For this reason, WebDriverManager uses another internal knowledge database (called versions database) to keep the association between the versions of browsers and drivers. Both versions and commands databases synchronize their values using an online master reference stored on GitHub.
-
WebDriverManager downloads the specific driver for the local operating system (Windows, Linux, or Mac OS) and stores it in the local filesystem in the driver cache (by default, in the path
~/.cache/selenium). -
Finally, WebDriverManager exports the downloaded driver path using the proper Java system property (e.g.,
webdriver.chrome.driver).
For the sake of performance and maintainability, WebDriverManager internally uses a resolution cache. This cache (by default stored in the driver cache as a properties file) keeps the relationship between the resolved driver versions. This relationship is valid following a time-to-live (TTL) approach. The default value of this TTL is one day for drivers (e.g., chromedriver 89.0.4389.23) and one hour for browsers (e.g., Chrome 89). The resolution algorithm resolves drivers using the cached files in the subsequent invocations (this usually happens in a Selenium WebDriver test suite). Then, when a TTL expires, the resolution algorithm tries to resolve a new driver release. Finally, when a different browser version is detected, WebDriverManager downloads the new driver (if required). Thanks to this process, the version compliance of browser and driver is warranted even for evergreen browsers.
Unit Testing Frameworks
As explained in Chapter 1, unit testing frameworks allow creating different types of tests. In this book, you will learn how to implement end-to-end tests for web applications using Selenium WebDriver. Hence, I suggest embedding the Selenium WebDriver calls within tests created with a particular unit testing framework. The alternatives I recommend you use is one of these options: JUnit 4, JUnit 5 (alone or in conjunction with Selenium-Jupiter, which is an extension for Selenium WebDriver), or TestNG. The following subsections provide more details about these alternatives.
JUnit 4
JUnit is a unit testing framework for Java created by Erich Gamma and Kent Beck in 1999. It is considered by many as the de facto standard framework for developing tests in Java. In JUnit, a test is a method within a Java class used for testing. As of JUnit 4, the building blocks for developing JUnit tests are Java annotations. The fundamental annotation of JUnit 4 is @Test since it allows identifying the method(s) which contain the test logic (i.e., the code used to exercise and verify a piece of software). In addition, there are other annotations to identify the methods used for the setup (i.e., what happens before the tests) and the teardown (i.e., what happens after the tests).
-
@BeforeClassis executed once before all tests. -
@Beforeis excuted before each test. -
@Afteris excuted after each test. -
@BeforeClassis executed once after all tests.
Figure 2-4 shows a graphical representation of the basic test lifecycle in JUnit 4.

Figure 2-4. JUnit 4 test lifecycle
Following this approach, Example 2-3 contains the structure I recommend for using Selenium WebDriver and WebDriverManager in a JUnit 4 test.
Example 2-3. JUnit 4 test skeleton using Selenium WebDriver and WebDriverManager
packageio.github.bonigarcia.webdriver.junit4.ch2.skeletons;importorg.junit.After;importorg.junit.Before;importorg.junit.BeforeClass;importorg.junit.Test;importorg.openqa.selenium.WebDriver;importorg.openqa.selenium.chrome.ChromeDriver;importio.github.bonigarcia.wdm.WebDriverManager;publicclassSkeletonChromeJUnit4Test{privateWebDriverdriver;@BeforeClasspublicstaticvoidsetupClass(){WebDriverManager.chromedriver().setup();}@Beforepublicvoidsetup(){driver=newChromeDriver();}@Afterpublicvoidteardown(){driver.quit();}@Testpublicvoidtest(){// TODO: use variable "driver" to call the Selenium WebDriver API}}

We declare a Java attribute using the interface
WebDriver. We use this variable in tests to control web browsers with Selenium WebDriver.
In the setup for all tests within this class (i.e., executed once), we call WebDriverManager to manage the required driver. In this example, since we use Chrome as a browser, we need to resolve chromedriver.

In the setup for each test, we instantiate some specific
WebDriverobject, in this case,ChromeDriver, since we use Chrome1.
The test logic will use the Selenium WebDriver API through the
drivervariable. This part is pending so far.
At the end of each test, we need to close the browser. To that aim, ew can invoke the method
quit()of thedriverobject (you can see more info about how to closeWebDriverobjects in Chapter 3).
JUnit 5
Due to several limitations in JUnit 4 (such as monolithic architecture or impossibility to compose JUnit runners), the JUnit team released a new major version (i.e., JUnit 5) in 2017. JUnit has been redesigned entirely in version 5, following a modular architecture consisting of three components (see in Figure 2-5). The first component is the JUnit Platform, which is the foundation of the whole framework. The goal of the JUnit Platform is two-folded:
-
It allows the discovery and execution (sequential or parallel) of tests in the JVM through the test launcher API. This API is typically used by programmatic clients such as build tools and IDEs.
-
It defines the test engine API for developing tests that run on the JUnit Platform. This API is typically used by frameworks that provide programming models for testing.

Figure 2-5. JUnit 5 architecture
Thanks to the test engine API, third-party test frameworks can execute tests on top of the JUnit Platform. Some examples of existing testing frameworks that have implemented test engines for JUnit 5 are Cucumber or Spock. In addition, JUnit 5 provides two implementations of the test engine API out-of-the-box. These engines are the remaining components of the JUnit 5 architecture, namely:
-
Vintage: test engine that provides backward compatibility with legacy JUnit tests (i.e., versions 3 and 4).
-
Jupiter: test engine that provides a new programming and extension model.
Jupiter is a relevant component of JUnit 5 since it provides a brand-new API to develop tests using a robust programming model. Some of the features of this programming model are:
-
Parameterized tests.
-
Parallel execution.
-
Tagging and filtering.
-
Ordered and tests.
-
Repeated and nested tests.
-
Rich capabilities to disable tests (ignored in execution).
Tip
In this book, you will learn the basics of Jupiter applied to end-to-end testing with Selenium WebDriver. Please check the JUnit 5 documentation for further details.
Like JUnit 4, Jupiter also uses Java annotations to declare test cases. For instance, the annotation to identify methods with testing logic is also @Test. The name of the rest of the annotations for the basic test lifecycle is a bit different in Jupiter: @BeforeAll, @BeforeEach, @AfterEach, and @AfterAll. As you can see in Figure 2-6, each of these annotations follows the same workflow of JUnit 4.

Figure 2-6. JUnit 5 test lifecycle
Thus, the structure of a Jupiter test using Selenium WebDriver and WebDriverManager is quite similar in JUnit 4 and JUnit 5. In addition to the change in the setup and teardown annotation names, the test methods (and their lifecycle) are not required to be public in the Jupiter programming model. Example 2-4 provides an example of a Jupiter test, this time using Edge as the browser.
Example 2-4. Jupiter test skeleton using Selenium WebDriver and WebDriverManager
packageio.github.bonigarcia.webdriver.jupiter.ch2.skeletons;importorg.junit.jupiter.api.AfterEach;importorg.junit.jupiter.api.BeforeAll;importorg.junit.jupiter.api.BeforeEach;importorg.junit.jupiter.api.Test;importorg.openqa.selenium.WebDriver;importorg.openqa.selenium.edge.EdgeDriver;importio.github.bonigarcia.wdm.WebDriverManager;classSkeletonEdgeJupiterTest{privateWebDriverdriver;@BeforeAllstaticvoidsetupClass(){WebDriverManager.edgedriver().setup();}@BeforeEachvoidsetup(){driver=newEdgeDriver();}@AfterEachvoidteardown(){driver.quit();}@Testvoidtest(){// TODO: use variable "driver" to call the Selenium WebDriver API}}
JUnit 5 with Selenium-Jupiter
The extension model of Jupiter allows adding custom features to the default programming model. To that aim, Jupiter provides an API that developers can extend (using interfaces called extension points) to provide custom functionality. The categories of these extension points are the following:
-
Test lifecycle callbacks: to include custom logic in different moments of the test lifecycle
-
Parameter resolution: to implement dependency injection (i.e., parameters injected in test methods or constructors).
-
Test templates: to repeat the tests based on a given context.
-
Conditional test execution: to enable or disable tests depending on custom conditions.
-
Exception handling: to manage Java exceptions during the test and its lifecycle.
-
Test instance: to create and process test class instances.
-
Intercepting invocations: to intercept calls to test code (and decide whether or not these calls proceed).
As a Jupiter developer, you can implement your custom extension or using the existing ones. Table 2-5 shows some examples of Jupiter extensions.
| Name | Description | License | Maintainer | Website |
|---|---|---|---|---|
JUnit Pioneer |
Extension pack for Jupiter |
EPL 2.0 |
JUnit Pioneer team |
|
MockitoExtension |
Jupiter extension for initializing mocks and handling stubbings |
MIT |
Mockito team |
|
QuickPerf |
Library for evaluating some performance-related properties |
Apache 2.0 |
QuickPerf team |
|
Selenium-Jupiter |
Jupiter extension for Selenium WebDriver |
Apache 2.0 |
Boni García |
|
SpringExtension |
Jupiter extension for the Spring Framework |
Apache 2.0 |
Pivotal Software |
Selenium-Jupiter is an attractive option in the context of this book since it enables using Selenium WebDriver in Jupiter tests seamlessly. The bases of Selenium-Jupiter are the following:
-
Reduced boilerplate code in test cases. Thanks to the parameter resolution feature provided by the Jupiter programming model, Selenium-Jupiter allows declaring an object of the
WebDriverhierarchy (e.g.,ChromeDriver,FirefoxDriver, etc.) to control web browsers from tests as a constructor or test parameters. -
Automated driver management through WebDriverManager. Thanks to the test lifecycle callbacks provided by the extension model, the usage of WebDriverManager is entirely transparent for Selenium-Jupiter users.
-
Advanced capabilities for end-to-end testing. For instance, seamless integration with Docker, test templates (for cross-browser testing), or troubleshooting and monitoring capabilities (e.g., session recordings or configurable screenshots).
Example 2-4 provides the structure of a test using JUnit 5 and Selenium-Jupiter. As you can see, to use Selenium-Jupiter, first, you need to declare its usage in a Jupiter test using the annotation @ExtendWith. Then, you need to select a type of the WebDriver hierarchy (FirefoxDriver in this example) and declare it as a test (or constructor) parameter. Internally, Selenium-Jupiter resolves the proper driver (geckodriver in this example) using WebDriverManager and instantiates the WebDriver object before each test. Finally, when the test finishes, Selenium-Jupiter disposes of the WebDriver object gracefully.
Example 2-5. Selenium-Jupiter test skeleton
packageio.github.bonigarcia.webdriver.seljup.ch2.helloworld;importorg.junit.jupiter.api.Test;importorg.junit.jupiter.api.extension.ExtendWith;importorg.openqa.selenium.firefox.FirefoxDriver;importio.github.bonigarcia.seljup.SeleniumJupiter;@ExtendWith(SeleniumJupiter.class)classSkeletonFirefoxSelJupTest{@Testvoidtest(FirefoxDriverdriver){// TODO: use variable "driver" to call the Selenium WebDriver API}}
TestNG
The last unit testing framework I use in this book is TestNG. Some of the more significant features that provide TestNG are the following:
-
It provides parallel execution of tests.
-
It allows assigning priority to tests.
-
It allows the grouping of tests.
-
It supports parameterizing tests.
-
It allows data-driven testing using custom annotations.
-
It provides a rich set of assertions.
-
It enables the creation of detailed HTML reports.
In the same way as JUnit 4 and Jupiter, TestNG also use Java annotations to declare tests and their lifecycle (i.e., what happens before and after each test). Again, the annotation @Test is used to designate test methods. Then, it provides the annotations @BeforeClass and @BeforeMethod to specify the test setup, and @AfterMethod and @AfterClass for the teardown (see Figure 2-7). In addition, TestNG allows to group the tests contained in Java classes using the following terminology:
-
Suite, which consists of one or more tests.
-
Test, which consists of one or more classes.
-
Class, which is a Java class with testing method(s), e.g., annotated with
@Test.
Following this notation, and as represented in Figure 2-7, TestNG provides additional annotations to execute custom logic before and after the suite and the test(s).

Figure 2-7. TestNG test lifecycle
All in all, the structure of a test using TestNG, Selenium WebDriver, and WebDriverManager, is again quite similar to the JUnit 4 and Jupiter tests. Example 2-6 shows a test skeleton using TestNG and Chrome.
Example 2-6. TestNG skeleton using Selenium WebDriver and WebDriverManager
packageio.github.bonigarcia.webdriver.testng.ch2.mainbrowsers;importorg.openqa.selenium.WebDriver;importorg.openqa.selenium.chrome.ChromeDriver;importorg.testng.annotations.AfterMethod;importorg.testng.annotations.BeforeClass;importorg.testng.annotations.BeforeMethod;importorg.testng.annotations.Test;importio.github.bonigarcia.wdm.WebDriverManager;publicclassSkeletonChromeNGTest{privateWebDriverdriver;@BeforeClasspublicvoidsetupClass(){WebDriverManager.chromedriver().setup();}@BeforeMethodpublicvoidsetup(){driver=newChromeDriver();}@AfterMethodpublicvoidteardown(){driver.quit();}@Testpublicvoidtest(){// TODO: use variable "driver" to call the Selenium WebDriver API}}
Fluent Assertions
As introduced in Chapter 1, there are different libraries for assertions. These libraries typically provide a rich set of fluent assertions and comprehensive error messages in case of failure. Among these alternatives, I use the library AssertJ in the examples repository. The reason is two-folded. First, we can select the available methods for quickly asserting data using the typical autocompletion feature in IDEs (typically available typically using Ctrl + space after the static method assertThat). Figure 2-8 shows an example about the inspection of this method using an IDE (Eclipse in this example).

Figure 2-8. Manual inspection of the available assertion methods in AssertJ using Eclipse
The second advantage of AssertJ compared to other options is that it allows assertions chain. Thanks to this, we can concatenate several assertions in the same line, for instance, as follows:
importstaticorg.assertj.core.api.Assertions.assertThat;intsum=1+1;assertThat(sum).isGreaterThan(1).isLessThan(3);
Logging
Finally, I recommend using a logging library to write traces from your Java code. As you may know, logging is a simple way programmers track events when some software executes. Logging is typically carried out by writing text messages into a file or the standard output, and it allows you to trace programs and diagnose problems. Today, it is a common practice to use specific libraries to do logging effectively. These libraries provide different benefits, such as the level of granularity for messages (e.g., debug, warning, or error), timestamping, or configuration capabilities. Particularly, I use two logging libraries in the examples repository:
-
Logback. It is the actual logging framework (also called logger). Logback is used by many relevant Java projects, such as the Spring Framework and Groovy, to name a couple.
-
Simple Logging Facade for Java (SLF4J). It is a popular utility based on the facade design pattern that decouples the underlying logger. It supports the main logging frameworks (e.g., Logback, Log4j, or SimpleLogger, among others). As summarized in Table 2-6, SLF4J defines six logging levels depending on the severity of the message.
| Log level | Description |
|---|---|
|
Used to report flaws in our application. |
|
Something unexpected happened, but it does not affect the expected application behavior. |
|
Informative messages, such as the application entered a given state, etc. |
|
Information for diagnosing and troubleshooting. |
|
Finest-grained information. We use this level only in exceptional cases where we need a complete understanding of what is happening in our application. |
As usual, to use these libraries, we need to resolve the corresponding dependencies (see next section for details in Maven and Gradle). Then, we need to configure Logback properly. For that, we need to include an XML configuration file in our project classpath. If we are configuring the logging for the whole project (i.e., application plus test logic), the name of this file should be logback.xml. In this case, it should be available within the application resources, typically under the src/main/resources folder (see next section for further information about the project layout). If we are logging only for tests, the name of the configuration file is logback-test.xml and is stored within the tests resources (e.g., in src/test/resources folder).
The syntax in both cases (logback.xml and logback-test.xml) is the same. Example 2-7 shows an example of configuration file. This XML file sets the pattern for each logging line, composed by the timestamp, the thread name, the trace level, the source (package, class name, and code line), and the message. In this example, INFO is the default logging level. This way, every trace of this level or more severe (i.e., WARN, ERROR, and FATAL) is displayed, but not the following (i.e., DEBUG, and TRACE). In addition, the traces from the package io.github.bonigarcia (used in the test examples, WebDriverManager, and Selenium-Jupiter) is DEBUG
Example 2-7. Logback configuration file
<?xml version="1.0" encoding="UTF-8"?><configuration><appendername="STDOUT"class="ch.qos.logback.core.ConsoleAppender"><encoder><pattern>%d{yyyy-MM-dd HH:mm:ss} [%thread] %-5level %logger{36}.%M(%line) - %msg%n</pattern></encoder></appender><loggername="io.github.bonigarcia"level="DEBUG"/><rootlevel="INFO"><appender-refref="STDOUT"/></root></configuration>
The final step is using a variable for logging in our Java classes. To that aim, we can use the code of Example 2-8. This snippet provides a handy way to get the current class using reflection through the method lookup(). Then, we declare the variable for logging (called log in this example) and using the SLF4J’s method getLogger(). Finally, we can use the variable log in any method of this class to log messages of different levels.
Example 2-8. Logback configuration file
importstaticjava.lang.invoke.MethodHandles.lookup;importstaticorg.slf4j.LoggerFactory.getLogger;importorg.slf4j.Logger;staticfinalLoggerlog=getLogger(lookup().lookupClass());log.info("This is an informative message");
Project Setup
Build tools are software utilities used to automate the creation of executable applications from source code. These tools ease the project management in terms of dependency management, testing, or release. Overall, build tools are a convenient way to automate the development of software projects, both in build servers (e.g., GitHub actions) and developer machines. Therefore, I highly recommend using a build tool to set up your project. The alternatives we cover in this book are Maven and Gradle.
Maven is an open-source build automation tool maintained by the Apache Software Foundation. It is used primarily for Java projects, although it also supports other languages such as C#, Ruby, or Scala. Similarly, Gradle is another open-source build automation tool for software development. It supports Java and other languages such as Kotlin, Groovy, Scala, C/C++, or JavaScript.
Project Layout
The project layout is the directory structure used to store the different assets of a software project (e.g., source code, binary files, static resources, and so on). Both Maven and Gradle use an equivalent layout for Java projects. Thanks to this, we can execute the examples repository with both build tools.
As you can see in Figure 2-9, the following set of folders (labeled as scaffolding folders) are identical in both build tools:
-
src/main/java: Application source code (i.e., Java files). -
src/main/resources: Application resources files (such as properties, configuration files, etc.). -
src/test/java: Test source code (i.e., Java files used for testing). -
src/test/resources: Test resources files (i.e., additional assets used for testing).

Figure 2-9. Project layout in Maven and Gradle
The rest of the project layout is different in both build tools. The first difference is the configuration file. On the one hand, this file is unique and called pom.xml (Project Object Model) in Maven. On the other hand, there are two files in Gradle for configuration, called settings.gradle and build.gradle.
The second difference between Maven and Gradle is the output folder. In both cases, the build tools created this folder to save the resulting build (i.e., compiled classes, resulting packaged files, etc.) The name of this folder is target in Maven and build in Gradle.
Finally, Gradle contains a set of folders and files for the so-called Gradle wrapper. This wrapper is a script file (called gradlew for Unix-like systems and gradlew.bat for Windows) that provides the following benefits:
-
Build a project without the need to install Gradle on the local machine.
-
Force to use a given version (which can be different from the locally installed instance of Gradle).
-
Upgrade to a new version easily by changing the wrapper artifacts (in folder
gradle/wrapper).
Note
It is out of the scope of this book to explain all the features provided by Maven and Gradle. In the rest of this section, you will find the configuration details for the examples repository, which should be sufficient for standard projects using Selenium WebDriver. For further information, read the official Maven and Gradle documentation.
Examples Repository Layout
The example repository is a vital ingredient of this book since it contains all the covered examples. Furthermore, it has the complete configuration of Maven and Gradle. Figure 2-10 shows the schematic representation of the examples repository layout. Since I am providing each example in four flavors (JUnit 4, JUnit 5, JUnit 5 plus Selenium-Jupiter, and TestNG), the configuration in both Maven and Gradle is based on multi-projects. This way, the examples repository has four modules, each one per testing framework, namely: selenium-webdriver-junit4, selenium-webdriver-junit5, selenium-webdriver-junit5-seljup, and selenium-webdriver-testng. In Maven, the multi-project setup is in the pom.xml located in the root folder, while in the file settings.gradle in Gradle.

Figure 2-10. Layout of the examples repository (hosted on GitHub)
As you can see in Figure 2-10, each module has the same structure. You can find the test source code in the folder src/test/java. I use Java packages to divide the examples per chapter (e.g., io.github.bonigarcia.webdriver.junit4.ch2.skeletons). Then, each project needs its own Logback configuration file. Although these subprojects do not contain application logic (only tests), I use the general configuration file (i.e., logback.xml) placed under the folder src/main/resources. I follow this convention since it is quite usual to use logging also for the application, and in case you plan to reuse this project structure, this is the standard approach. Finally, at the root of each subproject, you can find the specific configuration file for Maven (pom.xml) and Gradle (build.gradle). In these files, you can find the declaration for the dependencies, as explained below.
Dependencies Management
Among other features, build tools enable the automated management of the project dependencies. To that aim, we need to specify the coordinates of such dependencies in the project configuration file (see the following subsections for specifics on Maven and Gradle). The coordinates of a Java project are a group of three labels that univocally identify this project (e.g., a library, plugin, etc.), namely:
-
groupId: Organization, company, person, etc., that created the project. -
artifactId: Unique name that identifies the project. -
version: Particular release of the project. By default, I recommend you use the latest version of every release. For that reason, I use Dependabot to maintain these versions automatically.
The following subsections explain how to configure your project both for Maven and Gradle. This configuration includes the dependencies declaration and other project aspects. In addition, the final part of this section explains how to configure a build server (GitHub actions, since I use it in the GitHub repository) to build and test the project following a CI approach.
Maven Configuration
A core concept in Maven is the build lifecycle, which is the name given to the process of building and distributing a particular project. There are three standard build lifecycles in Maven: default (for project deployment), clean (for project cleaning), and site (for documentation). These build lifecycles have a list of build phases, wherein each phase represents a stage in the lifecycle. The primary phases of the default lifecycle are the following:
-
validate: assess the project is correct and all necessary information is available. -
compile: compile the source code. -
test: execute test using a unit testing framework. -
package: bundle the compiled code into a distributable format, such as a Java ARchive (JAR) file. -
verify: execute further tests (typically integration or other high-level tests). -
install: install the package into the local repository. -
deploy: install the package into a remote repository or server.
We can use the shell to invoke Maven, using the command mvn. For instance, the following command invokes the clean lifecycle (i.e., clean the target folder and all its content) and then, it invoke in cascade all the phases of the default lifecycle until package (i.e., validate, compile, test, and finally, package):
mvn clean package
Another core element in Maven is the concept of plugin. A plugin is a built-in artifact aimed to execute the abovementioned phases. In this book, we are particularly interested in testing. Therefore, we focus on the phases test and verify and their corresponding plugins: maven-surefire-plugin and maven-failsafe-plugin respectively. Table 2-7 summarizes the main differences between these two plugins.
maven-surefire-plugin |
maven-failsafe-plugin |
|
|---|---|---|
Description |
Maven plugin to execute tests before packaging |
Maven plugin to execute tests after packaging |
Classical usage |
Unit tests |
Integration (and other high-level) tests |
Basic command |
|
|
Type |
Default plugin (i.e., we can use it without declaring it in the |
Not default plugin (i.e., we need to declare it in the |
Used version |
Defined internally in Maven |
Latest available version |
Test name pattern |
|
|
For simplicity, I use only maven-surefire-plugin for executing tests in the examples repository. Although these tests are not unit (in fact, they are end-to-end), it is not a problem to run them with maven-surefire-plugin (i.e., after compilation and before packaging). This way, Table 2-8 summarizes the basic commands to run tests from the shell using this plugin.
| Command | Description |
|---|---|
|
Run all tests in the project |
|
Run all tests in a single class |
|
Run a single test in a single class |
Nevertheless, if you want to use maven-failsafe-plugin to execute tests, first, you need to follow the class pattern name explained in Table 2-8 (e.g., Java classes ending in with IT.java). Then, you need to copy the setup contained in Example 2-9 in your pom.xml file. Finally, you can execute the tests using the command mvn verify (i.e., run tests after packaging).
Example 2-9. Required Maven configuration for using maven-failsafe-plugin
<build><plugins><plugin><groupId>org.apache.maven.plugins</groupId><artifactId>maven-failsafe-plugin</artifactId><executions><execution><goals><goal>integration-test</goal><goal>verify</goal></goals></execution></executions></plugin></plugins></build>
Common Setup
Example 2-10 contains the common part of the Maven configuration.
Example 2-10. Common Maven dependencies in the examples repository
<properties><java.version>11</java.version><maven.compiler.target>${java.version}</maven.compiler.target><maven.compiler.source>${java.version}</maven.compiler.source></properties><dependencies><dependency><groupId>org.slf4j</groupId><artifactId>slf4j-api</artifactId><version>${slf4j.version}</version></dependency><dependency><groupId>ch.qos.logback</groupId><artifactId>logback-classic</artifactId><version>${logback.version}</version></dependency><dependency><groupId>org.seleniumhq.selenium</groupId><artifactId>selenium-java</artifactId><version>${selenium.version}</version><scope>test</scope></dependency><dependency><groupId>org.assertj</groupId><artifactId>assertj-core</artifactId><version>${assertj.version}</version><scope>test</scope></dependency><dependency><groupId>io.github.bonigarcia</groupId><artifactId>webdrivermanager</artifactId><version>${wdm.version}</version><scope>test</scope></dependency></dependencies>
The Java version for this project (
11in this case).The common dependencies. On the one hand, we declare Selenium WebDriver, AssertJ, and WebDriverManager using the
testscope. This way, we can use these dependencies only from the test logic (i.e., Java classes under thesrc/test/javafolder). On the other hand, the scope of SLF4J and Logback is missing, and therefore, Maven uses the default one, which iscompile. This fact means we can use these dependencies both from the application and the test logic. Finally, notice we use Maven properties to declare the dependencies versions (e.g.,${selenium.version}). You can find the precise version in the online repository.
JUnit 4
In a Maven project using JUnit 4 as the unit testing framework, we need to declare also the following dependency:
<dependency><groupId>junit</groupId><artifactId>junit</artifactId><version>${junit4.version}</version><scope>test</scope></dependency>
JUnit 5
Although JUnit 5 is a modular framework, we can declare a single dependency to use the Jupiter programming model in a Maven project. As you can see in ???, this artifact is called junit-jupiter, and it transitively pulls the following JUnit 5’s artifacts:
-
junit-jupiter-api: For developing tests. -
junit-jupiter-engine: For executing tests in the JUnit Platform. -
junit-jupiter-params: For developing parameterized tests (see Chapter 4).
Besides, we need to declare a specific version of maven-surefire-plugin. As explained in Table 2-7, the version used for this plugin is defined internally by Maven. In Maven 3.x, this version is not compatible with JUnit 5, and therefore, we need to specify a newer version, as you can see next.
<dependencies><dependency><groupId>org.junit.jupiter</groupId><artifactId>junit-jupiter</artifactId><version>${junit5.version}</version><scope>test</scope></dependency></dependencies><build><plugins><plugin><groupId>org.apache.maven.plugins</groupId><artifactId>maven-surefire-plugin</artifactId><version>${maven-surefire-plugin.version}</version></plugin></plugins></build>
JUnit 5 with Selenium-Jupiter
When using Jupiter in conjunction with Selenium-Jupiter, in addition to the previous artifacts (junit-jupiter and maven-surefire-plugin), we need to include the coordinates of Selenium-Jupiter (see below). In this case, we can remove the coordinates of WebDriverManager since Selenium-Jupiter transitively pulls it.
<dependency><groupId>io.github.bonigarcia</groupId><artifactId>selenium-jupiter</artifactId><version>${selenium-jupiter.version}</version><scope>test</scope></dependency>
TestNG
Finally, the coordinates we need to include in our pom.xml to use TestNG are the following:
<dependency><groupId>org.testng</groupId><artifactId>testng</artifactId><version>${testng.version}</version><scope>test</scope></dependency>
Gradle Configuration
Each Gradle project is composed of several tasks. Each task represents an atomic piece of work within the build. Typical examples of tasks in a Java project are:
-
compileJava: Compiles the application logic (i.e., Java classes in the foldersrc/main/java). -
processResources: Copies the application resources (i.e., files in the foldersrc/main/resources) into the output folder (build). -
compileTestJava: Compiles the test logic (i.e., Java classes in the foldersrc/test/java). -
processTestResources: Copies the test resources (i.e., files in the foldersrc/test/resources) into the output folder. -
test: Runs the tests using JUnit or TestNG. Table 2-9 summarizes common commands to run Gradle tests using the shell. -
clean: Deletes the project output folder and its content.
| Command | Description |
|---|---|
|
Run all tests in the project |
|
Run all tests in the project (even if everything is up-to-date) |
|
Run all tests in a single class |
|
Run a single test in a single class |
Example 2-11 contains the common configuration for all the subprojects of the examples repository. I explain the relevant parts of this snippet next.
Example 2-11. Common setup for Gradle projects
applyplugin:"java"compileTestJava{sourceCompatibility=11targetCompatibility=11options.compilerArgs+="-parameters"}test{testLogging{events"passed","skipped","failed"showStandardStreams=true}systemPropertiesSystem.properties}repositories{mavenCentral()}dependencies{implementation("org.slf4j:slf4j-api:${slf4jVersion}")implementation("ch.qos.logback:logback-classic:${logbackVersion}")testImplementation("org.seleniumhq.selenium:selenium-java:${seleniumVersion}")testImplementation("org.assertj:assertj-core:${assertjVersion}")testImplementation("io.github.bonigarcia:webdrivermanager:${wdmVersion}")}
Since we are implementing a Java project, we need to declare the
javaplugin.For compiling the tests, we specify the Java version to be used (
11in this case).Although not mandatory, we force writing the test logs in the standard output.
This allows passing Java system properties in the command line (as explained in Example 2-1 at the beginning of this chapter).
We use Maven Central to pull dependencies.

The common dependencies are Selenium WebDriver, AssertJ, WebDriverManager (for tests), and SLF4J and Logback (for the whole project).
JUnit 4
The specific dependency for JUnit 4 is the following:
dependencies{testImplementation("junit:junit:${junit4Version}")}
JUnit 5
When using JUnit 5, we need to specify the junit-jupiter artifact (like in Maven, it depends on junit-jupiter-api junit-jupiter-engine, and junit-jupiter-params). In addition, the need to select the JUnit Platform for executing by using the clause useJUnitPlatform() in the test task setup.
test{useJUnitPlatform()}dependencies{testImplementation("org.junit.jupiter:junit-jupiter:${junit5Version}")}
JUnit 5 with Selenium-Jupiter
If we use Selenium-Jupiter, in addition to the previous configuration for JUnit 5, we need to include the following dependency. In this case, we can remove WebDriverManager since it is pulled transitively by Selenium-Jupiter.
dependencies{testImplementation("io.github.bonigarcia:selenium-jupiter:${selJupVersion}")}
TestNG
Finally, for using TestNG as the unit testing framework, we need to include the following dependency:
dependencies{testImplementation("org.testng:testng:${testNgVersion}")}
GitHub Actions Configuration
I use GitHub Actions as the CI server for the examples repository. This way, each time I commit a new change to the repo, GitHub Actions build the project and executes all the tests. Example 2-12 shows the configuration to carry out this process.
Example 2-12. GitHub Actions workflow configuration
name:buildon:push:branches:[master]pull_request:branches:[master]env:DISPLAY::99WDM_GITHUBTOKEN:${{secrets.WDM_GITHUBTOKEN}}jobs:tests:runs-on:${{matrix.os}}strategy:matrix:os:[ubuntu-latest,windows-latest,macos-latest]java:['11']steps:-name:CheckoutGitHubrepouses:actions/checkout@v2-name:SetupJavauses:actions/setup-java@v2with:distribution:'adopt'java-version:${{matrix.java}}-name:StartXvfbrun:Xvfb:99&-name:TestwithMavenrun:mvn-Btest-name:TestwithGradlerun:./gradlewtest
The events that trigger the workflow are
push(new commits in the repository) andpull_request(commits proposed by other developers).Two environment variables are required:
-
DISPLAY: The browsers controlled by Selenium WebDriver, by default, need to be executed in an operating system with a graphical system. On the other side, the Linux distributions available in GitHub Actions are headless (i.e., without a graphical user interface). Thus, we use Xvfb (X virtual framebuffer) to run WebDriver tests on these Linux distributions. Xvfb is an in-memory display server for Unix-like systems that requires the declaration of the environment variableDISPLAYwith the screen number for the graphical system in Linux (X11). -
WDM_GITHUBTOKEN: GitHub hosts some of the drivers requited by Selenium WebDriver (e.g., geckodriver or operadriver). When external clients (like WebDriverManager) make many consecutive requests to GitHub, it eventually returns an HTTP error response (403, forbidden) due to its rate limit. To avoid this problem, WebDriverManager can make authenticated requests using a personal access token. Figure 2-11 shows the permissions granted to this token in the examples repository. All in all, this environment variable exports the value of this token. I keep the actual value of this token as a GitHub repository secret.
-
For the sake of completeness, I execute the workflow in three different operating systems: Ubuntu (i.e., Linux), Windows, and Mac OS, using Java 11 in all of them.
The workflow has five steps:
-
Check out the repository.
-
Set up Java 11 using AdoptOpenJDK.
-
Start X virtual framebuffer.
-
Run all tests with Maven.
-
Run all tests with Gradle.
-
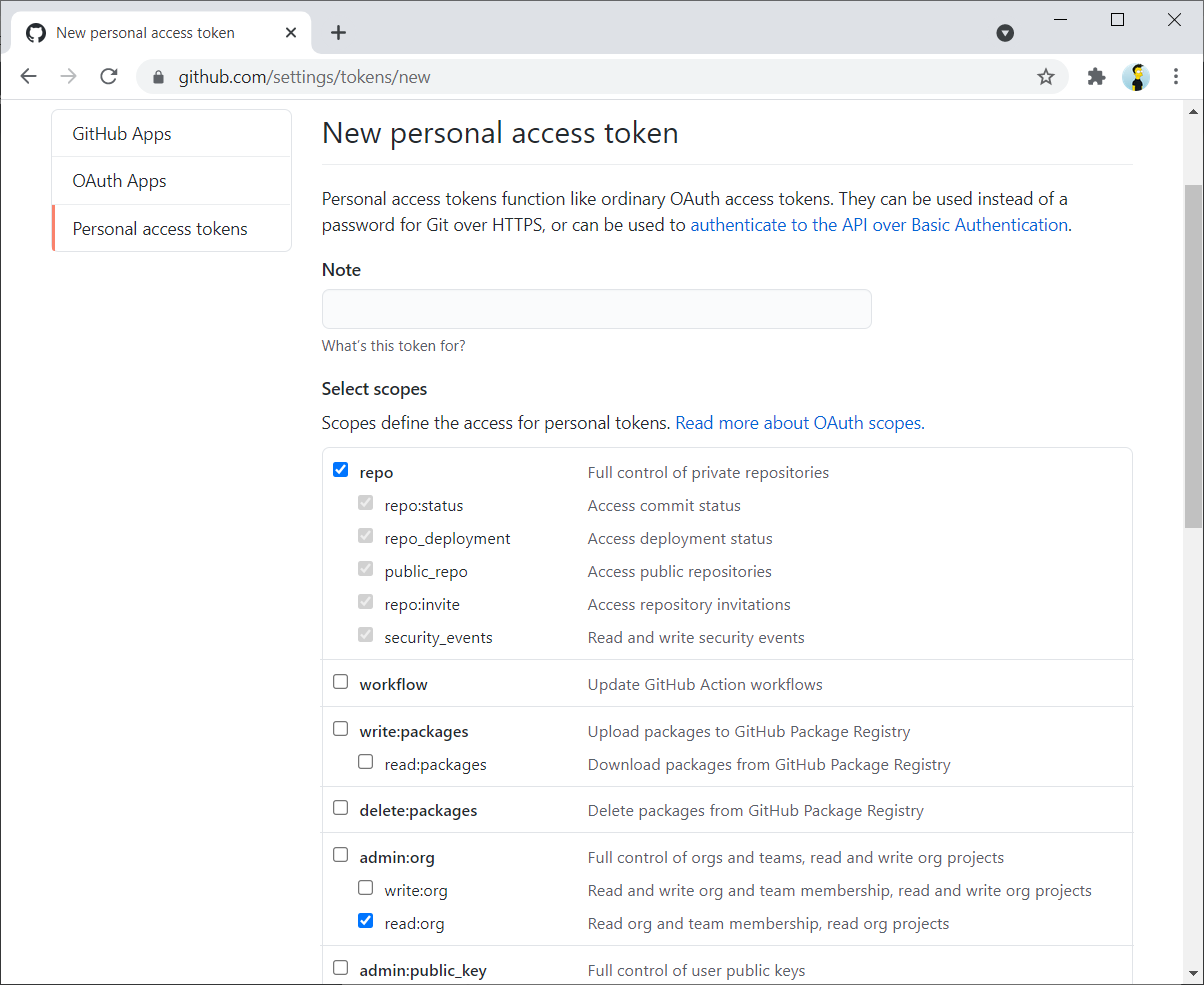
Figure 2-11. Permissions of the GitHub personal access token used in the examples repository
Hello World
We are ready to put all the pieces explained in this chapter together and implement our first end-to-end test. As you may know, a hello world program is a simple piece of code that many programming languages use to illustrate its basic syntax. Following this approach, Example 2-13 shows the Selenium WebDriver’s version of this classic hello world.
Tip
The following example uses JUnit 5 as the unit testing framework to embed the call to Selenium WebDriver. Remember that you can find the other flavors (i.e., JUnit 4, JUnit 5 with Selenium-Jupiter, and TestNG) in the examples repository.
Example 2-13. Hello World using Chrome and JUnit 5
packageio.github.bonigarcia.webdriver.jupiter.ch2.helloworld;importstaticjava.lang.invoke.MethodHandles.lookup;importstaticorg.assertj.core.api.Assertions.assertThat;importstaticorg.slf4j.LoggerFactory.getLogger;importorg.junit.jupiter.api.AfterEach;importorg.junit.jupiter.api.BeforeAll;importorg.junit.jupiter.api.BeforeEach;importorg.junit.jupiter.api.Test;importorg.openqa.selenium.WebDriver;importorg.openqa.selenium.chrome.ChromeDriver;importorg.slf4j.Logger;importio.github.bonigarcia.wdm.WebDriverManager;classHelloWorldChromeJupiterTest{staticfinalLoggerlog=getLogger(lookup().lookupClass());privateWebDriverdriver;@BeforeAllstaticvoidsetupClass(){WebDriverManager.chromedriver().setup();}@BeforeEachvoidsetup(){driver=newChromeDriver();}@AfterEachvoidteardown(){driver.quit();}@Testvoidtest(){// ExerciseStringsutUrl="https://bonigarcia.dev/selenium-webdriver-java/";driver.get(sutUrl);Stringtitle=driver.getTitle();log.debug("The title of {} is {}",sutUrl,title);// VerifyassertThat(title).isEqualTo("Hands-on Selenium WebDriver with Java");}}
In the class setup (executed once per class), we use WebDriverManager to manage chromedriver (since we use Chrome in this test).
In the test setup (executed once per test method), we instantiate the
WebDriverobject to control Chrome. In other words, we create an object of the typeChromeDriver.The test exercises the SUT. To that aim, first, we open a website application hosted on GitHub Pages using the
get()method of ourwebdrivervariable (which represents a Chrome browser, in this case). Then, we get the web page title using the methodgetTitle(). For debugging purposes, we log that title using theDEBUGlevel.The last part of the test contains an AssertJ assertion. In this case, we verify the web page title is as expected.
Finally, we close the browser gracefully in the test teardown.
You can execute this test in different ways. For instance, you can use the shell and Maven (as explained in Table 2-8) or Gradle (Table 2-9). In addition, IDEs provide built-in capabilities to execute the test from its GUI. For instance, Figure 2-12 shows a screenshot of the execution of the previous hello world test in Eclipse (in this case, using the command Run → Run As → JUnit Test). Notice that in the integrated console (at the bottom of the picture), the first traces correspond to the driver resolution by WebDriverManager, Then, the browser starts through chromedriver, and finally, we can see the test traces (concretely, the web page title).
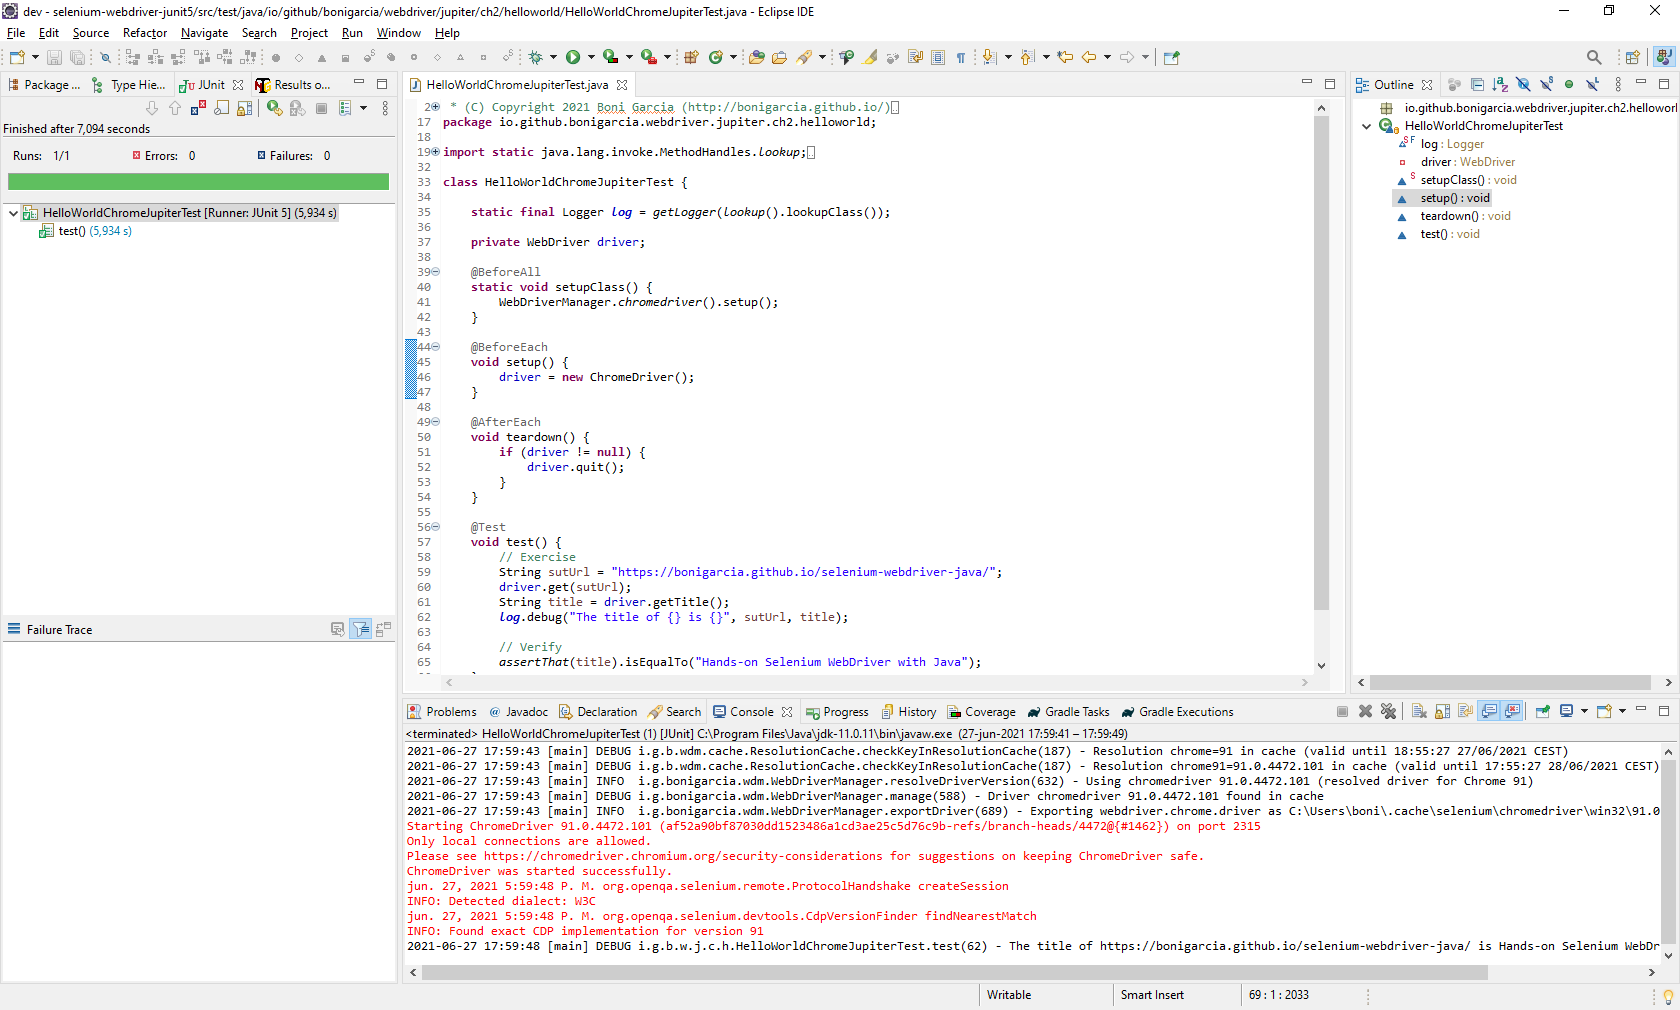
Figure 2-12. Screenshot of the execution of the Selenium WebDriver’s hello world in Eclipse
The hello world versions using JUnit 4 and TestNG are almost identical to JUnit 5 but using different annotations for the test lifecycle (e.g., JUnit 4’s @Before instead of JUnit 5’s @BeforeEach, etc.). Regarding JUnit 5 plus Selenium-Jupiter, the code is a bit more compact. Example 2-14 shows this hello world version. As you can see, there is no need to declare the setup and teardown. We simply need to declare the WebDriver object we want as a test parameter (FirefoxDriver in this case), and Selenium-Jupiter takes care of the driver management (also with WebDriverManager), object instantiation, and browser disposal. Notice that the test logic is the same as the example before.
Example 2-14. Hello World using Firefox and Selenium-Jupiter
packageio.github.bonigarcia.webdriver.seljup.ch2.helloworld;importstaticjava.lang.invoke.MethodHandles.lookup;importstaticorg.assertj.core.api.Assertions.assertThat;importstaticorg.slf4j.LoggerFactory.getLogger;importorg.junit.jupiter.api.Test;importorg.junit.jupiter.api.extension.ExtendWith;importorg.openqa.selenium.firefox.FirefoxDriver;importorg.slf4j.Logger;importio.github.bonigarcia.seljup.SeleniumJupiter;@ExtendWith(SeleniumJupiter.class)classHelloWorldFirefoxSelJupTest{staticfinalLoggerlog=getLogger(lookup().lookupClass());@Testvoidtest(FirefoxDriverdriver){// ExerciseStringsutUrl="https://bonigarcia.dev/selenium-webdriver-java/";driver.get(sutUrl);Stringtitle=driver.getTitle();log.debug("The title of {} is {}",sutUrl,title);// VerifyassertThat(title).isEqualTo("Hands-on Selenium WebDriver with Java");}}
Using Additional Browsers
In addition to what I am calling main browsers in this book (i.e., Chrome, Edge, and Firefox), the example repository contains the hello world test using other browsers: Opera, Chromium, and Safari. These tests, contained in the package helloworld_otherbrowsers of this repository, are slightly different from the raw hello world versions. For instance, Example 2-15 shows the JUnit 4’s version of the hello world using Opera. Since this browser might not be available in the machine running the test (e.g., Opera is not available in GitHub Actions), I use assumptions to conditionally disabling the test during its execution (otherwise, the test fails when the browser is unavailable). You can find the logic to do that in the class setup method, in which we use WebDriverManager to locate the browser path. If this path does not exist, we assume the browser is not installed in the system, and therefore the test is skipped. As you can see, I use the AssertJ static method assumeThat to implement this assumption.
Example 2-15. Hello World using Opera and JUnit 4
packageio.github.bonigarcia.webdriver.junit4.ch2.helloworld_otherbrowsers;importstaticjava.lang.invoke.MethodHandles.lookup;importstaticorg.assertj.core.api.Assertions.assertThat;importstaticorg.assertj.core.api.Assumptions.assumeThat;importstaticorg.slf4j.LoggerFactory.getLogger;importjava.nio.file.Path;importjava.util.Optional;importorg.junit.After;importorg.junit.Before;importorg.junit.BeforeClass;importorg.junit.Test;importorg.openqa.selenium.WebDriver;importorg.openqa.selenium.opera.OperaDriver;importorg.slf4j.Logger;importio.github.bonigarcia.wdm.WebDriverManager;publicclassHelloWorldOperaJUnit4Test{staticfinalLoggerlog=getLogger(lookup().lookupClass());privateWebDriverdriver;@BeforeClasspublicstaticvoidsetupClass(){Optional<Path>browserPath=WebDriverManager.operadriver().getBrowserPath();assumeThat(browserPath).isPresent();WebDriverManager.operadriver().setup();}@Beforepublicvoidsetup(){driver=newOperaDriver();}@Afterpublicvoidteardown(){driver.quit();}@Testpublicvoidtest(){// Same test logic than other "hello world" tests}}
As usual, you can find this test using others unit testing frameworks in the examples repository. The JUnit 5 and TestNG versions are almost identical to Example 2-15. Nevertheless, there is a significant difference when using JUnit 5 plus Selenium-Jupiter related to the assumption. As you can see in Example 2-16, Selenium-Jupiter simplifies the assumption logic by using a custom annotation (called EnabledIfBrowserAvailable) to disable tests conditionally depending on the browser availability (Safari in this case).
Example 2-16. Hello World using Safari and JUnit 5 plus Selenium-Jupiter
packageio.github.bonigarcia.webdriver.seljup.ch2.helloworld_otherbrowsers;importstaticio.github.bonigarcia.seljup.Browser.SAFARI;importstaticjava.lang.invoke.MethodHandles.lookup;importstaticorg.assertj.core.api.Assertions.assertThat;importstaticorg.slf4j.LoggerFactory.getLogger;importorg.junit.jupiter.api.Test;importorg.junit.jupiter.api.extension.ExtendWith;importorg.openqa.selenium.safari.SafariDriver;importorg.slf4j.Logger;importio.github.bonigarcia.seljup.EnabledIfBrowserAvailable;importio.github.bonigarcia.seljup.SeleniumJupiter;@EnabledIfBrowserAvailable(SAFARI)@ExtendWith(SeleniumJupiter.class)classHelloWorldSafariSelJupTest{staticfinalLoggerlog=getLogger(lookup().lookupClass());@Testvoidtest(SafariDriverdriver){// Same test logic than other "hello world" tests}}
Legacy Browsers
Although not recommended, it is possible to drive legacy browsers (such as Internet Explorer, PhantomJS, and HtmlUnit) with Selenium WebDriver. The following table summarizes the Java system properties (for manual driver management), the WebDriverManager calls (for automatic driver management), and the required dependencies (if any) to use these legacy browsers.
| Browser | Java system property | WebDriverManager call | Dependency |
|---|---|---|---|
Internet Explorer |
|
|
Not required |
PhantomJS |
|
|
|
HtmlUnit |
Not required |
Not required |
|
Summary and Outlook
This chapter provides the foundations for developing end-to-end tests for web applications using Selenium WebDriver and Java as language. The first important decision you need to take is to decide which unit testing framework to embed the Selenium WebDriver calls to implement these tests. For the sake of diversity, I propose four options in this book: JUnit 4, JUnit 5, JUnit 5 plus Selenium-Jupiter, and TestNG. They are all equivalent in the eyes of Selenium WebDriver. If you have no clear idea of which unit testing framework you should use, please continue reading. In the following chapters, you will discover some differences that can help you decide one or another based on your needs or preferences. Another decision you should make is to choose a build tool. In this book, I propose two options: Maven and Gradle. Once again, both alternatives are similar for standard development practices.
In the next chapter, you start to discover version 4 of the Selenium WebDriver API. This chapter covers the fundamental notions of automated web navigation: approaches for loading web pages, basic actions, browser disposal, or location and waiting strategies. As usual, each example will be available on the examples repository hosted in GitHub. My advice is to focus on the unit testing framework and the build tool you prefer to continue practicing with the examples presented in the rest of the book.
1 As usual, you can find this example in the GitHub repository. In addition to this test example, you can find other skeletons in the same package for the other main browsers (Edge and Firefox).