
Chapter 22
Advanced Techniques
WHAT’S IN THIS CHAPTER?
- Using advanced functions
- Tamper-proofing your objects
- Yielding with timers
JavaScript is an incredibly flexible language that can be used in a variety of styles. Typically, JavaScript is used in either a procedural manner or an object-oriented one. The language, however, is capable of much more intricate and interesting patterns because of its dynamic nature. These techniques make use of ECMAScript language features, BOM extensions, and DOM functionality to achieve powerful results.
Functions are one of the most interesting parts of JavaScript. They can be quite simple and procedural in nature, or they can be quite complex and dynamic. Additional functionality can be achieved through the use of closures. Furthermore, function pointers are very easy to work with, since all functions are objects. All of this makes JavaScript functions both interesting and powerful. The following sections outline some of the advanced ways that functions can be used in JavaScript.
Safe Type Detection
JavaScript’s built-in type detection mechanisms aren’t foolproof and, in fact, can sometimes give both false positives and false negatives. The typeof operator, for example, has several quirks that can make it unreliable in detecting certain types of data. Since Safari (through version 4) returns "function" when typeof is applied to a regular expression, it’s difficult to definitively determine if a value is a function.
The instanceof operator is also problematic in that it’s difficult to use when multiple global scopes are present, such as when there are multiple frames. The classic example of this problem, as mentioned in Chapter 5, is attempting to identify an object as an array using the following code:
var isArray = value instanceof Array;
This code returns true only if value is an array and was created in the same global scope as the Array constructor. (Remember, Array is a property of window.) If value is an array from another frame, this code returns false.
Yet another problem with type detection comes when trying to determine if an object is a native implementation or a developer-defined one. This problem came to the forefront as browsers began to natively implement the JSON object. Since many were already using Douglas Crockford’s JSON library, which defined a global JSON object, developers struggled to determine which object was present on the page.
The solution to all of these problems is the same. The native toString() method of Object can be called with any value to return a string in the format “[object NativeConstructorName]”. Each object has an internal [[Class]] property that specifies the constructor name that is returned as part of this string. For example:
alert(Object.prototype.toString.call(value)); //"[object Array]"
Since the native constructor name for arrays is the same regardless of the global context in which it was created, using toString() returns a consistent value. This allows you to create a function such as:
function isArray(value){
    return Object.prototype.toString.call(value) == "[object Array]";
}
The same approach can be used to determine if a value is a native function or regular expression:
function isFunction(value){
    return Object.prototype.toString.call(value) == "[object Function]";
}
function isRegExp(value){
    return Object.prototype.toString.call(value) == "[object RegExp]";
}
Note that isFunction() will return false in Internet Explorer for any functions that are implemented as COM objects rather than native JavaScript functions (see Chapter 10 for further details).
This technique is also largely in use for identifying the native JSON object. The toString() method of Object can’t determine constructor names for nonnative constructors, so any objects that are instances of developer-defined constructors return "[object Object]". Several JavaScript libraries contain code similar to the following:
var isNativeJSON = window.JSON && Object.prototype.toString.call(JSON) ==
"[object JSON]";
Being able to discern the difference between native and nonnative JavaScript objects is very important in web development to ensure you know the available capabilities of an object. This technique can be used on any object to definitively make this determination.
Keep in mind that it’s possible to assign Object.prototype.toString() to a different value. The technique discussed in this section assumes that Object.prototype.toString() is the native version and has not been overwritten by a developer.
Scope-Safe Constructors
Chapter 6 covered the definition and usage of constructors for defining custom objects. You’ll recall that a constructor is simply a function that is called using the new operator. When used in this way, the this object used inside the constructor points to the newly created object instance, as in this example:
function Person(name, age, job){
    this.name = name;
    this.age = age;
    this.job = job;
}

var person = new Person("Nicholas", 29, "Software Engineer");
ScopeSafeConstructorsExample01.htm
In this example, the Person constructor assigns three properties using the this object: name, age, and job. When used with the new operator, a new Person object is created, and the properties are assigned onto it. The problem occurs when the constructor is called without the new operator. Since the this object is bound at runtime, calling Person() directly maps this to the global object (window), resulting in accidental augmentation of the wrong object. For example:
var person = Person("Nicholas", 29, "Software Engineer");
alert(window.name);     //"Nicholas"
alert(window.age);      //29
alert(window.job);      //"Software Engineer"
ScopeSafeConstructorsExample01.htm
Here, the window object has been augmented with the three properties intended for a Person instance, because the constructor was called as a regular function, omitting the new operator. This issue occurs as a result of late binding of the this object, which was resolved to window in this case. Since the name property of window is used to identify link targets and frames, this accidental overwriting of the property could lead to other errors on the page. The solution is to create a scope-safe constructor.
Scope-safe constructors first check to ensure that the this object is an instance of the correct type before applying any changes. If not, then a new instance is created and returned. Consider this example:
function Person(name, age, job){
    if (this instanceof Person){
        this.name = name;
        this.age = age;
        this.job = job;
    } else {
        return new Person(name, age, job);
    }
}

var person1 = Person("Nicholas", 29, "Software Engineer");
alert(window.name);   //""
alert(person1.name);  //"Nicholas"

var person2 = new Person("Shelby", 34, "Ergonomist");
alert(person2.name);  //"Shelby"
ScopeSafeConstructorsExample02.htm
The Person constructor in this code adds an if statement that checks to ensure that the this object is an instance of Person, which indicates that either the new operator was used or the constructor was called in the context of an existing Person instance. In either case, the object initialization continues as usual. If this is not an instance of Person, then the constructor is called again with the new operator and that value is returned. The result is that calling the Person constructor either with or without the new operator returns a new instance of Person, avoiding any accidental property setting on the global object.
There is a caveat to scope-safe constructors. By implementing this pattern, you are locking down the context in which the constructor can be called. If you’re using the constructor-stealing pattern of inheritance without also using prototype chaining, your inheritance may break. Here is an example:
function Polygon(sides){
    if (this instanceof Polygon) {
        this.sides = sides;
        this.getArea = function(){
            return 0;
        };
    } else {
        return new Polygon(sides);
    }
}

function Rectangle(width, height){
    Polygon.call(this, 2);
    this.width = width;
    this.height = height;
    this.getArea = function(){
        return this.width * this.height;
    };
}

var rect = new Rectangle(5, 10);
alert(rect.sides);   //undefined
ScopeSafeConstructorsExample03.htm
In this code, the Polygon constructor is scope-safe, whereas the Rectangle constructor is not. When a new instance of Rectangle is created, it should inherit the sides property from Polygon through the use of Polygon.call(). However, since the Polygon constructor is scope-safe, the this object is not an instance of Polygon, so a new Polygon object is created and returned. The this object in the Rectangle constructor is not augmented, and the value returned from Polygon.call() is not used, so there is no sides property on the Rectangle instance.
This issue resolves itself if prototype chaining or parasitic combination is used with constructor stealing. Consider the following example:
function Polygon(sides){
    if (this instanceof Polygon) {
        this.sides = sides;
        this.getArea = function(){
            return 0;
        };
    } else {
        return new Polygon(sides);
    }
}

function Rectangle(width, height){
    Polygon.call(this, 2);
    this.width = width;
    this.height = height;
    this.getArea = function(){
        return this.width * this.height;
    };
}

Rectangle.prototype = new Polygon();

var rect = new Rectangle(5, 10);
alert(rect.sides);   //2
ScopeSafeConstructorsExample04.htm
In this rewritten code, an instance of Rectangle is also an instance of Polygon, so Polygon.call() works as it should, ultimately adding a sides property to the Rectangle instance.
Scope-safe constructors are helpful in environments where multiple developers are writing JavaScript code to run on the same page. In that context, accidental changes to the global object may result in errors that are often difficult to track down. Scope-safe constructors are recommended as a best practice unless you’re implementing inheritance based solely on constructor stealing.
Lazy Loading Functions
Because of differences in browser behavior, most JavaScript code contains a significant amount of if statements that fork execution toward code that should succeed. Consider the following createXHR() function from the previous chapter:
function createXHR(){
    if (typeof XMLHttpRequest != "undefined"){
        return new XMLHttpRequest();
    } else if (typeof ActiveXObject != "undefined"){
        if (typeof arguments.callee.activeXString != "string"){
            var versions = ["MSXML2.XMLHttp.6.0", "MSXML2.XMLHttp.3.0",
                            "MSXML2.XMLHttp"],
                i, len;

            for (i=0,len=versions.length; i < len; i++){
                try {
                    new ActiveXObject(versions[i]);
                    arguments.callee.activeXString = versions[i];
                    break;
                } catch (ex){
                    //skip
                }
            }
        }

        return new ActiveXObject(arguments.callee.activeXString);
    } else {
        throw new Error("No XHR object available.");
    }
}
Every time createXHR() is called, it goes through and checks which capability is supported for the browser. First it checks for native XHR, then it tests for ActiveX-based XHR, and finally it throws an error if neither is found. This happens each and every time the function is called, even though the result of this branching won’t change from call to call: if the browser supports native XHR, it supports native XHR always, so the test becomes unnecessary. Code going through even a single if statement is slower than code with no if statements, so the code could run faster if the if statement weren’t necessary every time. The solution is a technique called lazy loading.
Lazy loading means that the branching of function execution happens only once. There are two ways to accomplish lazy loading, the first is by manipulating the function the first time it is called. During that first call, the function is overwritten with another function that executes in the appropriate way such that any future calls to the function needn’t go through the execution branch. For example, the createXHR() function can be rewritten to use lazy loading in this way:
function createXHR(){
    if (typeof XMLHttpRequest != "undefined"){
        createXHR = function(){
            return new XMLHttpRequest();
        };
    } else if (typeof ActiveXObject != "undefined"){
        createXHR = function(){
            if (typeof arguments.callee.activeXString != "string"){
                var versions = ["MSXML2.XMLHttp.6.0", "MSXML2.XMLHttp.3.0",
                                "MSXML2.XMLHttp"],
                    i, len;

                for (i=0,len=versions.length; i < len; i++){
                    try {
                        new ActiveXObject(versions[i]);
                        arguments.callee.activeXString = versions[i];
                        break;
                    } catch (ex){
                        //skip
                    }
                }
            }

            return new ActiveXObject(arguments.callee.activeXString);
        };
    } else {
        createXHR = function(){
            throw new Error("No XHR object available.");
        };
    }

    return createXHR();
}
LazyLoadingExample01.htm
In the lazy loading version of createXHR(), each branch of the if statement assigns a different function to the createXHR variable, effectively overwriting the original function. The last step is then to call the newly assigned function. The next time createXHR() is called, it will call the assigned function directly so the if statements won’t be reevaluated.
The second lazy loading pattern is to assign the appropriate function immediately when the function is declared. So instead of taking a slight performance hit when the function is called for the first time, there’s a slight performance hit when the code is loaded for the first time. Here’s the previous example written using this pattern:
var createXHR = (function(){
    if (typeof XMLHttpRequest != "undefined"){
        return function(){
            return new XMLHttpRequest();
        };
    } else if (typeof ActiveXObject != "undefined"){
        return function(){
            if (typeof arguments.callee.activeXString != "string"){
                var versions = ["MSXML2.XMLHttp.6.0", "MSXML2.XMLHttp.3.0",
                                "MSXML2.XMLHttp"],
                    i, len;

                for (i=0,len=versions.length; i < len; i++){
                    try {
                        new ActiveXObject(versions[i]);
                        arguments.callee.activeXString = versions[i];
                        break;
                    } catch (ex){
                        //skip
                    }
                }
            }

            return new ActiveXObject(arguments.callee.activeXString);
        };
    } else {
        return function(){
            throw new Error("No XHR object available.");
        };
    }
})();
LazyLoadingExample02.htm
The approach used in this example is to create an anonymous, self-executing function that determines which of the different function implementations should be used. Note that the logic is exactly the same. The only things that have changed are the first line (using var to define the function), the addition of the self-executing anonymous function, and that each branch now returns the correct function definition so that it gets assigned to createXHR() immediately.
Lazy loading functions have an advantage in that you pay a performance penalty just once for forking the code. Which pattern is right for you is up to your unique requirements, but both patterns offer the advantage of ensuring that unnecessary code isn’t being executed all the time.
Function Binding
An advanced technique that has become increasingly popular is function binding. Function binding involves creating a function that calls another function with a specific this value and with specific arguments. This technique is often used in conjunction with callbacks and event handlers to preserve code execution context while passing functions around as variables. Consider the following example:
var handler = {
    message: "Event handled",

    handleClick: function(event){
        alert(this.message);
    }
};

var btn = document.getElementById("my-btn");
EventUtil.addHandler(btn, "click", handler.handleClick);
In this example, an object called handler is created. The handler.handleClick() method is assigned as an event handler to a DOM button. When the button is clicked, the function is called, and an alert is displayed. Even though it may seem as if the alert should display "Event handled", it actually displays "undefined". The problem is that the context of handler.handleClick() is not being saved, so the this object ends up pointing to the DOM button instead of handler in most browsers. (In Internet Explorer through version 8, this points to window.) You can fix this problem using a closure, as shown in the following example:
var handler = {
    message: "Event handled",

    handleClick: function(event){
        alert(this.message);
    }
};

var btn = document.getElementById("my-btn");
EventUtil.addHandler(btn, "click", function(event){
    handler.handleClick(event);
});
This solution uses a closure to call handler.handleClick() directly inside the onclick event handler. Of course, this is a very specific solution to this specific piece of code. Creating multiple closures can lead to code that is difficult to understand and debug. Therefore, many JavaScript libraries have implemented a function that can bind a function to a specific context. Typically, this function is called bind().
A simple bind() function takes a function and a context, returning a function that calls the given function in the given context with all arguments intact. The syntax is as follows:
function bind(fn, context){
    return function(){
        return fn.apply(context, arguments);
    };
}
FunctionBindingExample01.htm
This function is deceptively simple but is actually quite powerful. A closure is created within bind() that calls the passed-in function by using apply() and passing in the context object and the arguments. Note that the arguments object, as used here, is for the inner function, not for bind(). When the returned function is called, it executes the passed-in function in the given context and passes along all arguments. The bind() function is used as follows:
var handler = {
    message: "Event handled",

    handleClick: function(event){
        alert(this.message);
    }
};

var btn = document.getElementById("my-btn");
EventUtil.addHandler(btn, "click", bind(handler.handleClick, handler));
FunctionBindingExample01.htm
In this example, the bind() function is used to create a function that can be passed into EventUtil.addHandler(), maintaining the context. The event object is also passed through to the function, as shown here:
var handler = {
    message: "Event handled",

    handleClick: function(event){
        alert(this.message + ":" + event.type);
    }
};

var btn = document.getElementById("my-btn");
EventUtil.addHandler(btn, "click", bind(handler.handleClick, handler));
FunctionBindingExample01.htm
The handler.handleClick() method gets passed the event object as usual, since all arguments are passed through the bound function directly to it.
ECMAScript 5 introduced a native bind() method on all functions to make this process even easier. Instead of defining your own bind() function, you can call the method directly on the function itself. For example:
var handler = {
    message: "Event handled",

    handleClick: function(event){
        alert(this.message + ":" + event.type);
    }
};

var btn = document.getElementById("my-btn");
EventUtil.addHandler(btn, "click", handler.handleClick.bind(handler));
FunctionBindingExample02.htm
The native bind() method works similarly to the one previously described in that you pass in the object that should be the value of this. The native bind() method is available in Internet Explorer 9+, Firefox 4+, and Chrome.
Bound functions are useful whenever a function pointer must be passed as a value and that function needs to be executed in a particular context. They are most commonly used for event handlers and with setTimeout() and setInterval(). However, bound functions have more overhead than regular functions — they require more memory and are slightly slower because of multiple function calls — so it’s best to use them only when necessary.
Function Currying
A topic closely related to function binding is function currying, which creates functions that have one or more arguments already set (also called partial function application). The basic approach is the same as function binding: use a closure to return a new function. The difference with currying is that this new function also sets some arguments to be passed in when the function is called. Consider the following example:
function add(num1, num2){
    return num1 + num2;
}

function curriedAdd(num2){
    return add(5, num2);
}

alert(add(2, 3));      //5
alert(curriedAdd(3));  //8
This code defines two functions: add() and curriedAdd(). The latter is essentially a version of add() that sets the first argument to 5 in all cases. Even though curriedAdd() is not technically a curried function, it demonstrates the concept quite well.
Curried functions are typically created dynamically by calling another function and passing in the function to curry and the arguments to supply. The following function is a generic way to create curried functions:
function curry(fn){
    var args = Array.prototype.slice.call(arguments, 1);
    return function(){
        var innerArgs = Array.prototype.slice.call(arguments),
            finalArgs = args.concat(innerArgs);
        return fn.apply(null, finalArgs);
    };
}
FunctionCurryingExample01.htm
The curry() function’s primary job is to arrange the arguments of the returned function in the appropriate order. The first argument to curry() is the function that should be curried; all other arguments are the values to pass in. In order to get all arguments after the first one, the slice() method is called on the arguments object, and an argument of 1 is passed in, indicating that the returned array’s first item should be the second argument. The args array then contains arguments from the outer function. For the inner function, the innerArgs array is created to contain all of the arguments that were passed in (once again using slice()). With the arguments from the outer function and inner function now stored in arrays, you can use the concat() method to combine them into finalArgs and then pass the result into the function, using apply(). Note that this function doesn’t take context into account, so the call to apply() passes in null as the first argument. The curry() function can be used as follows:
function add(num1, num2){
    return num1 + num2;
}

var curriedAdd = curry(add, 5);
alert(curriedAdd(3));   //8
FunctionCurryingExample01.htm
In this example, a curried version of add() is created that has the first argument bound to 5. When curriedAdd() is called and 3 is passed in, the 3 becomes the second argument of add(), while the first is still 5, resulting in the sum of 8. You can also provide all function arguments, as shown in this example:
function add(num1, num2){
    return num1 + num2;
}

var curriedAdd = curry(add, 5, 12);
alert(curriedAdd());   //17
FunctionCurryingExample01.htm
Here, the curried add() function provides both arguments, so there’s no need to pass them in later.
Function currying is often included as part of function binding, creating a more complex bind() function. For example:
function bind(fn, context){
    var args = Array.prototype.slice.call(arguments, 2);
    return function(){
        var innerArgs = Array.prototype.slice.call(arguments),
            finalArgs = args.concat(innerArgs);
        return fn.apply(context, finalArgs);
    };
}
FunctionCurryingExample02.htm
The major changes from the curry() function are the number of arguments passed into the function and how that affects the result of the code. Whereas curry() simply accepts a function to wrap, bind() accepts the function and a context object. That means the arguments for the bound function start at the third argument instead of the second, which changes the first call to slice(). The only other change is to pass in the context object to apply() on the third-to-last line. When bind() is used, it returns a function that is bound to the given context and may have some number of its arguments set already. This can be useful when you want to pass arguments into an event handler in addition to the event object, such as this.
var handler = {
    message: "Event handled",

    handleClick: function(name, event){
        alert(this.message + ":" + name + ":" + event.type);
    }
};

var btn = document.getElementById("my-btn");
EventUtil.addHandler(btn, "click", bind(handler.handleClick, handler, "my-btn"));
FunctionCurryingExample02.htm
In this updated example, the handler.handleClick() method accepts two arguments: the name of the element that you’re working with and the event object. The name is passed into the bind() function as the third argument and then gets passed through to handler.handleClick(), which also receives the event object.
The ECMAScript 5 bind() method also implements function currying. Just pass in the additional arguments after the value for this:
var handler = {
    message: "Event handled",

    handleClick: function(name, event){
        alert(this.message + ":" + name + ":" + event.type);
    }
};

var btn = document.getElementById("my-btn");
EventUtil.addHandler(btn, "click", handler.handleClick.bind(handler, "my-btn"));
FunctionCurryingExample03.htm
Curried and bound functions provide powerful dynamic function creation in JavaScript. The use of either bind() or curry() is determined by the requirement of a context object or the lack of one, respectively. They can both be used to create complex algorithms and functionality, although neither should be overused, because each function creates additional overhead.
One of the long-lamented downsides of JavaScript is its shared nature: every object can be modified by any code running in the same context. This can lead to developers accidentally overwriting each other’s code or, worse, overwriting a native object with incompatible changes. ECMAScript 5 sought to address this problem by allowing you to create tamper-proof objects.
Chapter 6 discussed the nature of properties on objects and how you can manually set each property’s [[Configurable]], [[Writable]], [[Enumerable]], [[Value]], [[Get]], and [[Set]] attributes to alter how the property behaves. In a similar manner, ECMAScript 5 adds several methods that allow you to specify how an entire object behaves.
One thing to keep in mind: once an object has been made tamper-proof, the operation cannot be undone.
Nonextensible Objects
By default, all objects in JavaScript are extensible, meaning that you can add additional properties and methods to the object at any time. For example, I can define an object and then later decide to add another property to it, such as:
var person = { name: "Nicholas" };
person.age = 29;
Even though the person object is fully defined on the first line, the second line is able to add an additional property. The Object.preventExtensions() method changes this behavior so that new properties and methods cannot be added to the object. For example:
var person = { name: "Nicholas" };
Object.preventExtensions(person);

person.age = 29;
alert(person.age);   //undefined
NonExtensibleObjectsExample01.htm
After the call to Object.preventExtensions(), the person object can no longer have new properties or methods added. In nonstrict mode, an attempt to add a new object member is silently ignored, so the result of person.age is undefined. In strict mode, attempting to add an object member that doesn’t allow extension causes an error to be thrown.
Even though the object cannot have new members added, all of the existing members remain unaffected. You can still modify and delete already-existing members. It’s also possible to determine that an object can’t have extensions by using the Object.isExtensible() method:
var person = { name: "Nicholas" };
alert(Object.isExtensible(person));   //true

Object.preventExtensions(person);
alert(Object.isExtensible(person));   //false
NonExtensibleObjectsExample02.htm
Sealed Objects
The next level of protection for objects in ECMAScript 5 is a sealed object. Sealed objects aren’t extensible and existing object members have their [[Configurable]] attribute set to false. This means properties and methods can’t be deleted as data properties cannot be changed to accessor properties or vice versa using Object.defineProperty(). Property values can still be changed.
You can seal an object by using the Object.seal() method:
var person = { name: "Nicholas" };
Object.seal(person);

person.age = 29;
alert(person.age);      //undefined

delete person.name;
alert(person.name);     //"Nicholas"
SealedObjectsExample01.htm
In this example, the attempt to add an age property is ignored. The attempt to delete the name property is also ignored, and so the value remains intact. This is the behavior for nonstrict mode. In strict mode, attempting to add or delete an object member throws an error.
You can determine if an object is sealed by using Object.isSealed(). Since a sealed object is also not extensible, sealed objects also return false for Object.isExtensible():
var person = { name: "Nicholas" };
alert(Object.isExtensible(person));   //true
alert(Object.isSealed(person));       //false

Object.seal(person);
alert(Object.isExtensible(person));   //false
alert(Object.isSealed(person));       //true
SealedObjectsExample02.htm
Frozen Objects
The strictest type of tamper-proof object is a frozen object. Frozen objects aren’t extensible and are sealed, and also data properties have their [[Writable]] attribute set to false. Accessor properties may still be written to but only if a [[Set]] function has been defined. ECMAScript 5 defines Object.freeze() to allow freezing of objects:
var person = { name: "Nicholas" };
Object.freeze(person);

person.age = 29;
alert(person.age);      //undefined

delete person.name;
alert(person.name);     //"Nicholas"

person.name = "Greg";
alert(person.name);     //"Nicholas"
FrozenObjectsExample01.htm
As with preventing extensions and sealing, attempts to perform disallowed operations on a frozen object are ignored in nonstrict mode and throw an error in strict mode.
There is also an Object.isFrozen() method to detect frozen objects. Since frozen objects are both sealed and extensible, they also return false for Object.isExtensible() and true for Object.isSealed():
var person = { name: "Nicholas" };
alert(Object.isExtensible(person));   //true
alert(Object.isSealed(person));       //false
alert(Object.isFrozen(person));       //false

Object.freeze(person);
alert(Object.isExtensible(person));   //false
alert(Object.isSealed(person));       //true
alert(Object.isFrozen(person));       //true
FrozenObjectsExample02.htm
Frozen objects are especially useful for library authors. A very common problem with JavaScript libraries is when people accidentally (or intentionally) change the main library object. Freezing the main library object (or sealing) can help to prevent some of these errors.
Timers created using setTimeout() or setInterval() can be used to achieve interesting and useful functionality. Despite the common misconception that timers in JavaScript are actually threads, JavaScript runs in a single-threaded environment. Timers, then, simply schedule code execution to happen at some point in the future. The timing of execution is not guaranteed, because other code may control the JavaScript process at different times during the page life cycle. Code running when the page is downloaded, event handlers, and Ajax callbacks all must use the same thread for execution. It’s the browser’s job to sort out which code has priority at what point in time.
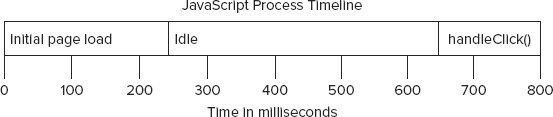
It helps to think of JavaScript as running on a timeline. When a page is loading, the first code to be executed is any code included using a <script> element. This often is simply function and variable declarations to be used later during the page life cycle, but sometimes it can contain initial data processing. After that point, the JavaScript process waits for more code to execute. When the process isn’t busy, the next code to be triggered is executed immediately. For instance, an onclick event handler is executed immediately when a button is clicked, as long as the JavaScript process isn’t executing any other code. The timeline for such a page might look like Figure 22-1.
Alongside the main JavaScript execution process, there is a queue of code that should be executed the next time the process is idle. As the page goes through its life cycle, code is added to the queue in the order in which it should be executed. When a button is clicked, for example, its event handler code is added to the queue and executed at the next possible moment. When an Ajax response is received, the callback function code is added to the queue. No code is executed immediately in JavaScript; it is executed as soon as the process is idle.
Timers work with this queue by inserting code when a particular amount of time has passed. Note that adding code to the queue doesn’t mean it’s executed immediately; it simply means that it will be executed as soon as possible. Setting a timer for execution in 150 milliseconds doesn’t mean that the code will be executed in 150 milliseconds; it means that the code will be added to the queue in 150 milliseconds. If nothing else is in the queue at that point in time, the timer code will be executed, giving the appearance that the code executed exactly when specified. At other times, the code may take significantly longer to execute.
Consider the following code:
var btn = document.getElementById("my-btn");
btn.onclick = function(){
    setTimeout(function(){
        document.getElementById("message").style.visibility = "visible";
    }, 250);

    //other code
};
Here, an event handler is set up for a button. The event handler sets a timer to be called in 250 milliseconds. When the button is clicked, the onclick event handler is first added to the queue. When it is executed, the timer is set, and 250 milliseconds later, the specified code is added to the queue for execution. In effect, the call to setTimeout() says that some code should be executed later.
The most important thing to remember about timers is that the specified interval indicates when the timer’s code will be added to the queue, not when the code will actually be executed. If the onclick event handler in the previous example took 300 milliseconds to execute, then the timer’s code would execute, at the earliest, 300 milliseconds after the timer was set. All code in the queue must wait until the JavaScript process is free before it can be executed, regardless of how it was added to the queue (see Figure 22-2).
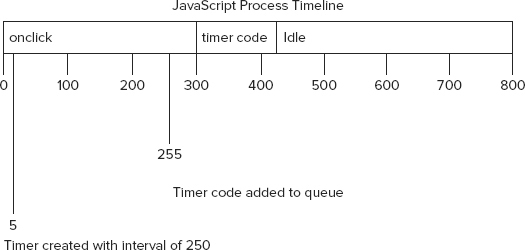
As you can see from Figure 22-2, even though the timer code was added at the 255-millisecond mark, it cannot be executed at that time because the onclick event handler is still running. The timer code’s first opportunity to be executed is at the 300-millisecond mark, after the onclick event handler has finished.
Firefox’s implementation of timers actually allows you to determine how far behind a timer has slipped. It does so by passing in the differential between the time that it was executed and the interval specified. Here is an example:
//works in Firefox only
setTimeout(function(diff){
    if (diff > 0) {
        //call is late
    } else if (diff < 0){
        //call is early
    } else {
        //call is on time
    }
}, 250);
When the execution of one set of code is complete, the JavaScript process yields for a short amount of time so that other processes on the page can be executed. Since the JavaScript process blocks other page processes, these small breaks are necessary to prevent the user interface from locking (which can still happen during long-running code). Setting a timer ensures that there will be at least one process break before the timer code is executed.
Repeating Timers
Timers created using setInterval() ensure regular injection of timer code into the queue. The problem with this approach is that the timer code may not finish execution before the code is added to the queue again. The result would be that the timer code is run multiple times in a row, with no amount of time between them. Fortunately, JavaScript engines are smart enough to avoid this issue. When using setInterval(), timer code is added to the queue only if there are no other instances of the timer code already in the queue. This ensures that the time between additions of the timer code to the queue is, at a minimum, the specified interval.
The downside to this regulation of repeating timers is twofold: (1) intervals may be skipped, and (2) intervals may be smaller than expected between multiple timer-code executions. Suppose you have a situation where an onclick event handler sets a repeating timer using setInterval() at any interval of 200 milliseconds. If the event handler takes a little over 300 milliseconds to complete, and the timer code takes about the same amount of time, you’ll end up with both a skipped interval and timer code running back-to-back (see Figure 22-3).
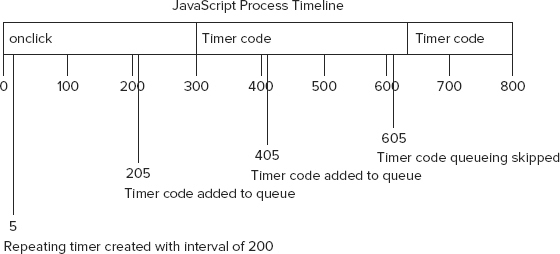
The first timer in this example is added to the queue at 205 milliseconds but can’t be executed until after the 300-millisecond mark. While the timer code is being executed, another copy is added to the queue at 405 milliseconds. At the next interval, 605 milliseconds, the first timer code is still being executed, and there is already one instance of the timer code in the queue. As a result, timer code is not added to the queue at that point. The timer code added at 405 milliseconds is then executed right after the timer code that was added at 5 milliseconds.
To avoid the two downfalls of repeating timers with setInterval(), you can use chained setTimeout() calls in the following pattern:
setTimeout(function(){

    //processing

   setTimeout(arguments.callee, interval);

}, interval);
This pattern chains calls to setTimeout(), creating a new timer each time the function is executed. The second call to setTimeout() uses arguments.callee to get a reference to the currently executing function and set another timer for it. The advantage is that new timer code isn’t inserted into the queue until the previous timer code has been executed, ensuring that there won’t be any dropped intervals. Furthermore, you are guaranteed that the next time the timer code is executed, it will be in at least the interval specified, avoiding back-to-back runs. This pattern is used most often for repeating timers, as in this example:
setTimeout(function(){

   var div = document.getElementById("myDiv"),
       left = parseInt(div.style.left) + 5;
   div.style.left = left + "px";

   if (left < 200){
       setTimeout(arguments.callee, 50);
   }

}, 50);
RepeatingTimersExample.htm
This code moves a <div> element to the right every time the timer code executes, stopping when the left coordinate is at 200 pixels. It’s quite common to use this pattern for JavaScript animation.
Each browser window, tab, or frame has its own code execution queue. This means that the timing of cross-frame or cross-window JavaScript calls may result in race conditions when code is executed synchronously. Whenever this type of communication is necessary, it’s a good idea to create a timer on the receiving frame or window to execute the code.
Yielding Processes
JavaScript running in a browser has a finite amount of resources allocated to it. Unlike desktop applications, which often have free rein over the amount of memory and processor time they can command, JavaScript is severely restricted to ensure that malicious web programmers can’t bring down a user’s computer. One of these restrictions is the long-running script limit, which prevents code from running if it takes longer than a certain amount of time or a certain number of statements. If you reach that limit, the user is presented with a browser error dialog indicating that a script is taking too long to execute and asking whether the user would like to allow it to continue processing or stop. It’s the goal of all JavaScript developers to ensure that the user never sees this confusing message from the browser. Timers are one way to work around this limitation.
Long-running script problems typically result from one of two issues: long, deeply nested function calls or loops that are doing a lot of processing. Of these two, the latter is an easier problem to solve. Long-running loops typically follow this pattern:
for (var i=0, len=data.length; i < len; i++){
    process(data[i]);
}
The problem with this pattern is that the number of items to process is unknown until runtime. If process() takes 100 milliseconds to complete, an array of two items may not be cause for worry, but an array of ten results in the script running for a second to complete. The amount of time it takes to completely execute this loop is directly related to the number of items in the array. And since JavaScript execution is a blocking operation, the longer a script takes to run, the longer users are left unable to interact with the page.
Before unrolling the loop, you need to answer these two important questions:
1. Does the processing have to be done synchronously? If the processing of this data is blocking something else from finishing, then you may not want to touch it. However, if you can answer a definitive “no” to this question, then it’s a good candidate for deferring some processing until later.
2. Does the data have to be processed sequentially? Oftentimes, an array of values is just a convenient way to group and iterate over items regardless of the order. If the order of the items has no significance, then it’s likely that you can postpone some processing until later.
When you find a loop is taking a significant amount of time to complete, and you can answer “no” to either of the previous two questions, you can split the loop using timers. This is a technique called array chunking, whereby processing of the array happens in small chunks, most often one at a time. The basic idea is to create a queue of items to process, use timers to pull the next item to process, process it, and then set another timer. The basic pattern looks like this:
setTimeout(function(){

    //get next item and process it
    var item = array.shift();
    process(item);

    //if there's more items, set another timeout
    if(array.length > 0){
        setTimeout(arguments.callee, 100);
    }
}, 100);
In the array chunking pattern, the array variable is essentially a “to do” list of items to process. Using the shift() method, you retrieve the next item in the queue to process and pass it in to a function. If there are still items in the queue, then another timer is set, calling the same anonymous function via arguments.callee. You can accomplish array chunking easily, using the following function:
function chunk(array, process, context){
    setTimeout(function(){
        var item = array.shift();
        process.call(context, item);

        if (array.length > 0){
            setTimeout(arguments.callee, 100);
        }
    }, 100);
}
ArrayChunkingExample.htm
The chunk() method accepts three arguments: the array of items to process, a function to use to process the items, and an optional context in which to run the function. Inside the function is a duplication of the basic pattern described previously, with the process() function being called via call() so that a proper context can be set if necessary. The interval of the timers is set to 100 milliseconds, which gives the JavaScript process time to go idle between item processing events. This interval can be changed based on your needs, although 100 milliseconds works well in most cases. The function can be used as follows:
var data = [12,123,1234,453,436,23,23,5,4123,45,346,5634,2234,345,342];

function printValue(item){
    var div = document.getElementById("myDiv");
    div.innerHTML += item + "<br>";
}

chunk(data, printValue);
ArrayChunkingExample.htm
This example outputs each value in the data array to a <div> element by using the printValue() function. Since the function exists in the global scope, there’s no need to pass in a context object to chunk().
Something to be aware of is that the array passed into chunk() is used as a queue, so the items in the array change as the data is processed. If you want to keep the original array intact, you should pass a clone of the array into chunk(), such as in this example:
chunk(data.concat(), printValue);
When the concat() method is called on an array without any arguments, it returns an array with the same items as the original. In this way, you can be assured that the original array is not changed by the function.
The importance of array chunking is that it splits the processing of multiple items into separate code on the execution queue. Other browser processes are given a chance to run after each item is processed, and you’ll avoid long-running script errors.
Whenever you have a function that takes over 50 milliseconds to complete, it’s best to see if you can split up the job into a number of smaller ones that can be used with timers.
Function Throttling
Some calculations and processes are more expensive in the browser than others. For instance, DOM manipulations require more memory and CPU time than non-DOM interactions. Attempting to perform too many DOM-related operations in sequence can cause the browser to hang, and sometimes crash. This tends to happen frequently in Internet Explorer when using an onresize event handler, which fires repeatedly as the browser is being resized. Attempting DOM manipulations inside the onresize event handler can make the browser crash because of the frequency of the changes being calculated. To get around this problem, you can throttle the function call by using timers.
The basic idea behind function throttling is that some code should not be executed repeatedly without a break. The first time the function is called, a timer is created that will run the code after a specified interval. When the function is called a second time, it clears the previous timer and sets another. If the previous timer has already executed, then it is of no consequence. However, if the previous timer hasn’t executed, it is essentially replaced by a newer timer. The goal is to execute the function only after the requests to execute it have subsided for some amount of time. The following is a basic representation of this pattern:
var processor = {
    timeoutId: null,

    //method that actually performs the processing
    performProcessing: function(){
        //actual processing code
    },

    //method that is called to initiate processing
    process: function(){
        clearTimeout(this.timeoutId);

        var that = this;
        this.timeoutId  = setTimeout(function(){
            that.performProcessing();
        }, 100);
    }
};

//try to start processing
processor.process();
In this code, an object called processor is created. There are two methods on this object: process() and performProcessing(). The former is the one that should be called to initiate any processing, and the latter actually performs the processing that should be done. When process() is called, the first step is to clear the stored timeoutId to prevent any previous calls from being executed. Then, a new timer is created to call performProcessing(). Since the context of the function used in setTimeout() is always window, it’s necessary to store a reference to this so that it can be used later.
The interval is set to 100 milliseconds, which means that performProcessing() will not be called until at least 100 milliseconds after the last call to process(). So if process() is called 20 times within 100 milliseconds, performProcessing() will still be called only once.
This pattern can be simplified by using a throttle() function that automatically sets up the timer setting/clearing functionality, as in the following example:
function throttle(method, context) {
    clearTimeout(method.tId);
    method.tId= setTimeout(function(){
        method.call(context);
    }, 100);
}
ThrottlingExample.htm
The throttle() function accepts two arguments: the function to execute and the scope in which to execute it. The function first clears any timer that was set previously. The timer ID is stored on the tId property of the function, which may not exist the first time the method is passed into throttle(). Next, a new timer is created, and its ID is stored in the method’s tId property. If this is the first time that throttle() is being called with this method, then the code creates the property. The timer code uses call() to ensure that the method is executed in the appropriate context. If the second argument isn’t supplied, then the method is executed in the global scope.
As mentioned previously, throttling is most often used during the resize event. If you are changing the layout of the page based on this event, it is best to throttle the processing to ensure that the browser doesn’t do too many calculations in a short period of time. For example, consider having a <div> element that should have its height changed so that it’s always equal to its width. The JavaScript to effect this change may look something like this:
window.onresize = function(){
    var div = document.getElementById("myDiv");
    div.style.height = div.offsetWidth + "px";
};
This very simple example shows a couple of things that may slow down the browser. First, the offsetWidth property is being calculated, which may be a complex calculation when there are enough CSS styles applied to the element and the rest of the page. Second, setting the height of an element requires a reflow of the page to take these changes into account. Once again, this can require multiple calculations if the page has many elements and a moderate amount of CSS applied. The throttle() function can help, as shown in this example:
function resizeDiv(){
    var div = document.getElementById("myDiv");
    div.style.height = div.offsetWidth + "px";
}

window.onresize = function(){
    throttle(resizeDiv);
};
ThrottlingExample.htm
Here, the resizing functionality has been moved into a separate function called resizeDiv(). The onresize event handler then calls throttle() and passes in the resizeDiv() function, instead of calling resizeDiv() directly. In many cases, there is no perceivable difference to the user, even though the calculation savings for the browser can be quite large.
Throttling should be used whenever there is code that should be executed only periodically, but you cannot control the rate at which the execution is requested. The throttle() function presented here uses an interval of 100 milliseconds, but that can be changed, depending on your needs.
Earlier in this book, you learned that events are the primary way in which JavaScript interacts with the browser. Events are a type of design pattern called an observer, which is a technique for creating loosely coupled code. The idea is that objects can publish events indicating when an interesting moment in the object’s life cycle occurs. Other objects can then observe that object, waiting for these interesting moments to occur and responding by running code.
The observer pattern is made up of two types of objects: a subject and an observer. The subject is responsible for publishing events, and the observer simply observes the subject by subscribing to these events. A key concept for this pattern is that the subject doesn’t know anything about the observer, meaning that it can exist and function appropriately even if the observer isn’t present. The observer, on the other hand, knows about the subject and registers callbacks (event handlers) for the subject’s events. When you’re dealing with the DOM, a DOM element is the subject and your event-handling code is the observer.
Events are a very common way to interact with the DOM, but they can also be used in non-DOM code through implementing custom events. The idea behind custom events is to create an object that manages events, allowing others to listen to those events. A basic type that implements this functionality can be defined as follows:
function EventTarget(){
    this.handlers = {};
}

EventTarget.prototype = {
    constructor: EventTarget,

    addHandler: function(type, handler){
        if (typeof this.handlers[type] == "undefined"){
            this.handlers[type] = [];
        }

        this.handlers[type].push(handler);
    },

    fire: function(event){
        if (!event.target){
            event.target = this;
        }
        if (this.handlers[event.type] instanceof Array){
            var handlers = this.handlers[event.type];
            for (var i=0, len=handlers.length; i < len; i++){
                handlers[i](event);
            }
        }
    },

    removeHandler: function(type, handler){
        if (this.handlers[type] instanceof Array){
            var handlers = this.handlers[type];
            for (var i=0, len=handlers.length; i < len; i++){
                if (handlers[i] === handler){
                    break;
                }
            }

            handlers.splice(i, 1);
        }
    }
};
EventTarget.js
The EventTarget type has a single property, handlers, which is used to store the event handlers. There are also three methods: addHandler(), which registers an event handler for a given type of event; fire(), which fires an event; and removeHandler(), which unregisters an event handler for an event type.
The addHandler() method accepts two arguments: the event type and a function used to handle the event. When this method is called, a check is made to see if an array for the event type already exists on the handlers property. If not, then one is created. The handler is then added to the end of the array, using push().
When an event must be fired, the fire() method is called. This method accepts a single argument, which is an object containing at least a type property. The fire() method begins by setting a target property on the event object, if one isn’t already specified. Then it simply looks for an array of handlers for the event type and calls each function, passing in the event object. Because these are custom events, it’s up to you to determine what the additional information on the event object should be.
The removeHandler() method is a companion to addHandler() and accepts the same arguments: the type of event and the event handler. This method searches through the event handler array to find the location of the handler to remove. When it’s found, the break operator is used to exit the for loop. The splice() method is then used to remove just that item from the array.
Custom events using the EventTarget type can then be used as follows:
function handleMessage(event){
    alert("Message received: " + event.message);
}

//create a new object
var target = new EventTarget();

//add an event handler
target.addHandler("message", handleMessage);

//fire the event
target.fire({ type: "message", message: "Hello world!"});

//remove the handler
target.removeHandler("message", handleMessage);

//try again - there should be no handler
target.fire({ type: "message", message: "Hello world!"});
EventTargetExample01.htm
In this code, the handleMessage() function is defined to handle a message event. It accepts the event object and outputs the message property. The target object’s addHandler() method is called, passing in "message" and the handleMessage() function. On the next line, fire() is called with an object literal containing two properties: type and message. This calls the event handlers for the message event so an alert will be displayed (from handleMessage()). The event handler is then removed so that when the event is fired again, no alert will be displayed.
Because this functionality is encapsulated in a custom type, other objects can inherit this behavior by inheriting from EventTarget, as in this example:
function Person(name, age){
    EventTarget.call(this);
    this.name = name;
    this.age = age;
}

inheritPrototype(Person,EventTarget);

Person.prototype.say = function(message){
    this.fire({type: "message", message: message});
};
EventTargetExample02.htm
The Person type uses parasitic combination inheritance (see Chapter 6) to inherit from EventTarget. Whenever the say() method is called, an event is fired with the details of a message. It’s common for the fire() method to be called during other methods of a type and quite uncommon for it to be called publicly. This code can then be used as follows:
function handleMessage(event){
    alert(event.target.name + " says: " + event.message);
}

//create new person
var person = new Person("Nicholas", 29);

//add an event handler
person.addHandler("message", handleMessage);

//call a method on the object, which fires the message event
person.say("Hi there.");
EventTargetExample02.htm
The handleMessage() function in this example displays an alert with the person’s name (retrieved via event.target.name) and the message text. When the say() method is called with a message, the message event is fired. That, in turn, calls the handleMessage() function and displays the alert.
Custom events are useful when there are multiple parts of your code that interact with each other at particular moments in time. If each object has references to all the others, the code becomes tightly coupled, and maintenance becomes difficult, because a change to one object affects others. Using custom events helps to decouple related objects, keeping functionality insulated. In many cases, the code that fires the events and the code that listens for the events are completely separate.
One of the most popular user interface patterns on computers is drag and drop. The idea is simple: click and hold a mouse button over an item, move the mouse to another area, and release the mouse button to “drop” the item there. The popularity of the drag-and-drop interface extends to the Web, where it has become a popular alternative to more traditional configuration interfaces.
The basic idea for drag and drop is simple: create an absolutely positioned element that can be moved with the mouse. This technique has its origins in a classic web trick called the cursor trail. A cursor trail was an image or multiple images that shadowed mouse pointer movements on the page. The basic code for a single-item cursor trail involves setting an onmousemove event handler on the document that always moves a given element to the cursor position, as in this example:
EventUtil.addHandler(document, "mousemove", function(event){
    var myDiv = document.getElementById("myDiv");
    myDiv.style.left = event.clientX + "px";
    myDiv.style.top = event.clientY + "px";
});
DragAndDropExample01.htm
In this example, an element’s left and top coordinates are set equal to the event object’s clientX and clientY properties, which places the element at the cursor’s position in the viewport. The effect is an element that follows the cursor around the page whenever it’s moved. To implement drag and drop, you need only implement this functionality at the correct point in time (when the mouse button is pushed down) and remove it later (when the mouse button is released). A very simple drag-and-drop interface can be implemented using the following code:
var DragDrop = function(){

    var dragging = null;

    function handleEvent(event){

        //get event and target
        event = EventUtil.getEvent(event);
        var target = EventUtil.getTarget(event);

        //determine the type of event
        switch(event.type){
            case "mousedown":
                if (target.className.indexOf("draggable") > -1){
                    dragging = target;
                }
                break;

            case "mousemove":
                if (dragging !== null){


                    //assign location
                    dragging.style.left = event.clientX + "px";
                    dragging.style.top = event.clientY + "px";
                }
                break;

            case "mouseup":
                dragging = null;
                break;
        }
    };

    //public interface
    return {
        enable: function(){
            EventUtil.addHandler(document, "mousedown", handleEvent);
            EventUtil.addHandler(document, "mousemove", handleEvent);
            EventUtil.addHandler(document, "mouseup", handleEvent);
        },

        disable: function(){
            EventUtil.removeHandler(document, "mousedown", handleEvent);
            EventUtil.removeHandler(document, "mousemove", handleEvent);
            EventUtil.removeHandler(document, "mouseup", handleEvent);
        }
    }
}();
DragAndDropExample02.htm
The DragDrop object encapsulates all of the basic drag-and-drop functionality. It is a singleton object that uses the module pattern to hide some of its implementation details. The dragging variable starts out as null and will be filled with the element that is being dragged, so when this variable isn’t null, you know that something is being dragged. The handleEvent() function handles all three mouse events for the drag-and-drop functionality. It starts by retrieving references to the event object and the event target. After that, a switch statement determines which event type was fired. When a mousedown event occurs, the class of the target is checked to see if it contains a class of "draggable" and if so, the target is assigned to dragging. This technique allows draggable elements to easily be indicated through markup instead of JavaScript.
The mousemove case for handleEvent() is the same as the previous code, with the exception that a check is made to see if dragging is null. When it’s not null, dragging is known to be the element that’s being dragged, so it is repositioned appropriately. The mouseup case simply resets dragging to null, which effectively negates the mousemove event.
There are two public methods on DragDrop: enable() and disable(), which simply attach and detach all event handlers, respectively. These methods provide an additional measure of control over the drag-and-drop functionality.
To use the DragDrop object, just include it on a page and call enable(). Drag and drop will automatically be enabled for all elements with a class containing "draggable", as in this example:
<div class="draggable" style="position:absolute; background:red"></div>
Note that for drag and drop to work with an element, it must be absolutely positioned.
Fixing Drag Functionality
When you try out this example, you’ll notice that the upper-left corner of the element always lines up with the cursor. The result is a little jarring to users, because the element seems to jump when the mouse begins to move. Ideally, the action should look as if the element has been “picked up” by the cursor, meaning that the point where the user clicked should be where the cursor remains while the element is being dragged (see Figure 22-4).

Some additional calculations are necessary to achieve the desired effect. To do so, you need to calculate the difference between the upper-left corner of the element and the cursor location. That difference needs to be determined when the mousedown event occurs, and carried through until the mouseup event occurs. By comparing the clientX and clientY properties of event to the offsetLeft and offsetTop properties of the element, you can figure out how much more space is needed both horizontally and vertically (see Figure 22-5).

In order to store the differences in the x and y positions, you need a couple more variables. These variables, diffX and diffY, need to be used in the onmousemove event handler to properly position the element, as shown in the following example:
var DragDrop = function(){

    var dragging = null,
        diffX = 0,
        diffY = 0;

    function handleEvent(event){

        //get event and target
        event = EventUtil.getEvent(event);
        var target = EventUtil.getTarget(event);

        //determine the type of event
        switch(event.type){
            case "mousedown":
                if (target.className.indexOf("draggable") > -1){
                    dragging = target;
                    diffX = event.clientX - target.offsetLeft;
                    diffY = event.clientY - target.offsetTop;
                }
                break;

            case "mousemove":
                if (dragging !== null){

                    //assign location
                    dragging.style.left = (event.clientX - diffX) + "px";
                    dragging.style.top = (event.clientY - diffY) + "px";

                }
                break;

            case "mouseup":
                dragging = null;
                break;
        }
    };

    //public interface
    return {
        enable: function(){
            EventUtil.addHandler(document, "mousedown", handleEvent);
            EventUtil.addHandler(document, "mousemove", handleEvent);
            EventUtil.addHandler(document, "mouseup", handleEvent);
        },

        disable: function(){
            EventUtil.removeHandler(document, "mousedown", handleEvent);
            EventUtil.removeHandler(document, "mousemove", handleEvent);
            EventUtil.removeHandler(document, "mouseup", handleEvent);
        }
    }
}();
DragAndDropExample03.htm
The diffX and diffY variables are private, because they are needed only by the handleEvent() function. When a mousedown event occurs, they are calculated by subtracting offsetLeft from the target’s clientX and offsetTop from the target’s clientY. These give you the amount that needs to be subtracted from each dimension when the mousemove event is fired. The result is a smoother dragging experience that behaves much more in the way that the user expects.
Adding Custom Events
The drag-and-drop functionality can’t really be used in an application unless you know when the dragging occurs. To this point, the code provides no way to indicate that a drag has been started, is in progress, or has ended. Custom events can be used to indicate when each of these occurs, allowing other parts of the application to interact with the drag-and-drop functionality.
Since the DragDrop object is a singleton using the module pattern, some changes are necessary to use the EventTarget type. First, a new EventTarget object is created, then the enable() and disable() methods are added, and finally the object is returned. Consider the following:
var DragDrop = function(){

    var dragdrop = new EventTarget(),
        dragging = null,
        diffX = 0,
        diffY = 0;

    function handleEvent(event){

        //get event and target
        event = EventUtil.getEvent(event);
        var target = EventUtil.getTarget(event);

        //determine the type of event
        switch(event.type){
            case "mousedown":
                if (target.className.indexOf("draggable") > -1){
                    dragging = target;
                    diffX = event.clientX - target.offsetLeft;
                    diffY = event.clientY - target.offsetTop;
                    dragdrop.fire({type:"dragstart", target: dragging,
                                   x: event.clientX, y: event.clientY});
                }
                break;

            case "mousemove":
                if (dragging !== null){

                    //assign location
                    dragging.style.left = (event.clientX - diffX) + "px";
                    dragging.style.top = (event.clientY - diffY) + "px";

                    //fire custom event
                    dragdrop.fire({type:"drag", target: dragging,
                                   x: event.clientX, y: event.clientY});
                }
                break;

            case "mouseup":
                dragdrop.fire({type:"dragend", target: dragging,
                               x: event.clientX, y: event.clientY});
                dragging = null;
                break;
        }
    };

    //public interface
    dragdrop.enable = function(){
        EventUtil.addHandler(document, "mousedown", handleEvent);
        EventUtil.addHandler(document, "mousemove", handleEvent);
        EventUtil.addHandler(document, "mouseup", handleEvent);
    };

    dragdrop.disable = function(){
        EventUtil.removeHandler(document, "mousedown", handleEvent);
        EventUtil.removeHandler(document, "mousemove", handleEvent);
        EventUtil.removeHandler(document, "mouseup", handleEvent);
    };

    return dragdrop;
}();
DragAndDropExample04.htm
This code defines three events: dragstart, drag, and dragend. Each of these events sets the dragged element as the target and provides x and y properties to indicate its current position. These are fired on the dragdrop object, which later is augmented with the enable() and disable() methods before being returned. This slight change in the module pattern allows the DragDrop object to support events such as the following:
DragDrop.addHandler("dragstart", function(event){
    var status = document.getElementById("status");
    status.innerHTML = "Started dragging " + event.target.id;
});

DragDrop.addHandler("drag", function(event){
    var status = document.getElementById("status");
    status.innerHTML += "<br>Dragged " + event.target.id + " to (" + event.x +
                        "," + event.y + ")";
});

DragDrop.addHandler("dragend", function(event){
    var status = document.getElementById("status");
    status.innerHTML += "<br>Dropped " + event.target.id + " at (" + event.x +
                        "," + event.y + ")";
});
DragAndDropExample04.htm
Here, event handlers are added for each event of the DragDrop object. An element is used to display the current state and location of the dragged element. Once the element is dropped, you have a listing of all the intermediate steps it took since it was initially dragged.
Adding custom events to DragDrop makes it a more robust object that can be used to manage complex drag-and-drop functionality in a web application.
Functions in JavaScript are quite powerful, because they are first-class objects. Using closures and function context switching, you can use functions in a number of powerful ways. For example:
- It’s possible to create scope-safe constructors, ensuring that a constructor called without the new operator will not change the wrong context object.
- You can use lazy loading functions by delaying any code forking until the first time that the function is called.
- Function binding allows you to create functions that are always run in a specific context, and function currying allows you to create functions that have some of their arguments already filled in.
- Combining binding and currying gives you a way to execute any function, in any context, and with any arguments.
ECMAScript 5 allows you to create tamper-proof objects in a number of different ways:
- Nonextensible objects don’t allow new properties or methods to be added to the object.
- Sealed objects are nonextensible and also don’t allow existing properties and methods to be deleted.
- Frozen objects are sealed and also don’t allow the overwriting of object members.
Timers can be created in JavaScript using setTimeout() or setInterval()as follows:
- Timer code is placed into a holding area until the interval has been reached, at which point the code is added to the JavaScript process queue to be executed the next time the JavaScript process is idle.
- Every time a piece of code executes completely, there is a brief amount of idle time to allow other browser processes to complete.
- This behavior means that timers can be used to split up long-running scripts into smaller chunks that can be executed at a later time. Doing so helps the web application to be more responsive to user interaction.
The observer pattern is used quite often in JavaScript in the form of events. Although events are used frequently with the DOM, they can also be used in your own code by implementing custom events. Using custom events helps to decouple different parts of code from one another, allowing easier maintenance and reducing the chances of introducing an error by changing what seems to be isolated code.
Drag and drop is a popular user-interface paradigm for both desktop and web applications, allowing users to easily rearrange or configure things in an intuitive way. This type of functionality can be created in JavaScript using mouse events and some simple calculations. Combining drag-and-drop behavior with custom events creates a reusable framework that can be applied in many different ways.