
Chapter 6
Building MonoCross Containers
What's In This Chapter?
- Tying together your models, controllers, and views
- Understanding MonoCross platform containers
- Defining your platform-specific views
- Implementing navigation between views
This chapter integrates the user interface designed in Chapter 2, “Designing Your User Experience,” with the models and controllers built in Chapter 5, “Building Shared Applications,” and ties it all together for five different platform implementations. The chapter starts with an explanation of how the views, models, and controllers are set up and managed by MonoCross and moves into how each platform implements the management of the views and controllers.
Following an introduction to how this portion of the framework functions, you learn how to implement views for the customer list and for displaying, adding, changing, and deleting a customer (standard CRUD operations). The sample code includes implementations for Windows console, iOS, Android, Windows Phone, and a WebKit server implementation.
Understanding How It All Fits Together
The Model-View-Controller (MVC) pattern describes a single screen and its data in an application, and applications consist of many views, even more data, and some form of navigation between the views. Up to this point you defined a high-level user interface, modeled your data, and constructed a navigational framework as defined in your application and implemented in controllers. The next step is to define your platform-specific views and implement the navigation between them for each platform you plan to support.
Figure 6.1 illustrates how the code built in the previous chapter is shared. The left side of the figure shows the relationship of the application object, the controllers, and the models. The right side shows the platform-specific bits we will concentrate on to build our views and defines them within platform-specific containers.
Figure 6.1 A UML diagram illustrates the object relationships and platform code boundaries.
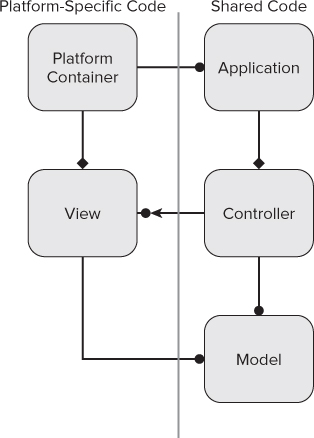
To this end we now create platform-specific view object classes using MonoCross framework convenience classes to simplify the implementation and make that implementation as consistent as possible across all your platforms. We still utilize all the platform-specific interfaces to give end users an application that looks and behaves as if it were designed just for the device they use.
At the base of your platform implementations are the platform-specific containers. The container for each platform is responsible for the following:
- Implementing the navigational structure
- Creating and loading your model via its controller
- Creating your view and assigning it the model
- Placing your view in its platform hierarchy
You may have noticed in the controllers that no consideration was given to making the controllers or their Load() methods multithreaded or asynchronous. At first thought, this is counter to how you would expect most user interfaces to function. An interface should always be responsive and as fast as possible, and long-running tasks in the foreground is a major affront to this need. In reality, all the navigation calls implemented in MonoCross are implemented as asynchronous on the platforms that need them. You can even hook into events that enable you to interact in various ways with the user to provide feedback on longer-running operations, for example, pulling relatively large amounts of data over a slow Internet connection.
Building your applications using a shared structure gives you an advantage over implementing separate applications for each platform. You can get consistency in design; you built your models and controllers and then defined views for each. These views have the same functionality across all platforms and have the same navigational structure. In addition, using a shared structure keeps you from going too far astray from your design. If changes are made, you need only change the model, application, and controller in one place. This change helps you keep consistency in all platforms.
For the remainder of the chapter, you create three views from two Model and Controller pairs for each platform. Those views are the Customer List View, the Customer View, and the Customer Edit View. You start with the most simplistic platform possible, a text-based console view, to highlight the aspects and responsibilities of the Models, Controllers, Application, Container, and Views. It helps to run and step through the code of each sample as they are presented here to further your understanding of the patterns and their implementations.
When designing and building your platform views, consider keeping the implementations of your views as consistent as possible while still utilizing the native user experience your chosen platforms provide. For example, when building the views, we can offer all the same data and functionality on each view; you can also name the views the same. The views need to be consistent with the platform and across platforms. This aids users in moving from one platform to another as well as in maintaining the code and allowing developers to easily identify where in the code to look when they need to perform maintenance tasks.
Implementing a Simple Application
To explore how to implement a simple application, let's start with the oldest and simplest user interface target, the command prompt. Even if you never need a text-based interface as a target you would give an end user, such a simple interface goes a long way in explaining the general concepts. Consisting of only text input and text output, it requires you to keep your views simple. Although it isn't an application you would ever deploy to an end user, this simple application can help you prove your model and controller implementation as well as your URI navigation and can sometimes test changes to your controllers.
Initializing the Container
All Mono and .NET console applications start from a single static function named Main(). (Yes, this application can run on Mac OS, Windows, and even Linux.) In Main() you initialize your application and then proceed to your first view. Initialization consists of creating an instance of the Application object you defined in Chapter 5. Listing 6.1 shows the implementation of Main() for the Customer Management application.

Listing 6.1: Console Main application
namespace CustomerManagement.Console
{
  class Program
  {
    static void Main(string[] args)
    {
      // initialize container
      MXConsoleContainer.Initialize(new CustomerManagement.App());

      // customer list view
      MXConsoleContainer.AddView<List<Customer>>(new Views.CustomerListView(),
        ViewPerspective.Default);

      // customer view and customer edit/new
      MXConsoleContainer.AddView<Customer>(new Views.CustomerView(),
        ViewPerspective.Default);
      MXConsoleContainer.AddView<Customer>(new Views.CustomerEdit(),
        ViewPerspective.Update);

      // navigate to first view
      MXConsoleContainer.Navigate(MXContainer.Instance.App.NavigateOnLoad);
    }
  }
}
Found in the CustomerManagement/CustomerManangement.Console/Program.cs file of the download
The Application object we defined in Chapter 5 holds the URI navigational mapping to your controllers and models, the platform-independent title of your application, and your entry point into the application that passes it into the console containers static Initialization() method. The code then adds each view to the container and specifies the model type for an associated view using a template parameter. The view type gives the container enough information to associate the model, the controller, and the view together. Note the second parameter of the AddView() method — the view perspective. It is sometimes important to have two or more views associated with the same model and controller. For example, you can use separate views for viewing and editing the Customer object, which allows you latitude in how you would edit a view as opposed to just showing it to the end user without having to force that functionality into the same form. The last step is to initiate the navigation to the first view from the URI specified in the NavigateOnLoad property from the application.
![]() The Console container is not asynchronous in any way, which enables you to step through all the code if you want to.
The Console container is not asynchronous in any way, which enables you to step through all the code if you want to.
Building the Customer List View
Now that you have initialized the container, you can implement the first view. Listing 6.2 shows the implementation of CustomerListView. Some lines are bolded to highlight key lines of code. In MonoCross, all views must implement the interface IMXView, which is required to allow the container to track the views, initialize the view with its model, and tell the view to render itself. All the platform containers provide basic template classes that attempt to simplify implementation of the views for each platform. The console container provides just one view type, MXConsoleView<ModelT>, which implements the basics that the console container needs to keep track of it and exposes a single abstract method, Render, to do its input and output.
Listing 6.2: Console Customer List View
namespace CustomerManagement.Console.Views
{
  public class CustomerListView : MXConsoleView<List<Customer>>
  {
    public override void Render()
    {
      // Output Customer List to Console
      System.Console.Clear();
      System.Console.WriteLine("Customers");
      System.Console.WriteLine();

      int index = 1;
      foreach (Customer customer in Model)
      {
        System.Console.WriteLine(index.ToString() + ". " + customer.Name);
        index++;
      }

      System.Console.WriteLine();
      System.Console.WriteLine(
          "Enter Customer Index, (N)ew Customer or Enter to go Back");

      // Input Actions from Console
      do
      {
        string input = System.Console.ReadLine().Trim();

        if (input.Length == 0)
        {
          this.Back();
          return;
        }

        if (int.TryParse(input, out index) && index > 0 && index <= Model.Count)
        {
          this.Navigate(string.Format("Customers/{0}", Model[index - 1].ID));
          return;
        }
        else if (string.Equals(input, "N"))
        {
          this.Navigate("Customers/NEW");
          return;
        }
        else
        {
          System.Console.WriteLine("Invalid input, retry input or Enter to go back");
        }

      } while (true);
    }
  }
}
Found in the CustomerManagement/CustomerManangement.Console/Views/CustomerListView.cs file of the download
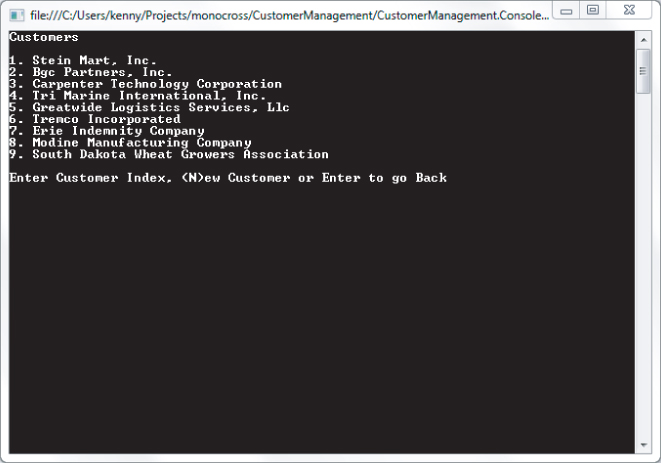
The first view from the initial design you completed in Chapter 2 is your Customer list; it has three functions: to display all your customers, to enable your user to get more information on a customer, and to create a new customer. To implement these functions, you utilize the only two methods for input and output that you have: Console.Write() and Console.Read(). You can define the view as CustomerListView, deriving from MXConsoleView<List<Customer>>, specifying your Model type, and overriding the Render method to do all the required work. Your implementation can output the customer name with an index. Upon completion, you can wait for one of two inputs: the index of the customer the user wants to see more information about or an “N” to add a new customer, to make the view a little friendlier. Users can exit the application by pressing Enter, giving no input. The application prompts them to re-enter a number or “N” for new. After that input, the user can navigate to another view, either the Customer View if an existing customer is specified or the Customer Edit View if the user is creating a new customer.
Navigation is implemented in the base container (MXContainer) upon which you base all platform-specific containers. The base container initiates navigation by matching the navigation URI against the patterns given in the base application. If a match is found, the associated controller's Load() method is called with the parameters from the URI to load the model. The platform-specific container is then used to find the associated view, and then render and complete the platform-specific steps needed to show the view.
In Listing 6.2, the navigate functions are static methods on the base container class. These particular calls are extension methods specific to the platform. Each platform can add extension methods that define additional parameters and functionality. For example, in platforms that support it, animations and transitions could be specified as additional information. Figure 6.2 shows the resulting view.
Figure 6.2 Implementing the code generates this console application Customer List View.
Building the Customer View
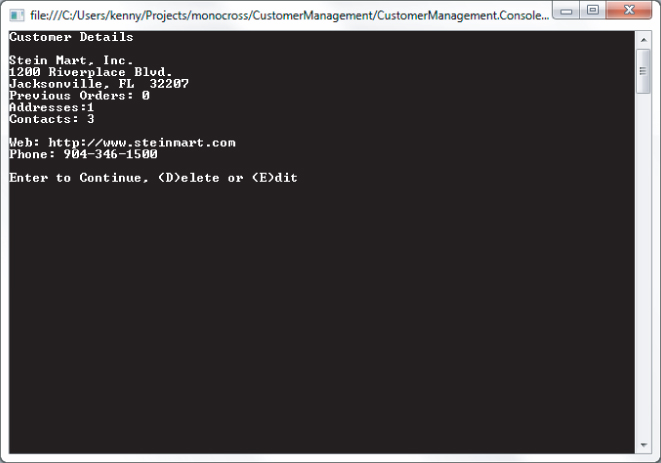
Building the Customer View is even simpler than building the Customer List View. Again you derive a view class from MXConsoleView. This time, however, Customer is the template model parameter. The functionality enables the user to see the customer details, such as the primary phone number, address, and other information, and enables the user to change the customer details by navigating to the Customer Edit View. A user can enter a blank response to return to the list or “E” to edit the customer details in the Customer Edit View. Listing 6.3 highlights the Navigate() method and shows the code for the Customer View. Figure 6.3 shows the view output.
Listing 6.3: Console Customer View
namespace CustomerManagement.Console.Views
{
  class CustomerView : MXConsoleView<Customer>
  {
    public override void Render()
    {
      System.Console.Clear();
      System.Console.WriteLine("Customer Details");
      System.Console.WriteLine();

      System.Console.WriteLine(Model.Name);
      System.Console.WriteLine(string.Format("{0} {1}", Model.PrimaryAddress.Street1,
        Model.PrimaryAddress.Street2));
      System.Console.WriteLine(string.Format("{0}, {1}  {2}", Model.PrimaryAddress.City,
        Model.PrimaryAddress.State, Model.PrimaryAddress.Zip));
      System.Console.WriteLine("Previous Orders: " + Model.Orders.Count.ToString());
      System.Console.WriteLine("Addresses:" + Model.Addresses.Count.ToString());
      System.Console.WriteLine("Contacts: " + Model.Contacts.Count.ToString());
      System.Console.WriteLine();
      System.Console.WriteLine("Web: " + Model.Website);
      System.Console.WriteLine("Phone: " + Model.PrimaryPhone);
      System.Console.WriteLine();
      System.Console.WriteLine("Enter to Continue, (D)elete or (E)dit");

      while (true)
      {
        string input = System.Console.ReadLine().Trim();
        if (input.Length == 0)
        {
          this.Back();
          return;
        }
        else if (input.StartsWith("E"))
        {
          this.Navigate("Customers/" + Model.ID + "/EDIT");
        }
        else if (input.StartsWith("D"))
        {
          this.Navigate("Customers/" + Model.ID + "/DELETE");
        }
      }
    }
  }
}
Found in the CustomerManagement/CustomerManangement.Console/Views/CustomerView.cs file of the download
Figure 6.3 The code generates a console application Customer View.
Building the Customer Edit View
The Customer Edit View is also a simple implementation; you simply prompt the user to type an overriding value, or nothing, and set the model value to the data entered by the user. If you look carefully at Listing 6.4, you can see the code updating the model and making a navigation call to the same URI that brought you here, with the exception that you appended either UPDATE or CREATE as an additional parameter. This tells the controller what the intent is. When the controller sees these parameters, it knows to take the values from the model it shares with the view and either updates an existing customer or creates a new one. After the controller updates the customer record, the controller issues its own navigation call to return to the Customer List View. You can see the final resulting view in Figure 6.4.
Listing 6.4: Console Customer Edit View
{
  class CustomerEdit: MXConsoleView<Customer>
  {
    public override void Render()
    {
      System.Console.Clear();
      System.Console.WriteLine("Customer Details");
      System.Console.WriteLine();

      System.Console.Write("Name: (" + Model.Name + ") New Name: ");
      string input = System.Console.ReadLine();
      if (!string.IsNullOrWhiteSpace(input))
          Model.Name = input;

      System.Console.Write("Website: (" + Model.Website + ") New Website: ");
      input = System.Console.ReadLine();
      if (!string.IsNullOrWhiteSpace(input))
          Model.Website = input;

      System.Console.Write(
              "Primary Phone: (" + Model.PrimaryPhone + ") New Primary Phone: ");
      input = System.Console.ReadLine();
      if (!string.IsNullOrWhiteSpace(input))
          Model.PrimaryPhone = input;

      System.Console.WriteLine();
      System.Console.WriteLine("New Customer Info");
      System.Console.WriteLine("Name: " + Model.Name);
      System.Console.WriteLine("Web: " + Model.Website);
      System.Console.WriteLine("Phone: " + Model.PrimaryPhone);
      System.Console.WriteLine();
      System.Console.WriteLine("Enter to Cancel - (S)ave");
      input = System.Console.ReadLine();
      if (!string.IsNullOrWhiteSpace(input) && string.Equals(input, "S")) {
         string action = string.Equals(Model.ID, "0") ? "CREATE": "UPDATE";
         this.Navigate("Customers/" + Model.ID + "/" + action);
      } else {
         this.Back();
     }
   }
  }
}
Found in the CustomerManagement/CustomerManangement.Console/Views/CustomerEdit.cs file of the download
Figure 6.4 Implementing the code results in the console application Customer Edit View.

Implementing an iOS Platform Container
In the previous section, you built a simple application that provides the bare minimum of user interaction. Now you build a fully functional iOS application that provides all the expected interface features a user of your application would expect. For brevity in the code discussed, we leave out data validation and multilingual features, but you can easily extend the sample to implement that functionality.
![]() For those of you reading this that haven't written MonoTouch applications yet, and even for those that haven't programmed for iOS, the best way to describe MonoTouch is to say it's a slimmed-down version of Microsoft's .NET desktop libraries with the addition of bindings to the native iOS programming APIs that Apple provides to C/Objective-C developers (Cocoa Touch). It does not provide an abstracted UI that you can run cross platform; instead it provides bindings to the native API of the device. There is no System.Graphics support beyond a few needed definitions, and there is no Microsoft.Windows.Forms support for windowing. If you need either of these types of functionality, you need to use the MonoTouch bindings for the user interface. The MonoTouch bindings to Cocoa Touch match Cocoa Touch's classes one for one and map directly to the MonoTouch class. MonoTouch provides only the wrapper around the MonoTouch classes and does not implement any of the Cocoa Touch functionality itself. Essentially, anything you can do with a native Objective-C interface you can do in MonoTouch; plus you get all the built-in .NET class libraries.
For those of you reading this that haven't written MonoTouch applications yet, and even for those that haven't programmed for iOS, the best way to describe MonoTouch is to say it's a slimmed-down version of Microsoft's .NET desktop libraries with the addition of bindings to the native iOS programming APIs that Apple provides to C/Objective-C developers (Cocoa Touch). It does not provide an abstracted UI that you can run cross platform; instead it provides bindings to the native API of the device. There is no System.Graphics support beyond a few needed definitions, and there is no Microsoft.Windows.Forms support for windowing. If you need either of these types of functionality, you need to use the MonoTouch bindings for the user interface. The MonoTouch bindings to Cocoa Touch match Cocoa Touch's classes one for one and map directly to the MonoTouch class. MonoTouch provides only the wrapper around the MonoTouch classes and does not implement any of the Cocoa Touch functionality itself. Essentially, anything you can do with a native Objective-C interface you can do in MonoTouch; plus you get all the built-in .NET class libraries.
Initializing a Container in MonoTouch
Almost identically to the console application, you can initiate iOS applications through a static Main function. The Main function generally has one job, which is to call a static function on the UIApplication class and specify the class name that iOS is to create to control the application. Listing 6.5 shows you the definition of the application delegate class aptly named AppDelegate. In Cocoa Touch terms, applications generally consist of a single Window (UIWindow) upon which all views and user interactions reside. The application delegate class has an override for a virtual method, FinishedLaunching(), which handles the initialization of the MonoCross application, sets up the Model-View mapping, and initiates navigation. In initializing the platform container this time, there are additional parameters passed to the container. Because the platform container handles creating and manipulating the views, it requires additional information to function in iOS. The additional items it needs are a reference to your application delegate and a reference to the window the application runs in.
Listing 6.5: iOS AppDelegate.cs
namespace CustomerManagement.Touch
{
  [MXTouchTabletOptions(TabletLayout.MasterPane,
    MasterShowsinLandscape = true,
    MasterShowsinPotrait = true,
    AllowDividerResize = false)]
  [MXTouchContainerOptions(SplashBitmap = "Images/splash.jpg")]
  [Register ("AppDelegate")]
  public partial class AppDelegate : UIApplicationDelegate
  {
    UIWindow window;

    public override bool FinishedLaunching (UIApplication app, NSDictionary options)
    {
      // create a new window instance based on the screen size
      window = new UIWindow (UIScreen.MainScreen.Bounds);

      MXTouchContainer.Initialize(new CustomerManagement.App(), this, window);

      // add Views
      MXTouchContainer.AddView<List<Customer>>(typeof(CustomerListView),
        ViewPerspective.Default);
      MXTouchContainer.AddView<Customer>(typeof(CustomerView),
        ViewPerspective.Default);
      MXTouchContainer.AddView<Customer>(typeof(CustomerEditView),
        ViewPerspective.Update);

      MXTouchContainer.Navigate(null, MXContainer.Instance.App.NavigateOnLoad);

      UIDevice.CurrentDevice.BeginGeneratingDeviceOrientationNotifications();

      return true;
    }
  }
}
Found in the CustomerManagement/CustomerManangement.Touch/AppDelegate.cs file of the sample code
The initialization of the container is nearly identical to the initialization of the container in the console application: the base initialization is called, the Model-View mappings are added, and then the first navigation is presented. This pattern persists across all the containers, but it is called at different points in the platforms' execution because of differences in the platforms themselves.
In addition to completing the initialization of the container, you have also added attributes on the AppDelegate class to describe how the views behave when displayed on a tablet. By default, the iOS container (MXTouchContainer) behaves and displays the same on an iPad as it would on an iPhone and iPod, making it function like a large phone. However, by specifying attributes on the AppDelegate class, the Touch Container can use a master-detail pane layout similar to the ones you see in the iPad Settings or e-mail apps. Because we target both the iPad and iPhone in this sample, you also need to provide a little more information on the views to allow the container to figure out where to put the views when a user navigates to a view. You address that aspect of each view when implementing each view. For this implementation, you specify the MXTabletOptions attribute with values for the layout style (MasterPane) and flags for when you want the master pane to show — in this case, both landscape and portrait. In addition to the properties used in the sample, additional properties enable you to specify the navigation bar color and a few other behaviors of the container.
The console section, “Implementing a Simple Application,” mentioned that navigation is either synchronous or asynchronous, depending on the platform. The Touch Container navigation is asynchronous, meaning that the navigation call at the end of AppDelegate initialization and the navigation in the views start a thread that loads the model data on a background thread and then shows the view when the controller finishes loading the data for the view.
Building the Customer List View in MonoTouch
In iOS applications, the top-level views are UIViewController-derived classes that contain the user interface elements (UIView-derived elements). Following that pattern for the MonoTouch platform container, all the view classes derive indirectly from UIViewController. MonoCross provides three base classes from which to derive your views:
- MXTouchViewController: A basic view with no functionality that is derived directly from UIViewController. It is intended to contain basic views and show the minimal functionality needed for a view in the Touch container. Possible uses include placing a UIImageView to show an image, or your own UIView-derived class.
- MXTouchTableViewController: A UITableViewController-derived class for implementing lists and tables. You can use this class to build your Customer List View.
- MXTouchDialogViewController: A view derived from DialogViewController, an open source project built and maintained by Miguel de Icaza. This class indirectly derives from UITableViewController and builds dialog-like views generally found in the iPhone and iPad Settings app. Your Customer View and Customer Edit View use this view class as its base.
- You can find more detailed information at the following location on GitHub: https://github.com/migueldeicaza/MonoTouch.Dialog.
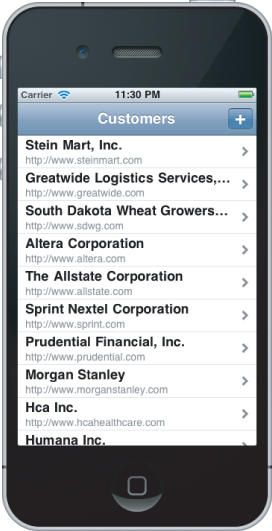
Listing 6.6 shows the view for the Customer List derived from MXTouchTableViewController, a convenience class that derives from UITableViewController, the class upon which all the lists in iOS are based. In the Customer List View, the overridden Render() method assigns a delegate class and a data source class based on the Customer List and adds a new Customer button. The delegate handles the user selecting a customer, and the data source assigns data to the cells that the table view uses to display the customers as the user scrolls through the list. Figure 6.5 shows the resulting view.
Listing 6.6: iOS Customer List View
namespace CustomerManagement.Touch
{
  [MXTouchViewAttributes(ViewNavigationContext.Master)]
  public class CustomerListView : MXTouchTableViewController<List<Customer>>
  {
    public CustomerListView()
    {
    }

    public override void Render()
    {
      Title = "Customers";

      TableView.Delegate = new TableViewDelegate(this, Model);
      TableView.DataSource = new TableViewDataSource(Model);
      TableView.ReloadData();

      if (MXTouchNavigation.MasterDetailLayout && Model.Count > 0)
      {
        // we have two available panes, fill both (like the email application)
        this.Navigate(string.Format("Customers/{0}", Model[0].ID));
      }
    }

    public override void ViewDidLoad()
    {
      base.ViewDidLoad();
      NavigationItem.SetRightBarButtonItem(
        new UIBarButtonItem(UIBarButtonSystemItem.Add,
          (sender, e) => { NewCustomer(); }), false);
    }

    public void NewCustomer()
    {
      MXTouchContainer.Navigate(this, "Customers/NEW");
    }

    public override void ViewWillAppear(bool animated)
    {
    }

    public override bool ShouldAutorotateToInterfaceOrientation(
      UIInterfaceOrientation toInterfaceOrientation)
    {
      return true;
    }

    private class TableViewDelegate : UITableViewDelegate
    {
      private CustomerListView _parent;
      private List<Customer> _clientList;

      public TableViewDelegate(CustomerListView parent, List<Customer> list)
      {
        _parent = parent;
        _clientList = list;
      }
      public override void RowSelected(UITableView tableView, NSIndexPath indexPath)
      {
        Customer client = _clientList[indexPath.Row];
        _parent.Navigate(String.Format("Customers/{0}", client.ID));
      }
    }

    private class TableViewDataSource : UITableViewDataSource
    {
      static NSString kCellIdentifier = new NSString("ClientCell");
      private List<Customer> _list;

      public TableViewDataSource(List<Customer> list)
      {
        this._list = list;
      }
      public override int RowsInSection(UITableView tableview, int section)
      {
        return _list.Count;
      }
      public override UITableViewCell GetCell(UITableView tableView,
        NSIndexPath indexPath)
      {
        UITableViewCell cell = tableView.DequeueReusableCell(kCellIdentifier);
        if (cell == null)
        {
          cell = new UITableViewCell(UITableViewCellStyle.Subtitle, kCellIdentifier);
          if (!MXTouchNavigation.MasterDetailLayout)
            cell.Accessory = UITableViewCellAccessory.DisclosureIndicator;
          else
            cell.Accessory = UITableViewCellAccessory.None;
        }
        cell.TextLabel.Text = _list[indexPath.Row].Name;
        cell.DetailTextLabel.Text = _list[indexPath.Row].Website;
        return cell;
      }
      public override string TitleForHeader(UITableView tableView, int section)
      {
        return string.Empty;
      }
      public override int NumberOfSections(UITableView tableView)
      {
        return 1;
      }
    }
  }
}
Found in the CustomerManagement/CustomerManangement.Touch/Views/CustomerListView.cs file of the download
Figure 6.5 The result of code implementation for the iOS iPhone application Customer List View should look similar.
Building the Customer View in MonoTouch
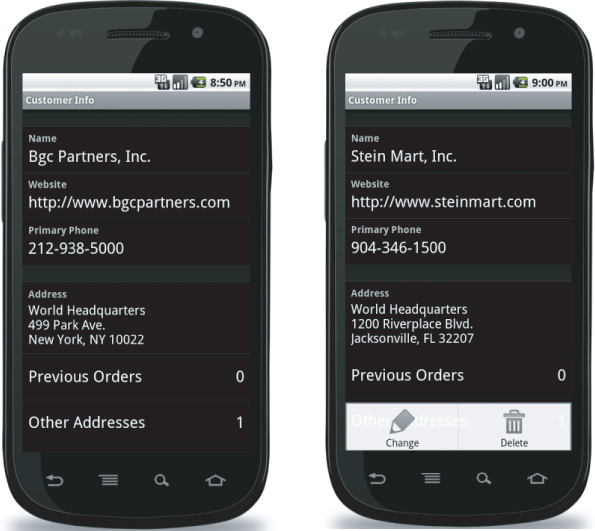
Your Customer View is just a simple view to display all the basic information about your customer in a form that looks much like one of the settings pages in the Settings app. Building upon the DialogViewController mentioned at the start of this section, you can add simple sections for Contact Info and General Info (contrived, yes). These sections place the contact information for your customer, including the customer's website address, main phone number, and main address. For these items you can also add simple embellishments that make sense for each by adding an anonymous delegate to handle a click event for each. Review Listing 6.7 for all the details involved in dialing a phone number, launching maps with an address, and launching a web link. Figure 6.6 shows the final implementation of the Customer View.
Listing 6.7: iOS Customer View
namespace CustomerManagement.Touch
{
  [MXTouchViewAttributes(ViewNavigationContext.Detail)]
  public class CustomerView : MXTouchDialogView<Customer>
  {
    public CustomerView()
      : base(UITableViewStyle.Grouped, null, true)
    {
    }

    public override void ViewDidLoad()
    {
      base.ViewDidLoad();

      NavigationItem.SetRightBarButtonItem(
        new UIBarButtonItem(UIBarButtonSystemItem.Action,
          (sender, e) => { ActionMenu(); }), false);
    }

    public override void Render()
    {
      string addressString = Model.PrimaryAddress != null ?
        Model.PrimaryAddress.ToString() : string.Empty;
      this.Root = new RootElement("Customer Info")
      {
        new Section("Contact Info")
        {
          new StringElement("ID", Model.ID),
          new StringElement("Name", Model.Name ?? string.Empty),
          new StringElement("Website", Model.Website ?? string.Empty,
            delegate { LaunchWeb();}),
          new StringElement("Primary Phone", Model.PrimaryPhone ?? string.Empty,
            delegate { LaunchDial();})
        },
        new Section("General Info")
        {
          new StyledMultilineElement("Address", addressString,
            UITableViewCellStyle.Subtitle,
              delegate { LaunchMaps(); } ),
          new StringElement("Previous Orders ", Model.Orders != null ?
             Model.Orders.Count.ToString() : string.Empty),
          new StringElement("Other Addresses ", Model.Addresses != null ?
             Model.Addresses.Count.ToString() : string.Empty),
          new StringElement("Contacts ", Model.Contacts != null ?
             Model.Contacts.Count.ToString() : string.Empty),
        },
      };
    }

    void ActionMenu()
    {
      //_actionSheet = new UIActionSheet("");
      UIActionSheet actionSheet = new UIActionSheet(
        "Customer Actions", null, "Cancel", "Delete Customer",
           new string[] { "Change Customer" });
      actionSheet.Style = UIActionSheetStyle.Default;
      actionSheet.Clicked += delegate(object sender, UIButtonEventArgs args)
      {
        switch (args.ButtonIndex)
        {
          case 0: DeleteCustomer(); break;
          case 1: ChangeCustomer(); break;
        }
      };

      if (UIDevice.CurrentDevice.UserInterfaceIdiom == UIUserInterfaceIdiom.Phone)
        actionSheet.ShowFromToolbar(NavigationController.Toolbar);
      else
        actionSheet.ShowFrom(NavigationItem.RightBarButtonItem, true);
    }

    void ChangeCustomer()
    {
      this.Navigate(string.Format("Customers/{0}/EDIT", Model.ID));
    }

    void DeleteCustomer()
    {
      var alert = new UIAlertView("Delete Client","Are you sure?",null,"OK","Cancel");
      alert.Show();
      alert.Clicked += (sender, buttonArgs) =>
      {
        if (buttonArgs.ButtonIndex == 0)
        {
          this.Navigate(string.Format("Customers/{0}/DELETE", Model.ID));
        }
      };
    }

    void LaunchWeb()
    {
      UIApplication.SharedApplication.OpenUrl(new NSUrl(Model.Website));
    }

    void LaunchMaps()
    {
      string googleAddress = string.Format("{0} {1}
{2}, {3}  {4}",
            Model.PrimaryAddress.Street1, Model.PrimaryAddress.Street2,
            Model.PrimaryAddress.City, Model.PrimaryAddress.State,
            Model.PrimaryAddress.Zip);

      googleAddress = System.Web.HttpUtility.UrlEncode(googleAddress);

      string url = string.Format("http://maps.google.com/maps?q={0}", googleAddress);

      UIApplication.SharedApplication.OpenUrl(new NSUrl(url));
    }

    void LaunchDial()
    {
      string url = string.Format("tel:{0}", Model.PrimaryPhone);
      UIApplication.SharedApplication.OpenUrl(new NSUrl(url));
    }

    void ViewOrders()
    {
    }

    void NewOrder()
    {
    }
  }
}
Found in the CustomerManagement/CustomerManangement.Touch/Views/CustomerView.cs file of the download
Figure 6.6 This iOS iPhone application Customer View is created using the code provided.
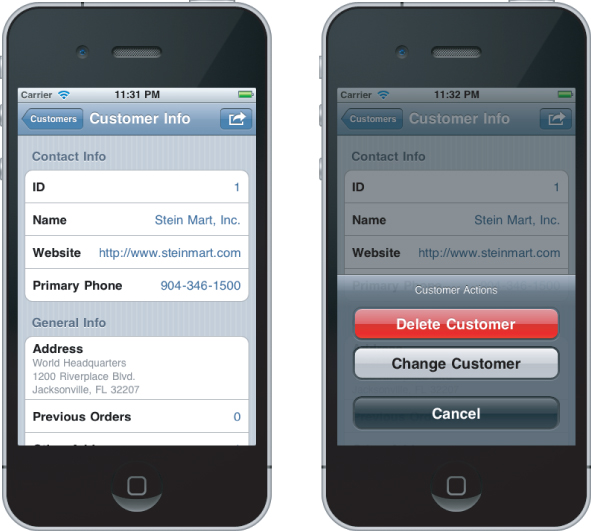
Following are some other details shown in Listing 6.7 you should consider in your own implementations:
- The CustomerView class is decorated with MXTouchViewAttributes. Here you can specify that the Customer View should display in the detail pane when displaying on an iPad.
- You added a button on the right of the navigation bar to show an action bar that enables you to go to the Customer Edit View or to delete this customer; both actions are navigations back to the customer controller.
Building the Customer Edit View in MonoTouch
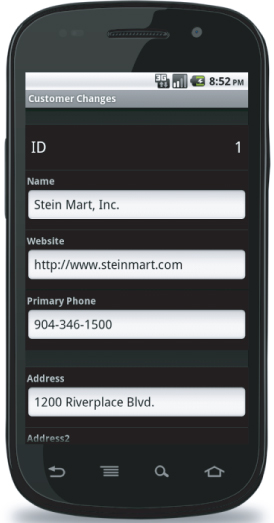
The final view is nearly identical to the last with two exceptions. First, replacing the label elements with data entry elements allows the user to change the values of the fields you give them access to. Secondly, you need to keep references to the elements so that you can update the model and save it. Listing 6.8 shows the complete implementation for the Customer Edit View.
Listing 6.8: iOS Customer Edit View
namespace CustomerManagement.Touch
{
  [MXTouchViewAttributes(ViewNavigationContext.Detail)]
  public class CustomerEditView : MXTouchDialogView<Customer>
  {
    EntryElement _nameEntry;
    EntryElement _webEntry;
    EntryElement _phoneEntry;
    EntryElement _address1Entry;
    EntryElement _address2Entry;
    EntryElement _cityEntry;
    EntryElement _stateEntry;
    EntryElement _zipEntry;

    public CustomerEditView()
      : base(UITableViewStyle.Grouped, null, true)
    {
    }

    public override void ViewDidAppear(bool animated)
    {
      base.ViewDidAppear(animated);

      this.NavigationItem.SetRightBarButtonItem(
        new UIBarButtonItem("Save", UIBarButtonItemStyle.Done, null), false);
      this.NavigationItem.RightBarButtonItem.Clicked += delegate
      {
        SaveCustomer();
      };
      this.NavigationItem.SetLeftBarButtonItem(
        new UIBarButtonItem("Cancel", UIBarButtonItemStyle.Bordered, null), false);
      this.NavigationItem.LeftBarButtonItem.Clicked += delegate
      {
        if (string.Equals("0", Model.ID))
          this.Navigate(string.Format("Customers", Model.ID));
        else
          this.Navigate(string.Format("Customers/{0}", Model.ID));
      };
    }

    public override void Render()
    {
      if (Model.PrimaryAddress == null)
        Model.PrimaryAddress = new Address();

      _nameEntry = new EntryElement("Name", "Name", Model.Name ?? string.Empty);
      _webEntry = new EntryElement("Website", "Website", Model.Website ?? string.Empty);
      _phoneEntry = new EntryElement("Primary Phone", "Phone",
         Model.PrimaryPhone ?? string.Empty);
      _address1Entry = new EntryElement("Address", "",
         Model.PrimaryAddress.Street1 ?? string.Empty);
      _address2Entry = new EntryElement("Address2", "",
         Model.PrimaryAddress.Street2 ?? string.Empty);
      _cityEntry = new EntryElement("City ", "",
         Model.PrimaryAddress.City ?? string.Empty);
      _stateEntry = new EntryElement("State ", "",
         Model.PrimaryAddress.State ?? string.Empty);
      _zipEntry = new EntryElement("ZIP", "", Model.PrimaryAddress.Zip ?? string.Empty);

      this.Root = new RootElement("Customer Info")
      {
        new Section("Contact Info")
        {
          new StringElement("ID", Model.ID ?? string.Empty),
            _nameEntry,
            _webEntry,
            _phoneEntry,
        },
        new Section("Primary Address")
        {
          _address1Entry,
          _address2Entry,
          _cityEntry,
          _stateEntry,
          _zipEntry,
        },
      };
    }

    void SaveCustomer()
    {
      Model.Name = _nameEntry.Value;
      Model.Website = _webEntry.Value;
      Model.PrimaryPhone = _phoneEntry.Value;

      Model.PrimaryAddress.Street1 = _address1Entry.Value;
      Model.PrimaryAddress.Street2 = _address2Entry.Value;
      Model.PrimaryAddress.City = _cityEntry.Value;
      Model.PrimaryAddress.State = _stateEntry.Value;
      Model.PrimaryAddress.Zip = _zipEntry.Value;

      // Save
      if (string.Equals(Model.ID, "0"))
        this.Navigate(string.Format("Customers/{0}/CREATE", Model.ID));
      else
        this.Navigate(string.Format("Customers/{0}/UPDATE", Model.ID));
    }
  }
}
Found in the CustomerManagement/CustomerManangement.Touch/Views/CustomerView.cs file of the download
The SaveCustomer() method places the field values into the model and navigates to the controller; this is where sharing the model between the view and the controller simplifies your implementation. You can place validation in the view, the controller, or both, whichever suits the needs of your implementation.
Figure 6.7 shows the Customer Edit View in action.
Figure 6.7 The sample code generates an iOS iPhone application Customer Edit View.
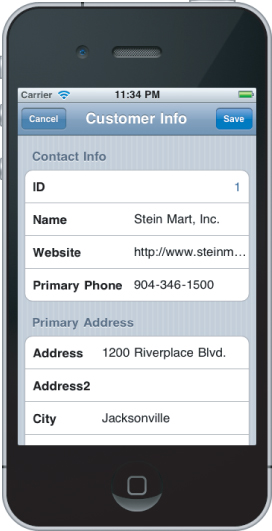
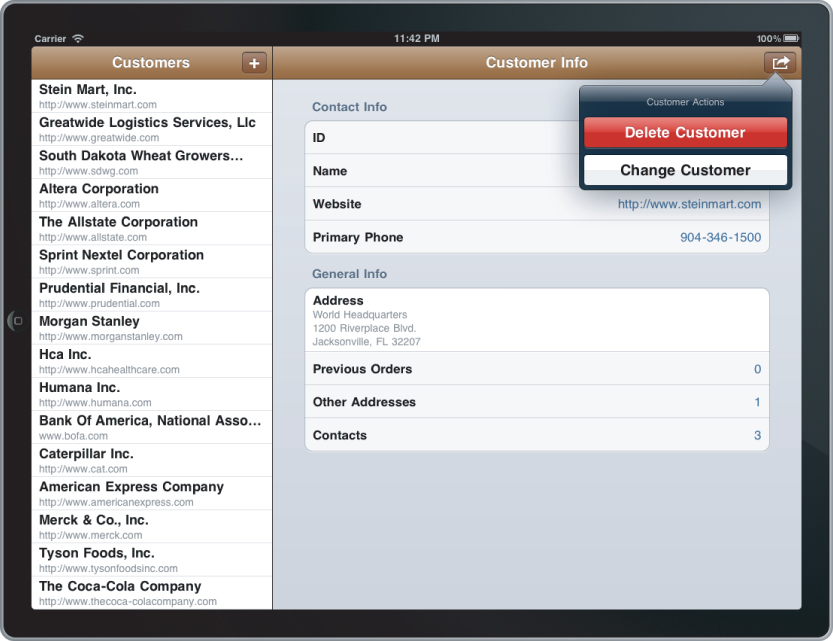
Figure 6.8 shows the sample iOS application running on an iPad with the Customer List in the master pane and the Customer View in the detail pane.
Figure 6.8 The iOS application runs on an iPad.
That completes the Customer Management sample for the iOS platform. It implements the bare minimum required to fully show how a MonoCross application can implement your requirements.
Implementing an Android Platform Container
The next code sample is an Android phone-based application. Although Android now supports both tablet and phone devices, the Mono for Android toolset began supporting tablet APIs only recently, so currently the sample runs on an Android tablet, but as a single-view application just like the phone implementation. By the time this book is published, this sample should have the similar features to its MonoTouch cousin.
The Android sample is nearly identical to the iOS version of your sample code with the exception of where and how you initialize the platform container.
Initializing the Container for Android
At a simple level, Android applications consist of one or more activities, and any activity can potentially be the entry point of the application. The developer specifies which activity is the entry point for the application; there is no handy main application to do your initialization. In addition, an Android application creates your views for you in response to a navigation-like call. To do your initialization, you must work within the context of an initial view. We typically do our initialization in a Splash Screen activity. You can leave the splash screen blank or give it an image; in either case, it displays a short time while you do your initial navigation.
Remember in the initialization of the iOS container you passed references to some platform-specific properties to allow the container to do proper navigation and deal with platform specifics. On the Android platform, the context is the common thread throughout an application. You need the context to do any navigation or create activities, so pass the application context on to the initialization of the Android container.
Moving on to the views and view navigation, you need to know that navigation is asynchronous, as it is in iOS. This is important because you don't need to worry about maintaining background threads in your view. They are handled by default by the MonoCross framework. Should it be important on a long-running controller load, you can add a handler to the platform container to show a message while the controller loads. Listing 6.9 shows the code for a splash screen that is used to show an initial view and initialize the MonoCross components.
Listing 6.9: Android SplashScreen Activity
namespace CustomerManagement.Droid
{
  [Activity(Label = "SplashScreenActivity",
    Theme = "@android:style/Theme.Black.NoTitleBar",
    MainLauncher = true,
    Icon = "@drawable/icon", NoHistory = true)]
  public class SplashScreenActivity : Activity
  {
    protected override void OnCreate(Bundle savedInstanceState)
    {
      base.OnCreate(savedInstanceState);

      // assign a layout with an image
      SetContentView(Resource.Layout.Splash);

      CheckFiles(ApplicationContext);

      // initialize app
      MXDroidContainer.Initialize(new CustomerManagement.App(),
        this.ApplicationContext);

      // initialize views
      MXDroidContainer.AddView<List<Customer>>(typeof(Views.CustomerListView),
        ViewPerspective.Default);
      MXDroidContainer.AddView<Customer>(typeof(Views.CustomerView),
        ViewPerspective.Default);
      MXDroidContainer.AddView<Customer>(typeof(Views.CustomerEditView),
        ViewPerspective.Update);

      // navigate to first view
      MXDroidContainer.Navigate(null, MXContainer.Instance.App.NavigateOnLoad);
    }

    protected override void OnResume()
    {
      base.OnResume();

    }

    /// <summary>
    /// Copies the contents of input to output. Doesn't close either stream.
    /// </summary>
    public void CopyStream(Stream input, Stream output)
    {
      byte[] buffer = new byte[8 * 1024];
      int len;
      while ((len = input.Read(buffer, 0, buffer.Length)) > 0)
      {
        output.Write(buffer, 0, len);
      }
    }

    public void CheckFiles(Context context)
    {
      string documents =
System.Environment.GetFolderPath(System.Environment.SpecialFolder.MyDocuments);

      string dataDirectory = Path.Combine(documents, "Xml");
      if (!Directory.Exists(dataDirectory))
        Directory.CreateDirectory(dataDirectory);

      string dataFile = Path.Combine(documents, @"Xml/Customers.xml");
      if (File.Exists(dataFile))
        return;

      Stream input = context.Assets.Open(@"Xml/Customers.xml");
      FileStream output = File.Create(dataFile);
      CopyStream(input, output);
      input.Close();
      output.Close();
    }
  }
}
Found in the CustomerManagement/CustomerManangement.Droid/SplashScreenActivity.cs file of the download
Building the Customer List View for Android
As mentioned in the previous section, in Android applications the top-level views derive from the Activity class, either directly or indirectly. Following that pattern for the Android platform container, all the View classes derive from Activity classes. The MonoCross Android container provides three base classes from which to derive your views:
- MXActivityView: A basic view with no added functionality, derived directly from Activity, intended to contain basic views and show the minimal functionality needed for a view in the Android container. Possible uses include placing an ImageView to show an image or your own view-derived class.
- MXListActivityView: A ListActivity-derived class for implementing lists and tables. Use this class to build your Customer List View. This class is analogous to the UITableView in the iOS platform.
- MXDialogActivityView: Built to be close to the MonoTouch.Dialog classes, they provide a set of classes for easily building Form classes to display and edit data in a similar pattern as the Android settings application. The Android-based Customer View and the Customer Edit View sections go into more detail.
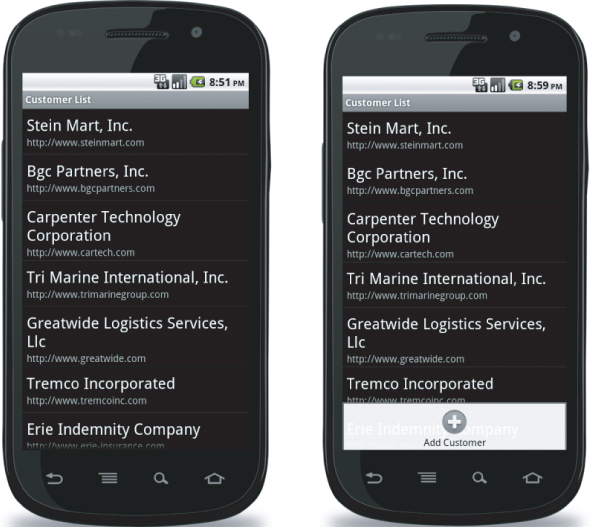
Listing 6.10 shows the view for the Customer List derived from MXListActivityView, a convenience class that derives from ListActivity, the class upon which nearly all the lists in Android are based. In the Customer List View, the overridden Render() method assigns an Adapter class that is responsible for returning views to the list as the user scrolls through the list. Items are recycled as they are scrolled through. For simplicity you can implement a simple adapter that populates the list using a predefined view. In addition to viewing the customers in the list, a menu that includes an Add Customer item similar to the functionality added to the iOS application displays.
Listing 6.10: Android Customer List View
namespace CustomerManagement.Droid.Views
{
  [Activity(Label = "Customer List", Icon = "@drawable/icon")]
  public class CustomerListView : MXListActivityView<List<Customer>>
  {
    class CustomerAdapter : ArrayAdapter<Customer>
    {
      List<Customer> items;

      public CustomerAdapter(Context context,
                             int textViewResourceId,
                             List<Customer> items)
            : base(context, textViewResourceId, items)
      {
        this.items = items;
      }

      public override View GetView(int position, View convertView, ViewGroup parent)
      {
        View v = convertView;
        if (v == null)
        {
          LayoutInflater li = (LayoutInflater)this.Context.GetSystemService(
            Context.LayoutInflaterService);
          v = li.Inflate(Android.Resource.Layout.SimpleListItem2, null);
        }

        Customer o = items[position];
        if (o != null)
        {
          TextView tt = (TextView)v.FindViewById(Android.Resource.Id.Text1);
          if (tt != null)
            tt.Text = o.Name;
          TextView bt = (TextView)v.FindViewById(Android.Resource.Id.Text2);
          if (bt != null && o.Website != null)
            bt.Text = o.Website;
        }
        return v;
      }
    }

    protected override void OnListItemClick(ListView l, View v, int position, long id)
    {
      base.OnListItemClick(l, v, position, id);
      this.Navigate(string.Format("Customers/{0}", Model[position].ID));
    }

    public override bool OnCreateOptionsMenu(IMenu menu)
    {
      MenuInflater.Inflate(Resource.Menu.customer_list_menu, menu);
      return true;
    }

    public override bool OnOptionsItemSelected(IMenuItem item)
    {
      switch (item.ItemId)
      {
        case Resource.Id.add_customer:
          AddCustomer();
          return true;
      }
      return base.OnOptionsItemSelected(item);
    }

    public override void Render()
    {
      ListView.Adapter = new CustomerAdapter(this, 0, Model);
    }

    void AddCustomer()
    {
      this.Navigate("Customers/NEW");
    }
  }
}
Found in the CustomerManagement/CustomerManangement.Droid/Views/CustomerListView.cs file of the download
Figure 6.9 shows the running Customer List View and the Menu item for adding a new customer.
Figure 6.9 The Android application Customer List View as developed provides a menu item to add a new customer.
Building the Customer View for Android
Next, you create the simple Customer View based on the MXDialogActivityView mentioned in the previous section. To build this view, you literally cut and paste the code from the iOS view's Render method and use it as your starting point. Then, change the event handlers and a menu for the Add and Delete commands, and you are done in short order. Listing 6.11 shows the code for the Customer View; compare the Render method to the implementation in Listing 6.7, and you can see the similarities. Figure 6.10 shows the result of implementing the code.
Listing 6.11: Android Customer View
namespace CustomerManagement.Droid.Views
{
  [Activity(Label = "Customer Info", WindowSoftInputMode = SoftInput.AdjustPan)]
  public class CustomerView : MXDialogActivityView<Customer>
  {
    public override void Render()
    {
      this.Root = new RootElement("Customer Info")
      {
        new Section("Contact Info")
        {
          new StringElement("Name", Model.Name,
            (int)DroidResources.ElementLayout.dialog_labelfieldbelow),
          new StringElement("Website", Model.Website,
             (int)DroidResources.ElementLayout.dialog_labelfieldbelow)
              {
                Click = (o, e) => { LaunchWeb(); },
              },
          new StringElement("Primary Phone", Model.PrimaryPhone,
             (int)DroidResources.ElementLayout.dialog_labelfieldbelow)
            {
               Click = (o, e) => { LaunchDial(); },
            },
        },
        new Section("General Info")
        {
          new StringMultilineElement("Address", Model.PrimaryAddress.ToString())
          {
            Click = (o, e) => { LaunchMaps(); },
          },
          new StringElement("Previous Orders ", Model.Orders.Count.ToString()),
          new StringElement("Other Addresses ", Model.Addresses.Count.ToString()),
          new StringElement("Contacts ", Model.Contacts.Count.ToString()),
        },
      };
    }

    void LaunchWeb()
    {
      Intent newIntent = new Intent(Intent.ActionView,
        Android.Net.Uri.Parse(Model.Website));
      StartActivity(newIntent);
    }

    void LaunchMaps()
    {
      string googleAddress = Model.PrimaryAddress.ToString();
      googleAddress = System.Web.HttpUtility.UrlEncode(googleAddress);

      string url = string.Format("http://maps.google.com/maps?q={0}", googleAddress);
      Intent newIntent = new Intent(Intent.ActionView, Android.Net.Uri.Parse(url));
      StartActivity(newIntent);
    }

    void LaunchDial()
    {
      string phoneNumber = PhoneNumberUtils.FormatNumber(Model.PrimaryPhone);
      Intent newIntent = new Intent(Intent.ActionDial,
        Android.Net.Uri.Parse("tel:" + phoneNumber));
      StartActivity(newIntent);
    }

    public override bool OnCreateOptionsMenu(IMenu menu)
    {
      MenuInflater.Inflate(Resource.Menu.customer_menu, menu);
      return true;
    }

    public override bool OnOptionsItemSelected(IMenuItem item)
    {
      switch (item.ItemId)
      {
        case Resource.Id.change_customer:
          this.Navigate(string.Format(@"Customers/{0}/EDIT", Model.ID));
          return true;
        case Resource.Id.delete_customer:
          this.Navigate(string.Format(@"Customers/{0}/DELETE", Model.ID));
          return true;
      }
      return base.OnOptionsItemSelected(item);
    }
  }
}
Found in the CustomerManagement/CustomerManangement.Droid/Views/CustomerView.cs file of the download
Figure 6.10 The code generates the Android application Customer View.
Building the Customer Edit View for Android
The Customer Edit View is nearly identical to the Customer View with two exceptions. First you need to replace the label elements you used in the Customer View with data entry elements so the user can change the values of the Name, Website, and other editable fields. Secondly, you need to keep references to the elements so that you can get the changed values from the edit elements, update the model, and save it.
The SaveCustomer() method places the field values into the Model and navigates to the controller, which is where sharing the model between the view and the controller simplifies your implementation. You can place validation in the view, the controller, or both, whichever suits the needs of your implementation. Listing 6.12 has the complete implementation for the Customer Edit View.
Listing 6.12: Android Customer Edit View
namespace CustomerManagement.Droid.Views
{
  [Activity(Label = "Customer Changes", WindowSoftInputMode = SoftInput.AdjustPan)]
  public class CustomerEditView : MXDialogActivityView<Customer>
  {
    EntryElement _nameEntry, _webEntry, _phoneEntry, _address1Entry, _address2Entry;
    EntryElement _cityEntry, _stateEntry, _zipEntry;

    public override void Render()
    {
      if (Model.PrimaryAddress == null)
        Model.PrimaryAddress = new Address();

      _nameEntry = new EntryElement("Name", Model.Name ?? string.Empty,
        (int)DroidResources.ElementLayout.dialog_textfieldbelow);
      _webEntry = new EntryElement("Website", Model.Website ?? string.Empty,
        (int)DroidResources.ElementLayout.dialog_textfieldbelow);
      _phoneEntry = new EntryElement("Primary Phone", Model.PrimaryPhone ??
        string.Empty, (int)DroidResources.ElementLayout.dialog_textfieldbelow);

      _address1Entry = new EntryElement("Address", Model.PrimaryAddress.Street1 ??
        string.Empty, (int)DroidResources.ElementLayout.dialog_textfieldbelow);
      _address2Entry = new EntryElement("Address2", Model.PrimaryAddress.Street2 ??
        string.Empty, (int)DroidResources.ElementLayout.dialog_textfieldbelow);
      _cityEntry = new EntryElement("City ", Model.PrimaryAddress.City ??
        string.Empty, (int)DroidResources.ElementLayout.dialog_textfieldbelow);
      _stateEntry = new EntryElement("State ", Model.PrimaryAddress.State ??
        string.Empty, (int)DroidResources.ElementLayout.dialog_textfieldbelow);
      _zipEntry = new EntryElement("ZIP", Model.PrimaryAddress.Zip ?? string.Empty,
        (int)DroidResources.ElementLayout.dialog_textfieldbelow);

      this.Root = new RootElement("Customer Info")
      {
        new Section("Contact Info")
        {
          new StringElement("ID", Model.ID ?? string.Empty),
          _nameEntry,
          _webEntry,
          _phoneEntry,
        },
        new Section("Primary Address")
        {
          _address1Entry,
          _address2Entry,
          _cityEntry,
          _stateEntry,
          _zipEntry,
        },
      };
    }

    public override bool OnCreateOptionsMenu(IMenu menu)
    {
      MenuInflater.Inflate(Resource.Menu.customer_edit_menu, menu);
      return true;
    }

    public override bool OnOptionsItemSelected(IMenuItem item)
    {
      switch (item.ItemId)
      {
        case Resource.Id.save_customer:
          SaveCustomer();
          return true;
      }
      return base.OnOptionsItemSelected(item);
    }

    void SaveCustomer()
    {
      Model.Name = _nameEntry.Value;
      Model.Website = _webEntry.Value;
      Model.PrimaryPhone = _phoneEntry.Value;

      Model.PrimaryAddress.Street1 = _address1Entry.Value;
      Model.PrimaryAddress.Street2 = _address2Entry.Value;
      Model.PrimaryAddress.City = _cityEntry.Value;
      Model.PrimaryAddress.State = _stateEntry.Value;
      Model.PrimaryAddress.Zip = _zipEntry.Value;

      // Save
      if (string.Equals(Model.ID, "0"))
        this.Navigate(string.Format("Customers/{0}/UPDATE", Model.ID));
      else
        this.Navigate(string.Format("Customers/{0}/CREATE", Model.ID));
    }
  }
}
Found in the CustomerManagement/CustomerManangement.Droid/Views/CustomerEditView.cs file of the download
Figure 6.11 shows a screen capture of the Customer Edit View.
Figure 6.11 The code generates the Android application Customer Edit View.
Implementing a Windows Phone Platform Container
Still a relative newcomer, Windows Phone will likely begin to gain popularity as Microsoft brings on additional manufacturers to support it. Windows Phone native application development is done in a Windows Phone-specific version of Silverlight. View layout, formatting, and data binding are done in XAML. Every page needs a XAML file; dynamic views are not supported on Windows Phone. Following is a quick tour of the Windows Phone implementation of the Customer Management sample.
Initializing a Container for Windows Phone
Windows Phone handles application initialization and application events via an Application-derived class generally named App. The MonoCross application initialized in the application constructor is the exception of the initial application navigation. Initial navigation is, instead, handled in the Application_Launching event to allow the application to initialize because many of the services used in a Silverlight application are not available until then. This is so because most useful APIs are asynchronous and require views to be available for internal messaging. Listing 6.13 shows the initialization of the application.
Listing 6.13: Windows Phone initialization
namespace CustomerManagement.WindowsPhone
{
  public partial class App : Application
  {
    /// <summary>
    /// Provides easy access to the root frame of the Phone Application.
    /// </summary>
    /// <returns>The root frame of the Phone Application.</returns>
    public PhoneApplicationFrame RootFrame { get; private set; }

    /// <summary>
    /// Constructor for the Application object.
    /// </summary>
    public App()
    {
      // Global handler for uncaught exceptions.
      UnhandledException += Application_UnhandledException;

      // Standard Silverlight initialization
      InitializeComponent();

      // Phone-specific initialization
      InitializePhoneApplication();

      // Show graphics profiling information while debugging.
      if (System.Diagnostics.Debugger.IsAttached)
      {
        // Display the current frame rate counters.
        Application.Current.Host.Settings.EnableFrameRateCounter = true;

        // Show the areas of the app that are being redrawn in each frame.
        //Application.Current.Host.Settings.EnableRedrawRegions = true;

        // Enable non-production analysis visualization mode,
        // which shows areas of a page that are handed off to GPU with a colored overlay
        // Application.Current.Host.Settings.EnableCacheVisualization = true;

        // Disable the application idle detection by setting the
        // UserIdleDetectionMode property of the
        // application's PhoneApplicationService object to Disabled.
        // Caution:- Use this under debug mode only. Application that disables user idle
        // detection will continue to run
        // and consume battery power when the user is not using the phone.
        PhoneApplicationService.Current.UserIdleDetectionMode =
          IdleDetectionMode.Disabled;
      }

      // initialize app
      MXPhoneContainer.Initialize(new CustomerManagement.App(), RootFrame);

      // initialize views
      MXPhoneContainer.AddView<List<Customer>>(
        typeof(CustomerListView), ViewPerspective.Default);
      MXPhoneContainer.AddView<Customer>(
        typeof(CustomerView), ViewPerspective.Default);
      MXPhoneContainer.AddView<Customer>(
        typeof(CustomerEditView), ViewPerspective.Update);
    }

    // Code to execute when the application is launching (eg, from Start)
    // This code will not execute when the application is reactivated
    private void Application_Launching(object sender, LaunchingEventArgs e)
    {
      MXPhoneContainer.Navigate(null, MXContainer.Instance.App.NavigateOnLoad);
    }

    // Code to execute if a navigation fails
    private void RootFrame_NavigationFailed(object sender, NavigationFailedEventArgs e)
    {
      if (System.Diagnostics.Debugger.IsAttached)
      {
        // A navigation has failed; break into the debugger
        System.Diagnostics.Debugger.Break();
      }
    }

    // Code to execute on Unhandled Exceptions
    // private void Application_UnhandledException(object sender,
    // ApplicationUnhandledExceptionEventArgs e)
    {
      if (System.Diagnostics.Debugger.IsAttached)
      {
        // An unhandled exception has occurred; break into the debugger
        System.Diagnostics.Debugger.Break();
      }
    }

    #region Phone application initialization

    // Avoid double-initialization
    private bool phoneApplicationInitialized = false;

    // Do not add any additional code to this method
    private void InitializePhoneApplication()
    {
      if (phoneApplicationInitialized)
        return;

      // Create the frame but don't set it as RootVisual yet; this allows the splash
      // screen to remain active until the application is ready to render.
      RootFrame = new PhoneApplicationFrame();
      RootFrame.Navigated += CompleteInitializePhoneApplication;

      // Handle navigation failures
      RootFrame.NavigationFailed += RootFrame_NavigationFailed;

      // Ensure we don't initialize again
      phoneApplicationInitialized = true;
    }

    // Do not add any additional code to this method
    private void CompleteInitializePhoneApplication(object sender,
                                                    NavigationEventArgs e)
    {
      // Set the root visual to allow the application to render
      if (RootVisual != RootFrame)
        RootVisual = RootFrame;

      // Remove this handler since it is no longer needed
      RootFrame.Navigated -= CompleteInitializePhoneApplication;
    }

    #endregion
  }
}
Found in the CustomerManagement/CustomerManangement.WindowsPhone/App.xaml.cs file of the download
Building the Customer List View for Windows Phone
Consider the XAML view. Listing 6.14 shows that the CustomerListView class is specified in XAML XML, as is its namespace. In addition, you can see the base class from which the CustomerListView derives. This causes a problem for the model you've used up to this point, which uses a template class with the model type as the template parameter. You can't use that pattern within an XML file because the < and > symbols that specify that the class name shouldn't be broken up cannot be used in the same manner in XML.
Listing 6.14 also shows highlighted properties from the Customer model class, which defines your data binding so that when you assign the DataContext for the view, Silverlight automatically populates the model property values from your model to specific display views on the page.
Listing 6.14: Windows Phone Customer List View XAML
<local:BaseCustomerListView
    x:Class="CustomerManagement.WindowsPhone.CustomerListView"
    xmlns:local="clr-namespace:CustomerManagement.WindowsPhone;
          assembly=CustomerManagement.WindowsPhone"
    xmlns="http://schemas.microsoft.com/winfx/2006/xaml/presentation"
    xmlns:x="http://schemas.microsoft.com/winfx/2006/xaml"
    xmlns:phone="clr-namespace:Microsoft.Phone.Controls;assembly=Microsoft.Phone"
    xmlns:shell="clr-namespace:Microsoft.Phone.Shell;assembly=Microsoft.Phone"
    xmlns:d="http://schemas.microsoft.com/expression/blend/2008"
    xmlns:mc="http://schemas.openxmlformats.org/markup-compatibility/2006"
    mc:Ignorable="d" d:DesignWidth="480" d:DesignHeight="768"
    FontFamily="{StaticResource PhoneFontFamilyNormal}"
    FontSize="{StaticResource PhoneFontSizeNormal}"
    Foreground="{StaticResource PhoneForegroundBrush}"
    SupportedOrientations="Portrait" Orientation="Portrait"
    shell:SystemTray.IsVisible="True">

  <!--LayoutRoot is the root grid where all page content is placed-->
  <Grid x:Name="LayoutRoot" Background="Transparent">
    <Grid.RowDefinitions>
      <RowDefinition Height="Auto"/>
      <RowDefinition Height="*"/>
    </Grid.RowDefinitions>

    <!--TitlePanel contains the name of the application and page title-->
    <StackPanel x:Name="TitlePanel" Grid.Row="0" Margin="12,17,0,28">
      <TextBlock x:Name="ApplicationTitle" Text="Client Management"
                   Style="{StaticResource PhoneTextNormalStyle}"/>
      <TextBlock x:Name="PageTitle" Text="Client List" Margin="9,-7,0,0"
                   Style="{StaticResource PhoneTextTitle1Style}"/>
    </StackPanel>

    <!--ContentPanel - place additional content here-->
    <Grid x:Name="ContentPanel" Grid.Row="1" Margin="12,6,12,6">
      <!--Double line list with text wrapping-->
      <ListBox Margin="0,0,-12,0" Name="listBox">
        <ListBox.ItemTemplate>
          <DataTemplate>
            <StackPanel Margin="0,0,0,17" Width="432">
              <TextBlock Text="{Binding Name}"
                         Style="{StaticResource PhoneTextExtraLargeStyle}"/>
              <TextBlock Text="{Binding Website}" TextWrapping="Wrap"
                         Margin="12,-6,12,0"
                         Style="{StaticResource PhoneTextSubtleStyle}"/>
            </StackPanel>
          </DataTemplate>
        </ListBox.ItemTemplate>
      </ListBox>
    </Grid>
  </Grid>

  <!--Sample code showing usage of ApplicationBar-->
</local:BaseCustomerListView>
Found in the CustomerManagement/CustomerManangement.WindowsPhone/Views/ CustomerListView.xaml file of the download
Listing 6.15 shows a base class derived from the template class instead to enable you to use the pattern. Now, instead of CustomerListView deriving from MXPhonePage<List<Customer>> you use an intermediary class named BaseCustomerListView.
Listing 6.15: Windows Phone Customer List View code
namespace CustomerManagement.WindowsPhone
{
  public class BaseCustomerListView : MXPhonePage<List<Customer>> { }

  [MXPhoneView("/Views/CustomerListView.xaml")]
  public partial class CustomerListView : BaseCustomerListView
  {
    // Constructor
    public CustomerListView()
    {
      InitializeComponent();

      ApplicationTitle.Text = MXContainer.Instance.App.Title;
      PageTitle.Text = "Customers";

      InitAppBar();
    }

    private void InitAppBar()
    {
      ApplicationBar appBar = new ApplicationBar();

      var addButton = new ApplicationBarIconButton(
                          new Uri("images/appbar.add.rest.png", UriKind.Relative));
      addButton.Click += new EventHandler(addButton_Click);
      addButton.Text = "Add";
      appBar.Buttons.Add(addButton);

      ApplicationBar = appBar;
    }

    void addButton_Click(object sender, EventArgs e)
    {
      this.Navigate("Customers/NEW");
    }

    public override void Render()
    {
      foreach (var customer in Model)
        listBox.Items.Add(customer);

      listBox.SelectionChanged +=
                     new SelectionChangedEventHandler(listBox_SelectionChanged);

      // remove the splash screen that was shown just before this
      NavigationService.RemoveBackEntry();
    }

    void listBox_SelectionChanged(object sender, SelectionChangedEventArgs e)
    {
      if (e.AddedItems.Count != 1)
        return;

      Customer c = e.AddedItems[0] as Customer;

      listBox.SelectedIndex = -1;

      MXPhoneContainer.Navigate(this, "Customers/" + c.ID);
    }
  }
}
Found in the CustomerManagement/CustomerManangement.WindowsPhone/Views/CustomerListView.xaml.cs file of the download
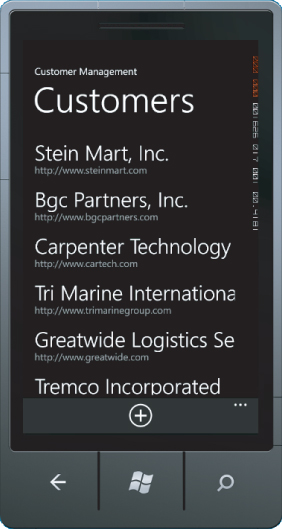
Figure 6.12 illustrates the result of the code in Listings 6-14 and 6-15.
Figure 6.12 The sample code results in the Windows Phone Customer List View.
Building the Customer View for Windows Phone
Moving on to the Customer View, because of the differences between Windows Phone with XAML and the other platforms, you cannot reuse much code, but you can still keep the functionality similar. Listing 6.16 shows the layout of the view where you can keep the data fields in the same order as the Customer Views on the other platforms.
Listing 6.16: Windows Phone Customer View XAML
<local:BaseCustomerView
    x:Class="CustomerManagement.WindowsPhone.CustomerView"
    xmlns:local="clr-namespace:CustomerManagement.WindowsPhone;
          assembly=CustomerManagement.WindowsPhone"
    xmlns="http://schemas.microsoft.com/winfx/2006/xaml/presentation"
    xmlns:x="http://schemas.microsoft.com/winfx/2006/xaml"
    xmlns:phone="clr-namespace:Microsoft.Phone.Controls;assembly=Microsoft.Phone"
    xmlns:shell="clr-namespace:Microsoft.Phone.Shell;assembly=Microsoft.Phone"
    xmlns:d="http://schemas.microsoft.com/expression/blend/2008"
    xmlns:mc="http://schemas.openxmlformats.org/markup-compatibility/2006"
    FontFamily="{StaticResource PhoneFontFamilyNormal}"
    FontSize="{StaticResource PhoneFontSizeNormal}"
    Foreground="{StaticResource PhoneForegroundBrush}"
    SupportedOrientations="Portrait" Orientation="Portrait"
    mc:Ignorable="d" d:DesignHeight="768" d:DesignWidth="480"
    shell:SystemTray.IsVisible="True">

    <!--LayoutRoot is the root grid where all page content is placed-->
    <Grid x:Name="LayoutRoot" Background="Transparent">
      <Grid.RowDefinitions>
        <RowDefinition Height="0.231*"/>
        <RowDefinition Height="0.769*"/>
      </Grid.RowDefinitions>

      <!--TitlePanel contains the name of the application and page title-->
      <StackPanel x:Name="TitlePanel" Grid.Row="0" Margin="12,17,0,28">
        <TextBlock x:Name="ApplicationTitle" Text="Customer Management"
          Style="{StaticResource PhoneTextNormalStyle}"/>
        <TextBlock x:Name="PageTitle" Text="Client" Margin="9,-7,0,0"
                         Style="{StaticResource PhoneTextTitle1Style}"/>
      </StackPanel>

      <!--ContentPanel - place additional content here-->
      <Grid x:Name="ContentPanel" Grid.Row="1" Margin="12,0,12,0">
        <ScrollViewer Margin="12,17,0,28" Grid.Row="0">
          <StackPanel x:Name="CustomerPanel" Width="444">
            <TextBlock Text="Name" Style="{StaticResource PhoneTextSubtleStyle}"/>
            <TextBlock Text="{Binding Name}"
                       Style="{StaticResource PhoneTextExtraLargeStyle}"/>
            <TextBlock Text="Website"
                       Style="{StaticResource PhoneTextSubtleStyle}"/>
            <TextBlock x:Name="textWebsite" Text="{Binding Website}"
                       Style="{StaticResource PhoneTextExtraLargeStyle}"/>
            <TextBlock Text="Primary Phone"
                       Style="{StaticResource PhoneTextSubtleStyle}"/>
            <TextBlock x:Name="textPhone"  Text="{Binding PrimaryPhone}"
                       Style="{StaticResource PhoneTextExtraLargeStyle}"/>
            <TextBlock Text="Address"
                       Style="{StaticResource PhoneTextSubtleStyle}"/>
            <TextBlock x:Name="textAddress"
                       Text="{Binding PrimaryAddress}" TextWrapping="Wrap"
                       Style="{StaticResource PhoneTextExtraLargeStyle}"/>
          </StackPanel>
        </ScrollViewer>
      </Grid>
    </Grid>
</local:BaseCustomerView>
Found in the CustomerManagement/CustomerManangement.WindowsPhone/Views/CustomerView.xaml file of the download
In the code behind the XAML view in Listing 6.17, you can add event handlers for clicking on the items, dialing out for the phone number, launching the maps application for the customer address, and starting up the web browser for the customer's website. The application bar adds the functionality to match the other platforms in your sample code.
Listing 6.17: Windows Phone Customer View code
namespace CustomerManagement.WindowsPhone
{
  public class BaseCustomerView : MXPhonePage<Customer> { }

  [MXPhoneView("/Views/CustomerView.xaml")]
  public partial class CustomerView : BaseCustomerView
  {
    public CustomerView()
    {
      InitializeComponent();

      ApplicationTitle.Text = MXContainer.Instance.App.Title;

      // events for
      this.textAddress.Tap += new EventHandler<GestureEventArgs>(textAddress_Tap);
      this.textPhone.Tap += new EventHandler<GestureEventArgs>(textPhone_Tap);
      this.textWebsite.Tap += new EventHandler<GestureEventArgs>(textWebsite_Tap);

      InitAppBar();
    }

    private void InitAppBar()
    {
      ApplicationBar appBar = new ApplicationBar();

      var backButton = new ApplicationBarIconButton(
                    new Uri("images/appbar.back.rest.png", UriKind.Relative));
      backButton.Click += new EventHandler(backButton_Click);
      backButton.Text = "Back";
      appBar.Buttons.Add(backButton);

      var editButton = new ApplicationBarIconButton(
                    new Uri("images/appbar.edit.rest.png", UriKind.Relative));
      editButton.Click += new EventHandler(editButton_Click);
      editButton.Text = "Edit";
      appBar.Buttons.Add(editButton);

      var deleteButton = new ApplicationBarIconButton(
                    new Uri("images/appbar.delete.rest.png", UriKind.Relative));
      deleteButton.Click += new EventHandler(deleteButton_Click);
      deleteButton.Text = "Delete";
      appBar.Buttons.Add(deleteButton);

      ApplicationBar = appBar;
    }

    void editButton_Click(object sender, EventArgs e)
    {
      this.Navigate(string.Format("Customers/{0}/EDIT", Model.ID));
    }

    void deleteButton_Click(object sender, EventArgs e)
    {
      this.Navigate(string.Format("Customers/{0}/DELETE", Model.ID));
    }

    void backButton_Click(object sender, EventArgs e)
    {
      NavigationService.GoBack();
    }

    public override void Render()
    {
      this.DataContext = Model;
    }

    void textWebsite_Tap(object sender, GestureEventArgs e)
    {
      WebBrowserTask webBrowserTask = new WebBrowserTask();
      webBrowserTask.Uri = new Uri(Model.Website);
      webBrowserTask.Show();
    }

    void textPhone_Tap(object sender, GestureEventArgs e)
    {
      PhoneCallTask pct = new PhoneCallTask();
      pct.DisplayName = Model.Name;
      pct.PhoneNumber = Model.PrimaryPhone;
      pct.Show();
    }

    void textAddress_Tap(object sender, GestureEventArgs e)
    {
      string googleAddress = string.Format("{0} {1}
{2}, {3}  {4}",
                  Model.PrimaryAddress.Street1, Model.PrimaryAddress.Street2,
                  Model.PrimaryAddress.City,
                  Model.PrimaryAddress.State,
                  Model.PrimaryAddress.Zip);
      googleAddress = Uri.EscapeUriString(googleAddress);

      string url = string.Format("http://maps.google.com/maps?q={0}", googleAddress);

      WebBrowserTask webBrowserTask = new WebBrowserTask();
      webBrowserTask.Uri = new Uri(url);
      webBrowserTask.Show();
    }
  }
}
Found in the CustomerManagement/CustomerManangement.WindowsPhone/Views/CustomerView.xaml.cs file of the download
Figure 6.13 shows the completed view with the menu bar.
Figure 6.13 This Windows Phone Customer View shows the menu available.

Building the Customer Edit View for Windows Phone
For the final view you use the XAML from your view and change over the TextBlocks to TextBoxes and set up the data binding for all the fields as in the Customer View. Because you use the same model type, the data binding is nearly identical; with the exception that you separate the address fields to allow a user to edit them separately. Listing 6.18 shows the resulting XAML template. One feature of the XAML approach using data binding is it greatly simplifies the code needed to update the model. In the previous examples, you maintained references to your edit fields, extracted the data from those fields, and updated the model. Data binding in Silverlight automatically updates the data elements in your model, making the update of the model simple via navigation to the controller via the UPDATE or CREATE action parameters because you use the shared model.
Listing 6.18: Windows Phone Customer Edit View XAML
<local:BaseCustomerEditView
    x:Class="CustomerManagement.WindowsPhone.CustomerEditView"
    xmlns:local="clr-namespace:CustomerManagement.WindowsPhone;
          assembly=CustomerManagement.WindowsPhone"
    xmlns="http://schemas.microsoft.com/winfx/2006/xaml/presentation"
    xmlns:x="http://schemas.microsoft.com/winfx/2006/xaml"
    xmlns:phone="clr-namespace:Microsoft.Phone.Controls;assembly=Microsoft.Phone"
    xmlns:shell="clr-namespace:Microsoft.Phone.Shell;assembly=Microsoft.Phone"
    xmlns:d="http://schemas.microsoft.com/expression/blend/2008"
    xmlns:mc="http://schemas.openxmlformats.org/markup-compatibility/2006"
    FontFamily="{StaticResource PhoneFontFamilyNormal}"
    FontSize="{StaticResource PhoneFontSizeNormal}"
    Foreground="{StaticResource PhoneForegroundBrush}"
    SupportedOrientations="Portrait" Orientation="Portrait"
    mc:Ignorable="d" d:DesignHeight="768" d:DesignWidth="480"
    shell:SystemTray.IsVisible="True">

    <!--LayoutRoot is the root grid where all page content is placed-->
    <Grid x:Name="LayoutRoot" Background="Transparent">
      <Grid.RowDefinitions>
        <RowDefinition Height="0.231*"/>
        <RowDefinition Height="0.769*"/>
      </Grid.RowDefinitions>

      <!--TitlePanel contains the name of the application and page title-->
      <StackPanel x:Name="TitlePanel" Grid.Row="0" Margin="12,17,0,28">
        <TextBlock x:Name="ApplicationTitle" Text="Customer Management"
                   Style="{StaticResource PhoneTextNormalStyle}"/>
        <TextBlock x:Name="PageTitle" Text="Client" Margin="9,-7,0,0"
                   Style="{StaticResource PhoneTextTitle1Style}"/>
      </StackPanel>

      <!--ContentPanel - place additional content here-->
      <Grid x:Name="ContentPanel" Grid.Row="1" Margin="12,0,12,0">
        <ScrollViewer Margin="12,17,0,28" Grid.Row="0">
          <StackPanel x:Name="CustomerPanel" Width="444">
            <TextBlock Text="Name" Style="{StaticResource PhoneTextSubtleStyle}"/>
            <TextBox x:Name="textName" Text="{Binding Name, Mode=TwoWay}"
                     DataContext="{Binding}" />
            <TextBlock Text="Website" Style="{StaticResource PhoneTextSubtleStyle}"/>
            <TextBox x:Name="textWebsite" Text="{Binding Website, Mode=TwoWay}"/>
            <TextBlock Text="Primary Phone"
                     Style="{StaticResource PhoneTextSubtleStyle}"/>
            <TextBox x:Name="textPhone" Text="{Binding PrimaryPhone, Mode=TwoWay}" />
            <TextBlock Height="30" Text="Address" />
            <TextBlock Text="Street" Style="{StaticResource PhoneTextSubtleStyle}"/>
            <TextBox x:Name="textAddress"
                     Text="{Binding PrimaryAddress.Street1, Mode=TwoWay}"/>
          </StackPanel>
        </ScrollViewer>
      </Grid>
    </Grid>
</local:BaseCustomerEditView>
Found in the CustomerManagement/CustomerManangement.WindowsPhone/Views/CustomerEditView.xaml file of the download
The code in Listing 6.19 has the navigational details.
Listing 6.19: Windows Phone Customer Edit View code
namespace CustomerManagement.WindowsPhone
{
  public class BaseCustomerEditView : MXPhonePage<Customer> { }

  [MXPhoneView("/Views/CustomerEditView.xaml")]
  public partial class CustomerEditView : BaseCustomerEditView
  {
    public CustomerEditView()
    {
      InitializeComponent();

      InitAppBar();
    }

    public override void Render()
    {
      this.DataContext = Model;
    }

    private void InitAppBar()
    {
      ApplicationBar appBar = new ApplicationBar();

      var backButton = new ApplicationBarIconButton(
        new Uri("images/appbar.back.rest.png", UriKind.Relative));
      backButton.Click += new EventHandler(backButton_Click);
      backButton.Text = "Back";
      appBar.Buttons.Add(backButton);

      var addButton = new ApplicationBarIconButton(
        new Uri("images/appbar.save.rest.png", UriKind.Relative));
      addButton.Click += new EventHandler(saveButton_Click);
      addButton.Text = "Save";
      appBar.Buttons.Add(addButton);

      ApplicationBar = appBar;
    }

    void saveButton_Click(object sender, EventArgs e)
    {
      this.Navigate("Customers/" + Model.ID +
                    (Model.ID == "0" ? "/CREATE" : "/UPDATE"));
    }

    void backButton_Click(object sender, EventArgs e)
    {
      NavigationService.GoBack();
    }
  }
}
Found in the CustomerManagement/CustomerManangement.WindowsPhone/Views/CustomerEditView.xaml.cs file of the download
Figure 6.14 shows the completed screen in action. The gray fields on the screen indicate the fields are editable.
Figure 6.14 Windows Phone Customer Edit View looks just a little different from the other Customer Edit View implementations.
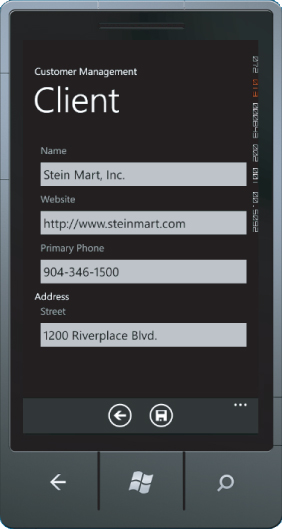
Implementing a WebKit Platform Container
Up to this point you've largely ignored solutions that target varied platforms, yet there are many reasons that you may need to do so. Smaller budgets or development teams may need to target a large number of platforms in a short amount of time, or you may need to consider a number of platforms if your target audience mostly uses iPhones, but you want to support other platforms until you know which are best to target directly. And of course, there is that Blackberry community that refuses to die and can't be directly targeted with C#. Also remember that with the web implementation access to GPS, barcode scanners and other hardware interfaces that are either required or wanted aren't available, so you must evaluate consistency with a native platform implementation.
MonoCross includes a basic container implemented for Microsoft's ASP.NET MVC framework. You can use WebApp.Net's Web UI framework implementation to give an iPhone-like presentation. If you want to know more about the details of Microsoft's framework, go to http://webapp-net.com. You can use other frameworks, such as jQuery mobile and jQTouch; most frameworks use some combination of JavaScript and CSS to generate their look and feel and navigational interface. One big difference between the WebKit container and the other platform-specific containers is that it runs on the server and not on the client. The view and the controller render the HTML for the web pages sent down to the client, which is simple for views that don't require any data entry, such as the Customer List and Customer View, but require a good amount of thought when applied to the Customer Edit View.
Another smaller difference is that navigation on the server is synchronous and not asynchronous, as is navigation on the mobile platform implementations you've used so far. As you might guess, multithreading isn't required in a web interface because all applicable code runs on the server. This sample can leave out chunks of code because much of it is boilerplate ASP.NET MVC code, but it includes the important portions that are applicable to the implementation.
Initializing a Container with WebKit
The WebKit container uses the ASP.NET MVC framework and integrates the URL rewriting mechanisms to the navigational model used by MonoCross. Listing 6.20 shows the implementation of Global.asax.cs. Initialization occurs for the web application during the Session Start and runs for each new client that connects to the web server. The minimal state, primarily the URL mapping, is maintained for each client.
Listing 6.20: ASP.NET Global.asax.cs
namespace CustomerManagement.Webkit
{
  public class MvcApplication : System.Web.HttpApplication
  {
    public static void RegisterRoutes(RouteCollection routes)
    {
      routes.Ignore("favicon.ico");
      routes.Ignore("WebApp/{*mapUri}");
      routes.MapRoute("", "{*mapUri}", new { controller = "App", action = "Render" });
    }

    protected void Application_Start()
    {
      RegisterRoutes(RouteTable.Routes);
    }

    protected void Session_Start()
    {
      // initialize app
      MXWebkitContainer.Initialize(new CustomerManagement.App());
      // add views to container
      MXWebkitContainer.AddView<List<Customer>>(new Views.CustomerListView(),
           ViewPerspective.Default);
      MXWebkitContainer.AddView<Customer>(new Views.CustomerEditView(),
           ViewPerspective.Update);
      MXWebkitContainer.AddView<Customer>(new Views.CustomerView(),
           ViewPerspective.Default);
    }
  }
}
Found in the CustomerManagement/CustomerManangement.WebKit/Global.asax.cs file of the download
Continuing with Listing 6.21, you implement the only controller for the ASP.NET MVC application. There is only a single controller that maps the incoming URL to the MonoCross navigation URI scheme and forwards it to the WebKit container, which in turn routes the request to the appropriately mapped controller.
Listing 6.21: ASP.NET WebKit Customer List
namespace CustomerManagement.Webkit.Controllers
{
  [HandleError]
  public class AppController : Controller
  {
    public ActionResult Render(string mapUri)
    {
      var url = (mapUri == null) ? MXContainer.Instance.App.NavigateOnLoad : mapUri;
      MXWebkitContainer.Navigate(url, this.Request);
      return null;
    }
  }
}
Found in the CustomerManagement/CustomerManangement.WebKit/Controllers/AppController.cs file of the download
Building the Customer List View with WebKit
The WebKit container implementation uses a single markup file called Root.html for its interface. All common HTML is contained in the Root.html file, including CSS and JavaScript includes, header and footer layout, and HTML specific for the WebApp.Net implementation. WebApp.Net uses layers of “div” tags to define a page and the navigational areas on the page, as well as all items on the page. The div tags have class attributes to define their look and feel and are styled according to the included CSS.
The MonoCross WebKit container provides two base classes from which to derive your views:
- MXWebkitView: Provides a basic view with a simple helper method for writing the HtmlGenericControl hierarchies to the web page.
- MXWebkitDialogView: Following the pattern established in the iOS and Android, MonoCross provides a Dialog building class nearly identical to the MonoTouch.Dialog and MonoDroid.Dialog classes. In addition, it provides a binding functionality that maps HTML form elements back to the model to simplify updates to the model via a form postback. Although not highlighted in this sample, it provides simple form layout for read-only layers as well.
The Customer List View in Listing 6.22 builds the HTML for the client using HtmlGenericControls. HTML link elements direct the client to show the view and edit pages, and the additional HTML is formatting for the list and its items.
Listing 6.22: ASP.NET WebKit Customer List
namespace CustomerManagement.Webkit.Views
{
  public class CustomerListView : MXWebkitView<List<Customer>>
  {
    public override void Render()
    {
      HtmlGenericControl button = new HtmlGenericControl("a");
      button.Attributes.Add("href", "Customers/NEW");
      button.Attributes.Add("rel", "action");
      button.Attributes.Add("rev", "async");
      button.Attributes.Add("class", "iButton iBClassic");

      HtmlGenericControl image = new HtmlGenericControl("img");
      image.Attributes.Add("src", "../../WebApp/Img/more.png");

      HtmlGenericControl list = new HtmlGenericControl("div");
      list.Attributes.Add("class", "iList");

      HtmlGenericControl ul = new HtmlGenericControl("ul");
      ul.Attributes.Add("class", "iArrow");
      ul.Attributes.Add("style", "background-color: #FFFFFF; color: #000000");

      foreach (CustomerManagement.Shared.Model.Customer customer in Model)
      {
        HtmlGenericControl li = new HtmlGenericControl("li");
        HtmlGenericControl a = new HtmlGenericControl("a");
        a.Attributes.Add("href", string.Format("/Customers/{0}", customer.ID));
        a.Attributes.Add("rev", "async");
        HtmlGenericControl em = new HtmlGenericControl("em");
        em.InnerText = customer.Name;
        HtmlGenericControl small = new HtmlGenericControl("small");
        small.Attributes.Add("style", "color:#666666");
        small.InnerText = customer.Website;
        a.Controls.Add(em);
        a.Controls.Add(small);
        li.Controls.Add(a);
        ul.Controls.Add(li);
      }
      button.Controls.Add(image);
      list.Controls.Add(ul);
      WriteToResponse("CustomerList", "Customers", new Control[] { button, list });
    }
  }
}
Found in the CustomerManagement/CustomerManangement.Webkit/Views/CustomerListView.cs file of the download
Figure 6.15 shows the page in its final form.
Figure 6.15 The sample code generates the WebKit Customer List View.
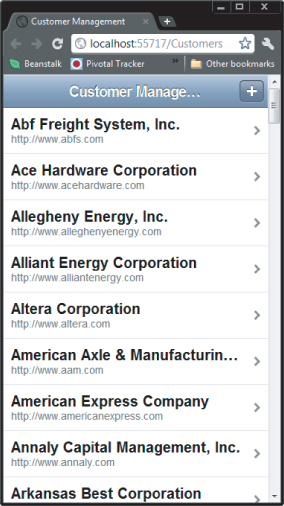
Building the Customer View with WebKit
The sample code for Customer View for the WebKit in Listing 6.23 shows the appropriate HTML using HtmlGenericControl objects and adding appropriate HTML elements for formatting and navigation. Notice the map, call, and customer home page are implemented as links, just as you did in the iOS, Android, and Windows Phone examples.
Listing 6.23: ASP.NET WebKit Customer View
namespace CustomerManagement.Webkit.Views
{
  public class CustomerView : MXWebkitView<Customer>
  {
    public override void Render()
    {
      HtmlGenericControl div = new HtmlGenericControl("div");
      div.Attributes.Add("class", "iMenu");

      HtmlGenericControl contactHeader = new HtmlGenericControl("h3");
      contactHeader.InnerText = "Contact Info";
      HtmlGenericControl contact = new HtmlGenericControl("ul");
      contact.Controls.Add(LabelItem("ID", Model.ID));
      contact.Controls.Add(LabelItem("Name", Model.Name));
      contact.Controls.Add(LinkItem(Model.Website, "Website", Model.Website));
      contact.Controls.Add(LinkItem(string.Format("tel:{0}",
                           Model.PrimaryPhone),
                           "Primary Phone", Model.PrimaryPhone));

      HtmlGenericControl addressHeader = new HtmlGenericControl("h3");
      addressHeader.InnerText = "Primary Address";
      HtmlGenericControl address = new HtmlGenericControl("ul");
      address.Controls.Add(BlockItem("Address",
                           string.Format("{0}<br>{1} {2}<br>{3}, {4}  {5}",
                           Model.PrimaryAddress.Description,
                           Model.PrimaryAddress.Street1,
                           Model.PrimaryAddress.Street2,
                           Model.PrimaryAddress.City,
                           Model.PrimaryAddress.State,
                           Model.PrimaryAddress.Zip
                                                              )));
      address.Controls.Add(LabelItem("Previous Orders",
                           Model.Orders.Count.ToString()));
      address.Controls.Add(LabelItem("Addresses",
                                     Model.Addresses.Count.ToString()));

      div.Controls.Add(contact);
      div.Controls.Add(address);

      div.Controls.Add(DeleteButton(
        string.Format("/Customers/{0}/{1}", Model.ID, "DELETE"),
                      "Delete Customer", false));
      div.Controls.Add(EditButton(
        string.Format("/Customers/{0}/{1}", Model.ID, "EDIT"),
                      "Change Customer", true));

      WriteAjaxToResponse("ViewCustomer", "Customer Details", div);
    }
    static HtmlGenericControl LabelItem(string caption, string value)
    {
      HtmlGenericControl item = new HtmlGenericControl("li");
      HtmlGenericControl span = new HtmlGenericControl("span");
      span.InnerText = value;
      item.InnerText = caption;
      item.Controls.Add(span);
      return item;
    }
    static HtmlGenericControl BlockItem(string caption, string html)
    {
      HtmlGenericControl item = new HtmlGenericControl("li");
      HtmlGenericControl div = new HtmlGenericControl("div");
      div.Attributes.Add("class", "iBlock");
      div.Attributes.Add("style", "font-weight:normal");
      div.InnerHtml = html;
      item.InnerText = caption;
      item.Controls.Add(div);
      return item;
    }
    static HtmlGenericControl LinkItem(string link, string caption, string value)
    {
      HtmlGenericControl item = new HtmlGenericControl("li");
      HtmlGenericControl a = new HtmlGenericControl("a");
      HtmlGenericControl span = new HtmlGenericControl("span");
      a.Attributes.Add("href", link);
      a.Attributes.Add("rev", "async");
      span.InnerText = value;
      a.InnerText = caption;
      a.Controls.Add(span);
      item.Controls.Add(a);
      return item;
    }

    static HtmlGenericControl DeleteButton(string link, string caption, bool async)
    {
      HtmlGenericControl a = new HtmlGenericControl("a");
      a.Attributes.Add("href", link);
      if (async) a.Attributes.Add("rev", "async");
      a.Attributes.Add("class", "iPush iBWarn");
      a.Attributes.Add("style", "width:100%");
      a.InnerText = caption;
      return a;
    }

    static HtmlGenericControl EditButton(string link, string caption, bool async)
    {
      HtmlGenericControl a = new HtmlGenericControl("a");
      a.Attributes.Add("href", link);
      if (async) a.Attributes.Add("rev", "async");
      a.Attributes.Add("class", "iPush iBClassic");
      a.Attributes.Add("style", "width:100%");
      a.InnerText = caption;
      return a;
    }
  }
}
Found in the CustomerManagement/CustomerManangement.Webkit/Views/CustomerView.cs file of the download
Figure 6.16 shows the completed view.
Figure 6.16 The result is the WebKit Customer View.
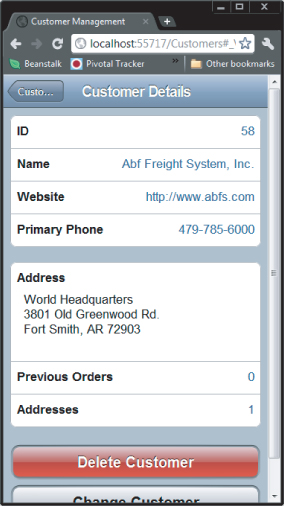
Building the Customer Edit View with WebKit
The final view is the most complex; although, it has the least amount of code. Listing 6.24 shows the implementation of the Customer Edit View, using the Dialog builder included in MonoCross to build the page layout almost identically to the Customer Edit Views in the iOS and Android samples. This view, in particular, requires the most thought because you need to handle form updates from the client and must get the form variables from the web page into the model and back to the controller. You can do this in the dialog building class. The Root constructor defines the navigation as in the previous sample, but the elements provide the formatting. Using reflection provides mapping used on postback to populate the model with the values the user may have updated.
Listing 6.24: ASP.NET WebKit Customer Edit View
namespace CustomerManagement.Webkit.Views
{
  public class CustomerEditView : MXWebkitDialogView<Customer>
  {
    public override void Render()
    {
      this.Root = new RootElement("Customer Info", "customerForm", "Customers",
                  string.Format("/Customers/{0}/{1}", Model.ID,
                  Model.ID == "0" ? "CREATE" : "UPDATE"), false)
            {
                new Section("Contact Info")
                {
                    new StringElement("ID", Model.ID),
                    new TextElement("Name", Model.Name, "Name"),
                    new TextElement("Website", Model.Website, "Website"),
                    new TextElement("Primary Phone", Model.PrimaryPhone, "PrimaryPhone")
                },
                new Section("Primary Address")
                {
                    new TextElement("Address 1", Model.PrimaryAddress.Street1,
                                    "PrimaryAddress.Street1"),
                    new TextElement("Address 2", Model.PrimaryAddress.Street2,
                                    "PrimaryAddress.Street2"),
                    new TextElement("City", Model.PrimaryAddress.City,
                                    "PrimaryAddress.City"),
                    new TextElement("State", Model.PrimaryAddress.State,
                                    "PrimaryAddress.State"),
                    new TextElement("Zip", Model.PrimaryAddress.Zip,
                                    "PrimaryAddress.Zip")
                }
            };
      WriteRootToResponse("EditCustomer", "Edit Customer", Root);
    }
  }
}
Found in the CustomerManagement/CustomerManangement.Webkit/Views/CustomerEditView.cs file of the download
Figure 6.17 shows the final view in action.
Figure 6.17 The WebKit Customer Edit View is now complete.
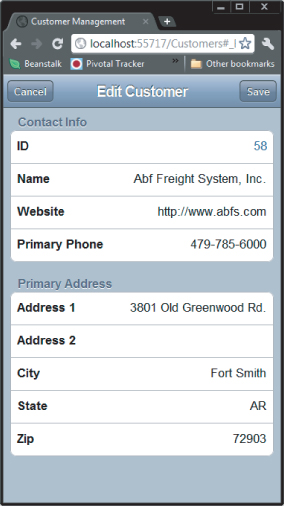
In this chapter, you've gone over the basics of showing a list of items, viewing those items, and performing the CRUD operations in a user experience that is unique to each platform but is implemented consistently across those platforms. You've seen in these solutions that you don't need to sacrifice the look and feel of the platform to build solutions that give your users what they expect from an application on their mobile device.
In the next chapter you see how to connect your backend enterprise systems to your cross-platform solutions so your application can consume data without overburdening the slower device.