
Chapter 5
Building Shared Applications
What's in this Chapter?
- Reviewing how to drive model design from user experience
- Walking through explicit model examples
- Understanding the controller's function
The model and controller are at the heart of an MVC application. For cross-platform applications, developers can reap more benefits from code portability by leveraging the model and controller classes to do the heavy lifting. Routines for verifying data input, logic trees, navigations flows, and data loading are all best placed in either the controller or the model. Such a practice results in the most reusable code.
Because you implement views independently on each platform, you can rarely leverage code written for one view when writing that same view for another platform. This is because each platform's UI classes and constructs are not shared. In iOS the UIView and its subclasses make up the large portion of the built-in controls. As might be expected, Android and Windows Phone 7 don't have a UIView class. For Android OS the Activity class serves as the root container for UI controls. In Windows Phone 7 the Silverlight Canvas classes sit at the base of UI controls.
At first it can seem obvious and easy to keep business logic out of the view. But every time a control verifies a value entered, every time a UI action updates a model's value, and every time a touch event causes a navigation event, the code must be rewritten in each platform's view. The navigation events are the secret sauce to wiring up a portable MVC application. Navigating to an endpoint is simple; writing code to verify values can be complex. Put the complex code in the models and controllers; put the simple stuff, such as navigation events, in the views.
![]() You can create abstract UI constructs that can be used to represent UI controls and then rendered using native UI objects. The most popular open-source presentation micro framework is MonoDialog. Originally written by Miguel de Icaza, the dialog framework initially spread through the open source community as a rapid development dialog framework for MonoTouch applications. As Mono for Android materialized, the dialog framework was ported to Android. The spread of the dialog framework to multiple platforms has proven the theory that abstract dialog concepts could be used to share application-specific UI code between wildly different native UI SDKs.
You can create abstract UI constructs that can be used to represent UI controls and then rendered using native UI objects. The most popular open-source presentation micro framework is MonoDialog. Originally written by Miguel de Icaza, the dialog framework initially spread through the open source community as a rapid development dialog framework for MonoTouch applications. As Mono for Android materialized, the dialog framework was ported to Android. The spread of the dialog framework to multiple platforms has proven the theory that abstract dialog concepts could be used to share application-specific UI code between wildly different native UI SDKs.
Although HTML 5 development enables greater flexibility on code placement in the view, the overall maturity of the language and technology stack to handle device-side storage and interact with device hardware is limited. Like most technologies, you can create solutions to hurdle these obstacles, but using the MVC pattern and C# can provide more robust solutions to meet your enterprise's needs.
HTML became a popular mobile development technology shortly after Apple released the iPhone. Just as popular mobile phones were being released with software development kits, Apple chose to keep the iOS platform closed. The WebKit HTML rendering engine under the hood of the Mobile Safari browser gave solution designers a gateway into application deployment for Apple's instant success. Connected applications quickly spread across the web, and websites targeted for consumption on mobile devices were launched.
The ability to host web applications for mobile devices is relatively new. Historically, mobile platforms have not been connected devices. As cellular technology has spread, many people are being introduced to mobile computing for the first time. Moving from web applications to native applications has not nullified the advantage of a data connection. Running a native (disconnected) application can bring real advantages, but much of the power in today's mobile apps comes from their ability to retrieve current information from online data sources. Users reach for today's applications because of an app's ability to display relevant information. The data can be trivial, for example sports scores, or vital business data, such as real-time stock quotes or inventory levels. Getting your user his or her information will often be at the heart of the application's functionality. Strategically designing your over-the-wire data pulls can be the difference between a responsive application and a slow one.
A data connection empowers applications to pull data of all sizes, and the speed of today's networks means there is no need to be concerned about pulling kilobytes of data. In addition, WiFi and high-speed cellular data speeds enable sub-second round trips for data. The same is true for retrieving megabytes of data. In a background thread, it is easy to achieve download times well under a minute for a megabyte of data. Compressing the data can decrease download times even more. The size of the data is less important than how it interrupts the user experience. If the application pulls 100MB of serialized .xml data seamlessly in the background, users will likely not complain. If, however, the user must wait for data too often, their experience will suffer. Keeping data pulls smaller when occurring between screen transitions helps the application feel responsive. Utilize background processes for pulling large data sets before the user needs them.
![]() Make sure to test on slower data connections when prototyping, developing, and regression testing your applications. Mobile users often find themselves connected to different data connections, some maxing out around 15 Kbps. Testing the application in a sheltered environment with a high-speed Internet connection may not reflect reality when the app is in production. Take time during the development phase to verify the user experience is not too heavily degraded when the device has a slower network connection.
Make sure to test on slower data connections when prototyping, developing, and regression testing your applications. Mobile users often find themselves connected to different data connections, some maxing out around 15 Kbps. Testing the application in a sheltered environment with a high-speed Internet connection may not reflect reality when the app is in production. Take time during the development phase to verify the user experience is not too heavily degraded when the device has a slower network connection.
As stressed in Chapter 2, “Designing Your User Experience,” the model's properties and methods should have a direct correlation to the data that is necessary for the view to render. If you render a list of customers, you do not need to pull every detail about each customer. It is enough to simply pull the details you want to display. The properties of the model and its methods should support this “just enough” approach. Perhaps your list includes each customer's name, region, and account number. Your model should provide a corresponding list property for each. In the customer look up example workflow discussed in Chapter 2, the rendering of the customer list did not require many details about the customer. Those details are not necessary until after a user chooses to view an individual customer from the customer list. At that point the application will need access to more details about that individual customer by using a customer detail property in your model. This is an example of how the desired behavior of the view drives the design of the model.
Starting from Your User Experience Design
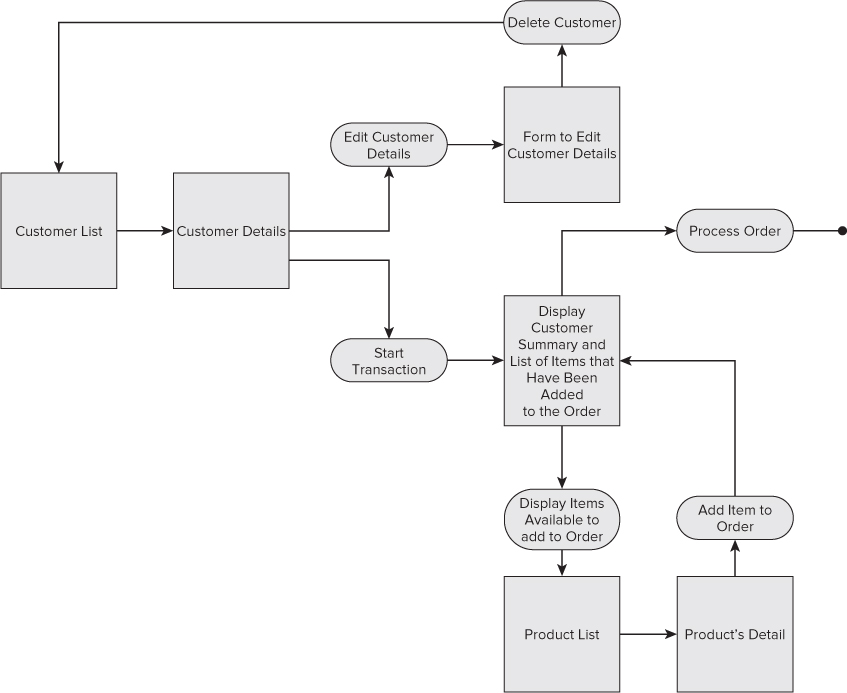
Chapter 2 looks at an initial customer management and order entry application workflow. The workflow, illustrated in Figure 5.1, includes searching for a customer, viewing a customer, and starting an order.
Figure 5.1 Activity diagram.
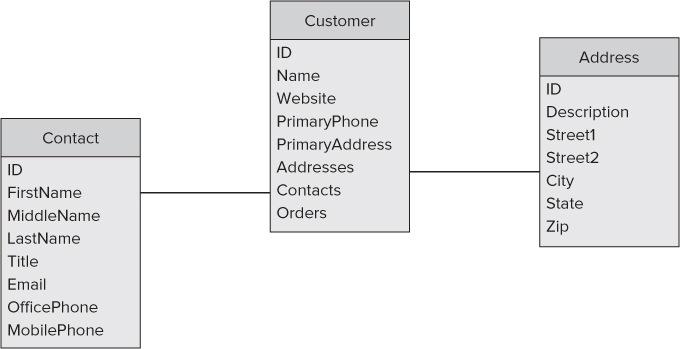
For your first dive into what the supporting model might look like, consider a possible customer model. The customer is the central object of the workflow because the process starts off with a list of customers. Figure 5.2 shows that the customer object has several attributes.
Figure 5.2 Simple customer data model diagram.
Listing 5.1 shows how the Customer model translates to a C# object that the view can leverage for displaying the list.

Listing 5.1: Customer model
public class Customer
{
  public string ID { get; set; }
  public string Name { get; set; }
  public string Website { get; set; }
  public string PrimaryPhone { get; set; }
  public Address PrimaryAddress { get; set; }
  public List<Address> Addresses { get; set; }
  public List<Contact> Contacts { get; set; }
  public List<Order> Orders { get; set; }
}
Found in the CustomerManagement.Shared/Model/Customer.cs file of the download
In the code you see several properties necessary for displaying a list, including ID and Name. Those properties are either critical to identifying the account or represent pieces of identifying information that the users might commonly use to query the customer. In the Customer model object, you also see several properties that would not be necessary for displaying the customer list, for example the list of orders. If the entire model and associated collections had to be populated for every customer before the list could be displayed, it's likely the user experience would be diminished by slow load times.
Over the history of mobile devices, connectivity has been lacking, in general, and high-bandwidth connectivity has been missing until very recently. Today's smartphones and cellphone-enabled tablets introduce a new connectivity paradigm. Developers can assume most devices are generally connected and have reasonable data bandwidths. The end result is that small data grabs can seamlessly occur between screen transitions, and larger data grabs can often occur within tolerable durations.
![]() Ultimately it's the user base that defines what reasonable wait times are. With second and third generation cellular data networks, pulling 10KB of data can be accomplished in well under a one second. That small download can occur easily between screen transitions. One second is acceptable for most users, as long as a touch or click indication can provide feedback that their user interaction has been recognized by the application. Often screens that require larger data pulls that take approximately 10 seconds are tolerable, but the user needs to see a wait spinner displayed. Be careful of screens requiring extremely large data downloads, such as a 5MB download. Users tire of using the app if they must routinely wait 20 seconds for the UI to render.
Ultimately it's the user base that defines what reasonable wait times are. With second and third generation cellular data networks, pulling 10KB of data can be accomplished in well under a one second. That small download can occur easily between screen transitions. One second is acceptable for most users, as long as a touch or click indication can provide feedback that their user interaction has been recognized by the application. Often screens that require larger data pulls that take approximately 10 seconds are tolerable, but the user needs to see a wait spinner displayed. Be careful of screens requiring extremely large data downloads, such as a 5MB download. Users tire of using the app if they must routinely wait 20 seconds for the UI to render.
Building for Lightly Loaded Lists
To match the new data connectivity paradigm, lightly loaded lists that are seamlessly integrated through the RESTful services can help shorten the duration of data pulls for larger lists. Lightly loaded lists contain a subset of information contained within the model. The subset should include key identifiable information the user might expect to see displayed on the screen, choose to query for in a search box, or need to complete calculations performed on the list. RESTful services provide an easy way to expose this type of information. JSON or XML endpoints are easily and securely exposed using WCF and SSL. Applications can use simple HTML GET and PUT actions to retrieve and post information to a data server. A simple GET request to an endpoint can provide a list of customers with just a few details of each customer. Listing 5.2 shows a slimmed down customer object with just a few properties for a lightly loaded list.
Listing 5.2: Lightly loaded Customer model
public class Customer
{
  public string ID { get; set; }
  public string Name { get; set; }
  public string Website { get; set; }
  public Date_LastOrder { get; set; }
}
Found in the CustomerManagement.Shared/Model/Customer.cs file of the download
In the lightly loaded customer model, the Name field would most likely be the identifiable information a user might want to see about the customer. In addition, the model contains a customer ID field that provides easy reference to the customer from a single identifier.
In the hypothetical customer model shown in Listing 5.2, there is an additional property for the date of the last order (Date_LastOrder). The last order date might not be a necessary property for display in a list of search results, but it serves as an example of key information that you might also include in your lightly loaded list. If the customer management application performs a lot of business logic around who the last customer was to order, having that information on the lightly loaded object can spare the application from downloading every customer record before completing that calculation.
Using lightly loaded list endpoints can be a great way to get the application up and running with a basic set of essential data for the application workflow. In the customer workflow in Figure 5.1 the user workflow does not require any real detailed information on the first screen. In the customer management workflow, the second screen transitions to the details of a specific customer. This can require an additional call to the data server to retrieve a more extensive set of information on that particular customer. The advantage of the lightly loaded list approach is that the customer list screen can load significantly faster because the details of each customer do not need to be downloaded first. Additionally, in this approach, the customer's detailed information is not retrieved until it is necessary to complete the screen render. This prevents unnecessary data from being transferred and speeds up the application's execution for the user.
Plan for Lazy-Loaded Details
Lazy-loading data is the simplest option to implement when utilizing RESTful services. This technique is accomplished by waiting to load a particular dataset until it is necessary for screen rendering. The technique works well for individual objects, because their data sizes are relatively small. When downloading lightly loaded lists, the data size can be large, simply due to the number of entities represented in the list. To prevent over engineering, start by completing RESTful service calls at the time of screen rendering. If the screen transitions or interactions are slow because of data loads, look at pulling the data earlier in the application's execution flow.
To accelerate the screen transitions more, pre-fetching models can help leverage times of idle network activity by initiating background data pulls when users are not accessing portions of the application requiring data — or are accessing screens that already have their supporting data cached to the device.
Techniques to lazy loading depend completely on the model. In the customer example, you can build in functionality to help users facilitate pre-fetching the model. You wouldn't have to build a UI queueing mechanism for your users. You can subtly build in benchmarks for your pre-fetching engine to determine which models to fetch first.
One subtle way to introduce a priority ordering mechanism is by identifying user preference “favorites.” Building on your Customer model in Listing 5.1, you can add a new Favorite property, as shown in Listing 5.3.
Listing 5.3: Favorite property added to the Customer model
public class Customer
{
  public string ID { get; set; }
  public string Name { get; set; }
  public string Website { get; set; }
  public Date LastOrder { get; set; }
  public string Favorite { get; set; }
}
Found in the CustomerManagement.Shared/Model/Customer.cs file of the download
The Favorite property on a Customer model provides the user a way to provide feedback into pre-fetch queueing logic. When a customer is identified as a user's favorite, the underlying logic can prioritize that customer in the queue above customers who are not the user's favorite.
The favorite customer approach works well in applications with large backend servers, where individual users are uniquely identified within the ecosystem. For smaller applications without individual user's, lazy-load prioritizing can be determined by other available information. One of the nice hardware items packaged in today's breed of smartphones is a GPS chip. By leveraging location services, the current location of the user can be determined and data pre-fetched based on proximity. In the Customer model in Listing 5.1, you see a primary address. If the primary address is included in the lightly loaded model, queueing your models for pre-fetching by proximity may serve as a reasonable way to prioritize the order in which data is queued.
![]() Implementing a pre-fetcher should not be necessary out-of-the-box. The first order of business is to let the application lazy load everything. If performance is not sufficient, then create a background thread to do the pre-fetching. Prioritizing can be as simple as sequentially walking through the individual list items from top to bottom. Only when performance is being compromised should additionally prioritized queuing become necessary.
Implementing a pre-fetcher should not be necessary out-of-the-box. The first order of business is to let the application lazy load everything. If performance is not sufficient, then create a background thread to do the pre-fetching. Prioritizing can be as simple as sequentially walking through the individual list items from top to bottom. Only when performance is being compromised should additionally prioritized queuing become necessary.
Advanced Techniques
The exchange of data between the data source and device generally occurs using either text representations or bytes, and at the most rudimentary level even text streams are byte streams. Traditional database synchronization engines are an example of data source interactions using byte streams. These engines analyze the underlying data structures and transfer “unsynced” information between the two data storage repositories. RESTful services provide another paradigm for data access. With REST data entities are transferred in their entirety to requesting clients. The clients do not house their own data repositories, but they cache snapshots of the database and, in turn, post all change requests to the server. When data discrepancies exist, the client relies on the server as the source of truth. These kinds of RESTful transactions typically occur using XML or JSON transferred in an HTTP GET request. The advantages of REST in mobile applications are discussed at length in later chapters, but you can see serialization techniques for interacting with models here.
JSON Versus XML
XML can be a great tool for data exchange in your mobile applications. It's human readable, easily serialized, and has solid parsing libraries for most platforms and frameworks. XML provides many nice advantages, especially legibility. Following is a trimmed-down version of the server's Customer list response in your Customer management example. The sample code provided returns 100 customers, but the output has been shortened to only four for the examples shown here:
<?xml version="1.0" encoding="utf-8"?>
<ArrayOfCompany xmlns:xsd="http://www.w3.org/2001/XMLSchema"
    xmlns:xsi="http://www.w3.org/2001/XMLSchema-instance">
  <Company>
    <ID>1</ID>
    <Name>Stein Mart, Inc.</Name>
    <PrimaryPhone>904-346-1500</PrimaryPhone>
    <PrimaryAddress>
      <ID>1-a1</ID>
      <Description>World Headquarters</Description>
      <Street1>1200 Riverplace Blvd.</Street1>
      <City>Jacksonville</City>
      <State>FL</State>
      <Zip>32207</Zip>
    </PrimaryAddress>
  </Company>
  <Company>
    <ID>2</ID>
    <Name>Bgc Partners, Inc.</Name>
    <PrimaryPhone>212-938-5000</PrimaryPhone>
    <PrimaryAddress>
      <ID>2-a1</ID>
      <Description>World Headquarters</Description>
      <Street1>499 Park Ave.</Street1>
      <City>New York</City>
      <State>NY</State>
      <Zip>10022</Zip>
    </PrimaryAddress>
  </Company>
  <Company>
    <ID>3</ID>
    <Name>Carpenter Technology Corporation</Name>
    <PrimaryPhone>610-208-2000</PrimaryPhone>
    <PrimaryAddress>
      <ID>3-a1</ID>
      <Description>World Headquarters</Description>
      <Street1>2 Meridian Blvd.</Street1>
      <City>Wyomissing</City>
      <State>PA</State>
      <Zip>19610</Zip>
    </PrimaryAddress>
  </Company>
  <Company>
    <ID>4</ID>
    <Name>Tri Marine International, Inc.</Name>
    <PrimaryPhone>425-688-1288</PrimaryPhone>
    <PrimaryAddress>
      <ID>4-a1</ID>
      <Description>World Headquarters</Description>
      <Street1>10500 N.E. 8th St.</Street1>
      <Street2>Ste. 1888</Street2>
      <City>Bellevue</City>
      <State>WA</State>
      <Zip>98004</Zip>
    </PrimaryAddress>
  </Company>
</ArrayOfCompany>
JSON is an excellent and efficient data serialization standard. It is widely used in enterprise applications. In most situations, JSON can provide a great solution in your run-time environment. Debugging with JSON can be a headache. There are several JSON parsing tools, but neither Visual Studio nor MonoDevelop have any parsing built into the debugger's user interface. The following is the same server response serialized to JSON (and condensed to four entries):
 [
  {
    "<Addresses>k_BackingField":null,
    "<Contacts>k_BackingField":null,
    "<ID>k_BackingField":"1",
    "<Name>k_BackingField":"Stein Mart, Inc.",
    "<Orders>k_BackingField":null,
    "<PrimaryAddress>k_BackingField":{
       "<City>k_BackingField":"Jacksonville",
       "<Description>k_BackingField":"World Headquarters",
       "<ID>k_BackingField":"1-a1",
       "<State>k_BackingField":"FL",
       "<Street1>k_BackingField":"1200 Riverplace Blvd.",
       "<Street2>k_BackingField":null,
       "<Zip>k_BackingField":"32207"
    },
    "<PrimaryPhone>k_BackingField":"904-346-1500",
    "<Website>k_BackingField":null
  },
  {
    "<Addresses>k_BackingField":null,
    "<Contacts>k_BackingField":null,
    "<ID>k_BackingField":"2",
    "<Name>k_BackingField":"Bgc Partners, Inc.",
    "<Orders>k_BackingField":null,
    "<PrimaryAddress>k_BackingField":{
       "<City>k_BackingField":"New York",
       "<Description>k_BackingField":"World Headquarters",
       "<ID>k_BackingField":"2-a1",
       "<State>k_BackingField":"NY",
       "<Street1>k_BackingField":"499 Park Ave.",
       "<Street2>k_BackingField":null,
       "<Zip>k_BackingField":"10022"
    },
    "<PrimaryPhone>k_BackingField":"212-938-5000",
    "<Website>k_BackingField":null
  },
  {
    "<Addresses>k_BackingField":null,
    "<Contacts>k_BackingField":null,
    "<ID>k_BackingField":"3",
    "<Name>k_BackingField":"Carpenter Technology Corporation",
    "<Orders>k_BackingField":null,
    "<PrimaryAddress>k_BackingField":{
       "<City>k_BackingField":"Wyomissing",
       "<Description>k_BackingField":"World Headquarters",
       "<ID>k_BackingField":"3-a1",
       "<State>k_BackingField":"PA",
       "<Street1>k_BackingField":"2 Meridian Blvd.",
       "<Street2>k_BackingField":null,
       "<Zip>k_BackingField":"19610"
    },
    "<PrimaryPhone>k_BackingField":"610-208-2000",
    "<Website>k_BackingField":null
  },
  {
    "<Addresses>k_BackingField":null,
    "<Contacts>k_BackingField":null,
    "<ID>k_BackingField":"4",
    "<Name>k_BackingField":"Tri Marine International, Inc.",
    "<Orders>k_BackingField":null,
    "<PrimaryAddress>k_BackingField":{
       "<City>k_BackingField":"Bellevue",
       "<Description>k_BackingField":"World Headquarters",
       "<ID>k_BackingField":"4-a1",
       "<State>k_BackingField":"WA",
       "<Street1>k_BackingField":"10500 N.E. 8th St.",
       "<Street2>k_BackingField":"Ste. 1888",
       "<Zip>k_BackingField":"98004"
    },
    "<PrimaryPhone>k_BackingField":"425-688-1288",
    "<Website>k_BackingField":null
  },
  {
    "<Addresses>k_BackingField":null
  }
]
Whether to use JSON or XML can be a decision made by the developer. With smaller data items, the extra bloat of the XML element scheme is easily masked by the speed of today's data connections. Additionally, XML can be much easier to read during a debug session. In general, JSON is a lighter-weight data serialization scheme. Ultimately, JSON can probably produce smaller serialized data sizes. In addition, JSON can compress larger payload sizes before they are sent.
A few considerations to keep in mind when choosing a serialization method are bandwidth, serialization time, and frequency of use. Upload and download bandwidths differ on most mobile devices. Nearly 100 percent of the time, you can count on a considerably faster download speed than upload speed. Keeping requests small can help in the upload request times.
Serialization time is worth evaluating within an enterprise application. There can be tremendous differences in serialization times based on complexity and size of the data being serialized. Picking a serialization scheme can have dramatic ramifications for both server and client execution. Expensive serialization routines on the server can cause a lag in the server's response time. In some situations serialization can take longer than the over-the-wire time saved from the smaller payload size. The reverse can be true on the device. It's possible that a particular serialization routine can execute within tolerance levels on a high-powered server but bog down on the less-powerful processors, which power most of today's mobile devices.
![]() A model's frequency of use can be another factor you consider when selecting its serialization method. If the object is not used a lot, don't waste time analyzing its serialization method. Simply use the project's default serialization method and optimize only if bottlenecks show up.
A model's frequency of use can be another factor you consider when selecting its serialization method. If the object is not used a lot, don't waste time analyzing its serialization method. Simply use the project's default serialization method and optimize only if bottlenecks show up.
You do not need to use the same serialization techniques across all models in an application. The .NET framework provides many libraries for data serialization and compression. That depth of qualified libraries means a development team does not need to spend a lot of time building libraries to assist with data transfer. With just a flip of an enumeration, teams can experiment with vastly different serialization schemes.
Don't Serialize What You Don't Need
Regardless of whether the data is serialized using JSON or XML, serializing unnecessary information is a waste of bandwidth and time. The number one piece of wasted data often transferred is data with values for objects that default to that value. If the item count is zero and the object defaults to an initialized value of zero, it's not necessary to serialize and transfer that value over the wire. You can take the same kind of optimization to the next level by wiring default values into the constructor of those objects.
Additionally, sending objects with greater resolution than necessary can cause wasted bandwidth. The most popular example is with DateTime values. The values are best serialized by their tick value. You can easily construct and manipulate DateTime objects using ticks. Ticks are a representation of 100 nanosecond time intervals stored in a Long. Chances are the business logic does not require fidelity down to the 100th nanosecond. Serializing a DateTime object to ticks and dividing that by 10000000 can shrink your DateTime object by 7 bytes and still provide 1-second fidelity. Considering an object's resolution and data fidelity when serializing can help shave precious bytes from large data payloads.
Additional Tips and Tricks
One of the advantages of using C# and .NET to build your application is the ability to carry your data-model objects with you when building the backend services. If using WCF to build RESTful services, the Model classes can be leveraged within the data server code too. This makes it easier to communicate data requirements and leverage more shared code.
Delayed instantiation is another trick to keep in mind if you are pre-fetching data objects. The concept of delayed instantiation is to prevent over consumption of large data items until the application run-time requires it. Because larger data objects require lengthier downloads, it can be advantageous to retrieve them in a background thread with the intent to them accessible on the device before the user needs them. When downloading data with a large number of objects, deserialization of the data can bog down the CPU. If the device is idle, it won't be a problem; but, if a screen rendering is occurring, the user could notice a significant delay in screen animations. For that reason, cache the resource to disk, but avoid deserializing the resource into objects until necessary.
Just as the heart of your application's responsiveness is in the model, the capability to leverage shared business logic exists within the controller. Business logic is the root of your application. It's the logic specific to your application's objects. Leveraging a shared code base for this logic allows you to reuse tested code as you take your application to new platforms.
The controller code provides an opportunity for the business logic to evaluate the current state of the model and execute a decision tree. You can find an example of this in your customer management workflow. Your customer management example provides a workflow where an order is processed. Order processing often includes business logic such as payment validation, in-stock status, and saving the order to the backend system. And, because the order processing code must execute on every platform, the controller is an ideal spot to place the code. Alternatively, you can place the order-processing code in the button or keystrokes' event handlers, but UI code cannot be compiled by each platform. The controller code is compiled into the application assembly and executed from a shared code base on each platform. If the logic were placed inside an event handler of a UI control, the majority of that platform-agnostic validation code would need to be copied and pasted between platform assemblies. To ensure the easiest code maintenance, compiling assemblies with shared code files is a far superior structure than copying and pasting C# code between source code files.
![]() The word platform can be an indicator of exponential work. Every piece of code written in a platform-specific implementation must be re-implemented each time the application is moved to a new platform. This includes the use of .NET libraries available for one target's compiler and not another's.
The word platform can be an indicator of exponential work. Every piece of code written in a platform-specific implementation must be re-implemented each time the application is moved to a new platform. This includes the use of .NET libraries available for one target's compiler and not another's.
Implementing Your Workflow
Within the MonoCross pattern, the Controller code must accomplish a couple of tasks. It must identify and process any parameters passed within the navigation URI, perform business logic related to the state of the application, and return a view perspective that can be leveraged by each platform's container. The platform container uses that perspective to determine what view to display.
Perhaps the easiest way to explore a controller's jobs is in code. You can break down the controller's three responsibilities into individual code segments. Within the customer management example you've been working through, you can pull out workflows to help highlight the concepts.
Looking back at Figure 5.1, you can see the customer management example has several screen transitions. Those screen transitions manifest as URIs in its navigation map. The relationship may be a one-to-one, view-to-URI relationship or a one-to-many relationship. The navigation map is discussed and displayed later in the chapter. A basic controller flow might look like the following if a view executes the navigation:
MXContainer.Navigate("Customer");
Listing 5.4 demonstrates the basic functionality of the controller logic. The Load() method populates the model and returns a view perspective related to the availability of the model. There is no business logic to execute on the list, in this functionality you just determine if it's immediately available.
Listing 5.4: Customer List controller
public class CustomerListController : MXController<List<Company>>
{
  public override string Load(Dictionary<string, string> parameters)
  {
    // populate model
    Model = new List<Company>();

    // determine current view perspective
    string perspective = ViewPerspective.Default;
    if (Model == null) { perspective = "No Data"; }
    return perspective;
  }
}
Found in the CustomerManagement/Controllers/CustomerListController.cs file of the download
Controllers have the option to return view perspectives and perform redirects. If the current state of the model does not support the default view, an alternative view perspective can be returned. If the data is not cached yet, you have the option to return a view perspective for data loading. If the current model has invalidated its state execution, flow can be directed to a new controller/model pair to initiate or restart a workflow.
Another task the controller performs is handling any parameters passed in the navigation URI. In the supporting MonoCross framework (MonoCross.Navigation) a simple regular expression (regex) extracts them from the navigated URI. When the controller's Load() method is called, the parameters are nicely packaged in the parameter dictionary collection.
When selecting a customer from the list, the Customer controller can perform a little bit more business logic based on the parameters provided by the navigation event, as shown in Listing 5.5.
Listing 5.5: Customer controller
public override string Load(Dictionary<string, string> parameters)
{
  if (parameters.ContainsKey("Customer"))
  {
    Model = Company.GetCompany(parameters["Customer"]);
    perspective = CustomerDetail;
  }
  return ViewPerspective.Default
}
Found in the CustomerManagement/Controllers/CustomerController.cs file of the download
The preceding Customer controller code contains a basic example of retrieving parameters from the URI. When you navigate from the Customer list screen, the ID of the customer to be represented on the next screen is placed in the URI. Parameters provide a simple mechanism to pass information necessary to facilitate screen transition. In this example, the parameter contains information related to which customer to view.
Generally, controllers are more complex than just data loaders. Often, a controller can encapsulate all the functionality around an object. The preceding Customer controller can easily be extended to handle basic operations to a customer. In Listing 5.6, the customer controller handles the business logic for both viewing a customer and creating a new one.
Listing 5.6: Customer controller with Partial CRUD implemented
public override string Load(Dictionary<string, string> parameters)
{
  string perspective = ViewPerspective.Default;

  string customer = null;
  parameters.TryGetValue("Customer", out customer);

  string action;
  if (!parameters.TryGetValue("Action", out action))
  {
    // set default action if none specified
    action = "VIEW";

    if (customer == null)
      throw new Exception("No Customer Id found");
  }

  switch (action)
  {
    case "VIEW":
      // populate the customer model
      Model = GetCustomer(customer);
      perspective = CustomerDetail;
      break;
    case "ADD":
      // process addition of new model
      Model = new Company();
      perspective = ViewPerspective.Create;
      break;

      // return and let redirected controller execute
      return ViewPerspective.Delete;
  }
  return perspective;
 }
Found in the CustomerManagement/Controllers/CustomerController.cs file of the download
The code snippet includes two business flows. If you want to create a new customer, simply instantiate a new instance of the model. If you want to view information about a customer, the information is loaded into the model. After the model is successfully prepared for the view, the perspective is returned. Each platform's container can then leverage that perspective to render the correct view.
These workflows introduce simple screens into the workflow. Although basic database functions of Create, Retrieve, Update, and Delete (CRUD) on a customer might not be too exciting, the simple customer activity diagram introduced in Chapter 2 illustrates areas of more complex business logic.
Generally, starting a transaction takes a little set up for the business logic and typically results in a more dynamic model setup. There may or may not be items added to the order. There could be additional order details present, such as shipping or payment information. Listing 5.7 shows the basic controller's Load() method for starting an order.
Listing 5.7: Order controller
public class OrderController : MXController<Order>
{
  public override string Load(Dictionary<string, string> parameters)
  {
    string actionParameter;
    if (parameters.TryGetValue("Order", out actionParameter))
    {
      Model = GetOrder(actionParameter);
    }
    else if (parameters.TryGetValue("Item", out actionParameter))
    {
      Order.Item item = new Order.Item();
      item.Product = Product.GetProduct(actionParameter);
      if (parameters.TryGetValue("Quantity", out actionParameter))
      {
        try { item.Quantity = Convert.ToInt32(actionParameter); }
        catch { }
      }
      Model.Items.Add(item);
    }
    else
    {
      Model = new Order();

      string customerId;
      if (parameters.TryGetValue("Customer", out customerId))
      {
        Model.Customer = CustomerController.GetCustomer(customerId);
      }
      return ViewPerspective.Create;
    }
    return ViewPerspective.Default;
  }

  private Order GetOrder(string orderId)
  {
    return null;
  }
 }
Found in the CustomerManagement/Controllers/OrderController.cs file of the download
The Order controller does a little more heavy lifting than the Customer controller. The Order controller fetches the existing order, or creates a new one. If a new order is created, it populates the Customer property. If a product is passed in the URI, it's added to the current order. The controller performs all the necessary logic. It handles the parameters passed within the navigation URI, it conditionally populates the model, and it returns an appropriate view perspective.
Basic Workflow Summary
At this point there is a controller/model combination for every entity identified in your workflow from Figure 5.1. The Customer controller loads the list of customers or returns a view perspective indicating no data is available. The Customer controller handles creating a new customer and loading existing customer information for the view. The Order controller can create a new order, load an existing order, or add an item to an order.
The Load() method of the controllers within the MonoCross pattern helps encapsulate business logic and data access into logical code modules. The MonoCross navigation framework is built on RESTful routing principles that feed the controller with all the information necessary to process business logic. Navigation endpoints will be generated from screens identified in your paper prototyping. Each screen will have one or more endpoint.
To recap each controller's execution flow for the previous workflow, you can identify a workflow strung together by the following navigation URIs in Listing 5.8.
Listing 5.8: Navigation map setup
public class App : MXApplication
{
  public override void OnAppLoad()
  {
    // Set the application title
    Title = "Customer Management";

    // Add navigation mappings for customer controller
    NavigationMap.Add("Customers", new CustomerListController());
    CustomerController customerController = new CustomerController();
    NavigationMap.Add("Customers/{CustomerId}", customerController);
    NavigationMap.Add("Customers/{CustomerId}/{Action}", customerController);

    // for the order controller
    OrderController orderController = new OrderController();
    NavigationMap.Add("Orders/{Order}", orderController);
    NavigationMap.Add("Orders/New/{Customer}", orderController);
    NavigationMap.Add("Orders/Add/{Order}/", orderController);

    // Set default navigation URI
    NavigateOnLoad = "Customers";
  }
}
Found in the CustomerManagement /App.cs file of the download
You can view the customer list by navigating to a parameter-less URI. But when navigating to a customer's details, the URI must contain a parameter that identifies the customer to view. When navigating to the Order controller, it requires several different pieces of information. And, as you found when you explored the Order controller's code, depending on the parameters the URI contains, one of several code paths are executed.
Stringing Together Controllers
At this point, the customer management example has laid out some straightforward workflows. Users can walk through basic workflows to view customers, create orders, and add items to an order. All these tasks are accomplished by stepping through a systematic workflow. For more advanced workflows, the MonoCross navigation pattern provides a redirect method for the controller to use. The purpose of the redirect is to cancel the loading of a model/view pairing and redirect business logic execution to another controller.
To better explain the navigation concept, explore another workflow in your customer management example. In the workflow laid out in Figure 5.1, the user can select a customer from the list to view details. Expanding on the workflow a little, you can assume the customer's detail screen also includes a delete customer option. Adding these two customer URIs to the navigation map sets up an illustration of the Redirect functionality.
The first two URIs leads to the same endpoint. One omits the Action parameter, which defaults to the GET option in the controller. The second enables a specific set of verbs to be acted on by the controller. Navigating from a view to the second URI shown in Listing 5.9 and specifying the DELETE action string can delete the customer model, and because that customer is deleted, the controller can redirect to another controller.
Listing 5.9: Sample navigation map entries
CustomerController customerController = new CustomerController();
NavigationMap.Add("Customer/{Customer}", customerController);
NavigationMap.Add("Customer/{Customer}/{Action}/", customerController);
NavigationMap.Add("Customer", new CustomerListController());
Found in the CustomerManagement/App.cs file of the download
In Listing 5.10, the direct is back to the list of customers.
Listing 5.10: CustomerController load method
using System;
using System.Collections.Generic;
using System.IO;
using System.Linq;
using System.Text;
using System.Net;
using System.Xml.Serialization;

using MonoCross.Navigation;

using CustomerManagement.Shared;
using CustomerManagement.Shared.Model;

namespace CustomerManagement.Controllers
{
  public class CustomerController : MXController<Customer>
  {
    public override string Load(Dictionary<string, string> parameters)
    {
      string perspective = ViewPerspective.Default;

      string customerId = null;
      parameters.TryGetValue("CustomerId", out customerId);

      // get the action, assumes
      string action;
      if (!parameters.TryGetValue("Action", out action))
      {
        // set default action if none specified
        action = "GET";
      }

      switch (action)
      {
        case "EDIT":
        case "GET":
          // populate the customer model
          if (customerId == null)
            throw new Exception("No Customer Id found");
          if (string.Equals(customerId.ToUpper(), "NEW"))
          {
            // assigm Model a new customer for editing
            Model = new Customer();
            perspective = ViewPerspective.Update;
          }
          else
          {
            Model = GetCustomer(customerId);
            if (String.Equals(action, "EDIT"))
              perspective = ViewPerspective.Update;
            else
              perspective = ViewPerspective.Default;
          }
          break;

        case "DELETE":
          if (customerId == null)
            customerId = Model.ID;
          // post delete request to the server
          DeleteCustomer(customerId);

          // return and let redirected controller execute, remaining
          // navigation is ignored
          MXContainer.Instance.Redirect("Customers");
          return ViewPerspective.Delete;

        case "CREATE":
          // process addition of new model
          if (AddNewCustomer(Model))
            MXContainer.Instance.Redirect("Customers");
          break;

        case "UPDATE":
          if (UpdateCustomer(Model))
            MXContainer.Instance.Redirect("Customers");
          break;
      }

      return perspective;
    }

    public static Customer GetCustomer(string customerId)
    {
      return CustomerManagement.Data.XmlDataStore.GetCustomer(customerId);
    }

    public static bool UpdateCustomer(Customer customer)
    {
      CustomerManagement.Data.XmlDataStore.UpdateCustomer(customer);
      return true;
    }

    public static bool AddNewCustomer(Customer customer)
    {
      CustomerManagement.Data.XmlDataStore.CreateCustomer(customer);
      return true;
    }

    public static bool DeleteCustomer(string customerId)
    {
      CustomerManagement.Data.XmlDataStore.DeleteCustomer(customerId);
      return true;
    }
  }
}
Found in the CustomerManagement/Controllers/CustomerController.cs file of the download
Code Summary
To complete the preceding example code, Listing 5.11 provides the underlying layouts of the sample application's classes. As described in Chapter 4, “The MonoCross Pattern,” the thread tying the application together is the MXApplication class. When the application loads, the OnAppLoad() method is called, and the navigation map is built. For the preceding example controllers, the MXApplication class is laid out here.
Listing 5.11: MXApplication
public class App : MXApplication
{
  public override void OnAppLoad()
  {
    // Set the application title
    Title = "Customer Management";

    // Add navigation mappings for customer controller
    NavigationMap.Add("Customers", new CustomerListController());
    CustomerController customerController = new CustomerController();
    NavigationMap.Add("Customers/{CustomerId}", customerController);
    NavigationMap.Add("Customers/{CustomerId}/{Action}", customerController);

    // for the order controller
    OrderController orderController = new OrderController();
    NavigationMap.Add("Orders/{Order}", orderController);
    NavigationMap.Add("Orders/New/{Customer}", orderController);
    NavigationMap.Add("Orders/Add/{Order}/", orderController);

    // Set default navigation URI
    NavigateOnLoad = "Customers";
  }
 }
Found in the CustomerManagement/App.cs file of the download
The customer management workflow starts with the loading of the customer list. Listing 5.12 shows the Customer List controller code.
Listing 5.12: CustomerListController
public class CustomerListController : MXController<List<Customer>>
{
  public override string Load(Dictionary<string, string> parameters)
  {
    // populate model
    Model = GetCustomerList();

    return ViewPerspective.Default;
  }

  public static List<Customer> GetCustomerList()
  {
    List<Customer> customerList = new List<Customer>();
    // XML Serializer
    System.Xml.Serialization.XmlSerializer serializer = new
XmlSerializer(typeof(List<Customer>));

    // web request
    string urlCustomers = "http://localhost/MXDemo/customers.xml";
    HttpWebRequest request = (HttpWebRequest)HttpWebRequest.Create(urlCustomers);
    using (StreamReader reader = new
StreamReader(request.GetResponse().GetResponseStream(), true))
    {
        // XML serializer
        customerList = (List<Customer>)serializer.Deserialize(reader);
    }
    return customerList;
  }
}
Found in the CustomerManagement/Controllers/CustomerListController.cs file of the download
Applying Changes to the Model
As briefly seen in the Order controller, the controller provides an opportunity for the business logic to update the Model. The MonoCross pattern does not force controllers to save data to the model. As items are selected in a view, the view can write directly to the model. However, the purpose of the MonoCross pattern is to facilitate the development of a shared code base. The purpose of the MVC pattern is to keep business logic out of the view code.
In the previous example, the view could easily add a selected item to an order. The code used to demonstrate how to update the model was not complex. But often each piece of data gets validated. Validation code usually involves business logic specific to that application. Performing that validation in the controller allows the code base to be utilized on all platforms without copying and pasting code between code files that can be compiled only on a single platform. Each source code file for a controller can be compiled, in its entirety, by each compiler utilized for the MonoCross targets.
In this chapter, you learned about the model and controller pieces of the MVC pattern that MonoCross uses to create a shared code base. You learned how to create the models based on data either necessary to create views they support or to complete calculations based on business rulesets. The chapter also addressed the importance of coding business rules into the controller whenever possible. Code placed in the model and controller classes are the heart of your shared code base.
In the next chapter you take a look at building views for the customer management application. You explore the different UI objects within the various SDKs, as well as looking at how to leverage the MonoCross framework to pass execution from the controller's Load() method to the container's Render() method.
The link between the controller and the view is the model and view perspective. One option for data loading is to kick off the data load in the controller and let the view pick it up when the Render() method is called. In the case of the Customer List controller, there would be no logic executed in the controller. The default view perspective could be returned and execution passed on. The advantage of that approach comes when the view takes a while to render, or the wait spinner can display in the view until the model is populated. That flow of execution works well in cases where no business logic execution needs to occur after the model is populated.