Chapter 9: Working with Flash
When you use the built-in flash or pair the EOS 70D with a Canon Speedlite, a new world of light and light control opens for you. The 70D enables you to control functions of both the built-in flash and an accessory Speedlite directly from the camera menu. You can set the metering, flash sync speed in Aperture-priority AE mode ( ![]() ), Flash Exposure Compensation, bracketing, shutter synchronization, flash ratio, and Custom Functions for compatible EX-series Speedlites. In addition, you can use wireless flash with radio or optical transmission depending on the Speedlite you’re using. The camera’s built-in flash serves as the master control unit to trigger one or more Speedlites. So, whether you use only the built-in flash or multiple Speedlites, learning to use flash broadens your shooting possibilities in both practical and creative ways.
), Flash Exposure Compensation, bracketing, shutter synchronization, flash ratio, and Custom Functions for compatible EX-series Speedlites. In addition, you can use wireless flash with radio or optical transmission depending on the Speedlite you’re using. The camera’s built-in flash serves as the master control unit to trigger one or more Speedlites. So, whether you use only the built-in flash or multiple Speedlites, learning to use flash broadens your shooting possibilities in both practical and creative ways.

This image was made with one Canon Speedlite mounted to a stand and a large silver reflector camera-right. The flash was diffused with an umbrella. Exposure: ISO 160, f/16, 1/125 second.
Deciding When to Use Flash
Some photographers hate using flash and others love it. For years, I avoided flash, not only because it was difficult to use, but also because, in my opinion, it created a sterile, unappealing light that neither added to the story of the image, nor complemented the subject.
However, times have changed. Thankfully, flash photography has come a long way. I am now one of the many photographers who consider flash an indispensable tool. With the plethora of light-shaping tools, in-camera flash controls, wireless triggers, and other accessories, I have as much control over portable flash units as I do over my studio strobes.
Even if you hate using flash, I hope you’ll consider experimenting with the built-in flash and with one or more off-camera Speedlites. This chapter is by no means a definitive flash guide, but it does give you the basics to help you get started.
Calculating Flash Exposure
If you cringe to think of figuring out the flash exposure, you can rest easy because with E-TTL, the camera automatically calculates the flash exposure. However, knowing the elements that factor into flash exposures enables you to use flash within its limits and to troubleshoot the settings when the exposure isn’t what you expected. Whether you use the built-in flash, an accessory Speedlite, or a third-party flash unit, the same factors go into calculating flash exposure.
Flash exposure begins with the flash unit’s guide number. The guide number indicates the relative power of the flash, and you can use the guide number to compare the power outputs of different flash units. The higher the guide number, the more powerful the flash. The guide number is easily found on Canon Speedlites in the name. For example, the Canon 600EX-RT has a guide number of 60, the first two numerals in the name.
A guide number is typically measured at ISO 100 for a 105mm focal length. From the guide number, you can determine what aperture to set given the subject distance and the ISO. The guide number for the Canon Speedlite 600EX-RT is 60 meters/197 feet at 200mm flash coverage and at ISO 100. Once you know the guide number, you can divide the guide number by the flash-to-subject distance to determine the appropriate aperture to set.
The relationship between the aperture and the flash-to-subject distance is Guide Number ÷ Aperture = Distance, and Guide Number ÷ Distance = Aperture for optimal exposure. Thus, to calculate flash exposure in feet, if the subject is 15 feet from the camera, just divide 197 (the guide number in feet) by 15 feet (camera-to-subject distance) to get f/13 at ISO 100.
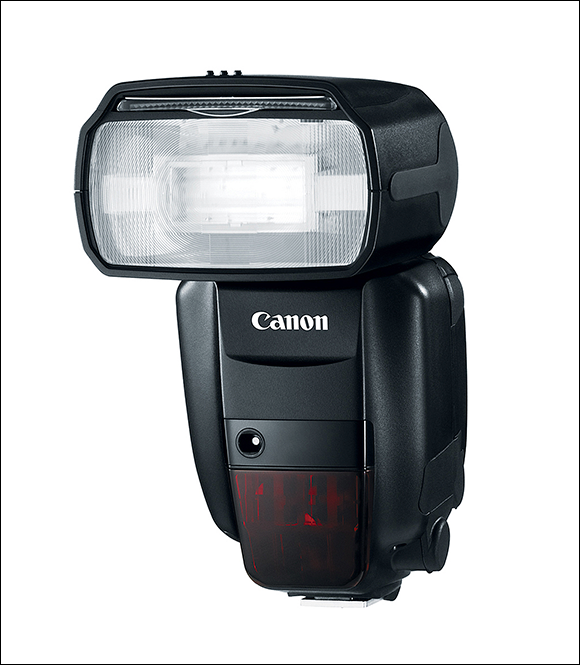
Image courtesy of Canon
9.1 The 600EX-RT is the most powerful Speedlite in Canon’s flash lineup with a guide number of 60.
What do you do if you want to shoot at a different aperture? You can change the camera-to-subject distance, or you can increase the ISO sensitivity setting on the camera. When you increase the ISO, the camera needs less light to make the exposure, and it simultaneously increases the range of the flash. For example, when you increase the ISO from 100 to 200, the guide number increases by a factor of 1.4x; increasing from 100 to 400 doubles the guide number.
The last factor to consider is the focal length of the lens. The flash covers a fixed area, or a fixed angle of view. Thus, when you use a wide-angle lens, the flash may not cover the entire area, causing dark areas on the periphery. And with a telephoto focal length, some of the light may spill outside the lens’s angle of view. For example, the Canon 580EX II Speedlite has default coverage from 24mm to 105mm while the 600EX-RT has coverage of 20mm to 200mm. Both flash units include a pull-out wide panel that extends flash coverage to 14mm.
Using E-TTL II Technology
Canon flash units use E-TTL II technology. To make a flash exposure using Evaluative metering ( ![]() ), the camera takes a reading of the light in the scene when you half-press the shutter button. When you fully press the shutter button, a pre-flash is fired and read by the camera. The camera compares the available light and pre-flash readings to determine the best flash output, and then stores that information in its internal memory. The camera also detects when there is a difference between the available and flash light readings, and it assumes that the difference is the subject. If the camera detects areas where there are large differences in readings, it attributes them to a highly reflective surface, such as glass or a mirror, and ignores them when calculating the exposure.
), the camera takes a reading of the light in the scene when you half-press the shutter button. When you fully press the shutter button, a pre-flash is fired and read by the camera. The camera compares the available light and pre-flash readings to determine the best flash output, and then stores that information in its internal memory. The camera also detects when there is a difference between the available and flash light readings, and it assumes that the difference is the subject. If the camera detects areas where there are large differences in readings, it attributes them to a highly reflective surface, such as glass or a mirror, and ignores them when calculating the exposure.
At the same time, the flash unit also receives information from the camera, including the focal length of the lens, distance from the subject, and exposure settings, and this information confirms if the subject distance from the flash reading is correct. The flash also automatically figures in the angle of view. Thus, the EX-series Speedlites automatically adjust the flash zoom mechanism to get the best flash angle and to illuminate key areas of the scene, which also conserves power.

9.2 This portrait was made with the 600EX-RT Speedlite shooting into an umbrella and a 580EX II to the right of the subject. Exposure: ISO 200, f/16.0, 1/125 second.
E-TTL II technology also enables high-speed sync flash with accessory Speedlites. High-speed sync flash allows flash synchronization at a shutter speed faster than the camera’s flash sync speed of 1/250 second. The advantages are that you can sync at all shutter speeds and use fill flash in brightly lit scenes, such as outdoors. Also, you can open up the lens to a wide aperture when shooting a backlit subject to create a shallow depth of field while shooting at shutter speeds faster than 1/250 second.
Using the Built-in Flash
Many people complain that the built-in flash isn’t powerful enough and that it isn’t in the best position. These are valid complaints, but the built-in flash is handy and, in many cases, it gets the job done. In Creative Zone modes, such as Aperture-priority AE ( ![]() ) or Shutter-priority AE (
) or Shutter-priority AE ( ![]() ), just pop it up if you need some fill flash for a portrait or some extra light in a dim venue. Plus, it serves as a nice trigger when you’re using an accessory Speedlite.
), just pop it up if you need some fill flash for a portrait or some extra light in a dim venue. Plus, it serves as a nice trigger when you’re using an accessory Speedlite.
The built-in flash offers coverage for lenses as wide as 17mm and sync speeds ranging from 1/250 to 30 seconds, and a recycle time of approximately 3 seconds. Tables 9.1 and 9.2 show what you can expect when you use the built-in flash in various exposure modes, and it provides flash range estimates.
Table 9.1 The 70D Exposure Settings Using the Built-in Flash
|
Shooting mode |
Shutter speed |
Aperture |
|
|
The 70D automatically sets the shutter speed in the range of 1/250 second to 1/60 second. |
The 70D automatically sets the aperture. With flash use, you cannot shift, or change, the exposure in |
|
|
You set the shutter speed from 1/250 second to 30 seconds. If you set a shutter speed faster than 1/250 second, the camera automatically readjusts it to 1/250. |
The camera automatically sets the appropriate aperture. |
|
|
The camera automatically sets the shutter speed from 1/250 second to 30 seconds depending on the ambient light. Because the shutter speed can go very slow, you can go to Shooting menu 2 ( |
You set the aperture and the camera sets the shutter speed. |
|
|
You can set the shutter speed in the range of 1/250 second to 30 seconds. |
You set the aperture manually. |
|
|
The exposure lasts as long as you hold down the shutter button. |
You set the aperture. |
|
|
The 70D automatically sets the shutter speed in the range of 1/60 second to 1/250 second. |
The 70D automatically sets the aperture. |
Table 9.2 Built-in Flash Ranges*
|
ISO sensitivity setting |
Wide-angle lens @ f/3.5 (feet/meters) |
Telephoto lens @ f/5.6 (feet/meters) |
|
100 |
3.3-11.2 (1-3.4) |
3.3-7 (1-2.1) |
|
200 |
3.3-15.9 (1-4.8) |
3.3-9.9 (1-3) |
|
400 |
3.3-22.5 (1-6.9) |
3.3-14.1 (1-4.3) |
|
800 |
4-31.8 (1.2-9.7) |
3.3-19.9 (1-6.1) |
|
1600 |
5.6-45 (1.7-13.7) |
3.5-28.1 (1.1-8.6) |
|
3200 |
8-63.6 (2.4-19.4) |
5-39.8 (1.5-12.1) |
|
6400 |
11.2-90 (3.4-27.4) |
7-56.2 (2.1-17.1) |
|
12800 |
15.9-127.3 (4.8-38.8) |
9.9-79.5 (3-24.2) |
|
H (25600) |
22.5-180 (6.9-54.9) |
14.1-112.5 (4.3-34.3) |
* Information courtesy of Canon.
From the information in Table 9.1, you can see that flash use differs based on the exposure mode you choose. In Aperture-priority AE ( ![]() ) and Shutter-priority AE (
) and Shutter-priority AE ( ![]() ) modes, the 70D balances the available light with the light from the flash to provide fill flash. Fill flash uses the light in the scene for the exposure, and provides just enough flash illumination to fill shadows and brighten the subject. Fill flash provides more natural-looking exposures than when you use the flash as the primary light source.
) modes, the 70D balances the available light with the light from the flash to provide fill flash. Fill flash uses the light in the scene for the exposure, and provides just enough flash illumination to fill shadows and brighten the subject. Fill flash provides more natural-looking exposures than when you use the flash as the primary light source.
In Aperture-priority AE mode ( ![]() ), you can choose the aperture you want, but because more available light is used for much of the exposure, it’s usually up to you to ensure that the shutter speed is fast enough to prevent the blur that can occur when you handhold the camera. You can monitor the shutter speed in the viewfinder when you use the flash in Aperture-priority AE mode (
), you can choose the aperture you want, but because more available light is used for much of the exposure, it’s usually up to you to ensure that the shutter speed is fast enough to prevent the blur that can occur when you handhold the camera. You can monitor the shutter speed in the viewfinder when you use the flash in Aperture-priority AE mode ( ![]() ). If the shutter speed is too slow, you can use a wider aperture or a tripod, or use a higher ISO setting. Better yet, use the Flash syc. Speed in the Av mode option on Shooting menu 2 (
). If the shutter speed is too slow, you can use a wider aperture or a tripod, or use a higher ISO setting. Better yet, use the Flash syc. Speed in the Av mode option on Shooting menu 2 ( ![]() ), Flash control to set a shutter speed range. This option, covered later, will help ensure a fast enough shutter speed to prevent the blur that can occur when handholding the camera.
), Flash control to set a shutter speed range. This option, covered later, will help ensure a fast enough shutter speed to prevent the blur that can occur when handholding the camera.
In Shutter-priority AE mode ( ![]() ), you can set a shutter speed that is fast enough to prevent camera shake. However, if you set a shutter speed that is out of range for the amount of light in the scene, the aperture value flashes in the viewfinder, alerting you that the camera cannot record enough of the available light to get a balanced fill-flash exposure. In those cases, set a slower shutter speed, use a tripod, or increase the ISO setting.
), you can set a shutter speed that is fast enough to prevent camera shake. However, if you set a shutter speed that is out of range for the amount of light in the scene, the aperture value flashes in the viewfinder, alerting you that the camera cannot record enough of the available light to get a balanced fill-flash exposure. In those cases, set a slower shutter speed, use a tripod, or increase the ISO setting.
In Manual mode ( ![]() ), you have full control over the balance between existing and flash light. With fast shutter speeds, less of the existing light is captured — unless the existing light is very bright — and the background goes dark. If you choose a very slow shutter speed, you run the risk of camera shake if you’re handholding the camera or if the subject moves, but the background will be brighter because more of the existing light factors into the exposure.
), you have full control over the balance between existing and flash light. With fast shutter speeds, less of the existing light is captured — unless the existing light is very bright — and the background goes dark. If you choose a very slow shutter speed, you run the risk of camera shake if you’re handholding the camera or if the subject moves, but the background will be brighter because more of the existing light factors into the exposure.
The built-in flash features options you can use to control the flash output to get natural-looking flash images. These options include Flash Exposure Compensation (FEC) ( ![]() ) and Flash Exposure Lock (FE Lock) (
) and Flash Exposure Lock (FE Lock) ( ![]() ). In addition, you can set flash functions using the Flash Control options on Shooting menu 2 (
). In addition, you can set flash functions using the Flash Control options on Shooting menu 2 ( ![]() ) when you shoot in the Creative Zone modes, such as Shutter-priority AE (
) when you shoot in the Creative Zone modes, such as Shutter-priority AE ( ![]() ), and Aperture-priority AE (
), and Aperture-priority AE ( ![]() ).
).
To use the flash in Creative Zone exposure modes, you have to press the flash button to pop up the flash. In Basic Zone modes except Flash Off ( ![]() ), Landscape (
), Landscape ( ![]() ), Sports (
), Sports ( ![]() ), Night Portrait (
), Night Portrait ( ![]() ), and Handheld night scene (
), and Handheld night scene ( ![]() ) modes, the flash pops up and fires automatically when the 70D determines that additional light is needed.
) modes, the flash pops up and fires automatically when the 70D determines that additional light is needed.
Red-eye reduction
One of the first things you should set before using the built-in flash for photos of people and animals is Red-eye reduction. The red appearance in a person’s eye is caused when the bright flash reflects off the retina, illuminating the blood vessels in the reflection. The Red-eye reduction option fires a pre-flash that causes the pupils of the subject’s eye to contract when the subject looks at the pre-flash, thereby reducing the appearance of redness in the eyes. Just be sure to ask the person to look at the pre-flash light when it fires.
You can enable Red-eye reduction on Shooting menu 2 ( ![]() ). Just highlight Red-eye reduc., press the Setting button (
). Just highlight Red-eye reduc., press the Setting button ( ![]() ), and then choose Enable. Press the Setting button (
), and then choose Enable. Press the Setting button ( ![]() ) again to confirm the change.
) again to confirm the change.
Modifying Flash Exposure
There are times when the flash doesn’t produce the image that you envisioned. There are also times when you want to increase or decrease the flash exposure, or avoid hot spots on the subject. In these situations, you can modify the flash output using either Flash Exposure Compensation ( ![]() ) or Flash Exposure Lock (
) or Flash Exposure Lock ( ![]() ). You can set these options for the built-in flash and for an accessory Speedlite.
). You can set these options for the built-in flash and for an accessory Speedlite.
Flash Exposure Compensation
Flash Exposure Compensation ( ![]() ), or FEC, enables you to adjust the flash output manually, without changing the aperture or shutter speed when shooting in Program AE (
), or FEC, enables you to adjust the flash output manually, without changing the aperture or shutter speed when shooting in Program AE ( ![]() ), Shutter-priority AE (
), Shutter-priority AE ( ![]() ), Aperture-priority AE (
), Aperture-priority AE ( ![]() ), Manual (
), Manual ( ![]() ), or Bulb (
), or Bulb ( ![]() ) modes. FEC is effective when you want to adjust the balance between the fore- and background exposure, and it can help compensate for highly or non-reflective subjects.
) modes. FEC is effective when you want to adjust the balance between the fore- and background exposure, and it can help compensate for highly or non-reflective subjects.
FEC is also useful for balancing lighting in unevenly lit scenes and reducing the dark background shadows that often happen with flash use. When you are using the flash as the primary light, FEC gives good results. If you’re using the flash for fill light, then you can use FEC ( ![]() ) as a dimmer switch to turn the amount of light up or down.
) as a dimmer switch to turn the amount of light up or down.
Fill flash is using the flash at reduced power to add a little extra light on the subject, while reducing shadows and increasing brightness. Fill flash is very effective when shooting outdoor portraits.
With FEC, you can increase the flash output up to +/-3 stops in 1/3-stop increments. As a result, you can maintain the camera’s original E-TTL (Evaluative Through-the-Lens) readings while manually increasing or decreasing the flash output.
If you use an accessory Speedlite, you can set FEC ( ![]() ) on either the camera or Speedlite. However, the compensation that you set on the Speedlite overrides any that you set using the 70D’s FEC function on Shooting menu 2 (
) on either the camera or Speedlite. However, the compensation that you set on the Speedlite overrides any that you set using the 70D’s FEC function on Shooting menu 2 ( ![]() ). In short, set compensation either on the Speedlite or on the camera, but not on both. For me, it’s easier to set FEC on the 70D because the LCD screen is big, and the controls are more straightforward than those on a Speedlite are.
). In short, set compensation either on the Speedlite or on the camera, but not on both. For me, it’s easier to set FEC on the 70D because the LCD screen is big, and the controls are more straightforward than those on a Speedlite are.
If you’re using the built-in flash to fill shadows on the subject’s face in sunny conditions or when the subject is backlit, the flash loses its effectiveness when you are more than 6 to 8 feet from the subject. Even using positive FEC may not help. The solution is to move closer to the subject.
FEC can also be combined with exposure compensation. If you shoot a scene in which one part is brightly lit and another is much darker — for example, an interior room with a view to the outdoors — then you can set exposure compensation to -1 and FEC to +1 to make the transition between the two areas appear more natural.
Auto Lighting Optimizer ( ![]() ) can mask the effect of FEC (
) can mask the effect of FEC ( ![]() ). If you want to see the effect of the compensation, turn off Auto Lighting Optimizer (
). If you want to see the effect of the compensation, turn off Auto Lighting Optimizer ( ![]() ) by setting it to Disable on Shooting menu 3 (
) by setting it to Disable on Shooting menu 3 ( ![]() ).
).
Before you begin, ensure that the camera is set to Program AE ( ![]() ), Shutter-priority AE (
), Shutter-priority AE ( ![]() ), Aperture-priority AE (
), Aperture-priority AE ( ![]() ), Manual (
), Manual ( ![]() ), or Bulb (
), or Bulb ( ![]() ) mode.
) mode.
To set FEC for the built-in flash, follow these steps:
1. Press the Quick Control button (![]() ), and then select the Flash exposure compensation button (
), and then select the Flash exposure compensation button (![]() ). The Flash exposure compensation screen appears.
). The Flash exposure compensation screen appears.
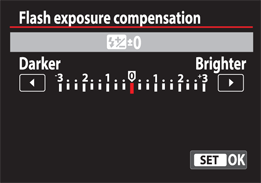
9.3 The Flash exposure compensation screen.
2. Turn the Main dial (![]() ) to set the amount of compensation you want. You can also use the touchscreen to drag the tick mark. Setting the tick mark to the left of 0 (zero) decreases the flash output, and setting it to the right increases it.
) to set the amount of compensation you want. You can also use the touchscreen to drag the tick mark. Setting the tick mark to the left of 0 (zero) decreases the flash output, and setting it to the right increases it.
3. Press the Setting button (![]() ). To remove FEC, repeat these steps, but in step 2, move the tick mark back to 0 (zero). The compensation you set remains in effect until you change it.
). To remove FEC, repeat these steps, but in step 2, move the tick mark back to 0 (zero). The compensation you set remains in effect until you change it.
Flash Exposure Lock
Flash Exposure Lock ( ![]() ) is a great way to control flash output for any part of the scene or subject. For example, you might want to set the flash exposure for a subject’s skin in a portrait or for a photographic gray card. When you press the shutter button halfway, FE Lock fires a pre-flash that reads from a small area at the center of the viewfinder — it takes a Spot meter reading from 3 percent of the viewfinder at the center. So be sure to point the center of the viewfinder over the part of the scene or subject from which you want to take the meter reading. This pre-flash meter reading is stored for 16 seconds so that you can move the camera to recompose the scene, focus, and make the image.
) is a great way to control flash output for any part of the scene or subject. For example, you might want to set the flash exposure for a subject’s skin in a portrait or for a photographic gray card. When you press the shutter button halfway, FE Lock fires a pre-flash that reads from a small area at the center of the viewfinder — it takes a Spot meter reading from 3 percent of the viewfinder at the center. So be sure to point the center of the viewfinder over the part of the scene or subject from which you want to take the meter reading. This pre-flash meter reading is stored for 16 seconds so that you can move the camera to recompose the scene, focus, and make the image.
If you’re accustomed to using gray cards, then you can use the one provided in the back of this book, or identify a middle-gray tonal value in the scene and lock the flash exposure on it. If the area from which you take the meter reading is brighter or darker than middle gray, you may need to set some Flash Exposure Compensation to compensate for the difference. Regardless of your approach, FE Lock is a technique that you want to add to your arsenal for flash images.
If you are shooting a series of images under unchanging light, then Flash Exposure Compensation is a more efficient approach to modifying flash exposure than the Flash Exposure Lock ( ![]() ).
).
Before you begin, be sure the camera is set to Program AE ( ![]() ), Shutter-priority AE (
), Shutter-priority AE ( ![]() ), Aperture-priority AE (
), Aperture-priority AE ( ![]() ), Manual (
), Manual ( ![]() ), or Bulb (
), or Bulb ( ![]() ) mode. To set FE Lock, follow these steps:
) mode. To set FE Lock, follow these steps:
1. Press the Flash button to raise the built-in flash. The flash icon appears in the viewfinder when you half-press the shutter button.
2. Point the center of the viewfinder over the area of the subject where you want to lock the flash exposure or over a gray card, and then press the FE Lock button (![]() ) on the back of the camera. The camera fires a pre-flash. FEL is displayed momentarily in the viewfinder, and the flash icon in the viewfinder displays an asterisk beside it to indicate that flash exposure is locked. If the flash icon in the viewfinder blinks, the subject is beyond the flash range, so move closer and repeat the process.
) on the back of the camera. The camera fires a pre-flash. FEL is displayed momentarily in the viewfinder, and the flash icon in the viewfinder displays an asterisk beside it to indicate that flash exposure is locked. If the flash icon in the viewfinder blinks, the subject is beyond the flash range, so move closer and repeat the process.
3. Move the camera to compose the image, press the shutter button halfway to focus, and then completely press the shutter button to make the image. Ensure that the asterisk is still displayed to the right of the flash icon in the viewfinder before you make the picture. As long as the asterisk is displayed, you can take other images at the same compensation amount, for about 16 seconds.
Setting Flash control options
You can set most of the built-in flash settings using the Flash control option on Shooting menu 2 ( ![]() ). This menu offers an array of adjustments, and the settings change depending on the options you choose. In automatic modes, such as Scene Intelligent Auto (
). This menu offers an array of adjustments, and the settings change depending on the options you choose. In automatic modes, such as Scene Intelligent Auto ( ![]() ), and Creative Auto (
), and Creative Auto ( ![]() ), you can only set the Red-eye reduction option.
), you can only set the Red-eye reduction option.
Before you begin, be sure the camera is set to Program AE ( ![]() ), Shutter-priority AE (
), Shutter-priority AE ( ![]() ), Aperture-priority AE (
), Aperture-priority AE ( ![]() ), Manual (
), Manual ( ![]() ), or Bulb (
), or Bulb ( ![]() ) mode. If you have the wireless function for the Built-in flash settings set to Disable, not all of these options are available. Also, the options change depending on the wireless function you choose.
) mode. If you have the wireless function for the Built-in flash settings set to Disable, not all of these options are available. Also, the options change depending on the wireless function you choose.
Here are some things you should know as you review the Flash control screen:
• A colon (:) represents ratio control between the built-in and Speedlite flash units. Ratios and stops are equivalent. One stop is twice as bright as the other. With each stop being twice as bright, the formula is 2 × 2 × 2 = 8. An 8:1 ratio represents a 3-stop difference.
• A plus sign (+) means that the built-in and Speedlite flash units act as one flash system.
• The letters A, B, C represent groups with one or more flash units in a group.
• Ratio control (such as A:B ratio) determines the relative power or brightness between two flash groups.
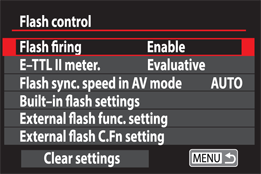
9.4 The Flash control screen.
To set Flash Control options, select Flash Control on Shooting menu 2 ( ![]() ), and then press the Setting button (
), and then press the Setting button ( ![]() ). The Flash control screen appears. Turn the Quick Control dial (
). The Flash control screen appears. Turn the Quick Control dial ( ![]() ) to highlight the setting that you want to change (see Table 9.3), and then press the Setting button (
) to highlight the setting that you want to change (see Table 9.3), and then press the Setting button ( ![]() ).
).
Table 9.3 Flash Control Menu Options
|
Setting |
Option(s) |
Suboptions/Notes |
|
Flash firing |
Enable, Disable |
Enable turns the flash on so that you can use it in Creative Zone modes such as |
|
E-TTL II meter. |
Evaluative, Average |
Evaluative metering samples the entire scene and biases the exposure for the subject area. Average metering averages the exposure for the entire scene. With Average metering, you may need to set Flash Exposure Compensation to get a pleasing exposure. |
|
Flash sync. speed in Av mode |
AUTO, 1/250–1/60 sec. auto, or 1/250 sec. (fixed) |
This determines the flash sync speed when you’re shooting in |
|
Built-in flash settings |
Flash mode |
ETTL (E-TTL II flash metering), a good choice for use with Canon EX Speedlites. Choose M (Manual flash) when you want to meter the exposure with a handheld flash meter, or when you want to determine the flash exposure based on the guide number or distance measurement. |
|
Shutter sync |
1st curtain: Flash fires at the beginning of the exposure. Can be used with a slow sync speed to create light trails in front of the subject. 2nd curtain: Flash fires just before the exposure ends. The sequence is for the camera to fire a pre-flash to determine the flash output, then the exposure begins, and the flash fires just before the second curtain closes at the end of the exposure. You can use this option with a slow sync speed to create light trails behind the subject. |
|
|
Wireless func. |
Choose Disable when you do not want to use the built-in flash to trigger one or more accessory Speedlites. In other words, choose when the built-in flash is the only flash you are using. Choose Speedlite: Built-in flash when shooting with one Speedlite and the built-in flash. This represents ratio control for Speedlites that you set as slave units and the built-in flash. Choose Speedlite (only) for automatic shooting with a single Speedlite. Choose Speedlite + Built-in flash for shooting with the built-in flash and one or more Speedlites. All the flash units work together, although you still have ratio control for multiple Speedlites in multiple groups. This is an advanced setting. |
|
|
Channel |
This option appears only when the Wireless func. is set to one of the options that includes Speedlites. Choose a channel from 1 to 4. You may need to change from the default Channel 1 when you’re shooting in areas where other photographers are shooting to prevent interference. |
|
|
[Flash] exp. comp |
Press |
|
|
Flash ratio |
This option appears only when the Wireless func. is set to one of the options that includes Speedlites. Choose the ratio of one flash to the other: 8:1, 4:1, 2:1, or 1:1. |
Working with Speedlites
Canon offers a full line of accessory Speedlites. The latest Speedlite at this writing is the 600EX-RT with built-in radio transmission (RT) capability. Radio Transmission makes it possible to position one or more flash units in places where older, optical flash units could not be because they required line of sight to the camera or transmitter. This opens up many creative opportunities. However, the 600EX-RT isn’t the only excellent flash gun in the lineup. There are eight Speedlites, ranging in price from $150 to $550. In most cases, you can mix and match Speedlites for a multiflash setup. Plus, you can use the built-in flash as an optical transmitter to trigger wirelessly one or more Speedlites positioned around the scene.
Further, the 70D offers a high level of control over the flash units directly from the camera. For example, you can set the metering mode, Av mode sync speed, wireless functions, zoom, shutter sync, and make flash exposure modifications directly from the 70D’s camera menus. You can also set the Custom Functions for the Speedlite from the camera.
By now, you know how handy the Quick Control screen is for changing settings on the 70D. The equivalent to that screen for the flash is the Flash function settings screen — a handy screen with the most commonly used flash settings.
The options displayed on the Flash function settings screen vary depending on the Speedlite you’re using. For earlier or other models of Speedlites, some options covered in this section may not be available. None of these options is available in the Basic Zone shooting modes.
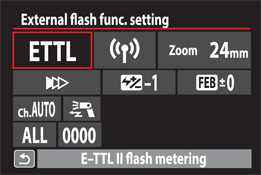
9.5 The External flash func. setting screen for a Speedlite 600EX-RT.
Here are the options for setting up and controlling an external Speedlite (in this case, the 600EX-RT):
• ETTL. This is a good choice for automatic flash exposure with EX-series Speedlites.
• M. Manual flash is the option to choose if you’re using a handheld flash meter to determine the flash exposure. You can set the flash output from full to 1/128 power in 1/3-stop increments.
• MULTI. MULTI flash (stroboscopic) enables you to capture successive movements of the subject when shooting with a slow shutter speed using stroboscopic flash. You can set wireless for radio or optical transmission, or no wireless, and you can set the number of flashes, the flash frequency (Hz), and the flash output level from 1/128 power to 1/2.
Speedlites are daylight balanced — that is, the light from the flash is the same color temperature as the midday sun. As a result, you can shoot outdoors or in a daylight studio using the flash because the colors are so similar.
• Ext.A or Ext.M. These modes use the Speedlite’s built-in external metering sensor to measure the light that is reflected from the subject back to the Speedlite. Then it adjusts the flash output for achieving a standard exposure. The A and M designations stand for Auto and Manual. With Auto, the Speedlite automatically adjusts the flash output; with Manual, you set the flash output with the ISO and aperture settings on the camera.
• Gr. Individual group control gives you control over groups of flash units designated by letters from A to E. For each group, you can set the Flash mode with options for E-TTL, Manual flash, and AutoExtFlash. Or you can choose Disable. Then, you can also set Flash Exposure Compensation for each group.
• Wireless functions. The choices are Off, Wireless: Radio transmission, or Wireless: Optical transmission. You can use radio transmission only with the 600EX-RT flash and with the Speedlite Transmitter ST-E3-RT. Wireless optical transmission is compatible with Speedlites previous to the 600EX-RT. You can use the 600EX-RT as part of an optical wireless multiple-flash setup. When you choose a wireless setting, the options on the Flash function settings screen change. For example, if you choose Radio transmission, then the Flash function settings screen adds options to set the radio channel, whether the master flash fires, the firing of flash groups, and the flash ratio for groups. You can also set the wireless radio ID. If you have flash units set in groups, then when you choose the firing of flash group, you can choose ALL to fire all units at the same power, choose A:B, or choose A:B C. For optical wireless multiflash shooting, you can set the channel from 1 to 4, the master flash firing, the flash ratio, and the flash group firing with options for ALL, A:B, or A:B C.
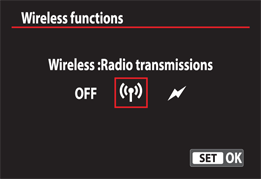
9.6 The Wireless functions screen for a 600EX-RT Speedlite.
• Zoom. This function enables you to have the Speedlite automatically detect the focal length of the lens, or manually set the focal length on the Flash zoom screen to set flash coverage.
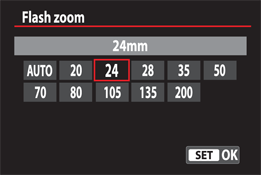
9.7 The Flash zoom screen.
• Shutter synchronization. The options here are:
• First-curtain synchronization. This is the most commonly used setting and causes the flash to fire immediately after the exposure starts.
• Second-curtain synchronization. With this option, the flash fires just before the shutter closes. Two flashes fire: one at the beginning and one just before the exposure ends. If you use this option and set the shutter speed to 1/30 second or faster, then first-curtain sync is automatically used. So, set the shutter speed at 1/125 second or slower, down to 1/30 second. Second-curtain is a good option for creating traffic trails from car lights when using a slow shutter speed.
• High-speed synchronization. This enables use of the flash at shutter speeds faster than 1/250 second. With High-speed sync, the faster the shutter speed, the shorter the flash’s range. The effective flash range is displayed on the LCD screen.
• Flash exposure compensation (![]() ). This option is much like Exposure compensation on the camera. It enables you to dial the flash exposure up or down in 1/3-stop increments up to plus/minus 3 stops to balance the foreground and background tones. To set compensation, choose this option, press the Setting button (
). This option is much like Exposure compensation on the camera. It enables you to dial the flash exposure up or down in 1/3-stop increments up to plus/minus 3 stops to balance the foreground and background tones. To set compensation, choose this option, press the Setting button ( ![]() ), and then turn the Quick Control dial (
), and then turn the Quick Control dial ( ![]() ) to the left to reduce flash output, or the right to increase it.
) to the left to reduce flash output, or the right to increase it.
Auto Lighting Optimizer ( ![]() ) can mask the effect of FEC. If you want to see the effect of the compensation, turn off the Auto Lighting Optimizer (
) can mask the effect of FEC. If you want to see the effect of the compensation, turn off the Auto Lighting Optimizer ( ![]() ) by setting it to Disable on Shooting menu 3 (
) by setting it to Disable on Shooting menu 3 ( ![]() ).
).
• Flash Exposure Bracketing (![]() ). Bracketing is a good way to cover your bases to get a flash exposure that is pleasing, and it is similar to using Exposure bracketing on the camera. The bracketing sequence includes three images, one with positive flash exposure compensation, one with the standard flash output, and one with negative flash exposure compensation. Bracketing can be set in 1/3-stop increments up to +2/-4 stops. To set bracketing, choose this option, press the Setting button (
). Bracketing is a good way to cover your bases to get a flash exposure that is pleasing, and it is similar to using Exposure bracketing on the camera. The bracketing sequence includes three images, one with positive flash exposure compensation, one with the standard flash output, and one with negative flash exposure compensation. Bracketing can be set in 1/3-stop increments up to +2/-4 stops. To set bracketing, choose this option, press the Setting button ( ![]() ), and then turn the Quick Control dial (
), and then turn the Quick Control dial ( ![]() ) to the right to set bracketing in 1/3-stop or 1/2-stop increments (depending on the Speedlite). Next, press the Setting button (
) to the right to set bracketing in 1/3-stop or 1/2-stop increments (depending on the Speedlite). Next, press the Setting button ( ![]() ). Bracketed images take a bit of time to complete because the flash has to recycle after each exposure. To bias the exposure to either over or under the standard exposure, you can combine Flash Exposure Bracketing (
). Bracketed images take a bit of time to complete because the flash has to recycle after each exposure. To bias the exposure to either over or under the standard exposure, you can combine Flash Exposure Bracketing ( ![]() ) with Flash Exposure Compensation (
) with Flash Exposure Compensation ( ![]() ).
).
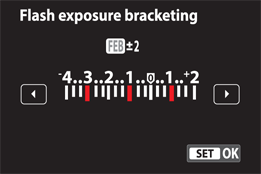
9.8 The Flash exposure bracketing screen.
• Channel (![]() ). Optical channels range from 1 to 4. Radio channel options are Auto, or 1 to 15. Be sure that the flash units are set to the same channel. Set a channel when working around other photographers using wireless flash to keep from firing another photographer’s flash.
). Optical channels range from 1 to 4. Radio channel options are Auto, or 1 to 15. Be sure that the flash units are set to the same channel. Set a channel when working around other photographers using wireless flash to keep from firing another photographer’s flash.
• Master flash firing (![]() ). Enable this option to have the external Speedlite control flash units that you’ve set up as slave units. The other option is Disable.
). Enable this option to have the external Speedlite control flash units that you’ve set up as slave units. The other option is Disable.
• Flash group. This option gives you ratio control over flash groups. For example, A:B ratio determines the relative power or brightness between the two flash groups A and B. You can choose All, or you can choose A:B, or A:B C.
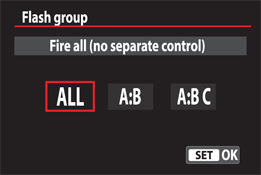
9.9 The Flash group firing screen.
• Wireless radio ID. This option appears when you enable the Wireless function. You can manually enter a four-digit ID.
• A:B fire ratio. This option sets the lighting ratio of external flashes. You can choose 2:1, 1:1, or 1:2.
If you want to use flash with Live View shooting mode ( ![]() ), you must use a Canon flash. Third-party flashes will not fire in Live View mode (
), you must use a Canon flash. Third-party flashes will not fire in Live View mode ( ![]() ).
).
To set any of these options, mount the Speedlite to the camera, turn it on, and then follow these steps:
1. On Shooting menu 2 (![]() ), highlight Flash control, and then press the Setting button (
), highlight Flash control, and then press the Setting button (![]() ). The Flash control screen appears.
). The Flash control screen appears.
2. Turn the Quick Control dial (![]() ) to highlight External flash func. settings, and then press the Setting button (
) to highlight External flash func. settings, and then press the Setting button (![]() ). The External flash func. setting screen appears.
). The External flash func. setting screen appears.
3. Turn the Quick control dial (![]() ) to select the option that you want to change, and then press the Setting button (
) to select the option that you want to change, and then press the Setting button (![]() ). Alternately, just touch the option on the screen. The settings screen appears for the option you chose.
). Alternately, just touch the option on the screen. The settings screen appears for the option you chose.
4. Turn the Quick Control dial (![]() ) to change the setting, and then press the Setting button (
) to change the setting, and then press the Setting button (![]() ). The External flash func. setting screen appears.
). The External flash func. setting screen appears.
If you have the 580EX II or 430EX II Speedlite, you can use Custom Function 00 to change the flash distance indicator on the rear LCD screen from meters to feet.
It’s important to note that the options on the screen change as you make various adjustments, so be sure to continue exploring the options. Just turn the Quick Control dial ( ![]() ) to select additional options as they appear, and then press the Setting button (
) to select additional options as they appear, and then press the Setting button ( ![]() ) to view more settings.
) to view more settings.
The main Flash control screen also offers the option to set External flash Custom Functions. Having control of the Custom Functions from the camera is convenient.
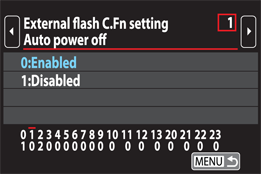
9.10 You can change the Custom Function settings for the Speedlite by choosing the External flash C.Fn setting option on the Flash control menu in Shooting menu 2. This is one of the Custom Functions for the 600EX-RT Speedlite.
In low-light indoor or night outdoor scenes, the flash often illuminates the subject properly, but the background is too dark. In these scenes, switch to Aperture-priority AE ( ![]() ) or Shutter-priority AE (
) or Shutter-priority AE ( ![]() ) mode, and use a wide aperture, slow shutter speed (respectively), or both to allow more of the existing light to contribute to the exposure. Just ask your subject to remain still if the shutter speed is slow.
) mode, and use a wide aperture, slow shutter speed (respectively), or both to allow more of the existing light to contribute to the exposure. Just ask your subject to remain still if the shutter speed is slow.
Setting Up Wireless Flashes
While it’s beyond the scope of this book to provide detailed instructions for wireless flash techniques, the following sections help get you started with flash setups, ranging from one to multiple Speedlites. However, if you have only one Speedlite, then you can still get lovely images with it. Even if the built-in flash is all you have, you can experiment using some of the new attachments that diffuse the light to create pleasing illumination and combine it with existing light and reflectors to get very nice images.
Using a one-light setup
Any lighting system begins with a single light. With some creativity, you can use one Speedlite effectively for portraits, still-life subjects, and some food and product shots. Be sure to have reflectors on hand to increase your options for directing the light.
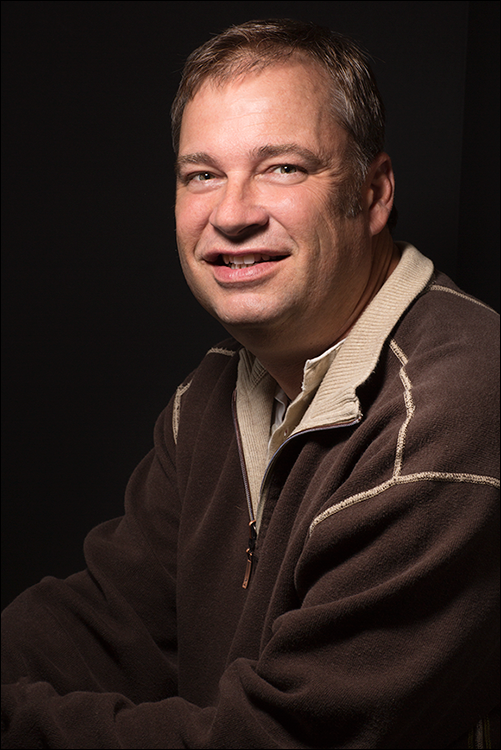
9.11 A black background helps you avoid dark shadows behind the subject. Exposure: ISO 160, f/16, 1/125 second, 600EX-RT Speedlite, -2 stops Flash Exposure Compensation.
To get the best images, it’s important to get the Speedlite off the camera. Speedlites come with small stands so you can place them where you want them. If you are using one or more optical Speedlites (models introduced before the 600EX-RT in 2012), then be sure that the flash has a clear line of sight to the camera’s built-in flash so they can communicate. Then you can use the built-in flash to trigger the Speedlite(s). Alternately, you can use the Speedlite Transmitter ST-E3-RT or the ST-E2 with Speedlites older than the 600EX-RT. For Figure 9.11, I had the 600EX-RT Speedlite on a stand shooting into an umbrella. I positioned the flash above and slightly to the right of the camera. A large silver reflector filled shadows on the right side of the face.
If you’re shooting in low light with a flash and you want to balance the ambient light with the subject that is being lit by the Speedlite, try using Aperture-priority AE mode ( ![]() ). Set a wide aperture, such as f/2.8 to f/4.0, and then use the ISO setting to control the shutter speed so it’s between 1/4 and 1/30 second. Use a tripod, and ask the subject to remain still.
). Set a wide aperture, such as f/2.8 to f/4.0, and then use the ISO setting to control the shutter speed so it’s between 1/4 and 1/30 second. Use a tripod, and ask the subject to remain still.
Setting up multiple Speedlites
It follows that if one light or flash is good, two or more flash units are better. While that logic doesn’t hold true for everything, in the case of flash units it does. Multiple Speedlites enable you to set up lighting patterns and ratios just as you can with a studio lighting setup. In addition, you can use flash units to re-sculpt existing light, while still providing natural-looking illumination.
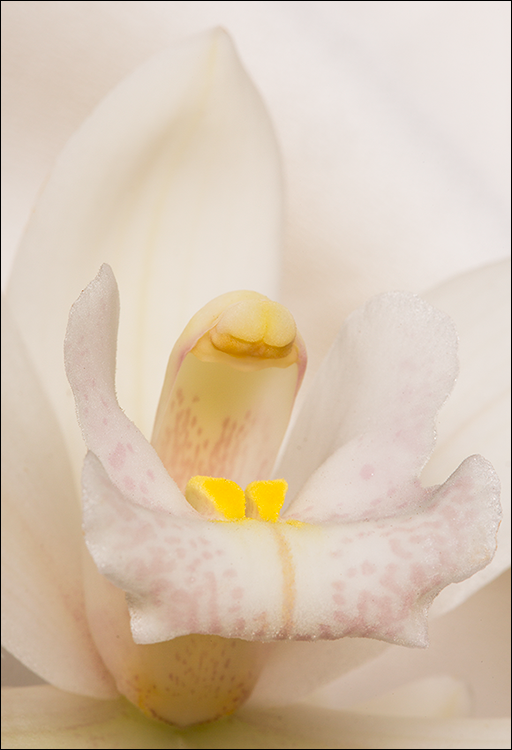
9.12 A Stofen cap over a flash head can help create soft lighting. Exposure: ISO 100, f/20, 1/125 second, -2 Flash Exposure Compensation.
With multiple Speedlites, you can use lighting ratios to create classic lighting patterns for portraits and for other still-life subjects.
When I shoot portraits on location, I take three Speedlites with stands, silver umbrellas, a softbox, and multiple reflectors. This setup is a lightweight mobile studio that can either provide the primary lighting for subjects or supplement existing light. And with the 70D, I bring the Speedlite Transmitter ST-E3-RT if I’m using the Speedlite 600EX-RT.
In any lighting setup, the key light provides the primary light. Then you add another light, and it determines the depth of the shadows. From there, you can add a background light or two, and a hair light. Then, just set the lighting ratio to get the effect you want. It also helps to have a complement of reflectors, softboxes, stands, and umbrellas on hand to soften and direct the light. Even a simple Stofen cap (www.stofen.com) on the flash heads will provide softer light. For image 9.12, I put a Speedlite behind the orchid and one in front of it with a Stofen cap over it. I also dialed the output down with -2 Flash Exposure Compensation.
You can set multiple Speedlites to fire as a single group when you need to fill an area with light. To do so, set the Firing group to ALL.

