Chapter 3: Working with Exposure
Photographers often talk about exposure. But what does exposure mean? In a strict sense, exposure is the amount of light that falls on a light-sensitive surface such as the sensor in your EOS 70D. In the best of worlds, the amount of light will also be the correct amount to create a good exposure that retains details in the highlights and shadows and that has pleasing contrast. In real life, however, exposures cover a broad range. Exposures can be creative, challenging, or just bad. One thing is certain, though — exposure is one of the things you want to get right.
In this chapter, I discuss exposure from a workflow perspective, including goals, exposure modes, the camera’s metering system, and how to evaluate and modify exposure when necessary. The new Multiple exposure and High-dynamic range (HDR) shooting options are also covered.
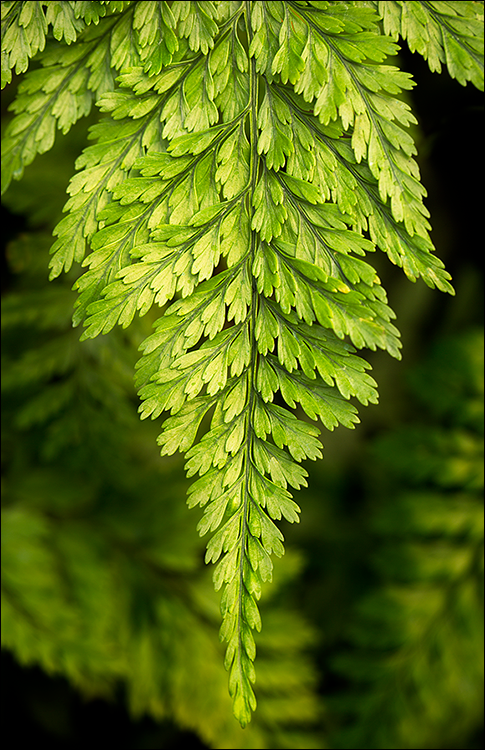
Regardless of the light, the 70D offers full control to get excellent exposures, with details in the highlights and shadows, as shown here. Exposure: ISO 200, f/5.6, 1/160 second.
Setting Exposure Objectives
If you are a new photographer, then I recommend adopting a goal for your photography — to get the exposure right in the camera with every shot. That is my goal, and it is the goal of most professional photographers. I emphasize this because many photographers are content to fix exposures later in Photoshop.
Certainly, many photos can be polished during image editing, but seasoned photographers know that no amount of Photoshop editing can rival the beauty of a spot-on in-camera exposure. In short, there is no substitute for getting the best possible in-camera exposure, and good exposure should never take a backseat to image editing.
Defining exposure goals
A good exposure has both aesthetic and technical components. Aesthetically, a good exposure captures and expresses the scene as the photographer saw and envisioned it. Technically, a good exposure maintains image detail through the bright highlights (or the most important subject highlights) and in the shadows, displays a full and rich tonal range with smooth tonal transitions, and has pleasing contrast. And, of course, the image must have sharp focus.
Getting good exposures can be challenging, but the fundamental and abiding goal is to capture the best possible exposure given the dynamics of the light, the subject, and the gear.
Practical exposure considerations
Should and can every exposure meet all the technical criteria of an excellent exposure? Not necessarily. Ideally, the exposure should help the photographer achieve his or her creative vision. Sometimes, there are lighting and other challenges that make it impossible to get a perfect exposure. In other cases, the exposure is manipulated to flatter the subject. A classic example of a technically imperfect exposure is when a photographer intentionally overexposes a portrait of a mature woman to minimize facial lines and wrinkles.
Other examples of imperfect-but-acceptable exposures are photos where the range from highlight to shadow is so great that you can properly expose only the most important part of the scene in a single frame. Of course, High Dynamic Range (HDR) imaging can be used in some of those scenes, and the 70D offers HDR shooting in the camera. However, HDR imaging isn’t an option at concerts, plays, and other events where subjects move, so the practical consideration is to get a good exposure on the subject and let the rest of the scene fall where it may.

3.1 In this image, the exposure gave me the overall light and bright sensibility I wanted. Exposure: ISO 400, f/4.0, 1/30 second, +2/3 exposure compensation.
Other practical exposure considerations include exposing images differently depending on whether you’re shooting RAW or JPEG images and balancing ISO and shutter speed to control digital noise. In short, practical exposure considerations have a significant influence on everyday shooting. The trick is to use your technical know-how skillfully with the 70D to get exposures that meet your creative vision for the image.
Choosing an Exposure Mode
One of the first adjustments you make in setting up the camera for shooting is choosing an exposure mode. The exposure mode choice is made with an eye toward other choices you’ll make, including the drive and autofocus modes. However, I start by discussing exposure modes. The 70D offers the traditional modes that range from giving you full manual to partial control over the exposure, and a complement of fully automatic exposure modes.
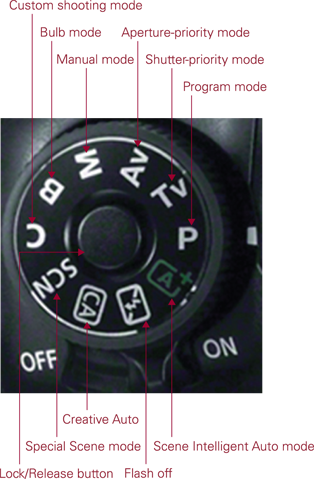
3.2 The Mode dial includes automatic exposure modes, semiautomatic modes, Manual mode, Bulb mode, and one Custom exposure mode.
To set any of the exposure modes, just press the Lock/Release button on the Mode dial, and then turn the dial to line up the mode you want with the white mark on the side of the camera.
Automatic modes
One section on the Mode dial is devoted to a fully automatic and semiautomatic modes. These modes are Scene Intelligent Auto ( ![]() ), a fully automatic mode, Creative Auto (
), a fully automatic mode, Creative Auto ( ![]() ), a semiautomatic mode, Flash off (
), a semiautomatic mode, Flash off ( ![]() ), an automatic mode, and Scene (
), an automatic mode, and Scene ( ![]() ) mode. Setting the Mode dial to Scene mode (
) mode. Setting the Mode dial to Scene mode ( ![]() ) gives you access to more traditional automatic modes, such as Portrait (
) gives you access to more traditional automatic modes, such as Portrait ( ![]() ) and Landscape (
) and Landscape ( ![]() ), as well as new modes, including Handheld Night Scene (
), as well as new modes, including Handheld Night Scene ( ![]() ) and HDR Backlight Control (
) and HDR Backlight Control ( ![]() ). As a group, these are called the Basic Zone modes.
). As a group, these are called the Basic Zone modes.
In all Basic Zone modes except Creative Auto ( ![]() ), the camera sets the ISO, aperture, and shutter speed automatically. In addition, in all Basic Zone modes, the camera automatically sets the following:
), the camera sets the ISO, aperture, and shutter speed automatically. In addition, in all Basic Zone modes, the camera automatically sets the following:
• ISO (set to Auto)
• Auto Picture Style ( ![]() )
)
• Auto White Balance ( ![]() )
)
• Auto Lighting Optimizer is turned on ( ![]() )
)
• sRGB is the color space
• AF mode and AF points for focusing are automatically selected by the camera except in Movie shooting mode ( ![]() )
)
• The AF-assist beam is fired as necessary in all except Flash off ( ![]() ), Landscape (
), Landscape ( ![]() ), and Sports (
), and Sports ( ![]() ) modes
) modes
• The Metering mode is set to Evaluative ( ![]() )
)
• In Movie mode ( ![]() ), the same settings are set, but you can choose any of the autofocus modes or focus manually if the lens allows. Also in Movie mode (
), the same settings are set, but you can choose any of the autofocus modes or focus manually if the lens allows. Also in Movie mode ( ![]() ), you can set the Sound recording, Time code, and Quick Control options.
), you can set the Sound recording, Time code, and Quick Control options.
Despite the automatic control of many camera functions, you can set or apply the following:
• Image quality, except RAW+JPEG or RAW if you’re shooting in the Handheld night scene ( ![]() ) or HDR backlight control (
) or HDR backlight control ( ![]() ) modes.
) modes.
• Creative filters
• Peripheral illumination correction to prevent vignetting
• Chromatic aberration correction to prevent color fringing around high-contrast edges
• Use Continuous AF for Live View shooting
• Drive mode, except in Movie mode ( ![]() )
)
• Using and controlling the built-in flash use depends on the mode you’re using. However, in general, you can control all or most of the flash settings except in Flash off ( ![]() ), Landscape (
), Landscape ( ![]() ), Sports (
), Sports ( ![]() ), and HDR Backlight Control (
), and HDR Backlight Control ( ![]() ) modes. In Movie mode (
) modes. In Movie mode ( ![]() ), the built-in flash is diabled.
), the built-in flash is diabled.
• For movie capture, you can also control the Digital zoom, Video snapshots, autofocus mode, Sound recording, Time code, and Quick Control settings.
The Basic Zone modes are covered in the following sections.
Scene Intelligent Auto
Scene Intelligent Auto mode ( ![]() ) is fully automatic — all you have to do is point and shoot. If you’ve had previous Canon cameras, this mode was called Full Auto. In this mode, the camera makes intelligent guesses about the scene, subject, and action or lack thereof to determine the exposure and focus settings. While the camera controls the key exposure settings, you can set the image quality, drive mode, and determine the flash settings.
) is fully automatic — all you have to do is point and shoot. If you’ve had previous Canon cameras, this mode was called Full Auto. In this mode, the camera makes intelligent guesses about the scene, subject, and action or lack thereof to determine the exposure and focus settings. While the camera controls the key exposure settings, you can set the image quality, drive mode, and determine the flash settings.
In Scene Intelligent Auto mode ( ![]() ), there are noticeably fewer camera menus, tabs, and options as compared to other exposure modes.
), there are noticeably fewer camera menus, tabs, and options as compared to other exposure modes.
Some photographers use Scene Intelligent Auto mode ( ![]() ) often, while others never do. It can be good mode for quick snapshots. To make adjustments in Scene Intelligent Auto mode (
) often, while others never do. It can be good mode for quick snapshots. To make adjustments in Scene Intelligent Auto mode ( ![]() ), press the Quick Control button (
), press the Quick Control button ( ![]() ), press a direction key on the Multi-controller (
), press a direction key on the Multi-controller ( ![]() ) to move to the setting you want to adjust, or tap the setting on the LCD screen, and then turn the Quick Control dial (
) to move to the setting you want to adjust, or tap the setting on the LCD screen, and then turn the Quick Control dial ( ![]() ) to adjust the setting. You can also press the Setting button (
) to adjust the setting. You can also press the Setting button ( ![]() ) to display the settings screen for the selected camera control. More options are available on the camera menus.
) to display the settings screen for the selected camera control. More options are available on the camera menus.
Flash Off
In Flash Off mode ( ![]() ), the 70D does not fire the built-in flash or an external Canon Speedlite, regardless of how low the scene light is. This is a good mode to use if you’re shooting in a museum or gallery where flash photography is prohibited and any time you do not want the flash to fire. If you’re shooting in low-light scenes using Flash Off mode (
), the 70D does not fire the built-in flash or an external Canon Speedlite, regardless of how low the scene light is. This is a good mode to use if you’re shooting in a museum or gallery where flash photography is prohibited and any time you do not want the flash to fire. If you’re shooting in low-light scenes using Flash Off mode ( ![]() ), be sure to use a tripod.
), be sure to use a tripod.
As with most automatic modes, the ISO is set automatically, and most of the time, the camera sets the ISO to a high setting. The high ISO gives you a faster shutter speed, and the faster shutter speed gives you a better chance of getting a sharp image when you handhold the camera. However, the high ISO setting also introduces digital noise that degrades the overall image quality. Even if you use a tripod and could get by with a low ISO setting, the camera is still likely to set a very high ISO. Sometimes, it’s just better to switch to either the Shutter-priority AE ( ![]() ) or Aperture-priority AE (
) or Aperture-priority AE ( ![]() ) mode so you can control the ISO yourself, and thereby, keep the image quality as high as possible.
) mode so you can control the ISO yourself, and thereby, keep the image quality as high as possible.
In Flash Off mode ( ![]() ), the camera automatically sets AI Focus AF (
), the camera automatically sets AI Focus AF ( ![]() ) with automatic AF-point selection. This means that the camera uses One-shot AF mode (
) with automatic AF-point selection. This means that the camera uses One-shot AF mode ( ![]() ), which is designed for still subjects, but automatically switches to the focus tracking mode AI Servo AF (
), which is designed for still subjects, but automatically switches to the focus tracking mode AI Servo AF ( ![]() ) if the subject begins to move.
) if the subject begins to move.
Creative Auto
Creative Auto ( ![]() ) mode displays visuals and text on the LCD screen to help you understand the results that you get from making various adjustments. This shooting mode gives you more control than Scene Intelligent Auto (
) mode displays visuals and text on the LCD screen to help you understand the results that you get from making various adjustments. This shooting mode gives you more control than Scene Intelligent Auto ( ![]() ), but less than the Program AE (
), but less than the Program AE ( ![]() ), Shutter-priority AE (
), Shutter-priority AE ( ![]() ), Aperture-priority AE (
), Aperture-priority AE ( ![]() ), or Manual (
), or Manual ( ![]() ) shooting modes.
) shooting modes.
To use Creative Auto mode ( ![]() ), turn the Mode dial to it, and then press the Quick Control button (
), turn the Mode dial to it, and then press the Quick Control button ( ![]() ). On the Multi-controller (
). On the Multi-controller ( ![]() ), press up or down to highlight the option you want to adjust, or tap it. Then turn the Quick Control (
), press up or down to highlight the option you want to adjust, or tap it. Then turn the Quick Control ( ![]() ) or Main (
) or Main ( ![]() ) dial to adjust the setting unless otherwise noted in the following sections.
) dial to adjust the setting unless otherwise noted in the following sections.
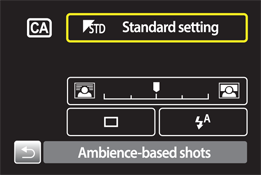
3.3 The Creative Auto screen offers more control over image appearance than other automatic modes, without the necessity of understanding exposure details.
To see the current exposure settings, press the Info Button ( ![]() ) one or more times to display the Shooting settings screen.
) one or more times to display the Shooting settings screen.
To adjust the sliders on the screen, press the left or right keys on the Multi-controller ( ![]() ), or turn the Main (
), or turn the Main ( ![]() ) or Quick Control (
) or Quick Control ( ![]() ) dials to make adjustments, or use touch to make changes. Once a setting is selected, you can also press the Setting button (
) dials to make adjustments, or use touch to make changes. Once a setting is selected, you can also press the Setting button ( ![]() ) to display a screen with the full options. You can change the following settings:
) to display a screen with the full options. You can change the following settings:
• Select Ambience setting. You can choose one of nine Ambience options from Standard to Monochrome.
Ambience options are covered in Chapter 5.
• Background blur. Adjust this control to softly blur or render the background with sharper detail by adjusting the slide control to the left or right, respectively. In other words, this adjustment changes the aperture (f-stop), and thus the depth of field. The camera also chooses the shutter speed to give a good exposure. For portraits, choose a blurred background, but for landscapes and large group portraits, choose more background sharpness. You can’t adjust the Background blur setting when the flash is raised.
• Drive mode. The Drive mode determines the speed at which the camera captures images. You can choose Single shooting mode ( ![]() ), in which each press of the shutter button makes one image; High-speed continuous drive mode (
), in which each press of the shutter button makes one image; High-speed continuous drive mode ( ![]() ), in which pressing and holding the shutter button captures up to 7 frames per second (fps); Low-speed continuous drive mode (
), in which pressing and holding the shutter button captures up to 7 frames per second (fps); Low-speed continuous drive mode ( ![]() ) for 3 fps; Silent single shooting (
) for 3 fps; Silent single shooting ( ![]() ) or Silent continuous (
) or Silent continuous ( ![]() ) to soften the sound of the shutter; the 10-second Self-timer/remote control mode (
) to soften the sound of the shutter; the 10-second Self-timer/remote control mode ( ![]() ) or the 2-second Self-timer/remote control (
) or the 2-second Self-timer/remote control ( ![]() ), in which shooting is delayed by 10 or 2 seconds so that you can be in the picture, or you can avoid camera shake by pressing the shutter button when you are shooting long exposures, macro images, or using a long telephoto lens.
), in which shooting is delayed by 10 or 2 seconds so that you can be in the picture, or you can avoid camera shake by pressing the shutter button when you are shooting long exposures, macro images, or using a long telephoto lens.
• Flash firing. With the Flash control, you can choose to have the built-in flash fire automatically when the light is too low to get a sharp handheld image, have the flash fire for every image, or turn off the flash completely. If you choose to turn off the flash and the light is low, be sure to stabilize the camera on a tripod or a solid surface before shooting. Also, even if you turn off the flash, the flash may pop up so the camera can use the flash’s AF-assist beam to help the camera focus in low light. Even if this happens, the flash will not fire during the exposure.
Portrait
In Portrait mode ( ![]() ), the 70D sets a wide aperture (small f-stop number) to create a shallow depth of field that blurs background details. Blurring background details helps prevent them from distracting the viewer’s eye from the subject. Portrait mode (
), the 70D sets a wide aperture (small f-stop number) to create a shallow depth of field that blurs background details. Blurring background details helps prevent them from distracting the viewer’s eye from the subject. Portrait mode ( ![]() ) is great, of course, for people portraits, but it’s also good for taking pet portraits and indoor and outdoor still-life shots.
) is great, of course, for people portraits, but it’s also good for taking pet portraits and indoor and outdoor still-life shots.
To enhance the Portrait mode effect of blurring the background, use a telephoto lens or move the subject farther from the background.
In Portrait mode ( ![]() ), the camera automatically selects One-shot AF (
), the camera automatically selects One-shot AF ( ![]() ) and automatically chooses the AF points. When the camera chooses the AF points, it looks for points in the scene where lines are well defined for the object that is closest to the lens and/or for points of strong contrast. In a portrait, the point of sharpest focus should be on the subject’s eyes.
) and automatically chooses the AF points. When the camera chooses the AF points, it looks for points in the scene where lines are well defined for the object that is closest to the lens and/or for points of strong contrast. In a portrait, the point of sharpest focus should be on the subject’s eyes.
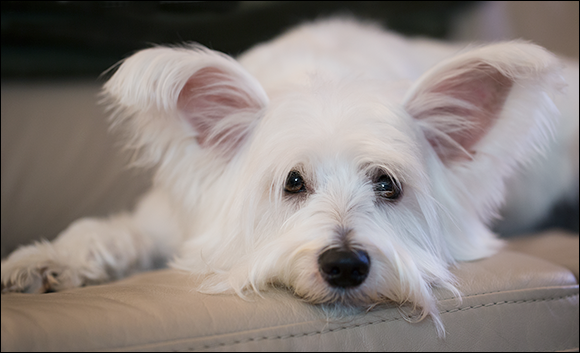
3.4 Portrait mode also works well for pet portraits. Exposure: ISO 1000, f/2.8, 1/25 second.
However, the eyes seldom meet the camera’s criteria for setting focus, and the camera instead focuses on the subject’s nose, mouth, or clothing. When you half-press the shutter button, watch in the viewfinder to see which AF points the camera chooses. If the AF point or points aren’t on the eyes, then shift the camera position slightly to try to force the camera to reset the AF point to the eyes. If you can’t force the camera to refocus on the eyes, then switch to Aperture-priority AE mode ( ![]() ), set a wide aperture, such as f/5.6, and then manually select the AF point that is over the subject’s eyes.
), set a wide aperture, such as f/5.6, and then manually select the AF point that is over the subject’s eyes.
Selecting an AF point manually is detailed in Chapter 4.
Landscape
In Landscape mode ( ![]() ), the 70D chooses a narrow aperture, a large f-stop number, to keep both background and foreground details in acceptably sharp focus, creating an extensive depth of field. The camera gives you the fastest shutter speed possible given the amount of light in the scene to help ensure sharp handheld images; and to do this, it may increase the ISO to a high setting. The high ISO setting can introduce digital noise in the image that degrades the overall quality.
), the 70D chooses a narrow aperture, a large f-stop number, to keep both background and foreground details in acceptably sharp focus, creating an extensive depth of field. The camera gives you the fastest shutter speed possible given the amount of light in the scene to help ensure sharp handheld images; and to do this, it may increase the ISO to a high setting. The high ISO setting can introduce digital noise in the image that degrades the overall quality.
So as the light fades, be sure to monitor the shutter speed in the viewfinder. If the shutter speed is 1/60 or 1/30 second or slower, or if you’re using a telephoto lens, then steady the camera on a solid surface or use a tripod. This mode works well not only for landscapes, but also for cityscapes and portraits of large groups of people where a flash is not needed. To get a truly wide view of the scene, use a wide-angle lens or zoom setting.
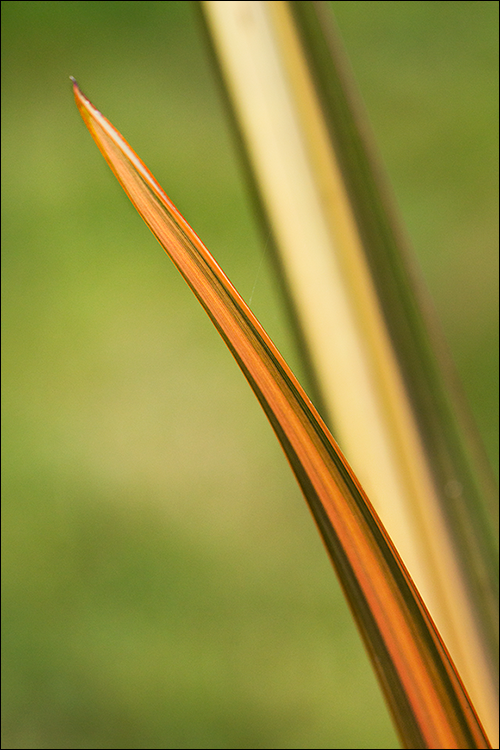
3.5 This image was taken in Close-up mode. I was able to achieve focus on the edge of the leaf after several small back and forth adjustments. Exposure: ISO 800, f/5.6, 1/125 second.
In Landscape mode ( ![]() ), the camera automatically sets One-shot AF mode (
), the camera automatically sets One-shot AF mode ( ![]() ) and automatic AF point selection. The built-in flash never fires, but an accessory Speedlite will fire.
) and automatic AF point selection. The built-in flash never fires, but an accessory Speedlite will fire.
Close-up
As in Portrait mode ( ![]() ), the camera sets a wide aperture to create a shallow depth of field in Close-up mode (
), the camera sets a wide aperture to create a shallow depth of field in Close-up mode ( ![]() ). It also sets as fast a shutter speed as possible given the light. You can further enhance the close-up effect by using a macro lens. If you’re using a zoom lens, zoom to the telephoto end of the lens. In Close-up mode (
). It also sets as fast a shutter speed as possible given the light. You can further enhance the close-up effect by using a macro lens. If you’re using a zoom lens, zoom to the telephoto end of the lens. In Close-up mode ( ![]() ), the camera automatically sets One-shot AF mode (
), the camera automatically sets One-shot AF mode ( ![]() ) with automatic AF point selection.
) with automatic AF point selection.
All lenses have a minimum focusing distance and it varies by lens. This means that you can’t get sharp focus at distances closer than the minimum focusing distance of the lens. Watch the focus confirmation light in the lower right of the viewfinder. If it is lit continuously, the camera has achieved sharp focus. If the light blinks, move back a little, focus, and then check the focus confirmation light.
Sports
In Sports mode ( ![]() ), the 70D sets a fast shutter speed to freeze subject motion. This mode is good for capturing athletes in mid-action or the antics of pets and children.
), the 70D sets a fast shutter speed to freeze subject motion. This mode is good for capturing athletes in mid-action or the antics of pets and children.
If you’re shooting in low light, the shutter speed display in the viewfinder blinks to warn you of the potential for blur due to camera shake. Camera shake occurs from the natural shake of your hands when holding the camera. If you see the shutter speed blinking, stabilize the camera on a tripod or other solid surface. If the shutter speed is slow, then the subject motion will be blurred.
To give you a fast shutter speed, the 70D increases the ISO setting, sometimes to very high levels. It also counteracts the high ISO by automatically applying High ISO speed noise reduction.
In Sports mode ( ![]() ), you begin focusing on the subject by placing the center AF point on the subject, and half-pressing the shutter button to establish focus using the Area AF frame. Be sure to watch the focus confirmation light in the viewfinder. If it is blinking, it means the camera could not lock in focus on the subject, so repeat the process until you see that the focus confirmation light is lit continuously. Also, there is a continuous soft beep during the time the camera is focusing.
), you begin focusing on the subject by placing the center AF point on the subject, and half-pressing the shutter button to establish focus using the Area AF frame. Be sure to watch the focus confirmation light in the viewfinder. If it is blinking, it means the camera could not lock in focus on the subject, so repeat the process until you see that the focus confirmation light is lit continuously. Also, there is a continuous soft beep during the time the camera is focusing.
Once focus is established, the camera should automatically track focus as the subject moves through the AF points. The focus is set the moment you fully press the shutter button. Also, if you’re shooting a burst of images, you can continue to hold the shutter button down and the camera maintains focus. In Sports mode ( ![]() ), the camera automatically sets AI Servo AF mode (
), the camera automatically sets AI Servo AF mode ( ![]() ) with automatic AF point selection. The built-in flash never fires in this mode, but an accessory Speedlite does fire.
) with automatic AF point selection. The built-in flash never fires in this mode, but an accessory Speedlite does fire.
High-speed continuous drive mode ( ![]() ) is the default drive mode in Sports mode (
) is the default drive mode in Sports mode ( ![]() ), enabling you to shoot at up to 7 fps for a maximum burst rate of 65 Large/Fine JPEG images with a USH-I memory card. With other cards, expect 40 shots.
), enabling you to shoot at up to 7 fps for a maximum burst rate of 65 Large/Fine JPEG images with a USH-I memory card. With other cards, expect 40 shots.
Night Portrait
In Night Portrait mode ( ![]() ), the flash usually fires providing proper exposure for the subject, and a long shutter speed provides proper exposure for the background. Together, the combination creates a natural-looking night portrait. Because this mode uses a long exposure, it’s important that the subject remain stock-still during the exposure to avoid blur. Be sure to stabilize the camera. The flash fires depending on the existing light level, so in low light, ensure that the subject is within the range of the built-in flash.
), the flash usually fires providing proper exposure for the subject, and a long shutter speed provides proper exposure for the background. Together, the combination creates a natural-looking night portrait. Because this mode uses a long exposure, it’s important that the subject remain stock-still during the exposure to avoid blur. Be sure to stabilize the camera. The flash fires depending on the existing light level, so in low light, ensure that the subject is within the range of the built-in flash.
Flash ranges for the built-in flash are provided in Chapter 9.
You should use this mode when people are in the picture, rather than for general night shots, because the camera sets a wide aperture to blur the background the way it does in Portrait mode ( ![]() ). For night scenes without people, use Landscape mode (
). For night scenes without people, use Landscape mode ( ![]() ) or a Creative Zone mode and a tripod. In Night Portrait mode (
) or a Creative Zone mode and a tripod. In Night Portrait mode ( ![]() ), the camera automatically sets One-shot AF mode (
), the camera automatically sets One-shot AF mode ( ![]() ) with automatic AF point selection.
) with automatic AF point selection.
Handheld Night Scene
Normally with low light, the camera shutter speed is necessarily long to let enough of the limited available light into the camera to make a proper exposure. Even with high ISO settings, the shutter speed can be very slow. With Handheld Night Scene mode ( ![]() ), a single press of the shutter button makes four images in quick succession. The photos are then merged to produce a single image that has brighter exposure and less blur from camera shake than a single frame would have. This mode does not guarantee a tack-sharp image, but it helps you get a sharper image than you would otherwise.
), a single press of the shutter button makes four images in quick succession. The photos are then merged to produce a single image that has brighter exposure and less blur from camera shake than a single frame would have. This mode does not guarantee a tack-sharp image, but it helps you get a sharper image than you would otherwise.
Of course, you still have to keep the camera as steady as possible, and its position must remain constant through all four shots. Otherwise, the camera won’t be able to align the four shots to create a sharp image. If you include people in the scene, then turn on flash firing by pressing the Quick Control button ( ![]() ), and then selecting the Flash setting (
), and then selecting the Flash setting ( ![]() ) and choosing Flash on. Only the first frame uses flash to illuminate the person or people properly, and the other three frames are made without the flash. In Handheld Night Scene mode (
) and choosing Flash on. Only the first frame uses flash to illuminate the person or people properly, and the other three frames are made without the flash. In Handheld Night Scene mode ( ![]() ), the camera automatically sets One-shot AF mode (
), the camera automatically sets One-shot AF mode ( ![]() ) with automatic AF point selection.
) with automatic AF point selection.
HDR Backlight Control
HDR Backlight Control mode ( ![]() ) is a handy mode that improves exposures in challenging light, specifically in scenes where the light behind the subject is much brighter than the light falling on the subject; in other words, in backlit scenes. Typically when photographing in backlit scenes, the camera correctly exposes the subject while the details in the much brighter background blow out to white. Backlit scenes are categorized as High Dynamic Range (HDR). In HDR scenes, the range of light from highlights to shadows as measured in f-stops is wider than the dynamic range of the image sensor. As a result, the camera has to sacrifice details, most often details in the highlights.
) is a handy mode that improves exposures in challenging light, specifically in scenes where the light behind the subject is much brighter than the light falling on the subject; in other words, in backlit scenes. Typically when photographing in backlit scenes, the camera correctly exposes the subject while the details in the much brighter background blow out to white. Backlit scenes are categorized as High Dynamic Range (HDR). In HDR scenes, the range of light from highlights to shadows as measured in f-stops is wider than the dynamic range of the image sensor. As a result, the camera has to sacrifice details, most often details in the highlights.
To solve the dynamic range problem, HDR Backlight Control mode ( ![]() ) takes three successive shots at different exposures — one reduced exposure to capture highlight detail, a standard exposure, and an increased exposure to capture shadow details. Then the shots are merged by the camera to create a single image with proper exposure in all areas. The HDR Backlight Control mode (
) takes three successive shots at different exposures — one reduced exposure to capture highlight detail, a standard exposure, and an increased exposure to capture shadow details. Then the shots are merged by the camera to create a single image with proper exposure in all areas. The HDR Backlight Control mode ( ![]() ) is echoed in the Creative Zone shooting modes with the HDR Shooting option. One major difference between the two modes is that with HDR Backlight Control mode (
) is echoed in the Creative Zone shooting modes with the HDR Shooting option. One major difference between the two modes is that with HDR Backlight Control mode ( ![]() ), you can’t control the amount of exposure difference among the frames.
), you can’t control the amount of exposure difference among the frames.
As with any mode in which the camera takes multiple frames, it is critical that you hold it steady or use a tripod, otherwise the three frames will not align perfectly during in-camera processing, and the edges of objects will be blurred, doubled, or tripled. In HDR Backlight Control mode ( ![]() ), the camera automatically sets One-shot AF mode (
), the camera automatically sets One-shot AF mode ( ![]() ) with automatic AF point selection.
) with automatic AF point selection.
Certainly, the automatic Basic Zone modes can be handy, and they produce nice images. However, if you want to control the way your images look, I encourage you to use the Creative Zone modes: Program AE ( ![]() ), Shutter-priority AE (
), Shutter-priority AE ( ![]() ), Aperture-priority AE (
), Aperture-priority AE ( ![]() ), and Manual (
), and Manual ( ![]() ).
).
Creative modes
Unlike the automatic Basic Zone modes, the semiautomatic and manual modes — Program AE ( ![]() ), Shutter-priority AE (
), Shutter-priority AE ( ![]() ), Aperture-priority AE (
), Aperture-priority AE ( ![]() ), and Manual (
), and Manual ( ![]() ) — give you full control of all camera functions and settings. Collectively, these modes are referred to as the Creative Zone.
) — give you full control of all camera functions and settings. Collectively, these modes are referred to as the Creative Zone.
Bulb mode ( ![]() ) is also on the Mode dial. It isn’t technically an exposure mode, but having it on the Mode dial allows quick access to it for exposures longer than 30 seconds, such as when photographing star trails.
) is also on the Mode dial. It isn’t technically an exposure mode, but having it on the Mode dial allows quick access to it for exposures longer than 30 seconds, such as when photographing star trails.
Program AE
Program AE mode ( ![]() ) is handy because it enables you either to shoot using the camera’s recommended exposure, or to quickly change or shift to a different, but equivalent, exposure. Equivalent exposure means that both exposures deliver the same amount of light to the image sensor. Here is how it works. When you press the shutter button halfway, the 70D gives you its suggested aperture and shutter speed based on the ISO currently set. You can shoot with those exposure settings, or you can use a different aperture and shutter speed by simply turning the Main dial (
) is handy because it enables you either to shoot using the camera’s recommended exposure, or to quickly change or shift to a different, but equivalent, exposure. Equivalent exposure means that both exposures deliver the same amount of light to the image sensor. Here is how it works. When you press the shutter button halfway, the 70D gives you its suggested aperture and shutter speed based on the ISO currently set. You can shoot with those exposure settings, or you can use a different aperture and shutter speed by simply turning the Main dial ( ![]() ) to temporarily change, or shift, the aperture and shutter speed.
) to temporarily change, or shift, the aperture and shutter speed.
For example, if the camera initially sets the exposure at f/4.0 at 1/125 second, you can turn the Main dial ( ![]() ) one click to the left to shift to an f/5.0 aperture and a 1/100 second shutter speed, which is equivalent to the initial exposure assuming the same ISO setting. Turning the Main dial (
) one click to the left to shift to an f/5.0 aperture and a 1/100 second shutter speed, which is equivalent to the initial exposure assuming the same ISO setting. Turning the Main dial ( ![]() ) to the right results in a shift to f/3.5 at 1/200 second, and so on. This assumes, of course, that the ISO stays the same.
) to the right results in a shift to f/3.5 at 1/200 second, and so on. This assumes, of course, that the ISO stays the same.
When you shift the exposure, the change is temporary. After you take a picture at the shifted exposure settings, the camera returns to its suggested (or standard) exposure for the next image. Also, if you shift the exposure, and then release the shutter button without taking the picture within a few seconds, the camera returns to its standard exposure.
At first glance, the Scene Intelligent Auto ( ![]() ) and Program AE (
) and Program AE ( ![]() ) modes seem similar. However, Program AE mode (
) modes seem similar. However, Program AE mode ( ![]() ) gives you full control over the focus, white balance, metering mode, and so on. In Scene Intelligent Auto (
) gives you full control over the focus, white balance, metering mode, and so on. In Scene Intelligent Auto ( ![]() ), you cannot change many of the camera settings.
), you cannot change many of the camera settings.
To use Program AE mode ( ![]() ), set the Mode dial to Program AE (
), set the Mode dial to Program AE ( ![]() ), and then press the shutter button halfway. If you want to shift the camera’s standard exposure, turn the Main dial (
), and then press the shutter button halfway. If you want to shift the camera’s standard exposure, turn the Main dial ( ![]() ) to the left to make the aperture narrower and the shutter speed longer, or to the right to make the aperture wider and the shutter speed shorter.
) to the left to make the aperture narrower and the shutter speed longer, or to the right to make the aperture wider and the shutter speed shorter.
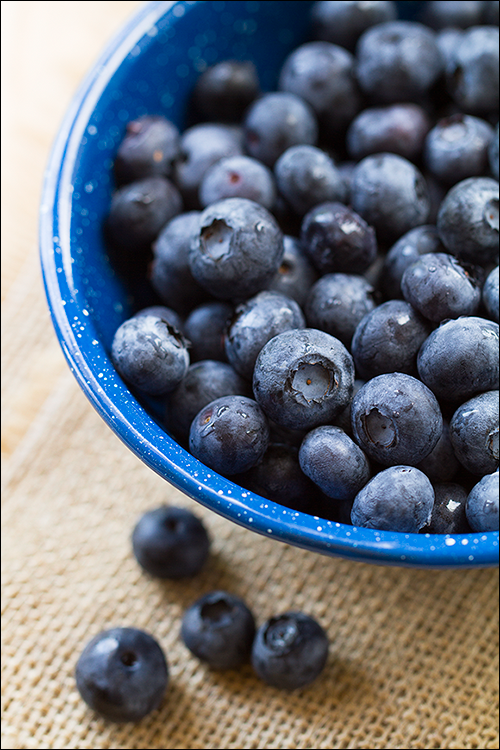
3.6 In Program AE mode, the camera’s standard exposure was f/3.5 for this bowl of blueberries, which created a very shallow depth of field. Exposure: ISO 200, f/3.5, 1/30 second.
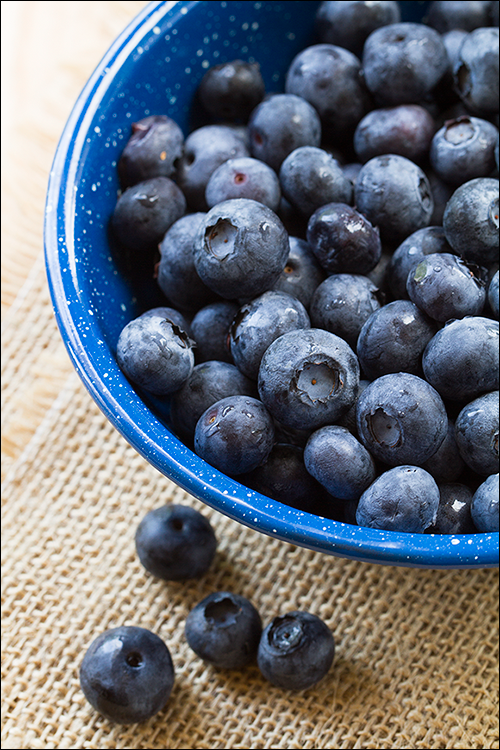
3.7 I wanted a shot of the blueberries with a more extensive depth of field, so here, I shifted the exposure to f/8.0. Exposure: ISO 200, f/8.0, 1/6 second.
If the shutter speed shows 30" and the maximum aperture of the lens is blinking in the viewfinder, it means that the image will be underexposed. You can change to a higher ISO or use the built-in or an accessory flash. However, if you use a Speedlite, you cannot shift the exposure. Conversely, if the shutter speed shows 8000 and the lens’s minimum aperture blinks in the viewfinder, the image will be overexposed. Use a lower ISO setting, or decrease the light with a neutral density (ND) filter or by using a scrim (that is, a material that cuts down the light falling on the subject).
Shutter-priority AE
When the primary concern is controlling the shutter speed, Shutter-priority AE ( ![]() ) is the mode of choice. In this semiautomatic shooting mode, you set the shutter speed and the camera automatically calculates the appropriate aperture based on the current ISO setting and the light meter reading.
) is the mode of choice. In this semiautomatic shooting mode, you set the shutter speed and the camera automatically calculates the appropriate aperture based on the current ISO setting and the light meter reading.
Controlling the shutter speed determines how subject motion is rendered in the image — either as frozen or blurred — and that makes Shutter-priority AE mode ( ![]() ) a good choice for sports and action shooting. However, it’s also the mode to use when you need to set a shutter speed fast enough to prevent blur from camera shake when you don’t have a tripod. For example, if you are shooting in moderate to low light with a non-Image Stabilized (IS) lens at a focal length of 100mm, then you can set the shutter speed to 1/100 second — a shutter speed that is fast enough to handhold the camera and get sharp images at this focal length. In Shutter-priority AE mode (
) a good choice for sports and action shooting. However, it’s also the mode to use when you need to set a shutter speed fast enough to prevent blur from camera shake when you don’t have a tripod. For example, if you are shooting in moderate to low light with a non-Image Stabilized (IS) lens at a focal length of 100mm, then you can set the shutter speed to 1/100 second — a shutter speed that is fast enough to handhold the camera and get sharp images at this focal length. In Shutter-priority AE mode (![]() ), the shutter speed remains constant as you continue shooting.
), the shutter speed remains constant as you continue shooting.
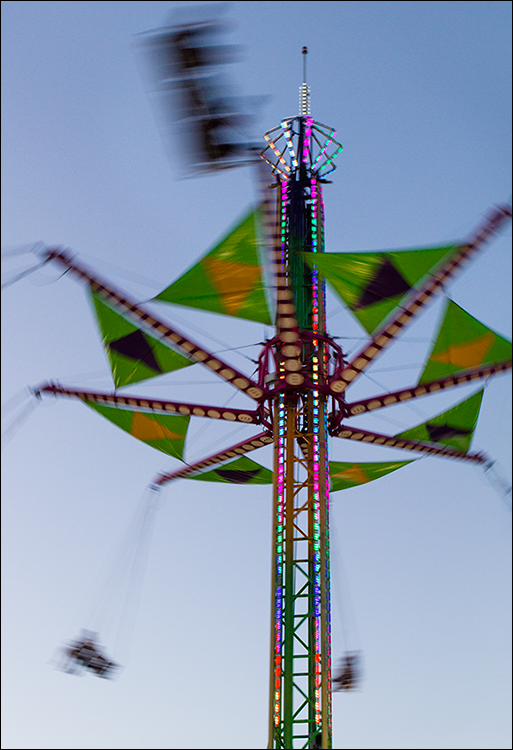
3.8 A slow shutter speed in Shutter-priority AE mode blurred the motion of the swings, while keeping the main ride structure in sharp focus. Exposure: ISO 200, f/14, 1/15 second, -1 exposure compensation.
On the 70D, you can select shutter speeds from 1/8000 second to 30 seconds, or switch to Bulb mode ( ![]() ). To show fractional shutter speeds, the 70D shows only the denominator of the fraction in the viewfinder. Thus, 1/8000 second is displayed as 8000 and 1/4 second is displayed as 4. Shutter speeds longer than 1/4 second are indicated with a double quotation mark that represents a decimal point between two numbers or following a single number. For example, 1"5 is 1.5 seconds, while 4" is 4 seconds.
). To show fractional shutter speeds, the 70D shows only the denominator of the fraction in the viewfinder. Thus, 1/8000 second is displayed as 8000 and 1/4 second is displayed as 4. Shutter speeds longer than 1/4 second are indicated with a double quotation mark that represents a decimal point between two numbers or following a single number. For example, 1"5 is 1.5 seconds, while 4" is 4 seconds.
To use Shutter-priority AE mode ( ![]() ), turn the Mode dial to it, press the shutter button halfway, and then turn the Main dial (
), turn the Mode dial to it, press the shutter button halfway, and then turn the Main dial ( ![]() ) to change the shutter speed. The camera automatically sets the appropriate aperture based on the current ISO and the light meter reading. If the lens’s maximum aperture blinks, the image will be underexposed. Increase the ISO setting or decrease the shutter speed until the aperture stops blinking.
) to change the shutter speed. The camera automatically sets the appropriate aperture based on the current ISO and the light meter reading. If the lens’s maximum aperture blinks, the image will be underexposed. Increase the ISO setting or decrease the shutter speed until the aperture stops blinking.
If you want to ensure that the exposure is correct in scenes in which the light changes quickly, you can enable Custom Function (see Chapter 6) I-6 Safety shift. Safety shift is useful in both the Shutter-priority AE ( ![]() ) and Aperture-priority AE (
) and Aperture-priority AE ( ![]() ) exposure modes.
) exposure modes.
In the default 1/3-stop increments, the following shutter speeds are available (in seconds): 1/8000, 1/6400, 1/5000, 1/4000, 1/3200, 1/2500, 1/2000, 1/1600, 1/1250, 1/1000, 1/800, 1/640, 1/500, 1/400, 1/320, 1/250, 1/200, 1/160, 1/125, 1/100, 1/80, 1/60, 1/50, 1/40, 1/30, 1/25, 1/20, 1/15, 1/13, 1/10, 1/8, 1/6, 1/5, 1/4, 0.3, 0.4, 0.5, 0.6, 0.8, 1, 1.3, 1.6, 2, 2.5, 3.2, 4, 5, 6, 8, 10, 13, 15, 20, 25, 30.
Shutter speed increments can be changed from the default 1/3-stop to 1/2-stop increments using C.Fn1-1 Exposure level increments. The 70D flash sync speed is 1/250 second or slower for Canon Speedlites.
Aperture-priority AE
When you want to control the depth of field, Aperture-priority AE mode ( ![]() ) is a good choice. In Aperture-priority AE mode (
) is a good choice. In Aperture-priority AE mode ( ![]() ), you select the aperture (f-stop) that you want, and the 70D automatically sets the shutter speed based on the current ISO and the light meter reading.
), you select the aperture (f-stop) that you want, and the 70D automatically sets the shutter speed based on the current ISO and the light meter reading.
The range of apertures available to you depends, of course, on the lens that you are using. On zoom lenses, the minimum aperture may vary by focal length. For example, the EF 24-105mm f/4L IS USM lens has a minimum aperture of f/22 at 24mm, and f/27 at 105mm. The maximum aperture is f/4.0 at all focal lengths. On other lenses, the maximum aperture is variable, based on the focal length.
To use this mode, set the Mode dial to Aperture-priority AE ( ![]() ), and then press the shutter button halfway. Turn the Main dial (
), and then press the shutter button halfway. Turn the Main dial ( ![]() ) to the right to set a narrower aperture, or to the left to set a wider aperture. The camera automatically calculates the appropriate shutter speed based on the light meter reading and the ISO.
) to the right to set a narrower aperture, or to the left to set a wider aperture. The camera automatically calculates the appropriate shutter speed based on the light meter reading and the ISO.
Apertures from f/5.6 to f/1.4 are referred to as large apertures because the opening of the lens diaphragm is large and allows more light to reach the image sensor. Large or wide apertures create a shallow depth of field, in which the back- and foregrounds are blurred. Apertures from f/8.0 to f/22 are referred to as small apertures because the opening of the lens diaphragm is narrow, allowing less light to reach the sensor. Small apertures create extensive depth of field, in which most of the scene from fore- to background is in acceptably sharp focus.
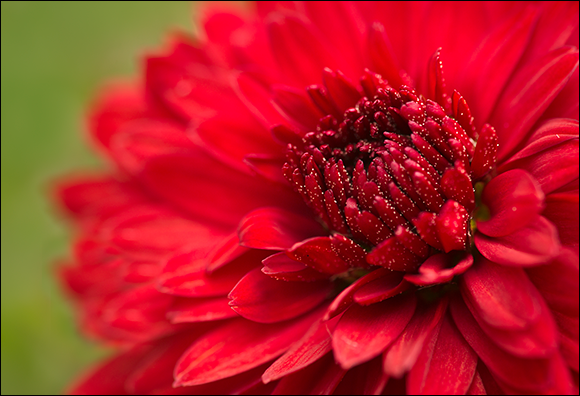
3.9 A wide aperture coupled with an EF 180mm macro lens isolated the center of this flower and brought out the tiniest specs. Exposure: ISO 200, f/5.6, 1/13 second, +2/3 exposure compensation.
Practically speaking, you can also control the shutter speed using Aperture-priority AE mode ( ![]() ), just as you can control aperture in Shutter-priority AE mode (
), just as you can control aperture in Shutter-priority AE mode ( ![]() ). For example, if I am shooting outdoors in Aperture-priority AE mode (
). For example, if I am shooting outdoors in Aperture-priority AE mode ( ![]() ) and see a flock of birds coming into the scene, I can quickly open up to (set) a wider aperture, knowing it will give me a faster shutter speed. So, I simply adjust the aperture until I get a shutter speed that’s fast enough to stop the motion of the birds. The same is true for Shutter-priority AE mode (
) and see a flock of birds coming into the scene, I can quickly open up to (set) a wider aperture, knowing it will give me a faster shutter speed. So, I simply adjust the aperture until I get a shutter speed that’s fast enough to stop the motion of the birds. The same is true for Shutter-priority AE mode ( ![]() ), albeit by adjusting the shutter speed to get to the aperture you want.
), albeit by adjusting the shutter speed to get to the aperture you want.
In 1/3-stop increments, and depending on the lens you use, the apertures are: f/1.2, f/1.4, f/1.6, f/1.8, f/2.0, f/2.2, f/2.5, f/2.8, f/3.2, f/3.5, f/4.0, f/4.5, f/5.0, f/5.6, f/6.3, f/7.1, f/8.0, f/9.0, f/10, f/11, f/13, f/14, f/16, f/18, f/20, f/22, f/25, f/29, f/32, f/36, f/40, f/45.
If you select an aperture and the exposure is outside the exposure range, the shutter speed value blinks in the viewfinder and on the LCD panel. If 8000 blinks, the image will be overexposed. If 30 blinks, the image will be underexposed. If this happens, adjust to a smaller or larger aperture, respectively, or choose a lower or higher ISO setting. You can preview the depth of field by pressing the depth-of-field preview button on the front of the camera.
Manual
As the name implies, Manual mode ( ![]() ) eliminates the automatic aspects of setting the exposure so that you set the aperture, shutter speed, and ISO manually. This exposure mode is a good choice when you:
) eliminates the automatic aspects of setting the exposure so that you set the aperture, shutter speed, and ISO manually. This exposure mode is a good choice when you:
• Determine the exposure settings by metering on a middle-gray area in the scene, or on a photographic gray card (such as the one available in the back of this book).
• Have predetermined settings for specific scenes or subjects, such as for fireworks, astral subjects, or when shooting with studio strobes. In Figure 3.10, I used Manual mode and underexposed the scene slightly to create a low-key (darker) look for the tulips.
• Want to intentionally underexpose or overexpose the scene or otherwise vary from the camera’s standard exposure.
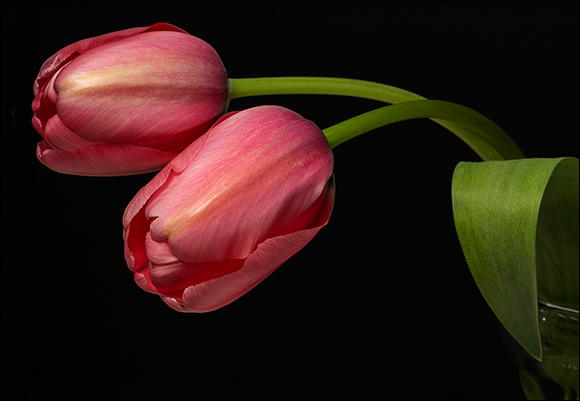
3.10 I always switch to Manual mode in the studio because it allows me to create a high- or low-key (as shown here) look quickly. Exposure: ISO 100, f/22, 1/125 second.
• Want a consistent exposure across a series of photos, such as for a panoramic series.
• Use a handheld light meter to determining exposure settings.
Before you begin, be sure to set the ISO to the setting you want. To use Manual mode ( ![]() ), follow these steps:
), follow these steps:
1. Set the Mode dial to Manual mode (![]() ), set the ISO, and then verify that the Lock switch on the back of the camera is unlocked (in the down position). You can either set a specific ISO, or use Auto ISO. However, if you use Auto ISO, the camera will change the ISO to get to the camera’s standard exposure rather than enabling you to vary from the standard exposure. You can press the AE Lock button (
), set the ISO, and then verify that the Lock switch on the back of the camera is unlocked (in the down position). You can either set a specific ISO, or use Auto ISO. However, if you use Auto ISO, the camera will change the ISO to get to the camera’s standard exposure rather than enabling you to vary from the standard exposure. You can press the AE Lock button ( ![]() ) to keep the ISO from changing when using Auto ISO, but I recommend setting a specific ISO instead of using Auto ISO.
) to keep the ISO from changing when using Auto ISO, but I recommend setting a specific ISO instead of using Auto ISO.
2. If you’re using recommended or predetermined exposure settings, then turn the Main dial (![]() ) to set the shutter speed, and then turn the Quick Control dial (
) to set the shutter speed, and then turn the Quick Control dial (![]() ) to set the aperture to the recommended settings. Use this technique when you’ve been given the ISO, aperture, and shutter speed settings to use for photographing the moon or stars, for example.
) to set the aperture to the recommended settings. Use this technique when you’ve been given the ISO, aperture, and shutter speed settings to use for photographing the moon or stars, for example.
3. To use the camera’s recommended exposure or set it based on a photographic gray-card reading, press the shutter button halfway. Turn the Main dial ( ![]() ) to adjust the shutter speed and/or turn the Quick Control dial (
) to adjust the shutter speed and/or turn the Quick Control dial ( ![]() ) to adjust the aperture until the tick mark is at the center of the Exposure level indicator displayed in the viewfinder. Next, focus and make the picture.
) to adjust the aperture until the tick mark is at the center of the Exposure level indicator displayed in the viewfinder. Next, focus and make the picture.
If you have enabled Auto Lighting Optimizer on Shooting menu 3 ( ![]() ), then the exposure will be adjusted automatically. For example, if you want a brighter exposure than the standard exposure, then Auto Lighting Optimizer will automatically darken the image. If you want to control the exposure, then turn off Auto Lighting Optimizer. If the image needs more or less exposure, you can adjust the aperture or shutter speed to get the exposure you want.
), then the exposure will be adjusted automatically. For example, if you want a brighter exposure than the standard exposure, then Auto Lighting Optimizer will automatically darken the image. If you want to control the exposure, then turn off Auto Lighting Optimizer. If the image needs more or less exposure, you can adjust the aperture or shutter speed to get the exposure you want.
You can overexpose or underexpose up to +/-3 Exposure Values (EV), and the amount of exposure variance from the metered exposure is displayed on the Exposure Level Indicator. If the amount of exposure is greater than +/-3 EV, then the Exposure Level Indicator shows an arrow on one or the other side. You can then adjust the aperture, shutter speed, or ISO sensitivity setting until the exposure is within range. With the camera in Manual exposure mode ( ![]() ), you cannot use Exposure Compensation. The aperture and shutter speed values detailed earlier in the chapter are also available in Manual mode (
), you cannot use Exposure Compensation. The aperture and shutter speed values detailed earlier in the chapter are also available in Manual mode ( ![]() ).
).
Bulb
Bulb mode ( ![]() ) enables you to keep the shutter open as long as the shutter button is fully depressed. Bulb mode (
) enables you to keep the shutter open as long as the shutter button is fully depressed. Bulb mode ( ![]() ) is handy for some night shooting, fireworks, celestial shots, and other exposures longer than 30 seconds.
) is handy for some night shooting, fireworks, celestial shots, and other exposures longer than 30 seconds.
Be sure that you have a fully charged battery before you begin an extended exposure.
To make a bulb exposure, turn the Mode dial to Bulb mode ( ![]() ). With the camera on a tripod, set up the remote switch to the amount of time you want for the exposure. You can, of course, press and hold the shutter button for the exposure duration, but that can cause blur from camera shake, not to mention finger fatigue. I recommend using the accessory RS-60E3 remote switch to hold the shutter open. You can also enable Mirror lockup to reduce the chance of blur caused by the reflex mirror action. Mirror lockup is in Shooting menu 2 (
). With the camera on a tripod, set up the remote switch to the amount of time you want for the exposure. You can, of course, press and hold the shutter button for the exposure duration, but that can cause blur from camera shake, not to mention finger fatigue. I recommend using the accessory RS-60E3 remote switch to hold the shutter open. You can also enable Mirror lockup to reduce the chance of blur caused by the reflex mirror action. Mirror lockup is in Shooting menu 2 ( ![]() ). Select the aperture you want by turning the Main (
). Select the aperture you want by turning the Main ( ![]() ) or Quick Control (
) or Quick Control ( ![]() ) dial, and then trip the remote switch. The camera displays elapsed exposure time in seconds on the LCD panel.
) dial, and then trip the remote switch. The camera displays elapsed exposure time in seconds on the LCD panel.
Because long exposures introduce digital noise and increase the appearance of grain, consider setting Long exposure noise reduction on Shooting menu 4 ( ![]() ) to either Auto or Enable (On).
) to either Auto or Enable (On).
Custom
One of the handiest options that the 70D offers is the ability to program an exposure mode with your favorite shooting settings and preferences. The Custom shooting mode ( ![]() ) enables you to set up the camera with your most commonly used settings — including an exposure mode, white balance setting, color space, Picture Style, Custom Functions, and more — and then register those settings to that mode. When you want to use those specific settings again, simply turn the Mode dial to the Custom shooting mode (
) enables you to set up the camera with your most commonly used settings — including an exposure mode, white balance setting, color space, Picture Style, Custom Functions, and more — and then register those settings to that mode. When you want to use those specific settings again, simply turn the Mode dial to the Custom shooting mode ( ![]() ).
).
The Custom shooting mode ( ![]() ) is detailed in Chapter 6.
) is detailed in Chapter 6.
Setting the ISO
As with other recent EOS cameras, the 70D has improved high-ISO performance. As a result, you have greater latitude in using high ISO settings in low-light scenes while getting lower levels of digital noise than in previous cameras.
If you’re new to photography, the ISO setting determines the image sensor’s sensitivity to light in general terms. In more technical terms, the ISO setting amplifies the electrical output of the image sensor. Higher amplification enables faster shutter speeds and the ability to use smaller apertures, as well as higher levels of digital noise in the image. High levels of noise also degrade the overall image quality. Because amplification increases digital noise and grain in the image, always shoot at the lowest ISO setting you can, given the existing light and your shooting needs.
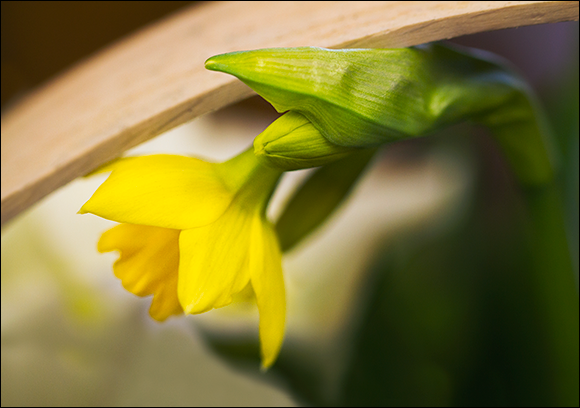
3.11 With the clean images that the 70D produces, you can shoot at higher ISO settings with confidence that the images will maintain good quality. Exposure: ISO 640, f/2.8, 1/40 second.
In Creative Zone exposure modes, you can set the ISO sensitivity in 1/3-stop increments. If you want to set them in 1-stop increments, change the C.Fn I-2 ISO speed setting increments to 1 stop. The 70D’s standard range is ISO 100 to 12800, but you can expand this to include ISO 25600 on Shooting menu 3 ( ![]() ). Just choose ISO speed settings, and then you can set ISO range limits.
). Just choose ISO speed settings, and then you can set ISO range limits.
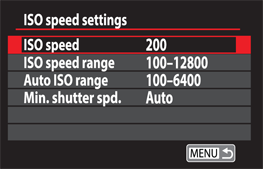
3.12 The ISO speed settings screen.
If you use the H setting, an exclamation mark is displayed in the viewfinder as a reminder to you that the ISO expanded setting is being used.
If you are concerned about controlling digital noise in images, and if you use Auto ISO, be sure to check the ISO setting in the viewfinder before shooting. If the camera sets the ISO very high, you can reduce the maximum ISO setting that can be used for Auto ISO. Alternatively, you can set the ISO manually, and that’s a very good option — one that I use every day.
In Bulb mode ( ![]() ) with Auto ISO, the ISO is set to 400 depending on the minimum and maximum Auto ISO range you’ve set.
) with Auto ISO, the ISO is set to 400 depending on the minimum and maximum Auto ISO range you’ve set.
You have good flexibility in setting up the ISO ranges for both the Auto ISO and manual ISO use. Also, with control over the maximum ISO, you can control the level of noise and overall quality of your images while having the advantage of automatic ISO adjustment.
The maximum ISO for movie recording (see Chapter 8) is 6400 in general for all modes. But if you have the Maximum ISO range set to 12800/H, then 12800 will be used depending on the light. If you are shooting with manual exposure and have ISO 25600 set when you begin shooting a movie, then the camera automatically sets the ISO to 12800.
When I shoot in low light, I am always aware that both high ISO settings and long exposure times increase digital noise and grain in images. I try to balance the two by choosing a moderately high ISO that gives an exposure time of 1 second or less (if the light allows). I find that I get better image quality with that approach than with a blanket approach of just keeping the ISO low and letting the exposure go long.
Without question, the best approach is to test the camera in different venues at different ISO settings and at differing shutter speeds. Then evaluate the results. With those tests, you’ll know how far and fast to push the ISO and exposure time, and how it affects overall image quality. Also, remember that the expanded ISO setting of 25600 purely and plainly will not deliver good image quality.
If you are new to photography, then remember that the lower the ISO, the better the image quality. Make it a habit to use the lowest ISO you can given the light. And get a good tripod. In many scenes, using a tripod can enable you to keep the ISO low so that the image quality stays high.
Here are some starting points for setting the ISO:
• Outdoor light ranging from bright sun to overcast/cloudy: ISO 100 to 400. In bright light, keep the camera set to ISO 100 or 200 and increase it only if you move to a shady area to shoot. On overcast days, keep a watchful eye on the shutter speed. If it falls to slower than 1/60-second, move to ISO 400, or use a tripod and keep the ISO at 100 or 200.
• Indoor natural daylight (for example, a subject lit by window light): ISO 400 to 800, and up to 1600. In my experience, it’s better to use a tripod, and keep the ISO between 400 and 800. ISO settings above 800 produce noise that will become noticeable in images. If you use the High ISO noise reduction option on Shooting menu 4 ( ![]() ), fine details in the image can be lost.
), fine details in the image can be lost.
• Evening, night venues, and indoor environments lit with artificial light: ISO 800 to 1600. At ISO 1600, there will be visible noise in the images, although the quality will be better than cameras of previous generations. At ISO 12800, the noise and noise reduction process (if you use it) negatively (and noticeably) affects the overall quality of the image. However, sometimes, using a high ISO setting is the only way to get the picture, and it’s great that the 70D can produce good images at these settings.
To set the ISO, press the ISO button above the LCD panel, and then turn the Main ( ![]() ) or Quick Control (
) or Quick Control ( ![]() ) dial to set the ISO. The letter A indicates Auto ISO, meaning that the camera sets the ISO automatically. You can also set the ISO on Shooting menu 3 (
) dial to set the ISO. The letter A indicates Auto ISO, meaning that the camera sets the ISO automatically. You can also set the ISO on Shooting menu 3 ( ![]() ) and the Quick Control screen. If you use the Highlight Tone Priority option on Shooting menu 4 (
) and the Quick Control screen. If you use the Highlight Tone Priority option on Shooting menu 4 ( ![]() ), you will not be able to set the ISO lower than 200.
), you will not be able to set the ISO lower than 200.
On the ISO speed menu screen, you can press the Info button ( ![]() ) to choose the Auto setting quickly.
) to choose the Auto setting quickly.
Using Auto ISO simplifies shooting by removing one setting that you need to adjust. And while it’s convenient to have the camera set the ISO for you, I recommend setting a maximum setting for Auto ISO. Auto ISO ranges for specific modes are as follows, although you can change these by setting the minimum and maximum ranges:
• Basic Zone modes, except Landscape (![]() ) and Handheld night scene (
) and Handheld night scene (![]() ): ISO 100 to 6400. Landscape (
): ISO 100 to 6400. Landscape ( ![]() ) goes up to ISO 1600 while Handheld night scene (
) goes up to ISO 1600 while Handheld night scene ( ![]() ) goes up to ISO 12800.
) goes up to ISO 12800.
• Program AE (![]() ), Shutter-priority AE (
), Shutter-priority AE (![]() ), Aperture-priority AE (
), Aperture-priority AE (![]() ), and Manual (
), and Manual (![]() ) modes: ISO 100 to 12800. This depends on the minimum and maximum ISO that you choose for the Auto ISO range.
) modes: ISO 100 to 12800. This depends on the minimum and maximum ISO that you choose for the Auto ISO range.
• Bulb mode (![]() ) or when using a Speedlite: ISO 400. In Bulb mode (
) or when using a Speedlite: ISO 400. In Bulb mode ( ![]() ), this depends on the minimum and maximum ISO that you choose for the Auto ISO range.
), this depends on the minimum and maximum ISO that you choose for the Auto ISO range.
While the very high ISO settings provide a safety net when there is no other way to capture an image, they aren’t ones you want to select on a daily basis. And if you have tested the camera’s ISO performance, you may have determined a range of ISO settings that provide acceptable image quality. You can use that range to set the minimum and maximum ISO ranges. Follow these steps to set an ISO range:
1. On Shooting menu 3 (![]() ), highlight ISO speed settings, and then press the Setting button (
), highlight ISO speed settings, and then press the Setting button (![]() ). The ISO speed settings screen appears.
). The ISO speed settings screen appears.
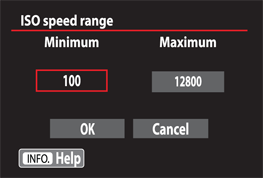
3.13 The ISO speed range screen.
2. Highlight either ISO speed range or Auto ISO range, and then press the Setting button (![]() ). The ISO speed range or the Auto ISO range screen appears, depending on the option you chose.
). The ISO speed range or the Auto ISO range screen appears, depending on the option you chose.
3. Select Minimum, press the Setting button (![]() ), and then press the up or down key on the Multi-controller (
), and then press the up or down key on the Multi-controller (![]() ) to set the value. The minimum range for manually setting the ISO is 100 to 12800. For Auto ISO, the minimum range is 100 to 800.
) to set the value. The minimum range for manually setting the ISO is 100 to 12800. For Auto ISO, the minimum range is 100 to 800.
4. Press the Setting button (![]() ).
).
5. Turn the Quick Control dial (![]() ) to select the Maximum value, press the Setting button (
) to select the Maximum value, press the Setting button (![]() ), and then press the up or down key on the Multi-controller (
), and then press the up or down key on the Multi-controller (![]() ) to set the value. The maximum range for manually setting the ISO is 200 to H (25600). The Auto ISO maximum range is ISO 200 to 12800.
) to set the value. The maximum range for manually setting the ISO is 200 to H (25600). The Auto ISO maximum range is ISO 200 to 12800.
6. Select OK, and then press the Setting button (![]() ). The ISO speed settings screen appears. Repeat these steps but select the option you didn’t choose in step 2.
). The ISO speed settings screen appears. Repeat these steps but select the option you didn’t choose in step 2.
The Auto ISO minimum and maximum settings are used for Safety shift as well. If you have Safety shift C.Fn I-6 set to ISO speed, then when you manually set the ISO in Program AE ( ![]() ), Shutter-priority AE (
), Shutter-priority AE ( ![]() ), and Aperture-priority (
), and Aperture-priority ( ![]() ) modes, it adjusts automatically if the brightness changes. If you manually set an ISO higher than the Auto ISO maximum, then Safety shift uses an ISO up to your manual setting, disregarding the Auto ISO maximum setting.
) modes, it adjusts automatically if the brightness changes. If you manually set an ISO higher than the Auto ISO maximum, then Safety shift uses an ISO up to your manual setting, disregarding the Auto ISO maximum setting.
You can also set the minimum shutter speed to use with Auto ISO. The minimum you set is used in ( ![]() ) and (
) and ( ![]() ) modes. This helps avoid blur from camera shake when the shutter speed is too slow. The only times the minimum shutter speed isn’t used is when you’re using the flash or when the shutter speed will not produce the proper exposure, in which case, the camera will set a slower shutter speed.
) modes. This helps avoid blur from camera shake when the shutter speed is too slow. The only times the minimum shutter speed isn’t used is when you’re using the flash or when the shutter speed will not produce the proper exposure, in which case, the camera will set a slower shutter speed.
To set a minimum shutter speed for Auto ISO, follow these steps:
1. On Shooting menu 3 (![]() ), highlight ISO speed settings, and then press the Setting button (
), highlight ISO speed settings, and then press the Setting button (![]() ). The ISO speed settings screen appears.
). The ISO speed settings screen appears.
2. Highlight Min. shutter spd., and then press the Setting button (![]() ). The Min. shutter spd. screen appears.
). The Min. shutter spd. screen appears.
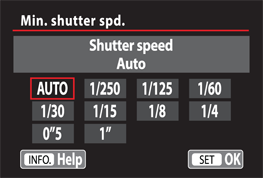
3.14 The Minimum shutter speed screen for Auto ISO.
3. Press left or right on the Multi-controller (![]() ) to select Auto or the shutter speed you want, and then press the Setting button (
) to select Auto or the shutter speed you want, and then press the Setting button (![]() ). The ISO speed settings screen reappears.
). The ISO speed settings screen reappears.
For my shooting, I set my camera to ISO 100 as a matter of course, or if I’m using Highlight Tone Priority, then it’s set to 200, the lowest ISO setting available. I increase the ISO only when the light in the scene forces me to, and then I increase it just enough to get the shutter speed that I need to either handhold the camera with the lens I am using, or to freeze subject motion if I’m shooting action. Doing this helps ensure that I get the highest image quality possible given the circumstances.
Metering Light and Adjusting Exposures
The starting point for every photographic exposure is the amount of light in the scene. So before the 70D can determine the exposure settings, it has to measure how much light is falling on the subject, and it does this by using the onboard reflective light meter. From the meter reading, the camera can then calculate the exposure settings. Depending on the subject and scene, you may want the meter to take into account the light in more or less of the scene. In those situations, you can choose from any of the four metering modes the 70D offers.
Before talking about metering modes, it’s helpful to know more about the 70D metering system. Traditionally, camera light meters were colorblind, and recognized only black-and-white brightness levels or luminosity. But the 70D’s meter is not entirely color blind. The dual-layer meter has 63 measurement zones to measure the full spectrum of Red, Green, and Blue (RGB). As a result, the meter makes more informed decisions about metering. Canon calls its autoexposure (AE) system Intelligent Focus Color Luminosity metering, or IFCL.
A side benefit of the IFCL metering system is that it helps the focusing sensor identify objects and their distances and improve focusing accuracy in unusual light such as sodium light.
In the default Evaluative metering mode ( ![]() ), the 70D evaluates the light and color throughout 63 zones within the viewfinder. Because the autofocus (AF) zones are aligned with the Auto Exposure zones, the camera receives exposure information from all the AF points. The 70D uses the subject distance information provided by the lens and the AF sensor to assist in making exposure decisions. For example, the metering system looks at objects that are close to the subject — using both the AF point that achieved focus and those that nearly achieved focus. Then it combines those meter readings with readings from the other zones to provide more consistent exposures, even in difficult lighting situations. The bottom line is that you can expect precise and consistent exposures regardless of the metering mode that you select.
), the 70D evaluates the light and color throughout 63 zones within the viewfinder. Because the autofocus (AF) zones are aligned with the Auto Exposure zones, the camera receives exposure information from all the AF points. The 70D uses the subject distance information provided by the lens and the AF sensor to assist in making exposure decisions. For example, the metering system looks at objects that are close to the subject — using both the AF point that achieved focus and those that nearly achieved focus. Then it combines those meter readings with readings from the other zones to provide more consistent exposures, even in difficult lighting situations. The bottom line is that you can expect precise and consistent exposures regardless of the metering mode that you select.
While the advanced metering system helps overcome some metering challenges, the meter can still be fooled by very light or dark subjects. In those scenes, you can choose among the four metering modes to get more precise metering results, or you can opt to use any of several exposure modification techniques, all of which are detailed in the following sections.
Using metering modes
The 70D offers four metering modes from which you can choose when shooting in the Program AE ( ![]() ), Shutter-priority AE (
), Shutter-priority AE ( ![]() ), Aperture-priority AE (
), Aperture-priority AE ( ![]() ), Manual (
), Manual ( ![]() ), or Bulb (
), or Bulb ( ![]() ) exposure modes.
) exposure modes.
Here is a look at each of the four metering modes:
• Evaluative metering mode (![]() ). This mode evaluates each of 63 zones in the viewfinder, as covered previously. It considers distance, light intensity, and color. It biases metering toward the subject’s position, which is indicated by the active AF point(s). It also compares the light values of adjacent AF points at distances that nearly achieved focus, and takes into account back- or frontlighting. Evaluative metering mode (
). This mode evaluates each of 63 zones in the viewfinder, as covered previously. It considers distance, light intensity, and color. It biases metering toward the subject’s position, which is indicated by the active AF point(s). It also compares the light values of adjacent AF points at distances that nearly achieved focus, and takes into account back- or frontlighting. Evaluative metering mode ( ![]() ) works well for scenes with an average distribution of light, medium, and dark tones, backlit scenes, and scenes with reflective surfaces, such as glass or water.
) works well for scenes with an average distribution of light, medium, and dark tones, backlit scenes, and scenes with reflective surfaces, such as glass or water.

3.15 Whether a scene is average (like this one), backlit, or something in-between, Evaluative metering produces consistently excellent exposures. Exposure: ISO 200, f/11, 1/320 second.
• Partial metering mode (![]() ). This mode hones in on a much smaller area (approximately 7.7 percent) of the scene at the center of the viewfinder. By concentrating the meter reading more specifically, this mode gives good exposures for backlit and high-contrast subjects, and when the background is much darker than the subject is.
). This mode hones in on a much smaller area (approximately 7.7 percent) of the scene at the center of the viewfinder. By concentrating the meter reading more specifically, this mode gives good exposures for backlit and high-contrast subjects, and when the background is much darker than the subject is.
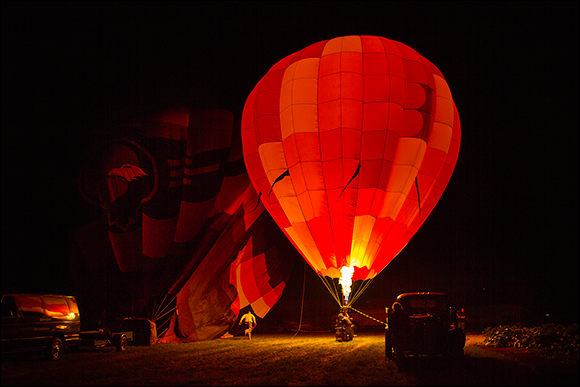
3.16 Here, I used Partial metering and metered on the balloon to the left of the flame. I then locked the exposure, recomposed, focused, and made the image. Exposure: ISO 800, f/2.8, 1/100 second.
• Spot metering mode (![]() ). In this mode, the metering concentrates only on a 3 percent area of the viewfinder at the center — the circle that is in the center of the viewfinder when the camera is set to Spot mode (
). In this mode, the metering concentrates only on a 3 percent area of the viewfinder at the center — the circle that is in the center of the viewfinder when the camera is set to Spot mode ( ![]() ). This mode is good for metering a middle-gray area in the scene or a photographic gray card to calculate exposure. Spot mode (
). This mode is good for metering a middle-gray area in the scene or a photographic gray card to calculate exposure. Spot mode ( ![]() ) is useful when shooting subjects with more extreme contrast, backlit subjects, and subjects against a dark background. You can also use Spot mode (
) is useful when shooting subjects with more extreme contrast, backlit subjects, and subjects against a dark background. You can also use Spot mode ( ![]() ) to keep the meter from being influenced by surrounding areas in the scene or subject. For Figure 3.17, the light on the flower bud was brighter than the background. I wanted to ensure that the bright area of the flower bud was exposed properly, so I used Spot metering and it produced an excellent exposure in the highlights, as well as in the rest of the scene.
) to keep the meter from being influenced by surrounding areas in the scene or subject. For Figure 3.17, the light on the flower bud was brighter than the background. I wanted to ensure that the bright area of the flower bud was exposed properly, so I used Spot metering and it produced an excellent exposure in the highlights, as well as in the rest of the scene.
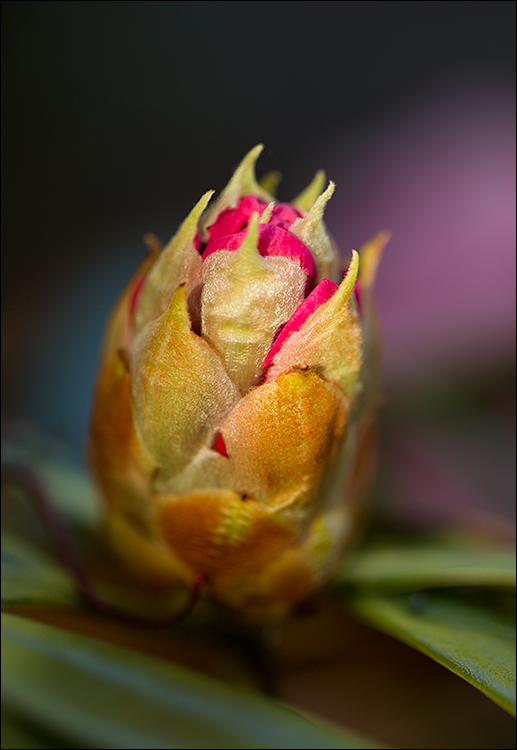
3.17 Spot metering delivered an excellent exposure of this image. Exposure: ISO 200, f/2.8, 1/250 second.
• Center-weighted Average meter-ing (![]() ). This metering mode weights exposure calculation for the light at the center of the scene shown in the viewfinder, and then evaluates light from the rest of the scene to get an average for the entire scene. The center area encompasses an area larger than the Partial metering area. As the name implies, the camera expects that the subject will be in the center of the frame. This mode gives good results in scenes with even lighting and brightness.
). This metering mode weights exposure calculation for the light at the center of the scene shown in the viewfinder, and then evaluates light from the rest of the scene to get an average for the entire scene. The center area encompasses an area larger than the Partial metering area. As the name implies, the camera expects that the subject will be in the center of the frame. This mode gives good results in scenes with even lighting and brightness.
In automatic shooting modes, such as Scene Intelligent Auto ( ![]() ), Portrait (
), Portrait ( ![]() ), and Landscape (
), and Landscape ( ![]() ), the camera automatically uses Evaluative mode (
), the camera automatically uses Evaluative mode ( ![]() ).
).
Partial ( ![]() ), Spot (
), Spot ( ![]() ), and Center-weighted Average (
), and Center-weighted Average ( ![]() ) metering all assume that the subject is at the center of the viewfinder. If you’re using Partial (
) metering all assume that the subject is at the center of the viewfinder. If you’re using Partial ( ![]() ) or Spot (
) or Spot ( ![]() ) metering and the subject isn’t in the center of the scene, move the camera so that the center AF point is over the area you want to meter, press the shutter button halfway, and then press the AE Lock button (
) metering and the subject isn’t in the center of the scene, move the camera so that the center AF point is over the area you want to meter, press the shutter button halfway, and then press the AE Lock button ( ![]() ) to lock the exposure. Then you can move the camera, focus, and press the shutter button.
) to lock the exposure. Then you can move the camera, focus, and press the shutter button.
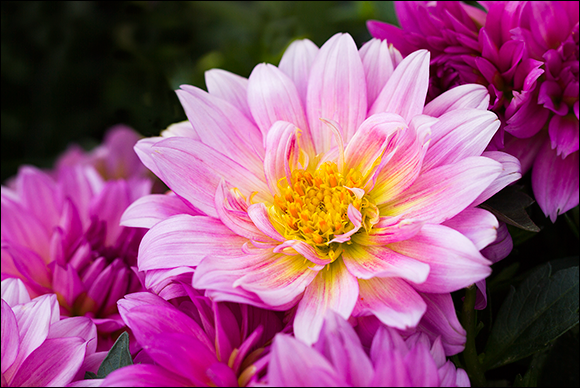
3.18 An image in which the subject is in the center of the frame is a good opportunity to use Center-weighted Average metering. Exposure: ISO 200, f/5.6, 1/400 second.
To change the metering mode, press the Metering mode start button ( ![]() ) above the LCD panel, and then turn the Main dial (
) above the LCD panel, and then turn the Main dial ( ![]() ) to choose the mode you want.
) to choose the mode you want.
Evaluating exposures
After you make an image, the next step is to evaluate the exposure to see if adjustments are needed. The 70D’s Brightness and RGB histograms are great tools for exposure evaluation, especially with JPEG capture. The histogram shows you immediately if the highlights retained detail or are blown out, and if the shadows retain detail or are blocked (go completely black too quickly). There are two types of histograms, and each provides important information for evaluating images.
A histogram is a bar graph that shows the distribution and number of pixels captured at each brightness level. The horizontal axis shows the range of values from black to white, and the vertical axis displays the number of pixels at each location.
Brightness histogram
The Brightness histogram is a snapshot of the exposure bias and the distribution of tones in the image. The brightness values are shown along the horizontal axis of the histogram. Values range from black (level 0 on the left side of the histogram) to white (level 255 on the right side of the histogram). Note that although the 70D captures 14-bit RAW images, the image preview and histogram are based on an 8-bit JPEG rendering of the RAW file.
The Brightness histogram shows whether the image has blown highlights (on the right side) or blocked-up shadows (on the left side). Blown highlights are indicated by a spike of pixels against the right side of the histogram. Once the highlight detail is blown, it is gone for good. Blocked-up shadows are indicated by a spike of pixels against the left side of the histogram. If the shadows are blocked up, you can, of course, lighten them in an editing program. However, lightening the shadows reveals the digital noise that is most prevalent in the shadows.
Overall underexposure is shown when there is a gap between the end of the highlight pixels and the right edge of the graph. Overexposure is indicated by a spike of pixels on the right side of the graph. If any of these exposure problems is indicated, you can reshoot using an exposure modification technique described later in this section.
The 70D’s Highlight alert causes blown highlights to appear as blinking areas on the image preview during playback. You can turn on Highlight alert in Playback menu 3 ( ![]() ).
).
The Brightness histogram simply reflects the tones in the image. In an average scene, the pixels are distributed fairly evenly across the histogram. In a scene with predominately light tones, such as a high-key image of a child in a white dress against a white background, more pixels are concentrated on the right side of the histogram. Likewise, in an image with predominately dark tones, or a low-key image, more pixels are concentrated toward the left side of the graph. The histogram for Figure 3.19 shows an excellent exposure, with detail in the highlights and shadows. By using the histogram, I knew to add 1/3 stop of extra exposure to get the full tonal range in this image.
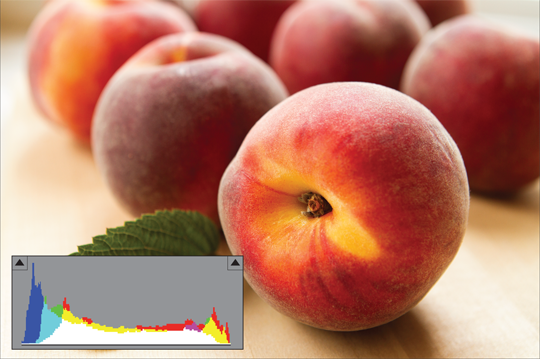
3.19 Here, a bit of positive exposure compensation helped create an excellent exposure. Exposure: ISO 200, f/3.2, 1/125 second, +1/3 exposure compensation.
RGB histogram
RGB histograms show the distribution of brightness levels for the Red, Green, and Blue (RGB) color channels. Each color channel has its own histogram so that you can evaluate the color channel’s saturation, gradation, and bias. As with the Brightness histogram, the horizontal axis shows how many pixels exist for each color brightness level and the vertical axis shows how many pixels exist at that level.
More pixels to the left indicate that the color is darker and less prominent, while more pixels to the right indicate that the color is brighter and denser. If pixels spike on the left or right side, then color information is either lacking or oversaturated with no detail, respectively.
Both types of histograms are great tools for evaluating JPEG images because the histograms are based on the JPEG format. However, if you shoot RAW images, the histogram is based on a less-robust JPEG version of the RAW image. The nature of the RAW image data does not make it feasible to display a histogram of the linear image data, so the camera makes a JPEG version of the image and uses it for the preview image and the histogram. If you shoot RAW, just know that the RAW image is richer in data than what you see on the histogram. Some photographers set the Picture Style to a lower contrast to get a better overall sense of the RAW exposure. Despite the JPEG rendering, the histogram is still an invaluable tool for evaluating RAW exposures in the field.
To display a histogram, press the Playback button ( ![]() ). If the histograms aren’t displayed, press the Info button (
). If the histograms aren’t displayed, press the Info button ( ![]() ) two to three times until they appear with the image preview.
) two to three times until they appear with the image preview.
You can set the type of histogram that is displayed by default when you review images during playback, and if you like to see all the histograms, this can save you a couple of presses of the Info button ( ![]() ) to change displays.
) to change displays.
To change the default histogram display, go to Playback menu 3, ( ![]() ), highlight Histogram disp, and then press the Setting button (
), highlight Histogram disp, and then press the Setting button ( ![]() ). Choose either Brightness or RGB, and then press the Setting button (
). Choose either Brightness or RGB, and then press the Setting button ( ![]() ).
).
Modifying and bracketing exposures
With the ability to review the image histogram immediately, you know right away whether you need to modify the exposure. If you need to make exposure modifications, the 70D offers both automatic and manual options to modify exposure. The options include Auto Lighting Optimizer, Highlight tone priority, Safety shift, Auto Exposure Lock, Exposure Compensation, and Auto Exposure Bracketing.
Auto Lighting Optimizer
One of the 70D’s automatic exposure adjustments is Auto Lighting Optimizer ( ![]() ), which brightens images that are too dark and/or that have low contrast. While the corrections are automatic, you can choose the level of optimization you want.
), which brightens images that are too dark and/or that have low contrast. While the corrections are automatic, you can choose the level of optimization you want.
Auto Lighting Optimizer is used in all automatic Basic Zone modes, but it’s optional in the Creative Zone modes. Also, it’s not applied in the Manual ( ![]() ) or Bulb (
) or Bulb ( ![]() ) exposure modes, although you can enable it. It’s also not applied to RAW image files, but you can apply it during image conversion in Canon’s Digital Photo Professional (DPP) program. Finally, Auto Lighting Optimizer is automatically disabled if you use Highlight Tone Priority, and it is temporarily disabled when you switch to HDR and Multiple-exposure shooting, features detailed later in this chapter.
) exposure modes, although you can enable it. It’s also not applied to RAW image files, but you can apply it during image conversion in Canon’s Digital Photo Professional (DPP) program. Finally, Auto Lighting Optimizer is automatically disabled if you use Highlight Tone Priority, and it is temporarily disabled when you switch to HDR and Multiple-exposure shooting, features detailed later in this chapter.
If you most often print images directly from the media card, then Auto Lighting Optimizer can help you get better prints. It can also be helpful when you record movies. However, if you care about controlling the exposure yourself, then don’t use Auto Lighting Optimizer because it adjusts the image appearance, and masks the effects of exposure modifications, including exposure compensation, and Auto Exposure Bracketing (AEB).
Also, a downside of Auto Lighting Optimizer is that as it brightens the shadow areas in the image, digital noise becomes visible, just as it does when shadows are lightened in an image-editing program. So, if you use Auto Lighting Optimizer, use it with a dose of caution. If, however, you don’t want or like to edit images on the computer, then Auto Lighting Optimizer may be a good option for you.
You can adjust the level of Auto Lighting Optimizer from the default Standard setting to Low or High, or you can turn off optimization entirely for images shot in the Program AE ( ![]() ), Shutter-priority AE (
), Shutter-priority AE ( ![]() ), and Aperture-priority AE (
), and Aperture-priority AE ( ![]() ) exposure modes. Just go to Shooting menu 3 (
) exposure modes. Just go to Shooting menu 3 ( ![]() ), choose Auto Lighting Optimizer, and then press the Setting button (
), choose Auto Lighting Optimizer, and then press the Setting button ( ![]() ). Choose the level you want or choose Disable to turn it off. On the same screen, you can enable Auto Lighting Optimizer for Manual (
). Choose the level you want or choose Disable to turn it off. On the same screen, you can enable Auto Lighting Optimizer for Manual ( ![]() ) and Bulb (
) and Bulb ( ![]() ) modes. On the Auto Lighting Optimizer screen, if a check mark (
) modes. On the Auto Lighting Optimizer screen, if a check mark ( ![]() ) is displayed next to the text, Disabled in M or B modes, it means that the optimization is turned off. If you want to enable it, press the Info button (
) is displayed next to the text, Disabled in M or B modes, it means that the optimization is turned off. If you want to enable it, press the Info button ( ![]() ) to remove the check mark.
) to remove the check mark.
In automatic exposure modes, Auto Lighting Optimizer ( ![]() ) is automatically applied at the Standard level to JPEGs.
) is automatically applied at the Standard level to JPEGs.
Highlight tone priority
Highlight tone priority is designed to help retain highlight detail in bright elements in the scene. Highlight detail is improved by extending the range between 18 percent middle gray and the maximum highlight tones in the image, effectively increasing the dynamic range. It provides up to one additional stop of image detail in the highlight areas. Using Highlight tone priority also makes the gradations between gray tones and highlights smoother.
Highlight tone priority is especially useful when shooting very light objects, such as a wedding dress or white tuxedo, bright white sand on a beach, or light-colored products. If you enable Highlight tone priority, the lowest ISO is adjusted to 200.
Highlight tone priority takes advantage of the higher ISO baseline so that the image sensor pixel wells do not fill, or saturate. Also, with the 70D’s 14-bit analog/digital conversion, the camera sets a tonal curve that is relatively flat at the top in the highlight area to compress highlight data. The result is almost a full f-stop increase in dynamic range (the range from highlight to shadow tones in a scene as measured in f-stops). The trade-off, however, is a more abrupt move from deep shadows to black — a reduced range of shadow tones that also increases the potential for digital noise in the shadows.
To enable Highlight tone priority, set the Mode dial to a Creative Zone mode, and then follow these steps:
1. On Shooting menu 4 (![]() ), select Highlight tone priority, and then press the Setting button (
), select Highlight tone priority, and then press the Setting button (![]() ). Two options then appear.
). Two options then appear.
2. Select Enable Highlight tone priority (![]() ).
).
3. Press the Setting button (![]() ). Shooting menu 4 (
). Shooting menu 4 ( ![]() ) appears.
) appears.
If you enable Highlight tone priority, it is denoted in the viewfinder and on the LCD panel with this icon, ![]() , which indicates Dynamic range.
, which indicates Dynamic range.
Safety shift
Another automatic exposure control option that can be very useful is Safety shift. With Safety shift, the camera automatically changes the manually selected aperture or shutter speed if the light changes dramatically enough to make the current exposure inaccurate when you shoot in the Aperture-priority AE ( ![]() ) or Shutter-priority AE (
) or Shutter-priority AE ( ![]() ) exposure modes. Alternatively, you can set Safety shift to adjust the ISO setting to get a standard exposure in sudden light shifts.
) exposure modes. Alternatively, you can set Safety shift to adjust the ISO setting to get a standard exposure in sudden light shifts.
Having Safety shift change the exposure may seem intrusive, but in some scenarios such as action shooting, Safety shift can be welcome insurance in getting the best exposure. And it enables you to concentrate on capturing the moments of peak action.
To enable Safety shift, set the Mode dial to a Creative Zone mode, and then follow these steps:
1. On the Custom Functions menu (![]() ), highlight C.Fn I: Exposure, and then press the Setting button (
), highlight C.Fn I: Exposure, and then press the Setting button (![]() ). The screen for the last Custom Function you used in this group appears.
). The screen for the last Custom Function you used in this group appears.
2. Press left or right on the Multi-controller (![]() ) until the number 6 appears in the box at the upper right of the screen, and then press the Setting button (
) until the number 6 appears in the box at the upper right of the screen, and then press the Setting button (![]() ). The camera activates the function options.
). The camera activates the function options.
3. Turn the Quick Control dial (![]() ) and select one of the following options:
) and select one of the following options:
• 0: Disable. This turns off Safety shift.
• Shutter speed/Aperture. Choose this option to have the camera automatically change either the shutter speed you set in Shutter-priority AE mode ( ![]() ) or the aperture you set in Aperture-priority AE mode (
) or the aperture you set in Aperture-priority AE mode ( ![]() ) to get a good exposure if the light changes enough to require an exposure adjustment.
) to get a good exposure if the light changes enough to require an exposure adjustment.
• ISO speed. Choose this option to have the ISO you set change automatically in Program AE ( ![]() ), Shutter-priority AE (
), Shutter-priority AE ( ![]() ), and Aperture-priority AE (
), and Aperture-priority AE ( ![]() ) modes to get a good exposure if the light changes.
) modes to get a good exposure if the light changes.
4. Press the Setting button (![]() ). Press the shutter button halfway to return to shooting.
). Press the shutter button halfway to return to shooting.
Auto Exposure Lock
If you’ve used the 70D for very long, then you know that when you focus, the exposure is also set at the same time. In most situations, this setting works well, but sometimes, you want the camera to meter and set the exposure on an area of the scene that is not where you want to focus. The only way that you can meter and lock the exposure on one area of the scene, and then focus on a different area is by using Auto Exposure Lock (AE Lock). You can also use AE Lock to lock and hold the exposure for a series of images taken under unchanging light.
AE Lock is a great tool to use with Spot metering mode ( ![]() ) when you meter on a middle tone, lock the exposure, and then focus on another area of the scene.
) when you meter on a middle tone, lock the exposure, and then focus on another area of the scene.
Be aware that AE Lock works a bit differently in different metering modes as detailed in Table 3.1. You can use AE Lock in Program AE ( ![]() ), Shutter-priority AE (
), Shutter-priority AE ( ![]() ), and Aperture-priority AE (
), and Aperture-priority AE ( ![]() ) modes. You cannot use AE Lock in the Basic Zone modes.
) modes. You cannot use AE Lock in the Basic Zone modes.
Table 3.1 Using AE Lock in Metering Modes

In cases in which the center AF point is used, be sure to point the center AF point over the part of the scene or subject on which you want to base the meter reading, and then press the AE Lock button ( ![]() ). The camera stores the locked meter reading for a few seconds while you move the camera to recompose the image, focus, and make the picture.
). The camera stores the locked meter reading for a few seconds while you move the camera to recompose the image, focus, and make the picture.
Exposure compensation
Another way to modify the camera’s standard exposure is by increasing or decreasing the exposure by a specific amount using exposure compensation. You can set the exposure compensation up to +/-5 stops in 1/3-stop increments. While the 70D offers 5 stops of compensation, the LCD panel and viewfinder can only display 3 stops of compensation. To set the full 5 stops, use the Quick Control screen (press the Quick Control button ![]() ), or use the Auto Exposure Bracketing (AEB) screen covered later in this chapter.
), or use the Auto Exposure Bracketing (AEB) screen covered later in this chapter.
The classic use of exposure compensation is to override the camera’s suggested exposure settings for subjects that are predominately white or black to get whiter whites and blacker blacks. You may have noticed that the camera tends to render snow scenes as grayish white and black train engines as grayish black. That’s because the camera meter expects that scenes will reflect an average of 18 percent of the light, and that translates to middle gray on a tonal scale. If a scene reflects more than 18 percent of the light, then the camera darkens the image to get it to the average reflectance. That’s how you get gray snow and train engines.
To get true whites and blacks, you have to override the standard exposure, and you can do that using exposure compensation. For example, setting +1 or +2 stops of compensation renders snow as white instead of grayish white. For a jet-black train engine, -1 or -2 stop of compensation renders it as true black. Of course, the goal is to set just enough compensation to get true whites without blowing out highlights, and to get true blacks without blocking up the shadows. For example, in Figure 3.20, I added 1/3 stop of extra exposure to get true whites in the flower. In bright light, less compensation is needed than in in moderate light. I also checked the histogram as I was shooting to ensure that the highlights retained details.
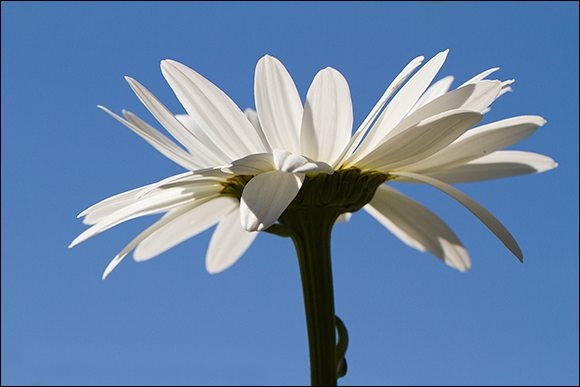
3.20 A slight amount of exposure compensation produced whiter whites in this daisy. Exposure: ISO 200, f/10, 1/800 second, +1/3 exposure compensation.
Exposure compensation is also useful when you want to modify the camera’s metered exposure for a series of shots. Here are some points to know about exposurecompensation:
• Exposure compensation can be used in Program AE ( ![]() ), Shutter-priority AE (
), Shutter-priority AE ( ![]() ), and Aperture-priority AE (
), and Aperture-priority AE ( ![]() ) shooting modes. It cannot be used in Manual (
) shooting modes. It cannot be used in Manual ( ![]() ) or Bulb (
) or Bulb ( ![]() ) modes.
) modes.
• In Shutter-priority AE mode ( ![]() ), setting exposure compensation changes the aperture by the specified amount of compensation. In Aperture-priority AE mode (
), setting exposure compensation changes the aperture by the specified amount of compensation. In Aperture-priority AE mode ( ![]() ), it changes the shutter speed. In Program AE mode (
), it changes the shutter speed. In Program AE mode ( ![]() ), compensation changes both the shutter speed and aperture by the exposure amount you set.
), compensation changes both the shutter speed and aperture by the exposure amount you set.
• The amount of exposure compensation you set remains in effect until you change it.
• Automatic exposure correction features, such as Auto Lighting Optimizer, can mask the effect of compensation. I recommend turning off Auto Lighting Optimizer ( ![]() ) on Shooting menu 3 (
) on Shooting menu 3 ( ![]() ) if you are using exposure compensation.
) if you are using exposure compensation.
• Exposure compensation is set by turning the Quick Control dial ( ![]() ). As a result, it is possible to inadvertently set or change compensation. To avoid this, set the Lock dial to the up position. When you want to set compensation, just set it to the down position.
). As a result, it is possible to inadvertently set or change compensation. To avoid this, set the Lock dial to the up position. When you want to set compensation, just set it to the down position.
To set exposure compensation, watch in the viewfinder and turn the Quick Control dial ( ![]() ) to the left to set negative compensation or to the right to set positive compensation. As you turn the Quick Control dial (
) to the left to set negative compensation or to the right to set positive compensation. As you turn the Quick Control dial ( ![]() ), the tick mark on the exposure level meter moves in 1/3-stop increments up to +/-3 stops.
), the tick mark on the exposure level meter moves in 1/3-stop increments up to +/-3 stops.
If you want to set 4 or 5 stops of compensation, go to the next section on AEB. Also, if you set more than 3 stops of compensation, the exposure level indicator in the viewfinder displays left and right arrows. To cancel exposure compensation, move the tick mark back to the center position of the exposure level indicator.
Auto Exposure Bracketing
Auto Exposure Bracketing (AEB) enables you to capture a series of three images, at three different exposures. AEB is a often used when capturing a series of High Dynamic Range (HDR) images, or to photograph scenes in difficult light to ensure that one of the three exposures is good. Traditionally, the bracketing sequence is one image at the camera’s standard exposure, one at increased exposure, and one at less exposure up to +/-3 stops. Thus, if the scene has high contrast, highlight detail is better preserved in the darker exposure than in either the standard or lighter exposure. Conversely, the shadows may be more open in the brighter exposure than in either of the other two.
With the 70D, you can shift the entire bracketing range to below or above 0 (zero) on the exposure level indicator. As a result, you can set all three bracketed exposures to be brighter or darker than the camera’s standard exposure.
Exposure bracketing provides a way to cover the bases — to get at least one printable exposure in scenes with challenging lighting, scenes that are difficult to set up again, or scenes where there is only one opportunity to capture an elusive subject.
Today, however, exposure bracketing is most often used for High Dynamic Range (HDR) imaging. With the 70D, you can combine both exposure compensation and AEB to set exposure values up to 8 stops from the metered exposure. In practical application, combining exposure compensation and AEB provides a bracketing range that is more than adequate for most HDR work if you choose to do it manually rather than using the HDR mode on the camera. The in-camera HDR feature on the 70D is covered later in this chapter.
Regardless of how you use the bracketed exposures, keep these points in mind when using AEB:
• AEB is available in the Program AE ( ![]() ), Shutter-priority AE (
), Shutter-priority AE ( ![]() ), Aperture-priority AE (
), Aperture-priority AE ( ![]() ), and Manual (
), and Manual ( ![]() ) exposure modes, but not in Bulb (
) exposure modes, but not in Bulb ( ![]() ) mode.
) mode.
• AEB cannot be used with the built-in or an accessory flash unit, Multi Shot Noise Reduction, or Creative Filters.
• Settings for AEB are good only for the current shooting session. Turning off the camera, popping up the built-in flash, or turning on an accessory Speedlite cancels AEB. If you want to retain the AEB settings even after turning off the camera, you can set C.Fn1-3, Bracketing auto cancel to Off to retain the settings.
• In the High-speed ( ![]() ), Low-speed (
), Low-speed ( ![]() ), and Silent (
), and Silent ( ![]() ) continuous drive modes, pressing the shutter button once takes all three bracketed exposures. Likewise, in the 10-second (
) continuous drive modes, pressing the shutter button once takes all three bracketed exposures. Likewise, in the 10-second ( ![]() ) or 2-second (
) or 2-second ( ![]() ) Self-timer modes, the bracketed shots are taken in succession after the timer interval elapses.
) Self-timer modes, the bracketed shots are taken in succession after the timer interval elapses.
• In the Single ( ![]() ) and Silent single shooting (
) and Silent single shooting ( ![]() ) drive modes, you have to press the shutter button three times to get all of the bracketed shots.
) drive modes, you have to press the shutter button three times to get all of the bracketed shots.
• The order of bracketed exposures begins with the standard exposure, followed by the decreased and increased exposures. You can change the order of bracketing using C.Fn1-4, Bracketing sequence.
• You can use C.Fn I-5 to change the number of bracketed shots from the default 3 shots to 2, 5, or 7. The higher numbers are useful for HDR shooting.
• You can change the default 1/3-stop exposure increment to 1/2 stop using C.Fn1-1, Exposure level increments.
If you combine AEB with exposure compensation, the bracketed exposures are based on the amount of exposure compensation that you set.
To set AEB, set the Mode dial to Program AE ( ![]() ), Shutter-priority AE (
), Shutter-priority AE ( ![]() ), Aperture-priority AE (
), Aperture-priority AE ( ![]() ), or Manual (
), or Manual ( ![]() ) mode, and then follow these steps:
) mode, and then follow these steps:
1. On Shooting menu 3 (![]() ), highlight Expo. comp./AEB.
), highlight Expo. comp./AEB.
2. Press the Setting button (![]() ). The Exposure comp./AEB setting screen appears.
). The Exposure comp./AEB setting screen appears.
3. Turn the Main dial (![]() ) clockwise to set the bracketing amount, and then press the Setting button (
) clockwise to set the bracketing amount, and then press the Setting button (![]() ). As you turn the Main dial (
). As you turn the Main dial ( ![]() ), two additional tick marks appear and move outward from the center in 1/3-stop increments. If you want to shift the bracketing sequence above or below 0 (zero), turn the Quick Control dial (
), two additional tick marks appear and move outward from the center in 1/3-stop increments. If you want to shift the bracketing sequence above or below 0 (zero), turn the Quick Control dial ( ![]() ). You cannot shift the bracketing sequence in Manual mode (
). You cannot shift the bracketing sequence in Manual mode ( ![]() ).
).
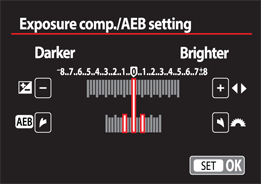
3.21 The AEB screen set for +/-1 stop of bracketing from the standard exposure.
Multiple-exposure Images
The 70D offers two new shooting techniques: Multiple-exposure images and HDR shooting. With both techniques, you have a nice range of options for setting up shots and choosing the final look of the image. Both techniques expand your creative opportunities with the camera. The following sections describe how to use both techniques.
Until recently, Canon digital photographers could not make multiple exposures in the camera. That changes with the 70D’s Multiple exposure option. With the Multiple exposure option, it’s possible to capture two to nine images and have the camera composite them into a single image. You can either shoot all new images, or choose an image on the media card as the base image. (The existing image you choose cannot have been captured with Highlight tone priority enabled, or have an aspect ratio other than 3:2.)
Shooting in Live View mode ( ![]() ) with the Multiple exposure option enabled allows you to watch each new image merge with the previous one.
) with the Multiple exposure option enabled allows you to watch each new image merge with the previous one.
Here are some things to know about multiple-exposure shooting:
• Image quality and image settings. You can use any of the JPEG image quality settings, and full-resolution RAW, S-RAW, and M-RAW for individual images, but the final image will be a full-resolution, RAW image. If M-RAW or S-RAW is selected when shooting begins, the camera automatically switches to RAW. You can shoot RAW+JPEG as well. The current settings for image quality (Picture Style, ISO, High ISO speed noise reduction, and so on), are used for the series. Multiple exposure shooting does not use the Auto Picture Style ( ![]() ). If it’s selected, the camera automatically changes it to the Standard Picture Style (
). If it’s selected, the camera automatically changes it to the Standard Picture Style ( ![]() ). For the best multiple-exposure image quality, keep the ISO low, the exposure time brief, use fewer rather than more exposures, and use a tripod in low light unless you’re going for a creative blur effect. Also, test the mode in advance to see how image blending works. For example, I’ve found that the first image in the series has a higher blend opacity in the final image using the Average exposure option.
). For the best multiple-exposure image quality, keep the ISO low, the exposure time brief, use fewer rather than more exposures, and use a tripod in low light unless you’re going for a creative blur effect. Also, test the mode in advance to see how image blending works. For example, I’ve found that the first image in the series has a higher blend opacity in the final image using the Average exposure option.
• Some camera settings are disabled during Multiple exposure mode. When shooting in Multiple exposure mode, you must shoot in one of the Creative Zone modes. Also, Auto Lighting Optimizer, Highlight tone priority, Peripheral illumination correction, and Chromatic aberration correction are disabled. These settings are not used even if they were in use for an existing RAW image that you select to use as the first image. Anything else that is grayed out on the menus is, of course, unusable.
• Multiple exposure shooting can’t be used in some modes. Multiple exposure shooting is disabled if you have chosen White Balance Bracketing ( ![]() ), HDR mode, Movie mode (
), HDR mode, Movie mode ( ![]() ), Wi-Fi, or any of the automatic modes including Creative Auto (
), Wi-Fi, or any of the automatic modes including Creative Auto ( ![]() ).
).
• You should avoid changing or adjusting certain things on the camera when shooting multiple exposures. Don’t turn off the camera or replace the battery, because it will cancel multiple-exposure shooting. It’s also cancelled if you start shooting in one exposure mode, and then switch to the Custom shooting mode ( ![]() ), although the single images you’ve shot are saved to the media card. The series is cancelled if you move from Custom shooting mode (
), although the single images you’ve shot are saved to the media card. The series is cancelled if you move from Custom shooting mode ( ![]() ) to Aperture-priority AE (
) to Aperture-priority AE ( ![]() ) or another exposure mode. In short, don’t switch among exposure modes during shooting. It is also cancelled if the camera powers off automatically. If you think that it will take several minutes or longer to shoot the series, then disable the Auto power off option on Setup menu 2 (
) or another exposure mode. In short, don’t switch among exposure modes during shooting. It is also cancelled if the camera powers off automatically. If you think that it will take several minutes or longer to shoot the series, then disable the Auto power off option on Setup menu 2 ( ![]() ).
).
• Only the composite image is saved. Individual images used for the series are not saved: Only the composite is saved. So, if there are images that you want to save individually, capture those images before you begin shooting the series.
Multiple exposure mode options
The Multiple exposure submenu on Shooting menu 4 ( ![]() ) has all the following options to set up the camera for shooting:
) has all the following options to set up the camera for shooting:
• Multiple exposure. This option is set to Disable by default. To enable multiple-exposure shooting, choose Enable.
• Multi-expos ctrl. This is where you determine the exposure calculation for the series. You can choose one of the following:
• Additive. Every image exposure is cumulative, with each exposure adding to the next. To get a final image with a good exposure, set negative exposure compensation before shooting each image. The more exposures you make, the higher the negative compensation needed per exposure. As a starting point, Canon recommends setting the following negative exposure compensation: 1 stop for 2 exposures, 1.5 stops for 3 exposures, and 2 stops for 4 exposures. When you use Additive, the image on the LCD may look noisy. However, noise reduction is applied to the final image for an improved appearance. Also, this option takes more time than the Average option.
• Average. Choose this option when you want the camera to automatically figure out the amount of negative exposure compensation to set based on the number of images you choose for the series. This works well when you photograph the same scene multiple times. In that scenario, the camera moderates the exposures to keep the background and overlapping highlight areas from overexposing. I find that option works well, even if there are moderate changes in light among the exposures. For Figure 3.22, I used two exposures and Average exposure control. The contrast of the composited image was very low, so I increased it during image editing.
• No. of exposures. You can choose from two to nine images. Alternatively, you can use an image on the media card as the starting image. If you do that, then it counts as the first image. Thus, in a three-image composite that uses an existing image on the card, you shoot two images to complete the series.
• Continue Mult-exp. Your choices are 1-shot only or Continuously. Each does what it says it will. If you choose Continuously, then be sure to come back to choose Disable for the Multiple exposure option on Shooting menu 4 ( ![]() ) to return to normal shooting.
) to return to normal shooting.
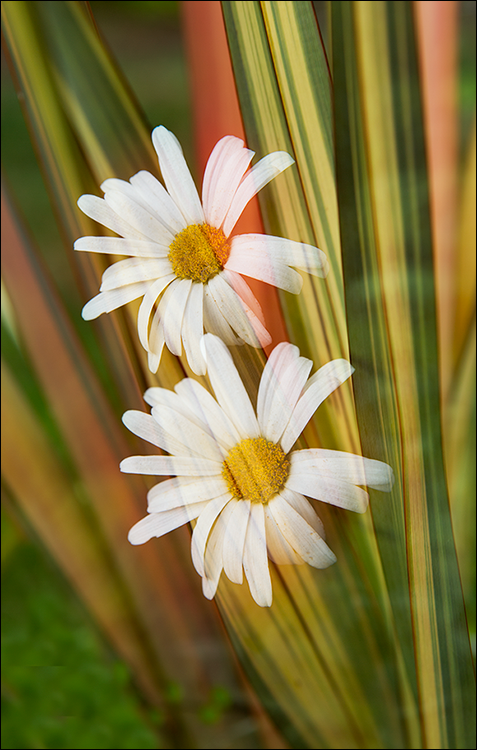
3.22 A two-image multiple-exposure using Average. Exposure: ISO 200, f/5.6, 1/600 second.
• Select image for multi. expo. The Multiple exposure screen provides this option so you can use an existing full-resolution RAW ( ![]() ) image as the starting image for the composite. You cannot use M/RAW (
) image as the starting image for the composite. You cannot use M/RAW ( ![]() ) or S/RAW (
) or S/RAW ( ![]() ), or JPEG images. You can choose this option, and then press the Setting button (
), or JPEG images. You can choose this option, and then press the Setting button ( ![]() ) to navigate to the RAW image on the media card you want to use as the first image. As mentioned earlier, there are restrictions, including that the image was not captured with Highlight tone priority. The camera settings, including the Picture Style, ISO, and color space used for the base image will be used for the rest of the images in the series.
) to navigate to the RAW image on the media card you want to use as the first image. As mentioned earlier, there are restrictions, including that the image was not captured with Highlight tone priority. The camera settings, including the Picture Style, ISO, and color space used for the base image will be used for the rest of the images in the series.
Shooting in Multiple exposure mode
An important step in getting a successful multiple-exposure image is planning the content of the composited image, and having a clear vision of the story. Before you begin capturing new images for a series, ensure that the Mode dial is set to Program AE ( ![]() ), Shutter-priority AE (
), Shutter-priority AE ( ![]() ), Aperture-priority AE (
), Aperture-priority AE ( ![]() ), Manual (
), Manual ( ![]() ), or Bulb (
), or Bulb ( ![]() ) exposure mode. Next, follow these steps:
) exposure mode. Next, follow these steps:
1. On Shooting menu 4 (![]() ), choose Multiple exposure, and then press the Setting button (
), choose Multiple exposure, and then press the Setting button (![]() ). The Multiple exposure screen appears.
). The Multiple exposure screen appears.
2. Select Multiple exposure, and then press Set (![]() ). Two options appear.
). Two options appear.
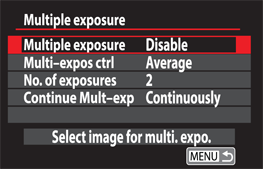
3.23 The Multiple exposure screen.
3. Choose Enable, and then press the Setting button (![]() ). The Multiple exposure screen options reappear.
). The Multiple exposure screen options reappear.
4. Select Multi-expos ctrl, and then press the Setting button (![]() ). The Additive and Average options appear.
). The Additive and Average options appear.
5. Choose an option, and then press the Setting button (![]() ).
).
6. Choose No. of exposures, and then press the Setting button (![]() ).
).
7. Press up or down on the Multi-controller (![]() ) to select the number of exposures you want, and then press the Setting button (
) to select the number of exposures you want, and then press the Setting button (![]() ). You can choose from 2 to 9 shots. In my experience, fewer images are generally better.
). You can choose from 2 to 9 shots. In my experience, fewer images are generally better.
8. Select Continue Mult-exp, and then press the Setting button (![]() ). The 1 shot only and Continuously options appear.
). The 1 shot only and Continuously options appear.
9. Choose the option you want, and then press the Setting button (![]() ). With 1 shot only, multiple-exposure shooting stops automatically when the selected number of shots is made. With the Continuously option, you have to specifically go back to steps 1 and 2 and choose Disable in step 3.
). With 1 shot only, multiple-exposure shooting stops automatically when the selected number of shots is made. With the Continuously option, you have to specifically go back to steps 1 and 2 and choose Disable in step 3.
To choose an existing RAW ( ![]() ) image as the starting image, repeat steps 1 and 2 in the previous list, and then follow these steps:
) image as the starting image, repeat steps 1 and 2 in the previous list, and then follow these steps:
1. On the Multiple Exposure screen, turn the Quick Control dial (![]() ) to highlight Select image for multi. expo., and then press the Setting button (
) to highlight Select image for multi. expo., and then press the Setting button (![]() ). The most recent image captured appears on the LCD screen.
). The most recent image captured appears on the LCD screen.
2. Turn the Quick Control dial (![]() ) to select the starting RAW image you want to use, and then press the Setting button (
) to select the starting RAW image you want to use, and then press the Setting button (![]() ).
).
3. Select OK. The image file number appears at the bottom of the screen, and the number of images in the series is reduced by one image. Then you can shoot the remaining images in the series.
As you shoot the images, the number of images left in the series is displayed in the lower right of the LCD screen and in the viewfinder, and new images are composited with earlier images. If you’re using Live View mode ( ![]() ), you can see the images as they are merged.
), you can see the images as they are merged.
To check the images captured so far, press the Playback button ( ![]() ). Next, press the Erase button (
). Next, press the Erase button ( ![]() ) to use the following controls:
) to use the following controls:
• Return to previous screen (![]() ). This option takes you back to the previous screen.
). This option takes you back to the previous screen.
• Undo last image (![]() ). Select this option, and then press the Setting button (
). Select this option, and then press the Setting button ( ![]() ) to confirm and delete the last image. After the deletion, the remaining number of images in the series increases by one, and the controls disappear so you can continue shooting.
) to confirm and delete the last image. After the deletion, the remaining number of images in the series increases by one, and the controls disappear so you can continue shooting.
• Save and exit (![]() ). Select this option, and then press the Setting button (
). Select this option, and then press the Setting button ( ![]() ) to confirm that you want to merge the images captured as the final multiple-exposure image. Choose OK on the Save and exit confirmation screen.
) to confirm that you want to merge the images captured as the final multiple-exposure image. Choose OK on the Save and exit confirmation screen.
• Exit without saving (![]() ). This cancels the multiple-exposure series, and all images are deleted.
). This cancels the multiple-exposure series, and all images are deleted.
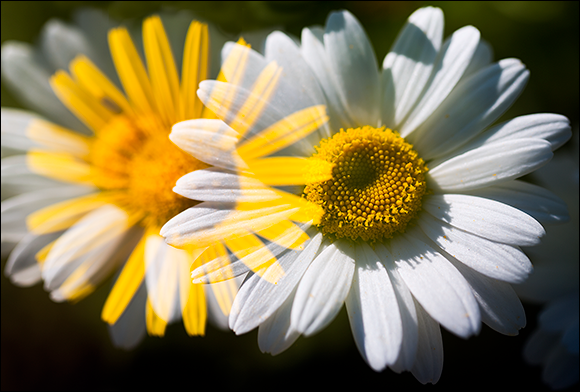
3.24 This three-shot exposure (set to Additive) interlaces the front and middle image elements in an interesting way. Exposure: ISO 200, f/3.5, 1/1250 second, +2/3-stop exposure compensation.
Shooting HDR images
HDR shooting is a technique that has gained wide acceptance and popularity among photographers. HDR shooting captures a series of bracketed images, with one or more exposures set to maintain the highlights, other exposures optimized for the midtones, and other exposures optimized for shadow detail. In traditional HDR shooting, three, five, seven, or more bracketed frames are merged into the final composite image in a specialized HDR program or in Photoshop. The resulting image has a dynamic range beyond what the camera can capture in a single frame. Various image-processing options create image looks that range from traditional photographic renderings to those with very high contrast and detail to artistic renderings.
HDR images are always bracketed by shutter speed rather than by aperture to avoid shifts in focal lengths among shots.
Now, it is much easier to use HDR for everyday shooting because the 70D offers in-camera HDR capture, compositing, and processing. The in-camera processing doesn’t offer the options that full-blown HDR programs offer, but it is still a very capable and handy feature.
With any HDR shooting, use a tripod so that the combined images align perfectly. Also, because the images are bracketed by shutter speed, it’s even more important to stabilize the camera for low-light scenes.
Here are some things to know about HDR shooting:
• Image quality and saved image. You cannot shoot RAW ( ![]() ) or RAW+JPEG (
) or RAW+JPEG ( ![]() ) images. The three bracketed JPEG images are composited, and saved as a single JPEG file. If you shoot using Large/Fine quality (
) images. The three bracketed JPEG images are composited, and saved as a single JPEG file. If you shoot using Large/Fine quality ( ![]() ), then the final image will be Large/Fine (
), then the final image will be Large/Fine ( ![]() ) quality. Otherwise, if you’re shooting at a lower JPEG quality, then the resulting HDR image will match that quality setting. Only the final composited JPEG image is saved — the bracketed images are not saved.
) quality. Otherwise, if you’re shooting at a lower JPEG quality, then the resulting HDR image will match that quality setting. Only the final composited JPEG image is saved — the bracketed images are not saved.
• About Auto Align. The main thing to know about using HDR shooting and Auto Align is that you should stabilize the camera. Really. It’s true that you can set Auto Image Align, and the 70D will automatically line up the edges as best it can. However, the natural shake of your hand while holding the camera during a slow shutter speed can cause images to misalign, as can subject movement. If the images are far off, then Auto Align may not be used at all. In addition, the alignment may not be perfect when shooting in very bright or dark exposures. If you don’t enable Auto Align and if you handhold the camera for a series of HDR images, then the images may not align due to camera shake and the expanded dynamic range effect may be minimal. Also, when the images are aligned, the camera may crop the edges of the composited image giving a smaller than usual final image. Scene and subject conditions such as repetitive patterns and flatly lit subjects can throw off alignment as well.
• Image settings and capture. You can use HDR only in Creative Zone modes. Image settings, including the quality, ISO, Picture Style, High ISO speed noise reduction, and so on, that are in effect for the first image will also be used for the remaining two images. Note that if you’re using the Auto Picture Style ( ![]() ), HDR shooting automatically sets it to the Standard Picture Style (
), HDR shooting automatically sets it to the Standard Picture Style ( ![]() ). When you press the shutter button to capture the three images, the camera fires them off relatively quickly. However, if you’ve set the drive mode to High-speed Continuous (
). When you press the shutter button to capture the three images, the camera fires them off relatively quickly. However, if you’ve set the drive mode to High-speed Continuous ( ![]() ), the capture rate will be slower than usual. Note also that color accuracy may be off when shooting in fluorescent light or with an LED.
), the capture rate will be slower than usual. Note also that color accuracy may be off when shooting in fluorescent light or with an LED.
• When HDR can’t be used. HDR shooting won’t work if you have set Auto Exposure Bracketing (AEB), White Balance Bracketing, Multi Shot Noise Reduction, Multiple exposure shooting, or an expanded ISO (the ISO range is 100 to 12800 for HDR). It also won’t work in Bulb ( ![]() ), Movie (
), Movie ( ![]() ), or automatic modes, or with the Wi-Fi function enabled.
), or automatic modes, or with the Wi-Fi function enabled.
• What’s disabled with HDR shooting. Neither the built-in flash or an accessory Speedlite will fire when shooting HDR images. When you enable HDR shooting, the camera disables Auto Lighting Optimizer, Highlight tone priority, and Exposure simulation (if you’re shooting in Live View mode ![]() ). Other menu items are also disabled.
). Other menu items are also disabled.
The HDR Mode screen provides the following options for HDR shooting:
• Adjust dyn range. With this menu option, you can set the bracketing range to plus/minus 1, 2, or 3 EV. Or choose Auto to let the camera determine the bracketing amount. Only the shutter speed changes, and that’s done to avoid focal-length shifts. While each scene differs, generally, the higher the contrast and the brighter the light in the scene, the wider the bracketing difference you should use.
• Continuous HDR. This menu option enables you to capture one HDR shot or shoot HDR for all images until you change this option.
• Auto Image Align. This is another menu option with which you can have the camera automatically align the images. With automatic alignment enabled, the camera can correct minor misalignments among the images for handheld images. In the alignment process, you can expect the composite image to be slightly cropped. If camera shake from handholding causes too much difference among images, then Auto image align won’t be used. If you are using a tripod, then choose Disable.
To set up for HDR shooting, set the Mode dial to a Creative Zone mode (except Bulb ![]() ), and then follow these steps:
), and then follow these steps:
1. On Shooting menu 4 (![]() ), select HDR Mode, and then press the Setting button (
), select HDR Mode, and then press the Setting button (![]() ). The HDR Mode screen appears.
). The HDR Mode screen appears.
2. Select Adjust dyn range, and then press the Setting button (![]() ).
).
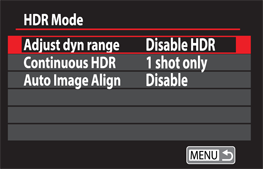
3.25 The HDR Mode screen.
3. Turn the Quick Control dial (![]() ) to choose the setting you want, and then press the Setting button (
) to choose the setting you want, and then press the Setting button (![]() ). The options are described earlier in this section.
). The options are described earlier in this section.
4. Select Continuous HDR, and then press Set (![]() ). The 1 shot only and Every shot options appear. If you choose Every shot, be sure to come back to the HDR Mode screen and disable HDR mode shooting when you finish shooting.
). The 1 shot only and Every shot options appear. If you choose Every shot, be sure to come back to the HDR Mode screen and disable HDR mode shooting when you finish shooting.
5. Turn the Quick Control dial to select the option you want, and then press Set (![]() ). The HDR Mode options reappear.
). The HDR Mode options reappear.
6. On the HDR Mode screen, select Auto Image Align, and then press Set (![]() ). The Enable and Disable options appear.
). The Enable and Disable options appear.
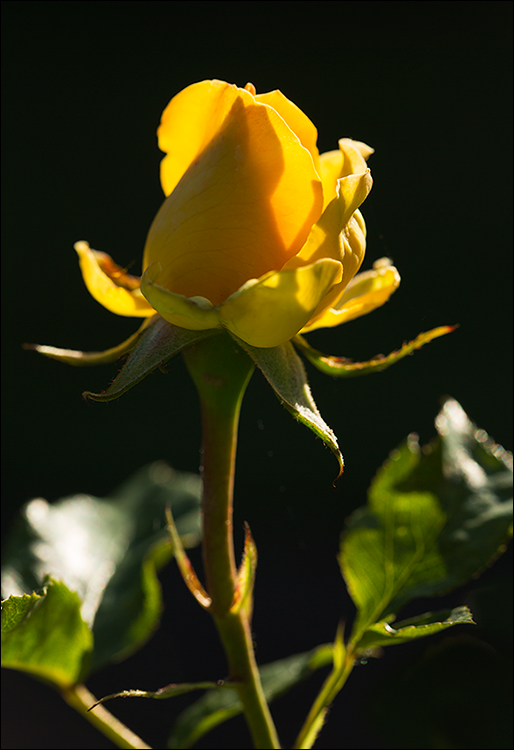
3.26 The HDR composite of a backlit rose bud. Exposure: ISO 200, f/7.1, 1/320 second.
7. Choose the option you want, and then press Set (![]() ). Choose Enable if you’re handholding the camera, or choose Disable if you’re using a tripod.
). Choose Enable if you’re handholding the camera, or choose Disable if you’re using a tripod.
8. Press the shutter button once to take the three bracketed images. After a short wait, the composited JPEG image appears on the LCD screen. The intermediate images used to make the final HDR image are not saved.

