Chapter 5: Working with Color and Creative Effects
In the days of film, you bought film based on the light in which you would be shooting. Often, color-correction filters were necessary to further modify the color. Next you had to trust the lab to deliver good color in the prints. All that is, thankfully, history. Now you control how good the color is in images, and the 70D offers a full complement of settings to ensure that images have beautiful color, including white balance and Picture Styles. The more faithful you are in setting the white balance and Picture Style for JPEG shooting, the less time you’ll spend correcting color on the computer. You can also apply filters to create artistic looks for your images.
In this chapter, I cover when and how to use each of these options to get the best color and fine-tune it for any type of light.
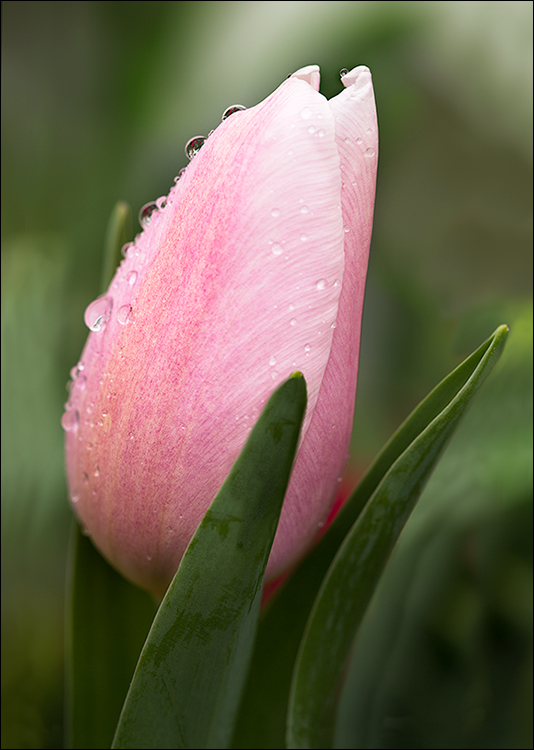
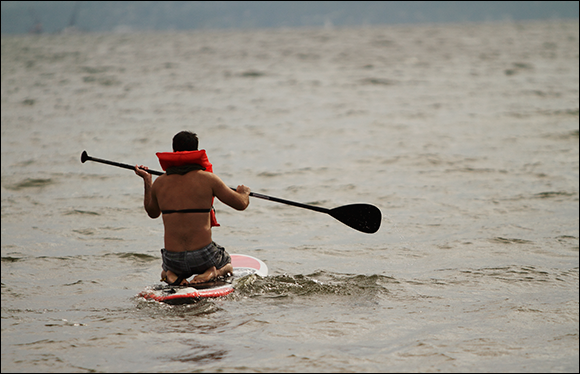
Regardless of the type of light in the scene, you can get stunning color by using the white balance settings and Picture Styles. Here, I used the Cloudy white balance setting and Neutral Picture Style. Exposure: ISO 250, f/5.6, 1/80 second.
Working with Color
Without question, you can save yourself a lot of time on the computer simply by getting the color right in the camera. The settings that affect the range of colors captured and the color rendering include the color space, white balance, and Picture Style options when you’re shooting in the Creative Zone exposure modes (Program AE ![]() , Shutter-priority AE
, Shutter-priority AE ![]() , Aperture-priority AE
, Aperture-priority AE ![]() , and Manual
, and Manual ![]() ).
).
Except for color space, there are comparable settings that you can use in many of the automatic exposure modes, such as Portrait ( ![]() ) and Scene Intelligent Auto (
) and Scene Intelligent Auto ( ![]() ) mode. Here is a quick summary of the options:
) mode. Here is a quick summary of the options:
• Color space. A color space determines the gamut of colors that can be reproduced by a device, such as a printer or computer monitor. On the 70D, you have two choices: Adobe RGB or sRGB. Adobe RGB encompasses a broader range of colors than sRGB. Choosing a color space also affects your overall image workflow. Typically, you want to keep the color space consistent from image capture through editing and printing. The Color Space option is one that most photographers set at once and seldom change. You can choose a color space when you’re shooting in the Program AE ( ![]() ), Shutter-priority AE (
), Shutter-priority AE ( ![]() ), Aperture-priority AE (
), Aperture-priority AE ( ![]() ), or Manual (
), or Manual ( ![]() ) modes.
) modes.
• White balance setting. To get accurate color, you must tell the camera what type of light is in the scene. You do this by setting a white balance that matches the scene light or by setting a custom white balance. White balance is a setting that you should change every time the light changes. You can set the white balance in the Creative Zone exposure modes. In many of the automatic modes, such as Portrait ( ![]() ) and Landscape (
) and Landscape ( ![]() ), you can change the lighting or scene type.
), you can change the lighting or scene type.
• Picture Styles. Picture Styles create a certain look in images, much like different films did. Each style has individual settings that render image colors more or less vivid and saturated, and that affect the image sharpness and contrast. How often you change the Picture Style depends on your preferences and the type of scene or subject that you are photographing. Picture Styles are available in Creative Zone modes. In most automatic exposure modes, you can use Ambience selections, such as Warm or Vivid.
Each of these settings plays a unique role in determining image color. The following sections provide more detail on using these settings in everyday shooting.
Choosing a Color Space
A color space is a mathematical system that describes colors numerically. In less technical terms, it defines the range of colors that can be reproduced and the way that a device — a digital camera, computer monitor, or printer — reproduces colors. Colors are created and described numerically by their RGB values. For example, a shade of pink can be expressed as R (Red) 253, G (Green) 158, and B (Blue) 188. For a computer, printer, or other device to know how to decode the values and display colors accurately, they must have an accompanying guide — the color profile. The 70D image files do not have a color profile appended. So, you’ll want to embed a color profile during RAW image conversion or while editing JPEG images.
There are several considerations in choosing a color space. The Adobe RGB color space supports a wider gamut of colors than the sRGB color space. And, as is true with all aspects of image capture, the more data captured in the camera, the richer and more robust the file will be. And the more robust the file, the better it can withstand image editing. When I’m shooting, I want to capture all the 70D image data possible, which is, after all, why I bought a high-resolution camera like the 70D, and so I use Adobe RGB. If I later need to make a copy of the image and change it to the sRGB color space, that’s easy to do during image editing. While I can easily convert images to a smaller color gamut during editing, I cannot go the other way – in other words, I cannot add in colors that were not captured during shooting.
The second consideration is keeping a consistent color space through the workflow — from capture to editing to printing. Using the same color space in the camera, in your image-editing program, and on your printer lessens color loss or alteration during color space conversions. When an image moves from a large color space to a smaller color space, the device — a computer or printer, for example — must decide which colors to keep, which to alter, and which to throw out. The fewer conversions, the better the color.
Another consideration when choosing color space is that the 70D captures color-rich 14-bit files that have 16,384 colors for each of the three color channels (Red, Green, and Blue). In contrast, 8-bit files offer only 256 values per color channel. Thus, the color loss is significant.
The 70D’s 14-bit RAW files can be processed in a conversion program, such as Adobe Camera Raw, Lightroom, or Apple Aperture, as 16-bit files.
Comparing color spaces
To see the difference that color space choice makes, compare the histogram for an image in each color space. You’re probably familiar with reading a histogram, so you know that a spike on the right edge of the histogram indicates that highlight image data is clipped or discarded from the image. A spike on the left indicates clipped shadow data. The higher the spike, the more data clipped. Ideally, you do not want colors to clip at all, or as little as possible. Predictably, the larger the color space, the less clipping that occurs. In short, more image color is retained by using the larger Adobe RGB color space. Capturing more color data translates into richer files.
Figure 5.1 shows a RAW image with two histograms as displayed in Adobe Camera Raw. With the bright light, the shadows clip in both color spaces, but notice how the highlight pixels are well contained in the tonal range in the histogram on the left that shows the image in Adobe RGB. The histogram on the right shows the image in the sRGB color space. The highlights on the right of the graph show considerable clipping (discarding pixels).
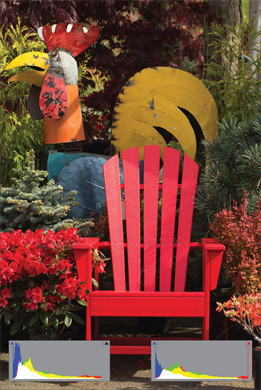
5.1 The histogram on the left shows the Adobe RGB color space of this image, while the one on the right shows the sRGB color space. Exposure: ISO 200, f/7.1, 1/400 second.
Color space also factors into printing. Adobe RGB is the color space of choice for printing on inkjet printers and for printing by some, though not all, commercial printers. If you print at a commercial lab, be sure to ask which color space it uses and then provide files in that color space.
While Adobe RGB is a great color space for capturing a wide range of colors, it doesn’t provide the best image color for online display. In fact, when you view an image that’s in the Adobe RGB color space outside of an image-editing program or online, the image colors look dull and flat. For online display, the sRGB color space provides the best color.
It may sound difficult to choose color spaces, for most photographers it translates into using Adobe RGB for capturing images, editing, and printing. When an image is needed for the web or e-mail, it’s easy to make a copy and convert it to the sRGB color space in an editing program such as Photoshop.
Canon typically notes in its manuals that Adobe RGB is an advanced setting. If you’re new to photography or only shoot as a hobby, and want to keep things simple, then by all means, use sRGB. With sRGB, your images will look good in an editing program and websites or in e-mails with no effort on your part. In the meantime, you know that you can then explore the option of using a larger color space for more nuances of colors and richness in your prints.
Here are some additional things to consider when choosing a color space:
• You can choose a color space when you are shooting in the Creative Zone modes.
• Filenames for images shot with Adobe RGB are preceded by an underscore (_).
Setting the color space
With this background on the two color space options, you can now choose the one that fits best into your overall image workflow.
To choose a color space, follow these steps:
1. On Shooting menu 3 (![]() ), highlight Color space, and then press the Setting button (
), highlight Color space, and then press the Setting button (![]() ). The sRGB and Adobe RGB options appear.
). The sRGB and Adobe RGB options appear.
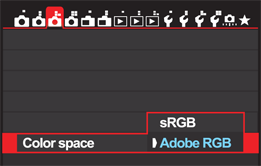
5.2 The color space options.
2. Highlight the option you want.
3. Press the Setting button (![]() ). The color space you chose remains in effect until you change it.
). The color space you chose remains in effect until you change it.
Setting the White Balance
If you want pleasing and accurate color straight from the camera, make it an unfailing habit to choose the white balance setting that matches the light in the scene. Setting the white balance tells the camera the type of light in the scene. That’s important because the camera is not as adept as the human eye at seeing color in different lights. When the light changes, our eyes immediately adjust to changes so we see a white shirt as being white whether it’s seen in sunlight or in tungsten (household) light. Our ability to see that same color regardless of light is called color constancy or chromatic adaptation. Cameras, unfortunately, do not have chromatic adaptation, and the camera will record the white shirt as yellow in tungsten light. So, if you want white shirts to be white in your images, make it a habit to set the white balance to match the scene light.
The 70D offers seven white balance settings, including preset options for common light sources. In addition, you can set a Custom white balance ( ![]() ) to set the light temperature to the specific light in the scene, or you can set a specific color temperature.
) to set the light temperature to the specific light in the scene, or you can set a specific color temperature.
Your choice of white balance setting may be affected by the amount of time you have to shoot a scene, the type and consistency of light, and whether you shoot RAW or JPEG capture. If you’re new to white balance settings, here is a summary for using the different options:
• Auto white balance (![]() ). The AWB option provides a best guess at the light temperature in the scene. This is an educated guess that tries to remove the colorcast from neutral colors, such as white or gray, in the scene. However, if there is no white or gray in the scene, the results are not as good. The AWB setting uses a color temperature (detailed later in this chapter) of approximately 3000 to 7000 degrees Kelvin. In my experience, AWB has a bluish (cool) color bias. I recommend using AWB in mixed light scenes when you don’t have time to set a Custom white balance (
). The AWB option provides a best guess at the light temperature in the scene. This is an educated guess that tries to remove the colorcast from neutral colors, such as white or gray, in the scene. However, if there is no white or gray in the scene, the results are not as good. The AWB setting uses a color temperature (detailed later in this chapter) of approximately 3000 to 7000 degrees Kelvin. In my experience, AWB has a bluish (cool) color bias. I recommend using AWB in mixed light scenes when you don’t have time to set a Custom white balance ( ![]() ) and when there is a neutral color in the scene. Otherwise, you’ll get better color by choosing one of the other light-specific options.
) and when there is a neutral color in the scene. Otherwise, you’ll get better color by choosing one of the other light-specific options.
• Preset white balance. A preset white balance setting, such as Daylight ( ![]() ), is a good choice when there is a single light source in the scene that clearly matches one of the preset white balance options. The preset white balance options are Daylight (
), is a good choice when there is a single light source in the scene that clearly matches one of the preset white balance options. The preset white balance options are Daylight ( ![]() , 5200 Kelvin), Shade (
, 5200 Kelvin), Shade (![]() , 7000K), Cloudy, Twilight, Sunset (
, 7000K), Cloudy, Twilight, Sunset (![]() , 6000K), Tungsten (
, 6000K), Tungsten (![]() , 3200K), White fluorescent (
, 3200K), White fluorescent (![]() , 4000K), and Flash (
, 4000K), and Flash (![]() ). Each option has very good color accuracy.
). Each option has very good color accuracy.
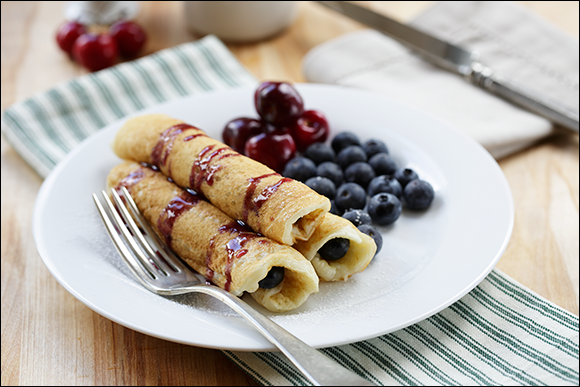
5.3 Here, I used the Auto white balance setting which gives the image an overall cool colorcast. Exposure: ISO 2050, f/5.6, 1/30 second, +1 exposure compensation.
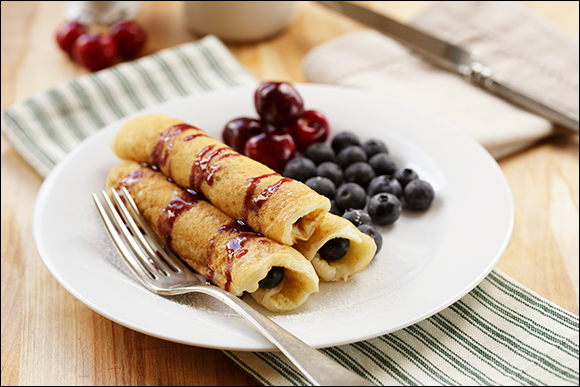
5.4 This image was taken using the Cloudy white balance setting. The colors are true to the original scene. Exposure: ISO 200, f/5.6, 1/30 second, +1 exposure compensation.
• Custom white balance (![]() ). A Custom white balance (
). A Custom white balance ( ![]() ) sets image color specifically for the light in the scene, whether it’s a single light source or mixed light. This is the option to use with mixed lighting and when the light source doesn’t clearly match one of the preset white balance options. Setting a Custom white balance (
) sets image color specifically for the light in the scene, whether it’s a single light source or mixed light. This is the option to use with mixed lighting and when the light source doesn’t clearly match one of the preset white balance options. Setting a Custom white balance ( ![]() ) takes a bit more time, but it provides very accurate color. It is worth the extra steps, especially when shooting a series of JPEG images in the same light. The Custom white balance (
) takes a bit more time, but it provides very accurate color. It is worth the extra steps, especially when shooting a series of JPEG images in the same light. The Custom white balance ( ![]() ) light temperatures range from 2000 to 10,000K. If you are shooting RAW, then shooting a white or gray card and balancing images during RAW image conversion is often faster than setting a Custom white balance (
) light temperatures range from 2000 to 10,000K. If you are shooting RAW, then shooting a white or gray card and balancing images during RAW image conversion is often faster than setting a Custom white balance ( ![]() ). This technique is covered later in this chapter.
). This technique is covered later in this chapter.
• Kelvin color temperature (![]() ). With the Kelvin white balance option (
). With the Kelvin white balance option ( ![]() ), you set the specific light temperature on the 70D between 2,500 to 10,000K in 100K increments. This is good for studio shooting when you know the temperature of the strobes or continuous lights. If you are fortunate enough to have a color-temperature meter, setting the specific color temperature is a good option.
), you set the specific light temperature on the 70D between 2,500 to 10,000K in 100K increments. This is good for studio shooting when you know the temperature of the strobes or continuous lights. If you are fortunate enough to have a color-temperature meter, setting the specific color temperature is a good option.
To change to a preset white balance, follow these steps:
1. Set the Mode dial to a Creative Zone mode, and then press the Quick control button (![]() ).
).
2. Press the up, down, left, or right key on the Multi-controller (![]() ) to select a white balance option.
) to select a white balance option.
3. Turn the Main dial (![]() ) to choose the setting that matches the scene’s light source. Instructions for using the K white balance (
) to choose the setting that matches the scene’s light source. Instructions for using the K white balance ( ![]() ) option are detailed in the next sections.
) option are detailed in the next sections.
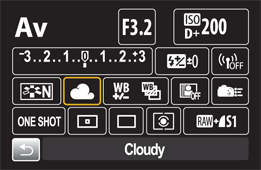
5.5 Choose the white balance option on the Quick control screen and change it to match the light in the scene.
Setting a Custom white balance
Because setting a Custom white balance ( ![]() ) adjusts image color precisely for the light that is in the scene, a Custom white balance (
) adjusts image color precisely for the light that is in the scene, a Custom white balance ( ![]() ) produces the most accurate color in any light. It’s especially good in scenes where the light doesn’t match any of the preset white balance settings, and in scenes with multiple types of light. You can set a Custom white balance (
) produces the most accurate color in any light. It’s especially good in scenes where the light doesn’t match any of the preset white balance settings, and in scenes with multiple types of light. You can set a Custom white balance ( ![]() ) in any Creative Zone mode.
) in any Creative Zone mode.
Before you begin, set the Mode dial to a Creative Zone mode, that the White balance isn’t set to Custom, and that the Picture Style is not set to Monochrome ( ![]() ). To set a Custom white balance (
). To set a Custom white balance ( ![]() ), complete all of these steps:
), complete all of these steps:
1. In the light used for the subject, position a piece of unlined white paper so that it fills the center of the viewfinder, and then take a picture of it. To focus on the paper, switch the lens to Manual focus mode ( ![]() ) if the lens offers manual focusing. Ensure that the card isn’t under- or overexposed.
) if the lens offers manual focusing. Ensure that the card isn’t under- or overexposed.
2. On Shooting menu 3 (![]() ), highlight Custom White Balance, and then press the Setting button (
), highlight Custom White Balance, and then press the Setting button (![]() ). The camera displays the most recent image captured, and that should be the picture of the white piece of paper. A Custom white balance icon (
). The camera displays the most recent image captured, and that should be the picture of the white piece of paper. A Custom white balance icon ( ![]() ) and the words Set and menu are displayed on the screen. If the image of the white paper is not displayed, turn the Quick Control dial (
) and the words Set and menu are displayed on the screen. If the image of the white paper is not displayed, turn the Quick Control dial ( ![]() ) until it is.
) until it is.
3. Press the Setting button (![]() ). The 70D displays a confirmation screen asking if you want to use the white balance data from this image.
). The 70D displays a confirmation screen asking if you want to use the white balance data from this image.
4. Choose OK, and then press the Setting button (![]() ). A second screen appears reminding you to set the white balance to Custom (
). A second screen appears reminding you to set the white balance to Custom ( ![]() ).
).
5. Press the Setting button (![]() ) to choose OK, and then press the shutter button to dismiss the menu. The camera imports the white balance data from the selected image and returns to Shooting menu 3 (
) to choose OK, and then press the shutter button to dismiss the menu. The camera imports the white balance data from the selected image and returns to Shooting menu 3 ( ![]() ).
).
6. Press the Quick Control button (![]() ) on the back of the camera. Press the up, down, left, or right key on the Multi-controller (
) on the back of the camera. Press the up, down, left, or right key on the Multi-controller ( ![]() ) to select the white balance option.
) to select the white balance option.
7. Turn the Main dial (![]() ) to choose the Custom white balance (
) to choose the Custom white balance (![]() ) option. The Custom white balance (
) option. The Custom white balance ( ![]() ) remains in effect until you change it. Be sure to reset the Custom white balance (
) remains in effect until you change it. Be sure to reset the Custom white balance ( ![]() ) if the subject light changes.
) if the subject light changes.
Setting a color temperature white balance
There are times when you know the exact temperature of the light in the scene, and in those instances, simply dial in the color temperature using the K Color Temperature white balance options ( ![]() ). For example, I know that the temperature of my studio lights is 5300K, so I use the K Color Temperature white balance (
). For example, I know that the temperature of my studio lights is 5300K, so I use the K Color Temperature white balance ( ![]() ) to set the exact temperature. Then, I can continue shooting without further adjustments to the white balance because the light temperature of the strobes remains constant.
) to set the exact temperature. Then, I can continue shooting without further adjustments to the white balance because the light temperature of the strobes remains constant.
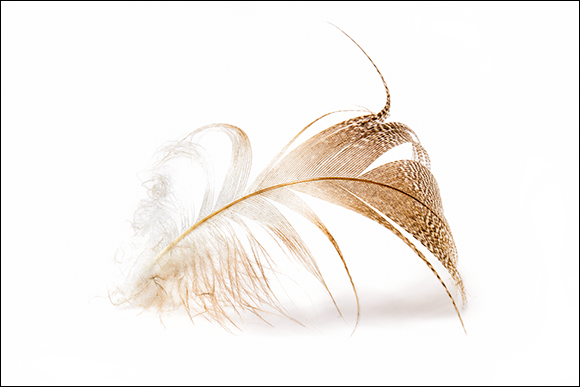
5.6 Here, I used the color temperature K white balance setting and set the color to 5300K to match the temperature of my studio lights. Exposure: ISO 200, f/32, 1/125 second.
Alternately, you can use K Color Temperature white balance ( ![]() ) to introduce a specific mood to the image. For example, you can use a higher color temperature to introduce a warm colorcast that mimics sunset.
) to introduce a specific mood to the image. For example, you can use a higher color temperature to introduce a warm colorcast that mimics sunset.
If you look up Kelvin Color Temperature scale on the Internet, you find illustrations showing color temperatures at different times of the day. For example, a cloudy day is approximately 6000-6500K, a sunny day is 4800-6500, outdoor shade is 7000-8000K, tungsten is 2500-2900K, fluorescent is 3200-75000K, and a candle is 1850-1930K.
Before you begin, set the Mode dial to a Creative Zone mode. Follow these steps to set a specific color temperature:
1. Press the Quick Control button (![]() ), and then press the direction keys on the Multi-controller (
), and then press the direction keys on the Multi-controller (![]() ) to highlight White balance.
) to highlight White balance.
2. Press the Setting button (![]() ). The White balance screen appears.
). The White balance screen appears.
5.7 The Color temp. menu.
3. Turn the Quick Control dial (![]() ) to highlight K Color temp. If you have previously changed the temperature for the K Color Temperature white balance setting (
) to highlight K Color temp. If you have previously changed the temperature for the K Color Temperature white balance setting ( ![]() ), the screen reflects the last temperature you set.
), the screen reflects the last temperature you set.
4. Turn the Main dial (![]() ) to the left to decrease the color temperature number or to the right to increase it, and then press the Setting button (
) to the left to decrease the color temperature number or to the right to increase it, and then press the Setting button (![]() ). The Quick Control screen appears with the white balance set to K Color Temperature (
). The Quick Control screen appears with the white balance set to K Color Temperature ( ![]() ).
).
If you use a color temperature meter, you’ll need to do some testing to compensate for differences between the camera’s temperature settings and the meter’s reading. And if you are setting a known temperature for a venue light such as an indoor gymnasium, you may need to modify the white balance toward magenta or green using White Balance Correction, which is described in the next section.
Fine-tuning white balance
Given the wide range of lights for household and commercial use, some color correction may be necessary to get accurate color. Alternately, in images where the color is accurate, you may want a warmer or cooler rendering than a preset white balance option provides.
To compensate for differences in specific light temperatures and to fine-tune a preset white balance setting, you can use White Balance Auto Bracketing ( ![]() ) and/or White Balance Correction (
) and/or White Balance Correction ( ![]() ). Both options enable you to bias image color in much the same way that color-correction filters did for film.
). Both options enable you to bias image color in much the same way that color-correction filters did for film.
White Balance Auto Bracketing
When the color isn’t quite accurate or pleasing, but you’re not sure how much color correction to apply, then using White Balance Auto Bracketing ( ![]() ) should produce at least one image with pleasing color. Bracketing produces three images with varying levels of color correction with a magenta/green or blue/amber bias. The bias is set in ±3 levels in one-step increments.
) should produce at least one image with pleasing color. Bracketing produces three images with varying levels of color correction with a magenta/green or blue/amber bias. The bias is set in ±3 levels in one-step increments.
Using White Balance Auto Bracketing ( ![]() ) predictably reduces the camera’s maximum burst rate by one-third. You can also combine White Balance Auto Bracketing (
) predictably reduces the camera’s maximum burst rate by one-third. You can also combine White Balance Auto Bracketing ( ![]() ) with exposure bracketing. When used together, the camera makes six images, a combination that not only reduces shooting speed to a virtual crawl, but also fills an SD card in very short order. However, in scenes that you can’t go back to and where image color is critical, White Balance Auto Bracketing (
) with exposure bracketing. When used together, the camera makes six images, a combination that not only reduces shooting speed to a virtual crawl, but also fills an SD card in very short order. However, in scenes that you can’t go back to and where image color is critical, White Balance Auto Bracketing ( ![]() ) is a good insurance policy for getting pleasing color.
) is a good insurance policy for getting pleasing color.
As with all the options discussed so far in this chapter, you can use White Balance Auto Bracketing ( ![]() ) in the Program AE (
) in the Program AE ( ![]() ), Shutter-priority AE (
), Shutter-priority AE ( ![]() ), Aperture-priority AE (
), Aperture-priority AE ( ![]() ), and Manual (
), and Manual ( ![]() ) modes, but not in the automatic exposure modes.
) modes, but not in the automatic exposure modes.
To get all three bracketed shots, you have to press the shutter button three times in Single shooting mode ( ![]() ). However, in High- (
). However, in High- ( ![]() ) and Low-speed (
) and Low-speed ( ![]() ) continuous shooting modes, pressing the shutter once fires off the three bracketed images.
) continuous shooting modes, pressing the shutter once fires off the three bracketed images.
Because White Balance Auto Bracketing ( ![]() ) and White Balance Correction (
) and White Balance Correction ( ![]() ) involve similar steps, I’ve combined the steps for both in the next section.
) involve similar steps, I’ve combined the steps for both in the next section.
White Balance Correction
White Balance Correction ( ![]() ) sets a single and specific color bias rather than bracketing in two directions as White Balance Auto Bracketing (
) sets a single and specific color bias rather than bracketing in two directions as White Balance Auto Bracketing ( ![]() ) does. This is the technique to use when you know the bias type and amount needed to get the image color you want. Using White Balance Correction (
) does. This is the technique to use when you know the bias type and amount needed to get the image color you want. Using White Balance Correction ( ![]() ) is similar to using color-compensation and color-correction filters with film, with the advantage of not needing to buy, carry, or protect multiple filters.
) is similar to using color-compensation and color-correction filters with film, with the advantage of not needing to buy, carry, or protect multiple filters.
You can correct color in any of four directions: Blue, green, amber, and magenta. Each level of color shift is the equivalent of 5 mireds of a color temperature conversion filter. A mired is a unit of measurement that indicates the density of a color temperature conversion filter.
5.8 The White Balance correction/White Balance bracketing screen.
The menu screen for White Balance Correction ( ![]() ) uses the term shift for the White Balance correction techniques.
) uses the term shift for the White Balance correction techniques.
Before you begin, set the Mode dial to a Creative Zone mode. To set White Balance Auto Bracketing ( ![]() ) or White Balance Correction (
) or White Balance Correction ( ![]() ), follow these steps:
), follow these steps:
1. On Shooting menu 3 (![]() ), highlight WB Shift/Bkt., and then press the Setting button (
), highlight WB Shift/Bkt., and then press the Setting button (![]() ). The WB +/- screen appears.
). The WB +/- screen appears.
2. To set White Balance Auto Bracketing (![]() ), turn the Quick Control dial (
), turn the Quick Control dial (![]() ) clockwise to set a blue/amber bias, or counterclockwise to set a magenta/green bias. As you turn the dial, three tick marks appear and separate to indicate the direction and amount of bracketing. The bracketing amount is displayed alphanumerically under the Bracket section of the screen.
) clockwise to set a blue/amber bias, or counterclockwise to set a magenta/green bias. As you turn the dial, three tick marks appear and separate to indicate the direction and amount of bracketing. The bracketing amount is displayed alphanumerically under the Bracket section of the screen.
3. To set White Balance Correction (![]() ), press the direction keys on the Multi-controller (
), press the direction keys on the Multi-controller (![]() ) in the direction of the shift you want. The direction and amount of shift are displayed in the Shift section of the screen.
) in the direction of the shift you want. The direction and amount of shift are displayed in the Shift section of the screen.
4. Press the Setting button (![]() ). If you change your mind and want to start over, press the Erase button (
). If you change your mind and want to start over, press the Erase button ( ![]() ). Bracketed images are taken with the Standard white balance first, followed by the blue (or magenta) bias, and then the amber (or green) bias. If you set White Balance Correction, the icon (
). Bracketed images are taken with the Standard white balance first, followed by the blue (or magenta) bias, and then the amber (or green) bias. If you set White Balance Correction, the icon ( ![]() ) is displayed in the viewfinder and on the LCD panel during shooting.
) is displayed in the viewfinder and on the LCD panel during shooting.
Soon after I began shooting with digital cameras, I learned that making my workflow as efficient as possible was the key to spending more time behind the camera and less time in front of the computer. One of the most important efficiency steps was moving to RAW capture. As a result, I seldom use white balance adjustments because most of my color correction involves the technique of shooting a white card covered earlier in this chapter. Even for individual images, I often place a white card in the scene, and then use it during RAW image conversion to correct color in all the images shot in the same light. Not only does this save time, but I also get great color.
Using lighting or a scene type
In Portrait ( ![]() ), Landscape (
), Landscape ( ![]() ), Close-up (
), Close-up ( ![]() ), and Sports (
), and Sports ( ![]() ) automatic shooting modes, you can’t change the white balance, but you can change the lighting or scene type, which function much the same way as the preset White Balance settings; however, their names are slightly different in some cases. In the Scene Intelligent Auto (
) automatic shooting modes, you can’t change the white balance, but you can change the lighting or scene type, which function much the same way as the preset White Balance settings; however, their names are slightly different in some cases. In the Scene Intelligent Auto ( ![]() ), Flash Off (
), Flash Off (![]() ), Creative Auto (
), Creative Auto ( ![]() ), and Night Portrait (
), and Night Portrait ( ![]() ) automatic shooting modes, the 70D automatically chooses the Default setting.
) automatic shooting modes, the 70D automatically chooses the Default setting.
The 70D includes these lighting and scene types:
• Default setting. The 70D makes its best guess at the light and light temperature in the scene. Typically, this is a good choice when you have mixed light sources.
• Daylight. This setting delivers the most accurate color under sunny skies for nature, landscape, and people shots.
• Shade. This setting corrects the blue color characteristic of cool light in the shade.
• Cloudy. This is good to use when the sky is fully overcast because it warms up colors nicely.
• Tungsten light. Use this setting for traditional incandescent household light bulbs to reduce the yellow/orange color they produce. (Not available in Landscape mode ![]() ).
).
• Fluorescent light. This setting is best for all types of fluorescent lighting. (Not available in Landscape mode ( ![]() ).
).
• Sunset. This setting renders the warm colors of sunset accurately.
If you use a flash in the Basic Zone modes, the lighting or scene type changes automatically to the Default setting.
You can combine a lighting type selection with an Ambience setting, detailed later in this chapter. If you do, be sure to set the Lighting or Scene type first so that the camera records the image color correctly before the camera shifts the color, as it does with some Ambience options.
In addition, if you’re using a Lighting or Scene type that creates warm image colors, such as Sunset, and then you choose an Ambience setting that further increases the color warmth, such as Warm, the combination may create an unnatural, over-the-top look. You can use Live View to ensure that the lighting or scene type and Ambience combination creates a pleasing result.
Here is how to change the lighting or scene type:
1. Set the Mode dial to Special Scene (![]() ), and then press the Quick Control button (
), and then press the Quick Control button (![]() ). The Quick control screen appears.
). The Quick control screen appears.
2. Press a direction key to select the mode icon in the upper left of the screen, and then press the Setting button (![]() ). The scene mode icons appear.
). The scene mode icons appear.
3. Turn the Quick Control dial (![]() ) to the mode you want, and then press the Setting button (
) to the mode you want, and then press the Setting button (![]() ). You can choose Portrait (
). You can choose Portrait ( ![]() ), Landscape (
), Landscape ( ![]() ), Close-up (
), Close-up ( ![]() ), or Sports (
), or Sports ( ![]() ) mode.
) mode.
4. Be sure the Live View shooting/Movie shooting switch is set to Live View shooting (![]() ), and then press the Start/Stop button (
), and then press the Start/Stop button (![]() ). A live view of the scene appears on the LCD screen. The advantage of using Live View is that you get an approximation of the Lighting or Scene type effect. The disadvantage is that it is difficult to see the effect on the LCD screen in bright light.
). A live view of the scene appears on the LCD screen. The advantage of using Live View is that you get an approximation of the Lighting or Scene type effect. The disadvantage is that it is difficult to see the effect on the LCD screen in bright light.
5. Press the Quick Control button (![]() ) to display the Quick Control screen, and then press up or down on the Multi-controller (
) to display the Quick Control screen, and then press up or down on the Multi-controller (![]() ) to highlight Default setting. Be sure the text at the bottom of the screen says Light/scene-based shots.
) to highlight Default setting. Be sure the text at the bottom of the screen says Light/scene-based shots.
6. Turn the Main dial (![]() ) to select the Lighting or Scene Type you want. If you’re using Live View, the preview scene on the LCD changes to reflect the setting you choose. If the color does not appear to your liking, choose another lighting type until it does. Then make the picture.
) to select the Lighting or Scene Type you want. If you’re using Live View, the preview scene on the LCD changes to reflect the setting you choose. If the color does not appear to your liking, choose another lighting type until it does. Then make the picture.
Working with Picture Styles
One of the great things about shooting with film was that each film type had its own special characteristics and look. Photographers chose film specifically to get the edgy, saturated colors that Fujifilm Velvia produced, or the ethereal skin tones and subdued contrast that Kodak’s Portra film provided.
That was then and this is now, and film is hard to find. However, the desire for that classic film look is as strong as ever. Canon provides the next best thing to film with seven Picture Styles. For example, to mimic Portra film, try using the Portrait Picture Style ( ![]() ), which is characterized by its subdued color, excellent skin tones, and moderate contrast. To capture nature and landscape scenes with the punchy, saturated colors and snappy contrast of Velvia, set the camera to the Landscape Picture Style (
), which is characterized by its subdued color, excellent skin tones, and moderate contrast. To capture nature and landscape scenes with the punchy, saturated colors and snappy contrast of Velvia, set the camera to the Landscape Picture Style ( ![]() ). If you want to shoot so that there is room to make post-capture edits to contrast, saturation, and color rendering, then the Neutral (
). If you want to shoot so that there is room to make post-capture edits to contrast, saturation, and color rendering, then the Neutral ( ![]() ) and Faithful Picture Styles (
) and Faithful Picture Styles ( ![]() ) give you that latitude.
) give you that latitude.
One of the goals of Picture Styles was to produce pictures that need little or no post-processing, so that you can print JPEG images directly from the memory card and get polished prints.
If you shoot RAW images, then you can apply Picture Styles during shooting or image conversion in Digital Photo Professional (DPP), a Canon conversion program that comes with the camera. Alternately, you can use the RAW image conversion feature on the 70D and apply the Picture Style during in-camera conversion from RAW to JPEG.
RAW images retain Picture Styles only if you convert them in Canon’s Digital Photo Professional software. Programs such as Adobe Lightroom, Apple Aperture, and so on, do not recognize Picture Styles.
Picture Styles are a collection of parameters including the tonal curve, color rendering and saturation, and sharpness, and you can adjust those parameters if you want. Alternatively, the Auto Picture Style ( ![]() ) evaluates the scene and changes the settings based on what the camera detects within the scene. Table 5.1 shows the styles and default settings. The parameters are listed in order of sharpness, contrast, color saturation, color tone, and for Monochrome, the Filter and Toning effects.
) evaluates the scene and changes the settings based on what the camera detects within the scene. Table 5.1 shows the styles and default settings. The parameters are listed in order of sharpness, contrast, color saturation, color tone, and for Monochrome, the Filter and Toning effects.
Table 5.1 Picture Styles
|
Picture Style |
Description |
Default settings |
|
|
Varies by scene, but generally renders colors as vivid and saturated. |
3, 0, 0, 0 |
|
|
Bright colors and saturation, moderately high sharpness |
3, 0, 0, 0 |
|
|
Natural, soft and flattering skin tone rendering, slightly high color saturation, and low sharpness |
2, 0, 0, 0 |
|
|
Vivid blues and greens in skies and foliage, high contrast and sharpness |
4, 0, 0, 0 |
|
|
Low saturation, contrast, and sharpness, resulting in rich detail and less chance of overexposure. |
0, 0, 0, 0 |
|
|
True rendition of colors when shooting in daylight light (5200K). Colors are adjusted to match the subject/scene colors precisely. |
0, 0, 0, 0 |
|
|
Black-and-white or toned images with slightly heightened sharpness. Unlike with previous EOS cameras, you cannot later convert monochrome images to color. |
3, 0, NA, NA |
With the Monochrome Picture Style ( ![]() ), only the sharpness and contrast parameters can be changed. However, you can apply the following:
), only the sharpness and contrast parameters can be changed. However, you can apply the following:
• Monochrome filter effects. Filter effects mimic the same types of color filters that photographers use when shooting black-and-white film. The Yellow filter makes skies look natural with clear white clouds. The Orange filter darkens the sky and adds brilliance to sunsets. The Red filter further darkens a blue sky and makes tree leaves look crisp and bright and renders skin tones realistically. The Green filter brightens foliage while rendering skin tones as subdued.
• Monochrome toning effects. You can apply creative toning effects with the Monochrome Picture Style ( ![]() ). The toning effect options are N: None, S: Sepia, B: Blue, P: Purple, and G: Green.
). The toning effect options are N: None, S: Sepia, B: Blue, P: Purple, and G: Green.
In automatic shooting modes, the camera automatically selects the Auto Picture Style ( ![]() ), which you cannot change. But you can use Ambience options that change the look of the images as well. Ambience options are detailed later in this chapter.
), which you cannot change. But you can use Ambience options that change the look of the images as well. Ambience options are detailed later in this chapter.
Choosing and customizing Picture Styles
You can use Picture Styles at their default settings, or you can change them. For me, changing the settings is a great way to create a more distinctive look for my images. Plus, the adjustments can be made with an eye toward keeping computer editing to a minimum. You can modify any or all of the existing styles, and you can create and save three styles that are based on the Canon styles. You get a lot of latitude in adjusting parameters with seven adjustment levels for sharpness and eight levels of adjustments for contrast, saturation, and color tone.
In addition, you can use the Picture Style Editor to customize and save changes to Picture Styles that you create on the computer, and then copy the style to the camera. The Picture Style Editor is included on the Canon EOS Digital Solution Disk that comes with the camera.
Customizing Picture Styles is a great way to adjust the look of JPEG images so they meet your creative vision, and your editing and printing needs. For example, if you prefer to edit images on the computer before printing, then the Neutral ( ![]() ), Portrait (
), Portrait ( ![]() ), and Faithful (
), and Faithful ( ![]() ) Picture Styles offer latitude for post-capture edits. If you want to print from the media card, then the Auto (
) Picture Styles offer latitude for post-capture edits. If you want to print from the media card, then the Auto ( ![]() ), Standard (
), Standard ( ![]() ), and Landscape Picture Styles (
), and Landscape Picture Styles ( ![]() ) produce snappy prints. Alternately, if the results are not quite what you want, you can modify a Picture Style to suit your needs.
) produce snappy prints. Alternately, if the results are not quite what you want, you can modify a Picture Style to suit your needs.
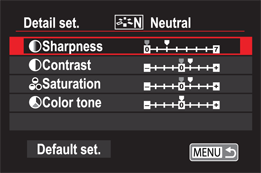
5.9 The Picture Style settings for a modified version of the Neutral Picture Style.
Here are the parameters you can adjust:
• Sharpness: 0 to 7. Level 0 (zero) applies no sharpening and renders a soft look. If you routinely print images directly from the memory card, then use a higher sharpness level. However, if you prefer to edit images on the computer, then a 0–2 level is adequate. The low setting also helps prevent sharpening halos when you sharpen images in an image-editing program.
• Contrast: -4 to +4. The Contrast parameter adjusts the image’s tonal curve. A negative adjustment produces a flatter look but helps prevent clipping. A positive setting increases the contrast and can stretch the tonal range. Higher settings can also lead to clipping (discarding highlight and/or shadow pixels). I prefer to get a slightly flatter look out of the camera, and then set a tonal curve in Photoshop that is to my liking.
• Saturation: -4 to +4. This setting affects the strength or intensity of the image’s color. A negative Saturation setting produces low saturation, and vice versa. As with the Contrast parameter, a high Saturation setting can cause individual color channels to clip. A +1 or +2 setting is adequate for snappy JPEG images destined for direct printing. For images that you edit on the computer, a 0 (zero) setting allows latitude for post-capture edits.
• Color tone: -4 to +4. This setting modifies the hue of the image. Negative settings produce tones that are redder, while positive settings produce more yellow tones.
After you evaluate and print pictures using different Picture Styles, you may want to adjust the Picture Style parameters to get the image look and rendering that suits your vision and workflow.
I have adjusted Pictures Styles with good results. Several years ago, I was having trouble with the camera oversaturating colors, particularly red objects in images. I talked to a friend from Canon, and he suggested that I modify the Neutral Picture Style. He gave me a starting point for the adjustments, and over the years, I have adjusted the parameters slightly.
The adjusted style has performed beautifully on several different Canon camera bodies, including the 70D. This modified style helped reduce oversaturation of red colors. So for almost all of my photography, I use a modified Neutral Picture Style ( ![]() ). Because I shoot RAW, I often use Digital Photo Professional to process images so that the Picture Style is retained.
). Because I shoot RAW, I often use Digital Photo Professional to process images so that the Picture Style is retained.
A couple of notes about this modified style are important. First, this style moderates color saturation, contrast, and sharpness so that I can interpret those characteristics to my liking during editing on the computer — something I always do. Second, in portraits this modified Neutral Picture Style ( ![]() ) creates subdued, lovely skin tones with a nice level of contrast as long as the lighting is not flat.
) creates subdued, lovely skin tones with a nice level of contrast as long as the lighting is not flat.
Here is how I set the modified Neutral Picture Style ( ![]() ) for my work. These settings work best when the lighting isn’t flat and the image isn’t underexposed. The settings are Sharpness +2, Contrast +1, Saturation +1, and Color tone 0.
) for my work. These settings work best when the lighting isn’t flat and the image isn’t underexposed. The settings are Sharpness +2, Contrast +1, Saturation +1, and Color tone 0.
Figures 5.12 through 5.15 compare some of the Picture Styles, and show the kinds of changes you can make, and the look you can expect when using them.
In Figure 5.10, I used the Neutral Picture Style ( ![]() ). If you compare it with Figure 5.11, you see how much lower the contrast and color saturation is with this style. In Figure 5.11, I used the Landscape Picture Style (
). If you compare it with Figure 5.11, you see how much lower the contrast and color saturation is with this style. In Figure 5.11, I used the Landscape Picture Style ( ![]() ). The increased blue and green color saturation is evident, as is the higher contrast and sharpness as compared to Figure 5.10. The Standard Picture Style (
). The increased blue and green color saturation is evident, as is the higher contrast and sharpness as compared to Figure 5.10. The Standard Picture Style ( ![]() ) would be very close to this, but with less color saturation in the greens and blues.
) would be very close to this, but with less color saturation in the greens and blues.
For the image shown in Figure 5.12, I used my modified Neutral Picture Style ( ![]() ). I wanted to moderate the contrast knowing it would help preserve detail in the highlights and shadows, and this style delivered on both counts. For portraits of women and children, I generally prefer the Portrait Picture Style (
). I wanted to moderate the contrast knowing it would help preserve detail in the highlights and shadows, and this style delivered on both counts. For portraits of women and children, I generally prefer the Portrait Picture Style ( ![]() ).
).
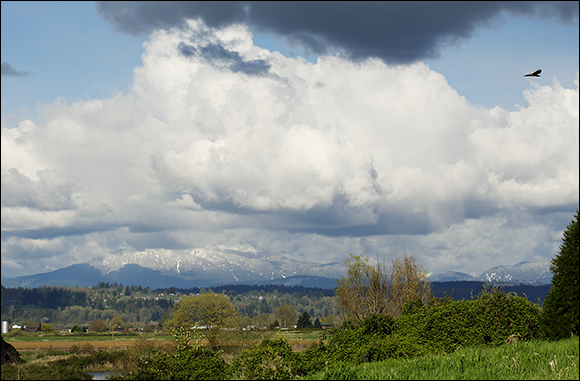
5.10 This picture of the valley in Snohomish, Washington was shot with the Neutral Picture Style. Exposure: ISO 200, f/11, 1/500 second.
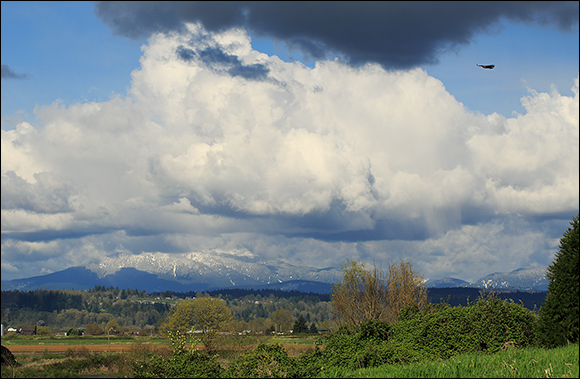
5.11 This the same scene captured using the Landscape Picture Style. Exposure: ISO 200, f/11, 1/640 second.
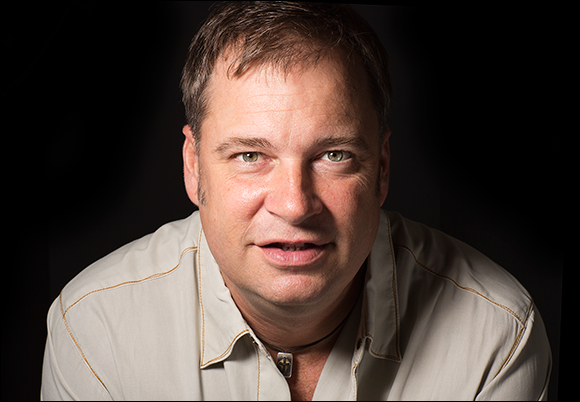
5.12 This image was made using a modified Neutral Picture Style. Exposure: ISO 160, f/16, 1/125 second.
Figure 5.13 uses the Standard Picture Style ( ![]() ). The snappy contrast and vivid colors are what most people expect to see in images. The Auto Picture Style (
). The snappy contrast and vivid colors are what most people expect to see in images. The Auto Picture Style ( ![]() ) is very much like the Standard Picture Style (
) is very much like the Standard Picture Style ( ![]() ) in scenes like this. Figure 5.14 is an example of the Faithful Picture Style (
) in scenes like this. Figure 5.14 is an example of the Faithful Picture Style ( ![]() ). Colors are very accurate to real life. The contrast is reduced, but it can be adjusted during editing.
). Colors are very accurate to real life. The contrast is reduced, but it can be adjusted during editing.
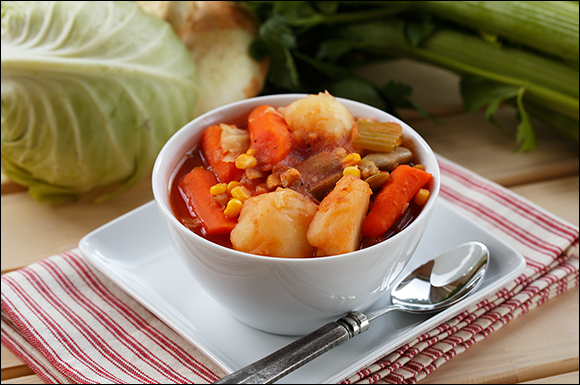
5.13 The Standard Picture Style. Exposure: ISO 200, f/6.3, 1/8 second, +1/3 exposure compensation.
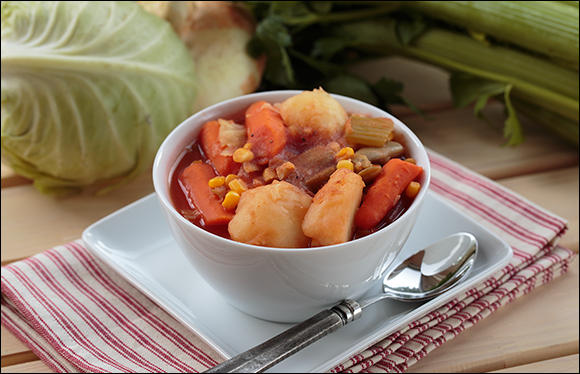
5.14 The Faithful Picture Style. Exposure: ISO 200, f/6.3, 1/8 second, +1/3 exposure compensation.
For Figure 5.15, I used the Monochrome Picture Style ( ![]() ) with a Green filter effect to subdue the skin tones and the Sepia Toning effect.
) with a Green filter effect to subdue the skin tones and the Sepia Toning effect.

5.15 Monochrome images are a favorite of many of my clients. Exposure: ISO 200, f/16, 1/125 second.
To modify a Picture Style, follow these steps:
1. On the Shooting menu 4 (![]() ), highlight Picture Style, and then press the Setting button (
), highlight Picture Style, and then press the Setting button (![]() ). The Picture Style screen appears.
). The Picture Style screen appears.
2. Press the down key on the Multi-controller (![]() ), select the Picture Style you want to modify, and then press the Info button (
), select the Picture Style you want to modify, and then press the Info button (![]() ). The Detail Set. screen for the selected style appears.
). The Detail Set. screen for the selected style appears.
3. Turn the Quick Control dial (![]() ) to select the parameter you want to adjust, and then press the Setting button (
) to select the parameter you want to adjust, and then press the Setting button (![]() ). A screen for adjusting the control appears.
). A screen for adjusting the control appears.
4. Turn the Quick Control dial (![]() ) to change the parameter, and then press the Setting button (
) to change the parameter, and then press the Setting button (![]() ). Negative settings decrease sharpness, contrast, and saturation, and positive settings provide higher sharpness, contrast, and saturation. Negative color tone settings provide reddish skin tones, and positive settings provide yellowish skin tones.
). Negative settings decrease sharpness, contrast, and saturation, and positive settings provide higher sharpness, contrast, and saturation. Negative color tone settings provide reddish skin tones, and positive settings provide yellowish skin tones.
5. Repeat steps 3 and 4 to change additional parameters, and then press the Menu button (![]() ). The modifications are saved and remain in effect until you change them.
). The modifications are saved and remain in effect until you change them.
Creating a new Picture Style
For a greater range of Picture Styles, you can create three additional Pictures Styles. These User Defined Picture Styles are based on an existing style, and then adjusted to get the image rendering that you want. These options expand the range of looks you can get from the 70D.
There is also the option to create a User Defined style on the computer using the Canon Picture Style Editor, a program included on the EOS Digital Solution Disk.
Here’s how to create and register a User-Defined Picture Style:
1. On Shooting menu 4 (![]() ), highlight Picture Style, and then press the Setting button (
), highlight Picture Style, and then press the Setting button (![]() ). The Picture Style screen appears.
). The Picture Style screen appears.
2. Select User Def. 1 (![]() ), and then press the Info button (
), and then press the Info button (![]() ). You have to scroll down using the Quick Control dial (
). You have to scroll down using the Quick Control dial ( ![]() ) to get to the User Def. styles. The Detail set. User Def. 1 screen appears.
) to get to the User Def. styles. The Detail set. User Def. 1 screen appears.
3. With the Picture Style option selected, press the Setting button (![]() ). The Picture Style screen appears with a list of the Picture Styles.
). The Picture Style screen appears with a list of the Picture Styles.
4. Turn the Quick Control dial (![]() ) to select a base Picture Style, and then press the Setting button (
) to select a base Picture Style, and then press the Setting button (![]() ). You can select any of the preset styles as the base style. The Detail set. User Def.1 screen appears.
). You can select any of the preset styles as the base style. The Detail set. User Def.1 screen appears.
5. Turn the Quick Control dial (![]() ) to select a parameter, such as Sharpness, and then press the Setting button (
) to select a parameter, such as Sharpness, and then press the Setting button (![]() ). The parameter’s control is activated.
). The parameter’s control is activated.
6. Turn the Quick Control dial (![]() ) to set the level of change, and then press the Setting button (
) to set the level of change, and then press the Setting button (![]() ).
).
7. Repeat steps 5 and 6 to change the remaining parameters. The remaining parameters are Contrast, Saturation, and Color tone.
8. Press the Menu button (![]() ). The Picture Style is registered and the Picture Style selection screen appears. The base Picture Style is displayed to the right of User Def. 1. This Picture Style remains in effect until you change it.
). The Picture Style is registered and the Picture Style selection screen appears. The base Picture Style is displayed to the right of User Def. 1. This Picture Style remains in effect until you change it.
You can repeat these steps to set up the two remaining User Defined styles.
Canon offers additional Picture Styles — including Studio Portrait, Snapshot Portrait, Nostalgia, Clear, Twilight, Emerald, Autumn Hues, and Video Camera X Series Look — on its Picture Style website at http://web.canon.jp/imaging/picturestyle/file/index.html.
Using Creative Filters and Ambience Settings
With the 70D, you can use in-camera image processing for creative renderings by using Creative filters and Ambience options. Creative filters can be applied to images during playback. They can also be applied to RAW images. The RAW images are then processed in-camera and saved as JPEGs. A good way to apply filters is in Live View mode ( ![]() ) so you can preview the effect. The Ambience effects can be used in select automatic shooting modes.
) so you can preview the effect. The Ambience effects can be used in select automatic shooting modes.
If you cannot apply Creative Filters, check to see if Wi-Fi is enabled on Setup menu 3 ( ![]() ). If it is, turn it off, and then you can use the filters.
). If it is, turn it off, and then you can use the filters.
Applying Creative filters
To add some fun and a creative edge to your images, you can choose from seven Creative filter effects. The filters are applied after the image is captured, and the image is saved as a new file, leaving the original image unchanged. Because the filters are applied in the camera, you can print with the filter applied directly from the media card.
There are a few considerations to keep in mind when using Creative filters. You can apply them to JPEG and full-resolution RAW images shot in all shooting modes, but you can’t apply them to the smaller Medium ( ![]() ) or Small (
) or Small ( ![]() ) RAW images. If you shoot RAW+JPEG images, the filter is applied to the RAW image and then it’s converted to and saved as a JPEG file. However, if you shoot Medium (
) RAW images. If you shoot RAW+JPEG images, the filter is applied to the RAW image and then it’s converted to and saved as a JPEG file. However, if you shoot Medium ( ![]() ) or Small (
) or Small ( ![]() ) RAW +JPEG, the filter is applied to the JPEG image.
) RAW +JPEG, the filter is applied to the JPEG image.
Here are the Creative filters you can select:
• Grainy B/W (![]() ). This filter creates a classic, high-grain look of older black-and-white images. You can adjust the contrast to change the overall look of the image.
). This filter creates a classic, high-grain look of older black-and-white images. You can adjust the contrast to change the overall look of the image.
• Soft focus (![]() ). This filter softens the image sharpness to create a soft blur. You can control the amount or strength of the blur.
). This filter softens the image sharpness to create a soft blur. You can control the amount or strength of the blur.
• Fish-eye effect (![]() ). This effect creates the 180-degree circular fish-eye look by enlarging the image from the center and then creating a circular, or barrel, distortion look. During the transition, some of the image will be cropped to create the effect, and with the center of the image being enlarged, image quality is reduced. Be sure to check the effect as you apply it to keep it from degrading the center of the image too much.
). This effect creates the 180-degree circular fish-eye look by enlarging the image from the center and then creating a circular, or barrel, distortion look. During the transition, some of the image will be cropped to create the effect, and with the center of the image being enlarged, image quality is reduced. Be sure to check the effect as you apply it to keep it from degrading the center of the image too much.
• Art bold effect (![]() ). This filter is designed to create a painterly look to the image while adding a sense of depth. With this filter you can say goodbye to smooth tonal gradations because the processing disrupts the gradations in favor of a more edgy look. Noise is also added, so check to see if it is more than you can tolerate. You can modify the contrast and color saturation with this filter.
). This filter is designed to create a painterly look to the image while adding a sense of depth. With this filter you can say goodbye to smooth tonal gradations because the processing disrupts the gradations in favor of a more edgy look. Noise is also added, so check to see if it is more than you can tolerate. You can modify the contrast and color saturation with this filter.
• Water painting effect (![]() ). This filter simulates watercolor painting by subduing the colors in the image. Your only adjustment option is color density or strength — an important characteristic in watercolor painting. If you apply this filter to images shot in low light or at night, digital noise can be revealed and tonal gradations are no longer smooth.
). This filter simulates watercolor painting by subduing the colors in the image. Your only adjustment option is color density or strength — an important characteristic in watercolor painting. If you apply this filter to images shot in low light or at night, digital noise can be revealed and tonal gradations are no longer smooth.
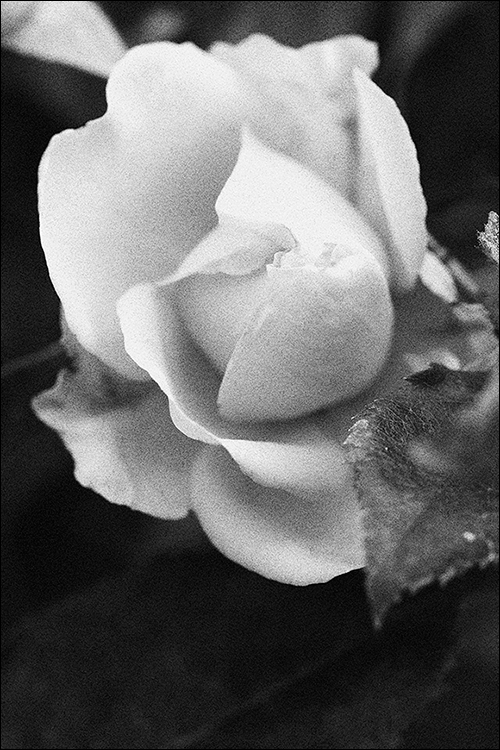
5.16 This image has the Grainy B/W filter applied. Exposure: ISO 640, f/5.6, 1/160 second.
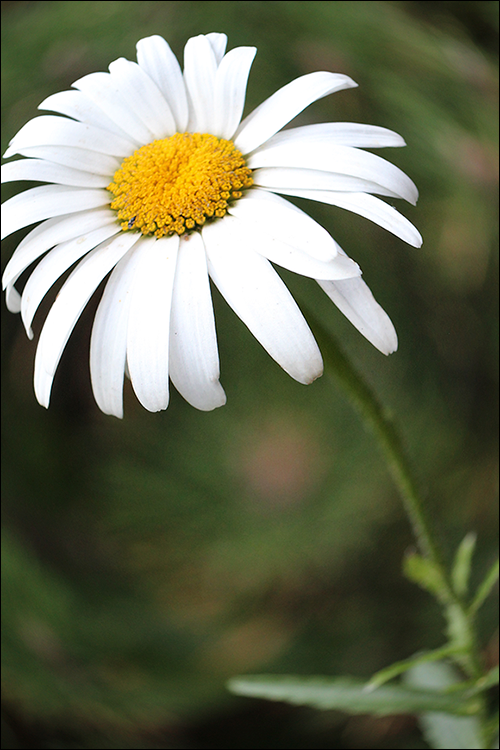
5.17 The Fish-eye filter effect. Exposure: ISO 800, f/5.6, 1/125 second.
• Toy camera effect (![]() ). This filter replicates the popular Holga- and Diana-camera look that includes a color shift and vignetting, a darkening of the image corners. You can adjust the color tone and colorcast.
). This filter replicates the popular Holga- and Diana-camera look that includes a color shift and vignetting, a darkening of the image corners. You can adjust the color tone and colorcast.
• Miniature effect (![]() ). This filter mimics the effect of a diorama, a sort of miniature, three-dimensional visual illusion introduced in 1821 by Louis Jacques Mandé Daguerre. You can press the Info Button (
). This filter mimics the effect of a diorama, a sort of miniature, three-dimensional visual illusion introduced in 1821 by Louis Jacques Mandé Daguerre. You can press the Info Button ( ![]() ) to change the orientation of the white frame that indicates which area of the image will be sharp.
) to change the orientation of the white frame that indicates which area of the image will be sharp.
To apply a Creative filter, follow these steps:
1. On Playback menu 1 (![]() ), highlight Creative filters, and then navigate to the picture you want. The last captured image appears. To move to a different image, press left or right on the Multi-controller (
), highlight Creative filters, and then navigate to the picture you want. The last captured image appears. To move to a different image, press left or right on the Multi-controller ( ![]() ).
).
2. Press the Setting button (![]() ), and then press left or right on the Multi-controller (
), and then press left or right on the Multi-controller (![]() ) to select the filter you want. The Creative filter options are displayed at the bottom of the image preview.
) to select the filter you want. The Creative filter options are displayed at the bottom of the image preview.
3. Press the Setting button (![]() ), press left or right on the Multi-controller (
), press left or right on the Multi-controller (![]() ) to set the level, and then press the Setting button (
) to set the level, and then press the Setting button (![]() ) again. The filter is applied to the image at the selected level. A message appears asking if you want to save the image as a new file. The original file remains on the card untouched.
) again. The filter is applied to the image at the selected level. A message appears asking if you want to save the image as a new file. The original file remains on the card untouched.
4. Select OK, and then press the Setting button (![]() ). The camera displays a message giving you the folder and file number. With the Miniature filter (
). The camera displays a message giving you the folder and file number. With the Miniature filter ( ![]() ), you can press up or down on the Multi-controller (
), you can press up or down on the Multi-controller ( ![]() ) to move the frame to the area of the image that stays sharp. The rest of the frame is blurred. Press the Setting button (
) to move the frame to the area of the image that stays sharp. The rest of the frame is blurred. Press the Setting button ( ![]() ).
).
5. Choose OK. The image is saved.
Using Ambience settings
Ambience options are somewhat like Picture Styles, but with a more pronounced effect. You can apply Ambience settings only when you’re shooting in Creative Auto ( ![]() ), Portrait (
), Portrait ( ![]() ), Landscape (
), Landscape ( ![]() ), Close-up (
), Close-up ( ![]() ), Sports (
), Sports ( ![]() ), or Night Portrait (
), or Night Portrait ( ![]() ) modes. Once you choose an Ambience option, you can apply it at a Low, Standard, or Strong setting.
) modes. Once you choose an Ambience option, you can apply it at a Low, Standard, or Strong setting.
If you check the exposure settings for the Ambience effects, you can see how the effect is achieved in most cases. For some Ambience effects, the 70D increases or decreases the saturation and contrast, just as can be done when using Picture Styles.
Some Ambience settings, such as Brighter, can cause blown highlights, so use them with care.
Here are the Ambience options you can select:
• Standard (![]() ). The default setting has punchy contrast and color.
). The default setting has punchy contrast and color.
• Vivid (![]() ). At the Standard level, this setting punches up the colors and sharpness.
). At the Standard level, this setting punches up the colors and sharpness.
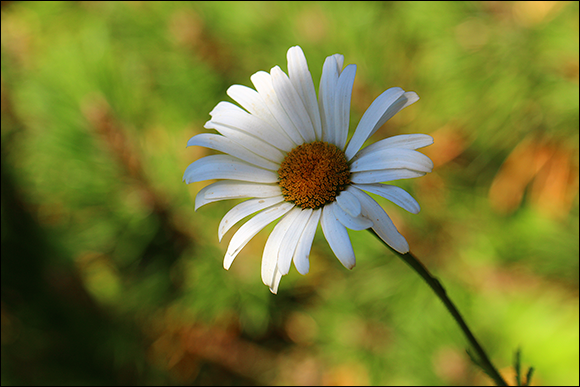
5.18 The Standard Ambience setting. Exposure: ISO 100, f/5.6, 1/200 second.
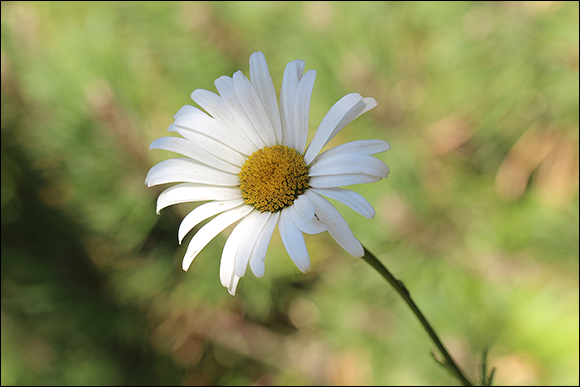
5.19 The Soft Ambience setting. Exposure: ISO 125, f/5.6, 1/160 second.
• Soft (![]() ). This option noticeably decreases color saturation and intensity as well as overall contrast so images tend to have a flat look. However, for dainty or delicate subjects, it can be a good choice.
). This option noticeably decreases color saturation and intensity as well as overall contrast so images tend to have a flat look. However, for dainty or delicate subjects, it can be a good choice.
• Warm (![]() ). This setting adds a noticeable shift to bolder yellows and reds, warming up skin tones and everything else in the image. Be careful using this Ambience option along with the Sunset Lighting or Scene type because it can cause over-the-top warming in the image.
). This setting adds a noticeable shift to bolder yellows and reds, warming up skin tones and everything else in the image. Be careful using this Ambience option along with the Sunset Lighting or Scene type because it can cause over-the-top warming in the image.
• Intense (![]() ). Just as the name implies, this setting darkens the image making colors look more saturated and making shadows look deeper. This is not the option to use if you want to show good detail in the shadows because it tends to block up the shadows. However, it is a good choice to create a moody or evocative image with the right subject, and it adds some punch to subjects in flat light.
). Just as the name implies, this setting darkens the image making colors look more saturated and making shadows look deeper. This is not the option to use if you want to show good detail in the shadows because it tends to block up the shadows. However, it is a good choice to create a moody or evocative image with the right subject, and it adds some punch to subjects in flat light.
• Cool (![]() ). This option delivers extremely blue skies and a cool (bluish) tint in foliage. The contrast and color saturation are both higher than in the Standard setting (
). This option delivers extremely blue skies and a cool (bluish) tint in foliage. The contrast and color saturation are both higher than in the Standard setting ( ![]() ).
).
• Brighter (![]() ). This setting lightens the image overall, including opening up shadow detail. It is a reasonable option for a scene or subject with predominately light tones; in other words, a high-key scene or subject. This is not a good setting to use in bright light, when the highlights are on the verge of blowing out or are already blowing out.
). This setting lightens the image overall, including opening up shadow detail. It is a reasonable option for a scene or subject with predominately light tones; in other words, a high-key scene or subject. This is not a good setting to use in bright light, when the highlights are on the verge of blowing out or are already blowing out.
• Darker (![]() ). This setting creates a darker image, but not quite as dark as Intense (
). This setting creates a darker image, but not quite as dark as Intense ( ![]() ) and with a lower contrast.
) and with a lower contrast.
• Monochrome (![]() ). This option offers a blue, sepia, and black-and-white option. The black-and-white option delivers bright whites and deep blacks with moderate overall contrast.
). This option offers a blue, sepia, and black-and-white option. The black-and-white option delivers bright whites and deep blacks with moderate overall contrast.
To apply an Ambience setting, follow these steps:
1. Set the Mode dial to Creative Auto (![]() ) or Special Scene mode (
) or Special Scene mode (![]() ). If you use Special Scene mode (
). If you use Special Scene mode ( ![]() ), then choose Portrait (
), then choose Portrait ( ![]() ), Landscape (
), Landscape ( ![]() ), Close-up (
), Close-up ( ![]() ), Sports (
), Sports ( ![]() ), or Night Portrait (
), or Night Portrait ( ![]() ) mode.
) mode.
2. Be sure the Live View shooting/Movie shooting switch is set to Live View shooting (![]() ), and then press the Start/Stop button (
), and then press the Start/Stop button (![]() ). A live view of the scene appears on the LCD screen. If you don’t want to use Live View mode (
). A live view of the scene appears on the LCD screen. If you don’t want to use Live View mode ( ![]() ) to set the Ambience, then skip to step 3. The advantage of using Live View mode (
) to set the Ambience, then skip to step 3. The advantage of using Live View mode ( ![]() ) is that you get an approximation of the Ambience effect.
) is that you get an approximation of the Ambience effect.
3. Press the Quick Control button (![]() ), and then press up or down on the Multi-controller (
), and then press up or down on the Multi-controller (![]() ) to highlight the Standard setting (
) to highlight the Standard setting (![]() ). A live view of the scene appears and the text Ambience-based shots appears at the bottom of the LCD screen with left and right arrows.
). A live view of the scene appears and the text Ambience-based shots appears at the bottom of the LCD screen with left and right arrows.
4. Press left or right on the Multi-controller (![]() ) to select the Ambience option you want. The preview scene on the LCD screen changes to approximate the look of adding the Ambience effect.
) to select the Ambience option you want. The preview scene on the LCD screen changes to approximate the look of adding the Ambience effect.
5. Press up or down on the Multi-controller (![]() ) to display the ambience levels, and then press left or right to set the strength: Low, Standard, or Strong. The text at the bottom of the LCD screen shows the current selection.
) to display the ambience levels, and then press left or right to set the strength: Low, Standard, or Strong. The text at the bottom of the LCD screen shows the current selection.
6. Compose, focus, and make the image using Live View mode (![]() ). You can dismiss the Live View screen by pressing the Start/Stop button (
). You can dismiss the Live View screen by pressing the Start/Stop button ( ![]() ).
).
