
Quick Tour
Welcome to the Quick Tour. This section covers some of the basic functions, so you can start using your D5200 right away. If you’ve already used a Nikon dSLR, a lot of this may be familiar to you. In fact, if you upgraded from a D5100, the setup for the D5200 is very similar. If you are upgrading from a compact digital camera or another brand of dSLR, you probably should read the entire Quick Tour to familiarize yourself with the camera and menu layout.
You should have already unpacked the camera, charged the batteries, and inserted the memory card. If you haven’t done these things, do them now.
The D5200 can grab awesome shots right out of the box.
Getting Started
If you’re anything like me, you’re ready to get out there right away and start taking pictures with your new camera. The great thing about the D5200 is that you can start taking great photos right out of the box. The D5200 has some automatic shooting modes that choose the proper settings for you. All you really have to do is point the camera at something and shoot!
Mounting the Lens
If you bought the D5200 as a kit, it came with the NIKKOR 18-55mm f/3.5-5.6G VR lens. If you aren’t sure what all of these letters and numbers mean, don’t worry; all of that and more is covered in Chapter 4. The lens needs to be mounted to the camera. First, locate the white lens mounting index dots: one is located on the camera body near the opening and the other is located on the base of the lens. Line these two dots up and gently rotate the lens counterclockwise until it locks firmly into place.
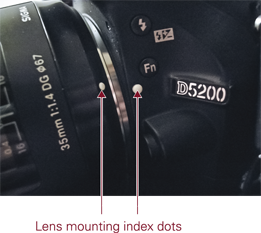
QT.1 The lens mounting index dots.
Image courtesy of Nikon, Inc.
QT.2 Rotate the lens counterclockwise to lock it in place.
You want to get the lens mounted as quickly as possible to reduce the exposure of the inside of the camera to the elements as dust may accumulate inside the camera and eventually find its way to the sensor. You also want to make sure that the camera is turned off to minimize any static charges, which tend to attract dust particles. Another good rule of thumb is to keep the lens opening facing downward to discourage any dust that finds its way into the camera from settling inside the body.
Once the lens is properly mounted, you can turn the camera on. The On/Off switch is located on top of the camera, surrounding the shutter-release button. Flick the switch to the right, and your D5200 is fired up and ready to go.
Setting the Shooting Mode
To get started quickly, set the shooting mode to Auto (![]() ). To change the shooting mode, just rotate the Mode dial, located on top of the camera. The shooting mode also appears in the top-left corner of the LCD screen when the shooting info is displayed. The Auto mode (
). To change the shooting mode, just rotate the Mode dial, located on top of the camera. The shooting mode also appears in the top-left corner of the LCD screen when the shooting info is displayed. The Auto mode (![]() ) is a simple, point-and-shoot mode. Everything is adjusted for you, including the shutter speed, aperture, ISO, and image quality. Even the flash is activated if there isn’t enough light. If you’re not familiar with any of these terms, don’t fret; I explain them all in this book.
) is a simple, point-and-shoot mode. Everything is adjusted for you, including the shutter speed, aperture, ISO, and image quality. Even the flash is activated if there isn’t enough light. If you’re not familiar with any of these terms, don’t fret; I explain them all in this book.
If you want to take a look at your settings, simply press the Info edit button (![]() ), which is just to the right of the viewfinder — a short stretch from where your thumb naturally rests when holding the camera. Press this button to display the shooting info on the LCD screen. The shooting info screen displays everything you need to know about your settings. Double-press the Info edit button (
), which is just to the right of the viewfinder — a short stretch from where your thumb naturally rests when holding the camera. Press this button to display the shooting info on the LCD screen. The shooting info screen displays everything you need to know about your settings. Double-press the Info edit button (![]() ) to change the camera settings on the LCD screen using the multi-selector. However, if the camera is in Auto mode (
) to change the camera settings on the LCD screen using the multi-selector. However, if the camera is in Auto mode (![]() ), your selections are limited because the camera is choosing most of the settings for you.
), your selections are limited because the camera is choosing most of the settings for you.
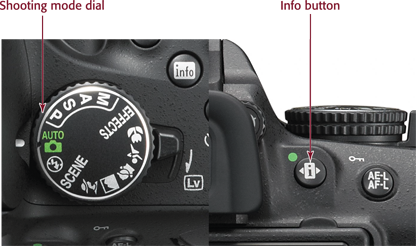
QT.3 The Shooting mode dial and Info button.
Focusing
Once you’ve set the Shooting mode, it’s time to focus. Put your eye up to the viewfinder and look through it. Point the camera lens at your intended subject and press the shutter-release button halfway to engage the autofocus. When the camera has locked focus, a red bracket lights up quickly in the viewfinder — this is the focus point. You also hear a beep indicating that the focus has locked.
By default, in Auto mode (![]() ), the camera focuses on the closest object. Once the camera achieves focus, fully press the shutter-release button to take the photo, and voilà! Quite simple, isn’t it?
), the camera focuses on the closest object. Once the camera achieves focus, fully press the shutter-release button to take the photo, and voilà! Quite simple, isn’t it?
Focus modes are covered more extensively in Chapter 2.
Viewing Your Images
After you shoot some images with your D5200, you can look at them on the big, bright, high-resolution 3-inch LCD screen. To view your images, press the Playback button (![]() ) on the rear of the camera just above the multi-selector. The most recent photo taken is the first image displayed. You can press the multi-selector left (
) on the rear of the camera just above the multi-selector. The most recent photo taken is the first image displayed. You can press the multi-selector left (![]() ) or right (
) or right (![]() ) to scroll through the images. Press the multi-selector right (
) to scroll through the images. Press the multi-selector right (![]() ) to view the images in the sequence in which they were taken. Press the multi-selector left (
) to view the images in the sequence in which they were taken. Press the multi-selector left (![]() ) to display the images in reverse order. You can also press the multi-selector up (
) to display the images in reverse order. You can also press the multi-selector up (![]() ) or down (
) or down (![]() ) to check the settings and other information.
) to check the settings and other information.
The following options are also available when the camera is in Playback mode (![]() ):
):
• Press the Thumbnail/Zoom out button (![]() ) to view thumbnails. You can choose to view 4, 9, or 72 images at a time, or you can view the thumbnails in a calendar view. When in Thumbnail mode, use the multi-selector to navigate among the thumbnails and highlight one. You can then press the OK button (
) to view thumbnails. You can choose to view 4, 9, or 72 images at a time, or you can view the thumbnails in a calendar view. When in Thumbnail mode, use the multi-selector to navigate among the thumbnails and highlight one. You can then press the OK button (![]() ) to enlarge the selected image to a full-size preview.
) to enlarge the selected image to a full-size preview.
• Press the Zoom in button (![]() ) to magnify the image. This allows you to check for sharpness or look for details. You can also press this button to exit the thumbnail preview.
) to magnify the image. This allows you to check for sharpness or look for details. You can also press this button to exit the thumbnail preview.
• Press the AE-L/AF-L (![]() )/Protect (
)/Protect (![]() ) button to save images from being deleted. The AE-L/AF-L button doubles as the Protect button. This locks the image to prevent you from accidentally erasing it when editing your images in the camera.
) button to save images from being deleted. The AE-L/AF-L button doubles as the Protect button. This locks the image to prevent you from accidentally erasing it when editing your images in the camera.
When you format a memory card, all images (including those that have been protected) are erased.
• Use the multi-selector to view image data. To see which settings were used when a photograph was taken, press the multi-selector up (![]() ) or down (
) or down (![]() ). This also allows you to check the histogram, which is a visual representation of the tonality of an image.
). This also allows you to check the histogram, which is a visual representation of the tonality of an image.
• Press the OK button (![]() ) while in Playback mode (
) while in Playback mode (![]() ) to enter the Retouch menu (
) to enter the Retouch menu (![]() ) and edit images. Here, you can do some rudimentary, in-camera editing, such as applying Active D-Lighting, fixing red-eye, and cropping.
) and edit images. Here, you can do some rudimentary, in-camera editing, such as applying Active D-Lighting, fixing red-eye, and cropping.
For more detailed information on the Retouch menu (![]() ) and in-camera editing, see Chapter 3.
) and in-camera editing, see Chapter 3.
• Press the Delete button (![]() ) to erase images. This permanently deletes an image from the memory card. When you first press the Delete button (
) to erase images. This permanently deletes an image from the memory card. When you first press the Delete button (![]() ), the camera asks for confirmation. Press the Delete button (
), the camera asks for confirmation. Press the Delete button (![]() ) again to complete the process.
) again to complete the process.