
Chapter 9: Viewing, Downloading, Managing, and Editing Images
The D5200 experience doesn’t end once you’re done photographing. For some photographers it’s just the beginning of the image-making process. First off, you can play back the images right on the LCD monitor, or you can plug the camera into your television and view them as a slide show with your friends and family. Eventually you will need to transfer them from the camera to your computer.
Some folks are finished with their photos at this point. They may post them to the web or e-mail them just as they are right out of the camera. Other people like to add effects, tweak and modify the colors, fix blemishes, and more. You can make simple edits to your photos using software such as the Nikon View NX2 packaged with the D5200. There are also a great number of very good options for editing software.

Taking the photo is just the beginning of the photographic process.
Viewing Your Images
The D5200 offers two different ways to view your images: You can simply press the Playback button (![]() ) and view them directly on the LCD monitor, or you can connect the camera to a television and view your pictures on the screen. You can connect to an HDTV using the HDMI out port, or you can connect to the RCA inputs on a standard-definition TV with the EG-CP16 A/V cable supplied with the D5200. If your HDTV also has standard RCA inputs, you can connect it there as well, but the output will not be high definition.
) and view them directly on the LCD monitor, or you can connect the camera to a television and view your pictures on the screen. You can connect to an HDTV using the HDMI out port, or you can connect to the RCA inputs on a standard-definition TV with the EG-CP16 A/V cable supplied with the D5200. If your HDTV also has standard RCA inputs, you can connect it there as well, but the output will not be high definition.
To play back and review your images, press the Playback button (![]() ). This displays the current image. You can then use the multi-selector left (
). This displays the current image. You can then use the multi-selector left (![]() ) and right (
) and right (![]() ) to scroll through the images on the active memory card. Press the multi-selector up (
) to scroll through the images on the active memory card. Press the multi-selector up (![]() ) or down (
) or down (![]() ) to display the photo information. How much information is displayed depends on the settings in the Playback menu (
) to display the photo information. How much information is displayed depends on the settings in the Playback menu (![]() ) → Playback display options.
) → Playback display options.
If you prefer, you can also use the Command dial to scroll through images in Playback.
You can also use the following buttons and options during playback:
• Delete button (![]() ). Press this button to display a confirmation dialog box asking if you want to delete the current image. Press the Delete button (
). Press this button to display a confirmation dialog box asking if you want to delete the current image. Press the Delete button (![]() ) again to erase the photo permanently.
) again to erase the photo permanently.
• Retouch menu (![]() ). Press the OK button (
). Press the OK button (![]() ) to display the Retouch menu (
) to display the Retouch menu (![]() ). You can use these options to retouch or edit your images, and save a copy to the memory card.
). You can use these options to retouch or edit your images, and save a copy to the memory card.
• Protect button (![]() ). You may notice above the AE-L/AF-L button (
). You may notice above the AE-L/AF-L button (![]() ) there is a key icon. This is the Protect button (
) there is a key icon. This is the Protect button (![]() ). Press this button to mark an image as protected and prevent it from being deleted accidentally. Once the image is protected, simply press the button again to remove the protection status.
). Press this button to mark an image as protected and prevent it from being deleted accidentally. Once the image is protected, simply press the button again to remove the protection status.
Protecting an image may also lock the file and prevent you from making changes to it on some computers and software.
• Zoom in button (![]() ). Press this button to zoom in on an image for a closer look to check for focus, sharpness, and so on. After you zoom in on an image, you can use the multi-selector to navigate to different areas of the image. If faces are detected in the image, you can press the Info edit button (
). Press this button to zoom in on an image for a closer look to check for focus, sharpness, and so on. After you zoom in on an image, you can use the multi-selector to navigate to different areas of the image. If faces are detected in the image, you can press the Info edit button (![]() ) once, and then use the multi-selector to center on the face (or faces) in the scene. Rotate the Main Command dial to scroll through the other images on the memory card at the same magnification ratio.
) once, and then use the multi-selector to center on the face (or faces) in the scene. Rotate the Main Command dial to scroll through the other images on the memory card at the same magnification ratio.
• Zoom out/Thumbnail button (![]() ). In the default full-frame playback mode, press this button to switch to thumbnail playback, and display numerous thumbnails of the images. Press the Zoom out/Thumbnail button (
). In the default full-frame playback mode, press this button to switch to thumbnail playback, and display numerous thumbnails of the images. Press the Zoom out/Thumbnail button (![]() ) once to display four thumbnails, press it twice to display nine thumbnails, and press it three times to view 72 thumbnails. If you press the Zoom out/Thumbnail button (
) once to display four thumbnails, press it twice to display nine thumbnails, and press it three times to view 72 thumbnails. If you press the Zoom out/Thumbnail button (![]() ) a fourth time, a calendar appears in which you can select to view images taken on a particular date. When playback is in Thumbnail mode, you can use the multi-selector to highlight an image. You can then zoom in, delete, retouch, or protect the image. To exit Thumbnail view, press the Zoom in button (
) a fourth time, a calendar appears in which you can select to view images taken on a particular date. When playback is in Thumbnail mode, you can use the multi-selector to highlight an image. You can then zoom in, delete, retouch, or protect the image. To exit Thumbnail view, press the Zoom in button (![]() ) until the camera returns to full-frame playback.
) until the camera returns to full-frame playback.
As mentioned previously you can connect your D5200 straight to your TV. It functions exactly the same as it does in Playback mode when viewing on the camera’s LCD monitor.
Being able to view your images and videos straight from the camera on your high-definition or standard television is a handy feature. You can set up a slide show to show all your friends the photos you shot that day, or you can edit your photos using the Retouch menu (![]() ) straight from the camera while being able to view the images larger than life. If your HDTV is device control compatible (HDMI-CEC), you can also use your television’s remote control to browse the images and camera menus. Isn’t technology great?
) straight from the camera while being able to view the images larger than life. If your HDTV is device control compatible (HDMI-CEC), you can also use your television’s remote control to browse the images and camera menus. Isn’t technology great?
This brings up an important issue regarding connecting you camera to an HDTV that is CEC compatible. When you connect the camera to a CEC-compatible HDTV, the camera will only function in Playback mode unless you go into the Setup menu (![]() ), select the HDMI option, and then select Device control and set it to Off.
), select the HDMI option, and then select Device control and set it to Off.
If your HDTV is HDMI-CEC compatible, the camera displays CEC in place of the number of remaining frames.
When you turn the Device control option Off and connect the camera to an HDTV, you see exactly what normally appears on the camera’s LCD monitor. The camera’s LCD monitor also continues to display the images. To connect your D5200 to a high-definition device, you will need to purchase a Type C mini HDMI connector from Nikon or the nearest electronics store.
Follow these steps to attach the D5200 to your HDTV:
1. Turn the camera off. This helps prevent static electricity from damaging your camera.
2. Open the connector cover. The connector cover is on the left side of the camera when the lens is facing away from you.
3. Plug in the Type C mini-pin HDMI cable. The cable is available separately from almost any electronics or camera store. Plug the cable into the HDMI out jack. This connection is clearly labeled, and located just below the USB port.
4. Connect the HDMI cable to the input jack of your HDTV.
5. Set your HDTV to the HD in setting. This may differ depending on your TV. See the owner’s manual if you are unsure.
6. Turn on the camera, and then press the Playback button (![]() ). Playback functions the same as if you were looking at the LCD monitor.
). Playback functions the same as if you were looking at the LCD monitor.
Downloading Your Images
While viewing your images on the LCD monitor is nice, and plugging the camera in and enjoying them in full high-resolution on your HDTV is even better, there’s going to come a time when you’re going to want to get those images into your computer and off of the memory card in the camera. Once they’re downloaded to your computer, you can edit them, post them to your social media accounts, e-mail them to friends and family, print them, and so on.
You can approach the downloading process in any of the following ways:
• Camera to computer. Probably one of the easiest ways is to use the USB cable supplied with the D5200. Plug the smaller end (Type B mini) into the USB output port on the camera, and then plug the larger end (Type A) of the USB cable into your computer. While this may be the most convenient option, there are a couple of drawbacks. The transfer usually takes a long time and the process is energy intensive, so you need a charged battery. If the battery dies midtransfer, you run the risk of losing some (or all) of the images, or damaging the memory card and rendering it unusable.
• Card reader. A card reader is a device that accepts the memory card into it (just like the card fits into the camera) and connects to your computer usually via USB port. Card readers transfer data at a much faster rate than the camera does, and the card reader doesn’t require a power supply like the camera does. A lot of computers these days have SD memory card slots built right in. My MacBook Pro does, and it’s such a handy feature not having to worry about whether I packed my reader or not. I have a collection of card readers because I’ve had to buy them numerous times while on location shooting or on vacation because I forgot to grab one. Of course, card readers are relatively inexpensive. Some readers transfer data faster than others, so if you’re using a faster card, make sure your reader supports a fast transfer rate.
• Eye-Fi. The Eye-Fi is an SD card like any other, but it has Wi-Fi built in. This allows you to upload your images straight from your camera right to your computer’s hard drive wirelessly. You can also transfer photos straight from the camera to your smartphone, so you can share real photos instead of low-quality camera-phone pics. The Eye-Fi cards have different features for different models. Check out the Eye-Fi site for more info.
File Management and Workflow
File management is a very important part of digital photography and an often overlooked one. One thing I can guarantee is that if you didn’t have a good workflow system worked out before you got your D5200, you will realize after a few weeks that you need one. The 24MP sensor of the D5200 has a lot of information. The file sizes are huge. If you’re shooting in RAW (as you should be), you will notice very quickly that you are using up more and more drive space faster and faster.
Because photography is my full-time job, I likely shoot more than most casual users do, so having a good system for managing my files is very important. The thing is, after you have been doing photography for a while, you’ll find that you can’t find the images you’re looking for if you haven’t developed a good file management and workflow plan. You start losing track of your files, and you wish you had a better system in place. The best thing to do is to get into the habit of a good workflow early and save yourself a headache in the end.
How do I know all of this? I went through this whole process. My original workflow consisted of making contact prints of my negatives and keeping the contact print with the negatives in the sleeves in three-ring binders. When I made the switch to digital I saved pretty much all of my files, even the unusable ones (after all, I didn’t throw out negatives). I basically just dumped all of my images into folders with random names that I’d come up with pertaining to the shoot. After a couple of years my hard drives were a complete mess. In short, get a good workflow started from the get-go. My workflow may not work perfectly for you, but in time you will develop your own system.
Folder structure
To download your images, you need a place to which you can download them. Many software options, such as Lightroom, Photoshop Elements, Windows Photo Gallery, or iPhoto, can help you with this. While most of these have ways to do this for you automatically, I prefer to download images directly to my hard drive manually so I can place them exactly where I want them. Because I put the files there manually, it helps me remember where they are. I shoot many types of things, so I have different hard drives for most job types. I rarely have any of my sessions stored on my main computer hard drive. Of course, this is unusual — you can use one drive, but you should always have at least one backup, preferably two.
I have separate folders for each type of photography: Concert, Wedding, Event, Commercial, Personal, and so on. From there I go into subcategories. For concerts, I simply use the band name, and within that folder I create another with a date where I store the originals. If I shoot the band again I create a second folder with another date, and so on. For weddings, I use the couple’s last names (Smith/Jones); for events, the name of the event. For personal work, I name the type of photography: Landscape, macro, portrait, and so on. If it’s a trip, I make a folder with the destination name and so on. The key is to be specific, so you know exactly what you’re looking for when you want it. For example, if I get a request for a photo of a Joshua tree I know that it will be in Travel → JoshuaTree. This may sound very complicated, but you can build folders as you go, and once you get the basic folder structure down, it’s quick. After you have your folder system created, just drag and drop your images where you want them to download them to your computer or drive.
Editing
After the files are transferred, I do a quick edit. This is where you find the keepers and delete any of the unusable ones or duplicates. This is a very important process because it prevents your hard drive from filling up with terabytes of images that will never be used. Some programs you can use to browse through and look at images are Lightroom, Photoshop Elements, Windows Photo Gallery, or iPhoto. This is just a quick once-over to delete the images that are obviously unusable. Some of the criteria I look for are highly over- or underexposed images, images that are completely out of focus, and images from a series for which I fired a number of similar shots (I pick the best one or two, and then trash the rest). All of these images should be immediately eliminated.
Don’t throw away all of the images that you aren’t attracted to straight away because you can always revisit them later, and you may see something in them that you didn’t before, or maybe a different crop will make them work.
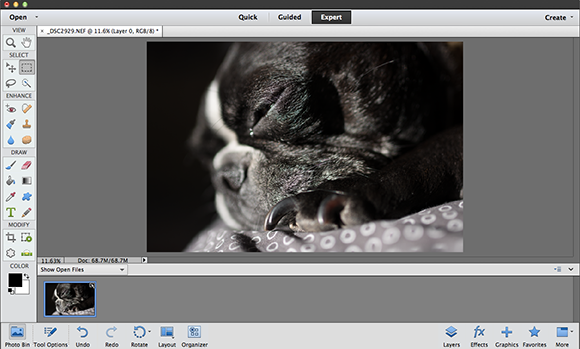
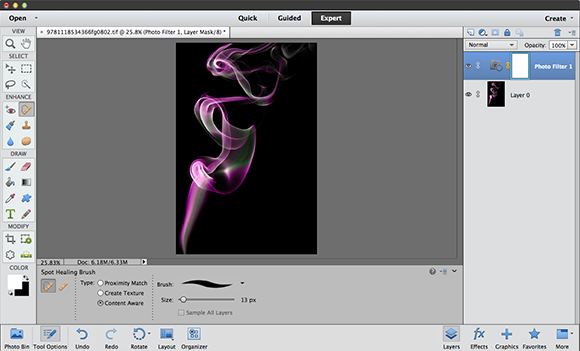
9.1 Adobe Photoshop Elements is a simple, yet powerful image-editing tool. It’s perfect for both beginning and advanced photographers.
Filenames and metadata
Renaming your files is a very good idea because it gives every one of your files a unique name. Remember that the default filename that the camera assigns is finite in its numbering system; every 9999 images will have the same filename. There’s no set way you should go about it, but I recommended using a system that keeps the filenames individual. My personal naming convention is a pretty simple one, the subject name, my initials, and numbers. For example, a musician would be TomWaits_JDT_001.NEF or a wedding might be SmithJones_JDT_001.NEF. There are no really hard and fast rules, but the filename should be indicative of what it is so that it is easier to pull up in a search.
One thing that I don’t think a lot of beginning photographers use, or necessarily understand, is metadata. Metadata is simply data about data. The following types of metadata are all stored in a single file:
• EXIF. EXIF stands for Exchangeable Image File Format. This metadata is written and fixed at the time the file is created and can’t be easily changed without special software. EXIF data contains the information about your camera, the make and model, serial number, the number of shutter releases, lens focal length and maximum aperture as well as the shooting data such as the exposure settings, metering mode, and more.
• IPTC. This is an important and underutilized metadata feature. IPTC stands for International Press Telecommunications Council. It is editable metadata that allows you to imbed captions, descriptions, keywords, copyright information, locations, GPS positioning, and more. I initially started using this when I began shooting for newspapers, online publications, magazines, and especially with my photo agency. Now I add IPTC data to all my images. It makes it easier to find in a search, both on your own computer and online. Keywords are especially helpful. I can shoot a landscape and tag it with a number of keywords, such as landscape, mountain, pine tree, river, Allegheny, Pennsylvania, and so on. If I (or a photo editor) need a specific image, say one with a pine tree in Pennsylvania, a quick search pulls up this image.
• XMP. This stands for Extensible Metadata Platform. These are also known as sidecar files because they “ride along” with files, and tell software and programs how to interpret some of the data. XMP is usually found with RAW files. This is what tells the RAW converter how to initially process the data. It contains information for exposure data, the white balance, proprietary noise reduction, and things of that nature.
Tonal Adjustments and Color Corrections
After you get the file management worked out, you can go thorough and select the images that you want to edit. Some people opt to edit images one at a time, and some do them in batches. I do them both ways depending on the scope of the assignment. If it’s a concert or a wedding I generally take a more generalized approach and work in batches, and then go back and do individual tweaks.
I almost always shoot in RAW because rarely is an image perfect straight out of the camera. Images usually need minor adjustments, either to make them better or simply to get them to look the way that you want. It may just need a minor white balance adjustment, or maybe sweeping tonal adjustments to recover lost detail in the shadows or highlights.
I don’t like to recommend one system over another; I like to use whatever is quickest and easiest for me. If I’m working on a large number of images at once, such as hundreds from a wedding, I prefer using Adobe Bridge CS6 to preview and select my images. I then open them all in Adobe Camera RAW and make my adjustments. I also retouch any spots, make any localized tonal corrections to specific spots, and then save them to the specified folder.
If I’m working with single images, I tend to use Adobe Lightroom 4 because it is a good tool for making simple corrections. It is one of the most powerful programs you can get at a relatively affordable price. Lightroom 4 is an all-in-one image organizer, photo editor, and RAW file converter. However, I find it rather slow and not very user-friendly for working on large amounts of images. The learning curve is also rather steep.
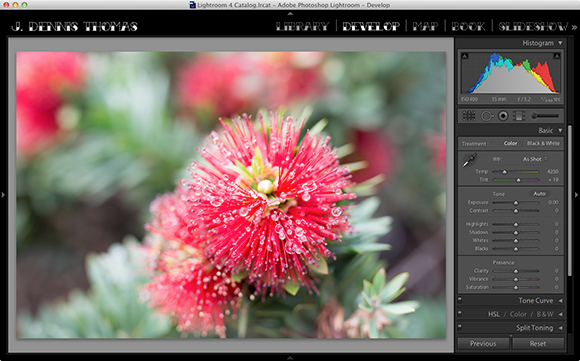
9.2 Adobe Lightroom 4 is a powerful tool for making image adjustments.
For simplicity, and the most features for the least amount of money, I recommend Adobe Photoshop Elements 11. This is two programs rolled into one: Elements 11 Organizer and Photoshop Elements Editor. The Organizer is a very intuitive, fast way to keep your images arranged. The Smart Events feature puts images in order based on the date they were shot, and the Places feature allows you to view images tagged with GPS information on a map.
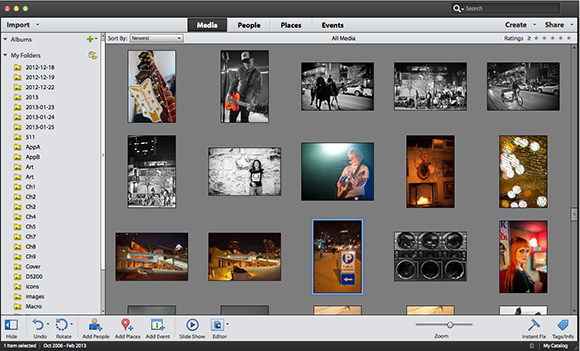
9.3 The Organizer in Adobe Photoshop Elements 11 helps you keep your images arranged logically.
The Editor has some of the same features that make Photoshop CS6 the de facto software for imaging professionals, but is much simpler to use. You can make tonal and color corrections, crop, retouch, and a whole lot more. This program features Adobe Camera RAW built right in so you can make all tonal and color adjustments to the RAW file, which ensures that you are making the most of the RAW data from the camera’s imaging sensor.
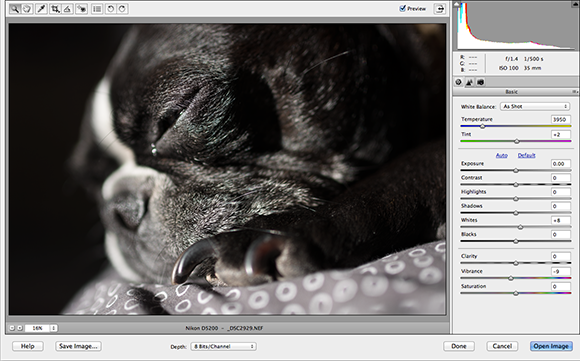
There are many programs you can use to convert RAW files, including Nikon’s View NX2, which is included with the D5200. View NX2 comes bundled with Nikon Transfer 2 to help you transfer your files from the D5200 to your computer. While some programs are more powerful than others, even the most basic RAW file converters, like View NX2, allow you to adjust color, white balance, and tonality.
9.4 Adobe Camera RAW is built in to Photoshop CS6 and Photoshop Elements Editor. The application launches automatically when you double-click the file to open it.
9.5 Adobe Photoshop Elements Editor allows you to do basic tonal and color corrections, as well as retouching.
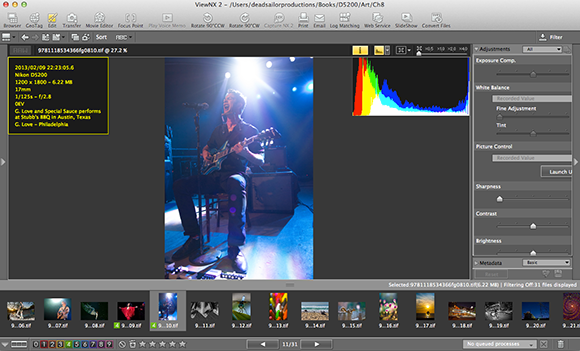
9.6 The Nikon View NX2 software comes with your D5200. It allows you to do basic tonal and color corrections.
The first thing to do when making minor adjustments to your image is to assess the white balance. If it’s good, leave it alone, but white balance usually needs a little tweak to get it just right. Add a bit of blue to cool the tone or amber to warm it up. The reason why white balance is the first thing you adjust is because changing the white balance affects the histogram, which can have an impact when you start doing tonal adjustments.
Next, you evaluate the exposure. You do this not only by taking a look at the image itself, but also, more importantly, the histogram. The histogram in the RAW editor is likely going to look different than it did on the LCD monitor because the preview on the LCD screen is based on the 8-bit JPEG, while the RAW file has a 14-bit histogram. The histogram will probably change in real time as you move the sliders, so pay close attention.
After analyzing the exposure and histogram, you can determine what (if anything) you should do to adjust it. Most of the time, an image requires a slight contrast boost. To do this, you adjust the Levels or Curves, or use the Exposure or Highlight recovery sliders, depending on what software you’re using.
Next, I usually add a bit of saturation to make the image pop, maybe a tiny bit of sharpening or noise reduction, and then I save it to a separate Save folder to keep the adjusted file separate from the original.
This is just a simple method of image editing when you’re just starting out. You can get very complex with editing your images. There are many different filters and borders that can be added (similar to the Instagram and Hipstamatic apps). There are effects and conversions you can do, such as black and white or sepia. The possibilities are almost limitless.