
3.1 The Playback menu.
Chapter 3: Setting up the Nikon D5200
To create a simpler, more intuitive operating experience, the D5200 menu system isn’t quite as extensive as that of other cameras, such as the Nikon D800 or D600. The menu system of the D5200 has most of the extraneous frills stripped away, but it is still a highly customizable camera with the most important features.
Understanding the menu options is pretty much the key to making the camera an extension of your vision. If you don’t know the menu system well, you will constantly be searching through them, and possibly, missing photographic opportunities. Learning the D5200 menu system is also important because, as mentioned previously, the Vari-angle LCD monitor keeps the external controls at a minimum. To enter the Nikon D5200 menu system, simply press the Menu button (![]() ), and then use the multi-selector to navigate through the options.
), and then use the multi-selector to navigate through the options.
Setting up your camera effectively allows you to focus on your art.
The Playback Menu
The Playback Menu (![]() ) displays options that allow you to control how your images are stored. You can also select how the camera displays the images during image review, and what information is displayed while reviewing your images. Press the Menu button (
) displays options that allow you to control how your images are stored. You can also select how the camera displays the images during image review, and what information is displayed while reviewing your images. Press the Menu button (![]() ), and then use the multi-selector up (
), and then use the multi-selector up (![]() ) or down (
) or down (![]() ) to highlight the Playback menu (
) to highlight the Playback menu (![]() ), and then press the OK button (
), and then press the OK button (![]() ) or multi-selector right (
) or multi-selector right (![]() ) to access the options.
) to access the options.
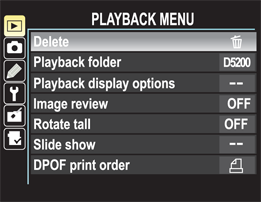
Delete
The Delete option allows you to delete selected images from your memory card, delete images from a certain date, or delete all of the images at once. To delete selected images, follow these steps:
1. Press the multi-selector right (![]() ), highlight Selected (default), and then press the multi-selector right (
), highlight Selected (default), and then press the multi-selector right (![]() ) again. The camera displays an image selection screen.
) again. The camera displays an image selection screen.
2. Press the Thumbnail button (![]() ) to set the image or images that you want to delete. You can also press the Zoom in button (
) to set the image or images that you want to delete. You can also press the Zoom in button (![]() ) to review an image close up before deleting it. When you select the image for deletion, the trash can symbol (
) to review an image close up before deleting it. When you select the image for deletion, the trash can symbol (![]() ) appears in the upper-right corner of the thumbnail.
) appears in the upper-right corner of the thumbnail.
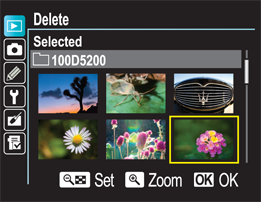
3.2 Selecting images to delete.
3. Press the OK button (![]() ) to erase the selected images. The camera asks you for confirmation before deleting the images.
) to erase the selected images. The camera asks you for confirmation before deleting the images.
4. Select Yes, and then press the OK button (![]() ) to delete. To cancel the deletion, highlight No (default), and then press the OK button (
) to delete. To cancel the deletion, highlight No (default), and then press the OK button (![]() ).
).
To delete images from a specific date, use the multi-selector to highlight Select date, and then press the multi-selector right (![]() ) or the OK button (
) or the OK button (![]() ). A list of dates (or a single date if you’ve only shot for one day on a card) appears; use the multi-selector to highlight a date, and then press the multi-selector right (
). A list of dates (or a single date if you’ve only shot for one day on a card) appears; use the multi-selector to highlight a date, and then press the multi-selector right (![]() ) to select the date of the images for deletion. A check mark appears in the box next to the date of the images that will be deleted. You can press the Thumbnail button (
) to select the date of the images for deletion. A check mark appears in the box next to the date of the images that will be deleted. You can press the Thumbnail button (![]() ) to view the images taken on that date to confirm that you want to delete them. Press the OK button (
) to view the images taken on that date to confirm that you want to delete them. Press the OK button (![]() ) to set the date range for deletion. When you’re ready to delete the images, press the OK button (
) to set the date range for deletion. When you’re ready to delete the images, press the OK button (![]() ) again; a dialog box appears, asking for confirmation. Select Yes to delete or No to cancel, and then press the OK button (
) again; a dialog box appears, asking for confirmation. Select Yes to delete or No to cancel, and then press the OK button (![]() ).
).
To delete all images, use the multi-selector to highlight All, and then press the OK button (![]() ). Select Yes when asked to confirm the deletion, and then press the OK button (
). Select Yes when asked to confirm the deletion, and then press the OK button (![]() ) to delete. To cancel the deletion, highlight No (default), and then press the OK button (
) to delete. To cancel the deletion, highlight No (default), and then press the OK button (![]() ).
).
Playback folder
The Nikon D5200 automatically creates folders in which to store your images. The main folder that the camera creates is called DCIM, and within this folder the camera creates a subfolder to store the images; the first subfolder the camera creates is labeled 100ND5200. After shooting 999 images, the camera automatically creates another folder, 101ND5200, and so on. If you have used the memory card in another camera and have not formatted it, there will be additional folders on the card (ND600, ND3S, and so on).
You can change the current folder using the Storage folder option in the Shooting Menu. You have the following two folder choices:
• Current. This option displays images only from the folder to which the camera is currently saving. This feature is useful when you have multiple folders from different sessions. Using this setting allows you to preview only the most current images.
• All. This option plays back images from all folders that are on the memory card.
Playback display options
A lot of information is available when you review images, and the Playback display options allow you to customize that information. By default, if you don’t select any of these options, playback displays the photo with some basic information (storage folder, file number, date and time, image quality, and size) in a letterbox below.
You can select one, all, or any combination of the following options:
• None (image only). As indicated, this shows the full size image only, with no information at all.
• Highlights. When you activate this option, any highlights that are blown out will blink. If this happens, you may want to apply some exposure compensation or adjust your exposure to be sure to capture highlight detail.
• RGB Histogram. When you activate this option, you can view the separate histograms for the Red, Green, and Blue channels along with a standard luminance histogram.
• Shooting Data. This option allows you to review the shooting data (metering, exposure, lens focal length, and so on).
• Overview. This option shows a thumbnail version of the image with the luminance histogram, as well as general shooting data: shutter speed, aperture, ISO, and so on.
When you select any of these options, you can toggle through them by pressing the multi-selector up (![]() ) and/or down (
) and/or down (![]() ).
).
If an optional GPS unit, such as the Nikon GP-1, is used and GPS data is attained, the camera displays an additional GPS data screen, which shows the Latitude, Longitude, Altitude, and Time.
Image review
The Image review option (see Figure 3.1) allows you to choose whether the image is shown on the LCD monitor immediately after you shoot it. When you turn this option off, you can view the image by pressing the Playback button (![]() ). Keeping this option off conserves battery power because the LCD monitor is actually the biggest drain on your battery. When shooting events with a lot of quickly changing action, such as sporting events and concerts, you may want to keep this option off. I have found that when shooting fast subjects, leaving the review on causes the camera to scroll through the image data instead of moving the focus point. This can cause you to lose important shots.
). Keeping this option off conserves battery power because the LCD monitor is actually the biggest drain on your battery. When shooting events with a lot of quickly changing action, such as sporting events and concerts, you may want to keep this option off. I have found that when shooting fast subjects, leaving the review on causes the camera to scroll through the image data instead of moving the focus point. This can cause you to lose important shots.
If you’re shooting portraits or other shots where you are shooting single images, you can turn this option on. This allows you a chance to immediately review the image to check the exposure, framing, and focus.
Rotate tall
The D5200 has a built-in sensor that can tell whether the camera was rotated while you took the image. The Rotate tall option rotates images that you have shot in portrait orientation to display upright on the LCD screen. I usually turn this option off because the portrait orientation image appears substantially smaller when displayed upright on the LCD screen.
The options are:
• On. The camera automatically rotates the image to be viewed while holding the camera in the standard upright position. When you turn this option on (and you set the Auto image rotation setting to On in the Setup Menu), the camera orientation is recorded for use in image-editing software.
• Off (default). When you turn the auto-rotating function off, images taken in portrait orientation display sideways on the LCD screen in landscape orientation.
Slide show
The Slide show option allows you to display a slide show of images from the current active folder. You can use this feature to review the images that you have shot without having to use the multi-selector. This is also a good way to show friends or clients your images. You can connect the camera to an HDTV to view the slide show on a big screen. The following options are available:
• Start. This option simply starts the slide show. It plays back both still images and movies.
• Image type. This option allows you to select what kinds of files are played back. You can select Still images and movies, Still images only, or Movies only.
• Frame interval. This option allows you to select how long the still images display. The options are 2, 3, 5, or 10 seconds.
While the slide show is in progress, you can press the multi-selector left (![]() ) to skip forward or right (
) to skip forward or right (![]() ) to skip back. Press the multi-selector up (
) to skip back. Press the multi-selector up (![]() ) or down (
) or down (![]() ) to view shooting information or histograms. You can also press the Menu button (
) to view shooting information or histograms. You can also press the Menu button (![]() ) to return to the Playback Menu, press the Playback button (
) to return to the Playback Menu, press the Playback button (![]() ) to end the slide show, or tap the shutter-release button lightly to return to the Shooting mode.
) to end the slide show, or tap the shutter-release button lightly to return to the Shooting mode.
If you press the OK button (![]() ) while the slide show is in progress, the slide show pauses and offers you options for restarting, changing the frame rate, or exiting the slide show. Press the multi-selector up (
) while the slide show is in progress, the slide show pauses and offers you options for restarting, changing the frame rate, or exiting the slide show. Press the multi-selector up (![]() ) or down (
) or down (![]() ) to make your selection, and then press the OK button (
) to make your selection, and then press the OK button (![]() ).
).
DPOF print order
DPOF stands for Digital Print Order Format. This option allows you to select images to be printed directly from the camera. You can use this feature with DPOF-compatible printers or devices such as a photo kiosk at your local photo printing shop. This is a handy feature if you don’t have a printer at home and you want to have prints made quickly, or if you do have a printer and want to print your photos without downloading them to your computer.
DPOF can only be used with JPEG files. If there are no JPEGs on the card, this option is not available. If you shoot RAW files, you can use the RAW editing features in the Retouch menu (![]() ) to create a JPEG copy.
) to create a JPEG copy.
Follow these steps to create a print set:
1. Use the multi-selector to choose the DPOF print order option, and then press the multi-selector right (![]() ) to enter the menu.
) to enter the menu.
2. Use the multi-selector to highlight Select/Set, and then press the multi-selector right (![]() ) to view thumbnails. You can press the Zoom in button (
) to view thumbnails. You can press the Zoom in button (![]() ) to view a larger preview of the selected image.
) to view a larger preview of the selected image.
3. Press the multi-selector right (![]() ) or left (
) or left (![]() ) to highlight an image to print, and then press the Thumbnail button (
) to highlight an image to print, and then press the Thumbnail button (![]() ) and multi-selector up (
) and multi-selector up (![]() ) to set the image and choose the number of prints. You can choose from 1 to 99. The number of prints and a small printer icon appear on the thumbnail. Continue this procedure until you have selected all of the images that you want to print. Press the multi-selector down (
) to set the image and choose the number of prints. You can choose from 1 to 99. The number of prints and a small printer icon appear on the thumbnail. Continue this procedure until you have selected all of the images that you want to print. Press the multi-selector down (![]() ) to reduce the number of prints and remove the image from the print set.
) to reduce the number of prints and remove the image from the print set.
4. Press the OK button (![]() ). A menu appears with the following two options:
). A menu appears with the following two options:
• Print shooting data. Press the multi-selector right (![]() ) to set. Press the multi-selector right (
) to set. Press the multi-selector right (![]() ) again to unset. A check mark appears in the box next to the menu option when the option is set. When you select this option, the shutter speed and aperture setting appear on the print.
) again to unset. A check mark appears in the box next to the menu option when the option is set. When you select this option, the shutter speed and aperture setting appear on the print.
• Print date. Press the multi-selector right (![]() ) to set. Press the multi-selector right (
) to set. Press the multi-selector right (![]() ) again to unset. A check mark appears in the box next to the menu option when the option is set. When you select this option, the date the image was taken appears on the print.
) again to unset. A check mark appears in the box next to the menu option when the option is set. When you select this option, the date the image was taken appears on the print.
5. Press the OK button (![]() ). This saves the Print order.
). This saves the Print order.
The Shooting Menu
The Shooting menu (![]() ) allows you to control how images are captured on your D5200. This includes ISO, image quality, white balance, Picture Controls, and more. In short, anything that affects the file or how the image is captured is set here. Some of the options in this menu, such as Image quality (
) allows you to control how images are captured on your D5200. This includes ISO, image quality, white balance, Picture Controls, and more. In short, anything that affects the file or how the image is captured is set here. Some of the options in this menu, such as Image quality (![]() ), White balance (
), White balance (![]() ), ISO (
), ISO (![]() ), and Picture Control (
), and Picture Control (![]() ), can also be set using external buttons, so you don’t have to enter this menu to change them.
), can also be set using external buttons, so you don’t have to enter this menu to change them.
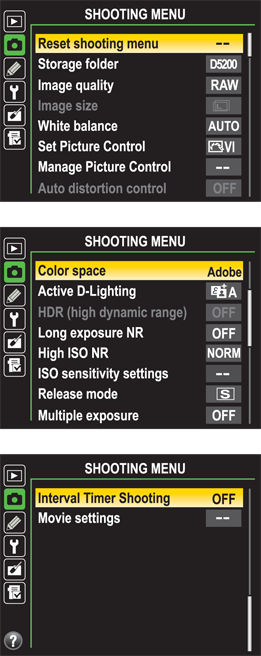
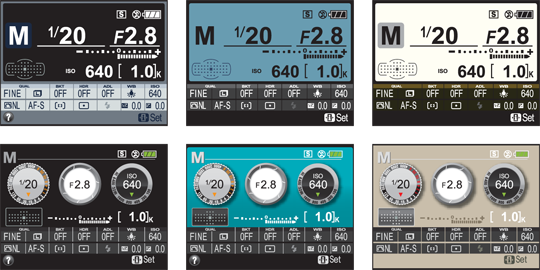
3.3 The Shooting menu, shown in three screens.
Reset shooting menu
Simply put, the Reset shooting menu option resets all of the Shooting menu options covered in this section to their defaults. To do this, select this option, and then press the OK button (![]() ) or the multi-selector right (
) or the multi-selector right (![]() ). Two options then appear: Yes and No. Select Yes to reset or No to cancel, and then press the OK button (
). Two options then appear: Yes and No. Select Yes to reset or No to cancel, and then press the OK button (![]() ) again.
) again.
Storage folder
Use the Storage folder option to select the folder into which your images should be saved as you shoot. You can also create new folders, rename existing folders, or delete folders that you no longer need. By default, the camera creates a folder numbered 100D5200. When the folder has 999 photos in it or contains a photo with the file number 9999, the D5200 creates a new folder with a number that is one higher (101D5200, and so on).
The Storage folder options are:
• Select folder. The default folder is D5200, and there’s another preexisting folder simply called Nikon. When you enter the Select folder submenu the current active folder appears on top and all subsequent folders follow in alphabetical order. Simply use the multi-selector to highlight the desired folder, and then press the OK button (![]() ) to select it.
) to select it.
• New. By selecting the New folder option, you can create a folder with your own designation. Simply choose a five-character, alphanumeric name for your folder, and then enter the name using the text entry menu that appears when you enter the New folder submenu. Use the multi-selector to scroll around in the keyboard text area at the top of the screen and highlight the letter or number that you want to input. When the correct character is highlighted in the keyboard area, press the OK button (![]() ). You can use the Command dial to move the cursor within the name area at the bottom to select the space where you want to place the character. To delete a character, move the cursor over the top of the letter, and then press the Delete button (
). You can use the Command dial to move the cursor within the name area at the bottom to select the space where you want to place the character. To delete a character, move the cursor over the top of the letter, and then press the Delete button (![]() ) to erase. After you input the text, press the Zoom in button (
) to erase. After you input the text, press the Zoom in button (![]() ) to create the folder. The folder then becomes the active storage folder.
) to create the folder. The folder then becomes the active storage folder.
• Rename. You can also rename an existing folder. You may want to do this instead of creating a new folder if you already have a folder that contains images, and you want to name the folder so that you can easily remember what photos you shot to help with file management.
• Delete. Navigating to this option and selecting Yes deletes the empty folder on the memory card. The camera asks you for confirmation so that you don’t accidentally erase any folders.
Image quality
Select Image quality (see Figure 3.3) to change the image quality of a file. You can choose from the following options:
• NEF (RAW) + JPEG fine. This option saves two copies of the same image, one in RAW and one in JPEG with minimal compression.
• NEF (RAW) + JPEG normal. This option saves two copies of the same image, one in RAW and one in JPEG with standard compression.
• NEF (RAW) + JPEG basic. This option saves two copies of the same image, one in RAW and one in JPEG with high compression.
• NEF (RAW). This option saves the images in RAW format with all of the 14-bit data from the sensor. You can adjust the RAW recording settings in the NEF (RAW) recording option in the Shooting Menu.
• JPEG fine. This option saves the images in JPEG format with minimal compression of about 1:4.
• JPEG normal. This option saves the images in JPEG format with standard compression of about 1:8.
• JPEG basic. This option saves the images in JPEG format with high compression of about 1:16.
For more detailed information on image quality, compression, and file formats, see Chapter 2.
Image size
The Image size option allows you to choose the size of JPEG files. You can change the image size depending on the intended output of the file. Choose from the following sizes:
• Large. This setting gives you a high-resolution image of 6000 × 4000 pixels, or 24 megapixels.
• Medium. This setting gives you a resolution of 4496 × 3000 pixels, or 13.5 megapixels.
• Small. This setting gives you a resolution of 2992 × 2000 pixels, or 6 megapixels.
White balance
You can change the white balance settings using this menu option. Select a white balance setting from the standard settings, which are Auto (![]() ), Incandescent (
), Incandescent (![]() ), Fluorescent (
), Fluorescent (![]() ), Direct Sunlight (
), Direct Sunlight (![]() ), Flash (
), Flash (![]() ), Cloudy (
), Cloudy (![]() ), and Shade (
), and Shade (![]() ). You can also set a custom white balance using the Preset manual option (
). You can also set a custom white balance using the Preset manual option (![]() ).
).
For more detailed information on white balance settings and color temperature, see Chapter 2.
Using white balance settings
To select one of the standard settings, choose the White balance option (see Figure 3.3) from the Shooting menu (![]() ), use the multi-selector to highlight the preferred setting, and then press the multi-selector right (
), use the multi-selector to highlight the preferred setting, and then press the multi-selector right (![]() ) or the OK button (
) or the OK button (![]() ). This displays a new screen that gives you the option to fine-tune the standard setting. This screen displays a grid that allows you to adjust the color tint of the selected white balance setting.
). This displays a new screen that gives you the option to fine-tune the standard setting. This screen displays a grid that allows you to adjust the color tint of the selected white balance setting.
The horizontal axis of the grid allows you to adjust the color from amber to blue, making the image warmer or cooler, while the vertical axis of the grid allows you to change the tint by adding a magenta or green cast to the image. Using the multi-selector, you can choose a setting from 1 to 6 in either direction; additionally, you can add points along the horizontal and vertical axes simultaneously. For example, you can add 4 points of amber to give it a warmer tone and also add 2 points of green, shifting the amber tone more toward yellow.
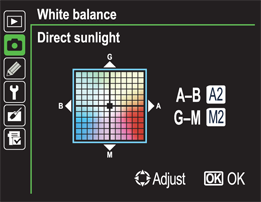
3.4 The White balance fine-tuning grid.
Choose the Fluorescent setting (![]() ) to display the following menu options:
) to display the following menu options:
• Sodium-vapor. These types of lights are often found in streetlights and parking lots. They emit a distinct, deep-yellow color.
• Warm-white fluorescent. These types of lamps give a white light with a slight amber cast to add some warmth to the scene. They burn at around 3000K, similar to an incandescent bulb.
• White fluorescent. These lights cast a very neutral, white light at around 5200K.
• Cool white fluorescent. As the name suggests, this type of lamp is a bit cooler than a white fluorescent lamp and has a color temperature of 4200K.
• Day white fluorescent. This lamp approximates sunlight at about 5500K.
• Daylight fluorescent. This type of lamp gives you about the same color as daylight. This lamp burns at about 6300K.
• High temp. mercury-vapor. These lights vary in temperature, depending on the manufacturer, and usually run between 4200 and 5200K.
This menu is handy if you know the specific type of lighting fixture that is being used. For example, most outdoor sporting arenas use mercury-vapor lights to light the field at night. If you select the Fluorescent white balance setting (![]() ) from the Shooting menu (
) from the Shooting menu (![]() ), and then choose the last option, High temp. mercury-vapor, you get a more accurate and consistent white balance, allowing you to more accurately assess the histogram.
), and then choose the last option, High temp. mercury-vapor, you get a more accurate and consistent white balance, allowing you to more accurately assess the histogram.
Preset manual white balance
The Preset manual white balance option (![]() ) allows you to make your own custom white balance settings. You can use this option when shooting in mixed lighting, such as a room with an incandescent bulb and sunlight coming through a window, or when the camera’s Automatic white balance (
) allows you to make your own custom white balance settings. You can use this option when shooting in mixed lighting, such as a room with an incandescent bulb and sunlight coming through a window, or when the camera’s Automatic white balance (![]() ) isn’t quite getting the correct color.
) isn’t quite getting the correct color.
You can set a custom white balance in two ways: using direct measurement, where you take a reading from a neutral-colored object (a gray card works best for this) under the light source; or copying it from an existing photograph, which allows you to choose a white balance setting directly from an image stored on the memory card.
See Appendix C for instructions on using the included gray card to preset the white balance.
To preset the white balance manually, select Measure from the Preset manual white balance menu option (![]() ), and then press the OK button (
), and then press the OK button (![]() ). The camera displays a blinking white balance preset icon (
). The camera displays a blinking white balance preset icon (![]() ). Next, aim the camera at a neutral subject and take a photo. If the preset was successful, the White balance good icon (
). Next, aim the camera at a neutral subject and take a photo. If the preset was successful, the White balance good icon (![]() ) flashes in the viewfinder. If the White balance no good icon (
) flashes in the viewfinder. If the White balance no good icon (![]() ) flashes in the viewfinder, you need to shoot another photo. You need a good amount of light to get a proper white balance setting.
) flashes in the viewfinder, you need to shoot another photo. You need a good amount of light to get a proper white balance setting.
You can also copy the white balance setting from any photo that is saved on the memory card that’s inserted into your camera. Once again, there are two options to select from: Measure or Use photo. Select Use photo from the Preset manual submenu. This displays two options: This image or Select image. Use the This image option to set the white balance to the image that you selected for the Preset manual (![]() ). To use the Select image option, press the multi-selector right (
). To use the Select image option, press the multi-selector right (![]() ). The menu then displays a list of available folders. Press the multi-selector up (
). The menu then displays a list of available folders. Press the multi-selector up (![]() ) or down (
) or down (![]() ) to choose a folder, and then press the multi-selector right (
) to choose a folder, and then press the multi-selector right (![]() ). This displays thumbnails of the images in the folder. Use the multi-selector to navigate through the images.
). This displays thumbnails of the images in the folder. Use the multi-selector to navigate through the images.
When you find a suitable image, press the OK button (![]() ) to select it. Use the Zoom in button (
) to select it. Use the Zoom in button (![]() ) if you want to take a closer look at the image. After you select an image, you again see the This image and Select image options. However, for the This image option, you now see a thumbnail of the image you selected. Make sure that This image is highlighted, and then press the OK button (
) if you want to take a closer look at the image. After you select an image, you again see the This image and Select image options. However, for the This image option, you now see a thumbnail of the image you selected. Make sure that This image is highlighted, and then press the OK button (![]() ).
).
Set Picture Control
Picture Controls allow you to choose how the images are processed, and you can also use them in the NikonView NX2 and Nikon Capture NX2 image-editing software. Picture Controls allow you to get the same results when using different cameras that are compatible with the Nikon Picture Control System.
When you save images as NEF (RAW files), Picture Controls are embedded in the metadata, and only Nikon software can use these settings. When you open RAW files in a third-party program, such as Lightroom or Adobe Camera RAW in Photoshop, Picture Controls are not applied.
Select Set Picture Control (![]() ) (see Figure 3.3) from the Shooting menu (
) (see Figure 3.3) from the Shooting menu (![]() ) to adjust all of the Picture Controls to suit your specific needs or tastes. In the color modes — SD (
) to adjust all of the Picture Controls to suit your specific needs or tastes. In the color modes — SD (![]() ), NL (
), NL (![]() ), VI (
), VI (![]() ), PT (
), PT (![]() ), LS (
), LS (![]() ) — you can adjust the sharpening, contrast, brightness, hue, and saturation. In MC mode (
) — you can adjust the sharpening, contrast, brightness, hue, and saturation. In MC mode (![]() ), you can adjust the filter effects and toning. After adjusting the Picture Controls (
), you can adjust the filter effects and toning. After adjusting the Picture Controls (![]() ), you can save them for later use. You do this in the Manage Picture Control option described in the next section.
), you can save them for later use. You do this in the Manage Picture Control option described in the next section.
For more detailed information about customizing and saving Picture Controls (![]() ), see Chapter 2.
), see Chapter 2.
Manage Picture Control
In the Manage Picture Control menu, you can edit, save, and rename your Custom Picture Controls. You can choose from the following options:
• Save/edit. In this menu, you choose a Picture Control, adjust, and save it. You can rename the Picture Control to help you remember what adjustments you made or to indicate what the Custom Picture Control is to be used for. For example, I have created one Picture Control named ultra-VIVID, which has the contrast, sharpening, and saturation boosted as high as it can go. I sometimes use this setting when I want crazy, oversaturated, unrealistic-looking images for abstract shots or light trails.
• Rename. This menu allows you to rename any of your Custom Picture Controls. You cannot, however, rename the standard Nikon Picture Controls.
• Delete. This menu gives you the option of erasing any Custom Picture Controls you have saved. This menu only includes controls you have saved or that you have downloaded from an outside source. You cannot delete the standard Nikon Picture Controls.
• Load/save. This menu allows you to upload Custom Picture Controls to your camera from your memory card; delete any Picture Controls saved to your memory; or save a Custom Picture Control to your memory card to export to Nikon View or Nikon Capture NX2 or to another camera that is compatible with Nikon Picture Controls.
For more detailed information about creating and managing Picture Controls (![]() ), see Chapter 2.
), see Chapter 2.
The D5200 also allows you to view a grid graph that shows you how the Picture Controls relate to each other in terms of contrast and saturation. Each Picture Control is represented on the graph by a square icon with the letter of the Picture Control to which it corresponds. Custom Picture Controls are denoted by the number of the custom slot to which they have been saved. Standard Picture Controls that you have modified display with an asterisk next to the letter. Picture Controls that have been set with one or more auto settings appear in green with lines extending from the icon to show you that the settings will change, depending on the images.
To view the Picture Control grid, select the Set Picture Control option from the Shooting menu (![]() ). Press the OK button (
). Press the OK button (![]() ) and the Picture Control list appears. Press the Zoom in button (
) and the Picture Control list appears. Press the Zoom in button (![]() ) to view the grid. Once the Picture Control grid appears, you can use the multi-selector to scroll though the different Picture Control settings. After you highlight a setting, press the multi-selector right (
) to view the grid. Once the Picture Control grid appears, you can use the multi-selector to scroll though the different Picture Control settings. After you highlight a setting, press the multi-selector right (![]() ) to adjust the settings or the OK button (
) to adjust the settings or the OK button (![]() ) to set the Picture Control. Press the Menu button (
) to set the Picture Control. Press the Menu button (![]() ) to exit back to the Shooting menu (
) to exit back to the Shooting menu (![]() ), or tap the shutter-release button to prepare the camera for shooting.
), or tap the shutter-release button to prepare the camera for shooting.
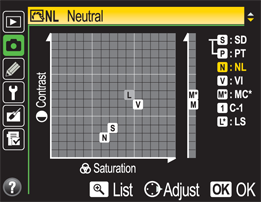
3.5 The Picture Control grid.
Auto distortion control
Each lens has its own specific distortion characteristics, and Nikon has built-in software that automatically corrects it on NIKKOR D- and G-type lenses only. It also only applies to JPEG or NEF files opened in Nikon software. Auto distortion control doesn’t work with NIKKOR Perspective Control and fisheye lenses, or when shooting video. Nikon also does not guaranteed that this feature will work with third-party lenses.
Color space
Color space (see Figure 3.3) simply describes the range of colors (also known as the gamut) that a device can reproduce. With the D5200, you have two choices of color spaces: sRGB and Adobe RGB. The color space you choose depends on what the final output of your images will be. The options are:
• sRGB. This is a narrow color space, meaning that it deals with fewer colors and also more saturated colors than the larger Adobe RGB color space. The sRGB color space is designed to mimic the colors that most low-end monitors can reproduce.
• Adobe RGB. This color space has a much broader color spectrum than is available with sRGB. The Adobe gamut was designed for dealing with the color spectrum that can be reproduced with most high-end printing equipment.
This leads to the question of which color space you should use. If you take pictures, download them straight to your computer, and typically only view them on your monitor or upload them for viewing on the web, then sRGB is fine. The sRGB color space is also useful when printing directly from the camera or memory card with no post-processing.
If you are going to have your photos printed professionally or you intend to do a bit of post-processing to your images, using the Adobe RGB color space is recommended. This allows you to have subtler control over the colors than is possible using a narrower color space like sRGB.
I generally capture my images using the Adobe RGB color space. I then do my post-processing and make a decision on the output. If I know that I will be posting an image to the web, I convert it to sRGB; any images destined for my printer are saved as Adobe RGB. I usually end up with two identical images saved with two different color spaces. Because most web browsers don’t recognize the Adobe RGB color space, any images saved as Adobe RGB and posted on the Internet usually appear dull and flat.
Some photo printing labs also require sRGB files. Consult with the lab to see what its requirements are before sending a file.
Active D-Lighting
Active D-Lighting (![]() ) is designed to help you retain highlight detail when shooting in a high-contrast situation — such as direct sunlight — which can cause dark shadows and bright highlight areas. The exact nature of how this works is a proprietary Nikon feature encoded into the Expeed 3 image processor.
) is designed to help you retain highlight detail when shooting in a high-contrast situation — such as direct sunlight — which can cause dark shadows and bright highlight areas. The exact nature of how this works is a proprietary Nikon feature encoded into the Expeed 3 image processor.
Using Active D-Lighting (![]() ) changes all of the Picture Control (
) changes all of the Picture Control (![]() ) brightness and contrast settings to Auto. This setting can be thought of as a more subdued form of High Dynamic Range (HDR) — even though the processing is very different, the final goal is the same; to expand the dynamic range of the image.
) brightness and contrast settings to Auto. This setting can be thought of as a more subdued form of High Dynamic Range (HDR) — even though the processing is very different, the final goal is the same; to expand the dynamic range of the image.
Active D-Lighting has six settings: Auto, Extra high, High, Normal, Low, and Off.
The Extra high or High settings can cause excessive noise or banding to appear in the shadow areas.
In my experience, I’ve found that Active D-Lighting works, but the changes it makes can be more subtle when I use the lower settings. For general shooting, I recommend setting Active D-Lighting to Auto. I prefer to shoot in RAW, and although the settings are saved to the metadata for use with Nikon software, I would rather do the adjustment myself in Adobe Photoshop, so I turn this feature off.
When using Active D-Lighting, the camera needs some extra time to process the images. Your buffer fills up faster when shooting continuously, so expect shorter burst rates.
High Dynamic Range
Although this term has become synonymous with hyper-realistic imagery, High Dynamic Range (HDR) is really just a tool to make your subjects look more as they do to the human eye. Nikon’s built-in HDR option (see Figure 3.3) takes two shots — one slightly overexposed and one slightly underexposed — and combines them using in-camera processing to expand the shadow and the highlight detail. Once you select the HDR mode from the Shooting menu (![]() ), you have six settings: Auto, Extra high, High, Normal, Low, and Off.
), you have six settings: Auto, Extra high, High, Normal, Low, and Off.
The High Dynamic Range (HDR) feature is only available when shooting JPEGs without RAW files. If you set the image quality to RAW or RAW + JPEG, the HDR option is not available.
One disappointing fact is that the HDR feature is only available as a one-time shot option. This means that after you shoot an HDR photo, the camera reverts to the normal setting; to shoot another HDR image, you must go back into the menu option and turn it back on. If you plan to make extensive use of the HDR feature, I suggest that you program it to the Function button (![]() ) in Custom Setting menu (
) in Custom Setting menu (![]() ) f1.
) f1.
When the camera is combining the images, the HDR indicator (![]() ) flashes in the viewfinder and the Info display. You cannot take any photos until the HDR has finished processing.
) flashes in the viewfinder and the Info display. You cannot take any photos until the HDR has finished processing.
Long Exposure NR
The Long Exposure NR menu option allows you to turn on noise reduction (NR) for exposures of 1 second or longer. When this option is on, after taking a long-exposure photo, the camera runs a noise-reduction algorithm that reduces the amount of noise in your image to produce a smoother result.
The D5200 employs a technique for long exposures called dark frame noise reduction. It is calculated by making an exposure of the same time with the shutter closed; the camera then analyzes the noise and bases the noise reduction on this second exposure. This doubles the processing time and slows your frame rate. Again, this is a setting I leave turned off because I prefer to do my own noise reduction during post-processing.
High ISO NR
The High ISO NR menu option allows you to choose how much noise reduction (NR) is applied to images that you take at high ISO settings (Nikon doesn’t specify at what setting this starts, but it’s probably somewhere around ISO 800). You can select from the following settings:
• High. This setting applies fairly aggressive noise reduction. A rather large amount of image detail can be lost when you use this setting.
• Normal. This is the default setting. Some image detail may be lost when you use this setting.
• Low. This setting applies a small amount of noise reduction. Most of the image detail is preserved when you use this setting.
• Off. This setting only applies noise reduction to images at ISO 2500 or higher, but it applies less NR than the Low setting.
ISO sensitivity settings
The ISO sensitivity settings (see Figure 3.3) allow you to set the ISO sensitivity and Auto ISO. You can also change the ISO sensitivity using the Info edit menu. The options go from ISO 100 on up to ISO 25,600 (Hi2) in 1/3 steps. The base settings are ISO 100 to ISO 6400. It’s recommended that you stick with the base settings rather than Hi settings. The Hi settings cause excessive noise and banding.
ISO settings are covered in detail in Chapter 2.
Release mode
Select Release mode (![]() ) from the Shooting menu (
) from the Shooting menu (![]() ) to change the Release mode. There are seven options: Single-frame (
) to change the Release mode. There are seven options: Single-frame (![]() ), Continuous L (
), Continuous L (![]() ), Continuous H (
), Continuous H (![]() ), Self-timer (
), Self-timer (![]() ), Delayed remote (ML-L3) (
), Delayed remote (ML-L3) (![]() ), Quick-response remote (ML-L3) (
), Quick-response remote (ML-L3) (![]() ), and Quiet shutter release (
), and Quiet shutter release (![]() ).
).
Release modes (![]() ) are covered in-depth in Chapter 2.
) are covered in-depth in Chapter 2.
Multiple exposure
The Multiple exposure option allows you to record multiple exposures in one image. You can record two or three shots in a single image. This is an easy way to get off-the-wall multiple images without using image-editing software like Adobe Photoshop. To use this feature, follow these steps:
1. Press the multi-selector right (![]() ) to select the mode: On (series) or Off. When you have selected the preferred option, press the OK button (
) to select the mode: On (series) or Off. When you have selected the preferred option, press the OK button (![]() ).
).
2. Select the Number of shots menu option, and then press the multi-selector right (![]() ).
).
3. Press the multi-selector up (![]() ) or down (
) or down (![]() ) to set the number of shots, and then press the OK button (
) to set the number of shots, and then press the OK button (![]() ).
).
4. Select the Auto gain option, and then press the multi-selector right (![]() ).
).
5. Set the gain, and then press the OK button (![]() ). Using Auto gain enables the camera to adjust the exposure according to the number of images in the multiple exposures. This is the recommended setting for most applications. Setting the gain to Off does not adjust the exposure values and can result in an overexposed image. I only recommend using the Auto gain Off setting in low-light situations.
). Using Auto gain enables the camera to adjust the exposure according to the number of images in the multiple exposures. This is the recommended setting for most applications. Setting the gain to Off does not adjust the exposure values and can result in an overexposed image. I only recommend using the Auto gain Off setting in low-light situations.
6. Take your pictures. I recommend using single burst and varying the subject matter.
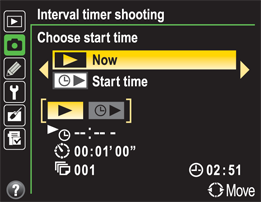
Interval timer shooting
Interval timer shooting (see Figure 3.3) sets your camera to shoot a specified number of still photos at predetermined intervals during a set period of time. You can use this interesting feature to record the slow movements of plants or animals, such as a flower opening or a snail crawling. Another option is to set up your camera with a wide-angle lens and record the movement of the sun or moon across the sky. I’ve also set up my camera on a tripod and used the interval timer to shoot photos of my band while I was on stage.
3.6 The Interval timer shooting menu.
Naturally, you need a tripod to do this type of photography, and if you plan on doing a lengthy shoot time, I suggest that you use the Nikon EH-5b AC power supply to be sure that your camera battery doesn’t die in the middle of your shooting. You can then set the following options:
• Start time. The camera can be set to start 3 seconds after the settings have been completed (Now), or you can set it to start photographing at a predetermined time in the future.
• Interval. This setting determines how much time elapses between each shot. You can set Hours, Minutes, and Seconds.
• Number of intervals. This setting allows you to specify the number of times you want an image captured.
• Shots per interval. This setting specifies how many shots are taken at each interval.
• On or Off. This option starts or stops the camera from shooting with the current settings.
Movie settings
The Movie settings on the D5200 allow you to adjust the size, frame rate, and quality of the videos you record. You can choose from the following options:
• Frame size/frame rate. This option allows you to set the size of the HD video and select the frame rate that is appropriate for your output. The following options are available:
• 1920 × 1080; 60i (![]() )
)
• 1920 × 1080; 30p (![]() )
)
• 1920 × 1080; 24p (![]() )
)
• 1280 × 720; 60p (![]() )
)
• 640 × 424; 30p (![]() )
)
For in-depth information about recording video and bit rates, see Chapter 7.
• Movie quality. There are two options here: High quality and Normal. These options set the maximum bit rate at which the video records.
• Microphone. This option allows you to adjust the volume of the recording using the built-in microphone or an external microphone. There are three easy options:
• Auto. This simple option automatically adjusts the volume level so that the audio levels don’t clip. This works well enough for most general video usage.
• Manual Sensitivity. This option allows you to set the microphone to record at a specified volume. This option is best for recording sound in a controlled environment.
• Microphone off. This turns off the audio recording. You may want to select this option if you are recording audio for your video project using an external recorder. This is what most professional videographers do.
• Manual movie settings. Set this option to On if you want to adjust the shutter speed and ISO sensitivity manually. This gives you more creative control over your videos. When Manual movie settings are turned Off, the camera sets the ISO and shutter speed automatically, although you can still control the aperture.
To use Manual movie settings, the camera must be in Manual mode (![]() ).
).
The Custom Setting Menu
The Custom Setting menu (![]() ) is where you really start customizing your D5200 to shoot to your personal preferences. This is where you make the camera yours. There are dozens of options that you can turn off or on to make shooting easier for you. This is probably the most powerful menu in the camera.
) is where you really start customizing your D5200 to shoot to your personal preferences. This is where you make the camera yours. There are dozens of options that you can turn off or on to make shooting easier for you. This is probably the most powerful menu in the camera.

3.7 The Custom Setting menu.
Reset custom settings
Choose the Reset custom settings option, and then select Yes to restore all of the custom settings to their default values.
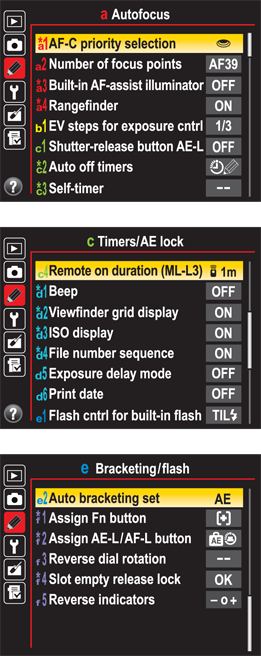
Custom Setting menu a: Autofocus
The Custom Setting menu (![]() ) a controls how the camera performs its autofocus (AF) functions. Because focus is a very critical operation, this is a very important menu.
) a controls how the camera performs its autofocus (AF) functions. Because focus is a very critical operation, this is a very important menu.
3.8 The Custom Setting submenus.
You can select from the following options:
• a1: AF-C priority selection. You can specify how the camera autofocus functions when in the Continuous Servo AF mode (![]() ) mode. Choose from the following options:
) mode. Choose from the following options:
• Release. Although this is not the default camera setting, it is the best option if you’re shooting moving subjects. It allows the camera to take a photo whenever you press the shutter-release button, regardless of whether the camera has achieved focus. This setting is best used for fast action shots, or when it’s imperative to get the shot, regardless of whether it’s in sharp focus.
• Focus. This is the camera default. This allows the camera to take photos only when the camera achieves focus and the focus indicator (green dot in the lower-left corner of the viewfinder) is lit. This is a good setting for slow-moving subjects where you want to be absolutely sure that your subject will be in focus.
• a2: Number of focus points. This option allows you to choose from the number of available focus points when using autofocus. You can specify 39 points, which allows you to choose all of the D5200’s available focus points. You can also set it to 11 points, which allows you to choose from only 11 focus points, similar to the D5100 and D3200 series cameras. When you choose the 11-point option, you can select your focus points much more quickly than when using 39 points. However, the 39-point option allows you to choose more accurately where in the frame the camera will focus.
• a3: Built-in AF-assist illuminator. The AF-assist illuminator lights up when there isn’t enough light for the camera to focus properly (when using the viewfinder only). In certain instances, you may want to turn this option off, such as when shooting faraway subjects, or in dim settings, like concerts or plays where the light may be a distraction. When set to On, the AF-assist illuminator lights up in low-light situations only if the Single Servo AF (![]() ) and Auto area AF (
) and Auto area AF (![]() )modes were selected. When in Single-point AF mode (
)modes were selected. When in Single-point AF mode (![]() ), or when Dynamic-area AF (
), or when Dynamic-area AF (![]() ) is chosen, the center autofocus point must be active. When set to Off, the AF-assist illuminator does not light at all.
) is chosen, the center autofocus point must be active. When set to Off, the AF-assist illuminator does not light at all.
• a4: Rangefinder. Setting this option to On causes the exposure indicator in the viewfinder to act as an electronic rangefinder to help with focus when the lens or camera is set to manual focus. If the indicator is showing to the left, the focus is in front of the subject; if it shows to the right, the focus is falling behind the subject. When the camera is set to Manual exposure (![]() ) the camera automatically defaults to displaying the exposure meter.
) the camera automatically defaults to displaying the exposure meter.
Custom Setting menu b: Exposure
Custom Setting menu (![]() ) b (see Figure 3.8) is where you can change the b1 setting: EV steps for exposure cntrl, which controls exposure increments. This setting determines how the increments for shutter speed, aperture, and auto bracketing are set. The choices here are also 1/3 or 1/2 steps. Choosing 1/3-step increments gives you a much less drastic change in exposure and allows you to get a more exact exposure in critical situations.
) b (see Figure 3.8) is where you can change the b1 setting: EV steps for exposure cntrl, which controls exposure increments. This setting determines how the increments for shutter speed, aperture, and auto bracketing are set. The choices here are also 1/3 or 1/2 steps. Choosing 1/3-step increments gives you a much less drastic change in exposure and allows you to get a more exact exposure in critical situations.
Custom Setting menu c: Timers/AE lock
Custom Setting submenu c: Timers/AE lock (see Figure 3.8) controls the D5200’s various menu timers and the auto exposure lock setting. You can choose from the following options:
• c1: Shutter-release button AE-L. When you set this option to the default (Off), the camera only locks exposure when you press the Auto Exposure Lock/Autofocus Lock button (![]() ). When you set it to On, the auto exposure settings lock when you press the shutter-release button halfway.
). When you set it to On, the auto exposure settings lock when you press the shutter-release button halfway.
• c2: Auto off timers. This option controls how long the LCD monitor displays remain on when you do not push any buttons. Because the LCD monitor is the primary drain on power consumption for any digital camera, choosing a shorter delay time is usually preferable. You can choose Short, Normal, Long, or you can set each type differently in the Custom menu. The Custom options are:
• Playback/menus – 8s, 20s, 1min, 5min, 10min
• Image review – 4s, 8s, 20s, 1min, 10min
• Live view – 5min, 10min, 15min, 20min, 30min
• Standby timer – 4s, 8s, 20s, 1min, 30min
• c3: Self-timer. This setting puts a delay on when the shutter is released after you press the shutter-release button. This is handy when you want to take a self-portrait and you need some time to get yourself into the frame. You can also use the Self-timer release mode (![]() ) to reduce camera shake caused by pressing the shutter-release button on long exposures. You can adjust the following settings:
) to reduce camera shake caused by pressing the shutter-release button on long exposures. You can adjust the following settings:
• Self-timer delay. You can set the delay to 2, 5, 10, or 20 seconds.
• Number of shots. You can press the multi-selector up (![]() ) or down (
) or down (![]() ) to set the camera to take from one to nine photos.
) to set the camera to take from one to nine photos.
• c4: Remote on duration. This setting controls how long the camera stays active while waiting for a signal from the ML-L3 wireless remote. You can set it to 1, 5, 10, or 15 minutes. After the preset amount of time has passed, the camera’s exposure meter is turned off. To reactivate the camera, tap the shutter-release button.
Custom Setting menu d: Shooting/display
The Custom Setting menu (![]() ) d (See Figure 3.8) is where you can change some of the minor shooting and display details. Here, you can choose from the following options:
) d (See Figure 3.8) is where you can change some of the minor shooting and display details. Here, you can choose from the following options:
• d1: Beep. When this option is on, the camera emits a beep when the self-timer is counting down or when the autofocus locks in Single Servo AF mode (![]() ). You can choose High, Low, or Off. Although the beep can be useful when in Self-timer mode (
). You can choose High, Low, or Off. Although the beep can be useful when in Self-timer mode (![]() ), it can also be an annoying feature, especially if you are photographing in a relatively quiet area. The beep does not sound when using Live View or when shooting in Quiet shutter release mode (
), it can also be an annoying feature, especially if you are photographing in a relatively quiet area. The beep does not sound when using Live View or when shooting in Quiet shutter release mode (![]() ). The default setting is Low.
). The default setting is Low.
• d2: Viewfinder grid display. This handy option displays a grid in the viewfinder to assist you in composing your photograph. I find this option to be very helpful, especially when composing landscape and architectural photos.
• d3: ISO display. Turning this option on shows the ISO setting in the viewfinder display instead of the remaining number of frames until you press the shutter-release button halfway, at which point the remaining frames are displayed.
• d4: File number sequence. The D5200 names files by sequentially numbering them. This option controls how the sequence is handled. When set to Off, the file numbers reset to 0001 when you format a memory card, create a new folder, or insert a new memory card. When set to On, the camera continues to count from the last number until it reaches 9999; it then returns to 0001 and counts up from there. When you set this option to Reset, the camera starts at 0001 when the current folder is empty. If the current folder contains images, the camera starts at one number higher than the last image in the folder. I always set this to On when setting up my camera. It reduces the risk of creating files with the same name, which can cause problems with file management. It also helps me keep track of how many shutter releases my camera has.
• d5: Exposure delay mode. Turning this option on causes the shutter to open 1 second after you press the shutter-release button and the reflex mirror has been raised. This option is for shooting long exposures with a tripod where camera shake from pressing the shutter-release button and mirror slap vibration can cause the image to be blurry.
• d6: Print date. This option only works with JPEGs and doesn’t appear on RAW files. It allows you to add the following to your JPEG image files:
• Off. No data is imprinted on the image.
• Date. The month, day, and year are imprinted.
• Date and time. The month, day, and year are imprinted, along with the time.
• Date counter. This option displays the number of days remaining or the number of days that have passed from the selected date.
Custom Setting menu e: Bracketing/flash
The Custom Setting menu (![]() ) e (see Figure 3.8) is where you set the controls for the built-in flash. Some of these options also affect external Speedlights. This menu also contains the controls for bracketing images. You can choose from the following options:
) e (see Figure 3.8) is where you set the controls for the built-in flash. Some of these options also affect external Speedlights. This menu also contains the controls for bracketing images. You can choose from the following options:
• e1: Flash cntrl for built-in flash. This submenu has other submenus nested within it. Essentially, this option controls how your built-in flash operates. The two submenus are:
• TTL (![]() ). This is the fully auto flash mode. You can make minor adjustments using Flash compensation (
). This is the fully auto flash mode. You can make minor adjustments using Flash compensation (![]() ).
).
• Manual (![]() ). You choose the power output in this mode. You can choose from full power down to 1/32 power.
). You choose the power output in this mode. You can choose from full power down to 1/32 power.
• e2: Auto bracketing set. This option allows you to choose how the camera brackets when Auto-bracketing (![]() ) is turned on. You can choose for the camera to bracket Auto exposure (
) is turned on. You can choose for the camera to bracket Auto exposure (![]() ), White Balance (
), White Balance (![]() ), or Active D-Lighting (
), or Active D-Lighting (![]() ). White Balance bracketing (
). White Balance bracketing (![]() ) is not available when the image quality is set to record RAW images.
) is not available when the image quality is set to record RAW images.
For more information on flash photography and the Nikon Creative Lighting System, see Chapter 6.
Custom Setting menu f: Controls
Custom Setting menu (![]() ) f (see Figure 3.8) allows you to customize some of the functions of the different buttons and dials on your D5200. There are five options, which I cover in the following sections.
) f (see Figure 3.8) allows you to customize some of the functions of the different buttons and dials on your D5200. There are five options, which I cover in the following sections.
f1: Assign Fn button
The Assign Fn button menu allows you to choose what the Function button (![]() ) does when you press it. Be aware that not all options are available, depending on which setting you choose. You can also access this setting using the Info Edit menu. The options are:
) does when you press it. Be aware that not all options are available, depending on which setting you choose. You can also access this setting using the Info Edit menu. The options are:
• Image quality/size. Pressing the button and rotating the Command dial allows you to set the image quality and size.
• ISO sensitivity. Pressing the button and rotating the Command dial allows you to change the ISO sensitivity settings.
• White balance. Pressing the button and rotating the Command dial allows you to change the white balance options.
• Active D-Lighting. This option allows you to adjust the Active D-Lighting (![]() ) settings quickly by pressing the Function button (
) settings quickly by pressing the Function button (![]() ) and rotating the command dial.
) and rotating the command dial.
• HDR. Assigning this option allows you to access the High Dynamic Range (HDR) feature quickly.
• NEF (RAW). When you activate this option, you set the camera to record JPEGs. Press the Function button (![]() ) to set the camera to record RAW and JPEG files simultaneously. Press the button again to return to recording only JPEGs.
) to set the camera to record RAW and JPEG files simultaneously. Press the button again to return to recording only JPEGs.
• Auto bracketing. This allows you to quickly turn on or adjust the Auto-bracketing (![]() ) as set in Custom Setting menu (
) as set in Custom Setting menu (![]() ) e2.
) e2.
• AF-area mode. Use this option to change the AF-area mode quickly by pressing the button and rotating the command dial.
• Live view. This option allows you to enter Live View mode (![]() ) by pressing the Function button (
) by pressing the Function button (![]() ).
).
• AE/AF Lock. With this option, the focus and exposure lock when you press and hold the button.
• AE lock only. With this option, the exposure locks when you press and hold the button. Focus continues to function normally.
• AE Lock (hold). With this option, the exposure locks until you press the button a second time or the exposure meter is turned off.
• AF Lock only. With this option, the focus locks while you press and hold the button. The AE continues as normal.
• AF-ON. This option activates the camera’s autofocus system.
f2: Assign AE-L/AF-L button
The Assign AE-L/AF-L button option allows you to assign a function to the AE-L/AF-L button (![]() ). Choose from the following options:
). Choose from the following options:
• AE/AF Lock. The focus and exposure lock when you press and hold the button.
• AE lock only. The exposure locks when you press and hold the button. Focus continues to function normally.
• AE Lock (hold). The exposure locks until you press the button a second time or the exposure meter is turned off.
• AF Lock only. The focus locks while you press and hold the button. The AE continues as normal.
• AF-ON. This option activates the camera’s autofocus system. This works best when Custom Setting menu (![]() ) a4 is set to AF-ON only.
) a4 is set to AF-ON only.
f3: Reverse dial rotation
In the Reverse dial rotation menu, you control how the Command dial works when you rotate it. By default, rotating the command dial to the right stops down the aperture, makes a faster shutter speed (reducing exposure), and adds exposure compensation (increases exposure). You can choose to reverse the actions of the dial rotation for the exposure compensation, aperture/shutter speed, or both simultaneously.
f4: Slot empty release lock
The Slot empty release lock controls whether the shutter releases when there isn’t a memory card in the camera. When you set it to Enable release, the shutter fires, and any image displayed on the monitor saves temporarily. When you set it to Release locked, the shutter does not fire. If you happen to be using Camera Control Pro 2 shooting tethered directly to your computer, the camera shutter releases regardless of to what this option is set.
Many people use this feature to lock the shutter release so that if there isn’t a memory card in the camera, the locked shutter instantly reminds them to insert one before they start snapping away, only to find out later that none of the images were recorded.
f5: Reverse indicators
The Reverse indicators option allows you to reverse the indicators on the electronic light meter that appears in the viewfinder and on the Info display. The default setting shows the underexposure on the left and the overexposure on the right. Nikon now offers this feature because on some of its earlier cameras, the indicators were the opposite way, and some people preferred them that way.
The Setup Menu
The Setup menu (![]() ) contains a smattering of options, most of which aren’t changed very frequently. Some of these settings include the time and date. A couple of other options are Clean image sensor and Battery info, which you may access from time to time.
) contains a smattering of options, most of which aren’t changed very frequently. Some of these settings include the time and date. A couple of other options are Clean image sensor and Battery info, which you may access from time to time.
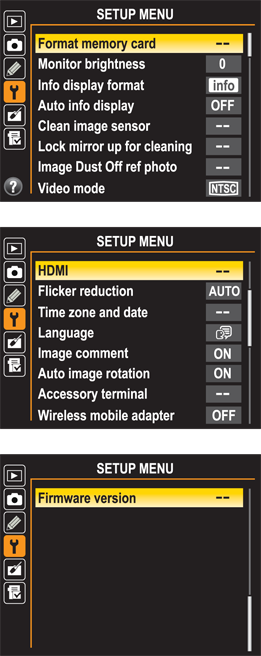
3.9 The Setup menu, shown in three parts.
Format memory card
If you select the Format memory card option, it erases everything on the memory card. Formatting your memory card erases all of the data on the card. It’s a good idea to format your card every time you download the images to your computer (just be sure all of the files are successfully transferred before formatting). Formatting the card helps protect against corrupt data. Simply erasing the images leaves the data on the card and allows it to be overwritten; sometimes this older data can corrupt the new data as it is being written.
Monitor brightness
The Monitor brightness menu sets the brightness of the LCD monitor. You may want to make it brighter when viewing images in bright sunlight, or dimmer when viewing images indoors or to save battery power. You can adjust the brightness of the LCD monitor ± 3 levels. The menu shows a graph with ten bars ranging from black to gray to white. The optimal setting is where you can see a distinct change in color tone in each of the ten bars. If the last two bars on the right side blend, the LCD monitor is too bright; if the last two bars on the left side blend, the LCD monitor is too dark.
Info display format
Select the Info display format option to choose how the Info display menu appears. You can choose the classic display, which shows the exposure settings simply as numbers, or you can choose the graphic interface, which can help you visualize the exposure settings so that you can have an easier grasp of what’s going on with the settings.
In addition, you can choose different display options for the Scene (![]() ) and Effects (
) and Effects (![]() ) shooting modes, as well as the Programmed auto (
) shooting modes, as well as the Programmed auto (![]() ), Shutter-priority auto (
), Shutter-priority auto (![]() ), Aperture-prirority auto (
), Aperture-prirority auto (![]() ), and Manual (
), and Manual (![]() ) modes. On top of that, both the graphic and classic displays allow three choices of color and background: Light on dark, blue, and dark on light.
) modes. On top of that, both the graphic and classic displays allow three choices of color and background: Light on dark, blue, and dark on light.
3.10 The Classic (top) and Graphic (bottom) Info display options.
Auto info display
Set the Auto info display option to On, and you can view the Info display by simply tapping the shutter-release button. You can turn the display off again by pressing the Info button (![]() ).
).
Clean image sensor
The camera uses ultrasonic vibration to remove dust from the filter in front of the sensor. This helps keep most dust off the sensor, but it is not going to keep it dust-free forever. You may need to have the sensor professionally cleaned periodically.
After you select the Clean image sensor option from the Setup menu (![]() ), you can then highlight Clean now, which cleans the image sensor immediately when you press the OK button (
), you can then highlight Clean now, which cleans the image sensor immediately when you press the OK button (![]() ). Selecting the Clean at startup/shutdown option brings up a submenu that includes the following options:
). Selecting the Clean at startup/shutdown option brings up a submenu that includes the following options:
• Clean at startup. The camera goes through the cleaning process immediately after you turn the camera on. This may slightly delay your start-up time.
• Clean at shutdown. The camera cleans the sensor when you power the camera down. This is my preferred setting because it doesn’t interfere with the start-up time.
• Clean at startup and shutdown. The camera cleans the image sensor when you turn the camera on and also when you power it down.
• Cleaning off. This option disables the dust reduction function when you turn the camera on and off. You can still use the Clean now option when this is set.
Lock mirror up for cleaning
When you select the Lock mirror up for cleaning option (see Figure 3.9), the mirror flips up and remains in that position so you can inspect or clean the image sensor. The sensor is also powered down to reduce any static charge that may attract dust.
The easiest way to clean the sensor is with a blower designed to blow puffs of air onto the sensor and remove any loose dust particles. This, combined with using the Clean image sensor feature regularly, should keep sensor dust to a minimum.
Sometimes, dust or dirt adheres to the filter that covers the sensor and it may need a wet cleaning. This involves a special swab and sensor cleaning fluid. Some people prefer to wet clean or swab the sensor themselves, but I recommend that you take your camera to an authorized Nikon service center for this during the initial factory warranty period. Any damage caused by improper cleaning is not covered by warranty and can lead to a very expensive repair bill.
That being said, learning to swab the sensor on your own is not difficult. It can also save you a lot of time and expense. You can remove the lens before or after locking up the mirror, but typically, it’s easier to remove the lens beforehand. Follow these steps to lock up the mirror:
1. Press the Menu button (![]() ) and use the multi-selector to enter the Setup menu (
) and use the multi-selector to enter the Setup menu (![]() ). Use the multi-selector to navigate to the Lock mirror up for cleaning option.
). Use the multi-selector to navigate to the Lock mirror up for cleaning option.
2. Press the OK button (![]() ) or the multi-selector right (
) or the multi-selector right (![]() ). This brings up the Start menu option. Press the OK button (
). This brings up the Start menu option. Press the OK button (![]() ). This shows a dialog box with instructions for raising the mirror.
). This shows a dialog box with instructions for raising the mirror.
The mirror will not raise and lock if the battery power is too low.
3. Press the shutter-release button to open the shutter, and then raise and lock the mirror. You now have access to the sensor, and can inspect or clean it.
4. Turn off the camera. This closes the shutter and lowers the mirror to the resting position.
Make sure that nothing is in the way of the shutter or mirror before you turn off the camera. If a blower nozzle or swab is in the way, it will severely damage the shutter curtain, and possibly the mirror. Also, make sure that the battery has plenty of charge. If it is depleted, the shutter will close and the mirror will drop.
Image Dust Off ref photo
The Image Dust Off ref photo option takes a photo that shows any dust or debris that may be stuck to the sensor. Nikon Capture NX2 then uses the image to retouch any subsequent photos where the specks appear automatically.
To use this feature, select either Start or Clean sensor and then start. Next, you are instructed by a dialog box to take a photo of a bright, featureless white object about 4 inches (10cm) from the lens. The camera automatically sets the focus to infinity. A Dust Off reference photo can only be taken when using a CPU lens. It’s recommended to use at least a 50mm lens, and when using a zoom lens, you should zoom all the way in to the longest focal length. The reference image, however, can be used for images taken at any focal length.
Video mode
Select the Video mode option (see Figure 3.9) to set the video playback mode. There are two options: NTSC and PAL. If you are in North America, use the NTSC option; if you are in Europe, set it to PAL.
HDMI
The D5200 has an HDMI (high-definition multimedia interface) output that allows you to connect your camera to a high-definition TV (HDTV) to review your images. The first option is Output resolution. There are five settings: Auto, 480p, 576p, 720p, and 1080i. The default is Auto, which selects the appropriate setting for your TV automatically. I recommend leaving the Output resolution set to Auto. See the manual for your TV to find the correct resolution if you decide to set it manually.
The second option in this menu is Device Control. This setting is important because, if it’s not set right, it might disable the Live View feed for the HDMI device. After you select Device Control, you can choose from the following options:
• On. Select this option only when you want to use your HDTV to view image playback as you would see it on your camera’s LCD screen. If your HDTV is HDMI-CEC capable, you will be able to use the TV remote control as you would the multi-selector. Be aware that if this setting is On, you will NOT be able to use Live View!
• Off. Use this option if you want to use the HDTV as a monitor to view Live View for shooting video or stills. This enables the camera to display what is on the LCD monitor directly to your HDTV or HDMI device.
If you want to change the HDMI settings, you must first disconnect the camera from the HD device.
Flicker reduction
Select the Flicker reduction option if a video is misbehaving. Some light sources, such as older fluorescent and mercury-vapor lights, can cause a video to flicker, depending on the local AC power grid. There are three options: Auto, 50 Hz, and 60 Hz. In the United States, the frequency is 60 Hz; in Europe, 50 Hz is the standard. The Auto option generally takes care of the problem, but if you aren’t getting good results, try adjusting the shutter speed to 1/60 second or faster.
Time zone and date
Select Time zone and date (see Figure 3.9) to set the camera’s internal clock. You can then choose from the following options:
• Time zone. Use the multi-selector to choose your time zone using the map display.
• Date and time. This is where you set the clock. It’s pretty self-explanatory.
• Date format. You can set the order in which the date appears: Year/Month/Date, Month/Date/Year, or Date/Month/Year.
• Daylight saving time. If you turn this option on when Daylight saving time is in effect, then the time is changed by one hour.
Language
When you select the Language option, you can set the language in which the menus and dialog boxes are displayed.
Image comment
When you select Image comment, you can attach comments to the images you take with your D5200. You enter the text using the Input Comment menu. You can then view the comments in Nikon Capture NX2 or ViewNX 2 software, or you can view them in the photo information on the camera. Setting the attach comment option applies the comment to all images you take until you disable this setting.
Image comments are limited to 36 characters.
Auto image rotation
When you select the Auto image rotation option, the camera records its orientation when you shoot a photo (portrait or landscape). This allows the camera (and image-editing software) to show the photo in the proper orientation. This way, you don’t have to take the time in post-processing to rotate images.
Accessory terminal
The Accessory terminal option (see Figure 3.9) allows you to adjust settings depending on what accessory you have plugged in to the terminal. You can select from the following options:
• Remote shutter release. This allows you to set what the camera does when a remote release is connected. You can set it to record stills or to start capturing video.
• GPS. You use this menu to adjust the settings of an optional GPS unit, such as the Nikon GP-1, which you can use to record longitude and latitude to the image’s EXIF data. You can choose from the following options:
• Standby timer. There are two options for this setting: Enable and Disable. Setting the option to Enable allows the standby timer to operate as set in Custom Setting menu (![]() ) c2. When the standby timer puts the camera to sleep, the GPS unit is disabled — it will need to reestablish GPS connections when it awakens or is reactivated. When set to Disable, the camera does not go into standby mode in order to keep the GPS connection active. The downside of this option is that the GPS unit drains the battery.
) c2. When the standby timer puts the camera to sleep, the GPS unit is disabled — it will need to reestablish GPS connections when it awakens or is reactivated. When set to Disable, the camera does not go into standby mode in order to keep the GPS connection active. The downside of this option is that the GPS unit drains the battery.
• Position. Selecting this option displays the longitude and latitude of the GPS unit reading.
• Use GPS to set camera clock. This option uses the GPS unit to set the internal clock of your D5200.
Eye-Fi upload
The Eye-Fi upload option only appears in the Setup menu (![]() ) when an Eye-Fi memory card is inserted into the camera. An Eye-Fi card allows you to transfer images to your computer wirelessly. There are a number of Eye-Fi card types, so it’s best to check the owner’s manual that comes with your specific card for more details.
) when an Eye-Fi memory card is inserted into the camera. An Eye-Fi card allows you to transfer images to your computer wirelessly. There are a number of Eye-Fi card types, so it’s best to check the owner’s manual that comes with your specific card for more details.
Wireless mobile adapter
Select the Wireless mobile adapter option (see Figure 3.9) to transfer files with the optional Nikon WU-1a wireless mobile adapter. If you have one of these devices, see the owner’s manual for details about operating it.
Firmware version
Select Firmware version from the menu to display the firmware version your camera is using. Firmware is a computer program embedded in the camera that tells it how to function. Camera manufacturers routinely update the firmware to correct for any bugs or to make improvements on the camera’s functions. Nikon posts firmware updates on its website at www.nikonusa.com.
The Retouch Menu
The Retouch Menu (![]() ) allows you to make changes and corrections to your images without using imaging-editing software. As a matter of fact, you don’t even need to download your images to a computer. You can make all of the changes in-camera using the LCD screen preview (or hooked up to an HDTV if you prefer). The Retouch menu (
) allows you to make changes and corrections to your images without using imaging-editing software. As a matter of fact, you don’t even need to download your images to a computer. You can make all of the changes in-camera using the LCD screen preview (or hooked up to an HDTV if you prefer). The Retouch menu (![]() ) only makes copies of the images, so you don’t need to worry about doing any destructive editing to your actual files.
) only makes copies of the images, so you don’t need to worry about doing any destructive editing to your actual files.
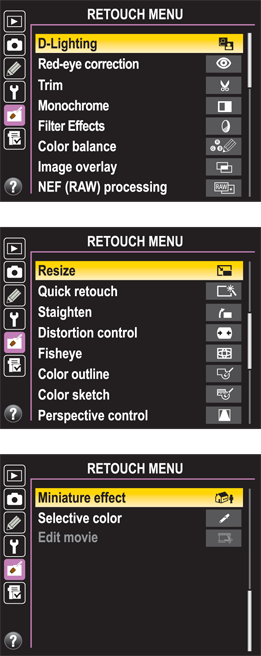
3.11 The Retouch menu, shown in three parts.
There are two ways to access the Retouch menu (![]() ). This first one is the quickest, but it doesn’t display all of the options. Follow these steps:
). This first one is the quickest, but it doesn’t display all of the options. Follow these steps:
1. Press the Playback button (![]() ) to enter Playback mode. Your most recent image appears on the LCD screen.
) to enter Playback mode. Your most recent image appears on the LCD screen.
2. Use the multi-selector to review your images.
3. When you see an image you want to retouch, press the OK button (![]() ) to display the Retouch menu (
) to display the Retouch menu (![]() ) options.
) options.
4. Use the multi-selector to highlight the Retouch option you want to use. Depending on the Retouch option you choose, you may have to select additional settings.
5. Make adjustments if necessary.
6. Press the OK button (![]() ) to save.
) to save.
This is the second method for entering the Retouch menu (![]() ). Follow these steps:
). Follow these steps:
1. Press the Menu button (![]() ) to view the menu options.
) to view the menu options.
2. Press the multi-selector down (![]() ) to move to the Retouch Menu (
) to move to the Retouch Menu (![]() ).
).
3. Press the multi-selector right (![]() ), and then press the multi-selector up (
), and then press the multi-selector up (![]() ) or down (
) or down (![]() ) to highlight the Retouch option you want. Depending on the Retouch option you select, you may have to select additional settings. Once you select your option(s), thumbnails appear.
) to highlight the Retouch option you want. Depending on the Retouch option you select, you may have to select additional settings. Once you select your option(s), thumbnails appear.
4. Use the multi-selector to select the image to retouch, and then press the OK button (![]() ).
).
5. Make the necessary adjustments.
6. Press the OK button (![]() ) to save.
) to save.
D-Lighting
The D-Lighting option (![]() ) allows you to adjust the image by brightening the shadows. This is not the same as Active D-Lighting (
) allows you to adjust the image by brightening the shadows. This is not the same as Active D-Lighting (![]() ). D-Lighting uses a curves adjustment to help bring out details in the shadow areas of an image. This option is for use with backlit subjects or images that may be slightly underexposed.
). D-Lighting uses a curves adjustment to help bring out details in the shadow areas of an image. This option is for use with backlit subjects or images that may be slightly underexposed.
When you select the D-Lighting option (![]() ) from the Retouch menu (
) from the Retouch menu (![]() ), you can use the multi-selector to choose a thumbnail, and then press the Zoom in button (
), you can use the multi-selector to choose a thumbnail, and then press the Zoom in button (![]() ) to get a closer look at the image. Press the OK button (
) to get a closer look at the image. Press the OK button (![]() ) to choose the image to retouch, and two thumbnails are displayed; one is the original image, and the other is the image with D-Lighting applied.
) to choose the image to retouch, and two thumbnails are displayed; one is the original image, and the other is the image with D-Lighting applied.
You can press the multi-selector up (![]() ) or down (
) or down (![]() ) to select the amount of D-Lighting: Low, Normal, or High. You can view the results in real time and compare them with the original before saving. Press the OK button (
) to select the amount of D-Lighting: Low, Normal, or High. You can view the results in real time and compare them with the original before saving. Press the OK button (![]() ) to save, the Playback button (
) to save, the Playback button (![]() ) to cancel, or the Zoom in button (
) to cancel, or the Zoom in button (![]() ) to view the full-frame image.
) to view the full-frame image.
Red-eye correction
Select the Red-eye correction option (see Figure 3.11) if you want the camera to automatically correct for the red-eye effect that can sometimes be caused by using the flash on pictures taken of people. This option is only available on photos taken with flash. When you choose images to retouch from the Playback menu (![]() ) by pressing the OK button (
) by pressing the OK button (![]() ) during preview, this option is grayed out and cannot be selected if the camera detects that a flash was not used. When you attempt to choose an image directly from the Retouch Menu (
) during preview, this option is grayed out and cannot be selected if the camera detects that a flash was not used. When you attempt to choose an image directly from the Retouch Menu (![]() ), a message appears, stating that this image cannot be used.
), a message appears, stating that this image cannot be used.
Once you select the image, press the OK button (![]() ); the camera then automatically corrects the red-eye and saves a copy of the image to the memory card. If you select an image that flash was used on but there is no red-eye present, the camera displays a message stating that red-eye is not detected in the image and no retouching will be done.
); the camera then automatically corrects the red-eye and saves a copy of the image to the memory card. If you select an image that flash was used on but there is no red-eye present, the camera displays a message stating that red-eye is not detected in the image and no retouching will be done.
Trim
Select the Trim option to crop your image to remove distracting elements, or crop closer to the subject. Use the multi-selector to find the image to crop and press the OK button (![]() ) to select it. You can also use the Zoom in button (
) to select it. You can also use the Zoom in button (![]() ) and the Zoom out button (
) and the Zoom out button (![]() ) to adjust the size of the crop. This allows you to crop closer in, or back it out if you find that you’ve zoomed in too much.
) to adjust the size of the crop. This allows you to crop closer in, or back it out if you find that you’ve zoomed in too much.
Use the multi-selector to move the crop around the image so you can center the crop on the part of the image that you think is most important. When you are happy with the crop you’ve selected, press the OK button (![]() ) to save a copy of the image, or press the Playback button (
) to save a copy of the image, or press the Playback button (![]() ) to return to the main menu without saving.
) to return to the main menu without saving.
Rotating the Main Command dial allows you to choose different aspect ratios for your crop. You can choose the aspect ratio to conform the crop to the following sizes:
• 3:2. This is the default crop size. It is good for prints that are 4 × 6, 8 × 12, and 12 × 18.
• 4:3. This ratio is for 6 × 8 or 12 × 16 prints.
• 5:4. The standard size for 8 × 10 prints.
• 1:1. Select this ratio for a square crop.
• 16:9. This is what’s known as a cinematic crop. Movie screens and widescreen televisions use this ratio.
Monochrome
The Monochrome option (see Figure 3.11) allows you to make a copy of your color image in a monochrome format. You can select from the following three options:
• Black-and-white. This option changes your image to shades of black, white, and gray.
• Sepia. Select this option to give your image the look of a black-and-white photo that has been sepia toned. Sepia toning is a traditional photographic process that gives the photo a reddish-brown tint.
• Cyanotype. This option gives your photos a blue or cyan tint. Cyanotypes are a result of processing film-based photographic images.
When using the Sepia or Cyanotype options, you can press the multi-selector up (![]() ) or down (
) or down (![]() ) to adjust the lightness or darkness of the effect. Press the OK button (
) to adjust the lightness or darkness of the effect. Press the OK button (![]() ) to save a copy of the image or press the Playback button (
) to save a copy of the image or press the Playback button (![]() ) to cancel without saving.
) to cancel without saving.
I recommend that you use the Monochrome Picture Control (![]() ) rather than the Monochrome option in the Retouch menu (
) rather than the Monochrome option in the Retouch menu (![]() ) because it offers settings that are more flexible.
) because it offers settings that are more flexible.
Filter effects
The Filter effects option allows you to simulate the effects of using certain filters over your lens to subtly modify the colors of your image. You can choose from the following seven filter effects:
• Skylight. A skylight filter is used to absorb some of the UV rays emitted by the sun. The UV rays can give your image a slightly bluish tint. Using the skylight filter effect causes your image to be less blue.
• Warm filter. A warming filter adds a little orange to your image to give it a warmer hue. This filter effect can sometimes be useful when using flash because flash can sometimes cause your images to feel a little too cool.
• Red intensifier. This filter boosts the saturation of reds in the image. Press the multi-selector up (![]() ) or down (
) or down (![]() ) to lighten or darken the effect.
) to lighten or darken the effect.
• Green intensifier. This filter boosts the saturation of greens in the image. Press the multi-selector up (![]() ) or down (
) or down (![]() ) to lighten or darken the effect.
) to lighten or darken the effect.
• Blue intensifier. This filter boosts the saturation of blues in the image. Press the multi-selector up (![]() ) or down (
) or down (![]() ) to lighten or darken the effect.
) to lighten or darken the effect.
• Cross screen. This effect simulates the use of a star filter, creating a star-shaped pattern on the bright highlights in your image. If your image doesn’t have any bright highlights, the effect is not apparent. Once you select an image for the cross screen filter, you see a submenu with a few options that you can adjust. You can choose the number of points on the stars: 4, 6, or 8. You can also choose the amount; there are three settings that give you more or fewer stars. You can choose three angle settings that control the angle at which the star is tilted. You also have three settings that control the length of the points on the stars.
3.12 The Cross screen filter. Exposure: ISO 100, f/2.0, 1/1600 second with a 50mm f/1.8G.
• Soft. This filter applies a soft glow to your images. This effect is mostly used for portraiture but can also be used effectively for landscapes.
3.13 The Soft filter. Exposure: ISO 100, f/2.0, 1/1600 second with a 50mm f/1.8G.
After choosing the desired filter effect, press the OK button (![]() ) to save a copy of your image with the effect added.
) to save a copy of your image with the effect added.
Color balance
You can use the Color balance option (see Figure 3.11) to create a copy of an image on which you have adjusted the color balance. Using this option, you can use the multi-selector to add a color tint to your image. You can use this effect to neutralize an existing color tint or to add a color tint for artistic purposes.
Press the multi-selector up (![]() ) to increase the amount of green, down (
) to increase the amount of green, down (![]() ) to increase the amount of magenta, left (
) to increase the amount of magenta, left (![]() ) to add blue, or right (
) to add blue, or right (![]() ) to add amber.
) to add amber.
A color chart and color histograms are displayed along with an image preview so you can see how the color balance affects your image. When you are satisfied with your image, press the OK button (![]() ) to save a copy.
) to save a copy.
If you adjust the color balance using the LCD monitor as a reference, it may not yield the most accurate results.
Image overlay
The Image overlay option allows you to combine two RAW images and save them as one. You can only access this menu option by entering the Retouch menu (![]() ), not by pressing the OK button (
), not by pressing the OK button (![]() ) when in Playback mode (
) when in Playback mode (![]() ).
).
To use this option, you must have at least two RAW images saved to the memory card. This option is not available for use with JPEGs.
Follow these steps to create an image overlay:
1. Press the Menu button (![]() ) to view the menu options. Use the multi-selector to scroll down to the Retouch menu (
) to view the menu options. Use the multi-selector to scroll down to the Retouch menu (![]() ), and then press the multi-selector right (
), and then press the multi-selector right (![]() ) to enter it.
) to enter it.
2. Press the multi-selector up (![]() ) or down (
) or down (![]() ) to highlight Image Overlay, and then press the multi-selector right (
) to highlight Image Overlay, and then press the multi-selector right (![]() ). This displays the Image Overlay menu.
). This displays the Image Overlay menu.
3. Press the OK button (![]() ) to view RAW image thumbnails.
) to view RAW image thumbnails.
4. Use the multi-selector to highlight the first RAW image to be used in the overlay, and then press the OK button (![]() ) to select it.
) to select it.
5. Adjust the exposure of Image 1 by pressing the multi-selector up (![]() ) or down (
) or down (![]() ), and then press the OK button (
), and then press the OK button (![]() ) when the image is adjusted to your liking.
) when the image is adjusted to your liking.
6. Press the multi-selector right (![]() ) to switch to Image 2.
) to switch to Image 2.
7. Press the OK button (![]() ) to view RAW image thumbnails.
) to view RAW image thumbnails.
8. Use the multi-selector to highlight the second RAW image to be used in the overlay, and then press the OK button (![]() ) to select it.
) to select it.
9. Adjust the exposure of Image 2 by pressing the multi-selector up (![]() ) or down (
) or down (![]() ), and then press the OK button (
), and then press the OK button (![]() ) when the image is adjusted to your liking.
) when the image is adjusted to your liking.
10. Press the multi-selector right (![]() ) to highlight the Preview window.
) to highlight the Preview window.
11. Press the multi-selector up (![]() ) or down (
) or down (![]() ) to highlight Overlay to preview the image. Use the multi-selector to highlight Save if you want to save the image without previewing it.
) to highlight Overlay to preview the image. Use the multi-selector to highlight Save if you want to save the image without previewing it.
NEF (RAW) processing
The NEF (RAW) processing option allows you to do some basic editing to images saved in the RAW format, without downloading them to a computer and using image-editing software. This option is limited in its function but allows you to fine-tune your image more precisely when printing straight from the camera or memory card.
You can save a copy of your image in JPEG format, choose the image quality and size at which to save the copy, adjust the white balance settings, fine-tune the exposure compensation, and select a Picture Control setting (![]() ) to apply.
) to apply.
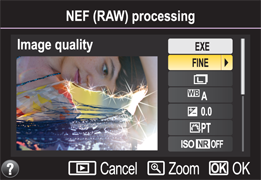
3.14 The NEF (RAW) processing option in the Retouch menu.
To apply RAW processing, follow these steps:
1. Enter the NEF (RAW) processing menu through the Retouch menu (![]() ).
).
2. Press the OK button (![]() ) or multi-selector right (
) or multi-selector right (![]() ) to view thumbnails of the images stored on your card. Only images saved in RAW format appear.
) to view thumbnails of the images stored on your card. Only images saved in RAW format appear.
3. Use the multi-selector to scroll through the thumbnails, and then press the OK button (![]() ) to select the highlighted image. This displays a screen with the image adjustment submenu located to the right of the image you selected.
) to select the highlighted image. This displays a screen with the image adjustment submenu located to the right of the image you selected.
4. Press the multi-selector up (![]() ) or down (
) or down (![]() ) to highlight the adjustment you want to make. You can set image quality, image size, white balance, exposure compensation, Picture Control, Hi ISO NR, Color space, and D-Lighting. You can also press the Zoom in button (
) to highlight the adjustment you want to make. You can set image quality, image size, white balance, exposure compensation, Picture Control, Hi ISO NR, Color space, and D-Lighting. You can also press the Zoom in button (![]() ) to view a full-screen preview.
) to view a full-screen preview.
5. After you make your adjustments, use the multi-selector to highlight EXE, and then press the OK button (![]() ) to save the changes. Press the Playback button (
) to save the changes. Press the Playback button (![]() ) to cancel without saving. EXE sets the changes, and saves a copy of the image in JPEG format at the size and quality that you select. The camera default saves the image as a Large, Fine JPEG.
) to cancel without saving. EXE sets the changes, and saves a copy of the image in JPEG format at the size and quality that you select. The camera default saves the image as a Large, Fine JPEG.
For more information on image size, quality, white balance, and exposure compensation, see Chapter 2.
Resize
The Resize option (see Figure 3.11) is handy because it allows you to make smaller-sized copies of your images. Smaller pictures are more suitable for making small prints and web-sized images, and for e-mailing to friends and family. The first thing you need to do when creating a resized image is select the Choose size option from the submenu. You then have the following options:
• 2.5M. 1920 × 1280 pixels.
• 1.1M. 1280 × 856 pixels.
• 0.6M. 960 × 640 pixels.
• 0.3M. 640 × 424 pixels.
• 0.1M. 320 × 216 pixels.
After you decide the size at which you want your small pictures copied, go to the Select image option. When the Select image option is chosen, the LCD screen displays thumbnails of all of the images in the current folder. To scroll through your images, press the multi-selector right (![]() ) or left (
) or left (![]() ). To select or deselect an image, press the multi-selector up (
). To select or deselect an image, press the multi-selector up (![]() ) or down (
) or down (![]() ). You can select as many images as you have on your memory card. When all the images from which you want to make a resized copy are selected, press the OK button (
). You can select as many images as you have on your memory card. When all the images from which you want to make a resized copy are selected, press the OK button (![]() ) to make the copies.
) to make the copies.
Quick retouch
The Quick retouch option is the easiest one to use in the Retouch menu (![]() ). The camera automatically adjusts the contrast and saturation, making your image brighter and more colorful, perfect for printing straight from the camera or memory card. In the event that your image is dark or backlit, the camera also automatically applies D-Lighting to help bring out details in the shadow areas of your picture.
). The camera automatically adjusts the contrast and saturation, making your image brighter and more colorful, perfect for printing straight from the camera or memory card. In the event that your image is dark or backlit, the camera also automatically applies D-Lighting to help bring out details in the shadow areas of your picture.
Once you select an image for Quick retouch, you can choose how much of the effect to apply: High, Normal, or Low. The LCD monitor displays a side-by-side comparison between the image as shot and the retouched image to give you a better idea of what the effect looks like.
Once you decide how much of the effect you want, press the OK button (![]() ) to save a copy of the retouched image, or you can press the Playback button (
) to save a copy of the retouched image, or you can press the Playback button (![]() ) to cancel without making any changes to your picture.
) to cancel without making any changes to your picture.
Straighten
The Straighten feature fixes images shot at a slight angle, which is another nice feature when printing directly from the camera. When you select an image, press the multi-selector right (![]() ) and left (
) and left (![]() ) to adjust the tilt amount. A grid overlay is displayed over the image. You can use it to align with the horizon or another straight object in the photo.
) to adjust the tilt amount. A grid overlay is displayed over the image. You can use it to align with the horizon or another straight object in the photo.
Distortion control
As discussed in Chapter 4, some lenses are prone to distortion. The Distortion control option (see Figure 3.11) allows you to make in-camera corrections for lens distortion. There are two options: Auto and Manual. Auto automatically applies any needed corrections, and Manual allows you to apply the effect yourself using the multi-selector. Press the multi-selector right (![]() ) to reduce barrel distortion (wide-angle), or press the multi-selector left (
) to reduce barrel distortion (wide-angle), or press the multi-selector left (![]() ) to reduce pincushion distortion (telephoto).
) to reduce pincushion distortion (telephoto).
The Distortion control Auto setting is recommended for use with NIKKOR G- and D-type lenses only.
Fisheye
The Fisheye option does the opposite of what distortion control does; it adds barrel distortion to the image to make it appear as if it were taken with a fisheye lens. Press the multi-selector right (![]() ) to increase the effect or left (
) to increase the effect or left (![]() ) to decrease it. To be honest, this effect isn’t that great, so use it at your own peril.
) to decrease it. To be honest, this effect isn’t that great, so use it at your own peril.
Color outline
The Color outline feature takes the selected image and creates an outline copy that you can open in image-editing software, such as Adobe Photoshop or Corel Paintshop Pro, and color in manually. This option works best when used on an image with high contrast. It’s a pretty cool effect, and the image can even be used straight from the camera, which gives it the look of a drawing.
Color sketch
Select Color sketch to make your image appear as if it were drawn with colored pencils. Selecting Vividness allows you to increase the color saturation of the effect. The Outlines option allows you to change the thickness of the outlines of the sketch.
Perspective control
The Perspective control option allows you to correct problems with perspective caused when you point the camera upward, or shoot at an angle instead of straight on. Think of shooting a tall building; when you tilt the camera up at the building, it causes the base to look larger than the top of the building. You can correct for this by using the Perspective control option.
Press the multi-selector up (![]() ) or down (
) or down (![]() ) to adjust the vertical perspective. Press the multi-selector left (
) to adjust the vertical perspective. Press the multi-selector left (![]() ) or right (
) or right (![]() ) to adjust the horizontal perspective.
) to adjust the horizontal perspective.
Miniature effect
The Miniature effect (![]() ) is modeled after a technique that some people, erroneously, call the tilt-shift effect because it can be achieved optically with a tilt-shift lens. Quite simply, what this effect does is simulate the shallow depth of field normally present in macro shots. This tricks the eye into seeing something large as something very tiny. The effect only works with very far-off subjects and works better when the vantage point is looking down. It’s a cool effect, but it only works with limited subjects, so keep that in mind.
) is modeled after a technique that some people, erroneously, call the tilt-shift effect because it can be achieved optically with a tilt-shift lens. Quite simply, what this effect does is simulate the shallow depth of field normally present in macro shots. This tricks the eye into seeing something large as something very tiny. The effect only works with very far-off subjects and works better when the vantage point is looking down. It’s a cool effect, but it only works with limited subjects, so keep that in mind.
Once an image is selected for use with the Miniature effect (![]() ), you can use the multi-selector up (
), you can use the multi-selector up (![]() ) or down (
) or down (![]() ) to move the sharpness zone up or down in the image. Use the multi-selector left (
) to move the sharpness zone up or down in the image. Use the multi-selector left (![]() ) or right (
) or right (![]() ) to adjust the width of the sharpness zone. Press the Zoom out/ Thumbnail button (
) to adjust the width of the sharpness zone. Press the Zoom out/ Thumbnail button (![]() ) to turn the sharpness zone from horizontal to vertical. You can then use the multi-selector up (
) to turn the sharpness zone from horizontal to vertical. You can then use the multi-selector up (![]() ) or down (
) or down (![]() ) to adjust the width of the sharpness zone in the image. Press the multi-selector left (
) to adjust the width of the sharpness zone in the image. Press the multi-selector left (![]() ) or right (
) or right (![]() ) to move the sharpness zone left or right.
) to move the sharpness zone left or right.
Press the Zoom in button (![]() ) to preview the effect. Press the OK button (
) to preview the effect. Press the OK button (![]() ) to save a copy of the image with the effect added, or press the Playback button (
) to save a copy of the image with the effect added, or press the Playback button (![]() ) to cancel.
) to cancel.
Selective color
Use the Selective color option (see Figure 3.11) to turn your image black and white, while retaining up to three colors. After selecting the image, use the multi-selector to maneuver the cursor over an object of a particular color. Once the cursor is over the color, press the AE-L/AF-L button (![]() ) to select the color. Press the multi-selector up (
) to select the color. Press the multi-selector up (![]() ) or down (
) or down (![]() ) to adjust the purity of the color. Lower numbers are more specific with the color; higher numbers select a broader range of the color selection.
) to adjust the purity of the color. Lower numbers are more specific with the color; higher numbers select a broader range of the color selection.
Rotate the Main Command dial right to select the other color options and follow the same procedures. For more precise color selection, use the Zoom in button (![]() ) to magnify the image. To reset the image, press the Delete button (
) to magnify the image. To reset the image, press the Delete button (![]() ). Press the OK button (
). Press the OK button (![]() ) to save the image.
) to save the image.
Edit movie
The Edit movie option allows you to make basic edits to videos that you shoot with the D5200. You have three options: choose the Start frame, choose the End frame, and grab a still image from the video. Each edit you make is saved as a new file so there’s no need to worry about making any permanent changes to your original file. To edit your video, follow these steps:
1. Press the Menu button (![]() ), and then use the multi-selector to select the Retouch menu (
), and then use the multi-selector to select the Retouch menu (![]() ).
).
2. Select Edit Movie. Press the OK button (![]() ) or the multi-selector right (
) or the multi-selector right (![]() ) to view menu options.
) to view menu options.
3. Choose the edit you want to make. The options are Choose start point, Choose end point, or Save selected frame. Press the OK button (![]() ) or the multi-selector right (
) or the multi-selector right (![]() ). This displays a menu with all videos saved to the current card.
). This displays a menu with all videos saved to the current card.
4. Select the video. Use the multi-selector to scroll through the available videos. The selected video is highlighted in yellow. Press the OK button (![]() ) when your video is selected.
) when your video is selected.
5. Play the video. Press the OK button (![]() ) to begin playback. Press the multi-selector up (
) to begin playback. Press the multi-selector up (![]() ) at the point in the video where you want to make the edit. You can press the multi-selector down (
) at the point in the video where you want to make the edit. You can press the multi-selector down (![]() ) to stop playback. Press the multi-selector left (
) to stop playback. Press the multi-selector left (![]() ) and right (
) and right (![]() ) to go backward or forward in the video clip.
) to go backward or forward in the video clip.
6. Make the edit. Press the multi-selector up (![]() ) to make the cut. I prefer to press the multi-selector down (
) to make the cut. I prefer to press the multi-selector down (![]() ) to pause the movie first, and make sure that’s where I want to make the cut. I then make the edit and the movie saves automatically.
) to pause the movie first, and make sure that’s where I want to make the cut. I then make the edit and the movie saves automatically.
My Menu
The My Menu option (![]() ) allows you to create your own customized menu by choosing the options that it contains. You can also set the different menu options to whatever order you want. This allows you to have all of the settings you change most often right at your fingertips without having to go searching through all the menus and submenus. For example, I have the My Menu option set to display all of the menu options I frequently use, including Storage Folder, GPS, Custom Settings menu (
) allows you to create your own customized menu by choosing the options that it contains. You can also set the different menu options to whatever order you want. This allows you to have all of the settings you change most often right at your fingertips without having to go searching through all the menus and submenus. For example, I have the My Menu option set to display all of the menu options I frequently use, including Storage Folder, GPS, Custom Settings menu (![]() ) f1 and f2, Picture Control (
) f1 and f2, Picture Control (![]() ), and a few others. This saves me an untold amount of time because I don’t have to go through a lot of different menus.
), and a few others. This saves me an untold amount of time because I don’t have to go through a lot of different menus.
3.15 My Menu with my personal settings.
Follow these steps to set up your custom My Menu (![]() ):
):
1. Select My Menu (![]() ), and then press the OK button (
), and then press the OK button (![]() ).
).
2. Select Add items, and then press the OK button (![]() ).
).
3. Use the multi-selector to navigate through the menus and add specific menu options, and then press the OK button (![]() ).
).
4. Use the multi-selector to position where you want the menu item to appear. Press the OK button (![]() ) to save the order.
) to save the order.
5. Repeat steps 2 through 4 until you have added all of the menu items you want.
To reorder the items in My Menu (![]() ), follow these steps:
), follow these steps:
1. Select My Menu (![]() ), and then press the OK button (
), and then press the OK button (![]() ).
).
2. Select Rank items, and then press the OK button (![]() ). A list of all menu options saved to My Menu (
). A list of all menu options saved to My Menu (![]() ) appears.
) appears.
3. Use the multi-selector to highlight the menu option you want to move, and then press the OK button (![]() ).
).
4. Use the multi-selector to move the yellow line where you want to move the selected item. Press the OK button (![]() ) to set. Repeat this step until you have moved all of the menu options that you want.
) to set. Repeat this step until you have moved all of the menu options that you want.
5. Press the Menu button (![]() ) or tap the shutter-release button to exit.
) or tap the shutter-release button to exit.
To delete options from My Menu (![]() ), simply highlight the one that you want to delete, and then press the Delete button (
), simply highlight the one that you want to delete, and then press the Delete button (![]() ). The camera asks for confirmation that you indeed want to delete the setting. Press the Delete button (
). The camera asks for confirmation that you indeed want to delete the setting. Press the Delete button (![]() ) again to confirm, or press the Menu button (
) again to confirm, or press the Menu button (![]() ) to exit without deleting the menu option.
) to exit without deleting the menu option.
As I mentioned earlier, you can replace the My Menu option (![]() ) with the Recent settings tab. The Recent settings menu (
) with the Recent settings tab. The Recent settings menu (![]() ) stores the last 20 settings you have adjusted. Follow these steps to switch from My Menu (
) stores the last 20 settings you have adjusted. Follow these steps to switch from My Menu (![]() ) to Recent settings (
) to Recent settings (![]() ):
):
1. Select My Menu (![]() ) from the Menu tab, and then press the OK button (
) from the Menu tab, and then press the OK button (![]() ) to view My Menu.
) to view My Menu.
2. Use the multi-selector to scroll down to the Choose tab menu option. Press the OK button (![]() ).
).
3. Select Recent settings (![]() ). Press the OK button (
). Press the OK button (![]() ) or the multi-selector right (
) or the multi-selector right (![]() ) to change the setting.
) to change the setting.
4. Press the Menu button (![]() ) or tap the shutter-release button to exit.
) or tap the shutter-release button to exit.
..................Content has been hidden....................
You can't read the all page of ebook, please click here login for view all page.