
Chapter 4: Working with Camera Raw
In This Chapter
![]() Getting familiar with Camera Raw
Getting familiar with Camera Raw
![]() Understanding the Camera Raw settings
Understanding the Camera Raw settings
![]() Using the raw converter to make tweaks
Using the raw converter to make tweaks
![]() Saving files
Saving files
The Camera Raw format provides you with an optimum image for editing in Elements. When a Camera Raw image is saved to a media source, all the information that the sensor captured is saved with the file. When you want to edit your images, this extra information gives you immense flexibility.
For example, you can open a Camera Raw image and, before the image opens in Elements, you can adjust temperature, exposure, and a bunch of other settings — in effect, processing the photo after the shot was taken.
You can return to the original Camera Raw file and change the temperature or exposure (for example) to open the file with different settings to see how they affect the image. Just as chemical temperature and development time affect analog film processing, similar options affect post-processing Camera Raw images. The difference between analog film and Camera Raw is that after the analog film is processed, you can’t change the processing attributes. With Camera Raw, you can go back and post-process the image 100 times or more — and change the processing attributes each time.
Camera Raw also supports higher bit-depth images than JPEG files do. In Book III, Chapter 5, we talk about 8-bit and 16-bit images, including advantages of using 16-bit images. Camera Raw files typically produce these higher bit-depth images that give you more flexibility when editing brightness, contrast, and color.
 If your camera offers you the choice between capturing just JPEG images and both JPEG and Camera Raw, always choose the latter. You have much more editing control over your images — and ultimately, you get better results.
 If your camera isn’t capable of taking Camera Raw files, you can always open your original JPEG files as Camera Raw. Choose File⇒Open As in the Photo Editor and choose Camera Raw from the Open As drop-down menu. Your file opens in the Camera Raw converter. All that follows in this chapter is available to users with or without camera options for taking Camera Raw photos. Check out the following sections for details about processing your images with the Elements Camera Raw tools.
Introducing the Benefits of Camera Raw Files
Camera Raw images enable you to post-process your pictures. When you take a picture with a digital camera in Camera Raw format, the camera’s sensor records as much information as it can. When you open a Camera Raw file in Elements, you decide what part of that data is opened as a new image.
If you don’t have a camera that’s capable of capturing Camera Raw images, you aren’t left out. Any photo you’ve saved in JPEG or TIFF format can also open in the Camera Raw converter. You don’t have the same file attributes as you do with Camera Raw images — these images won’t have all the data captured by your camera’s sensor because the images will already be post-processed — but you do have access to all the image-correction controls that authentic Camera Raw files have.
In regard to processing Camera Raw files, suppose that your camera is set for exposure in tungsten lighting. (Tungsten flash photography is common in studios.) If you take this camera outside in daylight and shoot an image without changing the settings, all your images appear with a blue cast because tungsten lighting requires a cooler color temperature than daylight.
If you acquire images that are saved in JPEG format, you have to do a lot of color correction after the image opens in Elements. If you shoot the image in Camera Raw format, you just process the image with a warmer temperature (consistent with conditions when the shot was taken), and your color correction in Elements happens in a fraction of the time it takes to fix a file opened without using the Camera Raw converter. Fortunately, you can also change temperature for JPEG and TIFF files if you open them in the Camera Raw converter.
Post-processing Camera Raw images requires a plug-in that’s installed with Photoshop Elements. When you open a Camera Raw image, the Camera Raw plug-in takes over and provides you with a huge set of options for post-processing the image before you open it in one of the Elements Editors.
Each camera manufacturer uses a different flavor of Camera Raw; some manufacturer use different Camera Raw formats in different models in their product line. Although Adobe tries to keep up with all the various Camera Raw formats, you may find a camera using a format not supported by the Camera Raw plug-in. Be sure to check for updates online for Photoshop Elements. As new developments occur, Adobe makes an effort to update plug-ins to support newer formats.
Opening Images in the Elements Raw Converter
When you open a Camera Raw file in Elements, it always opens in the raw converter. Elements recognizes raw files and defaults to open the file in the raw converter. (See Chapter 1 of this minibook for details about opening files.)
If you want to use the raw converter to work with any photo on your computer saved as JPEG, TIFF, or another format, you need to tell Elements that you want to use the raw converter. In the Photo Editor, choose Open As⇒Camera Raw. The file opens in the raw converter, where you can make adjustments before opening the file in the Photo Editor.
You might use this method to open nonraw files that need temperature adjustments before attempting to edit the photos in the Photo Editor.
In Figure 4-1, a single image is opened in the Camera Raw converter. You can use a vast number of options to post-process your image before you drop it into Elements. This window is like a digital darkroom, where you can process the film and see what you’re doing to the image before you accept the changes.
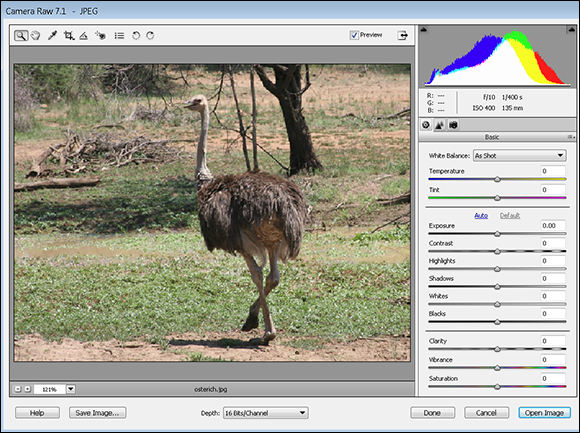
Figure 4-1: A single image opened in the Camera Raw converter.
Processing Files in the Camera Raw Converter
With an image open in the Camera Raw converter, don’t be shy. Poke around and adjust settings to see the results in the Preview area. The more you play with the settings, the more you find out about how to get the best out of Camera Raw.
If you have your monitor properly calibrated (as we explain in Book III, Chapter 5), all the adjustments you make for Camera Raw format are dynamically updated in the Image preview.
When working in the Camera Raw converter, the adjustments are placed in the order you should follow. Start at the top of the right panel and make adjustments beginning with Temperature and Tint. Follow downward making adjustments to Exposure, Contrast, Highlights, and so on. You can go back and fine-tune the adjustments after addressing each item from top to bottom.
In the following sections, you find an introduction to the tools and settings in the converter. You then walk through the steps of processing an image in the raw converter one setting at a time.
Introducing the converter’s tools and settings
The Camera Raw window has a large number of settings, as the following list describes:
![]() Tools: Nine tools appear in the window:
Tools: Nine tools appear in the window:
• Zoom: This tool zooms in and out of the Image preview.
• Hand: This option moves the image around, just as it does in the Elements image window.
• White Balance: Changes the Temperature and Tint.
• Crop tool: Draw a marquee with the Crop tool and make your color and brightness adjustments. The adjustments are applied only to the area defined by the Crop tool. When you click Open Image, the photo opens, cropped to the area you marked with the Crop tool.
• Straighten tool: The Straighten tool enables you to draw a horizontal axis to straighten a crooked photo.
• Red Eye Removal: Click the Red Eye Removal tool to remove red-eye caused by flash lighting.
• Open Preferences dialog box (Ctrl+K [![]() +K]): Click this tool to open the Camera Raw Preferences dialog box, where you can make choices for saving image settings, change default image settings, and use the Adobe Digital Negative (DNG) format.
+K]): Click this tool to open the Camera Raw Preferences dialog box, where you can make choices for saving image settings, change default image settings, and use the Adobe Digital Negative (DNG) format.
• Rotate Left: Used to rotate the image counterclockwise.
• Rotate Right: The last tool below the Title bar is used to rotate the image clockwise.
![]() Preview: Select the check box to show dynamic previews of your edits.
Preview: Select the check box to show dynamic previews of your edits.
![]() Shadow/Highlight Clipping: The Shadow and Highlight buttons above the histogram (denoted by the up-pointing arrows shown above the histogram at the top of the adjustments pane) show clipping in the shadows (dark areas of the image) and highlights (light areas of the image). Clipping means that, in a certain area, the image has lost data (and, ultimately, detail), and you don’t want clipping to appear in your pictures. When you make adjustments with clipping enabled, shadow clipping is shown in blue, and highlight clipping is shown in red in the Image preview. Take a look at Figure 4-2, in which we exaggerate clipping to show how the Clipping preview appears.
Shadow/Highlight Clipping: The Shadow and Highlight buttons above the histogram (denoted by the up-pointing arrows shown above the histogram at the top of the adjustments pane) show clipping in the shadows (dark areas of the image) and highlights (light areas of the image). Clipping means that, in a certain area, the image has lost data (and, ultimately, detail), and you don’t want clipping to appear in your pictures. When you make adjustments with clipping enabled, shadow clipping is shown in blue, and highlight clipping is shown in red in the Image preview. Take a look at Figure 4-2, in which we exaggerate clipping to show how the Clipping preview appears.
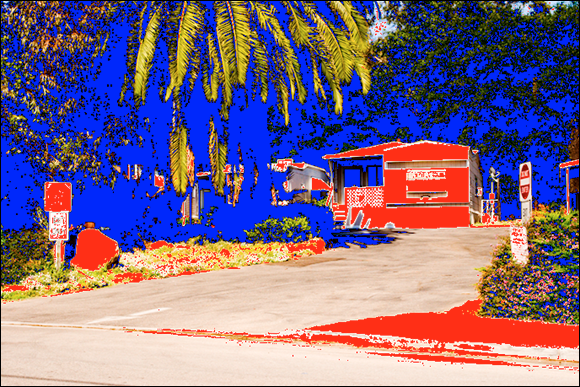
Figure 4-2: Shadow clipping appears in blue, and highlight clipping appears in red.
![]() Histogram: This graph displays all three channels (red, green, and blue) in an image simultaneously. The histogram changes when you change other options in the Camera Raw window.
Histogram: This graph displays all three channels (red, green, and blue) in an image simultaneously. The histogram changes when you change other options in the Camera Raw window.
The histogram graphs how pixels in an image are distributed. The distribution includes the number of pixels at each color-intensity level (one of the 256 levels, which you can find out about in Book III, Chapter 3).
If images have pixels concentrated in the shadows, you see the histogram skewed to the left. Conversely, images with pixels concentrated in the highlights reveal a histogram skewed to the right.
As you grow more familiar with histograms, eventually a quick glance at a histogram will suggest adjustments that you can make to improve an image.
![]() RGB values: These values appear below the histogram. When you first open an image, you don’t see any values in the RGB area. Click the Zoom tool, the Hand tool, or the White Balance tool and move the cursor over the Image preview. When you move any of these tools around the image, the RGB values corresponding to the point below the cursor are reported in this area.
RGB values: These values appear below the histogram. When you first open an image, you don’t see any values in the RGB area. Click the Zoom tool, the Hand tool, or the White Balance tool and move the cursor over the Image preview. When you move any of these tools around the image, the RGB values corresponding to the point below the cursor are reported in this area.
![]() Detail icons: The three icons change the pane below the Histogram from Basic (refer to Figure 4-1) to Detail (as shown in Figure 4-3), where you apply sharpening and noise reduction, or to Camera Calibration, where you can select a camera profile. Here’s a brief introduction to the areas you find on the Detail pane:
Detail icons: The three icons change the pane below the Histogram from Basic (refer to Figure 4-1) to Detail (as shown in Figure 4-3), where you apply sharpening and noise reduction, or to Camera Calibration, where you can select a camera profile. Here’s a brief introduction to the areas you find on the Detail pane:

Figure 4-3: Clicking the Triangle icon below the histogram opens the Detail tab, where you can adjust sharpness and reduce noise.
• Sharpening images: You can choose to sharpen images in the Camera Raw window or in Elements. Try to avoid sharpening here; instead, use the sharpening tools in Elements (as we explain in Book VIII, Chapter 1).
• Noise reduction: Includes options for adjusting the brightness and color. You’ve probably seen images with a lot of noise; in extreme cases, the pictures look like they were printed on sandpaper. Noise in an image is okay if that’s an effect you want to apply intentionally. If you want a smooth-looking image, however, you have to eliminate any noise introduced by the camera. Luminance Smoothing reduces grayscale noise. The next setting is Color Noise Reduction, which is used to reduce color noise.
![]() Settings (pop-up menu): This pop-up menu opens when you click the small icon on the far right of the Basic tab. From this menu, you have choices for applying settings to the open image. If you change any setting, the menu option changes to Custom.
Settings (pop-up menu): This pop-up menu opens when you click the small icon on the far right of the Basic tab. From this menu, you have choices for applying settings to the open image. If you change any setting, the menu option changes to Custom.
If you’ve made setting choices on a Camera Raw image and want to return to the shot as it was taken by the camera, open the image and select Reset Camera Raw Defaults from the Settings pop-up menu.
The Previous Conversion option is handy if you have a collection of images that all require the same settings. After adjusting the first image, open additional images and select Previous Conversion. The Camera Raw plug-in applies the last settings you made to a Camera Raw image to the currently open file.
![]() White Balance: You use White Balance settings (available on the Basic tab — the leftmost icon below the histogram; refer to Figure 4-1) to adjust the color balance of an image to reflect the lighting conditions under which the shot was originally taken. Remember that the sensor in a digital camera is capable of capturing the entire range of white balance that the sensor can see. You choose your settings not necessarily on the basis of what you see, but rather to match the white balance of the shot you took. Therefore, if you set up your camera to take pictures under one set of lighting conditions and then move to another set of lighting conditions but forget to change the settings, you can let the Camera Raw plug-in correct for the difference in white balance; that’s because the sensor picked up the entire range, and the necessary data is contained in the file.
White Balance: You use White Balance settings (available on the Basic tab — the leftmost icon below the histogram; refer to Figure 4-1) to adjust the color balance of an image to reflect the lighting conditions under which the shot was originally taken. Remember that the sensor in a digital camera is capable of capturing the entire range of white balance that the sensor can see. You choose your settings not necessarily on the basis of what you see, but rather to match the white balance of the shot you took. Therefore, if you set up your camera to take pictures under one set of lighting conditions and then move to another set of lighting conditions but forget to change the settings, you can let the Camera Raw plug-in correct for the difference in white balance; that’s because the sensor picked up the entire range, and the necessary data is contained in the file.
In Figure 4-4, you can see a picture taken with the camera set for tungsten lighting, but the shot was taken outdoors in daylight. By changing the White Balance setting in the Camera Raw dialog box, you can see how different settings affect the image color.
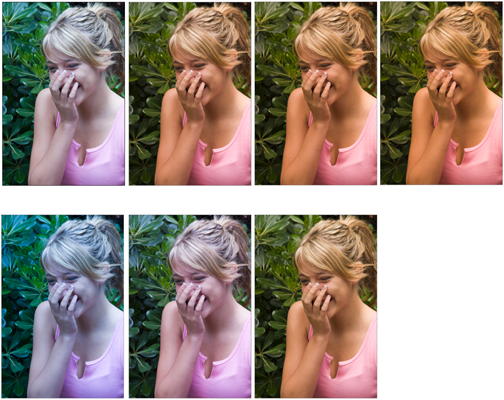
Figure 4-4: Changing the White Balance setting can dramatically change the image color.
![]() Temperature: If one of the preset White Balance options doesn’t quite do the job, move the Basic tab’s Temperature slider or edit the text box to settle on values between one white balance choice and another. Use this item to fine-tune the white balance.
Temperature: If one of the preset White Balance options doesn’t quite do the job, move the Basic tab’s Temperature slider or edit the text box to settle on values between one white balance choice and another. Use this item to fine-tune the white balance.
![]() Tint: Tint is another fine-tuning adjustment affected by white balance. This slider and text box (again, found on the Basic tab) are used to correct any green or magenta tints in a photo.
Tint: Tint is another fine-tuning adjustment affected by white balance. This slider and text box (again, found on the Basic tab) are used to correct any green or magenta tints in a photo.
![]() Brightness adjustments: Several adjustment sliders and text boxes in the Basic pane help you control the image brightness and tonal range. Notice the Exposure setting. This item lets you correct photos taken at the wrong exposure. In analog darkrooms, you might ask technicians to push or pull film during processing, which results in (respectively) longer or shorter processing times. Changing exposure times compensates for underexposing and overexposing film. A nice advantage of using Camera Raw is that you can change the exposure for one image and then later open the original raw image and change to a different exposure value. Analog film can’t be reprocessed, but by using Camera Raw, you can reprocess repeatedly.
Brightness adjustments: Several adjustment sliders and text boxes in the Basic pane help you control the image brightness and tonal range. Notice the Exposure setting. This item lets you correct photos taken at the wrong exposure. In analog darkrooms, you might ask technicians to push or pull film during processing, which results in (respectively) longer or shorter processing times. Changing exposure times compensates for underexposing and overexposing film. A nice advantage of using Camera Raw is that you can change the exposure for one image and then later open the original raw image and change to a different exposure value. Analog film can’t be reprocessed, but by using Camera Raw, you can reprocess repeatedly.
Other options for the brightness and tonal controls are similar to the choices you have in the Elements Photo Editor. (For more information on these adjustments, see Book VIII, Chapter 2.)
![]() Cancel/Reset: When you open the Camera Raw window, the button you see by default is Cancel. Press the Alt (Option on a Mac) key, and the button changes to Reset. If you want to scrub all the settings you made and start over, press the Alt (Option) key and click Reset.
Cancel/Reset: When you open the Camera Raw window, the button you see by default is Cancel. Press the Alt (Option on a Mac) key, and the button changes to Reset. If you want to scrub all the settings you made and start over, press the Alt (Option) key and click Reset.
![]() Open Image/Open Copy: This single button has two purposes:
Open Image/Open Copy: This single button has two purposes:
• Open Image: This button is the default. Click Open Image after you choose all your settings. Elements then processes the photo and opens it in the Photo Editor.
• Open Copy: Press the Alt (Option) key, and the button changes to Open Copy. Click Open Copy to open a copy of the raw image in Elements.
If you want to keep your original image at the default Camera Raw settings, press the Alt/Option key and click Open Copy. The original photo is not processed by the raw converter and remains unchanged.
![]() Done: Clicking Done doesn’t open the image in Photo Editor. You click Done after changing the settings; the new settings then become the new defaults for your raw image. You can clear the defaults by opening the Settings flyout menu (upper-right corner) and selecting Reset Camera Raw Defaults.
Done: Clicking Done doesn’t open the image in Photo Editor. You click Done after changing the settings; the new settings then become the new defaults for your raw image. You can clear the defaults by opening the Settings flyout menu (upper-right corner) and selecting Reset Camera Raw Defaults.
![]() Zoom: In this drop-down list (located in the lower-left area of the Raw Camera plug-in window), you can choose from several zoom presets. You can also type a zoom percentage in the text box, click the minus (–) button to zoom out, or click the plus (+) button to zoom in. Using any option from the menu zooms the Image preview.
Zoom: In this drop-down list (located in the lower-left area of the Raw Camera plug-in window), you can choose from several zoom presets. You can also type a zoom percentage in the text box, click the minus (–) button to zoom out, or click the plus (+) button to zoom in. Using any option from the menu zooms the Image preview.
![]() Help: Clicking the Help button opens a Help document to assist you in understanding more about Camera Raw.
Help: Clicking the Help button opens a Help document to assist you in understanding more about Camera Raw.
![]() Save Image: Click the Save Image button to open the Save Options dialog box.
Save Image: Click the Save Image button to open the Save Options dialog box.
![]() Depth: If your camera is capable of shooting higher bit depths of 16-bit or more, they’re listed here. If you want to convert to 8-bit images for printing, you can select the option from the drop-down list.
Depth: If your camera is capable of shooting higher bit depths of 16-bit or more, they’re listed here. If you want to convert to 8-bit images for printing, you can select the option from the drop-down list.
All we can hope to provide in this book is a simple cursory view for using Camera Raw. Several books have been written exclusively covering the Camera Raw format and how to open files in the Camera Raw plug-in window. For a more detailed look at using Camera Raw, see Color Management for Digital Photographers For Dummies, by Ted Padova and Don Mason (published by Wiley).
Adjusting the image settings
The idea behind using the raw converter is that you want to get the tonal range and brightness values set to an optimum before opening the image in Elements. You’ll find your editing tasks, such as adjusting color and brightness, much easier in Elements if your image starts somewhere in the ballpark of a good tonal range.
Take Figure 4-5 as an example. This Camera Raw file was opened in the Camera Raw dialog box. The image’s white balance is way off the scale, the contrast is poor, the saturation is poor, and the photo needs a lot of adjusting to bring it within an acceptable range of color and contrast. Here’s an overview of the process we used in the Elements Camera Raw converter and then the Photo Editor to adjust the image:
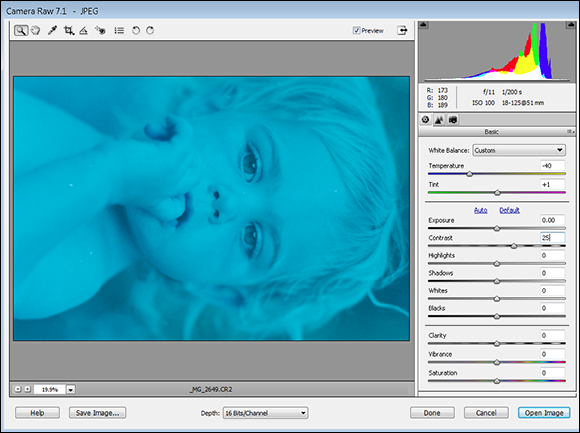
Figure 4-5: A poor-quality photo opened in the raw converter.
1. The first step to perform is to adjust the White Balance. We moved the Temperature slider to the far left to bring the White Balance into a proper setting.
2. We then made some adjustments for the Exposure, Brightness, Contrast, and Blacks, as shown in Figure 4-6.
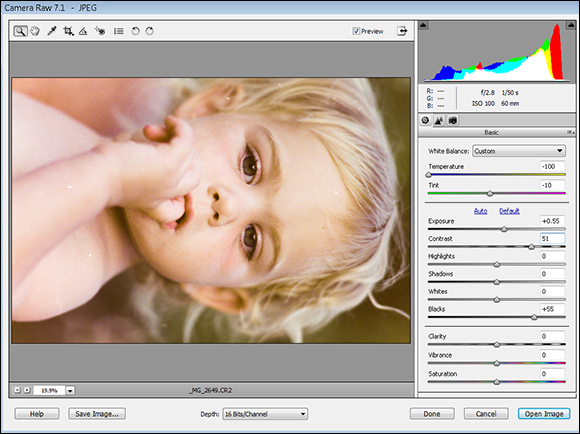
Figure 4-6: Making adjustments in the raw converter.
Your clue for making proper adjustments is the histogram. While you move the sliders, you want to try to get an even tonal range across the histogram without clipping the image (showing spikes on either end). Compare the histogram in Figure 4-5 with the one shown in Figure 4-6.
More important than the color balance is the data you find in the histogram about the tonal range. You can make adjustments for brightness and color after you open the image in Elements.
3. After we made our adjustments in the raw converter, we clicked Open, and the photo opened in the image window in Photo Editor, as shown in Figure 4-7. From here, all we need are a few adjustments using the Shadow/Highlight dialog box, the Levels dialog box, and the Hue/Saturation dialog box. (See Book VIII, Chapter 2 for information on using these image-enhancement settings.)
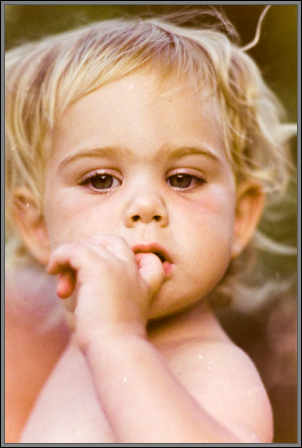
Figure 4-7: The file opened in the Photo Editor.
Now that you understand how the overall process of making adjustments works, follow these steps to make adjustments in your own photos:
1. Open an image in the raw converter.
Either use a Camera Raw file or choose File⇒Open As and open a JPEG or TIFF file. In the Open As drop-down list from within the Open As dialog box, choose Camera Raw. (A long list of files supported follows the Camera Raw option.)
2. Turn on Shadow and Highlight Clipping.
Click the up-pointing arrows above the histogram in the right pane of the Camera Raw converter (refer to Figure 4-1). Clicking the arrows turns on the clipping views.
3. Select an option from the White Balance drop-down menu.
For most images, just choose Auto. If you have a radical shift in white balance, such as the one shown in Figure 4-5, make a choice for another temperature setting that brings the image into an acceptable white balance. For the most part, just choose Auto for images that don’t have a radical shift in white balance.
4. Move the Exposure slider to bring the overall exposure into an acceptable setting.
You visually examine the photo, looking for an overall brightness without too much regard for the shadow and highlight clipping. You can recover the detail later. But realize that you will need to return to this slider after making other adjustments.
When moving sliders in the raw converter, you can double-click any slider to return that adjustment to the default.
5. Adjust Contrast.
Move the Contrast sliders to add some contrast. Adding contrast can help correct a flat appearance in the image.
6. Make decisions for clipping by adjusting the Shadows and Highlights sliders.
In many photos, you can’t recover all shadow and highlight data. You’ll see clipping often, especially with images taken with lower-end cameras. You may find that you have to let go of the idea for capturing all the highlight (or shadow detail). Look for general overall exposure being within an acceptable range.
7. Move the Blacks slider.
You want to look for a rich black in your photo. If the blacks look dirty and dingy, move the black slider to the right just far enough so that not much clipping occurs. If a few small areas are clipped, you want to leave the clipping in favor of adding richness in some of the black areas of your photo.
8. Adjust the Clarity.
Zoom in to your image to 400% or more by using the Zoom tool or pressing Ctrl+plus sign (+) or ![]() +plus sign (+). Move the Clarity slider to a setting where the image pixels appear smooth without a speckled look.
+plus sign (+). Move the Clarity slider to a setting where the image pixels appear smooth without a speckled look.
9. Adjust Vibrance.
Be careful with the Vibrance adjustment. Make a small adjustment to make the photo appear vibrant but don’t overdo it.
Instead of using the last adjustment in the pane, use the Hue/Saturation dialog box in the Photo Editor after opening the image for better saturation control.
10. Make Detail adjustments.
Click the Detail button at the top of the panel. Be certain that your view is 400% or more. These adjustments need to be made in a zoomed in view to see results of your edits:
• Sharpening images: You can choose to sharpen images here in the Camera Raw window or in Elements. Try to avoid sharpening here; instead, use the sharpening tools in Elements (as we explain in Book VIII, Chapter 1).
• Noise reduction: Includes options for adjusting the brightness and color. You’ve probably seen images with a lot of noise; in extreme cases, the pictures look like they were printed on sandpaper. Noise in an image is okay if that’s an effect you want to apply intentionally. If you want a smooth-looking image, however, you have to eliminate any noise introduced by the camera. Luminance Smoothing reduces grayscale noise. The next setting is Color Noise Reduction, which is used to reduce color noise.
Move sliders for sharpening and eyeball the results. Adjust the Luminance and Color sliders in zoomed-in views to see a smoothing of the image and lower grain effect.
11. Preview the results.
Return to the Basic pane by clicking the Basic icon at the top of the pane. Deselect Preview and then select it again to toggle the preview. Look over your results. You may need to return to a few adjustments to fine-tune your corrections.
12. When you’re finished in the raw converter, click the Open Image button.
The photo opens in Photo Editor, where you can use the Enhance tools to fine-tune the brightness, contrast, and color correction. For more on using the Enhance menu features, look over the chapters in Book VIII.
13. After opening an image in the Photo Editor, choose File⇒Save As and save the file under a new filename. For the file format, choose either Photoshop (*.PSD) or TIFF (*.TIF) to prevent the sort of data loss that occurs when you save an image in JPEG format.
When you save the file under a different name, you preserve the original raw image, and you can return to the raw converter, make other adjustments, and open the file in Elements again to tweak the brightness and color.
![]() For more detail on using Camera Raw, see our Web Extra at
For more detail on using Camera Raw, see our Web Extra at www.dummies.com/extras/photoshopelements12.