
Chapter 12
Dividing Programs into Modules
In This Chapter
![]() Breaking programs down into functions
Breaking programs down into functions
![]() Writing and using functions
Writing and using functions
![]() Returning values from a function
Returning values from a function
![]() Passing values to a function
Passing values to a function
![]() Providing a function prototype declaration
Providing a function prototype declaration
In Chapter 11, I show you how to divide a complex problem into a number of separate functions; it is much easier to write and get a number of smaller functions to work than one large, monolithic program. Often, however, you may want to reuse the functions you create in other applications. For example, I could imagine reusing the factorial() function created in Chapter 11.
One way to reuse such functions is to copy-and-paste the source code for the factorial() function into my new program. However, it would be a lot easier if I could put the function in a separate file that I could then link into future applications. Breaking programs into separate source code modules is the subject of this chapter.
Breaking Programs Apart
The programmer can break a single program into separate source files generally known as modules. These modules are compiled into machine code by the C++ compiler separately and then combined during the build process to generate a single program.
 These modules are also known by compiler geeks as C++ translation units.
The process of combining separately compiled modules into a single program is called linking.
Breaking programs into smaller, more manageable pieces has several advantages. First, breaking a program into smaller modules reduces the compile time. Code::Blocks takes only a few seconds to gobble up and digest the programs that appear in this book. Very large programs can take quite a while, however. I have worked on projects that took most of the night to rebuild.
In addition, recompiling all of the source code in the project just because one or two lines change is extremely wasteful. It’s much better to recompile just the module containing the change and then relink it into all of the unchanged modules to create a new executable with the change. (Compiling usually takes longer than linking.)
Second, it’s easier to comprehend — therefore, easier to write, test and debug — a program that consists of a number of well-thought-out but quasi-independent modules, each of which represents a logical grouping of functions. A large, single source module full of all the functions that a program might use quickly becomes hard to keep straight.
Third is the much-vaunted specter of reuse. A module full of reusable functions that can be linked into future programs is easier to document and maintain. A change in the module to fix some bug is quickly incorporated into other executables that use that module.
Finally, there’s the issue of working together as a team. Two programmers can’t work on the same module (at least not very well). An easier approach is to assign one set of functions contained in one module to one programmer while assigning a different set of functions in a different module to a second programmer. The modules can be linked together when ready for testing.
Breaking Up Isn’t That Hard to Do
I can’t really include a large program in a book like this … well, I could, but there wouldn’t be enough room left for anything else. Instead, I use the FactorialFunction demo from Chapter 11 as my example large-scale program. In this section, I create the FactorialModule project that separates the program into several source modules. To do this, I perform the following steps:
- Create the FactorialModule project.
This procedure is no different from creating any of the other project files up to this point in the book.
- Create the Factorial.cpp file to contain the factorial function.
- Create the Factorial.h include file (whatever that is) to be used by all modules that want to call.
- Update main.cpp to use the factorial() function.
Creating Factorial.cpp
The initial console application project created by Code::Blocks has only one source file, main.cpp. The next step is to create a second source file that will contain the factorial function.
Follow these steps to create factorial.cpp containing the factorial() function:
- Select File⇒New⇒File.
Code::Blocks responds by opening the window shown in Figure 12-1 showing the different types of files you can add.
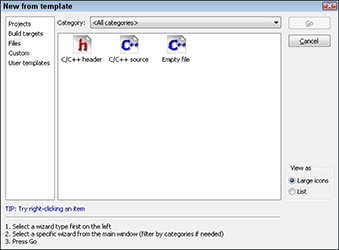
Figure 12-1: The New File Wizard provides you help in adding source files to your project.
- Select C/C++ Source and then click Go.
A box opens onscreen, showing a warning that you are about to enter the mysterious and dangerous Source File Wizard.
- Click Next.
This will open the Source File Wizard.
- Click the … next to the Filename with Full Path prompt.
A File Open dialog box appears, allowing you to navigate to a different folder if you want to keep your source files in different directories. But don’t make it any more complicated than it has to be.
- Enter factorial.cpp as the name of the source file and click Save.
- You want this file added to all executables that you create, so select All for the build targets.
When you are finished, the dialog box should look like Figure 12-2.
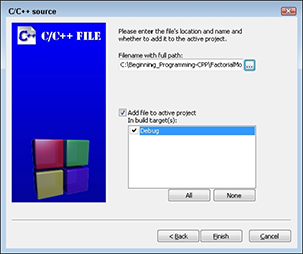
Figure 12-2: The C/C++ Source File dialog box lets you enter the name of the new module, factorial.cpp.
- Click Finish to create Factorial.cpp and add it to the Project.
 The project file includes the list of all source files that it takes to build your program.
 - Update Factorial.cpp as follows:
//
// factorial - this module includes the factorial function
//
#include <cstdio>
#include <cstdlib>
#include <iostream>
using namespace std;
#include "factorial.h"
//
// factorial - return the factorial of the argument
// provided. Returns a 1 for invalid arguments
// such as negative numbers.
int factorial(int nTarget)
{
// start with an accumulator that's initialized to 1
int nAccumulator = 1;
for (int nValue = 1; nValue <= nTarget; nValue++)
{
nAccumulator *= nValue;
}
return nAccumulator;
}
The first four lines are part of the standard template used for all C++ source files in this book. The next line is the factorial.h include file, which I discuss in further detail later in this chapter. This is followed by the factorial() function much as it appeared in Chapter 11.
 Include files don’t follow the same grammar rules as C++. For example, unlike other statements in C++, the #include must start in column 1 and doesn’t require a semicolon at the end.
Don’t try to compile factorial.cpp, as you haven’t created factorial.h yet.
Creating an #include file
The next step in the process is to create an include file. Okay, what’s an include file?
As I discuss in Chapter 11, the prototype declaration describes the functions to be called by providing the number and types of arguments and the type of the return value. Every function that you invoke must have a prototype declaration somewhere before the call.
It is possible to list out the prototype declarations manually for each function you intend to use, but fortunately that isn’t necessary. Instead C++ allows the same dummy who created the function to create an include file that contains the function’s prototype declarations. This file can then be included in the source files of the modules where the functions are called.
There are (at least) two ways to include these prototypes. One way is to copy the contents of the include file and paste them into the module where the calls are made. This isn’t a very good idea, however. For one thing, it is really laborious. For another, if the prototype declaration for any one of the functions in the include file is changed, the programmer will have to go through every place the include file is used, delete the old one, and repaste in the new file.
Rather than do that, C++ includes a preprocessor that understands very few instructions. Each of these instructions starts with a pound sign (#) in column 1 followed immediately by a command. (Preprocessor commands also end at the end of the line and don’t require a semicolon.)
The most common preprocessor command is #include "filename.h". This command copies and pastes the contents of filename.h at the point of the #include to create what is known as an intermediate translation file. The preprocessor then passes this intermediate translation file on to the C++ compiler for processing. This process is shown graphically in Figure 12-3.

Figure 12-3: The preprocessor inserts the contents of an include file at the point of the #include command before passing the results to the C++ compiler.
Including #include files
The Code::Blocks wizard makes creating an include file painless. Just execute the following steps:
- Select File⇒New⇒File.
Code::Blocks responds by opening the window shown in Figure 12-1, just as before. This time you’re creating an include file.
- Select Include File and then click Go.
- In the next window that warns you’re about to enter the Include File Wizard, click Next.
- Click the … next to the Filename with Full Path prompt.
A File Open dialog box appears.
- Enter factorial.h as the name of the include file and click Save.
- You want this file added to all executables that you create, so select All for the build targets.
When you’re finished, the dialog box should look like Figure 12-4.
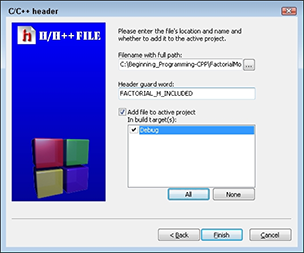
Figure 12-4: The C/C++ Header File dialog box lets you enter the name of the new include file module, factorial.h.
- Click Finish to create an empty include file that looks like the following:
#ifndef FACTORIAL_H_INCLUDED
#define FACTORIAL_H_INCLUDED
#endif // FACTORIAL_H_INCLUDED - Edit the include file by adding the prototype for the factorial() function as follows:
#ifndef FACTORIAL_H_INCLUDED
#define FACTORIAL_H_INCLUDED
int factorial(int nTarget);
#endif // FACTORIAL_H_INCLUDED - Click File Save.
You’re done!
Notice that the include file has been added to the project description in the Management tab of Code::Blocks. This indicates that Code::Blocks will automatically rebuild the application if the include file changes.
Why include factorial.h in factorial.cpp? After all, factorial() doesn’t require a prototype of itself. You do this as a form of error checking. C++ will generate an error message when compiling factorial.cpp if the prototype declaration in factorial.h does not match the definition of the function. This ensures that the prototype declaration being used by other source-code modules matches the function definition.
Creating main.cpp
You’re almost there: Open main.cpp and edit it to look like the following:
//
// FactorialModule - rewrite the factorial code as
// a separate function in its own module.
//
#include <cstdio>
#include <cstdlib>
#include <iostream>
using namespace std;
#include "factorial.h"
int main(int nNumberofArgs, char* pszArgs[])
{
cout << "This program calculates factorials"
<< " of user input.
"
<< "Enter a negative number to exit" << endl;
// stay in a loop getting input from the user
// until he enters a negative number
for (;;)
{
// enter the number to calculate the factorial of
int nValue;
cout << "Enter number: ";
cin >> nValue;
// exit if the number is negative
if (nValue < 0)
{
break;
}
// display the result
int nFactorial = factorial(nValue);
cout << nValue << " factorial is "
<< nFactorial << endl;
}
// wait until user is ready before terminating program
// to allow the user to see the program results
cout << "Press Enter to continue..." << endl;
cin.ignore(10, '
'),
cin.get();
return 0;
}
This version of main.cpp looks identical to the FactorialFunction version except that the definition of the factorial() function has been removed and the #include "factorial.h" added.
Building the result
Now you can build the program (by selecting Build⇒Build). Notice in the output messages that the compiler now compiles two files, main.cpp and factorial.cpp. This is then followed by a single link step.
When executed, the output from this version is indistinguishable from earlier versions, as demonstrated by the following test output:
This program calculates factorials of user input.
Enter a negative number to exit
Enter number: 5
5 factorial is 120
Enter number: 6
6 factorial is 720
Enter number: -1
Press Enter to continue …
Using the Standard C++ Library
Now you can see why the standard C++ template includes the directives
#include <cstdio>
#include <cstdlib>
#include <iostream>
These include files contain the prototype declarations for functions provided by C++ as part of its standard library of routines (like cin >>, for example).
Notice that the standard C++ library include files are included in angle brackets (<>), while I included my user-defined include file in quotes (" "). The only difference between the two is that C++ looks for files contained in quotes starting with the “current” directory (the directory containing the project file), while C++ begins searching for bracketed files in the C++ include file directories.
 You can find links to C++ wiki pages at www.dummies.com/extras/beginningprogrammingcplusplus that are a good source of information about the functions that make up the Standard C++ Library.
Variable Scope
A variable is also assigned a storage type depending upon where and how it’s defined, as shown in the following snippet:
int nGlobalVariable;
void fn()
{
int nLocalVariable;
static int nStaticVariable = 1;
nStaticVariable = 2;
}
Variables defined within a function like nLocalVariable don’t exist until control passes through the declaration. In addition, nLocalVariable is only defined within fn() — the variable ceases to exist when control exits the fn() function.
By comparison, the variable nGlobalVariable is created when the program begins execution and exists as long as the program is running. All functions have access to nGlobalVariable all the time.
We say that nLocalVariable has local scope, and nGlobalVariable has global scope.
The keyword static can be used to create a sort of mishling — something between a global and a local variable. The static variable nStaticVariable is created when execution reaches the declaration the first time that function fn() is called. Unlike nLocalVariable, however, nStaticVariable is not destroyed when program execution returns from the function. Instead, it retains its value from one call to the next.
In this example, nStaticVariable is initialized to 1 the first time that fn() is called. The function changes its value to 2. nStaticVariable retains the value 2 on every subsequent call — it is not reinitialized once it has been created. The initialization portion of the declaration is ignored every subsequent time that fn() is called after the first time.
However, the scope of nStaticVariable is still local to the function. Code outside of fn() does not have access to nStaticVariable.
Global variables are useful for holding values that you want all functions to have access to. Static variables are most useful for counters — for example, if you want to know how many times a function is called. However, most variables are of the plain ol’ local variety.