Chapter 5
Setting Up Project and Job Costing Systems
In This Chapter
![]() Setting up jobs and projects
Setting up jobs and projects
![]() Accounting for job and project costs
Accounting for job and project costs
![]() Finding alternative ways to do job costing
Finding alternative ways to do job costing
![]() Using estimates
Using estimates
![]() Figuring out progress billing
Figuring out progress billing
Many businesses work on projects or jobs. For example, one way to look at a home builder’s business is as a series of home construction projects. A manufacturer, such as a commercial printer, may print books, brochures, or posters for its customers. Each of those items represents jobs that are performed for specific customers.
Accounting may work a bit differently when a firm organizes its work into projects or jobs. In some situations, a firm needs to track revenues and expenses — not just by a standard chart of accounts, but also by jobs or projects. Fortunately, QuickBooks makes job costing, or project costing, pretty darn easy. In this chapter, I talk about the tools that QuickBooks provides.
Setting Up a QuickBooks Job
To set up a QuickBooks job, choose the Customers⇒Customer Center command. QuickBooks displays the Customer Center window, shown in Figure 5-1.
To set up a job for a particular customer, right-click the customer and choose the Add Job menu command from the shortcut menu. When you do so, QuickBooks displays the New Job window, shown in Figure 5-2.
To set up a job for a customer, use the Job Title box to give the job or project a name. For example, a home builder may use the address of the home as the job. (Perhaps just the street address would suffice.)
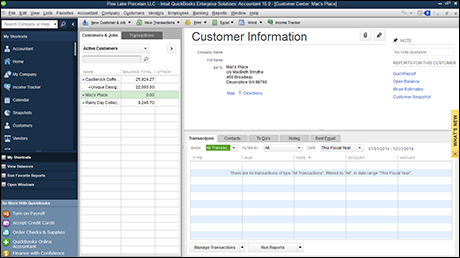
Figure 5-1: The Customer Center window.
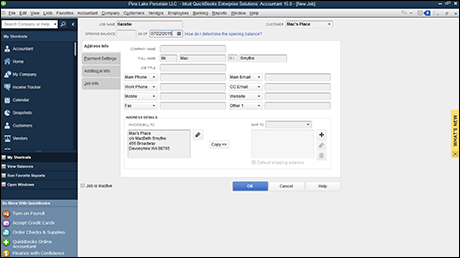
Figure 5-2: The Address Info tab of the New Job window.
Optionally, you can use the Address Info, Additional Info, Payment Settings (shown in Figure 5-3), and Job Info tabs to provide additional information about the job. Figure 5-4 shows the Job Info tab of the New Job window. This tab provides drop-down lists that you can use to identify the job status and the job type. The tab also provides text boxes that you can use to enter the job start date, projected end date, and actual end date. If a job is inactive, and you no longer want it to appear in the Customer Center window’s list, you can also select the Job Is Inactive check box.
And that, my friend, is that. Essentially, all you do to begin tracking jobs is add jobs to the QuickBooks Customer:Job list. Sweet, right?
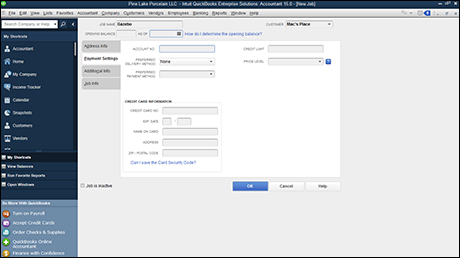
Figure 5-3: The Payment Settings tab of the New Job window.
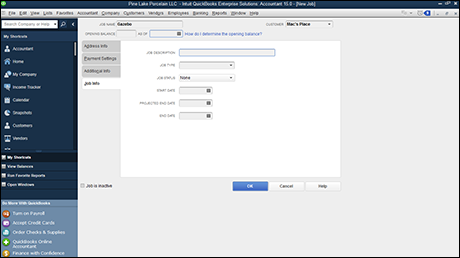
Figure 5-4: The Job Info tab of the New Job window.
Tracking Job or Project Costs
After you set up a job on the Customer:Job list, you track the income and expenses associated with the job. To do this, you enter the customer and job name (rather than just the customer) in the Customer:Job text box. For example, if you take a quick look at Figure 5-5, you see the Create Invoices window. (I go into more detail about the Create Invoices window in Book III, Chapter 1.) Note that the Customer:Job drop-down list can show both the customer and job name. If an invoice is associated with a particular job, you want to identify both the customer and the job by using the Customer:Job list. And that’s really all it takes.
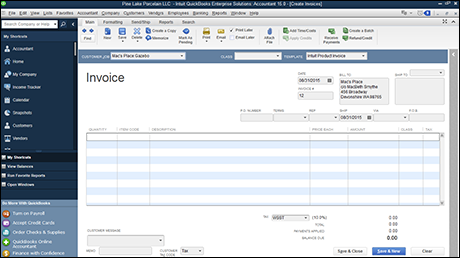
Figure 5-5: The Create Invoices window.
Other windows that you use to record income and expenses also provide Customer:Job drop-down lists. For example, if you look at the Time/Enter Single Activity window, shown in Figure 5-6, you can see that QuickBooks supplies the Customer:Job drop-down list for recording the time that you’ve worked on a particular customer’s project or job. (Book III, Chapter 1 also talks about billing for time.) Again, all you do to track the time associated with a particular job is identify both the customer and the job by using the Customer:Job drop-down list.

Figure 5-6: The Time/Enter Single Activity window.
Just because I have a compulsive personality, I need to point out one more example of the Customer:Job drop-down list. If you take a look at the Write Checks window, shown in Figure 5-7, you see that one of the columns shown on the Expenses tab is the Customer:Job column. This column lets you tag any expense amount as being associated with a particular customer’s job. All you do is identify both the customer and the job by using the Customer:Job column. You won’t be surprised to hear that if you happen to click the Items tab, it also supplies a Customer:Job column.
To summarize, to track income and expense by job, you must identify not only the account that some income transaction or expense transaction falls into, but also the customer and job associated with the income or expense transaction. You do this by entering the customer name and job name in the Customer:Job text box. And that’s all you have to do. Just remember to fill in that box.

Figure 5-7: The Write Checks window.
Job Cost Reporting
Other chapters in other minibooks of this reference talk about QuickBooks reports. For example, Book IV, Chapter 2 talks about how you can easily prepare QuickBooks financial statements and reports. Because I’ve already talked about QuickBooks reports in some detail, including how you print and customize reports, I don’t talk about that stuff here. However, I do want to point out that if you choose the Reports⇒Jobs, Time & Mileage command, QuickBooks displays a submenu of almost two dozen reports that supply job costing information. The report titles are pretty self-explanatory. Some reports give job profitability, and some reports identify the estimates associated with a particular job. Other reports compare job estimates with actual job costs. You get the picture.
Obviously, you want to experiment with these reports if you do begin to use job costing. These reports let you slice and dice your job accounting data in a bunch of ways. You should be able to use these reports (albeit with some modifications) to supply most of the information that you need to make good job costing decisions and to manage job costs.
Using Job Estimates
If you’ve told QuickBooks that you want to create estimates — you may have done this during QuickBooks setup — you can create job estimates of amounts that you later invoice.
To create a job estimate, choose the Customers⇒Create Estimates command. QuickBooks displays the Create Estimates window, as shown in Figure 5-8. I don’t describe how to fill in the fields of this window, because this window mirrors the Create Invoices window, which is described in detail in Book III, Chapter 1. In a nutshell, you fill out the Create Estimates window the same way that you fill out the Create Invoices window. This makes sense. An estimate is just an example or guess of the future invoice for a job. Predictably, you collect and supply the same information, and you fill in the fields the same way.
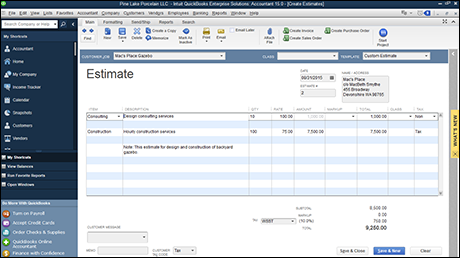
Figure 5-8: The Create Estimates window.
If you have questions about how to work with a particular field or box in the Create Estimates window, refer to Book III, Chapter 1. Find the description of the related field in the Create Invoices window. Whatever you do with that field in the Create Invoices window is the same thing that you do in the Create Estimates window.
 When you invoice a customer for whom you’ve previously prepared an estimate, QuickBooks displays a list of the previously prepared estimates and lets you select one of these estimates as the starting point for an invoice. (This shortcut can be a real timesaver.)
If you didn’t turn on Estimates when you set up QuickBooks, you can do so after the fact. Choose the Edit⇒Preferences command; click the Jobs & Estimates icon in the Preferences dialog box; click the Company Preferences tab, shown in Figure 5-9; and then select the Yes radio button below Do You Create Estimates? You may also want to select the Yes radio button below Do You Do Progress Invoicing? if you do progress invoicing. (I talk about progress invoicing or progress billing in the next section of this chapter.)
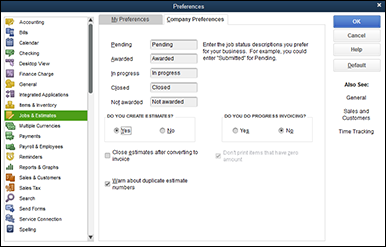
Figure 5-9: The Company Preferences tab of the Preferences dialog box.
If you use estimates to create invoices, you actually create another way to track job costs. You can ask QuickBooks to prepare reports that compare, item by item, the estimated amounts for a job with the invoiced amounts for the job. To produce this report, you choose the Item Estimates vs. Actuals command from the Jobs, Time & Mileage submenu. The Jobs, Time & Mileage submenu appears on the Reports menu.
Progress Billing
Progress billing occurs when you actually invoice, or bill, a customer for a portion of an amount that you’ve previously estimated. For example, take a peek at the Create Estimates window, shown in Figure 5-8 earlier in this chapter. Suppose that this window records an estimate that a client has asked you to supply. Further suppose, just for purposes of this discussion, that the estimate is for a consulting job that you’re doing.
If you want to later bill the consulting client for the actual work, you click the Create Invoice button that appears along the top edge of the Create Estimates window. If you’ve previously chosen to do progress billing (see Figure 5-9), QuickBooks displays the Create Progress Invoice Based on Estimate dialog box (see Figure 5-10). This dialog box lets you create an invoice by using the estimate information.
If you select Create Invoice for the Entire Estimate (100%), QuickBooks creates one invoice that uses all the information from the Create Estimates window. Or you can select one of the other options to bill only a portion of the estimate. For example, you can select the Create Invoice for a Percentage of the Entire Estimate radio button and then enter the percentage in the % of Estimate box. In this case, QuickBooks bills the customer for some specified percentage of the estimate. Alternatively, you can select the Create Invoice for Selected Items or for Different Percentages of Each Item radio button. In this case, QuickBooks lets you specify that different percentages of the items shown on the estimate should be billed.
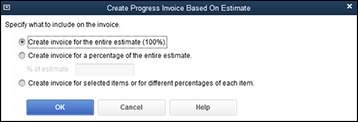
Figure 5-10: The Create Progress Invoice Based on Estimate dialog box.
When you click OK, QuickBooks either creates the invoice by using the estimate information or (if you indicated that you wanted to specify different percentages for different items on the invoice) displays the Specify Invoice Amounts for Items on Estimate dialog box, as shown in Figure 5-11. You use the Amount column to specify a portion of the estimated amount that you want to bill on the progress invoice.
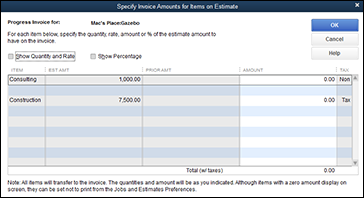
Figure 5-11: The Specify Invoice Amounts for Items on Estimate dialog box.
If you select the Show Quantity and Rate check box on the Specify Invoice Amounts for Items on Estimate dialog box, QuickBooks adds columns to the dialog box that let you see quantity and rate information. Similarly, if you select the Show Percentage check box, QuickBooks adds columns to the dialog box that show percentages. You probably don’t need this extra information, but if it’s important to be very precise on your invoice, you may want to experiment with these additional columns of information.