Chapter 5
Introduction to Swing Trading: Basic Rules and Procedures
At this point, it's crucial for you to already know the intra-day portion of this system. If not, you won't grasp and adequately apply the instructions on swing trading essentials that follow.
If you've studied the previous section, then you've learned how to use the daily price levels when finding the intra-day setups, and you've also learned how to apply the intra-day Golden Rules. Without them, you won't enter swing levels properly. Why? The intra-day levels help to determine your adjusted swing levels. Without them, your swing entries will be as much as $1 or more off.
This is more fully explained in Part 4, where I introduce you to fusion. In this part, which I've broken into two separate chapters to help you conceptualize, you'll learn the more profitable, yet more risky, swing trading strategy.
“Why is it more risky than intra-day trading?” you might want to know. It is because you're holding overnight and potentially with more than 300 shares. So swing trading is much more advanced than intra-day. Whether I formally coach you or you risk it alone, either way, it takes weeks to master.
In this part of the text I show only swing trading setups. Again, you'll learn how to merge intra-day trades with swing trades in Part 4 on fusion. For now my main goal is to show you how to recognize which levels are swing levels and which swing tiers you should enter at.
Let's get started on technical instructions. Just as in Part 2, where you learned to gather intra-day daily price levels, you'll need to set your chart to view daily candlesticks. You'll see that some of the price levels you've acquired for intra-day setups also happen to be swing levels. In this chapter I specifically show you how a daily price level can become a swing level.
But first let's recap the rules regarding how to pick daily price levels. It's important to be redundant here so I can reinforce just how critical your daily chart price levels are.
You have two basic price levels: your daily lows (supports) and your daily highs (resistance). To find them on the daily chart, you start with these procedures:
-
To find the daily lows, look at the most current day on the candlestick chart and scan to the left until you find the first candle that has at least four higher candlesticks to its left and right, meaning the price level has held for at least nine trading sessions.
This typically resembles a “V” shape.
-
To find the daily highs, look at the most current day on the candlestick chart and scan to the left until you find the first candle that has at least four lower candlesticks to its left and right, meaning the price level has held for at least nine trading sessions.
This typically resembles a “pyramid” shape.
Recall that each price level has at least four candlesticks on each side of the daily price level. This means the price held for at least nine days straight without breaking that level.
Once you start gathering the proper price levels, you'll find that there are several that match this criterion. You'll find that using this simple system on the daily chart produces several results for both supports and resistance.
Here is a recap of the rules that will help you eliminate several weaker daily levels:
- Each daily level should be $1.00 or more than the other.
- If you have two or more daily price levels within $1.00 of each other, then you choose the lowest/highest.
And you disregard levels that are over a year old. Unless:
- The price level was or is an all-time high/low.
- It has over 30 days to its left and right.
- It's over two years old. Then it must be more than $5.00 off other daily levels.
Following is an introduction to the breakdown on swing rules.
Introducing the Ten-Day Hold Rule
Before you can consider a daily price level a swing level, and therefore your current swing level to trade, each daily level needs to hold for at least 10 consecutive days. That's 10 consecutive trading sessions.
For example:
- If a new daily level forms that day, you need to wait five more days before it can be traded, 10 days total since the support/resistance level formed.
- If a new daily level forms that day, but does not hold for a total of 10 days, that level can still be used for a swing trade later, when it does hold for 10 consecutive days at that daily level H/L.
This is very tricky to express. In my program I literally show you on real-time charts. All I can offer here is a simple screenshot (see Figure 5.1) that reveals a swing level that just formed.

Figure 5.1 Swing Level
You can see how the most recent 10 trading sessions held above the 185.59 daily support level. This made the 185.59 daily level become a first-tier swing support level. So if the current price of 190.08 were to drop down on this day, then once the price broke the 185.59 first-tier swing level I would have a swing long position.
How to Determine the First-Tier Swing Level
After you scrutinize the daily candlestick chart, and you search for pre-established daily levels that have held for 10 consecutive trading sessions, that's when you determine the first-tier swing price level.
“What is a first tier?” you may ask. Tier is my term for each swing price level. Don't confuse this with the intra-day three-tier setups that I taught you in Part 2. When I use the word tier here, I'm strictly speaking of daily price levels that have specifically become swing levels. So, in essence, a swing tier is simply a daily price level that has held for 10 days or more.
The key, and the absolute challenge, is to find the first swing support/resistance level. That price level is your first tier. The most challenging part of this system is to know when a swing tier has cycled through, meaning it's already hit and profited, or in some cases passed over due to overnight gaps.
For instance, let's say you have a first-tier swing entry at 195.00 (resistance—short trade), and a second-tier swing entry at 198.00 (resistance). In this scenario you'd be shorting soon after they each break. But here's the difficult part: suppose the 195.00 tier breaks and then pulls back for a profit—then what do you do? This means that your second tier at 198.00 now becomes a first-tier swing level (short trade).
This will make more sense later. For now, just know that tiers are constantly changing, and if you're not on top of them, then you're probably trading the wrong price level.
Now that I've shown you the framework of the 10-day hold rule in swing, and I've introduced you to first-tier swing levels, you're ready to learn the within 5 percent rule. If your price levels are correctly logged on your whiteboard, this rule is pretty straightforward. The same is true if you're in my training program, where I have them already logged for you in my online trading room.
“What is this 5 percent rule?” Essentially it states that once you determine your first-tier swing price level, then you need to know all the swing price levels that follow. Whether those levels are swing supports or resistance, either way the 5 percent rule applies.
For instance, suppose you have a first-tier swing support price level at 187.05. All you need to do is take 5 percent of that number and subtract the amount from the first-tier number (as in subtract when swing levels are supports, and add when they're at resistance).
In the example in Figure 5.2 you'd have approximately 177.00 as your low end of the 5 percent range.

Figure 5.2 GS Earnings
I say “range” because I'm trying to find all the swing levels that are within a 5 percent range of the first swing entry.
In this illustration you have five swing tiers to trade. Later I show the framework of how you trade these tiers. For now I'm just showing you the basics.
This chart is a sample from my online trading room. It shows how the 5 percent rule is applied. Note that the final swing support (daily low level) is 176.62. That number is slightly outside of 5 percent (38 cents lower). In some cases this is allowed. There are several reasons why, but here I'll offer just a couple of reasons that will make perfect sense to you. They will also shed light on the fact that, as I've mentioned before, you need to trade every stock differently.
This stock is GS. Even though it's a highly priced stock, it's actually one of the stocks that moves relatively slowly compared to my other fast movers, like TSLA and BIDU. This is one reason why I allowed the final tier to be slightly outside of 5 percent.
Whenever I determine the 5 percent range, I typically allow for $1 over or under, but that's not a constant rule. In some cases I won't include a level when it's over or under $2, off the 5 percent.
Another reason of many is that the next tier (the sixth swing level at 171.26) is over $5 off. So you see, no decision is across the board. Everything depends on the stock.
For now I can tell you that in most cases, you don't trade all five levels (all tiers) simply because they are swing levels. This is the biggest reason why traders try my system and fail. They haphazardly enter off every swing level, thinking they will profit on each. That couldn't be farther from the truth.
I deliberately built in some procedures and processes that help you determine which levels to trade. Knowing which level to start at and how many shares to apply to each entry is the most difficult part of this system. Again, you're only looking at a framework of how to attain your first-tier swing price level, and certainly not your swing entry level. In this early point of my instruction, I feel I should make that very clear.
To reiterate, the 187.05 first-tier swing price level is not your first entry when it first breaks—not necessarily. It can be, but recognizing the price level is not the same thing as trading it, and as I said, people not formally taught to trade this system assume they can trade every level.
What they don't know is that if they don't know the price level that works the best for them, this system will not work properly. I'm not saying that the levels are off; I'm saying that certain price levels may work for some, but may not work for others. I touch upon this again later. In Chapter 10, I discuss my trading room and how the swing price levels are traded.
Understanding Entry and Exit Setup Rules
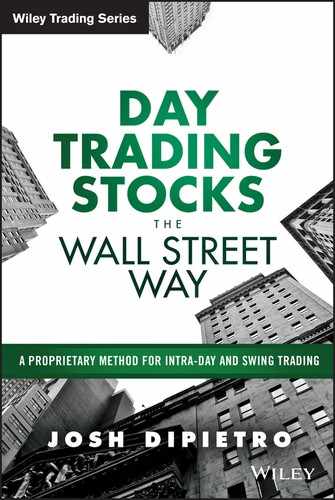
Let's focus on the entry/exit portion of my swing trading system. This is strictly a screenshot of how you determine the exact price levels to enter and exit at. Of course the most challenging part is deciding which swing price level (tier) you will trade.
Assuming you've completed all your chart analysis homework, and you've chosen today's swing price level to trade, then all you need to do now is wait for the price to run past your swing level by 50 cents to $2, which depends on several factors.
Note that I refer to the swing levels as daily levels in this chart. This is because all swing levels are daily levels, but only certain daily levels can be swing traded.
In Figure 5.3 are the entry rules, with a quick list of what to do with differently priced stocks.
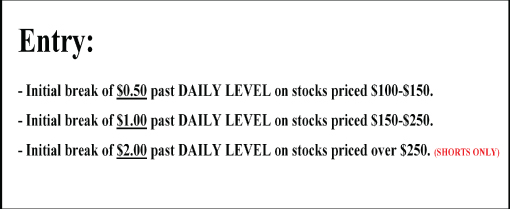
Figure 5.3 Entry Rules
Note that if a stock is priced at or over $250, you'll only be looking for short swing trades and you'll need to go a full $2 past. If you're a greenhorn, however, and especially if you've never been formally trained, you should simply stop trading a stock that's over $250. If you continue trading a stock that starts climbing above $250, you're on a very slippery slope. Great examples of this include AMZN and AAPL (before the split). Even if you go $2 past, these stocks can easily jump $15–$20 in one day and also not retrace. So until you have mastered this system, just stay away when over $250.
Next come the exit rules. Those that I've mapped here are very straightforward. I sometimes take more than $2, and I sometimes only take 50 percent of the profit target. I clarify this later.
What I want you to do for now is just remain highly consistent, and that means absolutely no guesswork. This is easier said than done. If I were to ask most novice traders what their exit strategy is, most would have very mixed answers. The right answer is highly consistent, and for good reason.
If you take a $2 profit ($200 on every 100 shares) on a stock priced over $150, that's being very conservative, especially when you've considered that the stock price has most likely already run $20+ in one direction before you entered. The current price is extremely overbought/oversold. Therefore a small $2 pullback is very likely to happen, and soon. It may take all day, and in some cases it may take an entire week, before you receive your $2 profit. But the critical thing to remember is that your profit potential is very high when you take only $2 on each swing entry. Keep in mind, if you have a 4-tier setup, that's a potential of $800 profit when it reverses for $2 pullback on your average price of all four tiers. But let's not get ahead of ourselves.
As for the flipside, you should not be selling yourself short by exiting too soon. I can't tell you how many times I've seen the stock price come within 20 cents of my exit but pull back a full dollar or more—this is normal. But you should always wait for your profit. If you break your consistency, in the long run you'll lose out. Trust the system and earn your money. Later I show examples of when you should take less than your normal profit target.
“So why $2 profits?” you might ask. You take $1.50 to $2.00 profits for the same reason that you take exactly 15 cents on intra-day trades—a much higher probability of hitting. Think about it: after a major support/resistance is broken and surpassed, the pullback is very likely to give back 15 cents on intra-day trades and at least $1.50 to $2.00 on swing trades, especially when you're countertrend trading.
Figure 5.4 illuminates the exit price points.
Figure 5.4 Exit Price Points
If your current swing position on one or several tiers (average price) is in the green 50 percent or more at the bell at 3:59 p.m., then you need to take your profits before the bell rings. It's not worth the risk to hold your swing position overnight, not when you're already in the green 50 percent or more of your profit target. The trade is over.
Here's a scenario that will help to clarify the 50 percent profit rule. Suppose you enter a long swing position at 185.00. For a $2.00 profit, your profit target would be to exit at 187.00. But it's 3:55 p.m. and the current price is at 186.10. This is a great time to exit at 186.00 or higher. This way you can at least lock in a $1.00+ profit on your swing trade—50 percent of your profit target. Note that the swing tier you were trading and exited at 50 percent profit is no longer a swing level—you need to trade the next tier now.
The 50 percent rule is particularly good for newbies to this system, whether they're greenhorn or advanced. As someone who has mastered this system, I will definitely hold overnight at times, because I'm anticipating much more than a $1.00 profit on the trade. This is especially true during earnings release season (just after the release of earnings). You are a newbie, however, and you should just be thinking about safety. This rule is highly conservative, and very wise for beginners to use when trading this system for the first time. Also consider that you may have entered off the wrong level, so any profit over 50 percent of its potential is a great opportunity to exit.
Two Key Swing Rules to Follow
These two rules are extremely important and also the most misused and/or disregarded. Even the most advanced traders in my program continue to struggle with these. (They are numbered for quick reference purposes only. Neither is more or less important than the other.)
Rule #1
If the price breaks any swing tier, and then comes within 25 cents of your swing entry price, and then retraces your $1.50 to 2.00 profit amount (or more) before hitting your swing entry price, you just missed the trade. Do not enter! This rule applies no matter what tier you're trading.
For instance, if your first-tier swing level (resistance) is $193.28 and the current price reaches $194.25 (not the full $1.00 past), and then it retraces all the way back down to 192.25 ($2.00 retrace from $194.25 level), then you just missed the swing trade. Figure 5.5 shows this scenario. It's very discouraging when this happens, but better safe than sorry.

Figure 5.5 GS One-Minute Chart
Also consider that once your first-tier swing level cycles through that means your second-tier swing level now reverts to being the first tier. The chart in Figure 5.6 helps to clarify this. Note that the 198.06 is currently the second-tier swing resistance, but once the 193.28 level pulled back for a $2 profit, then the 198.06 immediately becomes the new first-tier swing level.

Figure 5.6 First-Tier Swing Resistance
This rule is critical. If you trade a swing level that's already been traded (or missed), then you risk reentering into a price run, and I promise things will get ugly very fast. This goes for intra-day setups as well.
The best way to avoid this mishap is good old-fashioned due diligence. Back-testing on the one-minute candlestick chart will show whether the price has already retraced and whether the trade is over. This may be hard to digest without my showing you in real time on the charts, so for now just be aware that you may be trading a swing level that is actually no longer a swing level, and back-testing is the solution. You can easily double-check each swing level in five minutes or less, late at night and early in the morning. I do it three to five times each morning, on up to eight stocks, simultaneously. Once you master this system, it will only take you about 15 minutes to spot-check your swing levels on up to 10 stocks, all before the bell rings.
I can guarantee that most traders who attempt this system without formal training will screw this rule up royally. Recall that 90 percent of this system is being in rhythm with your price levels. The key here is to know your stock, and to know its price levels at all times, especially just prior to entering a swing trade. It just takes minutes to double-check, and that's the difference between holding a loser and making a quick $2 profit.
I never said this system is easy. It takes focus and patience and caution to get your correct entry price. You're getting paid for staying on top of your price levels. So earn your pay!
Rule #2
If your swing level entry price hits during pre-market, then wait to make your first entry off the intra-day pre-market low/high once the market opens.
For instance, suppose your swing entry price is at 179.56 (long), and it hits 179.56 in pre-market trading. You wait to trade until after the bell rings. Whatever the pre-market low is, you enter at 50 cents past. And that's how, if the pre-market low hits 178.82, your swing entry is 178.32 when it initially hits, after the bell rings.
This is a great example of how intra-day and swing setups merge. In Part 4 you'll learn more about this. Here I just need you to recognize that pre-market price levels are very important to both intra-day and swing setups. Also keep in mind that in this example, your swing entry of 178.32 and not 179.56 just saved you $1.24 on your trade. It can be viewed as entering your swing trade $1.24 richer.
Also consider this in pre-market trading, as in Rule #1: if the price hits the swing entry and then profits a full $2 in pre-market, and then the tier is gone, then you trade the next tier.
Buying Power and Trading Experience Dictate Your Swing Strategy
I want to make this very clear. Before you decide which stock(s) to swing trade (priced $100–$250), and before you decide how many shares you will swing trade, you need to consider the amount of cash/capital in your brokerage account (your non-leveraged buying power), and you need to consider your level of knowhow with my intra-day and swing systems.
These two factors are the main issues when you determine what swing price level you enter at, and how many shares at each swing tier. In other words, just because a swing level is hitting today, that does not mean you should be trading that price level (swing tier), and that does not mean you should be going more than 100 shares on each swing level. For instance, with my swing strategy you don't hold marginalized positions overnight. Therefore, all your swing trades should be purchased with cash-capital. This one rule keeps the risk of holding overnight down to a minimum.
According to SEC regulations, you're allowed to hold overnight up to a 2:1 leverage/margin. But my strategy is fiscally more conservative. By using your own capital you eliminate the largest risk of holding overnight: the dreaded margin call.
To recap, the margin call is when you're required to sell enough of your losing positions/shares to get your capital/margin ratio within the 2:1 leverage. In other words, if you're holding leverage overnight, you're forced to sell a position if you're in the red at any point. This creates an inevitable problem when trading with my system, because, don't forget, you will be in the red: this is expected and normal with swing trades, but you won't want to have to sell a position prematurely.
Most pattern-day traders who have a traditional broker will have at least 25K in their trading account. This means they can afford to purchase 100 shares of a $250 stock and hold overnight without any margin call issues or worries, or, to put it numerically, 200 shares of $125 stock.
The only downside to having limited capital (25K minimum) is that you may be holding a swing trade for days and sometimes even weeks. This means you cannot intra-day trade other stocks while you wait on your current swing position to reverse to a profit.
Here's the Good News!
I have strategies that will help to maximize your chances of entering a swing trade that isn't likely to last more than a few days, and in many cases will reverse for an intra-day profit. One great example is simple: once you know your 5 percent range and have your swing tiers, and you have four price levels within 5 percent, then all you need to do is wait for the third or fourth tier to hit. This way, if you can only afford 200 shares overnight, then only trade the final two tiers.
If you try trading tiers 1 and 2, then you risk the price running against you and not having enough capital to recapture stronger price levels at tiers 3 and 4. You risk having to hold your position much longer if the prices run the full 5 percent. This is a very basic example of trading on minimum capital funds. Again, you need at least 25K to trade this system properly, and any amount of capital between 25 and 50K would be considered minimum capital. This is not just true for my system, but for all real day trading systems.
As you can imagine, most Wall Street day traders are highly capitalized and not worried about these restrictions, so they tend to trade every swing tier, and with much more than 100 shares per price level entered. For you, however, capital is one big restriction, and another is your trading experience level. The amount of knowhow you have with this system will dictate which tiers you should trade and which tiers you should avoid. Every beginner in my program starts by avoiding all first-tier swing levels.
“Why?” First tiers are the most risky, the low end of the 5 percent range. They can run 5 percent against you, and you don't have enough capital to capture the stronger levels. After you see the entire framework, all this will make more sense.
This rule can't be overemphasized. In most cases you'll take the same amount of profit, no matter how many shares. This is generally true in the 100- to 1,000-share range. This rule changes when you get over 1,000 shares per position. However, 99 percent of traders are not going to trade in 1,000-share block trades. More typically, many of my advanced trainees quickly start trading in 200-share block trades and still capture their $2 profit target.
Here I have mapped out the framework of my swing trading system. In Chapter 6, I show several sample charts to clarify the swing system visually.