
Chapter 3
Getting and Using Haskell
IN THIS CHAPTER
![]() Obtaining and using Haskell
Obtaining and using Haskell
![]() Using GHCi and WinGHCi
Using GHCi and WinGHCi
![]() Writing Haskell code
Writing Haskell code
![]() Finding additional information
Finding additional information
The first sections of this chapter discuss the goals behind the Haskell installation for this book, help you obtain a copy of Haskell, and then show you how to install Haskell on any one of the three supported book platforms: Linux, Mac, and Windows. Overall, this chapter focuses on providing you with the simplest possible installation so that you can clearly see how the functional programming paradigm works. You may eventually find that you need a different installation to meet specific needs or tool requirements.
After you have Haskell installed, you perform some simple coding tasks using it. The main purpose of writing this code is to verify that your copy of Haskell is working properly, but it also helps familiarize you with Haskell just a little. A second example helps you become familiar with using Haskell libraries, which is important when viewing the examples in this book.
 The final section of the chapter helps you locate some Haskell resources. This book doesn’t provide you with a solid basis for learning how to program in Haskell. Rather, it focuses on the functional programming paradigm, which can rely on Haskell for a pure implementation approach. Consequently, even though the text gives some basic examples, it doesn't provide a complete treatment of the language, and the aforementioned other resources will help you fill in the gaps if you’re new to Haskell.
Working with Haskell in This Book
You can encounter many different, and extremely confusing, ways to work with Haskell. All you need to do is perform a Google search and, even if you limit the results to the past year, you find that everyone has a differing opinion as to how to obtain, install, and configure Haskell. In addition, various tools work with Haskell configured in different ways. You also find that different platforms support different options. Haskell is both highly flexible and relatively new, so you have stability issues to consider. This chapter helps you create a Haskell configuration that’s easy to work with and allows you to focus on the task at hand, which is to discover the wonders of the functional programming paradigm.
To ensure that the code that you find in this book works well, make sure to use the 8.2.2 version of Haskell. Older versions may lack features or require bug fixes to make the examples work. You also need to verify that you have a compatible installation by using the instructions found in the upcoming “Obtaining and Installing Haskell” section. Haskell provides a number of very flexible installation options that may not be compatible with the example code.
Obtaining and Installing Haskell
You can obtain Haskell for each of the three platforms supported by this book at https://www.haskell.org/platform/prior.html. Simply click the icon corresponding to the platform of your choice. The page takes you to the section that corresponds with the platform.
In all three cases, you want to perform a full installation, rather than a core installation, because the core installation doesn’t provide support for some of the packages used in the book. Both Mac and Windows users can use only a 64-bit installation. In addition, unless you have a good reason to do otherwise, Mac users should rely on the installer, rather than use Homebrew Cask. Linux users should rely on the 64-bit installation as well because you obtain better results. Make sure that you have plenty of drive space for your installation. For example, even though the Windows download file is only 269MB, the Haskell Platform folder will consume 2.6GB of drive space after the installation is complete.
 You can encounter a problem when clicking the links on the initial page. If you find that the download won’t start, go to
 https://downloads.haskell.org/~platform/8.2.2/ instead and choose the particular link for your platform:
- Generic Linux: haskell-platform-8.2.2-unknown-posix--full-i386.tar.gz
- Specific Linux: See the installation instructions in the “Installing Haskell on a Linux system” section that follows
- Mac: Haskell Platform 8.2.2 Full 64bit-signed.pkg
- Windows: HaskellPlatform-8.2.2-full-x86_64-setup.exe
Haskell supports some Linux distributions directly. If this is the case, you don’t need to download a copy of the product. The following sections get you started with the various installations.
Installing Haskell on a Linux system
Linux users numerous options from which to choose. If you see instructions for your particular Linux distribution, you may not even need to download Haskell directly. The $ sudo apt-get command may do everything needed. Use this option if possible. Otherwise, rely on the installation tarball for generic Linux. The specific Linux installations are:
- Ubuntu
- Debian
- Linux Mint
- Redhat
- Fedora
- Gentoo
A generic Linux installation assumes that you don't own one of the distributions in the previous list. In this case, make sure that you download the tarball found in the introduction to this section and follow these instructions to install it:
-
Type tar xf haskell-platform-8.2.2-unknown-posix--full-i386.tar.gz and press Enter.
The system extracts the required files for you.
-
Type sudo ./install-haskell-platform.sh and press Enter.
The system performs the required installation for you. You’ll likely see prompts during the installation process, but these prompts vary by system. Simply answer the questions as you proceed to complete the installation.
 This book won’t help you build Haskell from source, and the results are unreliable enough that this approach isn’t recommended for the novice developer. If you find that you absolutely must build Haskell from source files, make sure that you rely on the instructions found in the README file provided with the source code, rather than online instructions that may reflect the needs of an older version of Linux.
Installing Haskell on a Mac system
When working with a Mac platform, you need to access a Haskell installer specifically designed for a Mac. This chapter assumes that you don’t want to take time or effort to create a custom configuration using source code. The following steps describe how to perform the installation using the graphical installer.
-
Locate the downloaded copy of Haskell Platform 8.2.2 Full 64bit-signed.pkg on your system.
If you use some other version, you may experience problems with the source code and need to make adjustments when working with it.
-
Double-click the installation file.
You see a Haskell Platform 8.2.2 64-bit Setup dialog box.
-
Click Next.
The wizard displays a licensing agreement. Be sure to read the licensing agreement so that you know the terms of usage.
-
Click I Agree if you agree to the licensing agreement.
The setup wizard asks where you want to install your copy of Haskell. This book assumes that you use the default installation location.
-
Click Next.
You see a dialog box asking which features to install. This book assumes that you install all the default features.
-
Click Next.
You see a new dialog box appear that asks where to install the Haskell Stack. Use the default installation location to ensure that your setup works correctly.
-
Click Next.
The setup wizard asks you which features to install. You must install all of them.
-
Click Install.
You see the Haskell Stack Setup wizard complete.
-
Click Close.
You see the Haskell Platform wizard progress indicator move. At some point, the installation completes.
-
Click Next.
You see a completion dialog box.
-
Click Finish.
Haskell is now ready for use on your system.
Installing Haskell on a Windows system
When working with a Windows platform, you need access to a Haskell installer specifically designed for Windows. The following steps assume that you’ve downloaded the required file, as described in the introduction to this section.
-
Locate the downloaded copy of HaskellPlatform-8.2.2-full-x86_64-setup.exe on your system.
If you use some other version, you may experience problems with the source code and need to make adjustments when working with it.
-
Double-click the installation file.
(You may see an Open File – Security Warning dialog box that asks whether you want to run this file. Click Run if you see this dialog box pop up.) You see an Haskell Platform 8.2.2 64-bit Setup dialog box.
-
Click Next.
The wizard displays a licensing agreement. Be sure to read through the licensing agreement so that you know the terms of usage.
-
Click I Agree if you agree to the licensing agreement.
The setup wizard asks where you want to install your copy of Haskell, as shown in Figure 3-1. This book assumes that you use the default installation location, but you can enter a different one.
-
Optionally provide an installation location and then click Next.
You see a dialog box asking which features to install. This book assumes that you install all the default features, as shown in Figure 3-2. Note especially the Update System Settings option. You must ensure that this option is selected to obtain proper functioning of the Haskell features.
-
Choose the features you want to use and click Next.
The setup wizard asks you which Start menu folder to use, as shown in Figure 3-3. The book assumes that you use the default Start menu folder, but you can enter a name that you choose.
-
Optionally type a new Start menu folder name and click Install.
You see a new dialog box appear that asks where to install the Haskell Stack. Use the default installation location unless you need to change it for a specific reason, such as using a local folder rather than a roaming folder.
-
Optionally type a new location and click Next.
The setup wizard asks you which features to install. You must install all of them.
-
Click Install.
You see the Haskell Stack Setup wizard complete.
-
Click Close.
You see the Haskell Platform wizard progress indicator move. At some point, the installation completes.
-
Click Next.
You see a completion dialog box.
-
Click Finish.
Haskell is now ready for use on your system.
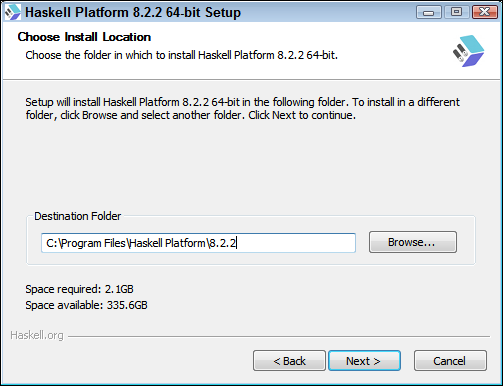
FIGURE 3-1: Specify a Haskell installation location.
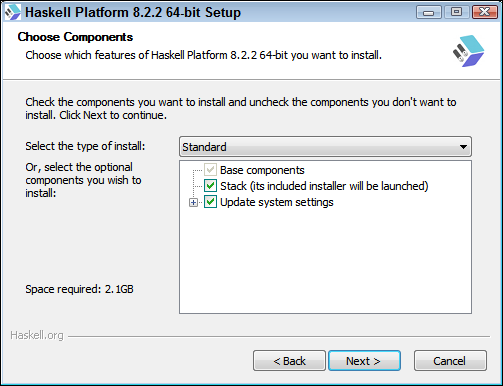
FIGURE 3-2: Choose which Haskell features to install.
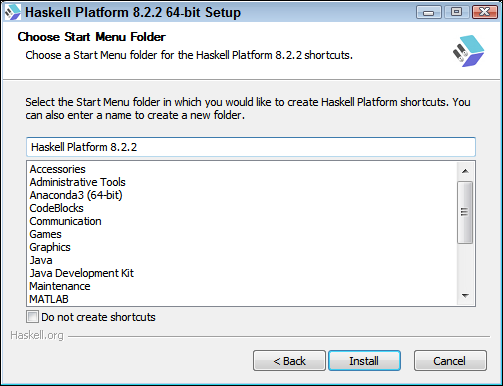
FIGURE 3-3: Type a Start menu folder name, if desired.
Testing the Haskell Installation
As explained in the “Using Haskell IDEs and Environments” sidebar, you have access to a considerable number of environments for working with Haskell. In fact, if you’re using Linux or Mac platforms, you can rely on an add-in for the Jupyter Notebook environment used for Python in this book. However, to make things simple, you can use the Glasgow Haskell Compiler interpreter (GHCi) that comes with the Haskell installation you created earlier. Windows users have a graphical interface they can use called WinGHCi that works precisely the same as GHCi, but with a nicer appearance, as shown in Figure 3-4.

FIGURE 3-4: The WinGHCi interface offers a nice appearance and is easy to use.
You can find either GHCi or WinGHCi in the folder used to store the Haskell application icons on your system. When working with Windows, you find this file at Start ⇒ All Programs ⇒ Haskell Platform 8.2.2. No matter how you open the interpreter, you see the version number of your installation, as shown in Figure 3-4.
The interpreter can provide you with a great deal of information about Haskell, and simply looking at what’s available can be fun. The commands all start with a colon, including the help commands. So to start the process, you type :? and press Enter. Figure 3-5 shows typical results.
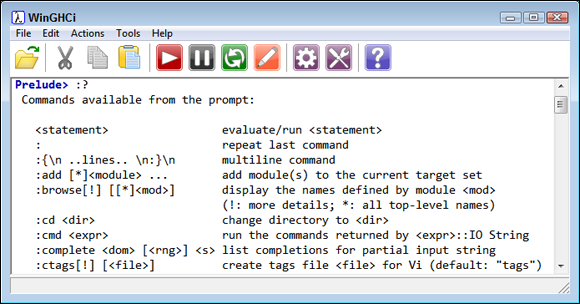
FIGURE 3-5: Make sure to precede all help commands with a colon (:) in the interpreter.
As you look through the list, you see that all commands begin with a colon. For example, to exit the Haskell interpreter, you type :quit and press Enter.
Playing with Haskell is the best way to learn it. Type "Haskell is fun!" and press Enter. You see the string repeated onscreen, as shown in Figure 3-6. All Haskell has done is evaluate the string you provided.
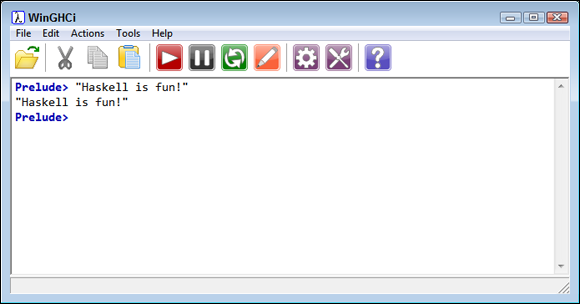
FIGURE 3-6: Typing a string and pressing Enter displays it onscreen.
As a next step, try creating a variable by typing x = "Haskell is really fun!" and pressing Enter. This time, Haskell doesn’t interpret the information but simply places the string in x. To see the string, you can use the putStrLn function. Type putStrLn x and press Enter. Figure 3-7 shows what you should see. At this point, you know that the Haskell installation works.
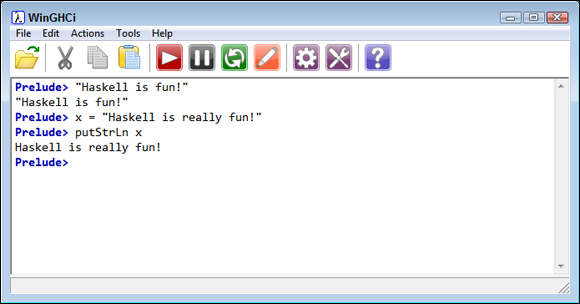
FIGURE 3-7: Haskell uses variables and functions to interact with the user.
Compiling a Haskell Application
Even though you'll perform most tasks in this book using the interpreter, you can also load modules and interpret them. In fact, this is how you use the downloadable source: You load it into the interpreter and then execute it. To see how this works, create a text file on your system called Simple.hs. You must use a pure text editor (one that doesn’t include any formatting in the output file), such as Notepad or TextEdit. Type the following code into the file and save it on disk:
main = putStrLn out
   where
      out = "5! = " ++ show result
      result = fac 5

fac 0 = 1
fac n = n * fac (n - 1)
 This code actually demonstrates a number of Haskell features, but you don’t need to fully understand all of them now. To compile a Haskell application, you must have a main function, which consists of a single statement, which in this case is
 putStrLn out. The variable out is defined as part of the where clause as the concatenation of a string, "5! = ", and an integer, result, that you output using the show function. Notice the use of indentation. You must indent the code for it to compile correctly, which is actually the same use of indentation as found in Python.
The code calculates the result by using the fac (factorial) function that appears below the main function. As you can see, Haskell makes it easy to use recursion. The first line defines the stopping point. When the input is equal to 0, the function outputs a value of 1. Otherwise, the second line is used to call fac recursively, with each succeeding call reducing the value of n by 1 until n reaches 0.
After you save the file, you can open GHCi or WinGHCi to experiment with the application. The following steps provide the means to load, test, and compile the application:
-
Type :cd <Source Code Directory> and press Enter.
Supply the location of the source code on your system. The location of your source code will likely differ from mine.
-
Type :load Simple.hs and press Enter.
Notice that the prompt changes to *Main>, as shown in Figure 3-8. If you're using WinGHCi, you can also use the File ⇒ Load menu command to accomplish this task.
-
Type :main and press Enter.
You see the output of the application as shown in Figure 3-9. When working with WinGHCi, you can also use the Actions ⇒ Run “main” command or you can click the red button with the right-pointing arrow on the toolbar.
-
Type :! ghc --make ″Simple.hs″ and press Enter.
The interpreter now compiles the application, as shown in Figure 3-10. You see a new executable created in the source code directory. When working with WinGHCi, you can also use the Tools ⇒ GHC Compiler menu command to perform this task. You can now execute the application at the command prompt and get the same results as you did in the interpreter.
-
Type :module and press Enter.
This act unloads all the existing modules. Notice that the prompt changes back to Prelude>. You can also perform this task using the Actions ⇒ Clear Modules menu command.
-
Type :quit and press Enter.
The interpreter closes. You’re done working with Haskell for now.
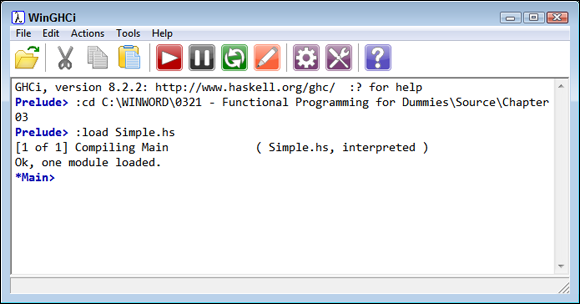
FIGURE 3-8: The prompt changes when you load a source file.
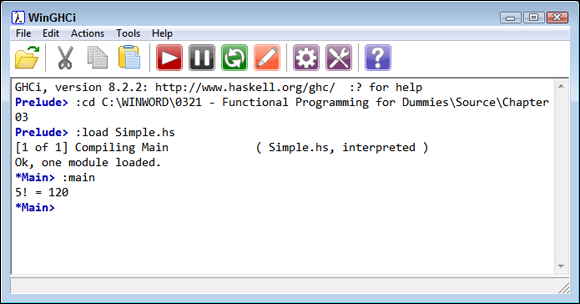
FIGURE 3-9: Executing the main function shows what the application file can do.
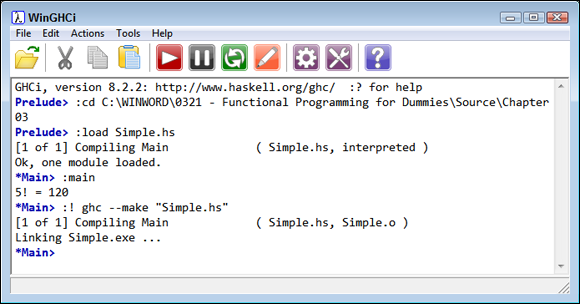
FIGURE 3-10: Compiling the loaded module creates an executable on disk.
These steps show just a small sample of the kinds of tasks you can perform using GHCi. As the book progresses, you see how to perform more tasks, but this is a good start on discovering what Haskell can do for you.
Using Haskell Libraries
Haskell has a huge library support base in which you can find all sorts of useful functions. Using library code is a time saver because libraries usually contain well-constructed and debugged code. The import function allows you to use external code. The following steps take you through a simple library usage example:
- Open GHCi, if necessary.
-
Type import Data.Char and press Enter.
Note that the prompt changes to Prelude Data.Char> to show that the import is successful. The
Data.Charlibrary contains functions for working with theChardata type. You can see a listing of these functions athttp://hackage.haskell.org/package/base-4.11.1.0/docs/Data-Char.html. In this case, the example uses theordfunction to convert a character to its ASCII numeric representation. -
Type ord(′a′) and press Enter.
You see the output value of 97.
The “Getting and using datasets” section of Chapter 2 discusses how to obtain a dataset for use with Python. You can obtain these same datasets for Haskell, but first you need to perform a few tasks. The following steps will work for any platform if you have installed Haskell using the procedure in the earlier part of this chapter.
- Open a command prompt or Terminal window with administrator privileges.
-
Type cabal update and press Enter.
You see the update process start. The cabal utility provides the means to perform updates in Haskell. The first thing you want to do is ensure that your copy of cabal is up to date.
-
Type cabal install Datasets and press Enter.
You see a rather long list of download, install, and configure sequences. All these steps install the Datasets module documented at
https://hackage.haskell.org/package/datasets-0.2.5/docs/Numeric-Datasets.htmlonto your system. -
Type cabal list Datasets and press Enter.
The cabal utility outputs the installed status of Datasets, along with other information. If you see that Datasets isn't installed, try the installation again by typing cabal install Datasets --force-reinstalls and pressing Enter instead.
Chapter 2 uses the Boston Housing dataset as a test, so this chapter will do the same. The following steps show how to load a copy of the Boston Housing dataset in Haskell.
- Open GHCi or WinGHCi.
-
Type import Numeric.Datasets (getDataset) and press Enter.
Notice that the prompt changes. In fact, it will change each time you load a new package. The step loads the
getDatasetfunction, which you need to load the Boston Housing dataset into memory. -
Type import Numeric.Datasets.BostonHousing (bostonHousing) and press Enter.
The
BostonHousingpackage loads asbostonHousing. Loading the package doesn't load the dataset. It provides support for the dataset, but you still need to load the data. -
Type bh <- getDataset bostonHousing and press Enter.
This step loads the Boston Housing dataset into memory as the object
bh. You can now access the data. -
Type print (length bh) and press Enter.
You see an output of
506, which matches the length of the dataset in Chapter 2.
Getting Help with the Haskell Language
The documentation that the wizard installs as part of your Haskell setup is the first place you should look when you have questions. There are three separate files for answering questions about: GHC, GHC flags, and the Haskell libraries. In addition, you see a link for HackageDB, which is the Haskell Software Repository where you get packages such as Datasets used in the “Using Haskell Libraries” section of this chapter. All these resources help you see the wealth of functionality that Haskell provides.
Tutorials make learning any language a lot easier. Fortunately, the Haskell community has created many tutorials that take different approaches to learning the language. You can see a listing of these tutorials at https://wiki.haskell.org/Tutorials.
No matter how adept you might be, documentation and tutorials won't be enough to solve every problem. With this in mind, you need access to the Haskell community. You can find many different groups online, each with people who are willing to answer questions. However, one of the better places to look for help is StackOverflow at https://stackoverflow.com/search?q=haskell.