Chapter 10
Working with Picture and Movie Files
IN THIS CHAPTER
![]() Rating photos and movies
Rating photos and movies
![]() Deleting unwanted files
Deleting unwanted files
![]() Protecting files from accidental erasure
Protecting files from accidental erasure
![]() Downloading files to your computer
Downloading files to your computer
![]() Processing Raw files
Processing Raw files
![]() Shrinking files for online use
Shrinking files for online use
Every creative pursuit involves its share of cleanup and organizational tasks. Painters have to wash brushes, embroiderers have to separate strands of floss, and woodcrafters have to haul out the wet/dry vac to suck up sawdust. Digital photography is no different: At some point, you have to stop shooting so that you can download and process your files.
This chapter explains these after-the-shot tasks. First up is a review of several in-camera file-management operations: rating files, deleting unwanted files, and protecting your best work from accidental erasure.
Following that, you can get help with transferring files to your computer, processing files that you shot in the Raw (NEF) format, and creating low-resolution copies of photos for online sharing. Along the way, I introduce you to Nikon ViewNX-i and Nikon Capture NX-D, two free computer programs that you can use to handle some of these tasks.
Note: If you own a smartphone, tablet, or other smart device that can run Nikon’s SnapBridge app, also check out the appendix. It offers information about connecting your camera to the smart device so that you can transfer photos wirelessly to the device and, from there, upload images to your favorite social media site or Nikon Image Space, a free online photo-storage and sharing site.
Rating Photos and Movies
Using your camera’s Rating feature, you can assign a rating to a picture or movie file: five stars for your best shots, one star for those you wish you could reshoot, and so on. You can even assign a “trash this” rating to flag files that you think you want to delete.
 Rating pictures has several benefits. First, when you create a slide show, as outlined in Chapter 9, you can tell the camera to display only photos or movies that have a certain rating. Second, assigning the Delete tag makes it easy to spot the rotten apples amid all your great work when you take the step of erasing files. (Merely assigning the Delete tag doesn’t actually erase the file.) Finally, some photo programs can read the rating and then sort files according to rating. That feature makes it easier to cull your photo and movie collection and gather your best work for printing and sharing.
![]() Before showing you how to rate files, I need to share one rule of the road: If you protect a file by using the feature described in the later section “Protecting Photos and Movies,” you can’t assign a rating to it. To remove protection, display the file and press the AE-L/AF-L button.
Before showing you how to rate files, I need to share one rule of the road: If you protect a file by using the feature described in the later section “Protecting Photos and Movies,” you can’t assign a rating to it. To remove protection, display the file and press the AE-L/AF-L button.
Assuming that the file isn’t protected, you can assign a rating in two ways:
-
Open the Playback menu and choose Rating. After selecting the Rating option, as shown on the left in Figure 10-1, press OK to display thumbnails, as shown on the right. Press the Multi Selector right or left or use the Command dial to move the yellow selection box over an image you want to rate.
To assign the rating, press the Multi Selector up or down. Press up to assign a star rating — each press raises the rating one notch. Press down to reduce the number of stars, remove all starts, or to mark a file as a dud, select the symbol that looks like a trash can. A symbol representing the rating appears with the thumbnail, as labeled in the figure.
 For a closer view of a selected photo, press the Zoom In button. Release the button to return to thumbnails view.
To rate another photo, move the selection box over it and repeat the process. After rating your photos, press OK to exit to the Playback menu.
I mention this elsewhere in the book, but it bears repeating: If you’re not sure what buttons to press to accomplish the task you’re attempting, check the bottom of the screen display. You may see reminder icons, as shown on the right in Figure 10-1. In this case, the left symbol tells you to use the up/down keys on the Multi Selector to set the rating. (The up/down arrows represent the up/down buttons on the Multi Selector.) The magnifying-glass symbol to the right looks like the one on the Zoom In button, showing that you can press that button to magnify the display. And the OK symbol tells you that you must press the OK button to lock in your settings. (I know you could have figured that last one out on your own, but it’s important to press the OK button when you see the symbol. Otherwise, you’re changes won’t stick.)  Assign a rating without leaving playback mode. Instead of going through the Playback menu, you can rate photos one by one as you’re viewing them. Display the photo or movie you want to rate and then press the i button. You see the Playback version of the i-button menu, as shown on the left in Figure 10-2. Select Rating and press the Multi Selector right (note the right pointing arrow, which is your cue to press the right Multi Selector to move to the next screen). The mini-menu disappears, and the rating strip highlighted on the right side of the figure appears. Press the Multi Selector right or left to choose a star rating from 1 to 5. Select the far-left dot, labeled Delete rating in the figure, to tag a picture for erasure. Press OK to complete the job.
 If you’re viewing images in the display mode that hides all shooting data from the screen, the OK Done text doesn’t appear on the rating screen (the right screen in Figure 10-2). You need to press OK to apply the rating nonetheless.
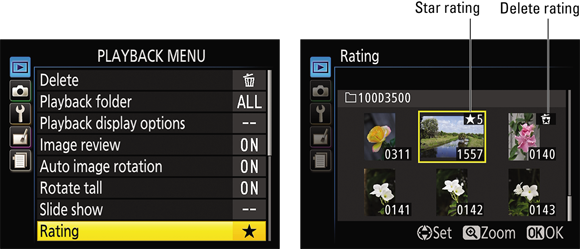
FIGURE 10-1: You can rate a batch of photos by choosing Rating from the Playback menu.
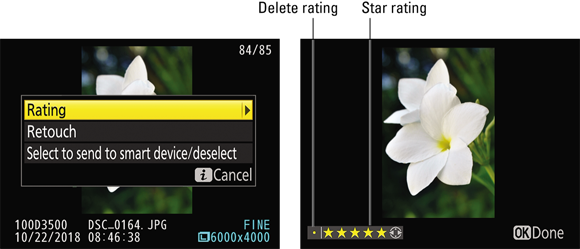
FIGURE 10-2: During playback, press the i button, select Rating, and then press the Multi Selector right or left to set the rating.
In playback mode, the rating appears with the image. Figure 10-3 shows you where to find the rating in the default display mode (File Information mode). For more about display modes, see Chapter 9.
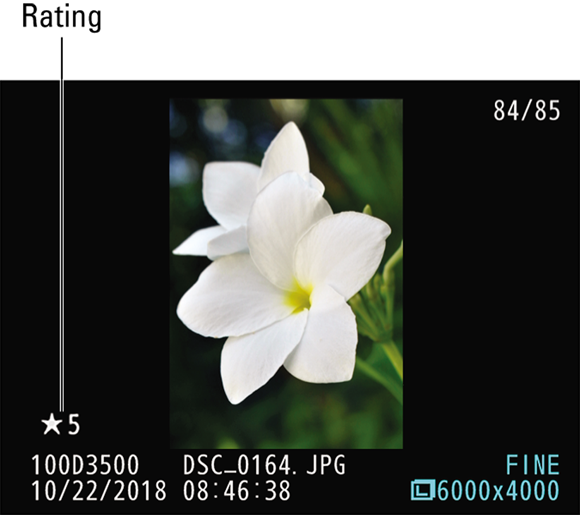
FIGURE 10-3: The rating appears here in File Information playback mode.
To “unrate” a file, choose the Rating option from the Playback menu or i-button menu. Then press the Multi Selector right or left until the rating strip contains only dots — no stars or the trash can symbol. Press OK to make it official.
Deleting Files
You have three options for erasing files from a memory card when it’s in your camera. The next few sections give you the lowdown.
One note before you begin: None of the Delete features erase files that you protect via the option that I outline in the upcoming section “Protecting Photos and Movies.” To remove protection, display the photo or movie in playback mode and press the AE-L/AF-L button.
Deleting files one at a time
 During playback, you can use the Delete button to erase photos and movie files. But the process varies depending on the current playback mode:
- In single-image view, press the Delete button.
- In thumbnails view, use the Multi Selector or Command dial to move the yellow selection frame over the picture you want to erase. Then press Delete.
 In Calendar view, highlight the date that contains the file. Then press the Zoom Out button to jump to the thumbnail list, use the Multi Selector to select the file's thumbnail, and press Delete.
You then see a message asking whether you really want to erase the picture. If you do, press Delete again. To cancel the process, press the Playback button.
By default, the camera displays your photo briefly after the shot is recorded. (You enable or disable this feature via the Image Review option on the Playback menu.) During the instant review period, you can press the Delete button to trash the file immediately. But you have to be quick or else the camera returns to shooting mode.
Deleting all files
Open the Playback menu, select Delete, as shown on the left in Figure 10-4, and press OK to display the second screen in the figure. Then highlight All and press OK. The camera asks you to verify that you want to delete all your pictures and movies; select Yes and press OK.
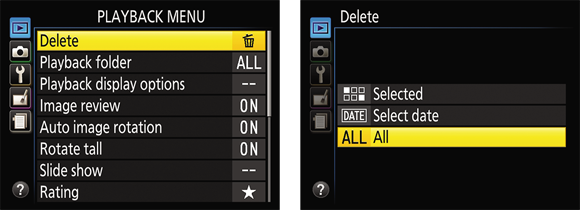
FIGURE 10-4: To delete all files (except those you protected), use this Playback menu option.
If your memory card contains multiple folders, these steps delete only pictures in the folder that is currently selected via the Playback Folder option on the Playback menu. For information, see the Chapter 9 section related to choosing which images to view. (Set the Playback Folder to All if you truly want to dump photos from all folders.) Remember, too, that any files you protected are not deleted.
Deleting a batch of selected files
When you want to get rid of more than a few files — but not erase all pictures and movies on the card — don’t waste time erasing each file, one at a time. Instead, you can tag multiple files for deletion and then take them all out to the trash at one time.
To start, display the Playback menu, highlight Delete, and then press OK. You see the screen shown on the left in Figure 10-5, which offers two options for selecting files to erase:
-
Selected: Use this option if the files you want to delete weren’t all taken on the same day. Highlight Selected, as shown on the left in Figure 10-5, and press the Multi Selector right to display thumbnails, as shown on the right.
Use the Multi Selector to place the yellow selection frame over the first file you want to delete and then press the Zoom Out button. A trash can appears in the upper-right corner of the thumbnail, as shown in the figure. If you change your mind, press the Zoom Out button again to remove the Delete tag. To undo deletion for all selected files, press the Playback button. For a closer look at the selected image, press and hold the Zoom In button. When you release the button, the display returns to normal thumbnails view. Images that you tag with the Delete rating, as explained in the first section of this chapter, are not officially marked for the trash heap. When you view your files, you see the Delete Rating symbol, labeled on the right in Figure 10-5; when you select the photo via the Delete menu, you see the symbol marked Delete File in the figure. That’s the symbol that triggers the camera to dump the file. -
Select Date: Use this option to quickly delete any record of a day you’d rather not remember. After choosing Select Date, as shown on the left in Figure 10-6, press the Multi Selector right to display a list of dates, as shown on the right. Highlight a date and press the Multi Selector right. A check mark appears in the box next to the date, tagging for deletion all images taken on that day. To remove the check mark, press the Multi Selector right again.
Can’t remember what photos are associated with the selected date? Try these tricks:
- To display thumbnails of all images taken on the selected date, press the Zoom Out button. (Again, notice the symbol that appears next to the word Confirm at the bottom of the screen; the symbol looks similar to the one on the Zoom Out button.)
- To temporarily view the selected thumbnail at full-size view, press the Zoom In button. Release the button to return to the thumbnails screen.
- On the confirmation (thumbnails) screen, press OK to select the date for deletion and return to the main date list. Or, to exit to the date list without selecting the date, press the Zoom Out button again.
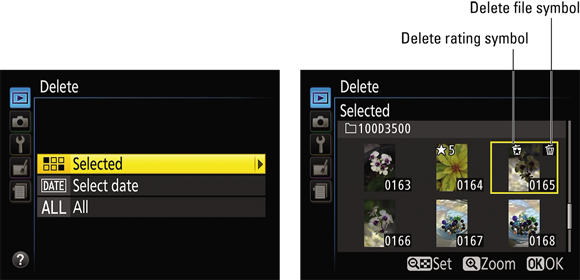
FIGURE 10-5: This Delete menu option offers a quick way to delete a batch of photos.
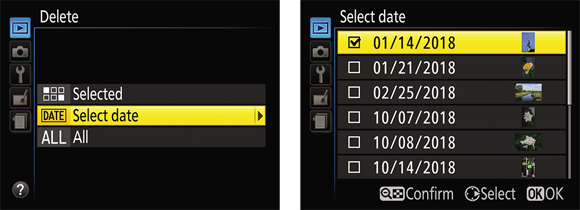
FIGURE 10-6: With the Select Date option, you can quickly erase all photos taken on a specific date.
After tagging files for deletion or specifying a date to delete, press OK. You see a confirmation screen; select Yes and press OK.
You have one alternative way to quickly erase all files shot on a specific date: In the Calendar display mode, highlight the date and then press the Delete button. You see the standard confirmation screen; press Delete again to wrap up. Visit Chapter 9 for the scoop on Calendar display mode.
Protecting Photos and Movies
You can protect files from accidental erasure by giving them protected status. After you take this step, the camera doesn’t allow you to delete the file, whether you press the Delete button or use the Delete option on the Playback menu.
I also use the Protect feature when I want to keep a handful of pictures on the card but delete the rest. Rather than use the options I describe in the preceding section to select all the pictures I want to trash, I protect the handful I want to preserve. Then I set the Delete menu option to All and dump the rest. The protected pictures remain intact.
 Formatting your memory card does erase even protected pictures. In addition, when you protect a picture, it may show up as a read-only file when you transfer it to your computer, depending on whether the software you use can read the protection tag. Files that have the read-only status can’t be altered until you unlock them. You can do this in Nikon ViewNX-i. After selecting the image in that program, open the File menu, choose Protect Files, and then select Unprotect.
Remember, too, that locking the file prevents you from assigning a rating to it — so rate photos before giving them protected status. (Refer to the first section of this chapter for information about the Rating feature.) Nor can you use tools on the Retouch menu to edit the file.
To protect a file, take these steps:
- Display or select the file you want to protect.
- In single-image view, just display the photo or movie.
- In 4/9/72 Thumbnail mode, use the Multi Selector or Command dial to place the yellow selection box over the file's thumbnail.
- In Calendar view, highlight the file thumbnail in the strip of thumbnails that appears on the right side of the screen. (Press the Zoom Out button to jump between the calendar dates and the thumbnails.)
 Press the AE-L/AF-L button, shown in Figure 10-7.
See the key symbol next to the button? That’s your reminder that you use the button to lock a picture. A key symbol also appears with locked photos during playback, as shown in the figure.
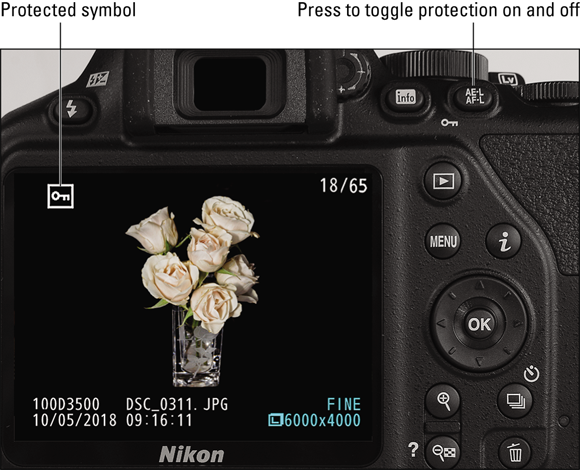
FIGURE 10-7: Press the AE-L/AF-L button to give an image protected status.
To remove protection, display or select the file and then press the AE-L/AF-L button again.
Taking a Look at Nikon's Photo Software
To move pictures and movies to your computer, you need some type of software to download, view, and manage the files. If you don't have a favorite photo program for handling these tasks, Nikon offers the following free solutions:
-
Nikon ViewNX-i: Shown in Figure 10-8, this program offers basic photo organizing and editing tools. In addition, a tool built into the program, Nikon Transfer, simplifies the job of sending pictures from a memory card or your camera to your computer. I explain the process in the next section.
Your program may not initially look like the one in the figure because I customized the screen layout to suit my needs. You can do the same via the options on the View and Window menus after opening the program.
Two features I especially like about ViewNX-i: -
Viewing picture settings (metadata): You can display a panel that shows the settings you used when shooting the picture, as shown in Figure 10-8. The settings are stored as metadata (extra data) in each picture's file. Although other photo programs can display some metadata, they often can't show all the detailed information that you can see in ViewNX-i.
Don’t see the panel? Open the Window menu at the top of the program window and choose Adjustments/Metadata. You may then need to click the triangle labeled Click to hide/display shooting data to expand the panel. One other note: You can toggle between the full list of metadata, as shown in the figure, and a small graphic that contains just the basics. (The graphic looks similar to the Information screen displayed on the camera.) Click the button labeled Click to view minimal shooting data to switch between the two views.
- Displaying focus points: Click the button labeled Display focus point in Figure 10-8 to display one or more red rectangles on the photo, as shown in the figure. The rectangle(s) indicate which focus point (or points) the camera used to establish focus, which can be helpful for troubleshooting focus problems. If the focus point is over your subject but the subject is blurry, the cause is likely not due to focusing at all, but to subject or camera movement during a too-long exposure (slow shutter speed). You don’t see the focus point if you used manual focusing, and it also may not appear if you used continuous autofocusing.
Nikon ViewNX-i also contains some photo-editing tools; access them by clicking the Edit tab near the top-left corner of the program window. For more sophisticated editing tools, use Nikon Capture NX-D, described next. You can send the current photo directly to that program from ViewNX-i by clicking the Capture NX-D icon that appears with the other icons along the top of the program window. Or open the File menu and choose Open with Capture NX-D.
-
-
Nikon Capture NX-D: Shown in Figure 10-9, this program offers pro-level photo-editing tools, including a good Raw processing tool, which I show you how to use later in this chapter. You also can view camera metadata in this program, as shown in the figure. Click the tabs labeled in the figure to toggle the panel display between the Information tab, which displays shooting data, and the Editing tabs, which contain editing tools.
Like ViewNX-i, Capture NX-D can display the focus point or points used to set focus when you took the picture, as shown in Figure 10-9. Toggle the focus point display on and off by opening the program’s Image menu and then selecting Show Focus Point.
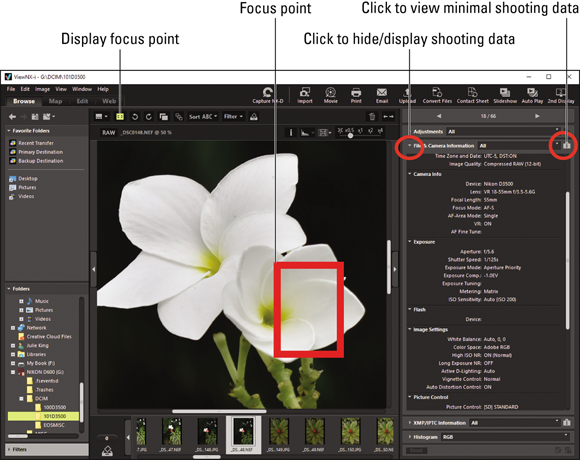
FIGURE 10-8: You can see the selected focus point and other camera settings when you view photos in Nikon ViewNX-i.

FIGURE 10-9: Capture NX-D offers a more advanced assortment of photo editing tools.
You can download both programs from the Nikon website (in the United States, www.nikonusa.com). Head for the Support section of the website, where you'll find a link to camera software. Be sure to download the latest versions. At the time I write this chapter, ViewNX-i is Version 1.3.0; NX-D is Version 1.5.0. Older versions of the software lack support for D3500 files. Also make sure that your computer meets the software operating-system requirements. (The program is available for both Windows-based and Mac computers.)
Downloading Pictures to the Computer
All picture and movie files are stored on the SD (Secure Digital) memory card installed in your camera. You can move those files from the card to your computer in two ways:
- Use a memory card reader. A card reader, if you’re unfamiliar, is just a small device that attaches to your computer (or, in some cases, is built into the computer). When you put a memory card into the reader, your computer recognizes the card as just another drive on the system, and you can then access the files on the card.
- Connect the camera to the computer via a USB cable. This option requires purchase of a specific Nikon cable, part UC-E20. You may be able to order it from Nikon directly (about $12) or from an online camera store. Local camera stores don’t usually carry the cable because it’s not a commonly requested item.
I recommend going the card reader route for a couple of reasons. First, if you connect the camera directly to the computer, the camera must be turned on during the entire transfer, wasting battery power.
Additionally, you can get a card reader for about the same price as the cable. And unlike the cable, which is specific to this camera (and a handful of other Nikon cameras) a card reader can do universal duty, handling cards from any devices that use SD cards for storage. For example, I have a tablet that stores data on a mini-SD card, which is a tiny version of a standard SD card. The mini cards usually come with an adapter that enables them to be read as a regular SD card, so I can use my card reader to transfer files from my tablet as well as my camera.
Before you buy a card reader, though, make sure one isn’t built into your computer. Some printers also have built-in card readers, and you can take that pathway to get files to the computer.
If you do need a card reader, look for an external version (versus one you have to install on a bay in the computer) so that you can use it with any computer. You can buy a good reader for under $30; higher priced models typically have slots for multiple types of memory cards rather than just SD slots. Be sure that the reader meets two specifications: First, it uses the type of connection compatible with your computer (USB connection is the most common). Second, check that the reader accepts the type of card your camera uses (SD) as well as the capacity of the cards you use. Currently, the highest capacity SD cards are labeled SDXC (Secure Digital Expanded Capacity). Some older card readers still being sold can’t read the high-capacity cards.
Also, the faster the transfer speed of the card reader, the faster your image files can be shipped to the computer. For USB connections, a USB 3 reader moves files more quickly than a USB 2 reader. If your computer only has USB 2 ports, don’t worry; you won’t enjoy the fastest speeds, but the reader will still work if its specifications indicate that it’s is backwards-compatible with USB 2.
What about wireless transfer, you ask? Well, there is one way to do it: You can buy Eye-Fi memory cards, which have wireless connectivity built in. You can find out more about these cards and how to set them up to connect with your computer at the manufacturer’s website, www.eye.fi. Also check the Eye-Fi details provided in the D3500 manual; look for the section related to the Eye-Fi Upload option on the Setup menu. (The menu item appears only when an Eye-Fi card is installed.) I don’t cover these cards in this book.
As for the Bluetooth wireless communication feature found on the D3500, you can’t use it to move files to your computer. But it does enable you to connect wirelessly to Android- and iOS-based phones, tablets, and other smart devices. You can then send copies of your photos to the device for viewing or for uploading to the internet. Check the appendix for a primer on Bluetooth features.
All that said, the next section tells you how to connect your camera and computer via USB. Following that, you can read about the steps in making the actual file transfer whether you go the USB route or use a card reader.
Connecting via USB
If you invest in the USB cable needed to download pictures directly from your camera to your computer, take these steps to connect the two devices:
-
Check the level of the camera battery.
If the battery is low, charge it before continuing. Running out of battery power during downloading can cause problems, including lost picture data. Alternatively, if you purchased the AC adapter, use it to power the camera during downloading. - Turn on the computer and give it time to finish its normal start-up routine.
- Turn off the camera.
-
Insert the smaller of the two plugs on the USB cable into the USB port on the side of the camera.
Look under the door on the left side of the camera for this port, labeled in Figure 10-10.
- Plug the other end of the cable into a USB port on the computer.
-
Turn on the camera.
What happens now depends on the photo software you have installed on your computer. The next section explains the possibilities and how to proceed with the transfer process.
- When the download is complete, turn off the camera and then disconnect it from the computer.
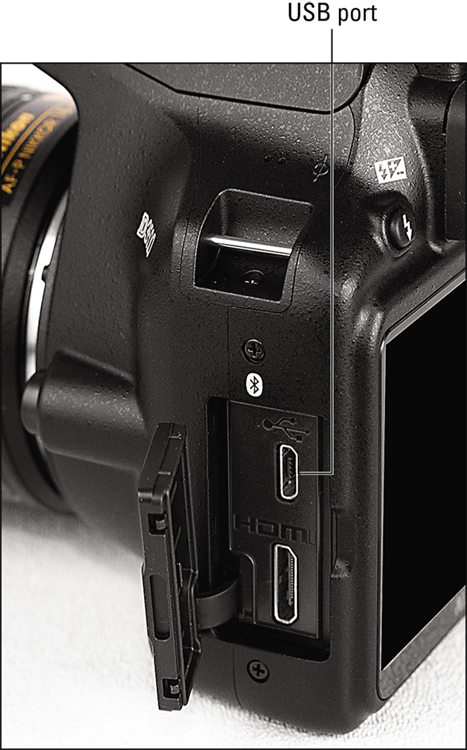
FIGURE 10-10: The port for connecting the USB cable is hidden under the door on the left side of the camera.
Starting the file-transfer process
After you connect the camera to the computer or insert a memory card into a card reader, what happens next depends on the software installed on your computer. Here are the most common possibilities and how to move forward:
- On a computer running Windows, you see a message asking what software you want to use to download your pictures (or movies). If you don’t have a favorite program to use for this task, I suggest you select Nikon ViewNX-i. The program should appear as an option after you install it onto your computer. I give step-by-step instructions for downloading files using this program in the next section.
-
An installed photo program automatically displays a photo-download wizard. For example, on a Mac computer, you may see the downloader associated with Photos (or iPhoto, on systems running some older versions of the Mac OS). Or the downloader associated with some other photo program, such as Adobe Lightroom, may leap to the forefront. Usually, the downloader that appears is associated with the software that you most recently installed.
If you don’t want a program’s downloader to launch whenever you insert a memory card or connect your camera, you can turn off that feature. Check the software manual to find out how to disable the auto launch. - Nothing happens. Don’t panic; assuming that your card reader or camera is properly connected, all is probably well. Someone simply may have disabled all the automatic downloaders on your system. Just launch your photo software and then transfer your pictures using whatever command starts that process.
The next section provides details on using Nikon ViewNX-i to download files. If you use another program, the concepts are the same, but check the program manual for specifics.
Downloading using Nikon ViewNX-i
Nikon ViewNX-i includes a built-in file-downloading tool called Nikon Transfer. Follow these steps to use it to preview and download images and movies from your memory card:
-
Launch Nikon Transfer 2 if it isn’t already open.
Depending on how you installed ViewNX-i, the Nikon Transfer 2 window, shown in Figure 10-11, may appear automatically when you attach the camera to the computer or put your memory card into a card reader. If you don’t see the Nikon Transfer 2 window, start ViewNX-i, open the File menu, and choose Import Images with Transfer. You also can just click the Import button at the top of the ViewNX-i window. (Note that although my figures show the Windows version of the program, these steps work for the Mac version as well.)
-
Display the Source tab to view thumbnails of your pictures, as shown in the figure.
Don’t see any tabs? Click the Options triangle (refer to Figure 10-11) to display them. Then click the Source tab. The icon representing your camera or memory card should be selected, as shown in the figure. If your camera or card isn’t selected, click the icon and choose the device that holds the files you want to transfer.
Thumbnails of your files appear in the bottom half of the dialog box. If you don’t see the thumbnails, click the Thumbnails triangle (refer to Figure 10-11) to open the thumbnails area. -
Select the files that you want to download.
Click a thumbnail to highlight it and then click the box near its lower-right corner to select that file for downloading.
These tricks speed up the process: - Select protected files only. If you used the in-camera function to protect pictures, you can select just those images by clicking the Select Protected icon (refer to Figure 10-11).
- Select all files. Click the Select All icon, also labeled in the figure.
-
Click the Primary Destination tab to display options for handling the file transfer, as shown in Figure 10-12.
You still see the entire Nikon Transfer window; I just cropped the figure to show only the options on the tab at the top of the window.
The most important setting on this tab is Primary Destination Folder, which determines where the program puts your transferred files. (Look for the option on the left side of the tab.) Open the drop-down list and choose the folder on your computer's hard drive (or external drive) where you want to put the pictures.
Other options on this tab enable you to specify how pictures should be organized inside the primary destination folder and whether to rename files during the transfer.
-
To send copies of your pictures to a backup drive as well as to your main storage location, click the Backup Destination tab to display the options shown in Figure 10-13.
This feature is a big timesaver, enabling you to download photos to your primary drive and to a backup drive at the same time. After selecting the Backup Files box, as shown in the figure, use the other panel options to specify where you want the backup files to go. -
Click the Preferences tab to display the options shown in Figure 10-14.
Three settings here are critical:
- Transfer New Files Only: This option, when selected, ensures that you don’t waste time downloading images that you’ve already transferred.
-
Delete Original Files after Transfer: Turn off this option. Otherwise, your pictures are erased from your memory card when the transfer is complete. Always make sure the pictures made it to the computer before you delete them from your memory card.
-
Open Destination Folder with the Following Application after Transfer: You can tell the program to immediately open your photo program after the transfer is complete. Choose ViewNX-i to view and organize your photos using that program. To choose another program, open the drop-down list, choose Browse, and select the program from the dialog box that appears. Click OK after doing so.
Your choices remain in force for any subsequent download sessions, so you don’t have to revisit this tab unless you want the program to behave differently.
-
Click the Start Transfer button, found at the bottom of the Nikon Transfer 2 window (refer to Figure 10-11).
After you click the button, the Process bar in the lower-left corner of the program window indicates how the transfer is progressing. What happens when the transfer completes depends on the choices you made in Step 6; if you selected Nikon ViewNX-i as the photo program, it opens and displays the folder that contains your just-downloaded images.
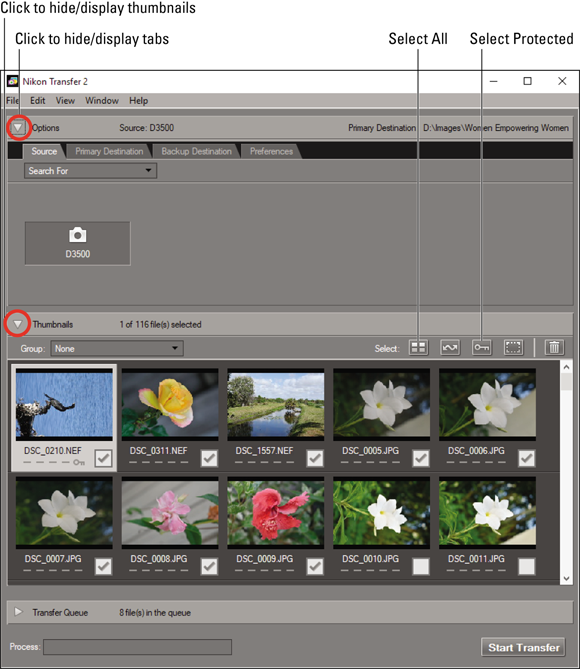
FIGURE 10-11: Select the check boxes of the images that you want to download.
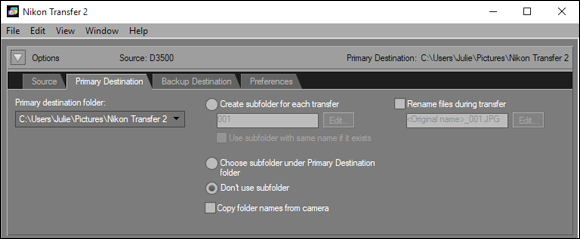
FIGURE 10-12: Specify the folder where you want to put the downloaded images.
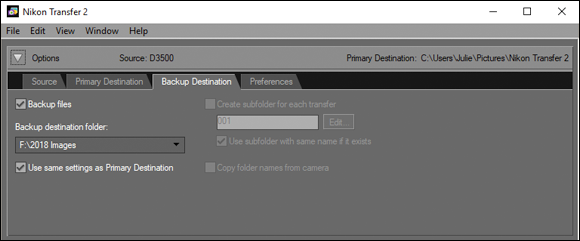
FIGURE 10-13: Use the options on this tab to automatically send duplicates of your pictures to a backup drive at the same time they’re being sent to your main storage drive.
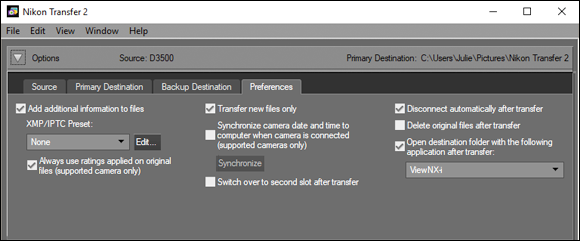
FIGURE 10-14: Turn off the Delete Original Files after transfer option!
Processing Raw (NEF) Files
Chapter 2 introduces you to the Raw file format. The advantage of capturing Raw files — NEF files on Nikon cameras — is that you make the decisions about how to translate the original picture data into an actual photograph. You take this step by using a software tool known as a Raw converter. To process your NEF files, Nikon offers the following free options:
- Use the in-camera processing feature. You can specify only limited image attributes when you go this route, and you can save the processed files only in the JPEG format, but still, having this option is a nice feature.
-
Process and convert in Capture NX-D. For more control over how your raw data is translated into an image, use this option. Not only do you get access to tools not found on the camera, you can save the adjusted files in either the JPEG or TIFF format. You also have the advantage of evaluating your photos on a larger screen than the one on your camera.
 TIFF stands for Tagged Image File Format and has long been the standard format for images destined for professional publication. I recommend saving your converted Raw files in this format because it does a better job than JPEG of holding onto your original image data. As explained in Chapter 2, JPEG compresses the file, meaning that it does away with what it considers “unnecessary” data.
Nikon ViewNX-i also enables you to convert Raw files, but Nikon NX-D offers more-capable tools for the job, so I focus on that program in this book.
Of course, you can use any third-party Raw-processing tool you prefer, such as the one provided with Adobe Photoshop and Adobe Lightroom. Just don't pay for a third-party tool until you've tried Capture NX-D — the fact that it's free doesn't mean that it isn't a good program. Also understand that third-party programs usually don't support new cameras right away, so check the program information to make sure that it can open Raw files from the D3500. You may need to download a software update to make that happen.
Processing Raw images in the camera
By using the NEF (RAW) Processing option on the Retouch menu, you can create a JPEG version of a Raw file right in the camera. Follow these steps:
 Press the Playback button to switch to playback mode.
-
Display the picture in the full-frame view.
If necessary, you can shift from thumbnails view to single-image view by pressing OK. Press OK twice if you’re in Calendar view. (Chapter 9 has details on these playback modes.)
- Press the i button.
You see the i-button menu on the screen, as shown on the left in Figure 10-15.
- Highlight Retouch and press the Multi Selector right to display the Retouch menu.
- Scroll to the NEF (RAW) Processing option (shown on the right side of Figure 10-15).
-
Press OK to display your processing options.
You see a screen similar to the one in Figure 10-16, which is where you specify which settings you want the camera to use when creating the JPEG version of the Raw image. If you press the Multi Selector down, you scroll to the second page of options, shown in Figure 10-17.
-
Set the conversion options.
Along the right side of the screen, you see a column offering the conversion options labeled in Figures 10-16 and 10-17. After highlighting an option, press the Multi Selector right to display available settings. Make your selection and then press OK to return to the main Raw conversion screen. Or, if a triangle appears to the right of a setting name, press the Multi Selector right to uncover additional options.
If you’re not familiar with all the settings, the following list offers a few general recommendations and points you to the chapter where you can get more information:
- Image Quality: Choose Fine to retain maximum picture quality. See the Chapter 2 section related to the JPEG format for details on this option.
- Image Size: Chapter 2 explains this one, too. Choose Large to retain all the original image pixels.
- White Balance: Unless colors appear to be wrong, stick with the default, Auto. Otherwise, experiment with each setting to see which one renders colors most accurately. Check out Chapter 6 for details about White Balance.
- Exposure Compensation: With this option, which I cover in Chapter 4, you can adjust image brightness. When using this feature for Raw conversion, you’re limited to a range of -2.0 and +2.0; when shooting, you can choose from settings ranging from nd5.0 to +5.0. Raise the value for a brighter image; lower it for a darker shot. The camera updates the preview to indicate how your setting will affect the picture. For example, I set the value to EV -1.7 in the figure.
- Picture Control: This option, detailed in Chapter 6, enables you to adjust color saturation, contrast, and image sharpness. As with the White Balance and Exposure Compensation settings, the screen updates to show you the effect of the selected Picture Control.
- High ISO Noise Reduction: If your picture looks noisy — that is, marred by a speckled look — enabling this feature may improve the picture. See Chapter 4 for an explanation of ISO and noise.
- Color Space: This setting determines whether the camera uses the default color space, sRGB, or the larger Adobe RGB color space when converting your photo. Stick with sRGB until you digest the Chapter 6 section that details this option.
- Vignette Control: Does your picture appear unnaturally dark in the corners? This flaw, called vignetting, can sometimes be eliminated or at least diminished by applying the Vignette Control feature. Chapter 4 has more information.
- D-Lighting: To brighten the darkest part of your picture without also brightening the lightest areas, try adjusting this setting. It’s the post-capture equivalent of the Active D-Lighting feature that’s available during shooting; see Chapter 4 for help with the option. You can set the level of adjustment to High, Normal, or Low; to darken shadows, try setting the option to Off.
At any time, you can magnify the image by pressing the Zoom In button. Release the button to return to the normal display. -
Highlight EXE on the first conversion screen (refer to Figure 10-16) and press OK.
The camera records a JPEG copy of your Raw file and displays the copy in the monitor. The camera assigns the next available file number to the image, so the number of the original and the number of the processed JPEG don't match. You also see the little Retouch menu symbol (the box with a paintbrush) with the photo during playback.
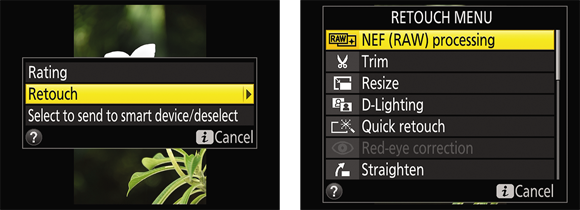
FIGURE 10-15: Select Retouch (left screen) and then scroll to the NEF (RAW) Processing option (right screen).
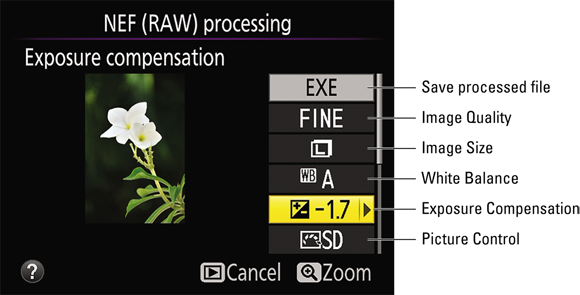
FIGURE 10-16: These Raw conversion options are on the first page of the menu screen.
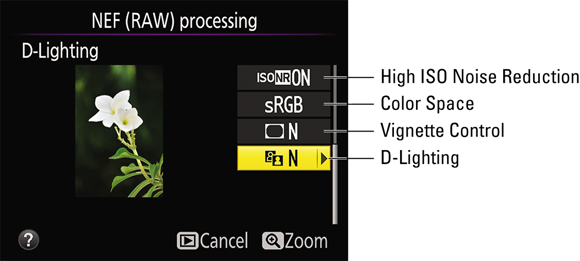
FIGURE 10-17: Press the Multi Selector down to scroll to the second page of conversion settings.
You also can access the Raw processing tool by displaying the Retouch menu and then choosing NEF (RAW) Processing. The camera displays thumbnails of Raw images; use the Multi Selector to highlight the image you want to process and then press OK to access the conversion options.
Processing Raw files in Capture NX-D
Figure 10-18 offers another look at Capture NX-D, one of the free programs you can download from the Nikon website. When you first open the program, it won’t look like what you see in the figure; I customized the window layout to show before and after views of my photo and to display the panel of Raw conversion tools along the right side of the window. You can customize these and other aspects of the program window through options on the View and Window menus. Click the Edit tool tabs, labeled in the figure, to access tools available for adjusting your Raw image.
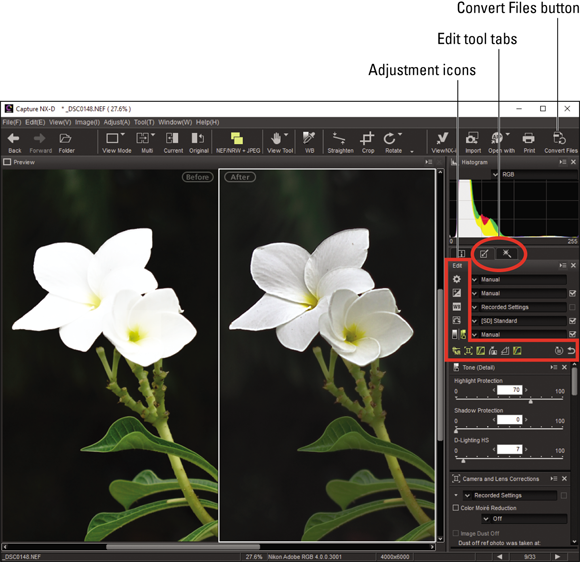
FIGURE 10-18: Capture NX-D offers a large assortment of tools for finalizing the look of your Raw images.
As you can see, this isn't a program for sissies; expect a little bit of a learning curve. Then again, you can't really "break" your photo no matter what you do, so don't be afraid to experiment. Your original data is never overwritten because you can't resave it in the Raw format — you can only create a copy in the TIFF or JPEG format.
I have room in this book only for the briefest of explanations of the Capture NX-D Raw-processing tools, but the following pointers should get you started in a good direction:
- Select the Raw file. After opening Capture NX-D, click the thumbnail of the image you want to process. (If you don't see any thumbnails, open the View menu and select the Thumbnail option.)
-
Display before and after views of your photo. Again, the secret to customizing the screen layout is the View menu. To arrange your original image side-by-side with the edited version, select Compare Before and After images.
To hide thumbnails showing other photos, choose Preview from the View menu. You can further declutter the screen so it looks like the one in Figure 10-18 by opening the Window menu and choosing the Folders and Bird’s Eye options. (Clicking the options hides and displays the respective panels.)
- Display the editing tools. Controls for adjusting your Raw image appear along the right side of the window, as shown in Figure 10-18. To display the panel shown in the figure, open the Window menu and choose Edit. Choose Retouch from the menu to display a second panel of tools.
-
Click the buttons labeled adjustment icons in the figure to explore various groups of editing tools. Use the scroll bar on the right side of the window to scroll the display to reveal more settings if needed.
Pause your cursor momentarily over an icon to display a text label that tells you what the symbol represents. - To crop and straighten the photo, select the tools at the top of the program window. With the Straighten tool, just drag across a line that should be vertical or horizontal. To crop, drag the edges of the crop box that appears when you choose the Crop tool. (The crop is applied when you choose a different tool.)
-
To undo all your changes, choose Recorded Settings from the top drop-down list on the Edit panel. The list should display the word Manual, in the figure, after you make your first edit to the photo. Choosing Recorded Settings takes you back to square one, displaying the photo as it originally appears.
Note that the original appearance of a Raw image is based on default Raw-processing settings established by Nikon. So, too, are the image thumbnails you see in the program’s image browser and on your camera monitor. Remember, a Raw image is really nothing more than a set of numbers, and in order to display a preview, the software and the camera have to make some decisions about image colors and so on. In most cases, the Raw preview looks pretty similar to what you would get if you captured the image in the JPEG file format. - When you finish adjusting the image, open the File menu and choose Convert Files. This step creates the processed copy of your original Raw image. In the Save dialog box that appears, set the Save as Type option to TIFF and the File Format option to 8-bit TIFF. (If you choose 16-bit TIFF, you may not be able to use the image in other programs, such as Microsoft PowerPoint.) The rest of the options work as they do when you save files in most Mac or Windows programs: Specify where you want to store the file, give the file a name, and then click Save.
One neat thing about working with Raw images is that you can easily create as many variations of the photo as you want. For example, you might choose one set of options when processing your Raw file as a color image and then a different set to create a black-and-white version of the photo. Just be sure to give each processed file a unique name so that you don't overwrite the first TIFF file you create with your second version.
You can find more details on Raw processing and other NX-D features in the program’s instruction manual, which is available online. To find out how to get to the manual, see the sidebar “Getting help with Nikon software,” elsewhere in this chapter.
Preparing Pictures for Online Sharing
Have you ever received an e-mail containing a photo so large that you can’t view the whole thing without scrolling the e-mail window? This occurs because monitors can display only a limited number of pixels. The exact number depends on the screen resolution, but suffice it to say that today’s cameras produce photos with pixel counts in excess of what the monitor can handle.
Thankfully, newer e-mail programs incorporate features that automatically shrink the photo display to a viewable size. That doesn’t change the fact that a large photo file means longer downloading times, though — and if recipients choose to hold onto the picture, a big storage hit on their hard drives.
Sending a high-resolution photo is the thing to do if you want the recipient to be able to generate a good print. But for simple onscreen viewing, I suggest limiting your photos to fewer than 1,000 pixels on the longest side of the image so that people who use older e-mail programs can see the entire picture (or nearly all of it) without scrolling the display.
This size recommendation means that even if you shoot at your camera’s lowest Image Size setting (2992 x 2000), you wind up with more pixels than you need for onscreen viewing. Some new e-mail programs have a photo-upload feature that creates a temporary low-res version for you, but if not, creating your own copy is easy. If you’re posting to an online photo-sharing site, you may be able to upload all your original pixels, though many sites have resolution limits.
In addition to resizing high-resolution images, check their file types; if the photos are in the Raw (NEF) or TIFF format, you need to create a JPEG copy for online use. Web browsers and e-mail programs can’t display Raw or TIFF files.
You can tackle both bits of prep in Nikon ViewNX-i or by using the Resize option in your camera. The next sections explain both methods.
Prepping online photos using ViewNX-i
For pictures stored on your computer, you can create small JPEG copies for online sharing using Nikon ViewNX-i. First, click the image thumbnail to select it. Next, open the File menu and choose Convert Files. When the Convert Files dialog box appears, set up things as follows:
- Select JPEG as the file type. Make your selection from the File Format drop-down list.
- Set the picture-quality level. Use the Quality slider to set the picture quality, which is controlled by how much JPEG compression is applied when the file is saved. For best quality, drag the slider all the way to the right, but remember the trade-off: As you raise the quality, less compression occurs, which results in a larger file size. (See Chapter 2 for more information about JPEG compression.)
- Set the image size (number of pixels). To resize the photo, select the Change the Image Size check box and then enter a value (in pixels) for the longest dimension of the photo. The program automatically fills in the other value.
- Select all three Remove check boxes. The boxes are located under the Change Image Size option. Selecting the boxes removes unnecessary camera metadata, which reduces image file size.
-
Tell the program where you want to store the reduced-size file and how you want to name the file. Use the options in the Save In area of the Convert Files dialog box handle this bit of business.
If you’re resizing a JPEG original, be sure to give the small version a new name to avoid overwriting that original. I like to add the words “For Web” to the filenames of my online versions — for example, if the original is DSC_0020.jpg, I name the online version DSC_0020 For Web.jpg. That way, it’s easy to find the file that is ready for online use.
After working your way through the Convert Files dialog box options, click the Convert button to create the small-size JPEG version of your original.
Resizing pictures from the Retouch menu
The resizing tool on the camera’s Retouch menu works on both JPEG and Raw images. With both types of files, your resized copy is saved in the JPEG format. You have two ways to use this feature:
- Resize a single photo. Set the camera to playback mode, display the photo, and press the i button. On the screen that appears, select Retouch, as shown on the left in Figure 10-19, and press the Multi Selector right. You then see the screen shown on the right in the figure. Choose Resize and then press the Multi Selector right to display the screen shown in Figure 10-20.
The first value shows the pixel dimensions of the small copy; the second, the total number of pixels, measured in megapixels. Highlight a size and press the Multi Selector right. On the next screen, highlight Yes and press OK.
-
Resize a batch of photos. Display the Retouch menu and choose Resize, as shown on the left in Figure 10-21. Press OK to display the screen shown on the right in the figure. First, select Choose Size, as shown in the figure, to display the screen where you can select the pixel count of the small images. Press OK to return to the Resize screen and then choose Select Image, as shown on the left in Figure 10-22. You then see thumbnails of your photos, as shown on the right in the figure.
Use the Multi Selector to move the yellow selection frame over an image you want to resize, and then press the Zoom Out button to tag it with a Resize icon (labeled in the figure). Highlight the next photo, rinse, and repeat. After tagging all the photos, press OK to display the go-ahead screen; highlight Yes and press OK.
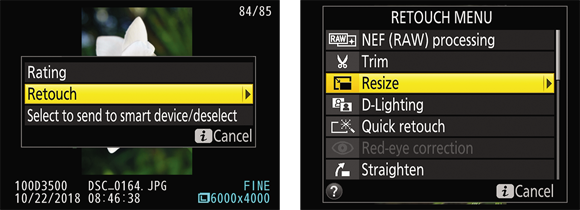
FIGURE 10-19: Use the Resize option to create a low-resolution version of a picture.
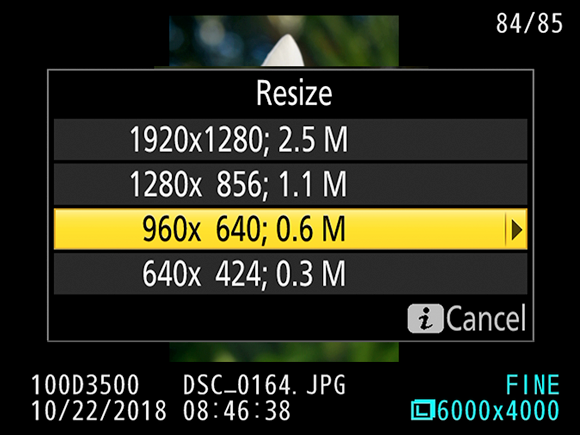
FIGURE 10-20: Select one of these options to set the size for your low-res copy.
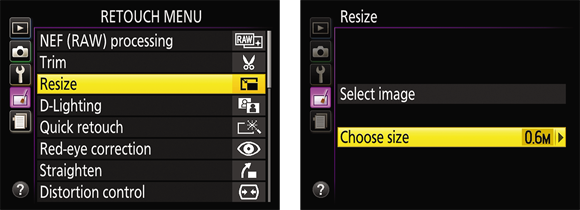
FIGURE 10-21: To resize a batch of photos, it's quicker to do the job via the Retouch menu.
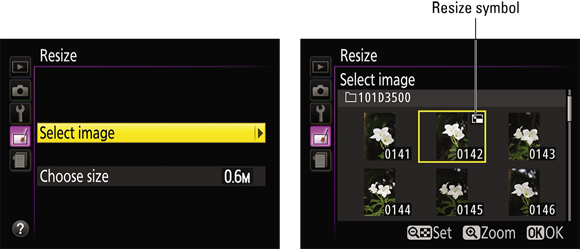
FIGURE 10-22: Press the Zoom Out button to tag the selected photo for resizing.
In both cases, the camera duplicates the selected images and downsamples (eliminates pixels from) the copies to achieve the size you specified. The small copies are saved in the JPEG file format, using the same Image Quality setting (Fine, Normal, or Basic) as the original. Raw originals are saved as JPEG Fine images. Either way, your original picture files remain untouched.
During playback, small-size copies are marked with the same Resize symbol you see in Figure 10-22. In some playback display modes, you also can view the pixel dimensions of the resized image. See Chapter 9 for help enabling and using the different display modes.