Chapter 12
Ten Special-Purpose Features to Explore on a Rainy Day
IN THIS CHAPTER
![]() Tagging files with image comments
Tagging files with image comments
![]() Adding copyright data to files
Adding copyright data to files
![]() Creating custom storage folders and filenames
Creating custom storage folders and filenames
![]() Altering the camera’s automatic shutdown timing
Altering the camera’s automatic shutdown timing
![]() Customizing the Information display
Customizing the Information display
![]() Changing the function of some buttons
Changing the function of some buttons
Consider this chapter the literary equivalent of the end of a late-night infomercial — the part where the host exclaims, “But wait! There’s more!” The features covered in these pages aren’t the sort that drive people to choose one camera over another, and they may come in handy only on certain occasions. Still, they’re included at no extra charge, so check ’em out when you have a few spare moments.
Adding Hidden Image Comments
Through the Image Comment feature on the Setup menu, you can add hidden text comments to your picture files. Suppose, for example, that you’re traveling on vacation and visiting a different destination every day. You can annotate all the pictures you take on a particular outing with the name of the location or attraction.
 The text doesn’t appear on the photo itself; instead, it's stored with other metadata (extra data, such as shutter speed, date and time, and so on). You can view the comment during playback in the Shooting Data display mode (see Chapter 9) or along with other metadata in Nikon ViewNX-i and Capture NX-D (see Chapter 10). Some third-party photo programs and apps also may be able to display the comments.
Start by selecting Image Comment from the Setup menu, as shown on the left in Figure 12-1. Press OK, highlight Input Comment, as shown on the right in the figure, and press the Multi Selector right to display the keyboard screen shown on the left in Figure 12-2.

FIGURE 12-1: You can tag pictures with text comments through this feature.

FIGURE 12-2: Use the Multi Selector to highlight a letter and press OK to enter it.
Use these text-entry techniques to create your comment:
-
Enter a character: Use the Multi Selector to highlight the character in the keyboard and then press OK. Your comment can be up to 36 characters long.
 To switch from capital letters to lowercase letters, highlight Aa& in the lower-right corner of the keyboard, as shown in Figure 12-2, and press OK. Press OK again to cycle to a screen of special symbols. Press OK one more time to return to the initial set of capital letters.
To enter a space, bring up either of the alphabetical keyboards, highlight the empty box to the left of the Aa& box, and press OK. I labeled the space character in Figure 12-2.
- Move the text cursor: Rotate the Command dial. The cursor appears as a gray box, as labeled in the figure.
 Delete a letter: Move the cursor under the letter and press the Delete button.
 After entering your comment, press the Zoom In button to display the screen shown on the right in Figure 12-2. You should see your text comment underneath the Input Comment line. Highlight Attach Comment and press the Multi Selector right to put a check mark in the box, as shown in the figure, and then press OK. The Image Comment item on the Setup menu should now read On.
To disable the feature, revisit the Setup menu, select Image Comment, highlight Attach Comment, and press the Multi Selector right to toggle the check mark off. Press OK to make your decision official.
Adding a Copyright Notice
Just as you can add miscellaneous comments via the Image Comment feature, you can embed copyright information within your image and movie files. Again, the copyright information is stored as metadata and can be viewed on the camera in some playback modes and also when looking at the photo or movie in some photo programs and apps.
Including a copyright notice is a reasonable first step to prevent people from using your pictures without permission. Anyone who views your picture in a program that can display metadata can see your copyright notice. Obviously, that won’t be enough to completely prevent unauthorized use of your images. And technically speaking, you hold the copyright to your photo whether or not you mark it with your name. But if you ever come to the point of pressing legal action, you can show that you did your due diligence in letting people know that you hold the copyright.
To add a copyright notice, choose Copyright Information from the Setup menu, as shown on the left in Figure 12-3. You then see the screen shown on the right in the figure.
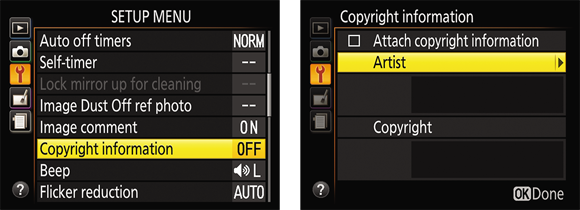
FIGURE 12-3: You also can tag files with copyright information.
Select Artist to display the same keyboard screen provided for adding image comments. Use the techniques outlined in the preceding section to enter your name. Then return to the Copyright Information screen (right screen in Figure 12-3) and select Copyright to display a keyboard where you can add that information. The Artist field can hold 36 characters; the Copyright field, 54 characters.
After you enter your data, it appears on the Copyright Information screen, as shown in Figure 12-4. If everything looks good, select Attach Copyright Information and press the Multi Selector right to turn on the check mark in the accompanying box. Press OK to finalize things.

FIGURE 12-4: After entering your copyright data, select Attach Copyright and press the Multi Selector right to put a check mark in the box.
While Attach Copyright is selected, the copyright data is embedded into every new photo or movie you shoot. To disable the copyright embedding, revisit the Copyright Information menu option and turn the Attach Copyright Information setting off.
Creating Custom Image Folders
By default, your camera stores all images in one folder, which it names 100D3500. Folders have a storage limit of 999 images; when you exceed that number, the camera creates a new folder, assigning a name that indicates the folder number — 101D3500, 102D3500, and so on. You're also given a new folder if a file in the current folder is numbered 9999.
If you choose, you can create your own folder-numbering scheme. For example, perhaps you sometimes use your camera for business and sometimes for personal use. To keep your images separate, you can set up one folder numbered 200D3500 for work images and use the regular 100D3500 folder for personal photos.
To create a new storage folder, follow these steps:
-
Display the Setup menu and select Storage Folder, as shown on the left in Figure 12-5.
The number you see along with the Storage Folder option reflects the first three numbers of the folder name (100, in the figure). During playback, you see the entire folder name (100D3500, for example) in playback modes that show the folder name.
-
Choose Select Folder by Number, as shown on the right in Figure 12-5.
You see the screen shown in Figure 12-6, with the current folder number shown in the middle of the screen.
A folder icon to the left of the folder number indicates that the folder already exists. A half-full icon like the one in Figure 12-6 shows that the folder contains images. A full icon means that the folder is stuffed to its capacity (999 images) or contains a picture with the file number 9999. Either way, that full icon means that you can't put any more pictures in the folder. -
Assign the new folder a new number.
Press the Multi Selector right or left to select a number box; then press up/down to change the number. When you create a new folder, the little folder icon disappears because the folder doesn't yet contain any photos.
-
Press the OK button.
The camera creates your new folder and automatically selects it as the current storage folder.
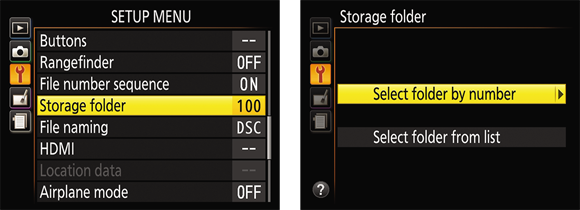
FIGURE 12-5: Use this Setup menu option to create custom-numbered folders and specify the folder you want to use to hold the next shots you take.

FIGURE 12-6: Press the Multi Selector right or left to highlight a number box; then press up/down to change the number.
 Each time you shoot, verify that the folder you want to use is shown for the Storage Folder option. If not, select that option and then choose Select Folder by Number to enter the folder number (if you know it) or choose Select Folder from List to pick from a list of all available folders.
Customizing Filenames
Normally, picture filenames begin with the characters DSC_, for photos captured in the sRGB color space, or _DSC, for images that use the Adobe RGB color space. (Chapter 6 explains color spaces.) Movie files are always captured in the sRGB space, so their filenames always begin with DSC_. You have the option of replacing the letters DSC with your own characters for both movies and stills. For example, you could replace DSC with BOB before you take pictures of your friend Bob and then change the prefix to SUE before you shoot Sue's wedding.
To enter a custom filename prefix, choose File Naming from the Setup menu, as shown on the left in Figure 12-7. On the next screen, shown on the right in the figure, you see the current file prefix for sRGB and Adobe RGB files. (Both use the same three letters; you can’t set up different prefixes for each color space.)
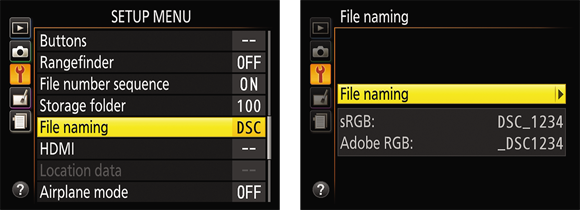
FIGURE 12-7: Select these options to customize the first three characters of filenames.
Select File Naming from that second screen and press the Multi Selector right to display the keyboard screen shown in Figure 12-8. The keyboard works the same way as the one presented for entering comments and copyright notices: Rotate the Command dial to move the cursor under the first character you want to replace, use the Multi Selector to highlight the replacement character in the keyboard, and press OK. Repeat the process to replace the other two characters.

FIGURE 12-8: After entering the replacement prefix, press the Zoom In button to lock in the change.
When you’re happy with the new file prefix, press the Zoom In button. You’re returned to the Setup menu, where the File Naming option displays the updated prefix, as shown on the left in Figure 12-9. Choose that option to display the second screen shown in the figure, where the new example filenames are shown for sRGB and Adobe RGB files.

FIGURE 12-9: The File Naming screens confirm your changes.
Turning Off the AF-Assist Illuminator
In dim lighting, the camera may emit a beam of light from the AF-assist light on the front of the camera. If that light could be distracting to your subject or others in the room, you can disable it via the Shooting menu, as shown in Figure 12-10. You may need to focus manually, though, because without the light to help it find its target, the autofocus system may have trouble.

FIGURE 12-10: Turn this option off to disable the AF-assist lamp.
Adjusting Automatic Shutdown Timing
When the camera is in shooting mode, its standby timer feature saves battery power by putting the Information display and viewfinder display to sleep after a period of inactivity. Similarly, the camera limits the Image Review period (the length of time your picture appears immediately after you press the shutter button), the length of time the Live View display remains on when no camera operations are performed, how long a picture appears in playback mode, and how long menus remain onscreen.
You can control the auto-shutdown timing through the Auto Off Timers option, found on the Setup menu and shown on the left in Figure 12-11.
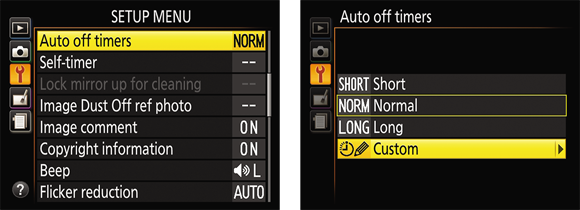
FIGURE 12-11: Customize auto shutdown timing here.
You get four choices, as shown on the right in the figure. The first three rows in Table 12-1 show the shutdown times that result when you select Short, Normal, or Long. (Normal is the default.) Select Custom, as shown in the figure, to adjust the shutoff times for the various features separately; the range of delay times for each feature appears in the last row of the table.
TABLE 12-1 Auto Off Timers Options
|
Option Name |
Standby Timer |
Live View |
Image Review |
Playback/Menus |
|
Short |
4 seconds |
5 minutes |
4 seconds |
20 seconds |
|
Normal |
8 seconds |
10 minutes |
4 seconds |
5 minutes |
|
Long |
1 minute |
20 minutes |
20 seconds |
10 minutes |
|
Custom |
4 seconds to 30 minutes |
5 minutes to 30 minutes |
4 seconds to 10 minutes |
8 seconds to 10 minutes |
To disable Image Review altogether, head for the Playback menu and set the Image Review item to Off.
Changing the Look of the Information Display
By default, the Information display appears as shown on the left in Figure 12-12 in the P, S, A, and M exposure modes. Other exposure modes use the same design but use a light gray background instead of the darker version used in the P, S, A, and M modes.
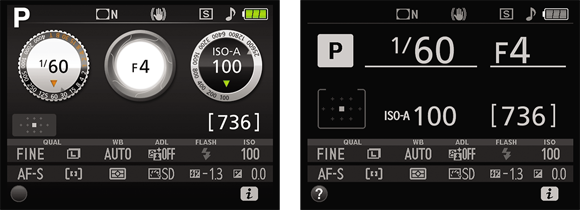
FIGURE 12-12: You can alter the Information display design and color scheme.
I haven’t a clue as to why Nikon opted to use different backgrounds for the default displays. But in both cases, one helpful aspect of this display is the graphic that shows the aperture setting, or f-stop — the middle circle, set to f/4 in the figure. As you change the f-stop, which widens or narrows the aperture to allow more or less light into the camera, the graphic updates to give you a visual reminder of what’s happening. (Chapter 4 explains apertures, f-stops, and other exposure-related terms.)
For obvious reasons, this default design is called Graphic display mode. If you prefer, you can switch to the simpler design — Classic mode — shown on the right in the figure. The benefit to this display is that the critical exposure settings (f-stop, shutter speed, and ISO) appear at a larger size, which is always a plus for those of us in the “where did I leave my reading glasses?” age category. (Hint: They’re probably on top of your head.)
With either design, you also can set the background color to teal, black, or gray. To make the change, select Info Display Format from the Setup menu, as shown in Figure 12-13. You then see the screen shown on the right in the figure. Choose the option that includes the exposure modes you want to affect and then select a design from the next screen.
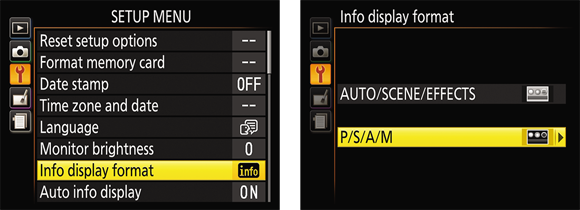
FIGURE 12-13: Modify the look of the Information display through this Setup menu option.
Keeping the Information Display Hidden
Just below the Info Display Format option on the Setup menu (refer to Figure 12-13), the Auto Info Display option offers another way to customize the Information display. When this option is On, as it is by default, the Information display appears when you press the shutter button halfway and release it. If you disable the Image Review feature (via the Playback menu), the Information display also appears after you take a picture.
Turn off the Auto Info Display option, and the Information screen appears briefly when you first turn on the camera, but after that, you must press the Info button to display it. Instructions in this book assume that you keep the option set to On. But because the monitor is one of the biggest drains of battery power, you may want to change it to Off if the battery is running low.
Customizing the AE-L/AF-L Button
![]() Set to the right of the viewfinder, the AE-L/AF-L button enables you to lock focus and exposure when you shoot in autoexposure and autofocus modes, as explored in Chapters 4 and 5.
Set to the right of the viewfinder, the AE-L/AF-L button enables you to lock focus and exposure when you shoot in autoexposure and autofocus modes, as explored in Chapters 4 and 5.
By default, the button is set to lock autofocus and autoexposure together and to keep them locked as long as you keep your finger on the button. But you can also set things up so that the button locks exposure only or focus only.
Change the AE-L/AF-L button behavior by choosing Buttons from the Setup menu (refer to the left screen in Figure 12-14), and then selecting Assign AE-L/AF-L Button (the right screen in the figure). Press OK to display the available settings, shown in Figure 12-15.
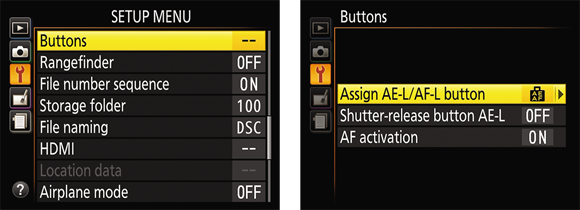
FIGURE 12-14: Choose these options to change the function of the AE-L/AF-L button.
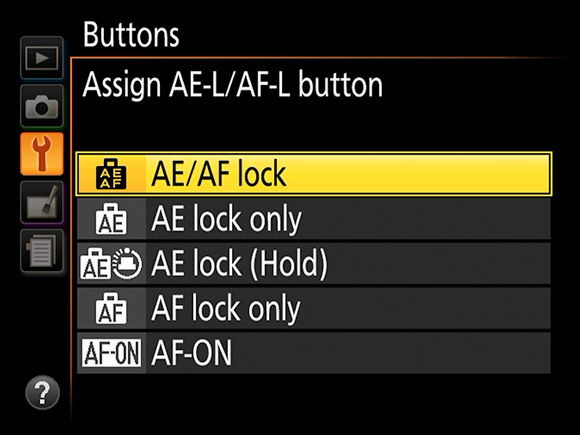
FIGURE 12-15: You can set the button to perform any of these five functions.
The options produce these results:
- AE/AF Lock: Highlighted in Figure 12-15, this setting is the default. Focus and exposure remain locked as long as you press the button.
- AE Lock Only: Autoexposure is locked as long as you press the button; autofocus isn’t affected. (You lock focus by pressing the shutter button halfway.)
- AE Lock (Hold): A single press of the button locks exposure only. Exposure lock remains in force until you press the button again or the Standby Timer delay time expires. (See the earlier section “Adjusting Automatic Shutdown Timing” for details on the Standby Timer option.)
- AF Lock Only: Focus remains locked as long as you press the button. Exposure isn’t affected.
- AF-ON: Pressing the button activates the camera’s autofocus mechanism. Whether focus is locked or continuously adjusted depends on the Focus mode setting, which I cover in Chapter 5. If you use the AE-L/AF-L button to set focus, pressing the shutter button activates exposure metering only.
The information that I give in this book with regard to using autofocus and autoexposure assumes that you stick with the default setting. So if you change the button’s function, remember to amend my instructions accordingly.
Using the Shutter Button to Lock Exposure and Focus (or Not)
You also can customize the behavior of the shutter button as far as the button’s impact on the autofocus and autoexposure systems. Again, start by opening the Setup menu and choosing the Buttons option, as shown on the left in Figure 12-16. On the next screen, shown on the right in the figure, the second and third settings relate to the shutter button. Here’s what you need to know about each setting:
- Shutter-release Button AE-L: This option determines whether pressing the shutter button halfway locks focus only or locks both focus and exposure. (AE-L stands for autoexposure lock.) At the default setting, Off, you lock focus only when you press the shutter button halfway. Exposure is adjusted continually up to the time you take the shot. If you change setting to On, your half-press of the shutter button locks both focus and exposure.
- AF Activation: At the default setting, On, pressing the shutter button halfway initiates autofocusing. If you change the setting to Off, pressing the shutter button halfway fires up the autoexposure system only.

FIGURE 12-16: The final two settings on the Buttons option list affect the shutter button’s role in setting focus and exposure.
As with the AE-L/AF-L button adjustment described in the preceding section, I recommend that you leave both options set to their defaults while you’re working with this book. Otherwise, your camera won’t behave as described here (or in the camera manual, for that matter).