
CHAPTER 5
Kubernetes Vulnerabilities
As the number of containers that you are running continues to increase over time, it becomes imperative that a container orchestrator of some description is used to manage them. The dynamic nature of orchestrators, such as Red Hat's OpenShift or Docker Swarm, means that their configuration is inherently complex, and they can be difficult to secure correctly. The most popular container orchestrator, Kubernetes, is what this book focuses on and for good reason due to its provenance.
Kubernetes (kubernetes.io) heralds from Google and began life as Borg (research.google/pubs/pub43438). Over the course of the next decade or so Kubernetes became Open Sourced, and its popularity, having run years of containerized workloads for Google's own services in one form or another, gained maturity to the extent that thousands of household names started hosting their online applications with it over subsequent years.
Gaining a deeper insight into how secure your Kubernetes cluster's configuration is can save all sorts of headaches that might otherwise have arisen. There's a clever piece of open source software called kube-hunter (github.com/aquasecurity/kube-hunter), from Aqua Security (www.aquasec.com), which can offer genuinely valuable hardening hints and tips for your cluster. In this chapter, we will first create a Kubernetes cluster for test purposes and then explore what kube-hunter can tell us about it.
Mini Kubernetes
Let's get started by creating a mini Kubernetes cluster using an outstanding micro Kubernetes distribution, k3s (k3s.io). Apparently, k3s is half the size of memory footprint than K8s, the popular abbreviation for Kubernetes and hence the unusual name.
If you are not aware of k3s, it is definitely a welcome addition to the Kubernetes family. A running cluster can use just 40MB of RAM, and it is an ideal addition to Internet of Things (IoT) infrastructure thanks to its tiny footprint.
The installation is a simple as this:
$ curl -sfL https://get.k3s.io | sh -
For security reasons, you do not have to execute the script that the curl command pulls down immediately, so remove the pipe and the -sh switch to check that you are happy with its contents first before installing to a system as per its instructions. The binary itself, required to install a cluster, is a staggeringly small 100MB in size. You have to give credit to the team at Rancher (rancher.com) that created k3s.
If you are curious about how the cluster operates, you are thinking along the right lines. Instead of using Kubernetes’ most popular key:value configuration database, etcd (etcd.io), k3s uses sqlite3 by default. That said, etcd and MySQL and Postgres can also be used if required. k3s offers a full-blown, production-ready cluster that can be installed in seconds, and exploring it is highly recommended. It is an excellent way to test applications in Kubernetes without having to leave a lab running round the clock, in the event that it might be needed in the future for testing.
When you run that installation command mentioned earlier, you are presented with a long list of container-related output mixed in with shell script output. Listing 5.1 shows the output from the installation process.
The download from GitHub takes a little while on a slow connection, but otherwise, using Ubuntu 18.04 as the host to install k3s upon, the cluster installs seamlessly and quickly. If you get any CrashLoopBackOff errors with your containers, check your iptables rule clashes. You might need to disable firewalld, for example, and wait a minute or two for the containers to restart:
$ systemctl stop firewalld
Try running a kubectl command as the root user to see if you are connecting to the cluster correctly:
$ kubectl version
If that does not work, then run this command:
$ export KUBECONFIG=/etc/rancher/k3s/k3s.yaml
If that still does not work, then the issue might be with existing iptables rules. You can flush all rules (if you are certain that you want to) as so with this command:
$ iptables -t nat -F; iptables -t mangle -F; iptables -F; iptables -X
Let's check that we have some containers running with this command, now that we have confirmed kubectl is working:
$ kubectl get pods --all-namespaces
In Listing 5.2 we can see a slightly abbreviated view of what pods are present in a standard installation, including the ingress controller to allow traffic into the cluster, traefik.
As we can see in Listing 5.2, we are all set and have a single-node cluster running and available. Other common Kubernetes components are present, including coredns (coredns.io), which provides local DNS lookups to be resolved to local cluster resource names. The whole process took less than two minutes. If you see any container restarts that then complete correctly after some retrying, then it is probably down to your CPU taking its time to finish off other tasks. Adding worker nodes is not complex when it comes to k3s, but we will just test against a master node for now. Incidentally, to uninstall k3s, use this command when you no longer need your lab:
$ /usr/local/bin/k3s-uninstall.sh
Let's quickly prove that we have a Kubernetes master node running as hoped with this command:
$ kubectl get nodesNAME STATUS ROLES AGE VERSIONkilo Ready master 5m18s v1.18.6+k3s1
Great, that looks promising and that is near enough the latest version. Note that, in the k3s lexicon, the master node is referred to as a k3s server and the worker/minion/slave nodes are referred to as k3s agents. Let's turn to our Kubernetes security tool now, the sophisticated kube-hunter.
Options for Using kube-hunter
We will now look at the ways you can use kube-hunter. There are different options for the deployment method, which allows you to choose how to implement scans with kube-hunter. You also have to make a choice about the scope of your scans and whether, as you will shortly see, you will scan only local Kubernetes clusters or remote clusters. Finally, you will be asked to confirm if you would like to enable the risky automated attack mode or just run passive scans. Let's look at these three options now.
Deployment Methods
You have three options for deploying kube-hunter to hunt for security issues within Kubernetes. In Table 5.1 we can see how these three options might be put to use best.
Table 5.1: Deployment Methods for kube-hunter
| DEPLOYMENT METHOD | DESCRIPTION |
|---|---|
| Host | This requires a version of Python v3 and pip, the Python package manager, present on the host. |
| Container | You can also use “host networking” with Docker to insecurely access all the host machine's network stack so that network interface scanning can occur. |
| Pod | Kubernetes uses the concept of pods as opposed to containers (a pod is simply one or more containers). Gain an inside-cluster perspective to see the damage that a nefarious pod might be able to cause within your cluster. |
Scanning Approaches
As mentioned, there are three different scanning approaches to how you might use kube-hunter
: remote, interface, and network scans. For a comprehensive audit, for example, you might choose to use all three of the scanning approaches combined, with a variety of deployment methods, as shown in Table 5.2.
Table 5.2: Scanning Options That You Can Try in kube-hunter
| SCANNING APPROACH | DESCRIPTION |
|---|---|
| Remote | An installation on a host connected to your network can scan remote machines for any cluster hosted outside of your local network, using an attacker's perspective. Or, armed with the local IP address of a node, you can use this internally too. |
| Interface | This permits the scanning of all of the host's local network interfaces when hunting for interesting Kubernetes components. |
| Network | Use this option to run a scan on a specific network CIDR only, e.g., 10.10.10.0/24. |
Hunting Modes
Finally, and most importantly, there are two main hunting modes that you can use with kube-hunter, as shown in Table 5.3.
Table 5.3: Hunting Modes in kube-hunter
| MODE | DESCRIPTION |
|---|---|
| Active | Once vulnerabilities have been highlighted, kube-hunter will then attempt to exploit those vulnerabilities. Active mode is turned off by default and must be enabled with the --active switch. Take exceptional care using this hunting option and only ever run it against your own clusters. |
| Passive | No changes will be made to your cluster if issues are discovered. |
As you can see, you should avoid running active mode in production environments, and you should not attempt to run kube-hunter over other people's clusters without explicit permission.
Container Deployment
We can install kube-hunter via a container (you will need Docker running as well as k3s) and scan the local machine using the interface option, as shown in Table 5.2. In Listing 5.3 we can see an abbreviated view of what happens when you run the displayed command. As Listing 5.3 demonstrates, once the container image has been pulled, you are presented with an interactive menu. Before proceeding, however, there is a caveat about using this approach.
The kube-hunter documentation explains that within the container there is a proprietary plugin that sends the scanning results to Aqua Security. You can pick up results from this address, having entered your email address: kube-hunter.aquasec.com.
Note that when uploading data to generate nicely formatted reports, you need to accept Aquasec's terms, found here: kube-hunter.aquasec.com/eula.html.
If you are not keen on the sharing of vulnerability information and accepting proprietary terms and conditions, you can build a container locally using the provided Dockerfile, within the GitHub repository, so it won't include the closed source plugin. The Dockerfile is here: github.com/aquasecurity/kube-hunter/blob/master/Dockerfile.
With kube-hunter installed, let's try scanning all of the host's interfaces using the interactive menu, by choosing Option 2. In Figure 5.1 we can see heavily abbreviated results from the interface scan.
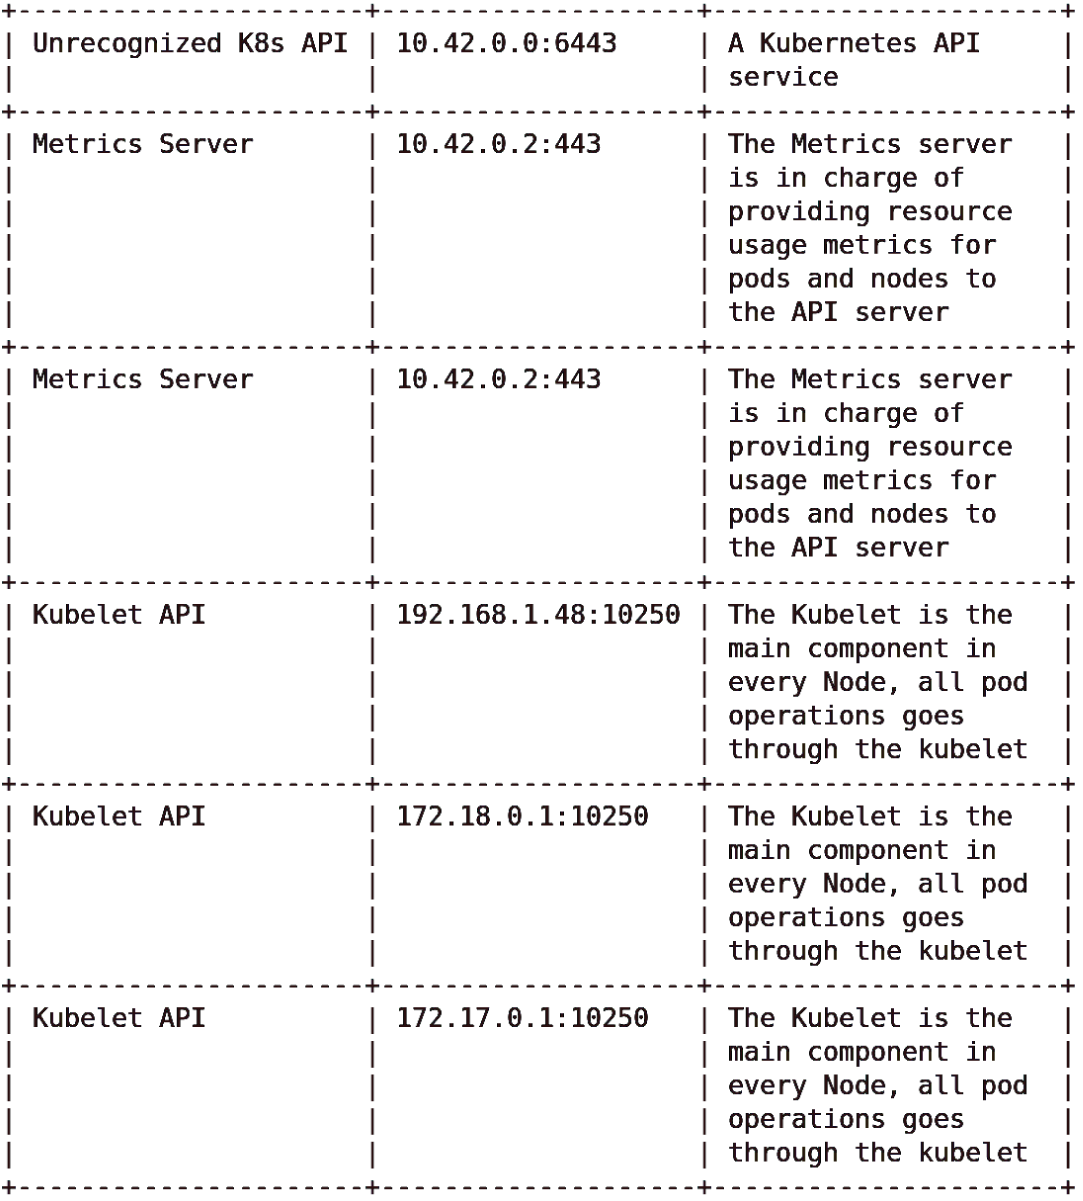
Figure 5.1: The excellent kube-hunter has found Kubernetes components but isn't sure what Kubernetes distribution that k3s is.
Inside Cluster Tests
Let's try the pod deployment approach now to gain a better internal overview of our cluster. In Listing 5.4 we can see the job.yaml file's contents (raw.githubusercontent.com/aquasecurity/kube-hunter/master/job.yaml) that will enable us to consume the YAML file as a batch job and then deploy a pod within the k3s cluster.
After copying that content into a local file named job.yaml, we can use the next command to ingest the configuration:
$ kubectl create -f job.yamljob.batch/kube-hunter created
The command's output looks promising. We can check which resources our “job” is consuming and where, using this command:
$ kubectl describe job kube-hunter
The end of that command's output offers us this required information:
Normal SuccessfulCreate 37s job-controllerCreated pod: kube-hunter-r4z4k
Armed with the pod name designated to run that Kubernetes job, we can then see the rigorous kube-hunter
's output with a reference to the pod's name from earlier within this command:
$ kubectl logs kube-hunter-r4z4k
As the results are so comprehensive, we will look at them in sections. In Listing 5.5 we can see the top of the logs output.
Interestingly, the output from kube-hunter demonstrates that what appeared to be an unknown Kubernetes distribution is actually behaving in the way that kube-hunter is familiar with. The main comments on discovered vulnerabilities are actually relating to the Kubernetes job that we just used to execute kube-hunter.
We can see, for example, “Read access to pod's service account token” was noted. Additionally, CAP_NET_RAW Enabled (which gives unbridled access to forge all kinds of packets, bind to any IP address, and allow “transparent” proxying) is also allowed to be used by the pod that we created. A little further later in Listing 5.5 we can also see “K8s Version Disclosure” has been captured as an issue too.
In Figure 5.2, we can see some of the vulnerabilities that we just mentioned explained at the end of the output from the pod.
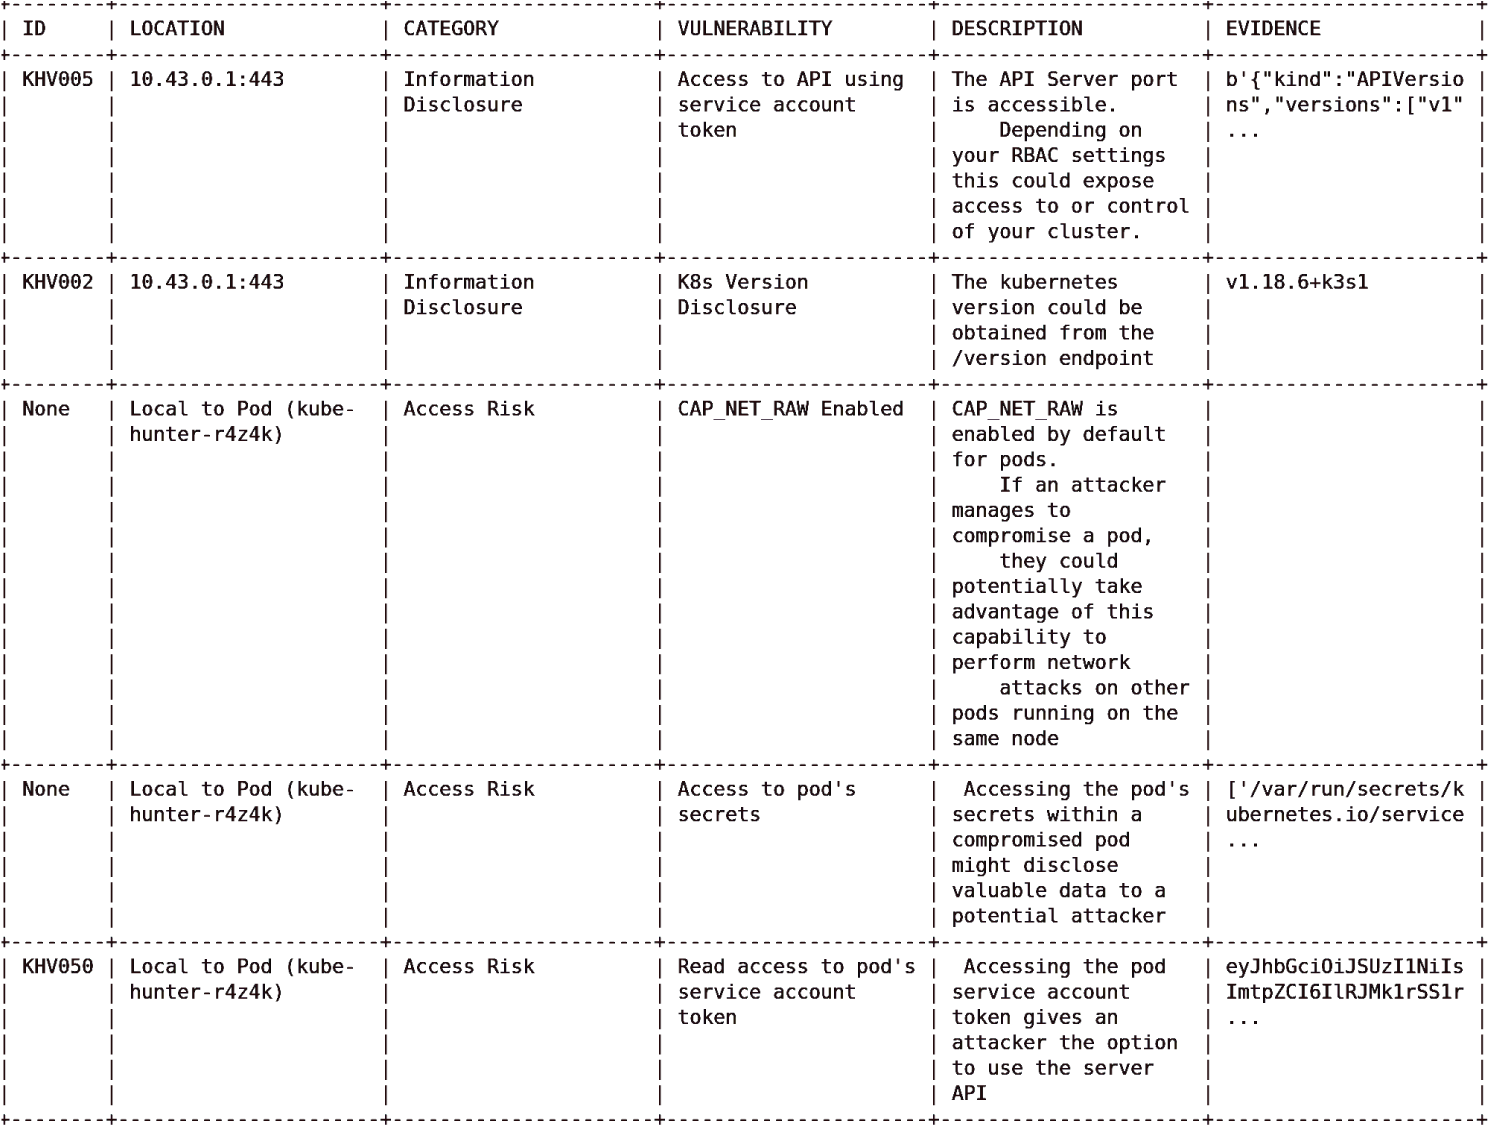
Figure 5.2: We need the vulnerability IDs so that we can look up more details within the kube-hunter Knowledge Base.
The left column here shows that there are Knowledge Base IDs offered for most of the issues spotted. You should be able to explore the vulnerability Knowledge Base (KB) at this address but it seems sometimes the KB site is unavailable: aquasecurity.github.io/kube-hunter.
In Figure 5.3, we can see what happens when we enter KHV002 into the Knowledge Base. We are greeted with much more useful detail and given advice about any potential risks.
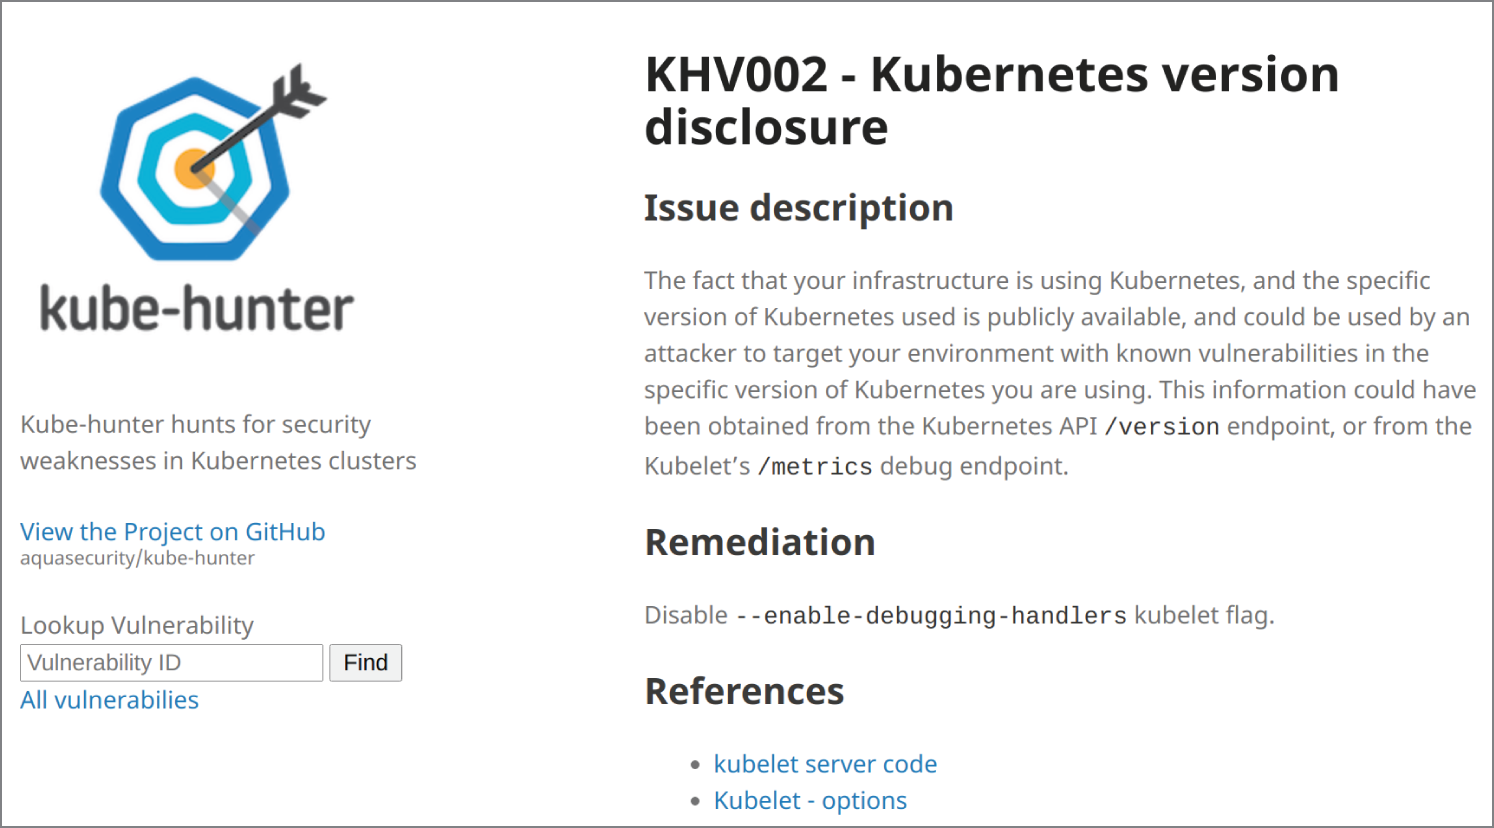
Figure 5.3: Looking up KHV002 in the Knowledge Base offers more detail.
Source: aquasecurity.github.io/kube-hunter/kb/KHV002.html
Fear not if the KB site is unavailable, however; Aqua dutifully lists all of the KB code and the relevant advice within its GitHub repository (github.com/aquasecurity/kube-hunter/tree/main/docs/_kb). In the case of our example, the URL is github.com/aquasecurity/kube-hunter/blob/main/docs/_kb/KHV047.md.
The remediation advice offered by the Knowledge Base is helpful. Exposing something as simple as a software version has long been known to give attackers useful tips about the bugs of a running system. You are advised to disable the --enable-debugging-handlers option in Kubernetes to make your cluster more suitable for production.
Minikube vs. kube-hunter
In Chapter 9, “Kubernetes Compliance,” we will install the Minikube Kubernetes distribution to test another Aqua Security product, kube-bench, which tests for compliance. Check that chapter for installing Minikube if you want to test kube-hunter against it.
To begin testing against another Kubernetes distribution, to avoid any compatibility issues of running two clusters on one lab machine, we can almost instantaneously tear down k3s by using this command:
$ /usr/local/bin/k3s-uninstall.sh
If you follow the Minikube install process offered in Chapter 9, you should be able to start up Minikube with this command:
$ minikube start --driver=none
If that command is successful, you should be able to see this at the tail of the output:
Verifying Kubernetes components..Enabled addons: default-storageclass, storage-provisionerDone! kubectl is now configured to use "minikube"
Returning now to the job.yaml file that we just looked at, let's attempt to install it into our Minishift cluster where a pod will be used to run the job through to completion.
Assuming that you still have the YAML file on hand, we can run the following command (if not, its contents are shown earlier and available in the GitHub repository for kube-hunter):
$ kubectl create -f job.yamljob.batch/kube-hunter created
That looks as if it was successful. Let's describe the job again with this command:
$ kubectl describe job kube-hunter
We can see that the job ran, and among the output we are told the pod's name is as follows:
Created pod: kube-hunter-thf9n
Check its logs again using this command:
$ kubectl logs kube-hunter-thf9n
As expected, the results are different from k3s's but not as dramatically as we might initially thought. In Figure 5.4 we can see that we are running a different version of Kubernetes from the one we used with k3s, but essentially most of the internal findings in this case were related to the permissions offered to the kube-hunter pod that we just ran and not actually to the cluster itself.
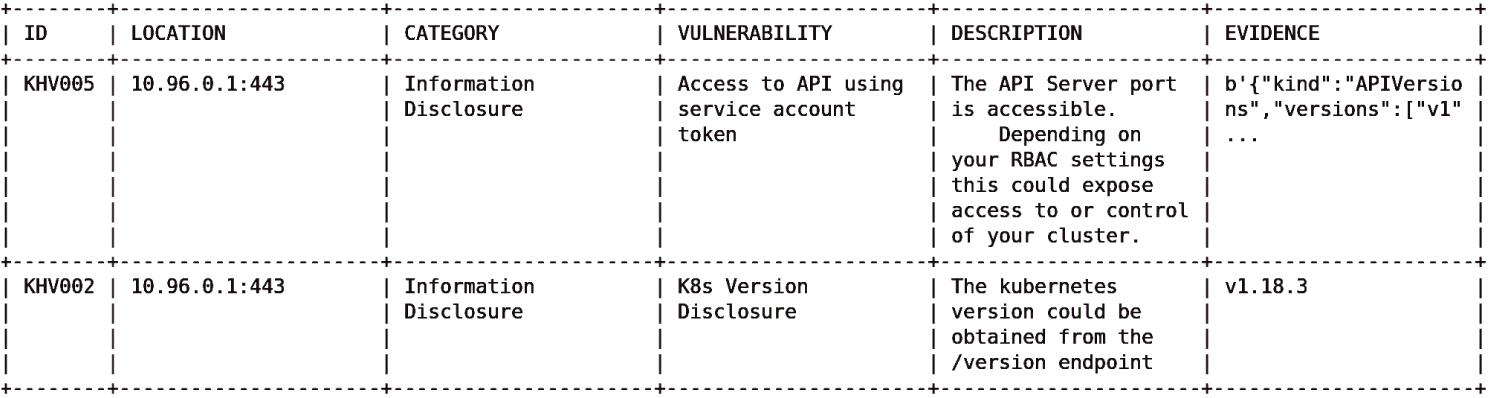
Figure 5.4: An internal view of Minishift is a slight improvement over k3s's.
Let's return to the network interface scanning again and then test Minishift this time. We rerun this Docker command using the container approach noted earlier and choose Option 2 for “interface”:
$ docker run -it --rm --network host aquasec/kube-hunter
This time, for example, we can see that etcd is present for the storage, whereas we know that k3s uses sqlite3 by default. The information reported for etcd, along with the IP address and port number in the findings that an attacker needs, is as follows:
“Etcd is a DB that stores cluster's data, it contains configuration and current state information, and might contain secrets”.
Also noted is that there is no mention of kube-hunter not recognizing the Kubernetes distribution, although the distribution is not named directly.
Having said that, however, the “host” install discussed earlier using the pip package manager returns the same result:
$ pip install kube-hunterCollecting kube-hunterCould not find a version that satisfies the requirement kube-hunterfrom versions: )No matching distribution found for kube-hunter
Getting a List of Tests
Running kube-hunter via a container again, we can generate a list of tests that the tool performs, using the following command:
$ docker run -it --rm --network host aquasec/kube-hunter --list
The --list switch generates a list of “passive” or “normal” hunters, and it contains an impressive number of items that kube-hunter will run through. Some examples are as follows:
* Kubelet DiscoveryChecks for the existence of a Kubelet service, and its open ports* Port ScanningScans Kubernetes known ports to determine open endpoints for discovery* Kubelet Secure Ports HunterHunts specific endpoints on an open secured Kubelet
If you are interested in just listing “active” hunting criteria, then this is the command for the container option:
$ docker run -it --rm --network host aquasec/kube-hunter—list—active
Again, the “passive” testing criteria is displayed, but this time a slightly shorter list of “active” test criteria is also shown. Here are some examples:
* Arp Spoof HunterChecks for the possibility of running an ARP spoof attack from withina pod (results are based on the running node)* Etcd Remote AccessChecks for remote write access to etcd, will attempt to add a new keyto the etcd DB* Prove /var/log Mount HunterTries to read /etc/shadow on the host by running commands inside a podwith host mount to /var/log
The “active” list of testing criteria is impressive and definitely worth reading through before executing “active” scanning tests.
Summary
In this chapter, we looked at creating a local, lightweight Kubernetes distribution called k3s and ran the thorough kube-hunter over that distribution to check for vulnerabilities.
Following that we tested against the Minikube Kubernetes distribution and noted that kube-hunter was able to recognize the distribution, whereas it did not when it came to k3s. On both of our laboratory installations of Kubernetes, the excellent kube-hunter provided valuable insights into what an attacker might look for such as software versions and networking details about the running components of Kubernetes.
When you are a bit more familiar with kube-bench, within a fully blown Kubernetes test cluster (not a production cluster), it is recommended that you try some of the “active” scans to gain more knowledge about the inherent issues that Kubernetes might have. There is no question that kube-hunter is a valuable tool to have available to you when hardening your Kubernetes clusters.