
Chapter 2
We Have Our Methods
IN THIS CHAPTER
![]() Defining a method
Defining a method
![]() Passing arguments to a method
Passing arguments to a method
![]() Getting results back
Getting results back
![]() Reviewing the WriteLine() method
Reviewing the WriteLine() method
Programmers need to be able to break large programs into smaller chunks that are easy to handle. For example, some programs contained in previous chapters of this minibook reach the limit of the amount of programming information a person can digest at one time. Many developers use rules like being able to see all the code for a particular task on a single monitor screen or printed piece of paper. The idea is that it's hard to keep scrolling back and forth to see what a particular piece of code does.
This chapter looks at methods, which is one way to split code into smaller pieces. C# lets you divide your class code into methods. A method is equivalent to a function, procedure, or subroutine. C# 7.0 and above supports something called a local function, which is really a method in disguise, but it lurks inside another method (the terminology appears to just confuse matters — that’s right, take a deep breath and move on). The difference is that a method is always part of a class. Properly designed and implemented methods can greatly simplify the job of writing complex programs.
 You don’t have to type the source code for this chapter manually. In fact, using the downloadable source is a lot easier. You can find the source for this chapter in the
 CSAIO4D2EBK02CH02 folder of the downloadable source. See the Introduction for details on how to find these source files.
Defining and Using a Method
Consider the following code (found in the Example application):
class Example
{
  public int anInt;                  // Instance
  public static int staticInt;       // Static

  public void InstanceMethod()       // Instance
  {
    Console.WriteLine("this is an instance method");
  }

  public static void ClassMethod()   // Static
  {
    Console.WriteLine("this is a static method");
  }
}
Look at the fields first. The anInt field is non-static, or an instance field, which means that you must create an instance of the Example class to use it. However, staticInt is a static field, which means that you can access it without creating an instance of the Example class, such as Example.staticInt. The “Generating Static in Class Members” section of Chapter 1 of this minibook tells you about these differences. Here is some sample code that shows the difference in static and instance field use:
Example fieldInstance = new Example();  // Create an instance of class Example.
fieldInstance.anInt = 1;                // Initialize instance member.
Example.staticInt = 2;                  // Initialize class member.
The same distinction between fields and properties also extends to methods. InstanceMethod() is known as an instance method, which is a set of C# statements that you can execute by referencing an instance of the Example class. On the other hand, ClassMethod() is a static method that you access using the method's name as part of the class, such as Example.ClassMethod(). You find a lot of static methods used in C#. For example, when writing Console.WriteLine(), Console is the class name (see https://docs.microsoft.com/en-us/dotnet/api/system.console) and WriteLine() is the static method name. The following snippet defines and accesses InstanceMethod() and ClassMethod() in almost the same way as the fields:
// These lines will compile.
Example thisInstance = new Example(); // Create an instance.
thisInstance.InstanceMethod();        // Invoke the instance method.
Example.ClassMethod();                // Invoke the class method.

// The following lines won't compile.
thisInstance.ClassMethod();           // No class method access via instance.
Example.InstanceMethod();             // No instance method access via a class.

Console.ReadLine();
Every instance of a class has its own, private copy of any instance members. But all instances of the same class share the same static members — both data members and methods — and their values.
The expression thisInstance.InstanceMethod() passes control to the code contained within the method. C# follows an almost identical process for Example.ClassMethod(). Executing the lines just shown (after commenting out the last two lines, which don't compile) generates this output:
this is an instance method
this is a static method
After a method completes execution, it returns control to the point where it was called. That is, control moves to the next statement after the call.
The bit of C# code given in the two sample methods does nothing more than write a silly string to the console, but methods generally perform useful (and sometimes complex) operations such as calculate sines, concatenate two strings, or sort an array of students. A method can be as large and complex as you want, but try to strive for shorter methods, using the approach described next.
 This book includes the parentheses when describing methods in text — as in
 InstanceMethod() — to make them a little easier to recognize. Otherwise, you might become confused in trying to understand the text.
Method Examples for Your Files
The idea behind methods is to break your code into small sections. C# allows many different ways to accomplish this task. The following sections show how to break a monolithic application into a much easier-to-understand application employing methods.
Understanding the problem
The monolithic CalculateInterestTable program from Book 1, Chapter 5 is a little difficult to read, so breaking it into several reasonable methods is important. The demonstrations in the sections that follow show how the proper definition of methods can help make a program easier to write and understand. The process of dividing working code this way is known as refactoring, and versions of Visual Studio 2012 and above provide a handy Refactor menu that automates the most common refactorings. When working with Visual Studio 2017 and above, you choose Edit ⇒ Refactor to access the refactoring options.
You find the exact details of method definitions and method calls in later sections of this chapter. This example simply gives an overview. In outline form, the CalculateInterestTable program appears this way:
public static void Main(string[] args)
{
  // Prompt user to enter source principal.
  // If the principal is negative, generate an error message.
  // Prompt user to enter the interest rate.
  // If the interest is negative, generate an error message.
  // Finally, prompt user to input the number of years.
  //
  // Display the input back to the user.
  //
  // Now loop through the specified number of years.
  while (year <= duration)
  {
    // Calculate the value of the principal plus interest.
    // Output the result.
  }
}
This bit of code illustrates a good technique for planning a method. If you stand back and study the program from a distance, you can see that it’s divided into these three sections:
- An initial input section in which the user inputs the principal, interest, and duration information
- A section mirroring the input data so that the user can verify the entry of the correct data
- A section that creates and outputs the table
Use this list to start looking for ways to refactor the program. In fact, if you further examine the input section of that program, you can see that the same basic code is used to input these amounts:
- Principal
- Interest
- Duration
Working with standard coding methods
Your observation gives you another good place to look. Alternatively, you can write empty methods for some of those comments and then fill them in one by one. That’s programming by intention. You can use these techniques to plan an approach to create the CalculateInterestTableWithMethods program. You can begin with Section 1, as shown here:
// InputInterestData -- Retrieve from the keyboard the
//    principal, interest, and duration information needed
//    to create the future value table. (Implements Section 1.)
public static void InputInterestData(
    ref decimal principal, ref decimal interest, ref decimal duration)
{
    // 1a -- Retrieve the principal.
    principal = InputPositiveDecimal("principal");

    // 1b -- Now enter the interest rate.
    interest = InputPositiveDecimal("interest");

    // 1c -- Finally, the duration
    duration = InputPositiveDecimal("duration");
}

// InputPositiveDecimal -- Return a positive decimal number
//    from the keyboard.
public static decimal InputPositiveDecimal(string prompt)
{
    // Keep trying until the user gets it right.
    while (true)
    {
        // Prompt the user for input.
        Console.Write("Enter " + prompt + ": ");

        // Retrieve a decimal value from the keyboard.
        string input = Console.ReadLine();
        decimal value = Convert.ToDecimal(input);

        // Exit the loop if the value that's entered is correct.
        if (value >= 0)
        {
            // Return the valid decimal value entered by the user.
            return value;
        }

        // Otherwise, generate an error on incorrect input.
        Console.WriteLine(prompt + " cannot be negative");
        Console.WriteLine("Try again");
        Console.WriteLine();
    }
}
This code lets the user input data values for principle, interest, and loan duration. It relies on a helper method named InputPositiveDecimal() that reduces the amount of code needed to obtain the correct information from the user. Instead of writing the same input code three times, you write it only once, making the code easier to understand, debug, and update. Here’s the final step of the process:
// OutputInterestTable -- Given the principal and interest,
//    generate a future value table for the number of periods
//    indicated in duration. (Implements Section 3.)
public static void OutputInterestTable(decimal principal,
                                       decimal interest,
                                       decimal duration)
{
    for (int year = 1; year <= duration; year++)
    {
        // Calculate the value of the principal plus interest.
        decimal interestPaid;
        interestPaid = principal * (interest / 100);

        // Now calculate the new principal by adding
        // the interest to the previous principal.
        principal = principal + interestPaid;

        // Round off the principal to the nearest cent.
        principal = decimal.Round(principal, 2);

        // Output the result.
        Console.WriteLine(year + "-" + principal);
    }
}
This code makes it possible to output the results of the calculations you perform. It performs the calculations period-by-period until it reaches the end of the loan duration. The OutputInterestTable() method contains an output loop with the interest rate calculations. This loop is the same one used in the inline, non-method CalculateInterestTable program. The advantage of this version, however, is that when writing this section of code, you don't need to concern yourself with any details of inputting or verifying data. When writing this method, think of it this way: “Given the three numbers — principal, interest, and duration — output an interest table,” and that's it. After you’re done, you can return to the line that called the OutputInterestTable() method and continue from there. The final step is to put everything together in the Main() method shown here:
static void Main(string[] args)
{
    // Section 1 -- Input the data you need to create the table.
    decimal principal = 0M;
    decimal interest = 0M;
    decimal duration = 0M;
    InputInterestData(ref principal, ref interest, ref duration);

    // Section 2 -- Verify the data by mirroring it back to the user.
    Console.WriteLine();  // Skip a line.
    Console.WriteLine("Principal     = " + principal);
    Console.WriteLine("Interest      = " + interest + "%");
    Console.WriteLine("Duration      = " + duration + " years");
    Console.WriteLine();

    // Section 3 -- Finally, output the interest table.
    OutputInterestTable(principal, interest, duration);
    Console.ReadLine();
}
The example divides Main() into three clearly distinguishable parts, each marked with comments:
- Part 1 calls the method
InputInterestData()to input the three variables the program needs in order to create the table:principal,interest, andduration. - Part 2 displays these three values for verification just as earlier versions of the program do.
- Part 3 outputs the table via the method
OutputInterestTable().
When you run this application, you see the same prompts and same results as in Book 1, Chapter 5. Here's an example:
Enter Principle: 1000
Enter Interest: 5.5
Enter number of years: 5

Principal     = 1000
Interest      = 5.5%
Duration      = 5 years

1-1055.00
2-1113.02
3-1174.24
4-1238.82
5-1306.96
Applying a refactoring approach
Refactoring offers a method of cleaning up code that may not be the easiest to read or that doesn’t follow the usual requirements for your organization. In this section, you start with the code found in the CalculateInterestTableMoreForgiving example in Book 1, Chapter 5 to produce the CalculateInterestTableWithRefactoring program.
Obtaining a copy of the Program.cs file
The following steps begin by obtaining a copy of the programming code for use in the new program.
After creating the
CalculateInterestTableWithRefactoring, right-clickProgram.csin Solution Explorer and choose Delete from the context menu.You see a dialog box telling you that this action will delete
Program.cspermanently. Click OK to close it. The copy ofProgram.csin Solution Explorer disappears.Right-click the project entry in Solution Explorer and choose Add ⇒ Existing Item from the context menu.
You see an Add Existing Item dialog box like the one shown in Figure 2-1. Note that this screenshot shows the required
Program.csfile already selected.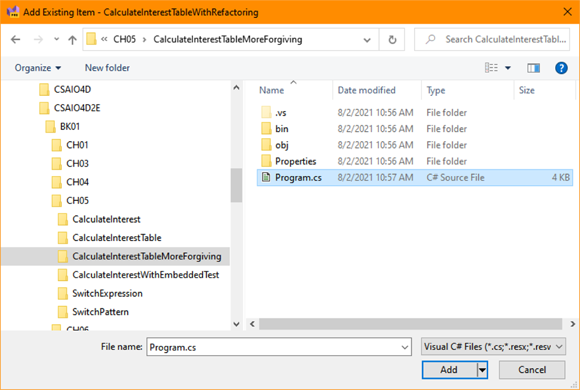
FIGURE 2-1: Obtaining a copy of
Program.csfrom theCalculateInterestTableMoreForgivingexample.Locate and highlight the
Program.csfile in theCSAIO4D2EBK01CH05CalculateInterestTableMoreForgivingfolder. Click Add.A copy of the
Program.csfile appears in Solution Explorer.Open
Program.cs.You see the code from Book 1, Chapter 5.
Performing the refactoring
Now that you have a copy of the required Program.cs file to use, you can begin refactoring it using the following steps.
- Using the example from Book 1, Chapter 5 as a starting point, select the code from the declaration of the
yearvariable through the end of thewhileloop:int year = 1; // You grab the loop variable
while (year <= duration) // and the entire while loop.
{
//…
} - Choose Edit ⇒ Refactor ⇒ Extract Method.
When you see the Rename: New Method dialog box, type OutputInterestTable in the highlighted part of the editing area.
Notice that every location where the new method is referenced automatically changes as you type. The proposed signature for the new method begins with the
private statickeywords and includesprincipal,interest, anddurationin parentheses.private static decimal OutputInterestTable(decimal principal,
decimal interest, int duration)Click Apply to complete the Extract Method refactoring.
The code you selected in Step 1 is located below
Main()and namedOutputInterestTable(). In the spot that it formerly occupied, you see this method call:principal = OuputInterestTable(principal, interest, duration);
The result of all this refactoring consists of these two pieces:
- A new
private staticmethod belowMain(), namedOutputInterestTable() - The following line of code within
Main()where the extracted code was:principal = OutputInterestTable(principal, interest, duration);
You can perform additional refactoring to obtain a program appearance much like that found in the previous section. The following steps begin by eliminating redundant code used to enter information. If you look at the original code, you see that there are actually three looping sections for principle, interest, and duration that are duplicates of each other except for prompts, so this is a good place to start refactoring. You can then simplify the input process much as it appears in the previous section. Use these steps to accomplish the task:
Highlight the first while loop in the
Main()method (the one immediately afterdecimal principal;) and choose Edit ⇒ Refactor ⇒ Extract Method.You see the same Rename: New Method dialog box as before.
Type InputPositiveDecimal to create the new method and click Apply.
The only problem with this new method is that it's currently specific to the principal variable, which won’t save any code.
Choose Edit ⇒ Refactor ⇒ Reorder Parameters.
You see the Change Signature dialog box. This dialog box lets you do more than simply change the order of parameters by highlighting a parameter and clicking the up and down arrows. You can also add and remove parameters using it.
Click Add.
You see the Add Parameter dialog box.
Type string in the Type Name field, prompt in the Parameter Name field, and “Principal” in the Value field; then click OK.
You have created an input parameter of type string, with a name of prompt that has a value of
"Principal"for this call. More important, the new method is now closer to becoming generic.- Change the first
Console.write()call inInputPositiveDecimal()to read:Console.Write($"Enter {prompt}: ");. Change the first line of the error message to read:
Console.WriteLine($"{prompt} cannot be negative");.The prompts in the function are now generic. They will work for any of the input variables.
Right-click the
principalvariable declaration inInputPositiveDecimal(), and choose Rename from the context menu. Type value and click Apply.The variable used to obtain information from the user prompt is now more generic as well. At this point, you have recreated a form of
InputPositiveDecimal()from the previous section using refactoring. Even though it doesn't match the hand-coded version perfectly, it’s very close.Replace the second
whileloop inMain()with:interest = InputPositiveDecimal("Interest");.Make sure you remove the second loop. At this point, you can build and run the application and the results will be the same as before.
Working with local functions
Security is increasingly more difficult to handle in most applications because developers don't really batten things down as they should. For example, if you don’t really need to make a method public, keep it private or possibly protected. Starting with C# 7.0, one way to make code more secure is to use local functions. If only one method calls another method, placing the called method inside the calling method will improve security because no one will even see the local function. The CalculateInterestTableWithLocalMethods program demonstrates how to perform this task with no loss in functionality.
Begin by using the technique shown in the “Obtaining a copy of the Program.cs file” section, earlier in this chapter, to obtain a copy of the Program.cs file from the CalculateInterestTableWithMethods program. Open the Program.cs file when you're done.
The first change you want to make is to move the InputPositiveDecimal() method into the end of the InputInterestData() method. Remove public static from in front of the InputPositiveDecimal() method. Local functions don't normally include these keywords because they’re generally private and they follow the host method’s static or instance functionality. The updated code will look like this:
public static void InputInterestData(ref decimal principal,
                                     ref decimal interest,
                                     ref decimal duration)
{
    // 1a -- Retrieve the principal.
    principal = InputPositiveDecimal("principal");

    // 1b -- Now enter the interest rate.
    interest = InputPositiveDecimal("interest");

    // 1c -- Finally, the duration
    duration = InputPositiveDecimal("duration");

    // InputPositiveDecimal -- Return a positive decimal number
    //    from the keyboard.

    decimal InputPositiveDecimal(string prompt)
    {
        // Keep trying until the user gets it right.
        while (true)
        {
            // Prompt the user for input.
            Console.Write("Enter " + prompt + ":");

            // Retrieve a decimal value from the keyboard.
            string input = Console.ReadLine();
            decimal value = Convert.ToDecimal(input);

            // Exit the loop if the value that's entered is correct.
            if (value >= 0)
            {
                // Return the valid decimal value entered by the user.
                return value;
            }

            // Otherwise, generate an error on incorrect input.
            Console.WriteLine(prompt + " cannot be negative");
            Console.WriteLine("Try again");
            Console.WriteLine();
        }
    }
}
The second change you want to make is to set public to private for both the InputInterestData() and OutputInterestTable() methods. You're ready to give the updated program a try. The program will run precisely as before, but now it’s a lot more secure.
Having Arguments with Methods
A method such as the following example is about as useful as a snow shovel in July because no data passes into or out of the method:
public static void Output()
{
  Console.WriteLine("this is a method");
}
Compare this example to real-world methods that do something. For example, the mathematical sine operation requires some type of input — after all, you have to calculate the sine of something. Similarly, to concatenate two strings, you need two strings. So the Concatenate() method requires at least two strings as input. You need to find a way to move data into and out of a method.
Passing an argument to a method
The values you input to a method are arguments. The inputs to a method are parameters. Parameters are a complete listing of inputs, some of which can be optional, so the arguments you provide to a method may not match the method's parameter list. Most methods require some type of arguments if they’re going to do something. You pass arguments to a method by listing them in the parentheses that follow the method name. Consider this small addition to the earlier Example class provided as the Example2 program:
public class Example
{
  … Other Methods …

  public static void Output(string someString)
  {
    Console.WriteLine("Output() was passed the argument: " + someString);
  }
}
You could invoke this method from within the same class by adding code to Main(), like this:
Example.Output("Hello");
You'd then see this not-too-exciting output:
Output() was passed the argument: Hello
The program passes to the method Output() a reference to the string "Hello". The method receives the reference and assigns it the name someString. The Output() method can use someString within the method just as it would use any other string variable. Try adding this code to the end of the code in Main():
string myString = "Hello";
Example.Output(myString);
This code snippet assigns the variable myString to reference the string "Hello". The call Output(myString) passes the object referenced by myString, which is your old friend "Hello". From there, the effect is the same as before.
A similar idea is passing arguments to a program. For example, you may have noticed that Main() usually takes an array argument.
Passing multiple arguments to methods
You can define a method with multiple arguments of varying types. Consider the following sample method AverageAndDisplay() from the AverageAndDisplay program:
// AverageAndDisplay -- Average two numbers with their
//    labels and display the results.
private static void AverageAndDisplay(string s1, double d1,
                                      string s2, double d2)
{
    double average = (d1 + d2) / 2;
    Console.WriteLine($"The average of {s1}"
        + $" whose value is {d1} and {s2}"
        + $" whose value is {d2} is {average}.");
}
You call it from Main() using this code:
static void Main(string[] args)
{
    // Access the member method.
    AverageAndDisplay("grade 1", 3.5, "grade 2", 4.0);
    Console.Read();
}
Executing this simple program generates this output:
The average of grade 1 whose value is 3.5 and grade 2 whose value is 4 is 3.75.
The method AverageAndDisplay() is declared with several parameters in the order in which arguments are to be passed to them.
As usual, execution of the sample program begins with the first statement after Main(). The first noncomment line in Main() invokes the method AverageAndDisplay(), passing the two strings "grade 1" and "grade 2" and the two double values 3.5 and 4.0.
The method AverageAndDisplay() calculates the average of the two double values, d1 and d2, passed to it along with their names contained in s1 and s2, and the calculated average is stored in average.
Changing the value of an argument inside the method can lead to confusion and errors, so be wise and assign the value to a temporary variable and modify it instead.
Matching argument definitions with usage
Each argument in a method call must match the method definition in both type and order if you call them without naming them. The following (illegal) version of Main() found in AverageWithCompilerError generates two build-time errors:
static void Main(string[] args)
{
    // Access the member method.
    AverageAndDisplay("grade 1", "grade 2", 3.5, 4.0);
    Console.Read();
}
C# can't match the type of each argument in the call to AverageAndDisplay() with the corresponding argument in the method definition. The string, "grade 1", matches the first string in the method definition; however, the method definition calls for a double as its second argument rather than the string that's passed. Figure 2-2 shows the errors you see when you choose View ⇒ Error List.
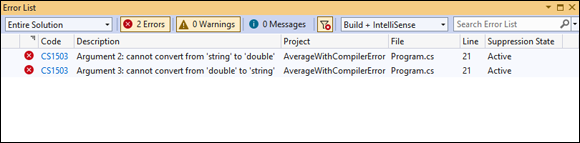
FIGURE 2-2: The IDE will tell you what is wrong with the passing of arguments.
You can easily see that the code transposes the second and third arguments. To fix the problem, swap the second and third arguments.
Double-clicking an error entry takes you directly to that error in the code. Notice the CS1503 error-code links in Figure 2-2. You can click these links to get additional information about the errors.
Overloading a method doesn’t mean giving it too much to do
You can give two methods within a given class the same name — known as overloading the method name — as long as their required parameters differ by type or number. (They can’t simply differ in the type or number of optional parameters because the compiler wouldn’t be able to tell calls apart.) These two methods in the AverageAndDisplayOverloaded example demonstrate overloading:
private static void AverageAndDisplay(string s1, double d1,
                                      string s2, double d2)
{
    double average = (d1 + d2) / 2;
    Console.WriteLine($"The average of {s1}"
        + $" whose value is {d1} and
 {s2}"
        + $" whose value is {d2} is {average}.
");
}

private static void AverageAndDisplay(double d1, double d2)
{
    double average = (d1 + d2) / 2;
    Console.WriteLine($"The average of {d1} and {d2}"
                    + $" is {average}.");
}
This program defines two versions of AverageAndDisplay(). Notice that the first version uses the
escape sequence to create new lines between the outputs, so the outputs are easier to read. You see other escape sequences used in examples throughout the book. The program invokes one and then the other by passing the proper arguments, as shown here:
static void Main(string[] args)
{
    // Access the first version of the method.
    AverageAndDisplay("my GPA", 3.5, "your GPA", 4.0);

    // Access the second version of the method.
    AverageAndDisplay(3.5, 4.0);
    Console.Read();
}
C# can tell which method the program wants by comparing the call with the definition. The program compiles properly and generates this output when executed:
The average of my GPA whose value is 3.5 and
 your GPA whose value is 4 is 3.75.

The average of 3.5 and 4 is 3.75.
C# doesn't allow two methods in the same class to have the same name unless the number or type of the methods’ arguments differs (or if both differ). Thus C# differentiates between these two methods:
AverageAndDisplay(string, double, string, double)AverageAndDisplay(double, double)
When you see it that way, it's clear that the two methods are different.
Implementing default arguments
In some cases, a method needs a default argument, a predefined value, to make it easier to use. If most of the developers using the method require a particular value, a default value makes sense. Providing a value for the argument then becomes one of flexibility so that developers who need other values still have the option of supplying one. Developers take two common routes:
- Method overloading: The technique shown in the previous section would allow you to create a default argument. You would set the value of the argument that isn’t supplied within the body of the method. The problems with this approach are that:
- It’s confusing to anyone reading the code because the purpose for overloading the method is unclear.
- It’s error prone because now you have two or more versions of the same method to maintain.
- Default parameters: C# provides the means to set default arguments as part of the method’s parameter list. This technique is clear because anyone looking at the code will see the defaults as part of the method declaration — there is no need to dig into the method code.
Because of the complexity and error-prone nature of using method overloading as a means of handling default arguments, this book always uses the default parameter approach, as shown in the DisplayRoundedDecimal() method in the MethodsWithDefaultArguments program:
static private string DisplayRoundedDecimal(
    decimal value = 0,
    int numberOfSignificantDigits = 2)
{
    // First round off the number to the specified number
    // of significant digits.
    decimal roundedValue = decimal.Round(
        value, numberOfSignificantDigits);

    // Convert that to a string.
    string s = Convert.ToString(roundedValue);
    return s;
}
The DisplayRoundedDecimal(decimal, int) method converts the decimal value that's provided into a string with the specified number of digits after the decimal point using a combination of the Round() and ToString() methods. Because decimals are often used to display monetary values, the most common choice is to place two digits after the decimal point. Notice the use of the equals sign (=) after each parameter to provide the default values. The default value for value is 0, and the default value for numberOfSignificantDigits is 2. You now have three ways in which to call DisplayRoundedDecimal() by employing the default values as shown here:
static void Main(string[] args)
{
    // Don't supply any values.
    Console.WriteLine(DisplayRoundedDecimal());

    // Supply just the first value.
    Console.WriteLine(DisplayRoundedDecimal(12.345678M));

    // Provide both values.
    Console.WriteLine(DisplayRoundedDecimal(12.345678M, 3));
    Console.ReadLine();
}
The third call is the only one that actually supplies both values, which demonstrates the usefulness of default values. When you hover your cursor over a method with default values, you see these values as part of the pop-up help, as shown in Figure 2-3.

FIGURE 2-3: Visual Studio tells you about the default method parameter values.
Here's the output from this example:
0
12.35
12.346
Using the Call-by-Reference Feature
Many real-world operations create values to return to the caller. For example, Sin() accepts an argument and returns the trigonometric sine. A method can return a value to the caller in two ways:
- Using the
returnstatement - Using the call-by-reference feature
Most of the preceding examples in the chapter demonstrate the return statement approach, so you already know how this approach works. The Average() method of the CallByReference program demonstrates the call-by-reference feature, as shown here:
private static void Average(
    ref double Result,
    double Input1 = 1.0,
    double Input2 = 2.0)
{
    Result = (Input1 + Input2) / 2;
}
Notice the addition of the ref keyword to this example. When you supply a reference to a variable, rather than the variable's value, the method can change the value of the variable as it appears to the caller. The most common use for a reference variable in this book will be to pass complex variables like structures. However, you can use this technique in situations in which you need to call the Windows API or create complex applications. The discussion at https://docs.microsoft.com/en-us/dotnet/csharp/language-reference/keywords/ref tells you more about these advanced topics that aren’t covered in the book.
 A reference variable must always appear as the first variable when you use variables with default values. Otherwise, the compiler will complain. Here is a version of
 Main() that shows how to work with Average():
static void Main(string[] args)
{
    // Initialize Result and show it.
    double Result = 0;
    Console.WriteLine(Result);

    // Make the call.
    Average(ref Result, 4.0, 3.0);

    // Show the change.
    Console.WriteLine(Result);
    Console.ReadLine();
}
The code begins by initializing the Main() version of Result to 0 and then displaying this value on screen. Notice again the use of the ref keyword when calling Average(). This example supplies two values, but you really don't need to in this case. After the call, Result now contains a value of 3.5, the average of 4.0 and 3.0. The Average() method was able to change Result because you passed it by reference.
Defining a Method with No Return Value
Some methods don't need to return a value to the caller. An earlier method, AverageAndDisplay(), displays the average of its input arguments but doesn’t return that average to the caller. Rather than leave the return type blank, you declare a method such as AverageAndDisplay() this way:
private void AverageAndDisplay(double, double)
The keyword void, where the return type is normally used, means nontype. That is, the declaration void indicates that the AverageAndDisplay() method returns no value to the caller. (Regardless, every method declaration specifies a return type, even if it's void.)
A void method returns no value. This definition doesn’t mean that the method is empty or that it’s used for medical or astronautical purposes; it simply refers to the initial keyword. By comparison, a method that returns a value is a nonvoid method.
A nonvoid method must pass control back to the caller by executing a return followed by the value to return to the caller. A void method has no value to return. A void method returns when it encounters a return with no value attached. Or, by default (if no return exists), a void method exits automatically when control reaches the closing brace of the method. Consider this DisplayRatio() method found in the VoidMethods program:
private static void DisplayRatio(double numerator,
                                 double denominator)
{
    // If the denominator is zero …
    if (denominator == 0.0)
    {
        //  …output an error message and …
        Console.WriteLine("The denominator of a ratio cannot be 0");

        //  …return to the caller.
        return;  // An early return due to the error
    }

    // This code is executed only if denominator is nonzero.
    double ratio = numerator / denominator;
    Console.WriteLine($"The ratio of {numerator}" +
        $" over {denominator} is {ratio}.");
}  // If the denominator isn't zero, the method exits here.
The DisplayRatio() method checks whether the denominator value is zero:
- If the value is zero: The program displays an error message and returns to the caller without attempting to calculate a ratio. Nothing terrible will happen if you perform the calculation; the result will simply be infinity. However, it's good practice not to provide the user with infinite values when you can help it.
- If the value is nonzero: The program displays the ratio. The closed brace immediately following
WriteLine()is the closed brace of the methodDisplayRatio()and therefore acts as the return point for the program.
Returning Multiple Values Using Tuples
In versions of C# prior to C# 7.0, every return value was a single object. It could be a really complex object, but it was still a single object. In C# 7.0, you can actually return multiple values using tuples. A tuple is a kind of dynamic array nominally containing two items that you can interpret as a key and value pair (but it isn't strictly required). In C#, you can also create tuples containing more than two items. Many languages, such as Python, use tuples to simplify coding and to make interacting with values considerably easier.
C# 4.x actually introduced the concept of a tuple as part of dynamic programming techniques. However, C# 7.0 advances the use of tuples to allow returning multiple values rather than just one object. This book doesn’t provide extensive coverage of tuples, but they work so well in returning complex data that you definitely need to know something about this use of tuples.
Using a tuple
A tuple relies on the Tuple data type, which can accept up to seven generic parameters, with the potential for an eighth. The best way to work with tuples is to provide the data types of the variables you plan to provide as part of the declaration. Here’s an example of a method that returns a tuple, as found in the UseTuples program:
private static Tuple<string, int> getTuple()
{
    // Return a single value using the tuple.
    return new Tuple<string, int>("Hello", 123);
}
The code begins by specifying that getTuple() returns a Tuple consisting of two items, a string and an int. You use the new keyword to create an instance of Tuple, specify the data types in angle brackets, <string, int>, and then provide the data values. The getTuple() method effectively returns two values that you can manipulate individually, as shown here:
// This is where your program starts.
static void Main(string[] args)
{
    // Obtain a single entry tuple.
    Console.WriteLine(
        getTuple().Item1 + " " + getTuple().Item2);
    Console.Read();
}
To access a tuple like this one, you call getTuple(), add a period, and then specify which item to use, Item1 or Item2. This example just demonstrates how tuples work, so it's simple. The output looks like this:
Hello 123
Using a tuple lets you return two values without resorting to complex data types or other odd structures. It makes your code simpler when the output requirements fit within the confines of a tuple. For example, when performing certain math operations, you need to return a result and a remainder or the real part and the imaginary part of a complex number.
Relying on the Create() method
An alternative way to create a tuple is to rely on the Create() method. The result is the same as when working with the method found in the previous section. Here’s an example of using the Create() method, as found in the CreateTuples program:
// Use the Create() method.
var myTuple = Tuple.Create<string, int>("Hello", 123);
Console.WriteLine(myTuple.Item1 + "	" + myTuple.Item2);
This approach isn't quite as safe as using the method shown in the previous section because myTuple could end up with anything inside because of the use of var. You could further eliminate the <string, int> portion of the constructor to force the compiler to ascertain what myTuple should receive as input. You can also rely on this shorthand method of creating a tuple (specifically a ValueTuple) when using the .NET Framework version 4.7 or above:
(string, int) t1 = ("Hello", 123);
Console.WriteLine($"{t1.Item1}	{t1.Item2}");
Creating tuples with more than two items
Tuples can have one to eight items in most cases (see https://docs.microsoft.com/en-us/dotnet/api/system.tuple-8?view=net-5.0 for details). If you want more than eight items, the eighth item must contain another tuple. Nesting tuples enables you to return an almost infinite number of items, but at some point you really do need to look at the complexity of your code and see whether you can keep the number of return items down. Otherwise, you find that your application executes slowly and uses a lot of resources. Here is an example that uses three Tuples holding three items, each enclosed in an array of Tuples (shown in the LotsOfTupleItems program):
static Tuple<string, int, bool>[] getTuple()
{
    // Create a new tuple.
    Tuple<string, int, bool>[] aTuple =
    {
        new Tuple<string, int, bool>("One", 1, true),
        new Tuple<string, int, bool>("Two", 2, false),
        new Tuple<string, int, bool>("Three", 3, true)
    };

    // Return a list of values using the tuple.
    return aTuple;
}
The technique follows the same pattern as before. The only difference is that you provide more values for each tuple. It also doesn't matter whether you create a single tuple or a tuple array used as a dataset. Either choice allows you to use up to eight items per tuple. However, there is another option. Here is a version of a tuple available in the .NET Framework version 4.7 and above that contains a lot more than just eight items:
var myTuple2 = (1, 2, 3, 4, 5, 6, 7, 8, 9, 10, 11, 12, 13, 14);
Console.WriteLine(myTuple2.Item11);
foreach (var Item in myTuple2.ToString().Split(','))
{
    Console.WriteLine(Item);
}
This form of tuple is the ValueTuple, and it offers quite a bit of flexibility when you need to return a lot of values from a method. You can’t use a ValueTuple directly with a foreach statement, but you can use a little trickery to make things work by converting it to a string first. In addition, it's a faster way to return data than using a standard tuple. You won’t find the ValueTuple used in this book, but you can find out more about it at https://www.dotnetperls.com/valuetuple. This is just an overview of the Tuple type; you can find more information about these types at https://docs.microsoft.com/en-us/dotnet/csharp/language-reference/builtin-types/value-tuples.