
Chapter 1
Getting Started with Visual Studio
IN THIS CHAPTER
![]() Surveying the available versions
Surveying the available versions
![]() Setting up Visual Studio
Setting up Visual Studio
![]() Understanding projects and solutions
Understanding projects and solutions
![]() Exploring the different types of projects
Exploring the different types of projects
Writing applications using a text editor and then compiling them at the command line is a thing of the past. Today, you use an Integrated Development Environment (IDE), which is a program that provides a platform for development, to create C# applications. An IDE helps to make development easier.
Programmers who are used to starting with a blank screen and a command line often dismiss an IDE as a slow, bogged-down waste of time. However, Visual Studio really does make working with C# faster and more pleasant. It’s quick, easy to use, agile, and smart. If you’re truly determined to use a command-line interface, consider using a Read, Evaluate, Print, and Loop (REPL) environment such as CShell (http://cshell.net), discussed in the “Using IDE alternatives” sidebar, later in this chapter.
True, you don't have to use an IDE to program, but if you’re going to use one, it should be Visual Studio. It was purposely built to write C# code, and it’s made to construct programs for all the platforms that .NET now supports, including Windows.
 Other options exist, however. MonoDevelop (
https://www.monodevelop.com/) is a tool built for Linux users to write .NET code, but it works in Windows. When working on the Mac, you might use Visual Studio for the Mac (https://visualstudio.microsoft.com/vs/mac/). You might even choose a browser-based IDE, such as OnlineGBD (https://www.onlinegdb.com/online_csharp_compiler), which actually allows you to develop your C# code using your Android tablet. If you really want to twist your brain into a knot, check out Rextester (https://rextester.com/), where you can select from any of a large number of languages to develop with using a browser interface. (Just select the language you want from the Language drop-down list.) These tools are all free.
Of course, you can also get the Visual Studio Community edition free. All the examples in this book will work with this particular IDE, so you should get the Community edition unless you need the advanced features of a paid version of Visual Studio or require one of the other products for some other reason. This chapter introduces you to the various versions of Visual Studio and discusses the C# projects available to you.
Versioning the Versions
Visual Studio has lots of different versions. The reason is its famous licensing problem. If Microsoft just sold the whole package for what it was worth, only the Fortune 50 could afford it, and it would cut out about 99 percent of its audience. If Microsoft makes a lot of different versions and tries to incorporate the features that different groups of people use, it can capture nearly 100 percent of the audience. This chapter discusses the features and benefits of all the major editions.
An overview of Visual Studio 2022 updates
Some of the changes in Visual Studio 2022 affect all editions. For example, you can now create applications for these platforms using various C# templates:
- Windows
- Android
- iOS
- Linux
- macOS
- Other technologies and platforms (see the list at
https://docs.microsoft.com/en-us/visualstudio/releases/2022/compatibility#developOtherfor details). Many of these other technologies and platforms won’t affect your C# development.
 The biggest news, however, is that Visual Studio 2022 is a fully 64-bit environment now, which means that you can make fuller use of all the functionality that your system provides. In addition, Visual Studio 2022 is noticeably faster in some areas than it was in the past. Fortunately, your 32-bit applications continue to run fine in the new environment.
As you read through this book, you also find mentions of .NET 6.0 updates that affect how you code. Some of the updates are significant, and you notice them immediately. Other updates are subtle, but you can find them if you look. You can see a list of .NET 6.0 updates at https://devblogs.microsoft.com/dotnet/announcing-net-6-preview-7/. What may surprise you is how many of these updates you have already noticed without really being aware of them because they’re under the covers.
Whether you call it IntelliSense, IntelliCode, or something else altogether, this feature of Visual Studio saves you time by helping you make corrections to your code as you type and also by making suggestions. In this version of Visual Studio, you definitely want to remember the Tab key because pressing Tab allows you to complete major code segments quickly, easily, and without error. At the end of the day, you may amaze yourself at your productivity after you get used to the new IntelliSense (the name used in this book) features. It’s the most noticeable and welcome feature for many developers.
The new debugging support will bedazzle you with all sorts of gizmos, charts, graphs, blinking lights, and pizzazz of every sort. However, you may find that you really don’t use much of it unless you work on a large project. The debugger does tell you more about what is wrong with your application, and this feature does save time. For the most part, however, you find that you use the same debugging techniques as in the past with just a bit more help from the IDE.
Community edition
The Community edition is the free version of Visual Studio. It’s made for hobbyists, classrooms, and academic research, but many professional programmers use it as their edition of choice for small personal projects, or for working on open source projects. Microsoft also targets this edition to small organizations that have five or fewer developers. So if you work for a small company, you might not need anything more than this edition, which means that C# development will remain free.
Although the Community edition is a little less functional than the Professional edition, you can compile every code example in this book by using the Community edition. It has the power of the .NET Framework, which is also free, and gives you a significant means of learning C#. From a development platform perspective, the Community edition supports everything that all the other editions support, including
- Windows Desktop
- Universal Windows Platform, or UWP (formerly known as Universal Windows Apps)
- Universal Application Platform (UAP)
- Web (ASP.NET)
- Azure development
- Cloud development
- Office 365
- Business Applications
- Apache Cordova
- C++ Cross-Platform Library Development
- Python
- Node.js
- .NET Core
- Git support
- Docker Tools
New to Visual Studio versions 2019 and above are cross-platform tools that help you create applications for all the non-Windows platforms that C# now supports. Here are the features you can expect:
- Remote iOS Simulator for Windows
- The ability to share code between Android and iOS using Xamarin (
https://dotnet.microsoft.com/apps/xamarin), a platform for building iOS and Android apps using C# and .NET - Native iOS and Android UI Designers
- Xamarin.Forms
In the past, the various Express and academic editions gave people a taste of what they could do with C#, but tended to move them toward the paid Professional edition. With Visual Studio 2022, Microsoft takes a different route and gives you everything needed to fully experience C#. You even have access to many advanced debugging and diagnostic tools, testing tools, and cross-platform templates. The chart at https://www.visualstudio.com/vs/compare/ provides a full comparison.
What the Community edition lacks is enterprise-level support. It’s important to note that Microsoft defines an enterprise as an entity having more than 250 PCs or more than $1 million U.S. dollars in annual revenue. If you find that you need enterprise-type support but don’t have an enterprise-sized organization, you need the Professional edition. However, for most developers, the Community edition provides everything needed to discover and use the wonders of C#.
Professional edition
Besides designing the Professional edition to work in a larger, enterprise environment, Microsoft endowed the Professional edition with one necessary addition: CodeLens (https://docs.microsoft.com/visualstudio/ide/find-code-changes-and-other-history-with-codelens). This feature is designed to help you look at your code in a detailed manner. Think about it as a sort of magnifying glass for code. You can use CodeLens to perform these sorts of tasks:
- Find references to your code wherever they might exist.
- Review the code history and determine how changes might affect your code.
- Manage the branches in your code.
- Determine who made code changes.
- Contact other team members about changes using Lync or Skype.
- Track linked code reviews and linked bugs.
- Locate and manage unit tests for your code.
Enterprise edition
There is a huge difference in functionality between the Professional edition and the Enterprise edition. Yes, the Community edition, Professional edition, and Enterprise edition can all create the same kinds of projects, but the tools required to design, build, test, and manage really large projects reside in the Enterprise edition. For example, all the architectural features, such as Architectural Layer Diagrams and Architecture Validation, are part of the Enterprise edition. If you want to validate your design, you need Live Dependency Validation, which is a truly amazing feature described at https://docs.microsoft.com/visualstudio/modeling/validate-code-with-layer-diagrams.
The management features are also designed around the huge project environment. For example, Code Clone (https://docs.microsoft.com/previous-versions/hh205279(v=vs.140)) provides the means to detect duplicate code in your project. After all, when a project is huge, multiple developers are apt to come up with the same way to perform specific tasks. Ensuring that you don’t have to maintain multiple copies of the same code reduces costs and makes the code easier to manage (not to mention that it eliminates some of the nastier bugs).
You also receive some truly advanced functionality for performing diagnostics and debugging your code. In addition, the Enterprise edition contains additional cross-platform support. However, where the Enterprise edition truly shines is with testing tools. When working with the Community edition or Professional edition, all you get is unit testing. However, the Enterprise edition provides all these other forms of testing:
- Live Unit Testing
- IntelliTest
- Microsoft Fakes (Unit Test Isolation)
- Code Coverage
- Snapshot Debugger
- Time Travel Debugging (see the walkthrough at
https://docs.microsoft.com/windows-hardware/drivers/debugger/time-travel-debugging-walkthrough)
There are also new cross-platform development features (starting in Visual Studio 2019) that help you create applications that work across multiple platforms. This includes Xamarin support, as shown here:
- Embedded Assemblies
- Xamarin Inspector
- Xamarin Profiler
MSDN
The Microsoft Developer Network (MSDN) subscription is by far the best way to get Microsoft products. It may seem as though setting up a development environment to develop anything of significance would be impossibly expensive. This is not necessarily the case.
The MSDN subscription is exactly what it sounds like — a subscription to a majority of the Microsoft products that matter. For around $1,199.00 for the first year and $799.00 a year after that for a Professional edition subscription, you get access to everything you need. This isn’t actually an edition of Visual Studio. (You can learn more about the various subscription costs for the Visual Studio component at https://visualstudio.microsoft.com/subscriptions/ and the MSDN Platforms component at https://visualstudio.microsoft.com/msdn-platforms/.)
That MSDN Platforms fee sounds like a lot, but think about it this way: Even if you do only one project a year on your own time, your investment will pay off. Considering the fact that Visual Studio alone is half of that, and it gets a revision every two years or so, it’s a bargain. Along with Visual Studio Professional, you also get subscriptions to a wealth of software that would take pages to list here, but you can see a complete list at https://visualstudio.microsoft.com/vs/pricing-details/.
Installing Visual Studio
Visual Studio Community edition installs much like any other Windows program. First, assure yourself that your machine can run Visual Studio. Then you run the setup program that you download from the Microsoft site at https://www.visualstudio.com/vs/community/ and make a few decisions. Then you wait. Visual Studio is big. It takes a while. The official minimum requirements for Visual Studio 2022 are shown in this list:
- Operating system:
- Windows 10 version 1909 or higher: Home, Professional, Education, and Enterprise (Team, LTSB, and S are not supported)
- Windows Server 2016: Standard and Datacenter
- Windows Server 2019: Standard and Datacenter
- Hardware:
- 1.8 GhZ or faster 64-bit quad-core (or better) processor
- 4GB of RAM (16GB of RAM recommended)
- 20GB of available hard drive space (50GB recommended)
- 5400 RPM drive
- Video card that supports a minimum display resolution of 720p (1280 by 720; higher resolution recommended)
 Remember that Visual Studio 2022 is a 64-bit-only IDE, so if you plan to continue working with a 32-bit platform or an older version of Windows, you might want to consider continuing to use Visual Studio 2019, which still comes with C# 9.0 support. You can find the Visual Studio 2019 requirements, which are significantly less than Visual Studio 2022, at
 https://docs.microsoft.com/en-us/visualstudio/releases/2019/system-requirements. Note that there is a very long list of platforms that Visual Studio 2022 doesn’t support, such as ARM processors, Windows Server Core, Windows Minimal Server, Windows containers, virtual machine environments, multiple simultaneous user environments, and so on. If you have any doubt about your setup, make sure to consult the requirements at https://docs.microsoft.com/visualstudio/releases/2022/system-requirements.
You can run on the configuration shown below, but you may find that some features run slowly and a few don’t run at all. Here’s a more realistic base configuration for Visual Studio Community edition:
- 3.4 GHz 64-bit 8-core processor
- 64-bit Windows 10 with 8GB of RAM
- 250GB of available space on a solid-state drive (SSD)
- Wide Extended Graphics Array (WXGA) (1366 × 768) or higher display adapter
- Dual monitors (or a laptop with an external monitor) with one being a touchscreen
Breaking Down the Projects
After you have run the setup program and set your default settings, you just need to start a project and get your fingers dirty. All the project types (except maybe one or two) in the first three minibooks were Console applications, meaning they are meant to be run at the command prompt. Many more projects are available. Notice the main kinds of projects in the Visual Studio New Project dialog box, shown in Figure 1-1. You control which projects you see by selecting options in the three drop-down list boxes at the top.
The following list shows the project types installed as part of Visual Studio Community edition for C# developers.
- Cloud: Scalable services that run on Microsoft Azure (
https://azure.microsoft.com/). You can create a number of service, web application, job, and mobile application types. This is also where you find Blazor (https://dotnet.microsoft.com/apps/aspnet/web-apps/blazor), Angular (https://angular.io/), React.js (https://reactjs.org/), and Redux (https://redux.js.org/) templates.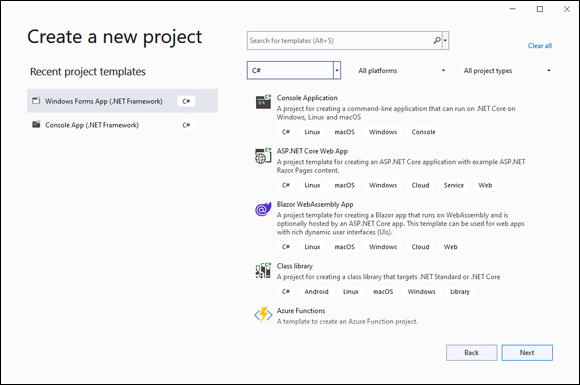
FIGURE 1-1: The Visual Studio Community edition provides lots of project types.
- Console: There are two kinds of console applications: .NET Core (which supports Linux, macOS, and Windows) and .NET Framework (which supports desktop development).
- Desktop: Rich client applications that compile into
.EXEs and run right on your computer. Microsoft Word is a Windows application. Most of the templates create applications that run on Windows, but some templates let you create applications for the Universal Windows Platform (UWP) and Xbox. - Extensions: You can use the templates in this category to create extensions for Visual Basic, so it does anything special that you need it to do. This category may be blank when you first look at it. You need to install additional tools and features by clicking the supplied link to provide entries here.
- Games: Creating games using Visual Studio and C# is possible, but it's not necessarily an easy task. The article at
https://narrasoft.com/is-c-a-good-tool-for-game-development/provides you with some insights into how to perform this task. This category may be blank when you first look at it. You need to install additional tools and features by clicking the supplied link to provide entries here. - IoT (Internet of Things): Allows you to create applications that interact with devices that support specific interfaces. You can read more about C# and IoT at
https://dotnet.microsoft.com/apps/iot. This category is likely to be blank when you first look at it. The article athttps://docs.microsoft.com/dotnet/iot/introprovides information on how to install the required support. - Library: Libraries make it possible to store code for use in multiple projects. Of course, you have to have the right library for the kind of project you want to create. The templates in this list support all the project types you can create using C#.
- Machine Learning: The ability to use computers to interact with humans in an intelligent way is a major part of what machine learning offers. Machine learning relies heavily on huge amounts of data and complex data, which means you must have a robust machine to even begin working with machine learning apps locally (there are online options). This category is likely to be blank when you first look at it. The sites at
https://dotnet.microsoft.com/apps/machinelearning-ai/ml-dotnetandhttps://dotnet.microsoft.com/apps/machinelearning-aiprovide information on how to get started with machine learning. - Mobile: Creating applications that run on multiple devices is a necessity today. The templates in this category let you create apps for Windows, iOS, and Android. This category may be blank when you first look at it. You need to install additional tools and features by clicking the supplied link to provide entries here.
- Office: You use the templates in this category to create Office and SharePoint applications. If you want to develop for Office 365, you need the special developer license discussed at
https://docs.microsoft.com/visualstudio/subscriptions/vs-m365. Desktop development requires that you install the support that comes with your Office product. This category will be blank unless you install the required support. - Other: Templates that don’t fit anywhere else appear in this category. This category is normally blank unless you install some type of specialized support.
- Service: Some types of applications have no user interface. Instead, they sit in the background and wait for requests from a client. These applications are services and Windows is packed with them (just open the Services app to see them). These templates let you create services specifically designed for your application in addition to Windows services.
- Test: Unit tests that help you check the functionality of your application using automation.
- UWP: Single-page applications that rely on the UWP. This app type has no predefined controls or layout.
- Web: Websites that require a web server to run. (A web server is included with Visual Studio for development purposes.) Microsoft.com is an example of a web application.
The default projects that you obtain with any copy of Visual Studio 2022 are the tip of the iceberg. These are the projects that Microsoft assumes that you will likely use most. However, Visual Studio 2022 can support a huge number of other project types that this book doesn’t cover. You install them using NuGet (see https://docs.microsoft.com/nuget/consume-packages/install-use-packages-visual-studio for details).
Exploring the Create a New Project dialog box
You start all new projects by using the New Project dialog box, shown in Figure 1-1. It’s possible to access this dialog box in a number of ways. The most common technique is to choose Create a New Project when Visual Studio starts. However, you can also choose File ⇒ New ⇒ Project. When adding a new project to an existing solution, you can also right-click the solution entry in Solution Explorer and choose Add ⇒ New Project.
To make it easier to choose a template, you see the templates you’ve used recently listed on the left side. You can simply select one of these entries and click Next to continue the wizard. You can also search for templates by criteria using the search field at the top. Otherwise, you can select entries in the three drop-down list boxes to choose a template that way.
What you see after you choose a template depends on the wizard for that template. However, Microsoft has attempted to standardize the wizards to some extent. You usually see three (or sometimes more) important text boxes when you click Next after choosing a template:
- Name: The name of this project.
- Location: The path to the project file.
- (Optional) Solution: Determines whether the new project is part of the existing solution or is part of a new solution.
- Solution Name: The name of the solution. Solutions are collections of projects.
- Framework: The version of the .NET Framework you want to use.
There is sometimes a third or fourth page of the wizard, asking you for additional information. Just follow the prompts and you’ll soon see the IDE, where you can begin editing your code.
Understanding solutions and projects
Visual Studio project files, and the solutions that love them, are a constant topic of interest to Microsoft developers. You work on one solution at a time, with a number of projects within. How you organize your solutions and their projects will make or break you when it comes time to find something.
You can think of solutions as folders that hold projects. They’re just folders with special properties. The second page of the wizard has a special check box entitled Place Solution and Project in the Same Directory. You deselect this option when you want to add multiple projects to a single solution and want each project to have its own directory within the solution. Keeping projects separate makes it easier to reuse a project in another application.
Projects are where you put the code files for your programs. They store all kinds of things, like references to the .NET Framework, resources like graphics or files, and what file should be used to start the project.
Solutions do the same thing for projects that projects do for files. They keep the projects in a folder and store certain properties. For instance, they store which project should be started when debugging starts.
Neither the project nor the solutions have much to do with a finished program. They are just simple organizational structures for Visual Studio. The installation of the finished program is determined by the setup project.
In reality, the solution is more than a folder. It’s a file in a folder that is used by Visual Studio to manage the developer experience. So, inside the folder for the solution is a file describing the projects within and then a bunch of folders containing the projects themselves.
There are files for the projects, too — files that describe the resources and references for the project. They are all XML files that contain text references to the values that you set using Visual Studio. Normally, you don’t need to look at the solution or project files. The results of any organization you perform appears in Solution Explorer. Figure 1-2 shows a typical example of a simple application setup consisting of a solution (CheckCIA) and two projects (CIAAssembly and InternalLimitsAccess). Each of the projects contains the files associated with that project, such as CIAAssembly.cs in the CIAAssembly project.
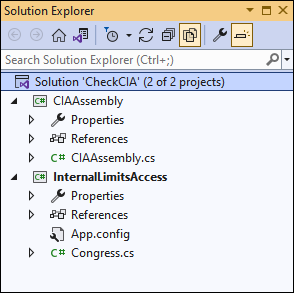
FIGURE 1-2: Solutions and projects appear in Solution Explorer.