
Chapter 5
Programming for Windows 10 and Above
IN THIS CHAPTER
![]() Understanding the Universal Windows Platform (UWP)
Understanding the Universal Windows Platform (UWP)
![]() Using UWP to your advantage
Using UWP to your advantage
![]() Developing a simple UWP app
Developing a simple UWP app
![]() Working with .NET Core applications in general
Working with .NET Core applications in general
The Universal Windows Platform (UWP) epitomizes the new direction of development for Windows 10 and above machines. What started in Windows 10 should see additional use in Windows 11. Windows 10 is a robust version of Windows that corrects many of the problems found in versions like Vista and Windows 8. You find Windows used in over 1.3 billion machines according to sources like PC Magazine (https://www.pcmag.com/reviews/microsoft-windows-10) and 78 percent of Windows installations are Windows 10. In fact, Windows still claims 75 percent of the desktops out there (with macOS accounting for around 17 percent and Linux, in its various forms, taking up the rest). So, the question on your mind might be why a new kind of application is needed if it’s going to affect so few people. The answer is that most people don’t just sit at a desktop system anymore — they want the same app to work on their desktop, tablet, laptop, and smartphone anywhere they might be. So, UWP represents Microsoft’s way of heading in this direction because it supports multiple platforms that include Windows 10/11, Windows 10/11 Mobile, Xbox One, and Hololens. So, the first part of this chapter helps fill in the details for you so that you can look oh so smart the next time you talk with your peers over cocktails at the company party.
Of course, there are billions (perhaps more) lines of more traditional Windows code out there — the kind used for most of the applications in this book. So you might be a little reticent about throwing them all out and starting from scratch. After all, your boss may not have been in a particularly good mood lately. The second part of this chapter is all about when using UWP for new development makes sense.
No chapter about the UWP would be complete without an example, so the chapter’s third section provides you with UWP basics that are better than a simple Hello World application. For example, you discover how to set your Windows 10 and above machine up for Developer Mode. Of course, you won’t find Developer Mode in older versions of Windows, so if you have one of those older versions, stop here, because you really can’t write a UWP application — Visual Studio 2022 won’t let you!
The final section of the chapter tells you more about the mysteries of .NET Core development. It focuses on .NET 6 because this is the latest and most feature-rich version of the .NET Framework. Again, if you’re using your rusty, trusty old version of Visual Studio, nothing will work in this section —you really do need Visual Studio 2022.
 You don’t have to type the source code for this chapter manually. In fact, using the downloadable source is a lot easier. You can find the source for this chapter in the
 CSAIO4D2EBK05CH05 folder of the downloadable source. See the Introduction for details on how to find these source files.
What is the Universal Windows Platform (UWP)?
You can look at UWP in a number of ways. From a simplistic perspective, it provides another method of creating a Windows client application. So, theoretically, it's just another in a long series of efforts on the part of Microsoft to make using Windows easier or better in some way, but still, it’s just a client application development technology.
Like all newer Windows apps created by C# developers, UWP apps have access to the Win32 API. However, the access is granted through a special WindowsApp.lib library file, as described at https://docs.microsoft.com/en-us/previous-versions/mt186421(v=vs.85), specialized DLLs (https://docs.microsoft.com/en-us/previous-versions/mt186422(v=vs.85)), and the .NET Framework (https://docs.microsoft.com/en-us/dotnet/api/?view=dotnet-uwp-10.0). In other words, you have new methods for doing the same old things you’ve always done. Paul Thurrott (a well-known, longtime technical reviewer) (https://www.thurrott.com/dev/206351/microsoft-confirms-uwp-is-not-the-future-of-windows-apps) says outright that UWP isn’t the absolute future of Windows app development; many UWP features will be made available through other avenues.
The reasons to use UWP don’t stem from a magical new application type or specialized libraries that will allow you to look like Super Programmer, the killer of all client problems. You use UWP to create WinCore apps that run the same across multiple devices and provide access to the app through the Microsoft store. In short, this is one tool in a toolbox, not the entire toolbox, as you might believe from some Microsoft hype. Even so, UWP provides you with this set of interesting and useful features:
- Modern UI: Whether users actually like tiles that blare out their messages in a multimedia frenzy or not remains to be seen (look at discussions like the ones found at
https://www.reddit.com/r/windows/comments/on98u0/why_do_people_hate_live_tiles/andhttps://mspoweruser.com/windows-10s-live-tiles-vestigial-time-go/if you have any doubts). UWP apps can rely on live tiles, push notifications, and user activities that interact with Windows Timeline and Cortana's Pick Up Where I Left Off functionality. The problem is whether users actually find the modern UI practical. - Adaptable: Many devices offer multiple modes of operation, such as orientation, and these devices have differing functionality, such as screen sizes, and UWP applications can accommodate all of it. This adaptability comes from the Model-View-ViewModel (MVVM) design pattern described at
https://docs.microsoft.com/windows/uwp/data-binding/data-binding-and-mvvm. - Install and uninstall preciseness: A huge problem with Windows apps as a whole is that they cause machine rot, the condition in which the OS must be installed from scratch because the various applications have modified it in some way. UWP supposedly disallows programming techniques that cause machine rot.
- Lifecycle-based development: Unlike many forms of Windows development, the developer has stronger control over the lifecycle of a UWP app. It’s now possible to control the deployment, update, installation, and even uninstallation of the application.
- Reduced development time: This feature comes with a caveat: The learning curve for true UWP development is huge, and there is no way to reduce it. However, after you get into the UWP mindset, you can save development time in these ways:
- Control over the development cycle means that less time is spent in application management.
- The adaptable nature of UWP means that you write the application once, not once for each device you want to support.
- Administrators spend less time trying to configure and adapt the application, so developers spend less time producing fixes.
- Users have a consistent look and feel on every device, so developers spend less time correcting UI functionality.
- Development issues surrounding UWP are theoretically eased by the UWP Bridges toolkits (
https://mspoweruser.com/microsoft-details-the-new-universal-windows-platform-at-build-2015/). However, only the Desktop Bridge receives much attention, such as in the message thread athttps://stackoverflow.com/questions/65737039/how-to-package-a-wpf-net-core-app-with-xamlislands-and-desktop-bridge.
- Security: A UWP app declares the resources it needs, and the user must allow that access. This is akin to the same functionality in Android apps.
- Common API: If your application doesn’t use any special low-level features, it can run on any device that runs Windows 10 and above.
- Strong language support: UWP applications can rely on C#, C++, Visual Basic, and JavaScript for development at the same time (rather than use a single language for the entire application). However, you can’t get by with just one language as in the days of yore because you need a second language for the UI: WinUI, XAML, HTML, or DirectX.
Devices Supported by the UWP
For development purposes, you must have a Windows 10 or above system. Most developers will use a desktop system because the Visual Studio 2022 interface requires a lot of screen real estate to use effectively. My personal experiences trying a laptop for development didn’t work out well, but I’m sure that some people will find that a laptop works fine for their needs. What really surprised me was the reader who decided to write code using their smartphone. I’m not sure how they got that to work, but I suspect they spend a lot of time squinting after a programming session. The point is, you need Windows to develop UWP apps.
Using UWP apps is another story. The official Microsoft line is that UWP apps run on any device that supports Windows 10 or above, including Windows 10/11, Windows 10/11 Mobile, Xbox One, and Hololens. You can also connect your app to external devices (see https://docs.microsoft.com/en-us/windows/uwp/devices-sensors/ for details). However, this is only part of the story. By using Xamarin (https://dotnet.microsoft.com/apps/xamarin) add-ins for Visual Studio 2022, it’s possible to expand UWP development to these platforms:
- iOS (
https://www.apple.com/ios/ios-15/) - Android (
https://www.android.com/) - tvOS (
https://developer.apple.com/tvos/) - watchOS (
https://www.apple.com/watchos/watchos-8/) - macOS (
https://www.apple.com/macos/)
With Xamarin support, you suddenly have access to a host of extremely popular devices that would be inconceivable for most Windows developers to even think about writing apps to support. Even though most of the products in this list are from Apple, don’t discount the Android support. As described in Android Application Development All-in-One For Dummies, 3rd Edition, by Barry Burd and John Paul Mueller (Wiley), Android appears on a huge number of device types, including IoT devices like smart thermostats, watches, and even cars.
Whether you can actually make a UWP app work on your car is another story. (Anyone who has come up with a unique UWP app for something like a car should contact me at [email protected].) Android Developer Studio (https://developer.android.com/studio) comes with templates that Xamarin (https://docs.microsoft.com/en-us/xamarin/android/) doesn’t currently appear to replicate. However, Xamarin most definitely supports Android wearables (https://docs.microsoft.com/en-us/xamarin/android/wear/get-started/intro-to-wear).
So, trying to pin down a precise list of devices that UWP supports is a little difficult. The answer to the question of support comes down to a mix of tools you’re willing to use and the requirements of the device that you want to support. In addition, your coding skill will have a great deal to do with the success you see because UWP development in these other areas definitely requires thinking outside the box.
Creating Your Own UWP App
It’s time to try your hand at UWP development. The following sections take you through the basic development process that you follow when working with UWP. Part of this process is setting up Developer Mode, which you have to do only once for each development machine you use.
Configuring Developer Mode
You can’t create any sort of UWP project without setting Developer Mode on. The moment you finish a UWP project setup, you see the dialog box shown in Figure 5-1 if you haven’t set up Developer Mode already. Consequently, this is one of the few sections in the minibook you absolutely can’t skip unless you choose not to develop UWP apps. The following sections tell you more about Developer Mode.
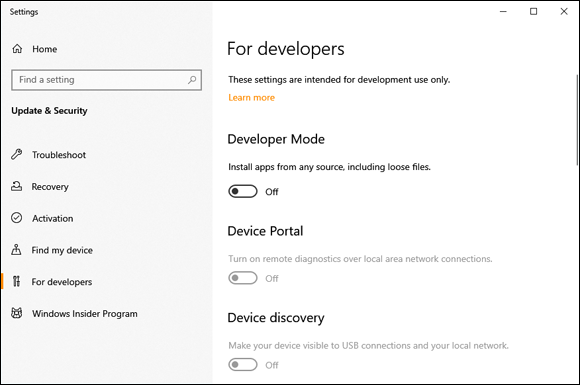
FIGURE 5-1: You can’t create a UWP app without setting Developer Mode on.
Defining Developer Mode
Developer Mode provides the means for developers to gain additional access to their system’s functionality when creating apps that could eventually end up in the Microsoft Store or on another device, such as a tablet. Microsoft actively discourages anyone from enabling Developer Mode (https://docs.microsoft.com/windows/apps/get-started/enable-your-device-for-development) unless actually needed for development purposes. For example, you wouldn’t enable Developer Mode to fix your system.
When creating certain kinds of applications for Windows 8, a developer had to apply for a developer license from Microsoft, https://docs.microsoft.com/en-us/previous-versions/windows/apps/hh974578(v=win.10), which could turn into a messy and annoying process at times (https://superuser.com/questions/496104/windows-8-developer-license). So, part of the reason for Developer Mode in Windows 10 and above is to avoid the whole licensing issue.
The reason for a development license and now Developer Mode is that developers need to work with apps that aren’t necessarily signed or from an official source. Apps from an official source are vetted to ensure that they behave properly and don’t represent a security risk, so allowing unsigned apps on a system presents the potential for damaging the system and its data. As part of granting this right, the system also enables Secure Shell (SSH) support (https://www.ssh.com/academy/ssh) for your system, so now there is the potential for outside access. When you turn Developer Mode on, you see the dialog box shown in Figure 5-2, warning you of the possible implications. You need to click Yes to complete the process.
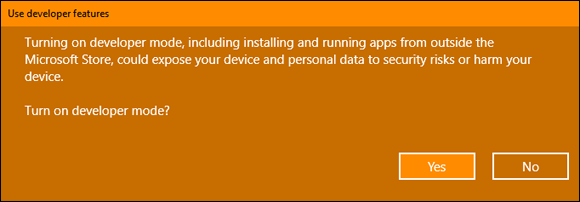
FIGURE 5-2: Microsoft warns you about the possible problems in enabling Developer Mode.
 This process of working with unsigned apps from unofficial sources is called sideloading (
https://docs.microsoft.com/windows/application-management/sideload-apps-in-windows-10). An individual user might allow sideloading by default, but larger organizations could disallow sideloading through various policies. If you experience problems during the development process with sideloading apps, type Group Policy in the search area and press Enter. You see the Local Group Policy Editor, shown in Figure 5-3, which lets you drill down into the Computer ConfigurationAdministrative TemplatesWindows ComponentsApp Package Deployment folder. Setting these policies to Enabled should fix the problem for you. However, remember that you pay a price in security by making these changes because now your system will likely accept any application from any source with your permission.
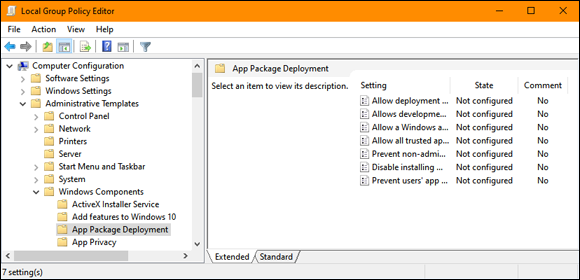
FIGURE 5-3: Make sure that local group policies don't get in the way of sideloading apps.
Locating Developer Mode in the Settings app
You may need to change the developer settings from time to time. However, as long as you have Developer Mode set to On, Visual Studio 2022 will never display the Settings app again. So, you need to look for it manually. To perform this task, type Developer Settings in the search field on the Windows taskbar, and you see the results shown in Figure 5-4. Select the Developer Settings entry that appears at the top to display the screen shown in Figure 5-1.
Working with the device settings
Besides making it possible to sideload apps, you can also configure Developer Mode to allow other activities that have security implications as well. The following list describes these features:
- Windows Device Portal: The Windows Device Portal (WDP) (
https://docs.microsoft.com/windows/uwp/debug-test-perf/device-portal) is a web server that- Lets you configure and manage the settings for the device over a network or USB connection
- Provides a localhost option for device configuration purposes
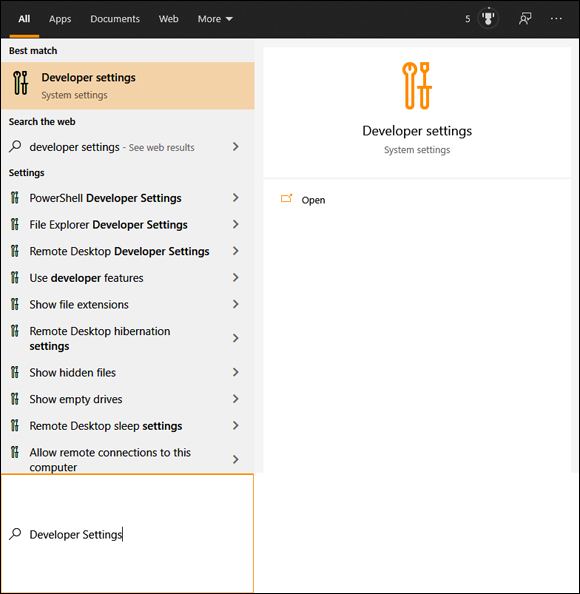
FIGURE 5-4: Using the search field on the taskbar makes it easy to find the Developer Settings.
- Enables troubleshooting of your apps using supplied diagnostic tools
- Allows viewing of the real-time performance of your Windows device
- Device Discovery: This feature allows device discovery and enables SSH support. Before you can interact with another device, you have to discover it programmatically (
https://docs.microsoft.com/windows/uwp/launch-resume/discover-remote-devices). Fortunately, you have a number of means of discovering devices through various discovery techniques and filtering methodologies.
The For Developers page of the Settings app contains a considerable number of other settings that you can review at https://docs.microsoft.com/windows/apps/get-started/developer-mode-features-and-debugging. The main focus of all these settings is that you gain a certain level of access in exchange for reduced security. As a consequence of these changes, your system may also become less reliable because the software that gets installed isn’t vetted by anyone, for the most part. As part of configuring your system to use Developer Mode, you have to consider the ramifications of each settings change on system performance as well.
Making File Explorer friendlier to developers
Most people are unaware of the vast number of settings available to control the appearance and functionality of File Explorer. Many of these settings could make the developer’s life easier. The Settings app shows an overview of settings that can affect the developer (see Figure 5-5).
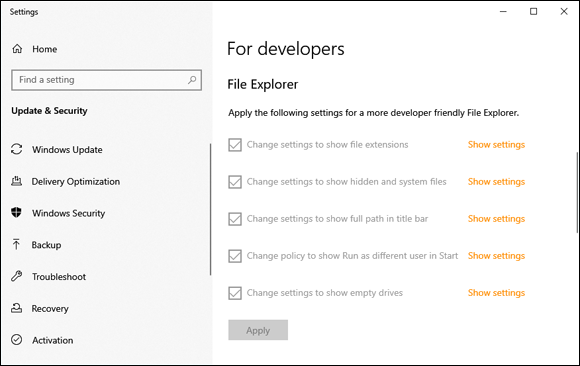
FIGURE 5-5: The Settings app provides an overview of developer-related settings for File Explorer.
These settings can appear in a variety of places in Windows, which is why it’s so convenient to have them in one place. However, you may find that these settings don’t quite provide everything you need, so you can click Show Settings to the right of the item you want to change, such as Change Policy to Show “Run as Different User” in Start (Figure 5-5), and see the details. In this case, you see a Microsoft Management Console (MMC) like the one shown in Figure 5-6 that allows you significantly more control over how File Explorer appears and works.
Notice that the Show “Run as Different User” Command on Start option is Enabled. Most of the settings appear as Not Configured, which means they use the Windows default setting. A setting is in an absolute condition only if you configure it.
Employing Remote Desktop
The Remote Desktop settings allow for running an application on one system and debugging it (among other things) on another. However, there is another group of settings that present a higher security risk. It’s the kind of settings group you’d use for two systems that aren’t connected to the Internet. As shown in Figure 5-7, the default setup does allow for connections with Remote Desktop with Network Level Authentication (because the check mark is grayed out). However, it doesn’t allow direct connections from other computers (because the check mark is filled in). If you click Apply, the recommended setting is applied. You can also deselect the check mark by clicking it, and the Apply button will become disabled.
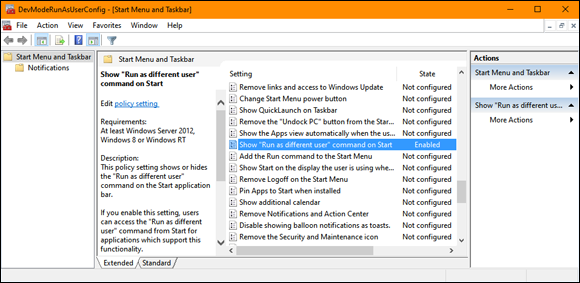
FIGURE 5-6: The actual settings for Developer Mode appear in a number of places, such as MMC.
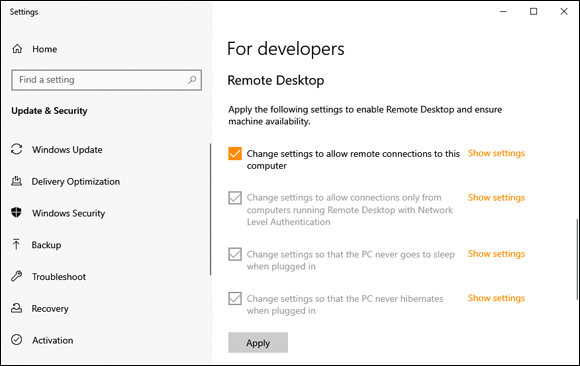
FIGURE 5-7: Use the Remote Desktop settings with care.
Using PowerShell
The PowerShell setting changes the execution policy to allow unsigned scripts to run locally. Remote scripts would still require that you sign them. So, if you click Apply in this For Developers area, you can run your local PowerShell scripts during development without problem.
 You might find it necessary to run both local and remote scripts without signing them when you’re creating certain types of apps within a remote environment. When that’s the case, you need to open a PowerShell prompt as an administrator (you can’t access the required registry key otherwise), type Set-ExecutionPolicy -ExecutionPolicy Unrestricted, and press Enter.
If you want to know more about the Set-ExecutionPolicy command, type help Set-ExecutionPolicy and press Enter. If you want to get detailed information with examples, check out the Microsoft site at https://go.microsoft.com/fwlink/?LinkID=113394. Note also that you type Get-ExecutionPolicy and press Enter to obtain the current execution policy as an administrator.
Defining the project
The process for creating a UWP project is much the same as for any other Visual Studio 2022 project, but with a few differences. The following steps help you through these differences. To create a UWP project:
Choose Create a New Project in the Start Page.
You see the usual list of recent project templates in the left pane and a (optionally) filtered list of project templates in the right pane.
Choose C#, Windows, and UWP in the three drop-down list boxes at the top of the right pane.
The project template list in the right pane changes to show the UWP templates (see Figure 5-8). Most of these templates have corresponding templates for other kinds of development purposes. For example, you can create a Class Library in the Windows Forms and WPF environments. These newer UWP templates serve the same purpose as the older templates do, but with a UWP twist.
Select the Blank App (Universal Windows) template and click Next.
You see the Configure Your New Project page. It contains the Project Name and Location fields that you’ve used in the past to create other projects.
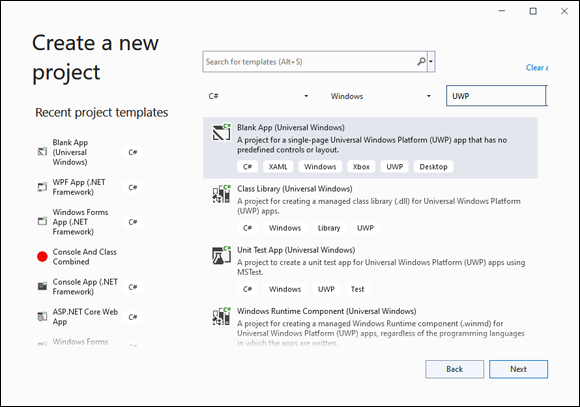
FIGURE 5-8: A listing of UWP templates.
Type MyUWPCalc in the Project Name field, provide a location for your project, select the Place Solution and Project in the Same Directory box, and then click Create.
So far, there is nothing different in this step from any other project you have created. However, things change when you click Create. Now you see the New Universal Windows Platform Project dialog box, shown in Figure 5-9.
You use this dialog box to determine the target version for your app, the one that you prefer that users have, and the minimum version for your app, the one that is less acceptable but still usable. If someone who doesn’t have a version of Windows within this range tries to download and install your app, the Windows Store will refuse to allow it. This step is where the process of controlling the life cycle of your app starts. You get to choose which versions of Windows are acceptable. Figure 5-9 shows the default range, but you should look at the other versions for both drop-down list boxes (Target Version and Minimum Version).
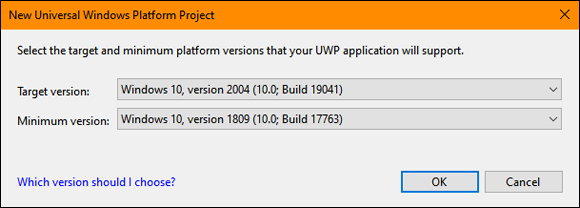
FIGURE 5-9: A UWP project requires some additional configuration.
Accept the default Windows version range values by clicking OK.
Visual Studio creates the project for you. The center pane shows the process used to develop and publish a UWP application (see Figure 5-10). The links below each step in the process provide you with additional details. Remember that you may not follow all the steps in this process and that the Microsoft-supplied links tend to support large application development. This chapter shows you something simpler, so don’t get overwhelmed!
 You may not see the content of Figure 5-10 if your development system lacks an Internet connection. Visual Studio 2022 always assumes that you have a live connection.
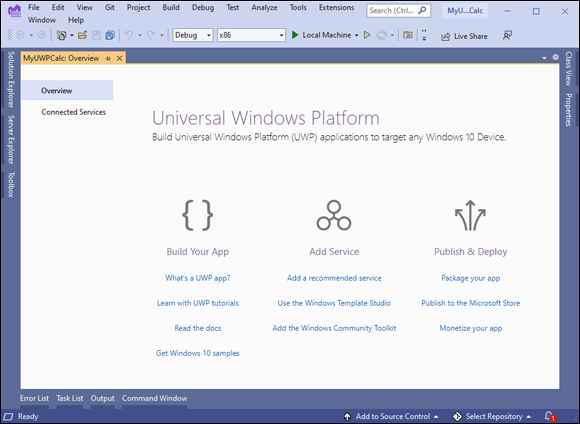
FIGURE 5-10: After completing the project wizard, you see a list of development steps.
Creating an interface
Use the same techniques you use for WPF when crafting your UWP application. You start with the MainPage.xaml file XAML, as shown here:
<Grid>
    <Grid.Resources>
        <Style TargetType="TextBlock">
            <Setter Property="FontSize" Value="14"/>
            <Setter Property="FontFamily" Value="Arial"/>
        </Style>
    </Grid.Resources>
    <Grid.RowDefinitions>
        <RowDefinition Height="50"/>
        <RowDefinition Height="50"/>
        <RowDefinition Height="*"/>
    </Grid.RowDefinitions>
    <StackPanel Orientation="Horizontal" Grid.Row="0">
        <TextBlock Text="Input: " Height="40" Width="150"/>
        <TextBox x:Name="Input" Text="0" Height="40" Width="200"/>
    </StackPanel>
    <StackPanel Orientation="Horizontal" Grid.Row="1">
        <TextBlock Text="Result: " Height="40" Width="150"/>
        <TextBox x:Name="Result" Text="0" Height="40" Width="200"
                 IsReadOnly="True"/>
    </StackPanel>
    <StackPanel Orientation="Horizontal" Grid.Row="2"
                VerticalAlignment="Top" HorizontalAlignment="Center">
        <Border BorderBrush="Black" BorderThickness="2" Padding="2">
            <Button x:Name="Add" Content="+" Click="DoMath"/>
        </Border>
        <Border BorderBrush="Black" BorderThickness="2" Padding="2">
            <Button x:Name="Sub" Content="-" Click="DoMath"/>
        </Border>
        <Border BorderBrush="Black" BorderThickness="2" Padding="2">
            <Button x:Name="Mul" Content="*" Click="DoMath"/>
        </Border>
        <Border BorderBrush="Black" BorderThickness="2" Padding="2">
            <Button x:Name="Div" Content="/" Click="DoMath"/>
        </Border>
        <Border BorderBrush="Red" BorderThickness="2" Padding="2">
            <Button x:Name="Clr" Content="X" Click="DoMath"/>
        </Border>
    </StackPanel>
</Grid>
This example sets a few more of the resources for the app than previous examples in the book do. For example, it shows how to configure the FontSize and FontFamily so that your app has a specific appearance, and so that you can ensure that the text is readable for your target audience.
As with a WPF application, you configure the UIElements by combining various containers. This app uses a <Grid> combined with a number of <StackPanel> containers. The input and output require two rows, while the controls consume a third. The result is a very flexible interface that can adapt to a number of format factors without giving up an organized appearance.
This example uses a <Border> around each <Button> to provide a nicer appearance. The effect isn't the same as adding the BorderBrush, BorderThickness, and Padding attributes directly to a <Button>. When using a <Border>, the <Button> remains the same size, and the surrounding border is placed around it. Otherwise, what you end up with is a really tiny button that your users will have to squint to see, greatly increasing the cost for glasses in your organization. Figure 5-11 shows how the UI looks.
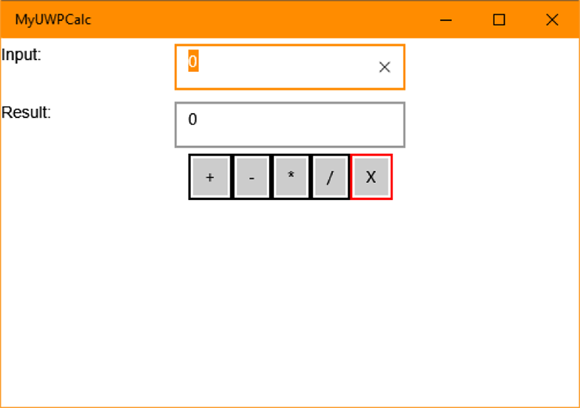
FIGURE 5-11: The app interface is very flexible and should work well for most devices.
The appearance in Figure 5-11 can be deceiving because you're getting a desktop view. The way to overcome this issue is to select a device type in the designer from the drop-down list box at the top. The default is a 13.5” Surface Book (3000 x 2000). The designer shows you how this version of the app looks for that device, as shown in Figure 5-12.
However, you might also need to support the app on a 6” Phone (1920 x 1080) format, so you can select that option from the drop-down list box. (It’s also possible to switch between landscape and portrait modes.) Figure 5-13 shows the result of selecting that option using precisely the same code.
Note that the designer supports a zoom feature that defaults to showing the entire display on the select device. To actually see what you’re doing in many cases, you need to change the zoom setting in the lower-left corner of the designer (set to 17.56% in Figure 5-13).
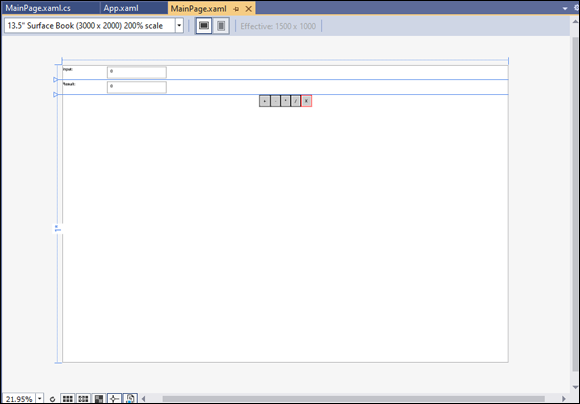
FIGURE 5-12: The example app shown in a 13.5” Surface Book (3000 x 2000) form.
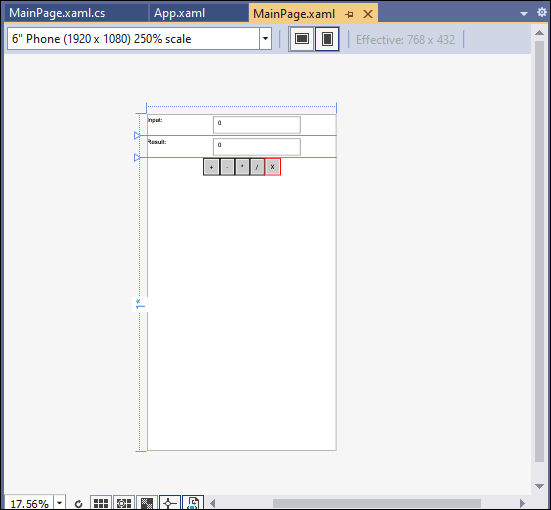
FIGURE 5-13: The example app shown in a 6” Phone (1920 x 1080) form.
Adding some background code
The app has a UI, but isn’t functional yet. One of the features of this app is to highlight the input value, which defaults to 0, so that the user merely has to type a new value. The following code selects the input value to make this happen when the app first starts:
public MainPage()
{
    this.InitializeComponent();

    // Set the input up to allow easy entry.
    Input.SelectAll();
    Input.Focus(FocusState.Keyboard);

}
Notice that you must use SelectAll() to select the 0, and then give the UIElement the Focus() using a two-step process. There are a lot of examples online that show calling Focus() by itself (which displays an error), but you must provide Focus() with a specific kind of state to use, which is FocusState.Keyboard in this case. The other common kind of focus for an app is FocusState.Pointer, which changes the focus of the mouse, rather than the keyboard.
The app uses a single handler called DoMath() to address all the buttons. The following code shows how to create this method:
private void DoMath(object sender, RoutedEventArgs e)
{
    // Obtain the current values.
    Double NewValue = 0;
    Double.TryParse(Input.Text, out NewValue);
    Double ExistingValue = 0;
    Double.TryParse(Result.Text, out ExistingValue);

    // Perform a task based on which button is pressed.
    switch (((Button)sender).Name)
    {
        case "Add":
            ExistingValue += NewValue;
            break;
        case "Sub":
            ExistingValue -= NewValue;
            break;
        case "Mul":
            ExistingValue *= NewValue;
            break;
        case "Div":
            ExistingValue /= NewValue;
            break;
        case "Clr":
            ExistingValue = 0;
            break;
    }

    // Output the result.
    Result.Text = ExistingValue.ToString();

    // Set the input up for the next entry.
    Input.Text = "0";
    Input.SelectAll();
    Input.Focus(FocusState.Keyboard);
}
The code begins by obtaining the current values of the Input and Result UIElements as Double values. The use of Double.TryParse() means that the user can enter any non-numeric value and not cause an app crash. Both NewValue and ExistingValue will contain a useful number or 0, depending on the input.
The next step is to determine which Button the user clicked and then act upon it. To make this happen, you must cast sender as a Button, and then obtain the Name property from it, as shown in the code. The code shows how to perform the appropriate task afterward.
Finally, the code outputs the result to screen. It then sets up Input to receive the next value from the user.
Choosing a test device
When working with a UWP app, you have multiple options for testing. The Run button sports the drop-down list shown in Figure 5-14, in which you can choose the device you want to use for testing purposes. Here are the options you have:
- Local Machine: This is the default option that produces a window similar to that shown in Figure 5-11. You use this option to create your application, test it for functionality, and work out any bugs before deploying it elsewhere.
- Remote Machine: You can deploy the app to another machine that has a network connection to your local machine. To make this work, you'll need to install Remote Tools for Visual Studio 2022 (
https://visualstudio.microsoft.com/vs/preview/) and ensure that the remote device allows Developer Mode setups. For example, when working with an Android device, you must specifically configure the device for Developer Mode before any sort of remote activity can happen. - Device: This option specifically applies to devices that you connect to your system through a USB port. As with the Remote Machine option, you need to have Remote Tools for Visual Studio 2022 installed on your local machine, and the device has to have Developer Mode enabled.
Download New Emulators: This option takes you to a website where you can download an emulator to use in place of a physically connected device.
All the emulators that are available as of this writing are for Windows 8, and they don’t work on Windows 10 and above for many people. The message thread at https://stackoverflow.com/questions/37209666/windows-phone-8-8-1-emulator-not-working-after-windows-10-upgradetells you more about this issue. The bottom line is that you need to ensure that your emulator will work with Windows 10/11 and that you have it configured correctly.
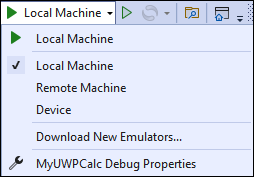
FIGURE 5-14: The Run button includes options for alternative deployments.
Working with .NET Core Applications
Most of the applications in this book rely on the .NET Framework 4.7.2, which supports Windows and only Windows. A .NET Core application is one that supports Linux, macOS, and Windows through various means. The concept of creating the application is the same, but the setup is slightly different and the resulting executables are different as well. The easiest way to see the .NET Core templates included with Visual Studio 2022 is to select C#, All Platforms, and All Project Types, then type .NET Core in the search box. You see a very long list of available .NET Core templates, as shown in Figure 5-15.
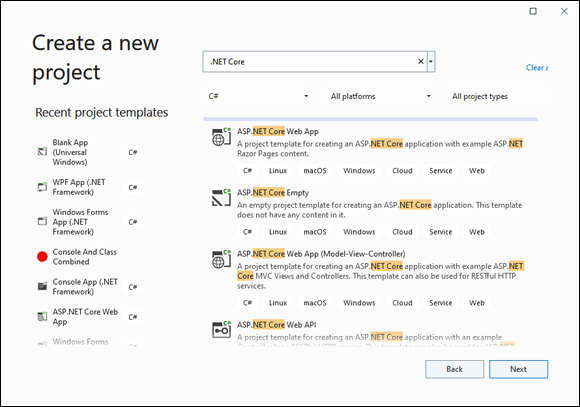
FIGURE 5-15: Locating the .NET Core templates is made easier using a search.
As you look through the list, you find some familiar entries, such as Console Application and Class Library. The output is the same in this case: a .dll file. Many of the templates have something to do with web development, a topic discussed in Book 6. Missing from this list is anything with a GUI similar to that found for a Windows Forms, WPF, or even a UWP application. Here, in a nutshell, is when you should use .NET Core:
- There is a cross-platform compatibility need that doesn’t rely on a GUI.
- The application relies on microservices, Docker containers, or both.
- An application needs to provide high performance and scalability.
- There is a requirement to run multiple .NET versions on the same server.
- The application relies heavily on a command-line interface to meet administrative needs.
- A particular new C# language feature isn’t found in the .NET Framework 4.7.2 (as demonstrated several times in this book).
You want to continue using the .NET Framework 4.7.2 for other needs, which include:
- The application runs exclusively on Windows.
- A desktop GUI is involved.
- The application uses Windows services to perform tasks.
- The application relies on technologies that aren’t part of the .NET Core.
- The application currently uses an older version of the .NET Framework 4.7.2.
- At least some application tasks require the use of a third-party library that requires the .NET Framework.
- The application deploys to a cloud service, such as Azure App Service, that doesn’t support the .NET Core.