
Chapter 4
Enhancing Your Security
IN THIS CHAPTER
![]() Encrypting your PC with BitLocker
Encrypting your PC with BitLocker
![]() Keeping on top of all those passwords
Keeping on top of all those passwords
![]() Getting a second opinion about the malware on your computer
Getting a second opinion about the malware on your computer
![]() Setting up VPN connections
Setting up VPN connections
In Chapter 3 of this minibook, I talk about built-in Windows security programs available to every Windows 11 owner. In this chapter, I continue with the adventure of securing your PC and start by presenting BitLocker. Unfortunately, this encryption tool is available only for Windows 11 Pro, so Home users are out of luck.
I continue with helping you manage your passwords online. Considering how many accounts we have all over the internet, having a system in place to manage them for us is vital to protecting our security and privacy. Many password managers are available, but I present two services that I like.
Then, I discuss a bit more about handling infections. Your device might get an infection that even Windows Security (and Microsoft Defender Offline) can’t handle. Usually it’s because you installed a program you didn’t research. If you get hit bad, there’s one place to turn. Malwarebytes, a combination of software and a very competent website, can crack just about any infection.
Lastly, if you want to connect to a website and make sure nobody can snoop on your connection — particularly important if you access financial sites from public Wi-Fi networks, like in a coffee shop or an airport — you should figure out how to use a VPN. Windows 11 can help you set up a VPN connection with ease, and there are some cool VPN services you can try. Some services have a strict no-logs policy, which is useful when a dodgy government or government agency tries to spy on your activities.
Encrypting Your PC with BitLocker
BitLocker encrypts an entire drive. Unlike Encrypting File System (see the nearby “Encrypting File System [EFS]” sidebar), you have to encrypt full drives (or, more accurately, volumes) or nothing at all. BitLocker runs underneath Windows: It starts before Windows starts. The Windows partition on a BitLocker-protected drive is completely encrypted. Even if thieves get their hands on your laptop or hard drive, they can’t view anything on it — not even your settings or system files.
BitLocker To Go is similar to BitLocker, except it works on USB drives like flash memory sticks and external hard disks.
BitLocker is part of Windows 11 Pro. It is not part of the Home edition of Windows 11. If you have Windows 11 and want to get BitLocker, you must upgrade to Windows 11 Pro. I talk about the various versions and editions of Windows 11 in Book 1, Chapter 3. Some people feel their information is sufficiently valuable that BitLocker, all by itself, justifies paying the extra bucks for Windows 11 Pro.
Here’s how to encrypt your hard drive with BitLocker:
Click or tap the search icon (magnifying glass) and type bitlocker. Click or tap Manage BitLocker.
The BitLocker Drive Encryption window appears, as shown in Figure 4-1.
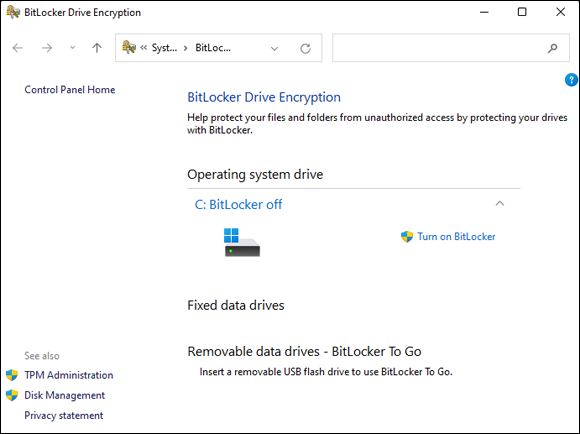
FIGURE 4-1: Manage everything from the BitLocker Drive Encryption window.
Next to the drive (volume) you want to encrypt, click or tap Turn on BitLocker.
The BitLocker Drive Encryption setup wizard appears, and Windows 11 checks whether it meets the requirements for running BitLocker.
 If your PC doesn’t have a built-in Trusted Platform Module system, you see a message that says Your administrator must set the ‘Allow BitLocker without a compatible TPM’ option. The only easy way to solve that problem is to run the Local Group Policy Editor program, gpedit.msc. If you need advice, check out this tutorial:
 www.digitalcitizen.life/how-enable-bitlocker-without-tpm-chip-windows-7-windows-8/.If everything is well, you're asked how you want to unlock your drive at startup. Using a password is the most convenient method.
Choose Enter a Password, type the password you want to use, confirm it, and click or tap Next.
The password must be at least eight characters long and must include uppercase and lowercase letters, numbers, symbols, and spaces.
After encrypting your PC with BitLocker, the recovery key is the only way to access your files when you have problems unlocking your PC. See Figure 4-2. You have options to save the key to your Microsoft account (on Microsoft’s servers in the cloud), to save the key to a file on your computer or USB flash drive, or to print the recovery key.
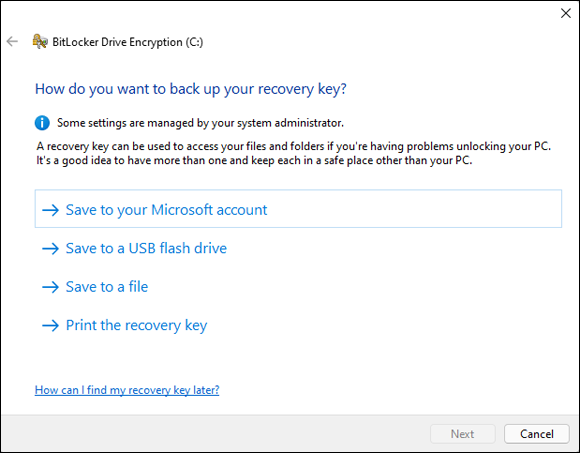
FIGURE 4-2: Choose how you want to save the BitLocker recovery key.
- Choose how you want to back up your recovery key, and then click or tap Next.
When asked to choose between encrypting used disk space only or the entire drive, make your choice and click or tap Next.
If you want the encryption to finish faster, choose to encrypt only the used disk space. Encrypting the entire drive may take many hours.
Choose which encryption mode to use, and then click or tap Next.
The new encryption mode, which I highly recommend, uses a more secure type of encryption.
Select the option to Run BitLocker System Check and click or tap Continue (instead of Start Encryption).
The system check ensures that BitLocker can read the recovery and encryption keys correctly before encrypting the drive, which is a great idea.
When asked to restart your computer, close all your open apps and files, and then click or tap Restart Now.
When you log back into Windows 11, BitLocker encrypts your drive automatically, in the background. You can continue using your PC as usual. The BitLocker icon appears in the system tray, on the right side of the taskbar. If you click or tap it, you see the progress of the encryption process.
 In case you were wondering, yes, you can use BitLocker on Storage Spaces too. BitLocker encrypts the entire Storage Space.
Managing Your Passwords
You can find no end of advice on creating strong passwords, using clever tricks, stats, mnemonics, and such. But all too frequently people tend to reuse passwords on what they think are inconsequential sites. It’s a big mistake. If somebody hacks into that small-time site and steals your password — an event that’s frighteningly common these days — any other place where you’ve used that same password is immediately vulnerable.
 In the past few years, there have been some spectacular examples of ultra-secure sites getting hacked because the hacker stole a username and password from an inconsequential site and then discovered that the same username and password opened the doors to a trove of top-secret — even politically sensitive — corporate email or customer bank account information. The usernames and passwords were stolen from seasoned security professionals and admins at sensitive sites. You’d think they’d know better.
Using password managers
I don’t know about you, but I have dozens of usernames and passwords that I use fairly regularly. There’s just no way I can remember them all. And my monitor isn’t big enough to handle all the yellow sticky notes they’d demand.
That’s where a password manager comes in. A password manager keeps track of all your online passwords. It can generate truly random passwords with the click of a button. Most of all, it remembers the username and password necessary to log in to a specific website.
Every time I go to www.ebay.com, for example, my password manager fills in my username and password. Amazon, too. Facebook. Twitter. My bank. Stock brokerage house. I have to remember the one password for the password manager, but after that, everything else gets filled in automatically. It’s a huge timesaver.
A password manager won’t log into Windows for you, and it won’t remember the passwords on documents or spreadsheets. But it does keep track of every online password and autocompletes the passwords you need with no hassle.
My recommendations
Many password management services are available, including ones built into web browsers such as Chrome, Edge, Opera, and Firefox. However, I like and trust two more than others.
The big difference between them? One was originally designed to run on a USB drive; the other has always been in the cloud, which is to say, on the internet:
- RoboForm initially could store passwords on your hard drive or on a USB drive. However, this capability has been retired from recent versions and now this service is based in the cloud, works with all major web browsers, and has simple tools for synchronizing passwords.
- Bitwarden, which stores passwords on its website, uses an encryption technique (AES-256) that guarantees your passwords won’t get stolen or cracked. One cool aspect is that it’s an open-source platform and its source code, features, and infrastructure security are vetted and improved by a global community.
Which one is better? It depends on how you use your computer.
If you always use the same computer, you may want the free plan offered by RoboForm. However, if you use many devices and you want password management on all, a solution like Bitwarden is better. Opinions run all over the place, but I prefer the interface of Bitwarden to that of RoboForm Everywhere. You should feel comfortable using either one.
Rockin’ RoboForm
The RoboForm app (www.roboform.com/) has all the features you need in a password manager. It manages your passwords with excellent recognition of websites, automatically filling in your login details. But it will also generate random passwords for you, if you like, and fill in forms on the web.
RoboForm stores all its data in AES-256 encrypted format too. If somebody steals your RoboForm database, you needn’t worry. Without the master key — which only you have — the entire database is gibberish.
RoboForm has versions for Windows, Mac, Linux, iPhone, iPad, and Android smartphones and tablets. There’s a free plan for one computer or device, and paid plans that cover all your devices. There’s even a family plan that helps save some money. You can also enjoy a 30-day trial version of RoboForm Everywhere, so that you can make an informed decision before buying. A yearly plan costs $23.88.
RoboForm can read the passwords from any web browser and migrate them over to your RoboForm account, as shown in Figure 4-3.
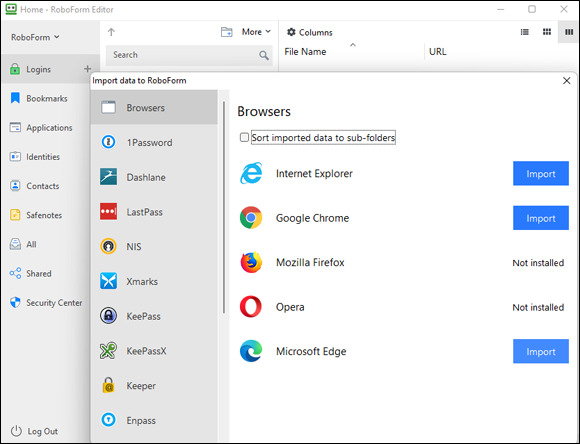
FIGURE 4-3: RoboForm is easy to use and can import passwords from all browsers.
Liking Bitwarden
Bitwarden (https://bitwarden.com/) stores everything in the cloud on its company servers. Like RoboForm, Bitwarden keeps track of your user IDs, passwords, automatic form-filling information (think name, address, phone, credit card number), and other settings, and offers them to you with a click.
Using Bitwarden can’t be simpler. Download and install it, and it’ll appear with a blue and white icon in the upper-right corner of your browser (see Figure 4-4).
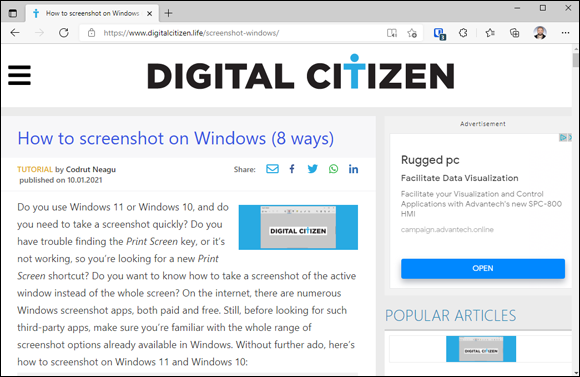
FIGURE 4-4: Bitwarden is on the job if you can see its icon in the upper-right corner.
You don’t really need to do anything. Bitwarden will prompt you for the master password when you start using your browser. If Bitwarden is turned off, its icon displays a red dot. Click or tap it, provide the master password, and the Bitwarden icon removes the red dot, a sign that it’s ready to roll.
When you go to a site that requires a username and password, if Bitwarden recognizes the site, it fills them both in for you. If it doesn’t recognize the site, you fill in the blanks and click, and Bitwarden remembers the credentials for the next time you surf this way.
Form filling works similarly.
You can maintain two (or more) separate usernames and passwords for any specific site — for example, if you log in to a banking site with two different accounts. If Bitwarden has more than one set of credentials stored for a specific site, it takes its best guess as to which one you want but then gives you the option of using one of the others. In Figure 4-4, I have three separate credentials for the site — that’s why the Bitwarden icon has a 3.
Any time you want to look at the usernames and passwords that Bitwarden has squirreled away, click or tap the Bitwarden icon. You have a chance to look at your Vault — which is your password database — or look up recently used passwords and much more. You can even keep encrypted notes to yourself.
 The way Bitwarden handles your data is clever: All your passwords are encrypted using AES-256. They’re encrypted and decrypted on your PC. Only you have the master password. So if the data is pilfered off the Bitwarden servers or somebody is sniffing your online communication, all the interlopers get is a bunch of useless bits.
You can also store secure notes, form-filling information such as your credit card information and address, and other data in Bitwarden.
One last cool bit is that, unlike RoboForm, Bitwarden hasn’t phased out its portable USB app. On its download page, you can still find a Portable App for Flash Drives that you can use.
Bitwarden is free for individual use, and it works on all major PC and mobile platforms. If you want some advanced features, such as sharing passwords with others, two-step authentication, or priority support, you need the Premium edition, which costs $10 a year.
Fighting Back at Tough Scumware
Windows Security works great. But sometimes you need a second opinion. Sometimes you get hit with an infection that’s so nasty, absolutely nothing will clean it up.
That’s when you want to check out Malwarebytes (www.malwarebytes.org/).
Malwarebytes is a last resort. If your system is running normally, there’s no reason to bother with it. And if your system is really messed up, you can probably fix things with a full scan in Windows Security (see Chapter 3 in this minibook) or Microsoft Defender Offline — or even a System Refresh (see Book 8, Chapter 2). If you’ve tried all that and still can’t get your machine to work properly, it's time to haul out the big guns.
Malwarebytes has long been a great choice for going after absolutely intractable infections. Viruses, Trojans, spyware, you name it, Malwarebytes can probably get rid of it.
When you’ve run Windows Security, Microsoft Defender Offline, and Refresh, but you still can’t get rid of the beast that’s plaguing your system, do the following:
- Go to the Malwarebytes support forum at
https://forums.malwarebytes.com/, see whether anyone has the same problem, and if so, log in and talk to that person. If that doesn’t work, go to the Malwarebytes Anti-Malware Free site at
www.malwarebytes.com/mwb-download, and install the free version of its antimalware package.During the installation phase, Malwarebytes disables parts of Windows Security. Not to worry. You don’t want to run two antivirus packages at the same time.
- Run Malwarebytes:
- If it doesn’t get rid of your problem, post your results on the support forum. Start at
https://forums.malwarebytes.com/topic/9573-im-infected-what-do-i-do-now/, and follow the instructions precisely. - If Malwarebytes fixes your problem, maybe pay for its Premium package. It’s only $3.33 /month (when purchasing an annual plan), and you’re helping to keep the Malwarebytes effort solvent.
- If it doesn’t get rid of your problem, post your results on the support forum. Start at
Securing Your Communication with VPN
If you are serious about protecting your web surfing from prying eyes and have ever used a public, unencrypted Wi-Fi connection, the onus is on you to lock down your connections. If you connect to a wireless access point that uses WPA2 or WPA3 encryption, you’re protected. But if you’re using a public hotspot with no password required, you’re definitely at risk. And the best way I know to protect against surreptitious sniffing — and a dozen other problems — involves a technology known as Virtual Private Networking, or VPN.
What’s a VPN?
You may have heard of VPN but figured it was just too difficult for regular Windows users to hook together. Big companies have VPN, but they also have experts to keep them running. Ends up that we little guys have good choices now, too.
VPN started as a way for big companies to securely connect PCs over the regular phone network. It used to take lots of specialty hardware, but if you worked for a bank and had to get into the bank’s main computers from a laptop in another country, VPN was the only choice. Times have changed. Now you can get free or low-cost VPN connections that don’t require any special hardware on your end, and they work surprisingly well.
When you set up a VPN connection with a server, you create a secure tunnel between your PC and the server. The tunnel encrypts all the data flowing between your PC and the server, provides integrity checks so no data gets scrambled, and continuously looks to make sure no other computer has taken over the connection.
VPNs prevent sidejacking because the connection between your PC and the wireless access point runs inside the tunnel: Firesheep or any other sniffer can see the data going by, but can’t decipher what it means. VPNs do much more than simply foil Firesheep attacks: They provide complete end-to-end security, so nobody — not even your internet service provider — can snoop on your communication, or look to see if you’re using a service such as BitTorrent. If you’re traveling in a country subject to governmental eavesdropping, VPN is necessary. However, keep in mind that some countries, such as Russia, China, and Turkey, have banned people from using state-unapproved VPN services.
With a VPN, data goes into the tunnel from your PC, out of the tunnel at the VPN server, then to whatever location you’re accessing, back into the VPN server, and out at your PC. A remarkably effective cloaking device hides your data everywhere in between. The people running the VPN server can match you up with your data stream, but nobody else can.
Setting up a VPN in Windows 11
You can set up your wireless router to work as a VPN server and connect to it from anywhere on the internet so that you remain protected. Or maybe your workplace has set up a VPN server for you to connect to directly from Windows, so it’s easier to access the company’s apps and internal websites. No matter the situation you’re in, all you need is the domain name or the IP address of the VPN server, a username, and a password, and you can connect to that VPN server directly from Windows.
Here’s how to add a VPN to Windows 11 and how to connect to it:
- Click or tap the Start icon and then the Settings icon (or press Windows+I).
In the Settings app, choose Network & Internet on the left, and then click or tap VPN on the right.
The VPN settings appear, as shown in Figure 4-5.
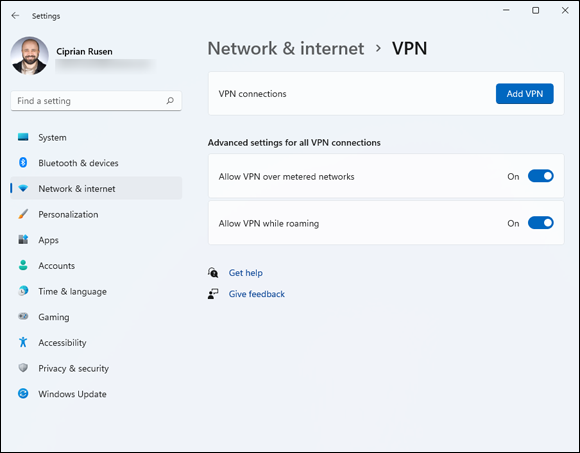
FIGURE 4-5: Windows 11 can manage VPN connections with ease.
Click or tap the Add VPN button.
The Add a VPN Connection dialog opens, as shown in Figure 4-6.
- Under VPN Provider, choose Windows (Built-In).
- Enter a descriptive name for your VPN connection.
- Type the IP address or the name of the VPN server (something like vpnserver.dummies.com).
- Choose the VPN type and then type the user name and password.
Don’t forget to check the box for “Remember My Sign-In Info” and click or tap Save.
The VPN connection is added below the Add VPN button.
Click or tap the Connect button next to the VPN connection.
If your internet connection and the VPN server are working, you should be connected in a matter of seconds.
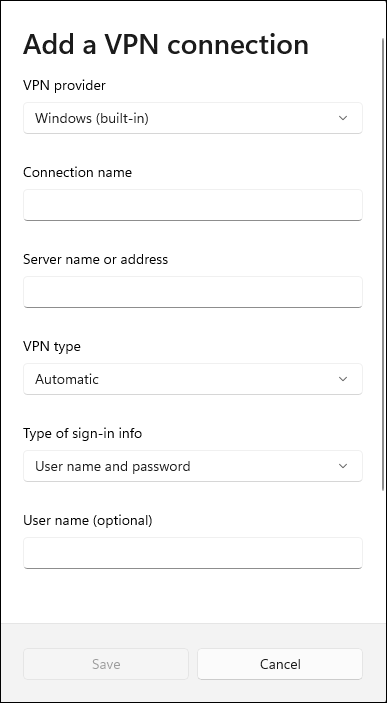
FIGURE 4-6: Add the details of your VPN connection.
Which paid VPN services should you consider?
If you want a VPN that offers useful features such as no logs of your activities, super-strong encryption, and the option to unlock services you don’t normally have access to (like watching Netflix and its entire USA portfolio, using your computer from UK, Italy, or some other country), consider the following paid services:
- NordVPN (
https://nordvpn.com/): This is one of the fastest and best-rated VPN services on the internet. It offers a strict no-logs policy, and easy-to-use VPN apps for all platforms, including Windows. - CyberGhost (
www.cyberghostvpn.com): Another fast service, CyberGhost also blocks ads while you browse the web. One aspect that makes it stand out from other VPN services is that it has the largest server network. See Figure 4-7. - Surfshark (
https://surfshark.com/): Alongside its no-logs policy and easy-to-use apps, it also includes an antivirus engine that protects you while connected to its VPN servers.
All these services have free trials, so you can try them out before subscribing. Also, if you don’t like the current price, subscribe to their e-mail newsletter. In a few weeks, you’re sure to receive an email with a discount offer. The competition is tough between VPN services, so discounts occur frequently.
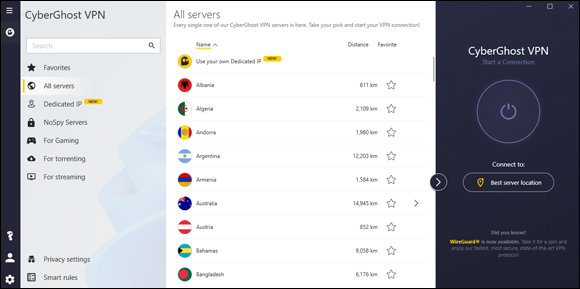
FIGURE 4-7: CyberGhost has an impressively lengthy list of servers.