
Chapter 20
Troubleshooting and Maintaining Your iPad
IN THIS CHAPTER
![]() Clean and protect your iPad
Clean and protect your iPad
![]() Fix a nonresponsive iPad
Fix a nonresponsive iPad
![]() Update the iOS software
Update the iOS software
![]() Get support
Get support
![]() Back up your iPad
Back up your iPad
iPads don’t grow on trees — they cost a pretty penny. That’s why you should learn how to take care of your iPad and troubleshoot any problems it might have so that you get the most out of it.
In this chapter, I provide some advice about the care and maintenance of your iPad, as well as tips about how to solve common problems, update iPad system software, and even reset the iPad if something goes seriously wrong. Finally, you get information about backing up your iPad settings and content using iCloud and the fingerprint reader feature, Touch ID.
Keep the iPad Screen Clean
If you’ve been playing with your iPad, you know (despite Apple’s claim that the iPad has a fingerprint-resistant screen) that it can be a fingerprint magnet. Here are some tips for cleaning your iPad screen:
- Use a dry, soft cloth. You can get most fingerprints off with a dry, soft cloth, such as the one you use to clean your eyeglasses or a cleaning tissue that’s lint-and chemical-free. Or try products used to clean lenses in labs, such as Kimwipes (which you can get from several major retailers, such as Amazon, Walmart, and office supply stores).
- Use a slightly dampened soft cloth. This may sound counter-intuitive to the previous tip, but to get the surface even cleaner, very (and I stress very) slightly dampen the soft cloth. Again, make sure that whatever cloth material you use is free of lint.
- Remove the cables. Turn off your iPad and unplug any cables from it before cleaning the screen with a moistened cloth, even a very slightly moistened one.
- Avoid too much moisture. Avoid getting too much moisture around the edges of the screen, where it can seep into the unit. It isn’t so much the glass surface you should worry about, as it is the Home button (if your iPad is equipped with one) and the speaker holes on the top and bottom of the iPad.
- Don’t use your fingers! That’s right, by using a stylus (or an Apple Pencil, if your iPad supports it) rather than your finger, you entirely avoid smearing oil from your skin or cheese from your pizza on the screen. Besides the Apple Pencil, a number of top-notch styluses are out there; just search Amazon for “iPad stylus,” and you’ll be greeted with a multitude of them, most of which are priced quite reasonably.
- Never use household cleaners. They can degrade the coating that keeps the iPad screen from absorbing oil from your fingers. Plus, you simply don’t need to use such cleaners because the screen cleans very easily with little or no moisture at all.
 Don't use premoistened lens-cleaning tissues to clean your iPad screen! Most brands of wipes contain alcohol, which can damage the screen's coating. Be sure that whatever cleaner you do use states that it’s compatible with your model iPad, because there are differences in screen technology between models.
Protect Your Gadget with a Case
Your screen isn’t the only element on the iPad that can be damaged, so consider getting a case for it so that you can carry it around the house or travel with it safely. Besides providing a bit of padding if you drop the device, a case makes the iPad less slippery in your hands, offering a better grip when working with it.
Several types of covers and cases are available, but be sure to get one that will fit your model of iPad because their dimensions and button placements may differ, and some models have slightly different thicknesses. There are differences between covers and cases:
- Covers tend to be more for decoration than overall protection. Although they do provide some minimal protection, they’re generally thin and not well-padded.
- Cases are more solid and protect most, if not all, of your iPad. They’re usually a bit bulky and provide more padding than covers.
Extend Your iPad’s Battery Life
The much-touted battery life of the iPad is a wonderful feature, but you can do some things to extend it even further. Here are a few tips to consider:
- Keep tabs on remaining battery life. You can view the amount of remaining battery life by looking at the Battery icon on the far-right end of the status bar, at the top of your screen.
- Keep iPadOS up to date. You can find out how in “Update the iPadOS Software,” later in this chapter.
Use standard accessories to charge your iPad most effectively. When connected to a recent-model Mac or Windows computer for charging, the iPad can slowly charge; however, the most effective way to charge your iPad is to plug it into a wall outlet using the Lightning-to-USB cable and the USB power adapter that come with your iPad.
A third-party charging cable (the cable, not the block) usually works just fine, but some are less reliable than others. If you use a third-party cable and notice that your iPad is taking longer than usual to charge, it’s a good idea to try another cable.- Use a case with an external battery pack. These cases are very handy when you’re traveling or unable to reach an electrical outlet easily. However, they’re also a bit bulky and can be cumbersome in smaller hands.
The fastest way to charge your iPad is to turn it off while charging it. If turning your iPad completely off doesn’t sound like the best idea for you, you can disable Wi-Fi or Bluetooth to facilitate a faster recharge.
Activate Airplane Mode to turn both Wi-Fi and Bluetooth off at the same time.- The Battery icon on the status bar indicates when the charging is complete.
Be careful not to use your iPad in ambient temperatures higher than 95° Farenheit (35° Celcius) because doing so may damage your battery. Damage of this kind may also not be covered under warranty. Charging in high temperatures may damage the battery even more. Although you can safely use your iPad within a wide range of temperatures, the optimal temps are between 62–72° Farenheit (16–22° Celcius).
If you notice that your battery won’t charge more than 80 percent, it could be getting too warm. Unplug the iPad from the charger and try again after it has cooled down a bit. If getting too warm becomes a recurring issue, be sure that you’re using a genuine Apple charger block and cable.
Your iPad battery is sealed in the unit, so you can’t replace it yourself the way you can with many laptops or other cellphones. If the battery is out of warranty, you have to fork over about $99 to have Apple install a new one. See the “Get Support” section, later in this chapter, to find out where to get a replacement battery.
Apple offers AppleCare+. For $129 for iPad Pro models or $69 for all other iPad models, you get an extra year of coverage (on top of the original one-year warranty that comes with your iPad, extending coverage to two years from the date of purchase), which even covers you if you drop or spill liquids on your iPad. Apple covers up to two incidents of accidental damage every 12 months with a $49 service fee, plus tax. You can purchase AppleCare+ when you buy your iPad or within 60 days of the date of purchase. Visit http://www.apple.com/support/products/ipad for more details.
What to Do with a Nonresponsive iPad
If your iPad goes dead on you, it’s most likely a power issue, so the first thing to do is to plug the Lightning-to-USB or Lightning-to-USB-C cable (depending on your iPad model) into the USB or USB-C power adapter, plug the power adapter into a wall outlet, plug the other end of the cable into your iPad, and charge the battery.
Another thing to try — if you believe that an app is hanging up the iPad — is to press the Sleep/Wake button for a couple of seconds and then press and hold the Home button. The app you were using should close.
You can always use the tried-and-true reboot procedure: On iPads with a Home button, you press the Top button until the power-off slider appears. For iPads without a Home button, press the Top button and either Volume button until the power-off slider appears. Drag the slider to the right to turn off your iPad. After a few moments, press the Top button to boot up the little guy again.
If the situation seems drastic and none of these ideas works, try to force restart your iPad. To do this, press and hold the Top button and the Home button at the same time (for iPads with a Home button) for at least ten seconds until the Apple logo appears onscreen. For iPads without a Home button, press the Volume Up button once, press the Volume Down button once, and then press and hold the Top button until the Apple logo appears.
If your iPad has this problem often, try closing out some active apps that may be running in the background and using up too much memory. To do this on iPads with a Home button, press the Home button twice, and then from the screen showing active apps, tap and drag an app upward to close it. For iPads without a Home button, swipe up from the bottom of the screen and pause momentarily until the active apps display. Then swipe an app upward to close it. Also check to see that you haven’t loaded up your iPad with too much content, such as videos, which could be slowing down its performance.
Update the iPadOS Software
Apple occasionally updates the iPad system software, known as iPadOS (formerly iOS), to fix problems or offer enhanced features. You should occasionally check for an updated version (say, every month or so). You can check by connecting your iPad to a recognized computer (that is, a computer that you’ve used to sign into your Apple account before), but it’s even easier to just update from your iPad Settings, though it can be just a tad slower:
- Tap Settings from the Home screen.
- Tap General and then tap Software Update (see Figure 20-1).
- A message tells you whether your software is up to date. If it’s not, tap Download and Install and follow the prompts to update to the latest iPadOS version.
If you’re having problems with your iPad, you can use the Reset feature to try to restore the natural balance. To do so, go to Settings ⇒ General ⇒ Transfer or Reset iPad ⇒ Reset, and then tap the function you want to reset when prompted.

Restore the Sound
My wife frequently has trouble with the sound on her iPad, and subsequently we’ve learned quite a bit about troubleshooting sound issues, enabling us to pass our knowledge on to you. Make sure that
You haven’t touched the volume control buttons on the side of your iPad.
Be sure not to touch the volume down button and inadvertently lower the sound to a point where you can’t hear it. However, pushing the volume buttons will have no effect if the iPad is sleeping.- The speaker isn’t covered up. No, really — it may be covered in a way that muffles the sound (perhaps by a case or stand).
- A headset isn’t plugged in. Sound doesn’t play over the speaker and the headset at the same time.
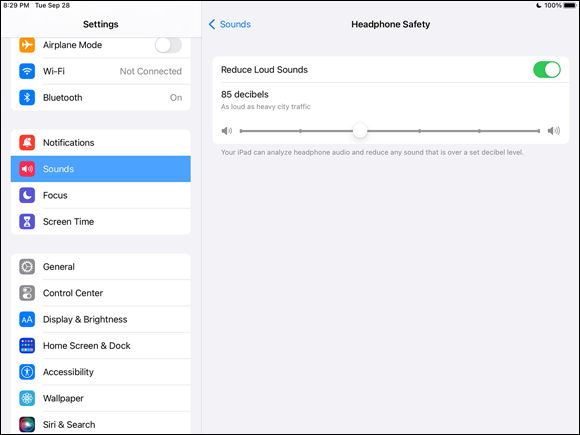
- The Reduce Loud Sounds option is set to On. You can set the decibel level limit for headphones to control how loudly audio can play through them. Tap Settings on the Home screen and then, on the screen that displays, tap Sounds, tap Reduce Loud Sounds, and then toggle the Reduce Loud Sounds switch to On (green). Use the slider that appears (shown in Figure 20-2) to set the decibel level limit.
When all else fails, reboot.
Get Support
Every new iPad comes with a year’s coverage for repair of the hardware and 90 days of free technical support. Apple is known for its high level of customer support, so if you’re stuck, I definitely recommend that you give them a try. Here are a few options for getting help that you can explore:
- The Apple Store: Go to your local Apple Store (if one’s nearby) to see what the folks there might know about your problem. Call first and make an appointment with the Genius Bar to be sure you get prompt service. To find your local Apple Store, visit
https://www.apple.com/retail/and enter your ZIP code. - The Apple support website: It’s at
http://support.apple.com/ipad. You can find online manuals, discussion forums, and downloads, and you can use the Apple Expert feature to contact a live support person by phone. - The iPad User Guide: You can download the free manual that is available through Apple Books from the Apple Books Store. Be sure to download the one for iPadOS! See Chapter 12 for more about Apple Books.
- The Apple battery replacement service: If you need repair or service for your battery, visit
http://www.apple.com/batteries/service-and-recyclingand scroll down to the iPad Owners section. Note that your warranty provides free battery replacement if the battery is defective during the warranty period. If you purchase the AppleCare+ service agreement, this is extended to two years.
Apple recommends that you have your iPad battery replaced only by an Apple Authorized Service Provider. Please don’t take this warning lightly; you don’t want to trust the inner workings of your iPad to just anyone who says they can work on it.
Back Up to iCloud
You used to be able to back up your iPad content using only iTunes on your Mac or PC, but since Apple’s introduction of iCloud, you can back up via a Wi-Fi network to your iCloud storage. You get 5GB of storage for free or you can pay for increased storage (a total of 50GB for 99 cents per month, 200GB for $2.99 per month, or 2TB for $9.99 per month).
You must have an iCloud account to back up to iCloud. If you don’t have an iCloud account, see Chapter 3 to find out more.
To perform a backup to iCloud:
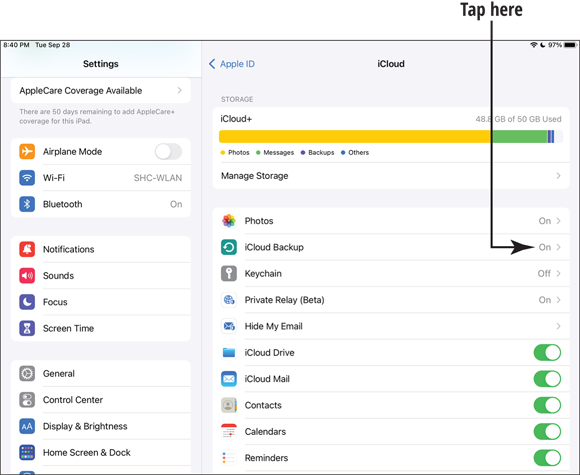
- Tap Settings from the Home screen and then tap your Apple ID at the top of the screen.
- Tap iCloud and then tap iCloud Backup (see Figure 20-3).
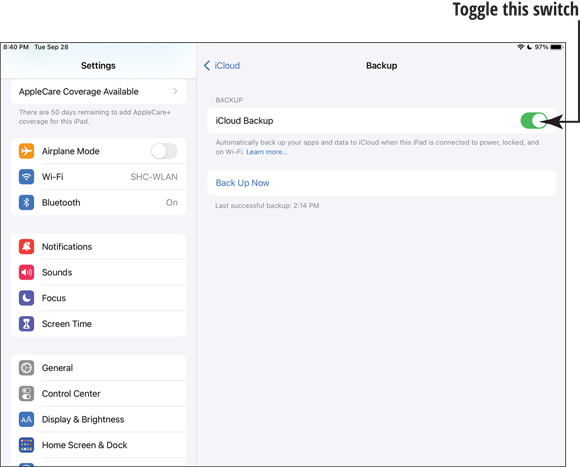
- In the pane that appears (see Figure 20-4), tap the iCloud Backup switch to enable automatic backups. To perform a manual backup, tap Back Up Now. A progress bar shows how your backup is moving along.
If you’ve been backing up your iPad to iCloud, you can get your content back if you erased it all because the iPad was lost. Just enter your Apple ID and password, and you can reactivate it.
You can also back up your iPad using Finder (for Macs running macOS 10.15 or newer) or iTunes (for PCs or Macs running macOS 10.14 or older). This method actually saves more types of content than an iCloud backup does, and if you have encryption turned on in iTunes, it can save your passwords as well. However, this method requires that you connect to a computer to perform the backup. If you do back up and get a new iPad at some point in the future, you can easily restore all your data from your computer to the new iPad.