
Chapter 3
Beyond the Basics
IN THIS CHAPTER
![]() Update iPadOS
Update iPadOS
![]() Charge your iPad’s battery
Charge your iPad’s battery
![]() Sign into an iTunes account
Sign into an iTunes account
![]() Sync your iPad wirelessly
Sync your iPad wirelessly
![]() Understand how to use iCloud
Understand how to use iCloud
![]() Store and browse files
Store and browse files
In this chapter, I look at updating your iPad OS version (the operating system that your iPad uses) and making sure that your iPad’s battery is charged.
Next, if you want to find free or paid content for your iPad from Apple, from movies to music to e-books to audiobooks, you’ll need to have an iTunes account.
You can also use the wireless sync feature to exchange content between your computer and iPad over a wireless network.
Another feature you might take advantage of is the iCloud service from Apple to store and push all kinds of content and data to all your Apple devices — wirelessly. You can pick up where you left off from one device to another through iCloud Drive, an online storage service that enables sharing content among devices so that edits that you make to documents in iCloud are reflected on all of your iPadOS and iOS devices, and Macs running OS X Yosemite or later.
 The operating system for Apple’s Mac computers used to be called OS X. These days, it’s referred to as macOS. The Mac operating system is mentioned a few times throughout this book, and you should know that OS X and macOS are different names for different versions of the same thing.
Update the Operating System to iPadOS 15
This book is based on the latest version of the iPad operating system at the time: iPadOS 15. To be sure that you have the latest and greatest features, update your iPad to the latest iPadOS now (and do so periodically to receive minor updates to iPadOS 15 or future versions of iPadOS). If you’ve set up an iCloud account on your iPad, you’ll receive an alert and can choose to install the update or not, or you can update manually:
Tap Settings.
Be sure that you have Wi-Fi enabled and that you’re connected to a Wi-Fi network to perform these steps.
- Tap General.
Tap Software Update.
Your iPad checks to find the latest iPadOS version and walks you through the updating procedure if an update is available.
You can also allow your iPad to perform automatic updates overnight. Go to Settings ⇒ General ⇒ Software Update ⇒ Automatic Updates and toggle the switch to On (green). Your iPad must be connected to Wi-Fi and its charger to automatically update.
Charge the Battery
My iPad showed up in the box fully charged, and I hope yours did, too. Because all batteries run down eventually, one of your first priorities is to know how to recharge your iPad’s battery.
Gather your iPad along with its charging cable and power adapter (be sure to use the proper cable and adapter).
Here's how to charge your iPad:
- Gently plug the correct end of the charging cable into the iPad. What kind of connector it is depends on which model iPad you have.
- Plug the other end of the charging cable into the Apple power adapter.
Plug the adapter into an electric outlet.
The charging icon appears onscreen, indicating that your phone is getting power.
You can also charge your iPad using your Mac, assuming it has the correct ports to match your charging cable.
Sign into an iTunes Account for Music, Movies, and More
The terms iTunes Account and Apple ID are interchangeable: Your Apple ID is your iTunes Account, but you’ll need to be signed in with your Apple ID to download items from the App Store and the iTunes Store.
If you’ve never set up an Apple ID or iTunes Account, please visit https://support.apple.com/en-us/HT204316 on your computer, iPhone, or iPad for help in doing so.
To be able to buy or download free items from the iTunes Store or the App Store on your iPad, you must open an Apple ID. Here's how to sign in to an account after you’ve created it:
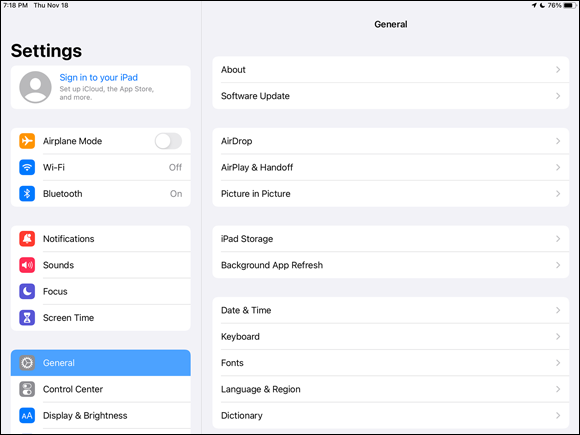
- Tap Settings on your iPad.
Tap Sign In to Your iPad at the top-left of the Settings list, as shown in Figure 3-1.
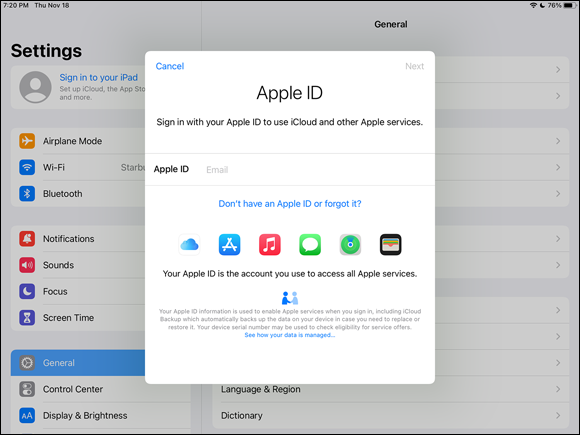
You must be connected to a Wi-Fi or cellular network to sign in.- Enter your Apple ID and password in the fields provided (see Figure 3-2) and then tap the Sign In button.
If you prefer not to leave your credit card info with Apple, one option is to buy an iTunes gift card and provide that as your payment information. You can replenish the card periodically through the Apple Store.
Sync Wirelessly
You can connect your iPad to a computer and use the tools there to sync content on your computer to your iPad. Also, with Wi-Fi turned on in Settings, use the iTunes Wi-Fi Sync setting to allow cordless syncing if you’re within range of a Wi-Fi network that has a computer connected to it with Finder open or iTunes installed and open.
If you have a Mac running macOS Mojave (10.14.x) or earlier, or a Windows-based PC, you’ll need iTunes installed on your computer to sync content with your iPad. You can download iTunes by visiting www.apple.com/itunes. If you have a Mac running macOS Catalina (10.15) or later, you use Finder to sync with your iPad.
Before you can perform a wireless sync, you need to perform a few steps with your iPad connected to your computer:
- If you’re charging with an electrical outlet, remove the power adapter.
- Use your iPad’s charging cable to connect your iPad to your computer.
If you have a Mac running macOS Mojave or earlier, or a Windows-based PC running iTunes:
- Open iTunes and click the icon of your iPad, which appears in the tools in the upper-left corner of the window.
- Select the Sync with This iPad over Wi-Fi check box. You may need to scroll down a bit to see the Sync with This iPad over Wi-Fi option.
You can click any item on the left side of the screen to handle settings for syncing such items as Movies, Music, and Books. You can also tap the list of items in the On My Device section on the left side to view and even play content directly from your iPad.- If you have a Mac running macOS Catalina or later:
- Open a Finder window and then click the icon of your iPad, which appears in the left sidebar.
- Select the Show This iPad When on Wi-Fi check box.
- Click Apply in the lower-right corner of the iTunes or Finder window.
- Disconnect your iPad from your computer.
After you complete the preceding steps, you’ll be able to wirelessly sync your iPad with your computer. Follow these steps:
- Back up your iPad. See Chapter 20 to find out how.
- On the iPad, tap Settings ⇒ General ⇒ iTunes Wi-Fi Sync. The iTunes Wi-Fi Sync settings appear.
- In the iTunes Wi-Fi Sync settings, tap Sync Now to sync with a computer connected to the same Wi-Fi network.
- If you need to connect your iPad to a network, tap Settings ⇒ Wi-Fi and then tap a network to join.
If you have your iPad set up to sync wirelessly to your Mac or PC and both are within range of the same Wi-Fi network, your iPad will appear in your devices list. This setup allows you to sync and manage syncing from iTunes or Finder (depending on which is required for your computer).
Your iPad will automatically sync with iTunes once a day if both are on the same Wi-Fi network, iTunes is running (on computers that require iTunes), and your iPad is charging.
Understand iCloud
There’s an alternative to syncing content by using iTunes. iCloud is a service offered by Apple that allows you to back up most of your content to online storage. That content is then pushed automatically to all your Apple devices through a wireless connection. All you need to do is get an iCloud account, which is free (again, this is simply using your Apple ID), and make settings on your devices and in iTunes for which types of content you want pushed to each device. After you’ve done that, content that you create or purchase on one device — such as music, apps, and TV shows, as well as documents created in Apple’s iWork apps (Pages, Keynote, and Numbers), photos, and so on — is synced among your devices automatically.
You can stick with iCloud’s default storage capacity, or you can increase it if you need more capacity.
Your iCloud account includes 5GB of free storage. You may be fine with the free 5GB of storage.
Content that you purchase from Apple (such as apps, books, music, iTunes Match content, Photo Sharing contents, and TV shows) isn’t counted against your storage.
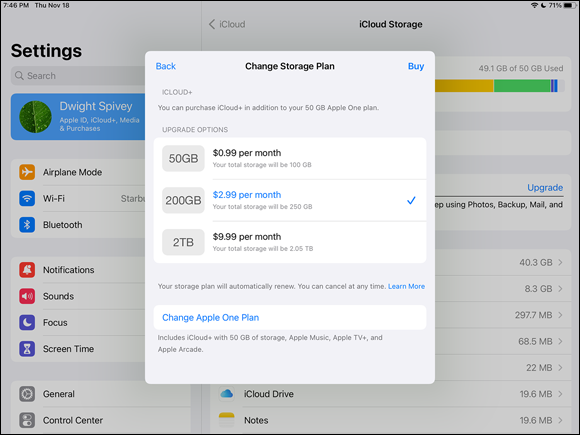
- If you want additional storage, you can buy an upgrade. Currently, 50GB costs only 99 cents per month, 200GB is $2.99 per month, and 2TB (which is an enormous amount of storage) is $9.99 per month. (All prices are in U.S. dollars.) Most likely, 50GB will satisfy the needs of folks who just like to take and share pictures, but if videos are your thing, you may eventually want to consider the larger capacities.
To upgrade your storage, go to Settings, tap your Apple ID at the top of the screen, go to iCloud ⇒ Manage Storage, and then tap Change Storage Plan, Buy More Storage, or Upgrade next to iCloud Storage. On the next screen, tap the amount you need and then tap Buy (in the upper-right corner), as shown in Figure 3-3.
If you change your mind, you can get in touch with Apple within 15 days to cancel your upgrade.
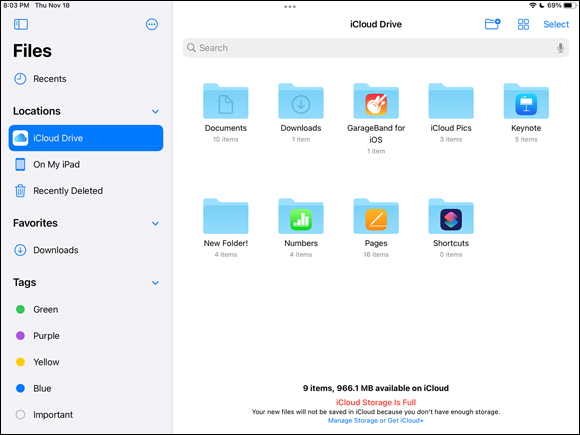
Turn on iCloud Drive
iCloud Drive is the online storage space that comes free with iCloud (as covered in the preceding section).
Before you can use iCloud Drive, you need to be sure that iCloud Drive is turned on. Here’s how to turn on iCloud Drive:
- Tap Settings and then tap your Apple ID at the top of the screen.
- Tap iCloud to open the iCloud screen.
- Scroll down in the iCloud screen until you see iCloud Drive.
- Tap the On/Off switch to turn on (green) iCloud Drive (see Figure 3-4).

Set Up iCloud Sync Settings
When you have an iCloud account up and running, you have to specify which type of content iCloud should sync with your iPad. Follow these steps:
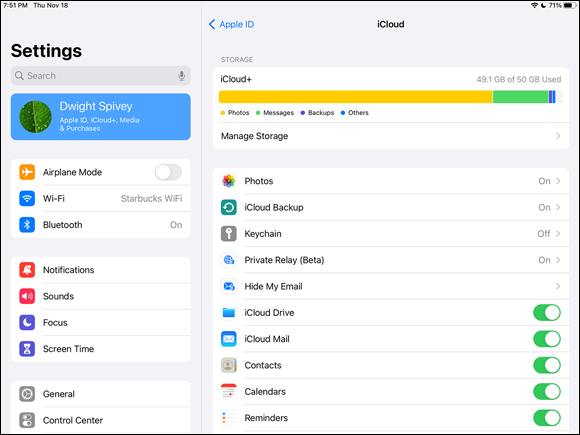
- Tap Settings, tap your Apple ID at the top of the screen, and then tap iCloud.
In the iCloud settings shown in Figure 3-5, tap the On/Off switch for any item that’s turned off that you want to turn on (or vice versa).
You can sync Photos, Mail, Contacts, Calendars, Reminders, Safari, Notes, News, Wallet, Keychain (an app that stores all your passwords and even credit card numbers across all Apple devices), and more. The listing of apps on this screen isn’t alphabetical, so scroll down if at first you don’t see what you’re looking for.
If you want to allow iCloud to provide a service for locating a lost or stolen iPad, tap your Apple ID in Settings, tap Find My, tap Find My iPad, and then toggle the On/Off switch in the Find My iPad field to On (green) to activate it.This service helps you locate, send a message to, or delete content from your iPad if it falls into other hands.
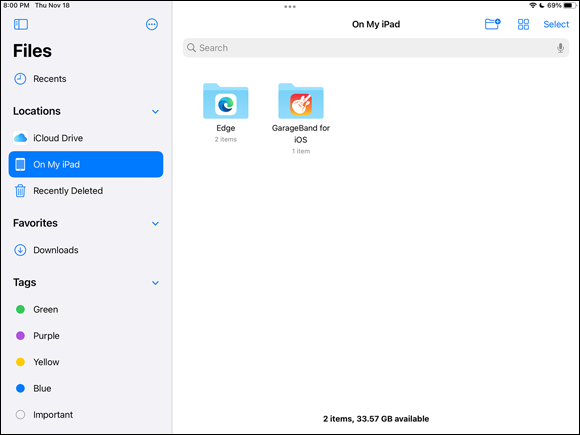
Browse Your iPad’s Files
Longtime iPad users have pined for a way to browse files stored on their devices, as opposed to being limited to finding documents and other files within the apps they’re intended for or created by. Finally, a few iPadOS iterations back, the Files app came along to allow you to browse not only for files stored on your iPad but also for stuff you’ve stored on other online (cloud) services, such as Google Drive, Dropbox, and others.
You’ll find the Files app on the first Home screen, by default.
- Tap the Files icon to open the app.
- On the Browse screen (see Figure 3-6):
- Tap the Search field to search for items by title or content.
- Tap a source in the Locations or Favorites sections to browse a particular service or your iPad.
- Tap a color in the Tags section to search for files you’ve tagged according to categories.
- When you’re in a source (see Figure 3-7), you can tap files to open or preview them, and you can tap folders to open them and view their contents.
- To perform an action on a file or folder (such as duplicating or moving it), tap Select in the upper-right corner of the screen and then tap items to select them for an action. Available actions, found at the bottom of the screen, include
- Duplicating files: Make copies of selected items.
- Moving files: Move files to other sources.
- Sharing files: Share files with other people in a variety of ways (Messages and Mail, for example), and you can even invite them to make edits, if you like.
- Deleting files: Trash files you no longer need.
If you need to retrieve a file you’ve deleted (you have 30 days to do so before it disappears forever into the digital ether), go to the Browse screen (if you’re not already there) and tap Recently Deleted in the left toolbar. Tap Select in the upper-right corner, tap the file you’d like to retrieve, and tap the Recover button at the bottom of the screen. The file will be placed back in the location it was originally deleted from. Please note that some services may not allow you to retrieve a file you’ve deleted, so if you don’t see the file you’re looking for, contact that particular service for help.