
Chapter 5
Promoting Your Server to Domain Controller
IN THIS CHAPTER
![]() Understanding Active Directory domains and why you want them
Understanding Active Directory domains and why you want them
![]() Preparing to create your domain with Windows Server 2022
Preparing to create your domain with Windows Server 2022
![]() Performing the domain configuration prerequisites
Performing the domain configuration prerequisites
![]() Configuring your server as a domain controller
Configuring your server as a domain controller
In the last chapter, I explain how to create and use workgroups. Although workgroups work well for smaller environments with few systems (less than 15 systems), they do not scale well in enterprise environments.
In most enterprise environments, you’ll be using a domain. A domain provides one central source of truth for all authentication events. You only need to create a user account once, assign it to the appropriate security groups, and then you’re able to assign the security group to whatever resources the user needs to access (assuming, of course, that the resources are on the domain). This simplifies user management significantly and improves your organization’s security standing because you’re able to enforce settings across the domain with Group Policy (see Book 3, Chapter 2).
Understanding Domains
Before I dive into how to create a domain controller, I think it’s important that you understand what an Active Directory domain is, how it’s architected, and some of the default groups that are created when you first create an Active Directory domain. I also cover domain controller roles. If you’re already familiar with these topics, feel free to skip ahead. If not, read on!
What is a domain?
Let’s start with the basic concepts and then build on them. A domain in a Microsoft network is commonly referred to as an Active Directory Domain Services (AD DS) domain. Each AD DS domain has its own database of objects within it. An object could be a user, a group, a computer, or even a printer.
AD domains are organized into a hierarchical structure with the forest being the highest level, followed by domains and organizational units (OUs). Each forest can have multiple domains, and each domain can have multiple OUs.
Forests and domains and OUs, oh my!
I’m throwing around a lot of terminology here, so let me define some things before moving on:
- Organizational units: OUs are containers for objects stored in Active Directory. They’re typically used to group like objects together — for example, all user accounts for people in the accounting department, or every computer on the second floor of a building. By grouping like items together, it can be simpler to manage these objects because it’s likely they’ll have similar settings or configurations.
- Domains: Think of a domain as a security boundary. A domain contains its own database of the objects it contains. All those objects share that database and any security policies that are assigned within the domain. Additionally, a domain may be set to trust another domain by creating a trust relationship, which may allow users in one domain to access resources in another domain.
- Domain trees: A domain tree is simply a collection of domains. For instance, you may have the domain tree namespace set to
sometestorg.com, and the domains underneath that tree would be something along the lines ofaccounting.sometestorg.comorhr.sometestorg.com. The domains share the namespace with the domain tree. - Forests: An Active Directory forest is the top-level object. It stores the entirety of Active Directory including all the trees and domains. The first domain created in a forest is referred to as a forest root domain. It will typically share the name of the forest.
- Schema: The Active Directory schema is similar to a dictionary in that it contains definitions. It contains the definition of every object class and every attribute that can be used by an Active Directory object.
Depending on the organization where you work, you may have a small instance of Active Directory that has only one forest and one domain, or you may work for a large company with multiple forests and multiple domains.
You may be asking why you would want to have more than one forest. It's more management overhead, right? Yes, it absolutely is. However, if you work in an environment where separating security boundaries is crucial, then multiple forests are your best bet. A common example is separating the corporate network from the production network. The corporate forest is used to manage corporate workstations where email and Internet are accessed. The production forest is used only to manage authentication traffic to servers or network devices. By separating the forests, and by extension the security boundaries of these two networks, you safeguard the production environment from the potentially malware-laced corporate environment.
Understanding privileged domain groups
When you create an Active Directory domain, several administrative groups are created by default. I've known a few administrators who simply put their accounts into the Enterprise Admins group and never looked back. As a system admin, you really want to enforce the concept of least privilege, meaning that people should have the permissions to do what they need to do, but nothing more. The Enterprise Admins group is a very privileged group to be in and shouldn’t be the solution to all your permissions woes.
Table 5-1 covers the various groups and what permissions you get when you’re placed into them.
Examining Flexible Single Master Operation roles on domain controllers
When Active Directory first came about, there were some definite challenges. Through the years, Microsoft continued to improve on how domain controllers work with Active Directory. It came up with the idea of Flexible Single Master Operation (FSMO). By using FSMO roles, domain controllers don’t fight over who gets to make changes, nor do you have to be as concerned about your main domain controller going down because the roles it was taking care of can be moved to another domain controller.
TABLE 5-1 Default Domain Groups
Group Name | Description |
|---|---|
Enterprise Admins | This group is located in the forest root domain. It’s a member of the Built-in Administrators in every domain in the forest. Members of the Enterprise Admins group can make changes to the forest, add or remove domains, establish forest trusts, and raise forest functional levels. This group should only be used when needed because it is such a highly privileged group — for example, when you’re constructing a forest for the first time, or when you’re making forest-wide changes like establishing forest trusts. |
Domain Admins | Members of the Domain Admins group are members of the Built-in Administrators group for that domain. They’re automatically added to the Local Administrator’s group on every system that is joined to their domain. |
Administrators | Domain Admins are members of the Administrators group for the domain in which their account resides. Enterprise Admins are members of this group across all domains in their forest. This group is the one that grants them access to the local administrator’s group on all domain-joined systems. This group has the ability to manage most of the domain’s objects with full permissions, and can take ownership of most every object in the domain. |
Schema Admins | Schema Admins is a special group. It exists in the forest root domain similar to the Enterprise Admins group. Schema Admins have permission to manage the schema in Active Directory but nothing else. This makes Schema Admins a less privileged group, but be very careful who you assign to be a Schema Admin. Changes to schema that go poorly can damage Active Directory. This group should only be assigned in the infrequent instance when schema changes need to made. |
Additional Administrative Groups | Additional Administrative Groups are created as you install roles and applications. DHCP, DNS, and Exchange Server are just a few example of roles or applications that will create new administrative groups in Active Directory. |
Here are the FSMO roles you see in today’s domain controllers and what each of them does:
- Forest wide:
- Schema Master: Manages the read/write copy of your AD schema.
- Domain Naming Master: Ensures that you don’t create domains with the same name as an existing domain.
- Domain wide:
- RID Master: Every security principal in Active Directory has a security identifier (SID). That SID is made up of the domain SID, which is the same for all systems in the same domain, and the relative ID (RID), which is unique for each security principal in that domain. The RID Master assigns blocks of SIDs to domain controllers so that they can issue them.
- PDC Emulator: PDC used to stand for Primary Domain Controller, which was used in environments running Windows NT 4.0 and earlier. The PDC Emulator was introduced to provide support for legacy systems, and it still performs important functions for modern systems. The PDC Emulator is the authoritative domain controller. It handles authentication, password changes, authentication failures and Group Policy Objects and sets the correct time for the entire domain. Next time you’re late for a meeting, blame your PDC emulator!
- Infrastructure Master: The Infrastructure Master is essentially the translator between domains. It can convert SIDs, globally unique identifiers (GUIDs), and distinguished names (DNs) between domains so that Domain1 understands what Domain2 is requesting. This allows users to access resources on other domains, not just the domain that they exist and authenticate to.
One last important conversation outside of roles is the Global Catalog. A Global Catalog server stores records for all the objects in all the domains in the forest. A domain controller keeps a fully writeable copy of its own Global Catalog, and a read-only copy from the other domains in the same forest. This allows you to search for objects in Active Directory without having to go to each individual domain to do it.
Preparing to Create a Domain
You’ve decided that you want to create a domain. There are a few tasks that you need to take care of ahead of time.
One of the most important tasks, especially if this is a brand-new server, is to install any available security updates and ensure that you have an up-to-date antivirus software installed. This is going to be your central authentication server after all, so you want to make sure that it’s protected.
The task that everybody dreads and sometimes skips is the planning task. I think it gets skipped over because it tends to be less fun than installing the server role and configuring it. Here’s the thing, though: If you take the time to plan the installation and configuration ahead of time, the outcome will be much better. You’ll be able to ensure that the server will meet your needs and, better yet, you won’t have to reinstall it when you find out it doesn’t meet your needs. So, sit down for a moment, and map out how you want your Active Directory to look. Will it have multiple domains? What kind of OU structure are you going to use?
Of course, mapping out how you want your AD to look tends to be more for new installations where Active Directory is not currently deployed. But if you’re adding a domain controller to an existing Active Directory environment, you should still plan things out. Will this domain controller host any of the FSMO roles? If so, which ones? Is this a newer domain controller being built to replace older domain controllers? If so, what is their current forest functional level and domain functional level?
Functional levels
Functional levels are used to tell domain controllers which features can be enabled at the forest or domain levels. With each new version of Active Directory, new features are added that you may want to take advantage of. If you’re creating a new installation of Active Directory, choose the highest functional levels available.
Functional levels can prevent a server from becoming a domain controller if its functional level is too low. Functional levels can be set at the forest level or the domain level. Domains can run with a higher functional level than the forest they’re in, but they can’t run at a lower functional level than the forest.
When you raise the functional level, you can’t add domain controllers that are set to a lower functional level. It’s also important to note that the domain functional level can be equal to or higher than the forest functional level, but it can’t be below it.
In older server operating systems, raising the functional level was a one-time deal. There was no nice way to back out the change if it caused problems. That is no longer the case. You can revert back to an older version with PowerShell as long as the rollback is supported, and none of the new features has been enabled that require the newer functional level. If you did enable them, you have to disable them before you can roll back.
Rolling back the forest functional level
Set-ADForestMode –ForestMode <desired forest level>
Forest functional levels include
- Windows2016Forest or 7
- Windows2012R2Forest or 6
Rolling back the domain functional level
Set-ADDomainMode –DomainMode <desired domain level>
Domain functional levels include
- Windows2016Domain or 7
- Windows2012R2Domain or 6
Forest functional level
In order to raise the forest functional level, you have to be a member of the Enterprise Admin group. You must raise the forest functional level from the domain controller that runs the Schema Master role. You can’t do it from the other domain controllers.
To check your current forest functional level, open PowerShell and run the command Get-ADForest.
Domain functional level
In order to raise the domain functional level, you have to be a member of the Domain Admin group. You must raise the domain functional level on the domain controller that runs the PDC Emulator role. You can’t do it from the other domain controllers.
To check your current domain functional level, open PowerShell and run the command Get-ADDomain.
Performing Domain Configuration Prerequisites
You've finished the planning stage. Now comes the fun part! Hopefully, you're installing the Active Directory Domain Services (AD DS) role on a fresh new server. If you are, you can skip ahead to installing Domain Name System (DNS) and Dynamic Host Configuration Protocol (DHCP). If you’re installing AD DS on an older server, you need to ensure that there are no unsupported roles or features that need to be uninstalled first.
AD DS requires DNS and DHCP to function properly. If you already have these in your environment, then great — you’re all set! If not, you can install them on the same system as AD DS or on separate systems.
Checking for unsupported roles and features
Microsoft doesn’t publish a list of roles and features that are incompatible with AD DS. If you’re installing AD DS on a system that has other roles and features, there two approaches you can take:
- If the roles and features are no longer in use, uninstall them.
- If the roles and features are in use, back up the system, uninstall the roles and features, install AD DS, and re-install the other roles and features.
 The best and safest practice is to install AD DS on a freshly built server, but if you find that you have no choice (this often happens in smaller companies that can’t afford multiple systems), follow the preceding steps.
Installing and configuring Domain Name System
DNS is responsible for resolving easy-to-remember hostnames to not-so-easy-to-remember IP addresses. It’s a requirement for Active Directory to function properly. If DNS is not installed on the system on which you’ll be installing AD DS, but it is available in your environment, then you’re good to go. If DNS does not exist in your environment, you need to install it.
You can install the DNS server role by itself, or you can install it as part of the configuration tasks when you install AD DS. I’m going to show you how to install DNS by itself.
 Before you install the DNS role, ensure that your server has a static IP address. If it doesn’t, you’ll be presented with a warning while installing the role. You’ll be allowed to continue with the installation, but your clients could lose connection to the DNS server if the IP address changes.
Installing Domain Name System
Follow these steps below to install DNS:
- From Server Manager, click Manage and then click Add Roles and Features.
- On the Before You Begin screen, click Next.
- On the Select Installation Type screen, click Next.
- On the Select Destination Server screen, click Next.
- On the Select Server Roles screen, select DNS Server.
- Click Add Features in the dialog box that pops up.
- Click Next.
- On the Select Features screen, click Next.
- On the DNS Server screen, click Next.
- Click Install.
- Click Close after the installation is complete.
Configuring Domain Name System
Follow these steps to configure DNS:
- From Server Manager, click Tools and then click DNS.
Click the arrow next to your server’s name to expand your options.
You see the configuration areas, which should look similar to Figure 5-1.
- Right-click Forward Lookup Zones and select New Zone.
- In the Welcome to the New Zone Wizard, click Next.
- On the Zone Type screen, leave Primary Zone selected and click Next.
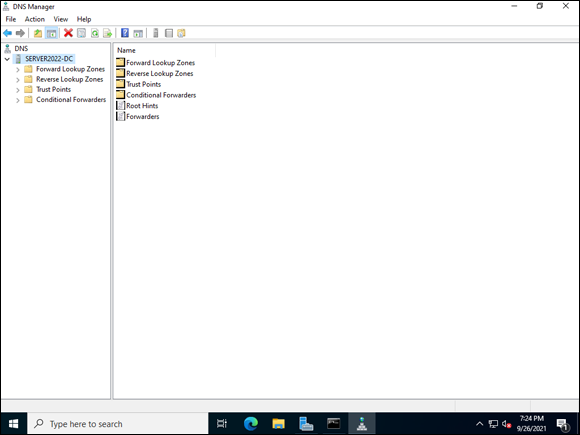
FIGURE 5-1: The DNS Manager screen after installation with no zones configured.
On the Zone Name screen, enter the zone name.
This will typically be your domain name. It indicates the namespace in which this DNS server is authoritative. In Figure 5-2, you can see that I’ve entered sometestorg.com.
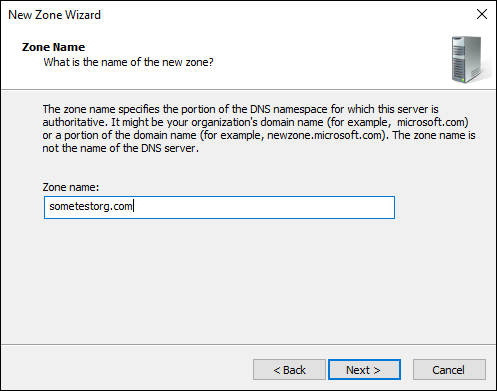
FIGURE 5-2: Naming your zone indicates which zone the DNS server is authoritative for.
- Click Next.
- On the Zone File screen, leave the selection on Create a New File with this File Name, and click Next.
- On the Dynamic Update screen, leave the selection on Do Not Allow Dynamic Updates, and click Next.
- In the Completing the New Zone Wizard, click Finish.
- Right-click Reverse Lookup Zones and select New Zone.
- On the Welcome to the New Zone Wizard screen, click Next.
- On the Zone Type screen, leave Primary zone selected and click Next.
- On the Reverse Lookup Zone Name screen, ensure IPv4 Reverse Lookup Zone is selected, and click Next.
On the next Reverse Lookup Zone Name screen, enter the Network ID.
This will be the host bits in the IP address. My DNS server’s IP address is 192.168.1.43. Assigning the network ID for this would be 192.168.1, as shown in Figure 5-3.
- Click Next.
- On the Zone File screen, leave the selection on Create a New File with this File Name, and click Next.
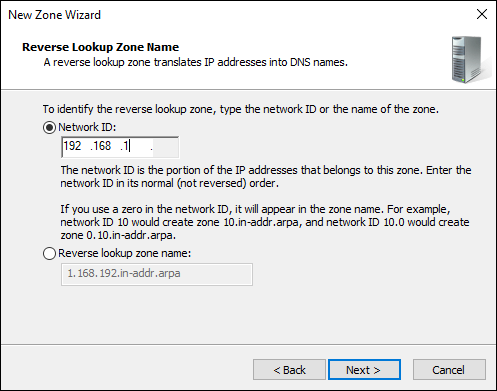
FIGURE 5-3: Assigning the Network ID.
- On the Dynamic Update screen, leave Do Not Allow Dynamic Updates selected and select Next.
- In the Completing the New Zone Wizard, click Finish.
That’s all there is to it. You now have a functional DNS server. You may be wondering why I told you to leave the dynamic updates off. When Active Directory is installed, you can enable secure dynamic updates. Until then, you have to enable all dynamic updates, which could actually be a very bad idea because any system would be registered in DNS.
Installing and configuring Dynamic Host Configuration Protocol
Installing DHCP is the next step on your journey. DHCP is responsible for assigning available IP addresses to systems on your network. This was a huge improvement over having to manually track IP addresses in a spreadsheet like you used to have to do. The DHCP client is enabled on the majority of systems, workstations, and servers. If a system needs a static IP address, like the infrastructure services I’m discussing right now (AD DS, DNS, DHCP), for example, that IP address should be set as a reservation on the DHCP server so that it doesn’t issue an IP address that is already in use.
Installing Dynamic Host Configuration Protocol
Follow these steps to install the DHCP server role:
- From Server Manager, click Manage and then click Add Roles and Features.
- On the Before You Begin screen, click Next.
- On the Select Installation Type screen, click Next.
- On the Select Destination Server screen, click Next.
- On the Select Server Roles screen, select DHCP Server.
- Click Add Features in the dialog box that pops up.
- Click Next.
- On the Select Features screen, click Next.
- On the DHCP Server screen, click Next.
- Click Install.
- Click Close after the installation is complete.
Configuring Dynamic Host Configuration Protocol
Follow these steps to configure DHCP:
- From Server Manager, click flag, and then click Complete DHCP Configuration.
In the DHCP Post-Install Configuration Wizard, click Commit.
This creates the security groups you need to manage the DHCP server.
- Click Close when it’s complete.
- From Server Manager, click Tools and then click DHCP.
Click the arrow next to the server’s name, and then the arrow next to IPv4.
Your screen should look similar to Figure 5-4.
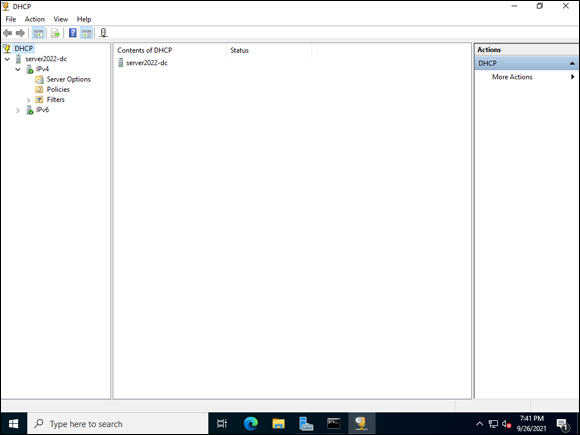
FIGURE 5-4: DHCP Console allows you to configure DHCP services.
Right-click IPv4, and choose New Scope.
 A DHCP scope defines the IP addresses that are available for lease to the systems that are on the subnet that has been defined. For each subnet on your network, you need a separate DHCP scope defined before you can issue IP addresses for systems that are in that subnet.
- On the Welcome to the New Scope Wizard, choose Next.
On the Scope Name screen, you can leave the description blank and click Next.
I’m calling it Demo Scope, just for the sake of this example.
On the IP Address Range screen, enter the pool of addresses you want the DHCP server to manage, as well as your subnet mask (see Figure 5-5).
I’ve created a very small scope for this example. Normally your scope would be much larger, potentially a whole subnet.
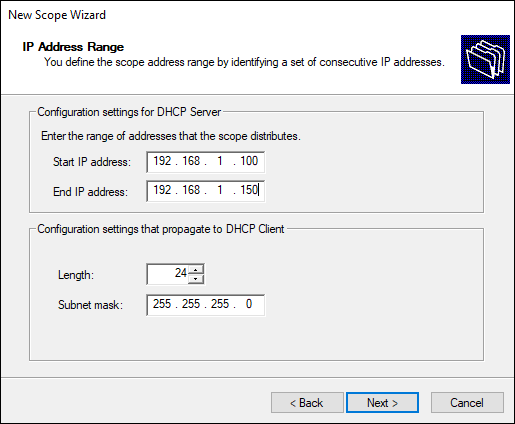
FIGURE 5-5: The IP Address Range screen allows you to specify the address range for the DHCP scope.
- Click Next.
On the Add Exclusions and Delay screen, enter addresses that you don’t want the scope to assign.
You may enter a router address or other device addresses that exist in this scope but should not be assigned by this server.
Click Next.
On the Lease Duration screen, you can see that the default is eight days. In most cases, this will be fine.
- Click Next.
- On the Configure DHCP Options screen, leave it set to Yes, I Want to Configure These Options Now and click Next.
- On the Router (Default Gateway) screen, add the IP address for your default gateway and click Next.
On the Domain Name and DNS Servers screen, enter the domain name you created earlier on your DNS server.
You can see my example in Figure 5-6.
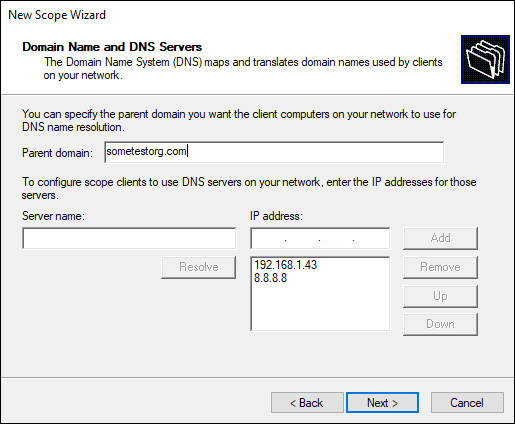
FIGURE 5-6: Setting the domain name and DNS servers in the DHCP Scope Options.
- Click Next.
On the WINS Servers screen, you can optionally enter the name or IP address of a WINS Server on your network, and then click Next.
I’m going to leave this blank.
The last screen asks if you want to activate your scope. The default option is Yes.
- Leave it set to Yes, and click Next.
- On the Completing the New Scope Wizard screen, click Finish.
That’s all there is to it.
Configuring the Server as a Domain Controller
To create a Windows domain controller, you need to install and configure Active Directory Domain Services. AD DS installs Active Directory and its database. It creates a central source of authentication and simplifies user management greatly.
Installing Active Directory Domain Services
With most things in Windows, you can install this role through the graphical user interface (GUI) or through PowerShell. In this section, I show you how to install this through the GUI, but I point out to you where you can get the PowerShell to rerun this same command if you’re configuring multiple domain controllers.
- From Server Manager, click Manage and then click Add Roles and Features.
- On the Before You Begin screen, click Next.
- On the Select Installation Type screen, click Next.
- On the Select Destination Server screen, click Next.
- On the Select Server Roles screen, select Active Directory Domain Services.
- Click Add Features in the dialog box that pops up.
- Click Next.
- On the Select Features screen, click Next.
- On the Active Directory Domain Services screen, click Next.
Click Install.
Do you have more domain controllers to build? After you’ve installed AD DS, the screen has an Export Configuration Settings link at the bottom. Click this link and save the XML file it generates. When you want to use it to create another domain controller, simply use PowerShell to point the installer to the XML file: Install-WindowsFeature –ConfigurationFilePath <path and name of file>- Click Close after the installation is complete.
Configuring Active Directory Domain Services
After AD DS is installed, the next natural step is to configure it so that your server can begin its life as a domain controller. Follow these steps:
- From Server Manager, click the flag, and then click Promote This Server to a Domain Controller, as shown in Figure 5-7.
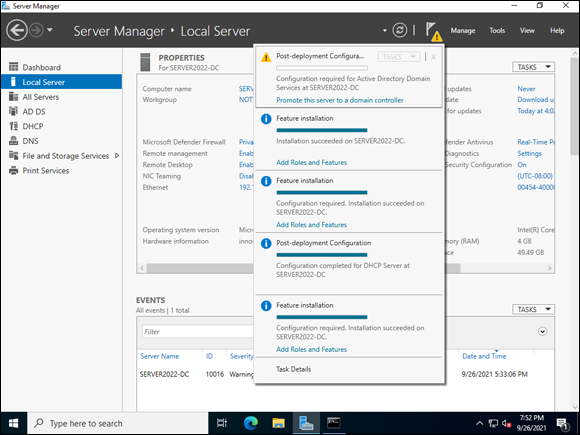
FIGURE 5-7: Promoting the server to a domain controller.
On the Deployment Configuration screen, select Add a New Forest.
There are three options when promoting a server to domain controller: - Add a New Forest is typically used when there is no existing AD infrastructure.
- Add a New Domain to an Existing Forest is used when creating domains other than the forest root domain. As you may imagine, this option is used if there is existing AD infrastructure in place.
- Add a Domain Controller to an Existing Domain does exactly what it says. You aren’t creating a forest or a domain; you’re just adding a new domain controller.
- Enter the root domain name, and click Next.
On the Domain Controller Options screen, select the functional levels you determined you needed earlier, and then click Next.
Leave Domain Name System (DNS) and Global Catalog selected. Enter a restore password and save it somewhere you can get to it; if AD ever has to be restored, you need this password to recover.
- On the next DNS Options screen, click Next.
- On the Additional Options screen, click Next.
- On the Paths screen, accept the default locations and click Next.
On the Review Options screen, click Next.
If you’re installing multiple domain controllers, you can click the View script button and see the PowerShell script for the same setup.On the Prerequisite Check screen, it’s common to have a few warnings. As long as you have a message at the top that says “All prerequisite checks passed successfully,” you’re good to go. See Figure 5-8 for an example.
Click Install.
After AD DS is installed, the server will automatically restart, and you’ll be able to log in as the domain administrator account. This will initially use the same password as the local admin account on the server. Be sure to change it.
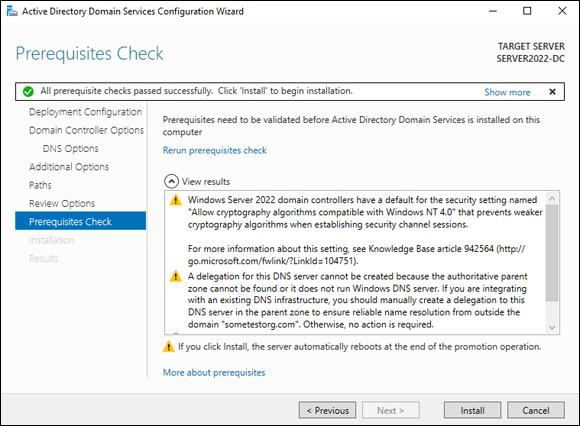
FIGURE 5-8: Checking the prerequisite checks passed before installing.
Converting your DNS Zone to an Active Directory Integrated Zone
When you set up DNS earlier in this chapter, you created the zones but chose manual updates rather than dynamic. Now that the DNS zone is associated with Active Directory, you can go back, integrate the DNS zones with Active Directory, and select secure dynamic updates.
Making your DNS zone and Active Directory integrated zone gives you a multi-master environment where any domain controller that is running DNS can update zones as long as they’re an authoritative server for that zone. Zone data is replicated through Active Directory rather than through the traditional zone transfer method. After you’ve chosen to make your zone and Active Directory integrated zone, you can also enable secure dynamic updates. This allows you to control which systems can update record names, as well as keep unauthorized systems from overwriting names in DNS.
Follow these steps to convert your zone to an Active Directory integrated zone and how to enable secure dynamic updates:
- From Server Manager, click Tools and then click DNS.
Expand the server name, and then expand Forward Lookup Zones.
You should see the zone you created earlier.
- Right-click the zone and choose Properties.
- On the General tab, under Type: Primary, click the Change button.
- With Primary still selected, check the Store the Zone in Active Directory check box and click OK.
- When you’re asked if you want the zone to be Active Directory integrated, click Yes.
Under Dynamic updates, select Secure Only.
See Figure 5-9 for an example of how your screen should look at this point.
- Click Apply and then click OK.
Expand Reverse Lookup Zones.
You should see the zone you created earlier.
- Right-click the zone and choose Properties.
- On the General tab, under Type: Primary, click the Change button.
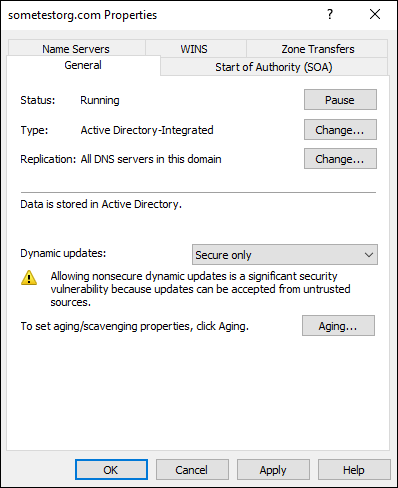
FIGURE 5-9: Setting the properties of your DNS zone to AD integrated.
- With Primary still selected, check Store the Zone in Active Directory check box and click OK.
- When you’re asked if you want the zone to be Active Directory integrated, click Yes.
Under Dynamic updates, select Secure Only.
See Figure 5-9 for an example of how your screen should look at this point. Keep in mind that Figure 5-9 is from the Forward Lookup Zone, however the settings themselves are identical.
- Click Apply, and then click OK.
Under Forward Lookup Zones, create the record for this server.
Future systems should pop up automatically now.
Right-click your domain name under Forward Lookup Zones and select New Host (A or AAAA).
Host records are used by the DNS server to map hostnames to IP addresses. A records match hostnames to IPv4 addresses, while AAAA records map hostnames to IPv6 addresses.- Under Name, enter the name of your system.
- Under IP Address, enter the IP address of the system.
Check the Create Associated Pointer (PTR) Record check box.
This creates a matching entry in the Reverse Lookup Zone.
- Click Add Host.
- Click OK on the confirmation box.
- Click Done in the New Host box.
Now you’re all set. Active Directory is installed, and you’re allowing dynamic updates in DNS in a secure fashion. You created a DNS record for your server. You can test at this point to make sure that name resolution is working properly. Here are the steps to test name resolution:
- Right-click the Start menu and choose Windows PowerShell.
Type nslookup <servername> as shown in Figure 5-10.
If DNS is working properly, it should return the IP address of the server name that you put in.
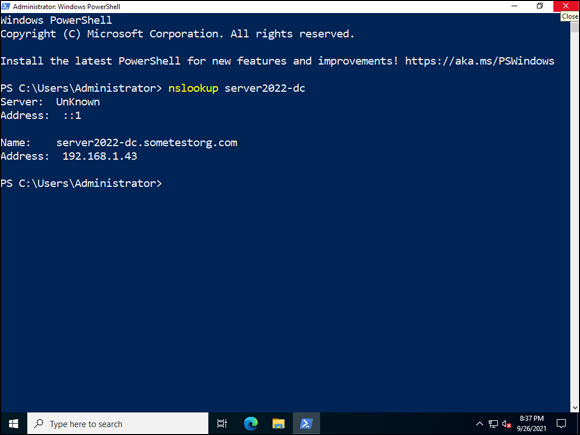
FIGURE 5-10: Using nslookup to verify that DNS is working properly.
As you can see, integrating DNS after the fact can be rather time consuming. You can install it at the same time as Active Directory and save yourself quite a bit of the configuration work. However, now you’ve seen it done the long way, so the shorter way will be much simpler.
Authorizing your DHCP Server for your Active Directory environment
There’s one last thing you need to do before you can use DHCP properly. Earlier, you installed DHCP and then set up a scope. Now that this server is a domain controller, you need to authorize DHCP in Active Directory so it can start handing out IP addresses for domain joined systems. By authorizing your DHCP server, you prevent rogue DHCP servers from appearing on your network. Rogue DHCP servers can cause a denial of service attack. To authorize your DHCP server, follow these steps:
- Starting with Server Manager, choose Tools ⇒ DHCP.
- Right-click the server’s name and select Authorize.
Click Action and then click Refresh.
The red downward-facing arrow that was on IPv4 should be a green check mark now.
Now your DHCP is configured to work with your Active Directory domain. Anytime you stand up new DHCP servers and you want them to work with your Active Directory environment, you need to authorize them.
Configuring the user accounts
Now that Active Directory is installed, you may want to start creating user accounts. The main purpose of Active Directory is for authentication after all! Here’s how to create your first user account in Active Directory:
- From Server Manager, choose Tools ⇒ Active Directory Users and Computers.
- Expand your domain name by clicking the arrow next to it.
Click Users (this is the Users OU) to select it.
You see the built-in accounts and groups.
- Right-click Users, and choose New ⇒ User, as shown in Figure 5-11.
Fill in the First Name and Last Name fields.
Notice that Full Name fills in automatically with what you typed.
Enter what you want the user’s login name to be.
In my example, for John Smith, I’m creating a username of jsmith (see Figure 5-12).
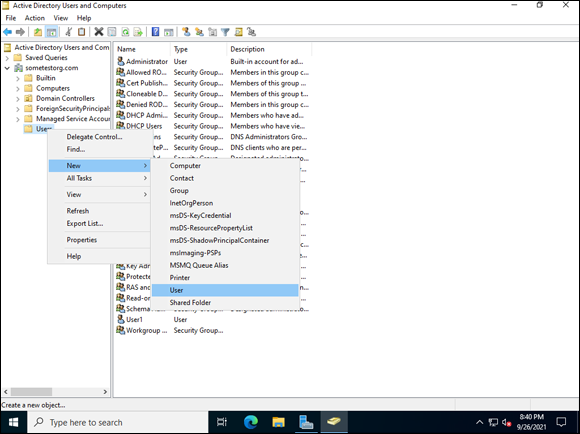
FIGURE 5-11: Creating a new user in Active Directory.
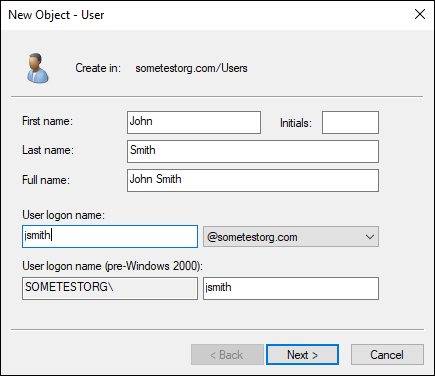
FIGURE 5-12: Creating my first user, John Smith.
- Click Next.
- Set the temporary password for the user.
- Type it in again in the Confirm Password field.
- Leave the User Must Change Password at Next Logon box checked and click Next.
- Click Finish.
- Double-click the new user, John Smith.
Click the Member Of tab.
You see that John Smith is a member of Domain Users.
Let’s say that John will be managing our DNS and DHCP servers.
- Click Add and type DnsAdmins and then click OK.
- Click Add again and type DHCP Administrators and then click OK.
- Click OK once more to close out of John’s configuration.
Sharing resources on a domain
Sharing resources on the domain is pretty similar to sharing resources off the domain. When working in an Active Directory domain, the best way to manage access to resources is to use groups.
Let’s create a group called File Share Users, add John Smith to it, and then assign it permissions on a folder share. Follow these steps:
- Right-click the Users OU, and choose New ⇒ Group.
- Enter a Group Name, and then click OK.
- Double-click the new group (in my case, that’s File Share Users) and click the Members tab.
- Click Add.
- Type John Smith and then click OK.
- Click OK once more to exit out of the group’s configuration screen.
- Click the File Explorer icon in the bottom of the screen (it looks like a folder).
- Click This PC and determine which volume you want to create this folder share on.
Double-click the volume to open it.
In my example, I am just going to use the
C:volume for the folder.- Right-click the blank space and choose New ⇒ Folder.
- Name the folder Files.
- Right-click the Files folder and choose Give Access To ⇒ Specific People.
In the box, type the name of the group you created earlier (in my case, File Share Users), and then click Add.
The security group is added with read permissions.
- Click the arrow next to Read, and choose Read/Write, as shown in Figure 5-13.
- Click Share.
- On the Your Folder Is Shared screen, click Done.
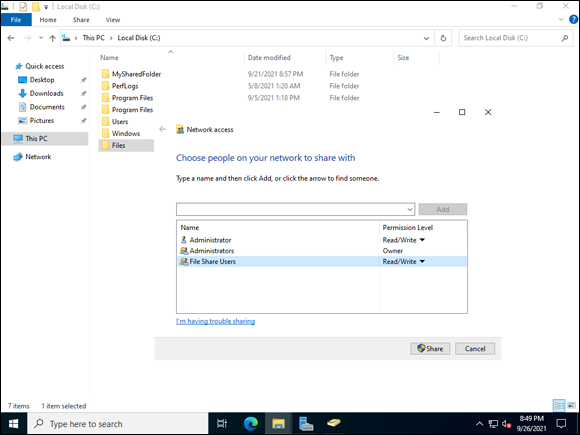
FIGURE 5-13: Sharing a folder to a domain security group.
When a user in the security group wants to access the share that you just created, all he has to do is the following:
- Click the Start menu.
Type \servernamesharename.
In my case, this is \server2022-dcFiles.
Press Enter.
This takes the user to the shared folder.
The great thing about this approach is that new users only need to be added to the security group File Share Users, and they have read/write access to the folder share that you created.
Joining clients to the domain
The last step on this journey is, of course, joining other systems to the domain so that you can then authenticate with domain credentials rather than local credentials. In this section, I cover doing this in both Server with Desktop Experience and Server Core.
By default, any member of the Authenticated Users group can add a workstation to an Active Directory domain. Members in the Authenticated Users group can add up to ten workstations. (This should be changed depending on your organization’s policies.) It can be adjusted domain wide in the Default Domain Controllers Policy in the Group Policy Management Console, located under Computer Configuration, then Policies, then Windows Settings, then Security Settings, then Local Policies, and then User Rights Assignment. Double-click Add Workstations to Domain. Add the security group you want to use to allow systems to be added to the domain (I’ve often seen Domain Administrators used here) and remove Authenticated Users.
Server with Desktop Experience
Server with Desktop Experience is the graphical version of Windows that most people are used to. Joining to the domain with Windows Server is pretty simple. Follow these steps:
- Log on to the non-domain-joined system as an administrator.
- When Server Manager launches, click Local Server on the left side of the menu.
Underneath the server name, click WORKGROUP.
The System Properties box, shown in Figure 5-14, appears.
- Click the Change button.
Under Member Of, select the radio button next to Domain, and fill in the name of the domain you want to join.
This should look similar to Figure 5-15.
- Click OK.
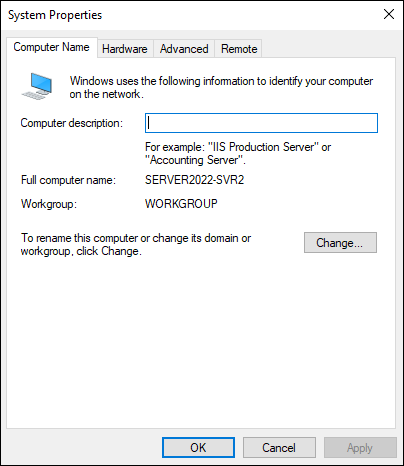
FIGURE 5-14: The System Properties box allows you to change the computer name and the workgroup/domain membership.
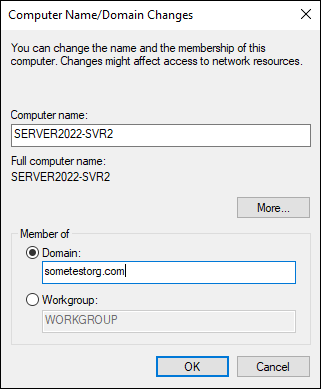
FIGURE 5-15: Changing the domain membership of the server.
Enter the username and password of an account that has permissions to join to the domain.
If you’ve been following along and you’ve built your domain from scratch, the domain administrator account will have the same password as the local administrator account did back on the domain controller. If you’re joining an established domain, this password may be different.Click OK.
You get the message “Welcome to the <domain name> domain.
Click OK.
You’re told that you need to restart the system.
- Click OK.
- Click Close to close out of System Properties.
Click Restart Now.
The system restarts, and when it comes back up it will be joined to the domain.
Server Core
Server Core doesn’t have the graphical menus that most admins are used to, so the experience of joining a domain is different. There are two ways to join a domain: You can use the sconfig utility, or you can use PowerShell.
JOINING THE DOMAIN WITH SCONFIG
sconfig is the text-menu-driven utility present in Server Core, which launches by default after you’ve logged in. Alternatively, from the command line you can access it by typing sconfig and pressing Enter. When sconfig starts, you have a screen similar to Figure 5-16.
Let’s join the domain using sconfig. For the purposes of instruction, I’ll assume you’ve already typed sconfig and are at the menu. Follow these steps:
- Press 1 to select Domain/Workgroup.
- Press D for domain and then press Enter.
- Enter the name of the domain you want to join, and then press Enter.
Enter a domain admin account.
In my case, I type sometestorgadministrator.
Enter the password for the account and press Enter.
You’re asked if you want to change the name of the computer before restart.
Type no.
If you need to restart, feel free to select Yes.
You’re prompted to restart the server.

FIGURE 5-16: The sconfig menu in Server Core is the main system configuration area.
- Type yes to restart.
- When the system comes back up, it will be joined to the domain.
JOINING THE DOMAIN WITH POWERSHELL
Sconfig is a manual process and, as such, does not work well with server automation efforts. PowerShell can make the domain-joining process much faster than sconfig and can be used as part of a scripted task. Here’s the command to join a server to Active Directory with PowerShell:
Add-Computer –domainname <domain name> -Credential domainadministrator -restart –force
See how nice and short and straightforward PowerShell can be? I recommend that you take the time to learn PowerShell. Book 6 is all about PowerShell.
Here are the steps to join Active Directory with the PowerShell command:
- Log in to the Server Core system.
- From sconfig, type 15 to exit to PowerShell.
- Using the example command earlier, type the domain name and credentials specific to your test domain, and then press Enter.
Enter the password, and then click OK.
The system will automatically restart. When it comes back up, it’s joined to the domain.
Wrapping Things Up
You may be asking yourself at this point, how do all these things tie together? If you worked through this chapter from beginning to end, you installed DNS, DHCP, and Active Directory. You went back and converted the DNS zone to an Active Directory integrated zone and then set up secure dynamic updates. You also went back and authorized your DHCP Server for Active Directory. Then you joined some systems to Active Directory.
If you go back to your DNS, all the systems you joined to the domain are registered. This occurred when you joined them to the domain. You can see my example in Figure 5-17.
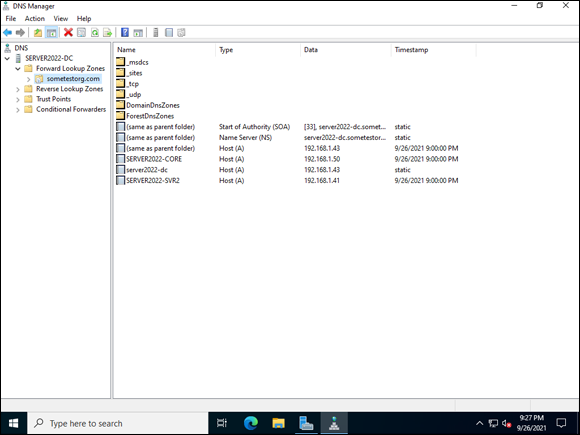
FIGURE 5-17: Active Directory–integrated DNS zones offer improved replication across your domain controllers, and secure dynamic updates ensure that records are added by authenticated users.
It’s important that the systems are registered because this means that your users can remember system names instead of IP addresses. With DNS resolving names properly, you can use the name, and the system will know what the IP address needs to be. Pretty cool when you think about it!
Name resolution is great and all, but as you scale, you don’t want to keep track of IP addresses manually. Let’s check on the DHCP server. Because it was authorized for Active Directory, when you joined your systems to Active Directory, it issued them IP addresses, as shown in Figure 5-18.
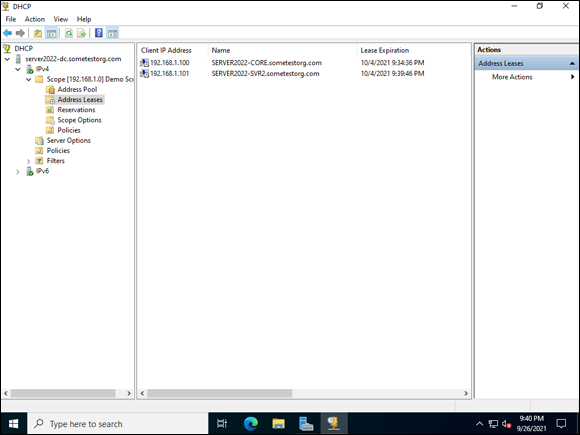
FIGURE 5-18: DHCP address leases for all your domain-joined systems.
You can set reservations to ensure that DHCP does not issue an IP address to another system. You can do this easily by right-clicking a system with a regular lease and choosing Add to Reservation.
Now let’s look at Active Directory. Your new domain-joined systems will show up in Active Directory now. Follow these steps:
- Starting from Server Manager, choose Tools ⇒ Active Directory Users and Computers.
Click the Domain Controllers OU.
You see the system that you set up as a domain controller.
Click the Computers OU.
You see the other domain-joined servers.
Now that these systems are in Active Directory, you have a central location to manage these systems. You can view which operating system they’re running, and you can delegate permission to them as well.