
Chapter 4
Working with Workgroups
IN THIS CHAPTER
![]() Defining workgroups
Defining workgroups
![]() Weighing the pros and cons of workgroups
Weighing the pros and cons of workgroups
![]() Knowing the difference between centralized and group sharing
Knowing the difference between centralized and group sharing
![]() Understanding how to configure a server for a workgroup
Understanding how to configure a server for a workgroup
![]() Keeping your workgroup running smoothly
Keeping your workgroup running smoothly
![]() Examining how Peer Name Resolution Protocol helps workgroup communications
Examining how Peer Name Resolution Protocol helps workgroup communications
For some networks, it doesn’t make sense to have a domain controller with Active Directory running. In these networks, however, it’s still considered desirable to be able to share things from system to system. This is where workgroups come into play.
In this chapter, I explain what workgroups are and how to create them. I also fill you in on the Peer Name Resolution Protocol, what it does, and why it’s important for workgroups.
Knowing What a Workgroup Is
A workgroup is a peer-to-peer group of computers that share resources but that do not belong to an Active Directory domain. A workgroup may have a central server that it uses to consume various services, or it may simply share data from individual workstations. A workgroup can be as small as two computers, or it can scale up to be larger (though the larger it gets, the more difficult it is to administer). The key point is that there is no Active Directory domain involved.
For a workgroup to work properly, all the systems must share the same workgroup name. By default, in Windows, a non-domain-joined system will belong to a workgroup called WORKGROUP.
The biggest difference to keep in mind between peer-to-peer and client–server relationships like those made in Active Directory is that peer-to-peer are decentralized in every way. You have to explicitly set up access for users and resources on each server that they want to connect to. Systems in a client–server relationship like Active Directory have a centralized database that handles authentication and authorization for access to resources.
 One of the key advantages to workgroups is that they can be very simple to manage as long as they’re small. You simply configure a resource for sharing and define who you want to share that resource with. You don’t have to worry about complex group policies, because everything is set locally. Workgroups can also be an inexpensive option because you don’t need multiple servers to support a workgroup; in fact, you don’t technically need servers at all, you could create a workgroup with just client systems. This chapter focuses on workgroups on a Windows Server 2022 system.
 However, because user accounts are managed on each individual system, security is a concern with workgroups. Passwords may not be changed very often. If they are changed, a user may update his password on a few systems but not on all of them, and then end up out of sync. Plus, some applications may require Active Directory; you won’t be able to use these applications if you’re using workgroups.
Knowing If a Workgroup Is Right for You
When you’re considering creating a workgroup, you need to understand what you can and cannot do with a workgroup. This will determine whether a workgroup is really a good fit for your environment. For instance, if you have a small network with less than 15 systems, a workgroup may be a good route to go. If you have 200 systems, a workgroup probably won’t be a good choice because it would result in a very large amount of administrative overhead.
In a workgroup, you can share files, databases, and printers. If this is all you need to do, and you have a small pool of systems (ideally 15 or less), then a workgroup is a good fit. This saves organizations the expense of setting up domain controllers, which will consume another server operating system license, as well as the cost of hiring a system administrator who knows how to take care of Active Directory.
However, you don’t have centralized authentication — every user must have an account on the system on which he wants to access resources. You can’t manage systems with Group Policy — you have to use local security policies only. Finally, you can’t run applications that require Active Directory.
Comparing Centralized and Group Sharing
If you’ve decided a workgroup is right for you, the next thing you need to decide is whether you want to use a centralized sharing model or a group sharing model.
In the centralized sharing model, all your data is stored on one system —a workstation or a server. All the other members of the workgroup connect to this central location to use the shared resources. The centralized sharing model is the simplest to sustain, because you can set up accounts for the workgroup members on the server and they’ll be able to share the resources.
In the group sharing model, all the workstations in the group share different resources. The group sharing model can be far more complex to manage because the users all need to have access to every system on which they need to access a resource.
Configuring a Server for a Workgroup
When configuring a server to be a workgroup server, you need to add groups, users, and whatever resources you want to share. Before you do any of these things, though, you need to change the name of your workgroup.
Changing the name of your workgroup
The Windows default workgroup name is WORKGROUP. You should change this to something that’s meaningful to you. Here’s how:
- In Server Manager, click Local Server.
Click the WORKGROUP link, below the computer name, shown in Figure 4-1.
The System Properties dialog box appears (see Figure 4-2).
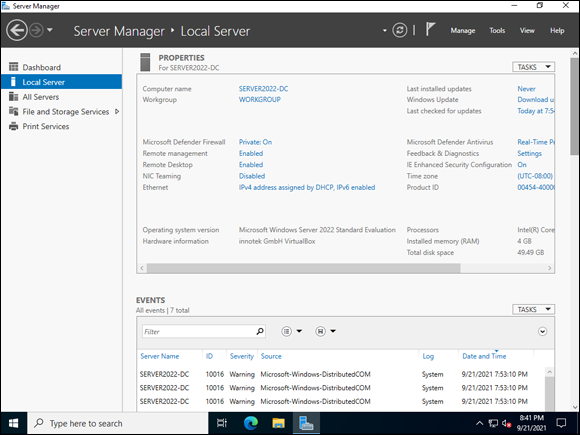
FIGURE 4-1: Configuring the workgroup begins in the Local Server screen in Server Manager.
- Click the Change button.
Change the workgroup name to whatever you want it to be, and click OK.
In my example, I changed the name to NOTWORKGROUP (see Figure 4-3).
You see a message welcoming you to your workgroup.
Click OK.
You see a message saying that the server needs to restart.
- Click OK.
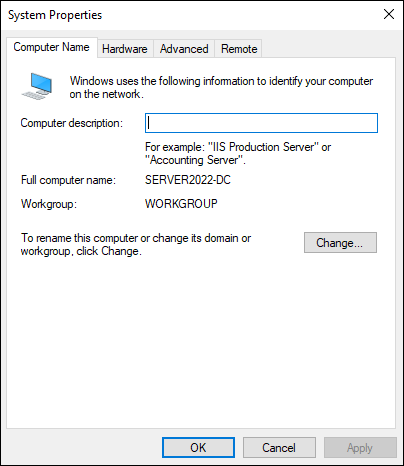
FIGURE 4-2: The System Properties dialog box allows you to set the workgroup name.
- In the System Properties dialog box, click Close.
- When prompted to restart the server, click Restart Now.
Changing the workgroup name is simple, and it follows a security best practice of changing the defaults.
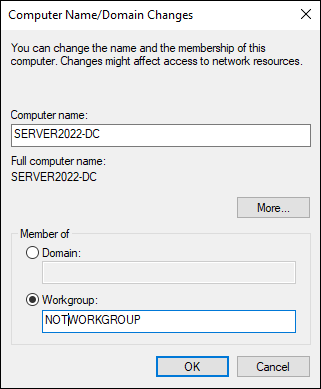
FIGURE 4-3: Setting the workgroup name.
Adding groups
You grant permissions for the shared resources to the group rather than directly to user accounts. This ensures that the users get access to everything they need — and it’s far easier to manage than individual user permissions. For this reason, you should create groups before you create users.
Here’s how to create a group:
- In Server Manager, choose Tools⇒ Computer Management.
- Click Local Users and Groups.
Double-click Groups.
Windows Server 2022 includes several groups out of the box. In this example, I’ll create a simple group called Workgroup Users.
Click More Actions on the right-hand side of the screen and choose New Group.
The New Group dialog box appears (see Figure 4-4).
- Enter a name in the Group Name field and click Create.
- Click Close to close the New Group dialog box.
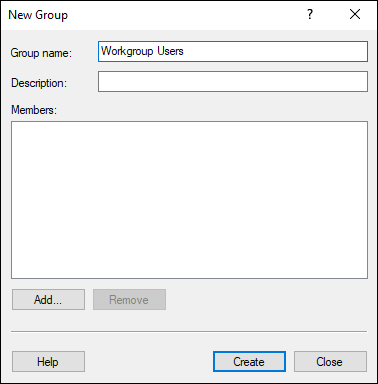
FIGURE 4-4: Creating a group to allow access to workstation resources.
Creating users and adding users to the group
In order for a user to access a workgroup, she must have a local account on the system she’s trying to connect to. When you create the user account, you can grant permissions directly, but adding the user to a group with the correct permissions is much simpler. Imagine if you have to create five users: You can set permissions for each of them, or simply add them to the group.
Here’s how to create a user and add the user to a group:
- In Server Manager, choose Tools⇒ Computer Management.
- Click Local Users and Groups.
Double-click Users.
Windows Server 2022 includes a few user accounts out of the box. In this example, I’ll create a user account called User1.
Click More Actions on the right-hand side of the screen and choose New User.
The New User dialog box appears.
Fill in the User Name, Full Name, and Password fields (see Figure 4-5).
In a Production environment, you’ll want to leave the User Must Change Password at Next Logon check box selected.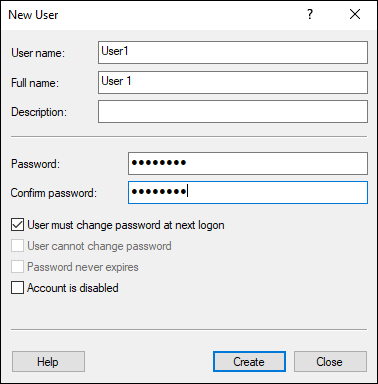
FIGURE 4-5: Creating a user account to allow access to workstation resources.
- Click Create.
- Click Close to close the New User dialog box.
Right-click the newly created user and choose Properties.
The User Name Properties dialog box appears (where User Name is the name of the user whose properties you’re looking at).
Click the Member Of tab, and click Add.
The Select Groups dialog box appears.
In the Enter the Object Names to Select field, type the name of the group that you created earlier and click Check Names.
If the group is found, it will be underlined and will start with the server name, as shown in Figure 4-6.
- Click OK to close the Select Groups dialog box.
- Click OK to close the User Name Properties dialog box.
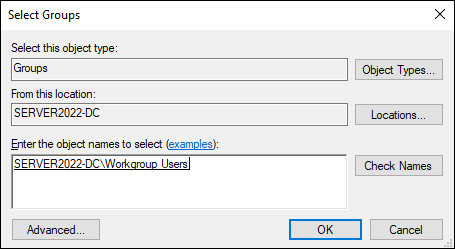
FIGURE 4-6: Selecting the group for your user account.
Adding shared resources
The most common things that are shared in a workgroup scenario are printers and files. In Book 2, Chapter 2, I explain how to install and configure the print server role. Here’s how to share files and folders:
- In Server Manager, choose Tools⇒ Computer Management.
- Click Shared Folders.
- Double-click Shares.
Click More Actions on the right-hand side of the screen, and choose New Share.
The Create a Shared Folder Wizard appears.
- On the first screen, called Welcome to the Create a Shared Folder Wizard, click Next.
On the Folder Path screen, click Browse.
The Browse for Folder dialog box appears.
- Navigate to the folder that you want to share (see Figure 4-7).
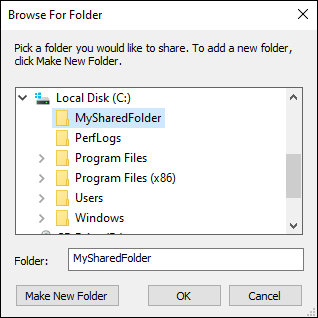
FIGURE 4-7: Selecting the folder you want to share in the Create a Shared Folder Wizard.
- Click OK to close the Browse for Folder dialog box.
Click Next.
The next screen allows you to change the name of the share and set the offline settings. This allows users who are offline to access share files.
After you’ve selected the options you want, click Next.
The next screen allows you to customize permissions for the share.
Select the Customize Permissions radio button, and then click Custom.
The Customize Permissions dialog box appears.
- Click Add.
- Type the name of the group that you created earlier and click Check Names to ensure that it resolves.
- Click OK.
In the Permissions for Workstation Users section, set the desired permissions for the share.
Typically, you will select the Change and Read check boxes, as shown in Figure 4-8.
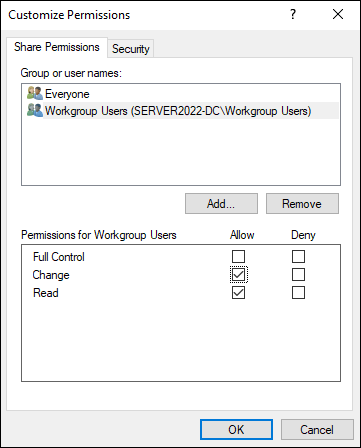
FIGURE 4-8: Customizing the shared folder permissions.
- Click OK to close the Customize Permissions dialog box.
- Click Finish.
- On the Sharing Was Successful screen, click Finish again.
After the share has been added, it will show up in Shares under Shared Folders, as shown in Figure 4-9.
If you ever set up workgroups on an older version of Windows, you know that your next step was to add the group you created to the share permissions on the folder in the file system as well. This was a lot of double work. Lucky for us, Microsoft remedied that. When you share the folder in the Shared Folders area in Computer Management, it sets the share permissions as well. If you want to look at the settings, follow these steps:
Click the folder icon in the taskbar at the bottom of the screen.
File Explorer launches.
- Click This PC, and then double-click the volume where you create the shared folder.
- Right-click the shared folder, and click Properties.
Click the Sharing tab, and then click Advanced Sharing, as shown in Figure 4-10.
On this screen, you can change the number of users who can connect at the same time, you can change the permissions, and you can change the caching. In this context, caching refers to offline access.
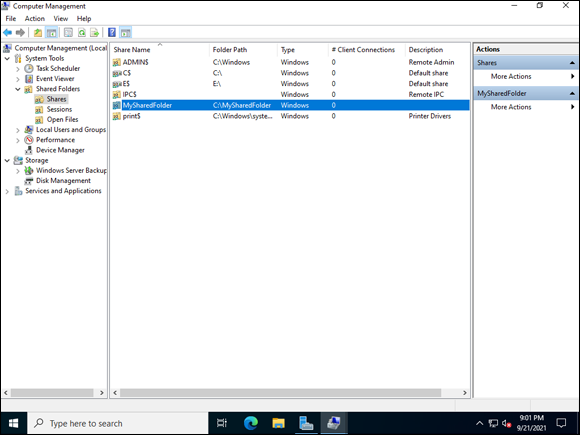
FIGURE 4-9: The new folder share is visible in the Shares section of Shared Folders.
- Click OK.
- Click OK again.
- Click Close.
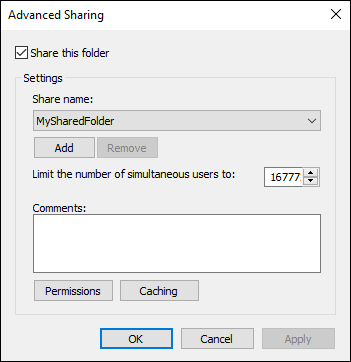
FIGURE 4-10: The Advanced Sharing dialog box allows you to configure the share.
Managing Workgroups
As the administrator of a workgroup, you may need to take care of some ongoing management tasks. Some of the most common are resetting passwords, though you can also change the user’s role. In this section, I fill you in on a few different methods to manage user accounts.
The Computer Management console
The Computer Management console is a great place to start. Follow these steps:
- From Server Manager, choose Tools⇒ Computer Management.
- Double-click Local Users and Groups to expand it.
Double-click Users to show the user list.
If all you want to do is reset the password, right-click the user account and choose Set Password. Click Proceed in the dialog box, and then enter the new password and click OK.Right-click the account you created earlier, and choose Properties.
The Properties dialog box appears. Here’s what you can do on each tab of this dialog box:
- General: Set the account to disabled, or require the user to change her password the next time she logs in.
- Member Of: Assign group memberships to the user.
- Profile: Set login scripts and set home folder locations.
- Environment: Set a program to start when the user logs in, and set the desired behavior of client devices.
- Sessions: Set how you want the sessions to be handled for a particular user account.
- Remote control: Allows you to take remote control of a user’s session. This is very helpful when troubleshooting an issue.
- Remote Desktop Services Profile: Similar to the Profile tab, except this only applies to Remote Desktop sessions.
- Dial-in: Controls alternative connection options.
The Account window
The Account window allows you to do the same user management functions that the Computer Management console does, just with a nicer looking interface. Here’s how to access it:
- Click the Start menu and click the Settings icon.
- Click Accounts.
- Click Other Users (shown in Figure 4-11).
- Select the user you created earlier.
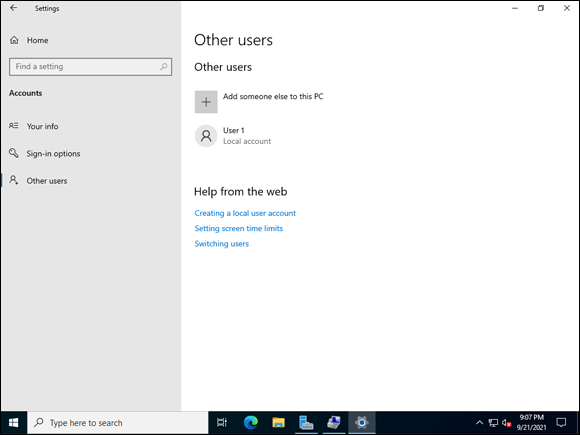
FIGURE 4-11: Clicking Other Users allows you to manage accounts other than your own.
From here, you can change the account type, or delete the account (see Figure 4-12).
PowerShell
You can manage your user accounts with graphical tools, but you can also use PowerShell to do the trick. In fact, there are a few administrative tasks that can only be accomplished by using PowerShell.
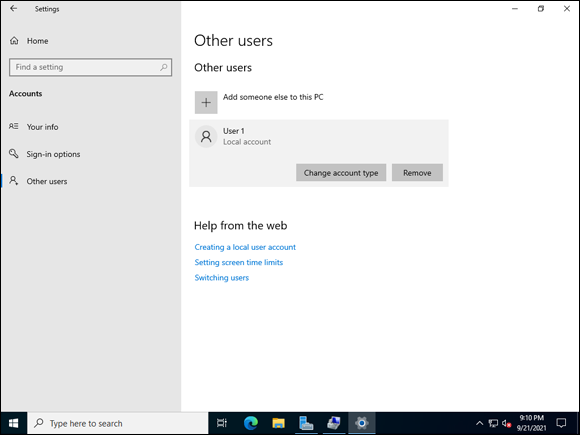
FIGURE 4-12: Managing the account of another user.
To get to PowerShell, click the Start menu and choose Windows PowerShell.
For the tasks that I’m doing, you need to open PowerShell as an administrator. If you choose PowerShell from the Start menu, that’s how it will launch. The majority of the tasks that you’ll want to accomplish will require that PowerShell is run as an Administrator. If you want to learn more about PowerShell, see Book 6.
Here are two handy commands for working with local accounts.
- To see the account’s current settings, type the following:
Get-LocalUser -Name "User1" Get-LocalUserqueries the system for information on the user account that you specify.- To change the user’s password, type the following:
$Password = Read-Host -Prompt 'Enter Password' -AsSecureString
$UserAccount = Get-LocalUser -Name "User1"
$UserAccount | Set-LocalUser -Password $Password
The words with
$in front of them are called variables. Think of them as containers for things. For instance,Read-Host -Prompt 'Enter Password' -AsSecureStringprompts you for a password and then saves it in the$Passwordvariable as a secure string. TheGet-LocalUsercmdlet retrieves the information for User1, and you store User1's information inside a variable named$UserAccount. Finally, you take the contents saved in$UserAccountand set the password with the secure string you saved earlier into$Password.
Figure 4-13 shows an example of the commands having been run.
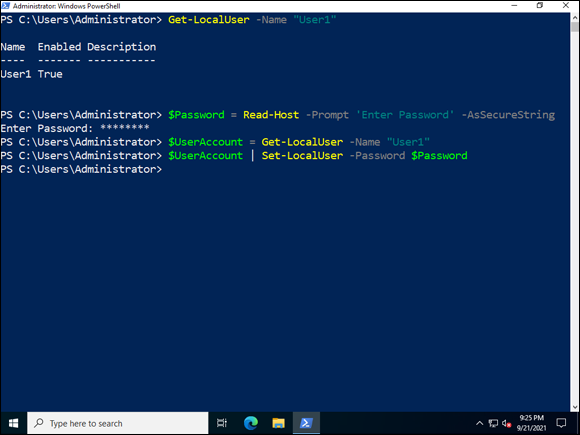
FIGURE 4-13: PowerShell window with user account management code line.
Examining the Peer Name Resolution Protocol
Peer Name Resolution Protocol (PNRP) was first introduced in Windows XP. It allows for name resolution and registration within peer-to-peer networks.
You may have noticed in the file sharing example that the share address started with the server’s name. If it weren’t for PNRP, you would have to connect with IP addresses because you would have no way to resolve the hostname. I don’t know about you, but having to remember a list of IP addresses would be very difficult for me to do, especially if there were multiple systems. You may be thinking, “Why not use Domain Name System (DNS) resolution instead?” There is no harm in using DNS, but you would need a DNS server to support that. PNRP does not require a separate server. You can get name resolution using the infrastructure already in place. Pretty cool, right? You can secure the PNRP traffic with a firewall if you need to provide better security. PNRP uses UDP 3540 to allow for name resolution to occur.
So, how does PNRP work? Let’s say that you’re on ServerA and you want to talk to ServerB. Here’s what happens: ServerA examines its cache to see if it has a PNRP ID for ServerB. There are two possibilities:
- If a match is found, ServerA sends a PNRP request message to ServerB.
- If a match is not found, ServerA sends a PNRP request message to whichever system has the closest PNRP ID to ServerB.
The PNRP request is received by whichever node it was sent to. From here, there are three options:
- If the PNRP request was sent to ServerB, and ServerB is up and responding, ServerB will send a reply to the request back to ServerA.
- If the node that received the PNRP request is not ServerB and doesn’t know who ServerB is (it doesn’t have a PNRP ID for ServerB), the node that received the request will respond to ServerA that it is not able to assist.
- If the node that received the PNRP request is not ServerB, but it either has the PNRP ID for ServerB or knows of a node closer to the PNRP ID of ServerB, it will respond with that information to ServerA. ServerA can then either reach out to ServerB, or reach out to the next closest node and start the search again.