
Chapter 1
An Overview of the Tools Menu in Server Manager
IN THIS CHAPTER
![]() Accessing the Tools menu in Server Manager
Accessing the Tools menu in Server Manager
![]() Working with common administrative tools in Windows Server 2022
Working with common administrative tools in Windows Server 2022
![]() Using Remote Server Administration Tools to manage your servers
Using Remote Server Administration Tools to manage your servers
The majority of the time, when you log in to a server, it’s to manage a role, manage a feature, or troubleshoot issues the system may be having. The great thing about the modern server operating systems is that Server Manager launches upon login and is your jumping-off point to all the tools that you’ll ever really need to use.
There are some things in the Tools menu that will be there on every server. Disk management utilities, troubleshooting utilities, and other useful system utilities are right at your fingertips. As long as the tool was written by Microsoft, and it has to do with administering the server, including the roles and features you’ve installed on the server, it will be in the Tools menu.
Accessing the Server Manager Tools Menu
There are a few ways to access the Tools menu. The simplest method is to click Tools from inside Server Manager. You can find this along the top bar of Server Manager. It gives you one-click access to the majority of your administrative tools. See Figure 1-1 for an example of the Tools menu.
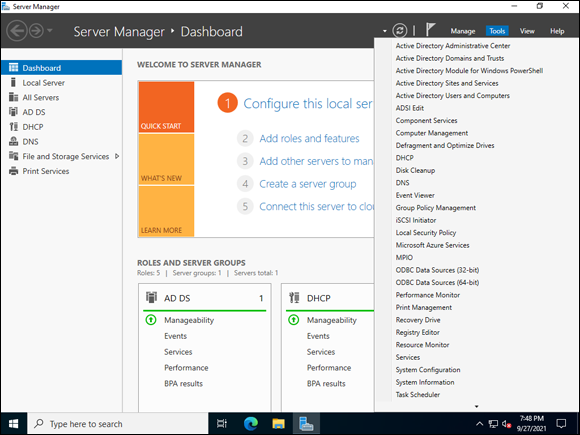
FIGURE 1-1: The Tools menu from within Server Manager.
Notice that there are Active Directory tools in the menu as well. This is due to the fact that we’re on a domain controller, which has the administration tools loaded. You can install these tools on your local PC with Remote Server Administration Tools (RSAT), which I cover later in this chapter.
The second method to access the Tools menu is to click the Start menu and scroll down until you reach Windows Administrative Tools. This is the same menu that shows up under Tools in Server Manager. It may be your go-to method of access if you’ve disabled Server Manager on startup. See Figure 1-2 for the Start menu location of the Tools menu.
 If you’ve disabled Server Manager on startup, you can click the Start menu and launch it from the Server Manager tile, or simply type servermanager into PowerShell, at the Command Prompt, or into the Run box.
The third way to access the Tools menu is the more classic method: Click the Start menu and choose the Control Panel tile. In Control Panel, choose System and Security, and you’ll have an option for Administrative Tools. This is the same menu you get with the other two methods. See Figure 1-3 for its location.
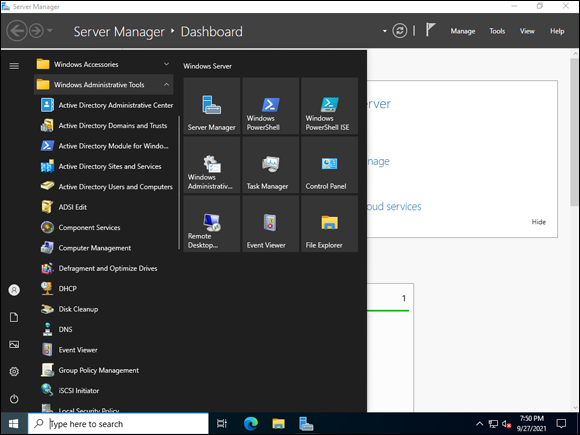
FIGURE 1-2: Windows Administrative Tools in the Start Menu is the same as the Tools menu in Server Manager.
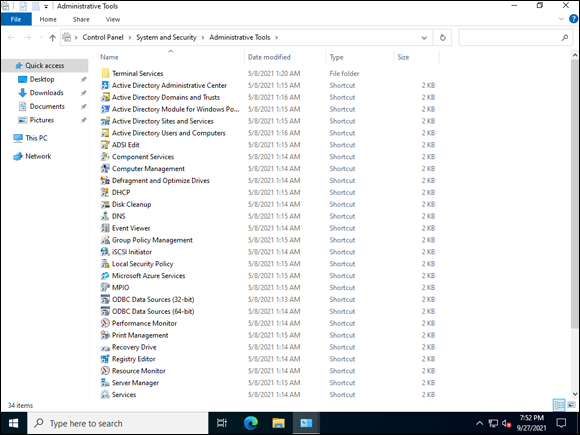
FIGURE 1-3: Accessing the Tools menu through Control Panel.
Working with Common Administrative Tools
Now that you know how to find the Tools menu, I need to fill you in on some of the more common administrative tools that you’ll find yourself using.
Computer Management
Computer Management is useful for a number of reasons. It gives you quick access to System Tools, which is a collection of tools such as Task Scheduler, Event Viewer, Shared Folders, Performance, and Device Management. It allows you to manage Storage, and it gives you access to manage the services and applications that are installed on the system. I cover each of these tools in later chapters, but for now, know that Computer Management gives you a way to access them all from the same console, as shown in Figure 1-4.
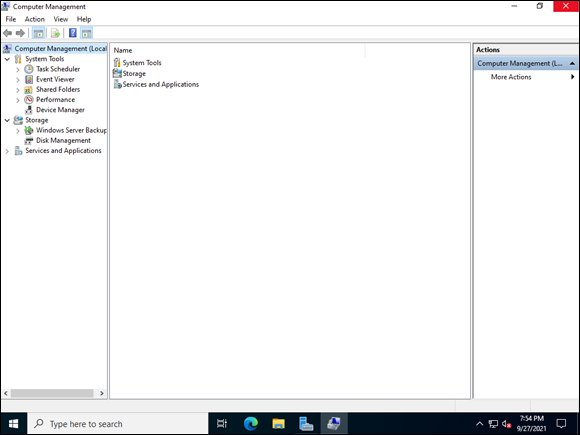
FIGURE 1-4: The Computer Management console gives you a centralized area to use administrative tools.
Defragment and Optimize Drives
When you choose Defragment and Optimize Drives, you’re given a menu that will allow you to manually analyze and optimize your drives. Optimization depends on what type of drives you have. A traditional hard disk drive (HDD), for instance, will get defragmented by the optimization process. A solid-state drive (SSD) with TRIM support (which allows the operating system to tell the SSD which blocks are not in use and can be wiped) will be retrimmed. You’ll notice that this is scheduled to run automatically once a week by default, as shown in Figure 1-5.
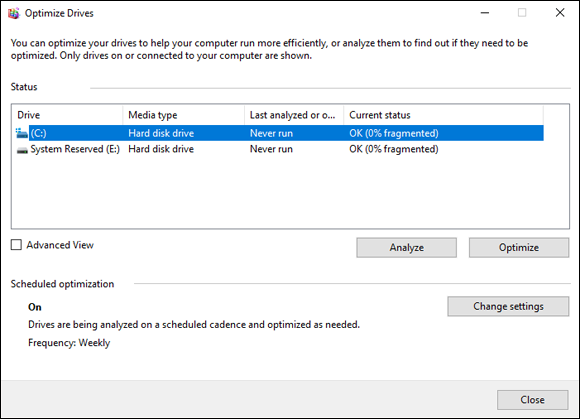
FIGURE 1-5: Defragmenting you hard drive is a scheduled task, but you can choose to run it manually.
This was a pretty good win for administrators, because the process of defragmenting drives used to be a manual one that you had to remember to do. It was typically only done when a system began having performance issues. With defragmentation being done automatically, you don’t have to worry about doing it anymore.
Disk Cleanup
The Disk Cleanup tool has been in Windows operating systems for a very long time. When you run it, it asks you which drive you want to run it against, and then it scans for things that you can get rid of safely. This will typically be temporary Internet files, content in the Recycle Bin, and so on. The tool gives you an estimate of how much space it will be able to free up. All you need to do is click OK, and it will remove whatever you have told it to remove. Note the check boxes that are checked in Figure 1-6. These are the items it will remove.
There is a More Options tab you can select that gives you the ability to remove programs you don’t use, as well as old copies of System Restore and Shadow Copies if you have them enabled.

FIGURE 1-6: The Disk Cleanup utility in all its glory.
Event Viewer
Event Viewer is probably one of the most helpful utilities when it comes to troubleshooting issues with hardware, software, and applications.
Most people, if they’ve spent any time with Windows operating systems, are used to the basic three logs in Event Viewer: Application, Security, and System. There are so many other logs you can leverage, though. Under Custom Views, you can look at logs specific to the roles that you have installed. If you click Applications and Services, then click Microsoft, and then click Windows, you can view logs specific to Windows components. A common scenario, for instance, is when you think the Windows Firewall may be blocking you. The logs for Windows Firewall show up under Applications and Services, then Microsoft, then Windows, and then Windows Firewall with Advanced Security.
If you’re looking for something specific, you can choose the log you want to search and then create a filter like the one in Figure 1-7.
I highly recommend digging into Event Viewer and experimenting with filters. The filters will really save time, especially when you’re troubleshooting an issue and your boss wants information ASAP!
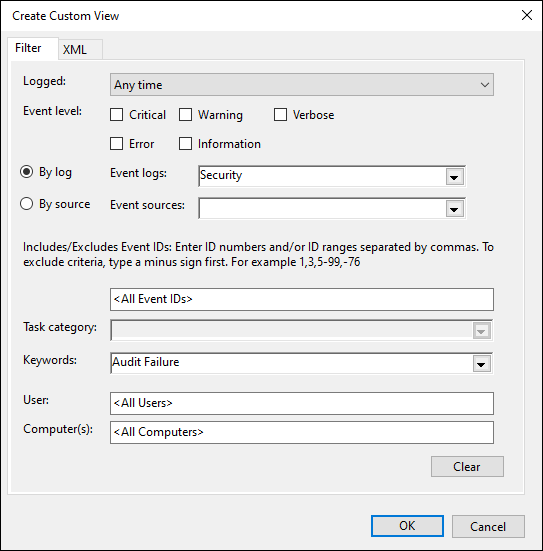
FIGURE 1-7: Using a filter in Event Viewer to find failed logins.
Local Security Policy
Local Security Policy allows you to change many of the settings on your system. If you’re in an Enterprise environment, chances are, you won’t access this because everything will be set through Group Policy. If you’re on a standalone system, or on a computer that is in a workgroup, then Local Security Policy is where you set requirements for security on the system. This may include settings for accounts, auditing requirements, and other security-related settings. You can see the local password policy in Figure 1-8.
Registry Editor
 The Registry Editor will allow you to make changes to your system’s Registry. Use this tool with extreme caution! If you change something that you shouldn’t have, you could cause damage to your system.
I cover the Registry in more depth in Book 3, Chapter 3. Be sure to check it out! There, I discuss what each of the hives is for, how to interact with them, and even more important, how to back up the Registry before making changes.
Just about every setting on your system is stored in the Registry somewhere. Figure 1-9 shows you the area of the Registry where system colors are set. These are stored as RGB values. For instance, 255 255 255 is white and 0 0 0 is black.

FIGURE 1-8: The local password policy set in Local Security Policy.
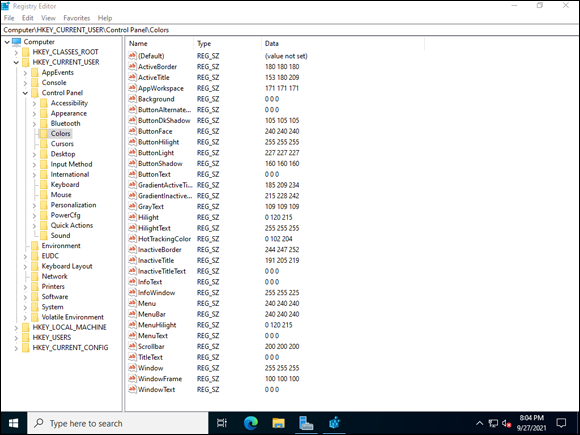
FIGURE 1-9: System colors are stored in the Registry.
Services
Clicking Services brings up the Services management console. Every service on the system shows up in the console. You can see what the status of the service is, what the startup type is set to, and which account each of the services is using to run.
 A service is an application that runs in the background. You don’t normally interact with it directly, although you can stop and start a service and define startup options for it.
If you double-click one of the services, you’re presented with several tabs. The General tab allows you to change the startup type. You have your choice of the following:
- Automatic: Services whose startup type are automatic will start when the server starts.
- Automatic (Delayed Start): If a service has Automatic (Delayed Start) it means that it will start, just not right away. This is typically done for services that have a dependency on another service. It ensures that the dependency is satisfied before the service comes up.
- Manual: If a service is set to manual, it means that something has to kick it off. This may be a user action or a call from an application.
- Disabled: If a service is disabled, it can’t be started.
You can also stop and start the service. On the Log On tab, you can set the account the service will run with. The Recovery tab allows you to specify what action to take if the service runs into an issue. You can set it to restart the service, run a program, or restart the system. The Dependencies tab will tell you if the service is dependent on any other services, and whether any services are dependent on it. You can see the Properties of the Server service in Figure 1-10.
System Configuration
System Configuration allows you to work with boot time services. On the General tab, for instance, you can choose Normal Startup (default), Diagnostic Startup, or Selective Startup. These are helpful for diagnosing issues that happen when the full OS boots. See Figure 1-11 for an example of the General tab in System Configuration.
The Boot tab allows you to specify which drive to boot to, and some boot options like safe boot, No GUI boot, and so on.
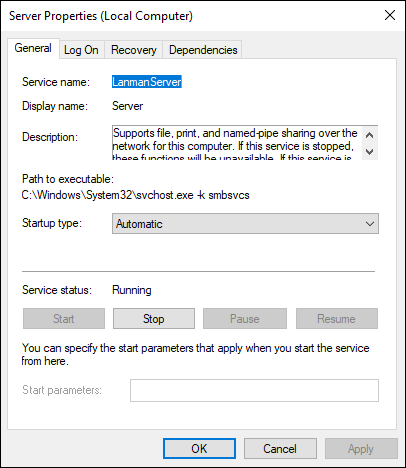
FIGURE 1-10: The Server service Properties page allows you to set startup type and manage the service.
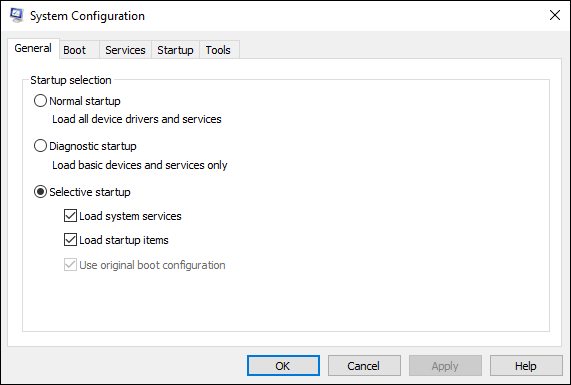
FIGURE 1-11: The General tab in System Configuration lets you set the type of startup you want.
The Services tab allows you to specify which services should be enabled or disabled. You can choose to hide all the Microsoft services so that you can see which third-party services are installed.
The Startup tab still exists, but Startup items are not enabled by default, so the tab is blank unless you enable them.
Last but not least, the Tools tab has many different OS tools. You can select the tool, and it will display the location of the tool. In addition, you can click the Launch button to actually launch the tool.
Task Scheduler
The Task Scheduler allows you to schedule various administrative tasks so that they execute automatically. Many of the Windows components have their own tasks out of the box.
You can create your own tasks to run custom scripts or perform other actions through Task Scheduler as well. You choose what you want the trigger to be. Triggers can be anything from a scheduled time to a logon, an event, and so on. See Figure 1-12 for a view of a custom task in Task Scheduler.
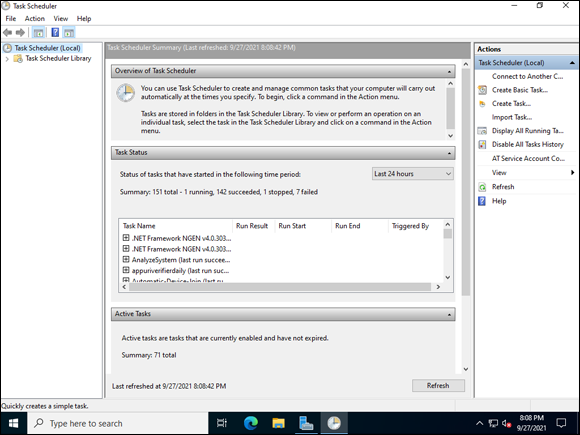
FIGURE 1-12: Creating a custom task in Task Scheduler.
Installing and Using Remote Server Administration Tools
When you install the management features along with roles and features, you are installing components of RSAT. RSAT is often installed on a desktop so that you can manage your servers from your workstation instead of logging on to each individual server. In this section, I walk you through installing RSAT on a Windows 10 system, and show you how to add servers to manage.
Installing Remote Server Administration Tools
As of the 1809 build of Windows 10, RSAT is included as part of the operating system and you only need to enable it. Follow these instructions to install RSAT:
- Click Start and then click Settings.
- Select Apps and then select Optional Features.
- Click Add a Feature.
- Select the specific RSAT tools you need.
You can search for the RSAT tools specifically by typing RSAT in the search field and then pressing Enter. They’re all prefaced with RSAT:.
The 1809 version update was a nice touch. It saves administrators time because you no longer have to go out to download and install the package. Be sure to install Server Manager. The examples I provide assume that you installed this part of RSAT.
Microsoft provides version numbers that identify which build of Windows 10 you’re on. For instance, version 1809 was released on November 13, 2018. In 2020, the build numbers were revised somewhat. 20H2 was released in the second half of 2020, and 21H1 was released in the first half of 2021.
Using Remote Server Administration Tools
After RSAT is installed, you’ll want to start using it. Let’s get started!
- Click the Start menu.
- Scroll down to S and choose Server Manager.
When Server Manager launches, click the Add Other Servers to Manage link on the Quick Start tile.
The Active Directory tab allows you to search Active Directory for systems to add, as shown in Figure 1-13.
- Select SERVER2022-DC and click the right arrow to select it.
- Click OK.
- After the system is added, the roles and/or features that are installed on that server can now be managed through Server Manager on my Windows 10 client system, as shown in Figure 1-14.
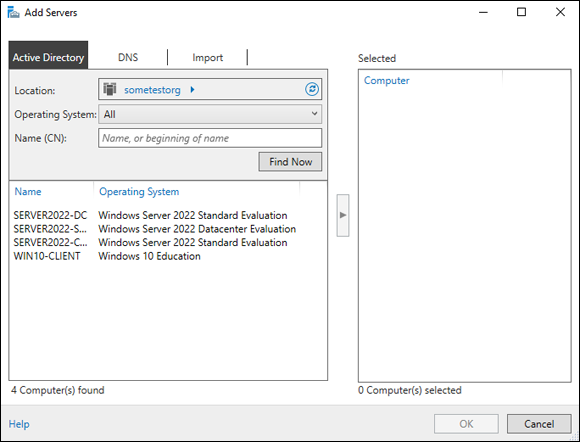
FIGURE 1-13: Searching Active Directory for systems to manage.
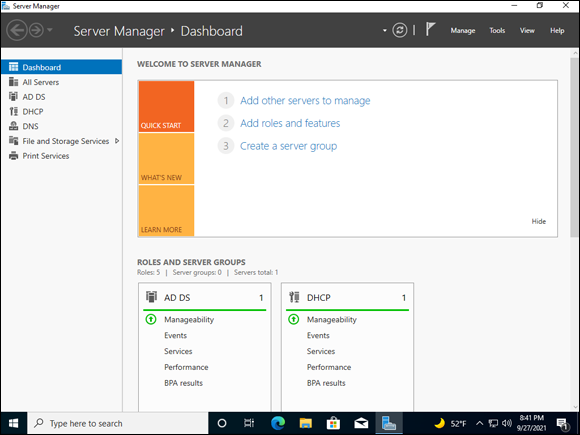
FIGURE 1-14: Server Manager showing the roles from the system I added.
You can now add roles and features just as you would if you were on the servers in question. Let’s try that.
- From Server Manager click Manage and then click Add Roles and Features.
- On the Before You Begin screen, click Next.
- On the Select Installation Type screen, click Next.
- On the Select Destination Server screen, choose the remote server you want to install the role or feature on and click Next.
From that step on, it’s identical to installing while logged into the server.
In Server Manager on the All Servers tab, right-click on a server you want to manage. Depending on what’s installed, you get a slightly different list. The list in Figure 1-15, for instance, is from my domain controller, which I just added.
That should give you an idea of what Server Manager is capable of doing. Install it and make your life as a system administrator easier!
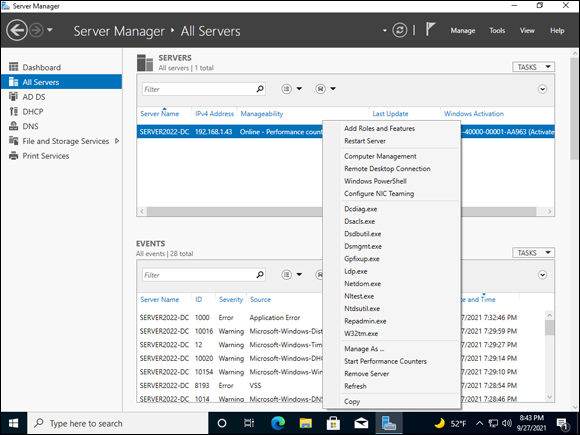
FIGURE 1-15: Managing a remote server with Server Manager on Windows 10.