
Chapter 2
Setting Group Policy
IN THIS CHAPTER
![]() Understanding how Group Policy works in an Active Directory domain
Understanding how Group Policy works in an Active Directory domain
![]() Starting the Group Policy Editor to work with Group Policy Objects
Starting the Group Policy Editor to work with Group Policy Objects
![]() Performing computer management with Group Policy
Performing computer management with Group Policy
![]() Achieving user configuration with Group Policy
Achieving user configuration with Group Policy
![]() Viewing Resultant Set of Policy to troubleshoot issues with Group Policy
Viewing Resultant Set of Policy to troubleshoot issues with Group Policy
Making settings changes on one or two systems isn’t that bad. But imagine you work in an enterprise with 200 systems. Or 2,000 systems. Suddenly making settings changes on individual machines becomes an impossible task. This is where Group Policy comes into play.
Group Policy allows you create a policy and then target that policy to users or systems within organizational units (OUs), security groups, or even on an individual basis. Group Policy is a very powerful way to enforce your organization’s requirements across all Active Directory domain joined systems. Common items that get configured by Group Policy are
- Password policies
- User rights assignments (who can do what)
- User Account Control (UAC) settings
- BitLocker settings
- Patch management settings
Group Policy offers hundreds of configuration items that allow you to centrally manage the configuration and security of all your domain-joined systems.
Understanding How Group Policy Works
A Group Policy Object (GPO) is a collection of settings. The GPO can be linked at several different levels, most commonly domain or OU. You can target specific systems or security groups within the GPO as well.
On startup, computer-focused GPOs are applied. These GPOs affect settings on the computer regardless of who logs into the system afterward. User policy objects are applied when a user logs into a system; they are used to make changes that would impact the user such as password policies, lockout policies, and so on. User GPOs follow the user regardless of which system the user logs in to. Remember the following rule: Last applied wins. If you run into an issue with a policy not doing what you’re expecting it to do, a later GPO may be overwriting the behavior of a preceding GPO.
By default, Group Policy refreshes every 90 minutes, although there may be a randomized delay of up to 30 minutes. So, if you apply a change, it may take up to 120 minutes for that change to be applied to all systems/users. Some settings do not refresh in this way and require the user to log out and log back in or require a restart of the system. Changes that fall into this category are things like folder redirection, drive mappings, and some file preferences.
Group Policy applies its settings in a set order:
- Local policies (set by
gpedit.msc) - Site policies
- Domain policies
- OU policies
Think of it as a top-down approach to processing: After the local policies have been applied, site GPOs are the most broad, followed by domain GPOs, and then OU GPOs. Most system administrators have experience managing GPOs at the domain and OU level.
A common issue that occurs is when a system administrator makes a change to a domain-level policy, but the change doesn't seem to be applying. The most common culprit is an OU-level policy that is overwriting the setting from the domain policy.
In Group Policy, you configure settings with policies and preferences. Table 2-1 is a comparison of the two to see what the differences are between them.
TABLE 2-1 Group Policy: Policies versus Preferences
Policies | Preferences |
|---|---|
When a Group Policy policy is no longer applicable, the setting is removed, and the original value is restored. | When a Group Policy preference is no longer applicable, the setting remains in the registry. |
When a Group Policy policy is set to a certain value for an application, the application uses the value set by the policy. If the policy is removed, the application will use the original value. | When a Group Policy preference is set to a certain value for an application, it overwrites the default value for the application. If the preference is removed, the value for the application will remain the same. |
When a Group Policy policy is used to enforce settings, users see grayed out options that inform them that the setting is managed by their administrators. | When a Group Policy preference is used to enforce settings, users can change the setting manually. Group Policy will not reapply the configured value after the first time it was applied. |
 One last thing before I move on to the next section: Group Policy has been around for a long time, since Windows Server 2000. There is a newer way to configure systems: PowerShell Desired State Configuration (DSC). Group Policy and PowerShell DSC should not be used to make configuration settings on the same systems at the same time. If one setting is different between the two, you’ll run into a constant battle between the GP policy applying and overwriting a setting, followed by PowerShell DSC changing the setting back to the previous value. If you’re in an enterprise environment that is already using Group Policy, my suggestion is to stick with Group Policy. If you’re building your environment from scratch, or if you’re in a DevOps-centric environment, PowerShell DSC is the better choice going forward. You can learn more about PowerShell DSC in Book 6, Chapter 5.
Starting the Group Policy Editor
In Server Manager, choose Tools⇒ Group Policy Management. Group Policy Management is available on the server itself, assuming you installed the management tools. It is also available through Remote Server Administration Tools (RSAT) so you can manage Group Policy from your Windows 10 desktop.
When you first start the Group Policy Management snap-in, you see an entry for the Active Directory forest you’re in. Click the arrow beside that forest to expand it. Click the arrow next to Domains to expand that, and then expand your domain name by clicking the arrow next to it.
With a fresh Active Directory environment, you have a Default Domain Policy. This is linked at the domain level. The Default Domain Policy is typically where you set things that will apply to all users, like passwords and other security settings. You can see in Figure 2-1, that the Default Domain Policy is applied to anyone in the Authenticated Users group, indicated by the presence of this group in the Security Filtering section.
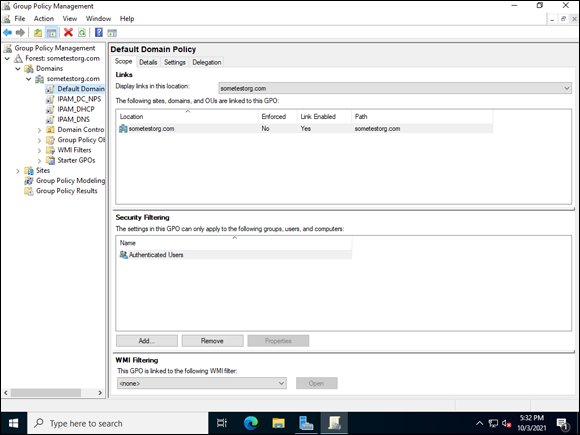
FIGURE 2-1: The Default Domain Policy is set at the domain level.
To open the Group Policy Management Editor, all you need to do is right-click a GPO and choose Edit. The Group Policy Management Editor opens, and you can make your changes from there.
In the following sections, I show you how to make changes to Group Policy. I cover computer management first and then user configuration. I also go over how you can see which policies are getting applied.
Performing Computer Management
Computer management activities can encompass everything from security settings to what applications you want to install on a particular system. You can do quite a few different things with Group Policy. The only real limitation to what you can do with Group Policy is whether there is a setting that will perform the configuration you require.
Follow these steps to create a brand-new GPO:
- With Group Policy Management open, and the tree expanded, right-click Group Policy Objects and choose New, as shown in Figure 2-2.
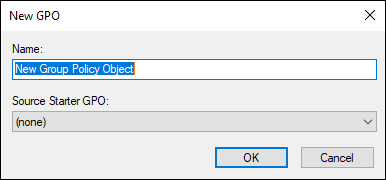
FIGURE 2-2: Creating a new GPO.
Name your GPO.
I’ll name mine Computer GPO.
Leave Source Starter GPO blank and click OK.
If you want to create GPO templates for common administrative tasks, you can create them in the Starter GPO’s folder instead of the Group Policy Objects folder. This allows you to choose them as a source when creating a new GPO and will automatically copy their settings into your new GPO.- With the new GPO selected, click the Add button underneath the Security Filtering section in the main window of the policy.
- Click the Object Types button, select the Computers check box, and click OK.
Enter the name of the server (or group of servers) you want to target, and click OK.
In my case, this will be SERVER2022-DC.
- To link the GPO at the domain level, right-click the domain name and choose Link an Existing GPO.
- Select Computer GPO (or whatever you chose to call your new GPO) and click OK.
That’s all there is to getting started with editing Group Policy. Now let’s make some actual edits to the Computer GPO that you just created.
Modifying computer software settings
The software settings area in Group Policy allows you to install software on systems to which the GPO is applied. You might use this to deploy software to a particular group of systems, or to all your systems as a whole.
Note: The software you want to deploy needs to be in a shared folder that is accessible to the systems that you’re wanting to deploy it to. The systems need to have permission to access the shared folder and its contents. In this case, I’ve created a shared folder called Software, and that is where I’ve chosen the package.
Follow these steps to deploy software with Group Policy:
- Starting from the Group Policy Management screen, right-click the GPO that you created earlier and choose Edit.
- Expand Computer Configuration, Policies, and Software Settings, and then select Software Installation.
Right-click the blank space next to Software Installation and choose New⇒ Package.
The browser box will open looking for Windows installer packages. These typically end in
.msi.- Select the file and click Open.
- Select Assigned and click OK.
You can see in Figure 2-3 that I now have my software package assigned to be installed through this GPO, and that the software source is the shared folder I created before.
Modifying computer settings
The Windows Settings area of the Computer Configuration allows you to change certain areas of the system configuration. You can configure Domain Name System (DNS) settings, set Startup and Shutdown scripts, and set up printers and security settings.

FIGURE 2-3: Setting up software to be deployed via Group Policy.
Here’s how to set some of the basic security settings for a computer:
- Starting from the Group Policy Management screen, right-click the GPO that you created earlier and choose Edit.
- Expand Computer Configuration, Policies, Windows Settings, Security Settings, and Local Policy, and then select Audit Policy.
- Double-click Audit Account Logon Events.
- Select Define These Policy Settings, choose Success and Failure, and click OK.
- Repeat Steps 3 and 4 for each of the items in Audit Policy.
When this is completed, your screen should look similar to Figure 2-4.
Take the time to look through the rest of the settings under Local Policies. You can do quite a few things to customize how your users will interact with your systems. For instance, you can block Microsoft accounts so users have to log in with an Active Directory account. You can change the login screen so that it doesn’t show who the last logged on user was. There are so many settings available to you that I recommend you look through them and experiment in a home lab or a test lab if you have one.

FIGURE 2-4: Setting the audit policy to track both successes and failures.
 Don’t modify Group Policy in a production environment until you’ve fully tested the change in a test environment. Due to the delay in Group Policy processing, you could break things — badly, and you can’t roll back quickly. It could take a few minutes for Group Policy to reapply with the working settings.
Using Administrative Templates
Administrative Templates allow you to further customize how your users will interact with your systems. Here’s how to customize the Start menu:
- Starting from the Group Policy Management screen, right-click the GPO that you created earlier and choose Edit.
- Expand Computer Configuration, Policies, Administrative Templates, and Start Menu and Taskbar.
- Double-click Do Not Keep History of Recently Opened Documents.
- Choose Enabled and click OK.
This is just a very small example of what you can do. Look through the rest of the Administrative Template settings that are available to you. You have loads of customization options.
Performing User Configuration
User configuration follows a user rather than a particular computer. User GPOs apply when a user logs in and potentially when a user logs out, depending on what the GPO has been set to do. User GPOs are often used to make account settings or software installations where the user is more important to target than the system. Use them with care, though, because they can increase login times for users.
Modifying user software settings
Similar to the Computer Configuration, software can be installed based on users if configured in User Configuration. Follow these steps:
- Starting from the Group Policy Management screen, right-click the GPO that you created earlier and choose Edit.
- Expand User Configuration, Policies, and Software Settings, and then click Software Installation.
Right-click the blank space next to Software Installation, and choose New⇒ Package.
The browser box will open looking for Windows installer packages. These typically end in
.msi.- Select the file and click Open.
- Select Assigned and click OK.
Your screen should now look similar to Figure 2-5. If it does, you’ve successfully deployed software to your users. Note: You would not typically deploy the same software to computer and user. You would choose one or the other.
Modifying a user’s Windows Settings
Similar to Computer Configuration’s Windows Settings, the User Configuration’s Windows Settings has system-specific settings. The biggest difference is that they apply when the user logs in, rather than when the system starts up. Windows Settings doesn’t have anywhere near as many options as the Computer Configuration equivalent does.

FIGURE 2-5: Software deployed via the User Configuration.
Let’s set up folder redirection for the user’s Documents folders. This is a common use case because users save things in Documents where they don’t get backed up. By turning on redirection, you can save the user’s Documents folders on the server where it does get backed up. Follow these steps:
- Starting from the Group Policy Management screen, right-click the GPO that you created earlier and choose Edit.
- Expand User Configuration, Policies, Windows Settings, and Folder Redirection, and then select Documents.
Right-click the blank area to the right of Documents, and choose Properties.
The Document Properties dialog box appears.
- On the Target tab, from the Setting drop-down list, choose Basic.
- Under Target Folder Location, select Create a Folder for Each User under the Root Path.
Click the Browse button and choose where you want the Documents folders to redirect to.
Your screen should look similar to Figure 2-6. Normally the redirection is done to a file server on the network with enough storage to support all the user directories.
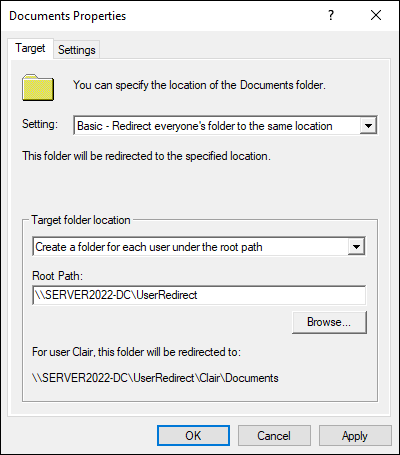
FIGURE 2-6: Setting up folder redirection for the Documents folder.
Click OK.
You receive a warning regarding older operating systems not potentially being able to support folder redirection.
- Click Yes to continue.
You’ve now set up folder redirection for your user’s Documents folder. You won’t see anything in the Group Policy Management Editor. However, you can verify the redirection is working by having one of the affected users log out and then log back in. She should have her folder created on the server in the share location you specified. Pretty cool!
Using user Administrative Templates
User Administrative Templates are very similar to the Computer versions, except they allow you to customize specific areas in the OS related to users.
- Starting from the Group Policy Management screen, right-click the GPO that you created earlier and choose Edit.
- Expand User Configuration, Policies, Administrative Templates, and Desktop, and then choose Desktop.
- Double-click Disable Active Desktop.
- Choose Enable and then click OK.
If your organization has wallpaper it wants on everyone’s systems, you can set that here as well, under Desktop Wallpaper. Simply point it to the shared folder where the wallpaper is stored and — voilà! — the next time your user logs in, he’ll get the new wallpaper.
I recommend you dig through the menus and see what options are available to configure. You can customize to a great level of detail.
Viewing Resultant Set of Policy
You’ve configured your GPOs and you’ve applied them, but something just isn’t working right. Your user isn’t receiving the Group Policy settings that you’re expecting her to, and you aren’t sure why. This is where you need to look at Resultant Set of Policy (RSoP). Let’s launch RSoP and see what the results look like:
- Right-click the Start menu and choose Windows PowerShell.
Type rsop.msc and press Enter.
RSoP runs and then displays the results of the settings that are currently applied.
If the software I set up in the GPO hadn’t installed, I could click User Configuration, click Software Settings, and select Software Installation.
If the software I setup in the GPO is there, then I know the policy applied and the installation must have failed for another reason. If the software I’m applying via policy isn’t there, then I know that the policy didn’t apply. If this is a user policy, that may mean I need to log out and log back in. If it’s a computer policy, a reboot may be needed.
RSoP is a very helpful utility. It shows you only the categories that have settings applied. Keep in mind that User Configuration applies to the currently logged-on user. In Figure 2-7, for example, you can see that I don’t have Administrative Templates showing up under my User Configuration even though I set the setting for Active Desktop. This is expected behavior in this case, because I haven’t logged out and logged back in since I made that change. If I was troubleshooting an issue for a user and saw this, I would ask the user to log out and then log back in so the new setting could apply.
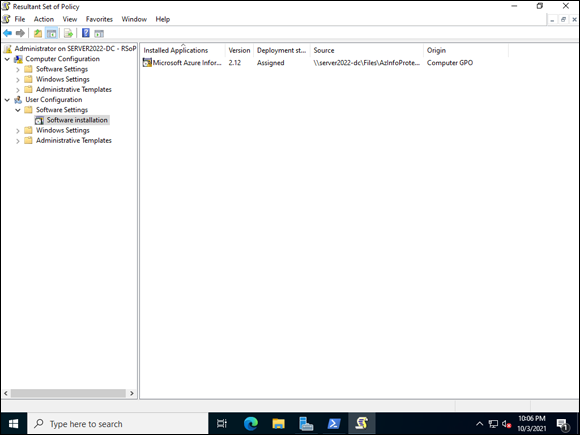
FIGURE 2-7: RSoP shows which GPOs are successfully applied.