
Chapter 3
Accomplishing Advanced Network Tasks
IN THIS CHAPTER
![]() Gaining remote access with Remote Desktop Services
Gaining remote access with Remote Desktop Services
![]() Working with Network Policy and Access Services on Windows Server 2022
Working with Network Policy and Access Services on Windows Server 2022
![]() Troubleshooting network issues at the command line
Troubleshooting network issues at the command line
Knowing how to set up the basics of Windows Server networking is a must, but knowing how to set up some of the more advanced services can be very important, too. Although the network provides access to resources, sometimes you need to allow remote access or set up access for network devices to leverage your Active Directory (AD) infrastructure for authentication.
In this chapter, I explain how to set up Remote Desktop Services (RDS), and tell you what’s required to get it set up properly. I also discuss installing the Network Policy Server (NPS) component of the Remote Access Service (RAS) role, which allows network devices to leverage a protocol called RADIUS, which in turn allows for authentication against AD, even if the device itself is not AD-aware.
Working with Remote Desktop Services
Remote Desktop Services, formerly known as Terminal Services, allows for multiple Remote Desktop Protocol (RDP) connections to the same server. By default, Windows Server 2022 allows for two remote connections. RDP allows you to connect to a remote system and view the desktop, just as if you had the actual console of the server up. To allow Remote Desktop, you need to enable it on the server, and you must allow TCP and UDP 3389 if there is a firewall between you and the server that you want to RDP to.
Using RDS, you can give your users their own virtual desktops to work from. This is great for applications where the install is complicated or costly, and it simplifies upgrades because you only need to upgrade the application on the server, not on multiple PCs. You can also use RDS for RemoteApps, which allows you to run an application on the server but present the application to the user as if it were installed on their desktop.
Installing Remote Desktop Services
Remote Desktop Services is a role, but the installation is a bit different from the past roles that you may have installed. Here’s how to install RDS:
Starting from Server Manager, click Manage and then click Add Roles and Features.
The Add Roles and Features Wizard opens.
- On the Before You Begin screen, click Next.
- On the Select Installation Type screen, select Remote Desktop Services Installation, as shown in Figure 3-1, and click Next.
- On the Select Deployment Type screen, select Quick Start and click Next.
- On the Select Deployment Scenario screen, choose Session-Based Desktop Deployment and click Next.
- On the Select a Server screen, the server you are on is already selected, so just click Next.
On the Confirm Selections screen, check the Restart the Destination Server Automatically If Required check box, and then click Deploy.
You see a progress screen as the role installs (see Figure 3-2). When the role is installed, the server reboots.
- After the server reboots, click Close.
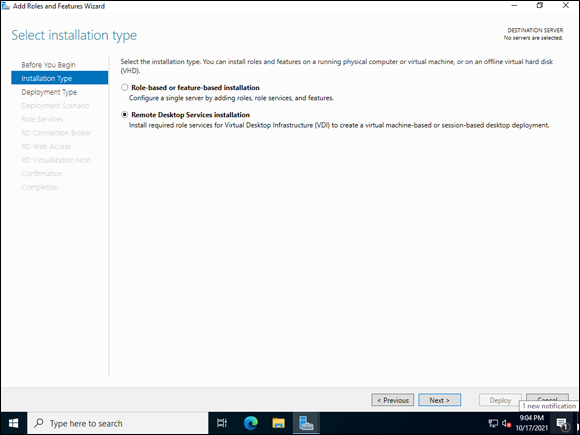
FIGURE 3-1: Selecting Remote Desktop Services is a departure from the usual steps for installing a role.
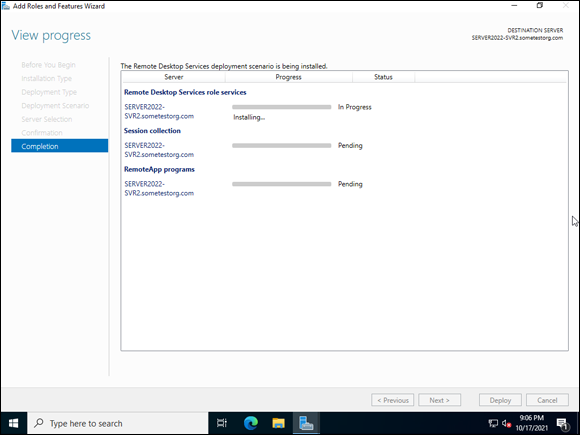
FIGURE 3-2: Installing the RDS role on a single server via the Quick Start installation.
Configuring user-specific settings
After you have RDS installed, you may be tempted to let people start connecting and enjoying the service, but you should hold off because you may want to make some changes first. If you use roaming profiles, you may want to set the RDS server to use roaming profiles. You may also want RDS to map the user’s home drive. The goal is generally going to be giving your end users the best experience possible, with things like being able to access mapped drives and applications just as they would on a regular, physical desktop. You can do all of these things in RDS just as you do with regular user sessions.
- Log on to a system that has the RSAT tools installed for Active Directory.
- Click Server Manager and then choose Tools⇒ Active Directory Users and Computers.
- Expand your domain name and select the Users container.
Double-click a user account.
In this example, I’m using my Karen Smith account.
The Properties dialog box for the user you selected appears.
- Click the Remote Desktop Services Profile tab (see Figure 3-3).
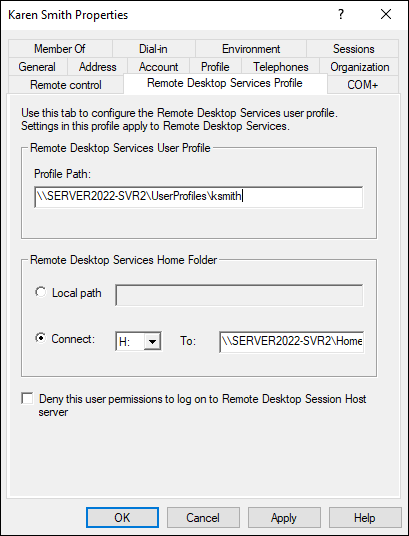
FIGURE 3-3: Setting up a user’s profile to take full advantage of the RDS functionality involves a roaming profile and mapping a home drive.
Fill in the information as needed.
Here are your options:
- Profile Path: Fill this in if you’re using roaming profiles.
- Remote Desktop Services Home Folder: This sets the home drive for the user when they log into a session on RDS.
- Deny This User Permissions to Log on to Remote Desktop Session Host Server: Checking this box blocks the user from connecting through RDS, regardless of whether they’re part of a security group that allows it.
Configuring apps
One of the really useful things about RDS is the ability to publish apps. You may be publishing them to a user’s desktop, or you may want to make them available through RD Web Access. There are common reasons to share applications through RDS. Applications that rely on old versions of Java or Flash or Internet Explorer, for example, are great candidates for this service. By using RDS to support this legacy application, you only have the old version of the software installed on one system, rather than all the systems where users need to use the legacy application. This reduces the amount of vulnerable software on your network. Windows Server 2022 has three apps already shared by default (assuming you deployed with the Quick Start method — see “Installing Remote Desktop Services,” earlier in this chapter): Calculator, Paint, and WordPad. Let’s say the business doesn’t want users to work with WordPad through RDS; instead, it wants users to work with Notepad++. You can install Notepad++ on the server and configure it to be used over RDS. In that case, you would follow these steps:
- Download the Notepad++ executable and install it on the Windows server you installed RDS on earlier.
- From Server Manager, click the side menu where it says Remote Desktop Services.
- Click QuickSessionCollection located under Collections.
- In the RemoteApp Programs window, click Tasks and then click Publish RemoteApp Programs.
- Click Add, locate the executable for Notepad++, make sure it’s selected (see Figure 3-4), and then click Next.
- On the Confirmation screen, click Publish.
- On the Completion screen, click Close.
- Right-click the newly added app, and choose Edit Properties.

FIGURE 3-4: Adding a non-Windows program to the list of RemoteApp programs available is simple as long as you know where the executable is.
Click User Assignment.
By default, everyone has access to the new app. However, you can change that by selecting Only Specified Users and Groups.
- Make your changes if desired, and click OK.
That’s all there is to configuring an application and making it available to your users with RDS.
Using RD Web Access
RDS has a great feature known as RD Web Access, which allows you to connect to applications or Remote Desktop sessions via a standard web browser. By default, when you install RDS in Quick Start mode this is enabled, and the address follows this format: https://serveraddress/RDWeb.
You can control which applications are visible in RD Web Access from the same screen where you publish new apps. By default, they're published in RD Web Access when you publish them on the RDS Server. If you don’t want an app to be in RD Web Access, you can edit the properties of the app. The General tab has an area titled Show the RemoteApp Program in RD Web Access. Simply change the button to No and click OK to remove it.
Before you can access the RD Web Access page, you need to configure a Secure Sockets Layer (SSL) certificate. In previous versions of Windows Server, a self-signed certificate was automatically created and you could just bypass certificate warnings. A self-signed certificate is no longer created by default, however, so let’s create one and attach it to the RDWeb service. Follow these steps:
- Open Server Manager and select Remote Desktop Services from the menu on the left.
- On the Overview screen, click the Tasks drop-down next to Deployment Overview.
- Select Edit Deployment Properties.
- Select Certificates to expand it.
- Click RD Web Access
Click Create New Certificate
You can alternatively click Select Existing Certificate if you have a certificate issued from your enterprise Public Key Infrastructure (PKI) system.
For certificate name, you need to enter a fully qualified domain name (FQDN).
For my example, I’ve entered server2022-svr2.sometestorg.com.
- Enter a password.
- Select the Store This Certificate check box and choose a location to save the certificate.
- Check the Allow the Certificate to Be Added to the Trusted Root Authorities Certificate Store on the Destination Computers check box.
Click OK.
State will say Ready.
Click Apply.
After you’ve clicked Apply, State will say Successful.
Keep in mind that you only need to perform steps 6 through 11 if you don’t have a certificate already issued by a trusted certificate authority. If you’d like to know more about deploying your own certificate authority in Windows Server, check out Book 5, Chapter 6.
I assume if you’re reading and you’ve done this setup that you want to play with RD Web Access. Open your web browser (on a system that is not the RD web server) and enter the address for your RD web server. In my case, the address is https://server2022-svr2.sometestorg.com/RDWeb.
You may get an error due to an untrusted certificate. This is expected because the certificate is self-signed if you chose to create a certificate in the previous instructions. You can safely disregard this message for now. After you’ve entered the address, you should see a screen similar to Figure 3-5.
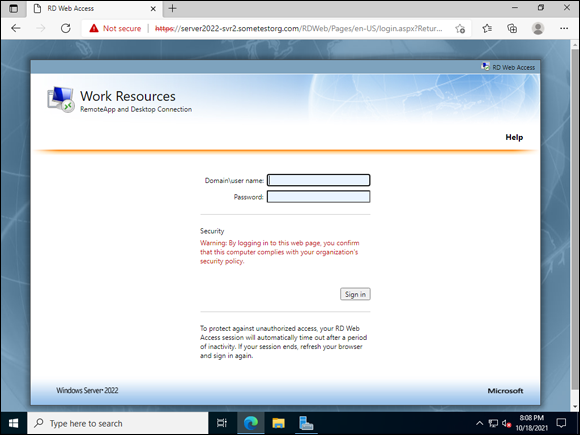
FIGURE 3-5: The logon screen for RD Web Access is simple and elegant.
When you log in to RD Web Access, you see all your published apps that you have permissions to. If you were following along in the previous section and installed the Notepad++ application, you see the icon for Notepad++ in the list. Click that icon to launch Notepad++.
You may get a message saying that a website is trying to run a RemoteApp program. It’s complaining because Microsoft doesn’t recognize the publisher. Because you know that Notepad++ is safe, go ahead and click Connect. You see a dialog box that says Starting Your App (see Figure 3-6). After the remote connection to the server is established, the application will open just as if it were installed on your system.
Configuring and using RDS licensing
Licensing for RDS is done with client access licenses (CALs). A CAL is essentially a commercial license that allows you to consume a service on a server. The RDS CAL specifically is used to license either a user or device that is connecting to the RDS server.
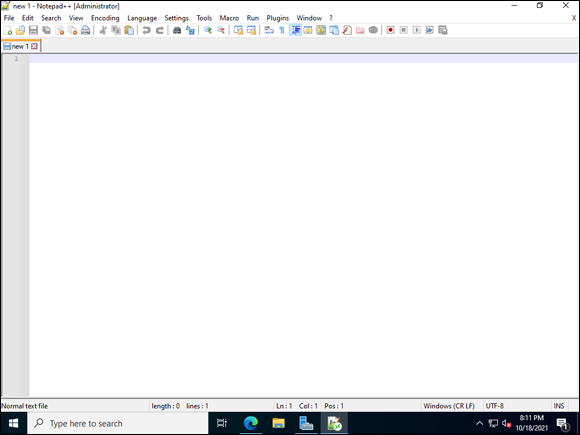
FIGURE 3-6: When you select an application in the RD Web Access console, a remote connection is established, and then the application opens as if it were actually installed on your system.
There are two types of Remote Desktop Services (RDS) licensing:
- Device-based licensing: Device-based licensing has the following characteristics:
- It’s physically assigned to a device.
- It can be tracked regardless of whether a device is in Active Directory or not.
- Temporary CALs are good for up to 89 days.
- CALs can’t be over-assigned.
- User-based licensing:
- CALs are assigned to users in Active Directory.
- CALs can’t be tracked via workgroup; they can only be tracked via Active Directory.
- Temporary CALs aren’t available.
- CALs can be over-assigned (which allows you to go over what you’re allowed in your licensing agreement).
You need to have an active licensing server to be able to assign licenses. I find it strange that this piece doesn’t get installed with the other components for RDS. Here’s how to install the licensing role onto your RDS server:
- From Server Manager, click the left side of the screen where it says Remote Desktop Services.
- In the Deployment Overview window, click the green plus sign labeled RD Licensing to start adding the RD licensing role.
- Select your server and click the arrow to move your server into the selected box.
- Click Next and then click Add.
Click Close.
Now that RD Licensing is installed, the plus sign has been replaced by a ribbon icon, as shown in Figure 3-7.
- Click the Tasks button right above RD Licensing and choose Edit Deployment Properties.
Click RD Licensing and select which licensing mode you want to use.
I’m going to select Per User.
- Click OK.
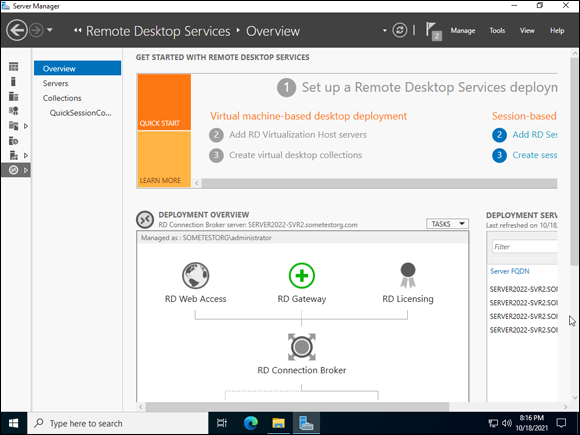
FIGURE 3-7: Click the plus sign to install the RD Licensing role.
Now that the licensing server is installed, let’s look at how to add a license to the RDS server:
- From Server Manager, choose Tools⇒ Remote Desktop Services⇒ RD Licensing Manager.
- Right-click the server name and choose Activate Server.
- In the Welcome to the Activate Server Wizard, click Next.
- Under Connection Method, leave it on Automatic Connection and click Next.
- Enter your company’s information, and click Next.
Skip the next screen because it’s asking for additional optional information — just click Next.
You see a message that says “Activating the License Server.”
If activation was successful, you see the Completing the Activate Server Wizard screen.
- Click Finish.
Now that your RDS server is activated, you can install your CALs.
- Right-click the server and choose Install Licenses.
- On the Welcome screen, click Next.
- Select the program that you purchased your licenses through, and click Next.
- Enter the information for your license program (a license code, agreement/authorization code, or something along those lines), and click Next.
Select your product version, your license type, and the number of licenses you want to install, and click Next.
You server will reach out to Microsoft to retrieve the licenses.
- After the licenses are retrieved, click Finish.
Your RDS server is now installed and licensed. Your users are able to connect to remote desktop sessions and do their work as if they were sitting in front of a desktop in the office. Or maybe they can access a legacy application that has historically had difficulty running on their regular desktops. Setting up RDS is not a small or simple task, but it’s a very useful service to support your business’s needs.
Working with Network Policy and Access Services
It’s time to switch gears from Remote Desktop Services to Network Policy and Access Services (NPAS). Network Policy and Access Services is a server role that includes Network Policy Server (NPS).
First, you need to install NPAS. Then I introduce NPS and explain what you can do with that.
- From Server Manager, click Manage and then click Add Roles and Features.
- On the Before You Begin screen, click Next.
- On the Select Installation Type screen, click Next.
- On the Select Destination Server screen, click Next.
- On the Select Server Roles screen, scroll down and select Network Policy and Access Services, click Add Features, and then click Next.
- On the Select Features screen, click Next.
- On the Network Policy and Access Services screen, click Next.
- On the Confirm Installation Selections screen, choose Install.
- After the installation has completed, click Close.
Network Policy Server
Network Policy Server is a component of NPAS that allows you to centrally manage authentication, authorization, and accounting for various devices on the network. It’s very commonly used to support authentication on network switches and firewalls. After you’ve installed NPAS, you can access NPS from Server Manager by choosing Tools⇒ Network Policy Server.
Registering your RADIUS server
A Remote Authentication Dial-In User Service (RADIUS) server is capable of performing authentication, authorization, and accounting. This is one of the more common reasons why you may install NPS. It was originally used to authenticate remote users connecting through dial-up, but these days it’s more commonly used to authenticate systems against Active Directory that don’t normally support AD authentication. Frequently, that is network switches, routers, wireless access points, and firewalls. RADIUS servers allow administrators to log in to devices that support the RADIUS protocol with their Active Directory credentials, instead of having to remember a local login on each device.
Before you can use a brand-new RADIUS server to authenticate against Active Directory, you need to register it. This is a very important step that is often missed when setting up a RADIUS server. Here are the steps to register your RADIUS server:
- From Server Manager, choose Tools⇒ Network Policy Server.
Right-click NPS (Local) and select Register Server in Active Directory.
You’re prompted to allow the server to read the user’s dial-in properties.
Click OK.
NPS confirms that it can now read the dial-in properties.
- Click OK.
That’s all there is to it. It’s a very simple step, but a crucial one that is often missed.
Understanding RADIUS Proxy
A RADIUS Proxy server forwards both authentication and accounting messages on to a RADIUS server. These can be helpful in providing authentication when domain trusts become involved.
Setting up a RADIUS client
For this scenario, let’s say you have a Cisco switch. You’ve been logging into the switch locally, but you want to configure a central source of authentication so that you don’t have to remember a username and password for every switch in your environment. The configuration of the switch to point to the RADIUS server is out of scope for this book, but the configuration of the client is not. Here’s how to set up the RADIUS client for a Cisco switch:
- From Server Manager, choose Tools⇒ Network Policy Server.
- Expand RADIUS Clients and Servers and select RADIUS Clients.
Right-click RADIUS Clients and choose New.
The New RADIUS Client dialog box appears.
Fill in the friendly name, the IP address, and the shared secret.
The dialog box should look similar to Figure 3-8.
- Click the Advanced tab.
- From the Vendor Name drop-down list, select Cisco.
- Click OK.
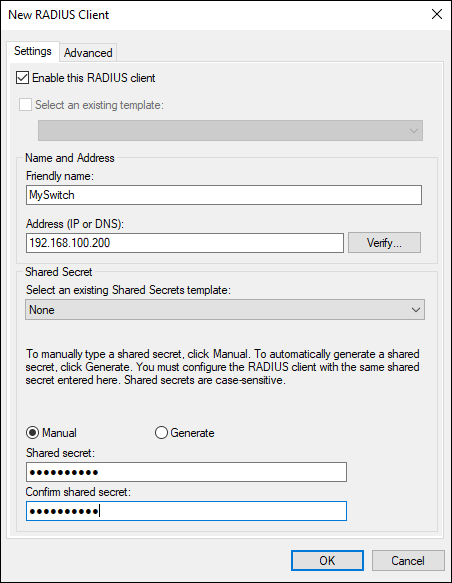
FIGURE 3-8: The Settings tab is where the bulk of the configuration happens for a RADIUS client.
Setting up a network policy
Network policies control what is allowed to authenticate through your RADIUS server. Here’s how to configure a basic network policy:
- From Server Manager, choose Tools⇒ Network Policy Server.
- Expand Policies.
- Right-click Network Policies and select New.
Give the policy a name and specify the type of network access server.
In this case, I’ve named the policy Domain Admins to Network Switches and I’ve left the type of network access server on Unspecified.
- Click Next.
On the Specify Conditions screen, specify what conditions must be met for the policy to apply.
I followed these steps:
- Select the condition User Groups.
- Click Add.
- Click Add Groups.
- Type Domain Admins and then click OK.
- Click OK one more time.
- Click Add.
- Select the condition Client Vendor.
- Click Add.
- Choose Cisco
- Click OK.
- Back on the Specify Conditions screen, you can add another condition or click Next.
- On the Specify Access Permission screen, select Access Granted, and click Next.
- On the Configure Authentication Methods screen, click Next.
- On the Configure Constraints screen, click Next.
- On the Configure Settings screen, click Next.
- On the Completing New Network Policy screen, click Finish.
You can see in Figure 3-9, my new Allow policy on top of the deny policies. If an incoming connection doesn’t match my policy, it will automatically be denied.
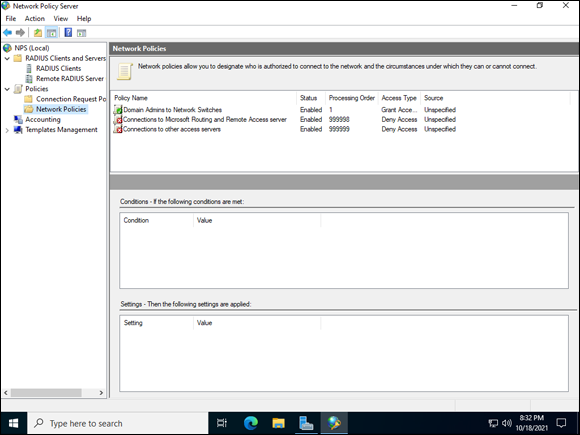
FIGURE 3-9: A network policy allowing traffic needs to have the lower processing number so that it will be processed before the default deny polices.
Troubleshooting at the Command Line
PowerShell is installed on every Windows Server by default. It has many different modules to assist in different tasks. In this section, I walk you through a few of the modules that may assist you in troubleshooting your servers and their network connectivity.
The Test-NetConnection cmdlet is a powerful tool in your troubleshooting arsenal. Used by itself, the Test-NetConnection cmdlet shows you basic information regarding the network, in addition to a ping. There are some other parameters that really help you dig into specific issues, as shown in Table 3-1.
There are several different combinations that you can use with the parameters. For instance, let's look at a basic check to ensure that you’re able to connect to a remote port. Open PowerShell, and type the following command:
Test-NetConnection -Port 443 -InformationLevel "Detailed"
This command tests to see if you can make a connection over port 443 (HTTPS) and gives detailed output on the results, as shown in Figure 3-10.
TABLE 3-1 Test-NetConnection Parameters
Parameter | Description |
|---|---|
| Used to test remote connectivity to a destination server. You specify a TCP port number and it tests the connection. |
| There are two values you can use with this parameter: Detailed returns quite a bit of information, and Quiet returns basic information. |
| Runs route diagnostics. |
| Runs tracert against the destination system. Tracert displays each hop until it reaches its destination. |
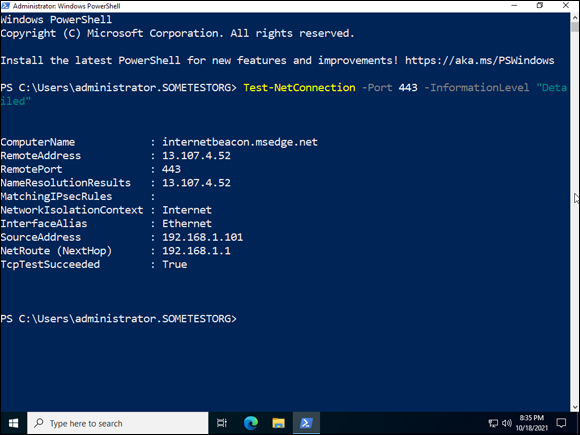
FIGURE 3-10: You can test basic connectivity with just a few parameters added to the Test-NetConnection cmdlet.
The prior test checks for basic connectivity. Picture this scenario: Your users have complained that when they’re on their remote desktop sessions, they can’t reach a certain website. They say that they can reach the website when they use their regular systems. though. You can try the basic connectivity test again, but this time specify a destination. I’ve used the address www.dummies.com for my example.
Test-NetConnection -ComputerName www.dummies.com -Port 443
If this command succeeds, the TcpTestSucceeded field will say True. If this is the case, the connection to the site is good. If the TcpTestSucceeded field says False, then you may have a routing issue. You can confirm whether this is a routing issue or not with the -TraceRoute parameter.
Test-NetConnection -ComputerName www.dummies.com -TraceRoute
The preceding command performs a TraceRoute and will show you each hop along the path to the destination. If the TraceRoute does not succeed, there is potentially a routing issue or your Internet service provider (ISP) may be having issues.
As a last step, you can run routing diagnostics to see if there is an issue with the routing to the destination site. You can run routing diagnostics with the -DiagnoseRouting parameter. The command looks like this:
Test-NetConnection -ComputerName www.dummies.com -DiagnoseRouting -InformationLevel "Detailed"
As you can see, this one command can give you a lot of information and can aid in your troubleshooting efforts. You’ll be able to find the source of the problem and get network connectivity issues resolved more quickly.