
Chapter 1
What Is Hyper-V?
IN THIS CHAPTER
![]() Understanding the basics of virtualization
Understanding the basics of virtualization
![]() Knowing the difference between Type 1 and Type 2 hypervisors
Knowing the difference between Type 1 and Type 2 hypervisors
![]() Installing and configuring Hyper-V on Windows Server 2022
Installing and configuring Hyper-V on Windows Server 2022
In the technology field, there is always the next hot thing that everybody starts talking about. Virtualization was one of those topics when it first made its appearance. Virtualization has enabled IT professionals to better use the resources that have been purchased and has led to the creation of cloud computing services.
In this chapter, you learn about Microsoft’s virtualization product, which is called Hyper-V. I fill you in on the basics of virtualization, and then show you how to install and configure Hyper-V.
Introduction to Virtualization
When I first started in the technology field, every organization had physical servers. In most cases, they followed best practices and one server was dedicated to one application. This often led to wasted resources because the application didn’t actually need all the central processing unit (CPU) and random access memory (RAM) it was given, so those resources would sit idle. At the same time, the organization was paying for power and cooling for a server that wasn’t necessarily doing anything at the moment.
The amount of time it took to stand up a new server could be an issue for projects that were time-sensitive. With each physical server, you had to rack it, cable it, configure it, and install software on it. Provisioning new servers for large projects could take weeks to months, especially if multiple teams were involved.
Virtualization was a game changer. Instead of buying individual smaller servers to run single applications, an organization could purchase bigger, more powerful servers to run a hypervisor of some kind that would, in turn, run multiple virtual servers, referred to as virtual machines (VMs). By purchasing larger servers to run the smaller workloads, organizations were able to save on power and cooling costs. They were also able to reduce the amount of time needed to go to market, because the virtualization administrator was typically the one who would spin up the server operating system in a VM, set up the networking, and perform the basic configuration tasks like assigning IP addresses and other necessary steps.
Virtualization really streamlined the process for system administrators and organizations to be able to build servers quickly in response to the needs of other teams for projects or for expanding the existing capacity to support applications. It also simplified recovery efforts when configured properly because VMs on a failed host could be transferred to another host.
 You sometimes hear hypervisors referred to as hosts and virtual machines referred to as guests. If you run into this terminology, don’t let it confuse you. These terms are used across all types of virtualization technologies.
Type 1 and Type 2 Hypervisors
Before I dive into the difference between Type 1 and Type 2 hypervisors, I want to make sure that you understand what a hypervisor is. The hypervisor is essentially a process that allows you to create, run, and manage VMs.
The hypervisor is ultimately responsible for presenting resources to the VMs that are running on it, including CPU, RAM, networking, and storage.
 Most of the hypervisors let you overprovision VMs, meaning that you can assign resources that are not necessarily available. This may work for you if your workloads are very small, but if there are spikes in the workloads, or if VMs take too many resources, then the hypervisor could become starved for resources, which could impact all your VMs that are running on that hypervisor. For this reason, I recommend not over-provisioning your VMs.
Type 1 hypervisors
Type 1 hypervisors are also referred to as bare-metal hypervisors. This is because the software for the hypervisor can run directly on the host system’s hardware. Type 1 hypervisors provide the best performance and security of the hypervisors, but some of them are more complex that others to set up.
Here are some examples of the more common Type 1 hypervisors:
- Microsoft Hyper-V
- VMware ESXi
- Oracle VM Server
- KVM
- Citrix XenServer
Type 2 hypervisors
Type 2 hypervisors are referred to as hosted hypervisors. They require an operating system to be able to install and run. Type 2 hypervisors are usually easier to install and configure, but they’re less secure and not as performant as Type 1 hypervisors because they don’t have direct access to the host system’s hardware.
Here are some examples of the more common Type 2 hypervisors:
- Oracle VirtualBox
- VMware Workstation
- VMware Fusion
Installing and Configuring Hyper-V
Windows Server 2022 offers Hyper-V, a Type 1 hypervisor. Hyper-V is a role that gets installed on a Windows Server 2022 operating system. Unlike with previous versions of Windows Server, there is no longer a stand-alone graphical user interface (GUI)–less Windows Server 2022 Hyper-V SKU. You’ll need to install the role to work with Hyper-V. In this section, I show you how to install Hyper-V from the role. The lab systems that I’m using for this installation are joined to the domain sometestorg.com.
Windows 10 also has a version of Hyper-V available that you can install. It’s a feature that can be enabled, and it will allow you to support virtual machines, virtual networking, and virtual storage. This is very helpful if you need to be able to run multiple operating systems in your normal day-to-day activities. This feature is only available if you’re running Windows 10 Pro, Enterprise or Education editions. It is not available on Windows 10 Home edition. The Windows 10 version of Hyper-V does not support advanced functionality like live migration, Hyper-V Replica, or SR-IOV.
Installing Hyper-V
You need to make some basic configuration decisions during the installation of Hyper-V, but they can be changed after the installation, so if you change your mind or make a mistake, don’t panic!
Follow these steps to install Hyper-V:
- From Server Manager, choose Manage ⇒ Add Roles and Features.
- On the Before You Begin screen, click Next.
- On the Select Installation Type screen, click Next.
- On the Select Destination Server screen, click Next.
- On the Select Server Roles screen, select Hyper-V.
- Click Add Features in the dialog box that pops up, and then click Next.
- On the Select Features screen, click Next.
- On the first Hyper-V screen, click Next.
On the Create Virtual Switches screen, select the network adapter you want to use for the virtual switch.
As you can see in Figure 1-1, I have only one adapter to choose from right now, so I’ll select it.
- Click Next.
On the Virtual Machine Migration screen, select the Allow This Server to Send and Receive Live Migrations of Virtual Machines on This Server check box and select the Use Credential Security Support Provider radio button (see Figure 1-2).
Live migrations enable you to move a virtual machine from one Hyper-V host server to another Hyper-V host server with no downtime. CredSSP is the simplest way to set up live migration, but it requires you to log into the server being migrated, so it isn’t the best for automatically moving virtual machines.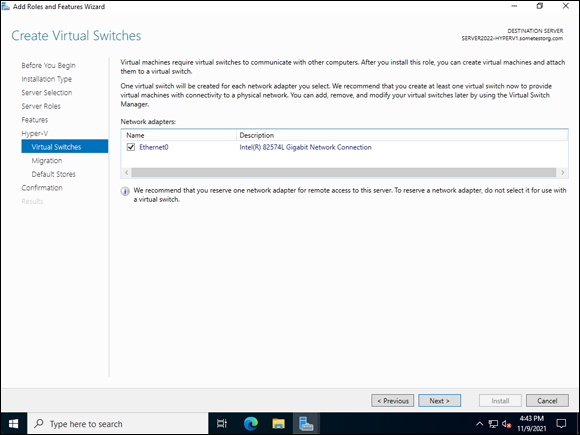
FIGURE 1-1: You must select a network adapter for the virtual switch to use. You can change this later.
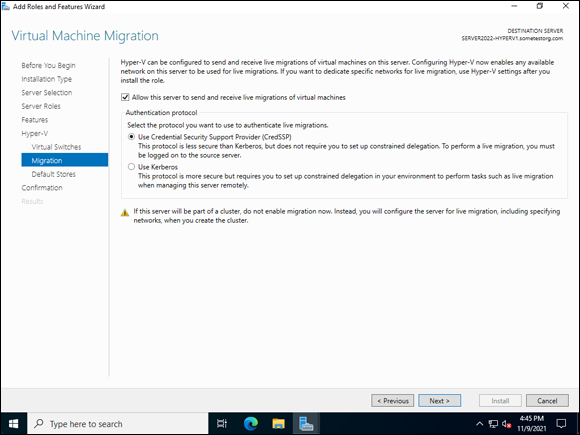
FIGURE 1-2: To enable live migration of VMs, select the check box to allow them and select CredSSP.
- Click Next.
- On the Default Stores screen, keep the default locations and click Next.
- On the Confirm Installation Selections screen, select the Restart the Destination Server Automatically If Required check box.
- Click Yes on the dialog box that is confirming you want to allow the reboot.
- Click Install.
The Hyper-V role installs, and then the server restarts. When it comes back up from the restart, you can start configuring the Hyper-V host.
Configuring Hyper-V
After Hyper-V is installed, there are many different things that you can configure or change from what you set during installation. Getting to the Hyper-V console is similar to the other roles that you install on Windows Server 2022. From Server Manager, choose Tools ⇒ Hyper-V Manager.
When Hyper-V Manager opens, you see the name of the server on which you just installed the role. Click that server, and you see the menus change to reflect some of the things that you can do with the host. If you right-click the host, you see a menu similar to Figure 1-3. This menu allows you to configure your Hyper-V host the way that you want to.
To start configuring the host, click Hyper-V Settings in the menu that you got from right-clicking the server’s name.
Virtual Hard Disks and Virtual Machines
The first two configuration options — Virtual Hard Disks and Virtual Machines — allow you to change the storage location of the virtual hard disks that are used for the VMs and the location of the VM’s configuration files.
NUMA Spanning
The third option, Non-Uniform Memory Access (NUMA) Spanning, shown in Figure 1-4, allows you to set the host to act as a NUMA node. This allows VMs to use resources from the server they’re on as well as other servers that are configured to be NUMA nodes. This means that a virtual machine can have more CPU or RAM than what is on the one physical host, if another host which is also a NUMA node is sharing that resource. This has an impact on performance so I wouldn’t recommend it unless you’re using it in a lab or development environment. Avoid using this in production environments.
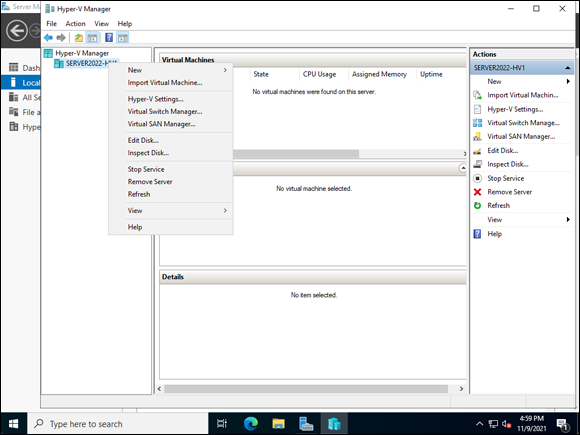
FIGURE 1-3: The menu for the host in Hyper-V Manager presents you with your configuration options for that host.
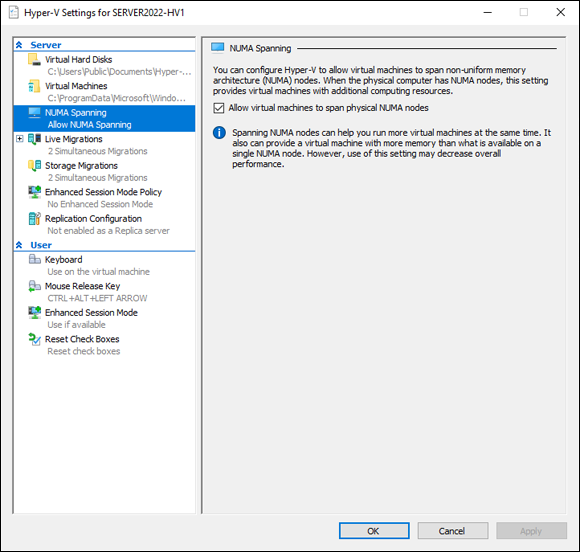
FIGURE 1-4: NUMA Spanning can be helpful in lab and development environments where you may not have the same resources that you do in production because it allows you to share resources across NUMA nodes.
Live Migrations
Assuming you followed along in the installation of Hyper-V, your Live Migrations section should have a check mark in the Enable Incoming and Outgoing Live Migrations check box. On this screen, you can specify how many live migrations can happen at any given time. The default here is two, as shown in Figure 1-5. You can also specify a particular IP address if you want Live Migration to happen over a different interface than the rest of the traffic.
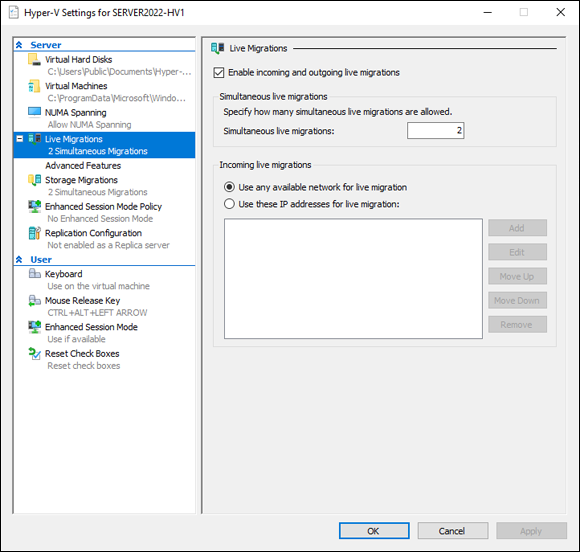
FIGURE 1-5: Live Migration allows virtual machines to move between hosts with no downtime, and you can specify how many migrations can happen at the same time.
There is a plus sign next to Live Migrations. If you click that, you get the option for Advanced Features. Advanced Features is where you can change what kind of authentication you want to use for migrations. This is set to CredSSP right now (if you followed the installation instructions), and this is where you can choose Kerberos if you would like (for more information, turn to Book 7, Chapter 5).
You can also choose performance options from here. Your choices are TCP/IP, Compression, or SMB. I recommend leaving this on Compression.
Storage Migrations
Storage Migrations allows you to move VM storage with no downtime to the virtual machine. It’s very helpful when moving to a new storage array, or when getting ready to perform maintenance on a storage array because you can move the storage with the virtual machine still powered on. In this section, you can decide how many storage migrations you want to allow to happen at the same time. The default setting for this screen is two.
Enhanced Session Mode Policy
Enhanced Session Mode Policy allows your Hyper-V host to connect to your VMs over Remote Desktop Protocol (RDP). You may be wondering why you would want to allow that. When you use RDP to connect, you can pass local devices to your VMs like disk drives, flash drives, and other peripherals. You also gain a shared clipboard that allows you to copy and paste, and it improves support for viewing the VMs on a higher-resolution monitor. This setting is disabled by default on Windows Server 2022 so you need to enable it if you want to use this feature.
Replication Configuration
You can set up your Hyper-V host to act as a Hyper-V Replica. When a Hyper-V host is configured as a replica, VMs are copied to it from the primary Hyper-V servers. If the primary Hyper-V server ever experienced a major malfunction, the replica server can bring up the VMs that are kept in a powered-off state.
You can specify whether you want replication traffic to be sent plaintext or encrypted. I always recommend using encryption when it’s available. And you can also select whether you want to allow replication from any server that can authenticate, or if you want to limit replication to specific servers. This screen is shown in Figure 1-6.
Keyboard
The Keyboard screen is one of the user settings. You can specify whether key combinations like Alt+Tab, for example, will apply to the physical computer the keyboard is attached to, the VM, or on the VM but only if the VM is full screen.
Mouse Release Key
If you haven’t installed the VM drivers, you can set which key combination you want to use to release the mouse so that you can use it outside of the VM. Unless there is a good reason not to, I always recommend installing the VM drivers.
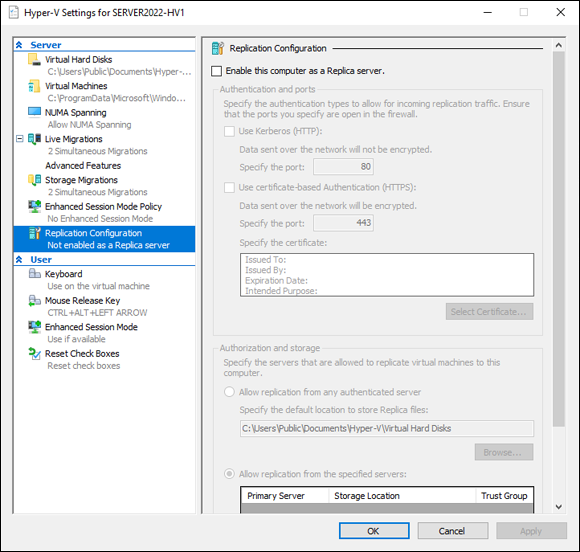
FIGURE 1-6: Configuring a Hyper-V Replica server is a great addition to your organization’s disaster recovery strategy.
Enhanced Session Mode
Enhanced Session Mode is enabled for the user by default. It allows you to use a remote desktop connection to pass through drives, printers, and so on, and to use the shared clipboard.
Reset Check Boxes
All this setting does is reset check boxes that are used to hide pages or messages when they’re checked. It doesn’t reset anything else.
Virtual Switch Manager
When you right-click your Hyper-V host, you may notice an option for Virtual Switch Manager. This selection allows you to create virtual switches that your VMs can use to communicate on the network. There are three types of switches that you can use within Hyper-V:
- External: Allows you to connect to a physical network
- Internal: Allows the virtual machines to communicate with other virtual machines on the same switch and with the host
- Private: Only allows virtual machines to communicate with other virtual machines on the same switch
Having the right type of switch to support your use case is critical if you want your Hyper-V deployments to succeed. The screen is shown in Figure 1-7. You can learn more about configuring virtual networking with Hyper-V in Book 7, Chapter 3.
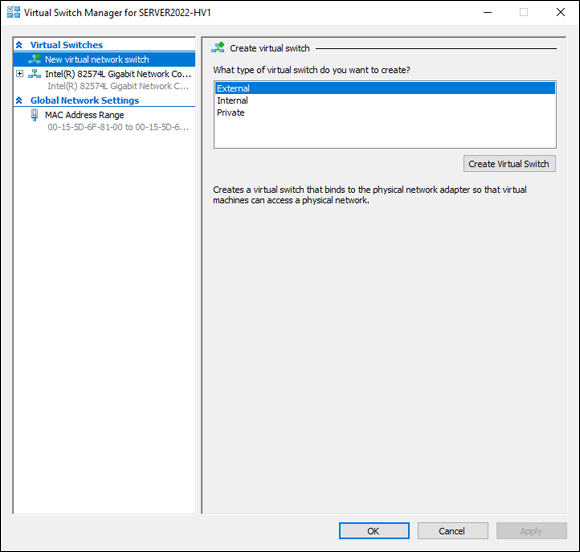
FIGURE 1-7: The Virtual Switch Manager allows you to configure virtual network switches for your Hyper-V environment.
Virtual SAN Manager
Also in the menu for your Hyper-V host is the Virtual SAN Manager. This allows you to connect your Hyper-V host to a Fibre Channel SAN. This is especially helpful for large organizations that have invested in Fibre Channel technology. You can see in Figure 1-8 that you can define the World Wide Node Name (WWNN) for the Fibre Channel port that is on the Hyper-V host.
 Fibre Channel SANs utilize special switching equipment to support high-speed, low-latency storage networks. Systems that use Fibre Channel need special storage network adapters installed, which are referred to as host bus adapters (HBAs).
Storage for Hyper-V servers is discussed in more detail in Book 7, Chapter 4.
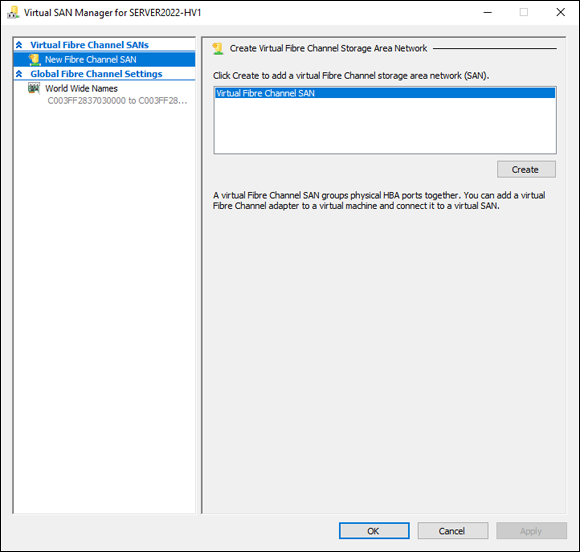
FIGURE 1-8: Hyper-V offers support for Fibre Channel SANs, which is a huge benefit to larger organizations that have invested in Fibre Channel technology.