
Chapter 2
Virtual Machines
IN THIS CHAPTER
![]() Creating a Hyper-V virtual machine
Creating a Hyper-V virtual machine
![]() Configuring a virtual machine in Windows Server 2022 Hyper-V
Configuring a virtual machine in Windows Server 2022 Hyper-V
![]() Safeguarding your virtual machines with shielded virtual machines
Safeguarding your virtual machines with shielded virtual machines
In Chapter 1 of this minibook, I explain what virtualization is and show you how to install and configure Hyper-V. There’s no point in having a host if you aren’t going to have virtual machines (VMs). That’s the fun part, after all! VMs on Hyper-V hosts and the Hyper-V hosts themselves can be centrally managed from the Hyper-V console. This makes day-to-day administration more efficient for system administrators because they can accomplish all their tasks in one console.
VMs, also referred to as guests, are the virtual servers that run on the host server. They’re given resources by the host, and they’re able to function much like a regular physical server would. You have a lot of configuration options when it comes to your VMs, and I explain those options in this chapter.
This chapter is all about VMs. Here, you find out how to create and configure Hyper-V VMs. You discover some of the choices you need to make when creating your VMs (some of them can’t be changed later), and see why you may want to make those decisions for your VMs.
Creating a Virtual Machine
Creating a VM is the one of the most common activities that a system administrator will undertake. There are, of course, some very important decisions that you need to make in regard to your server, like which generation of VM you want it to be. You can’t change the generation of a VM after it’s created, so it’s important that you choose the right one the first time.
Hyper-V supports multiple guest operating systems on both the Windows side and the Linux side. Supported Windows guests are Windows 7 with Service Pack 1, up to Windows 11, and Windows Server 2008 with Service Pack 2 all the way up to Windows Server 2022. Supported Linux guest VMs include Red Hat Enterprise Linux (RHEL) and CentOS, Debian, Ubuntu, Oracle, SUSE, and FreeBSD.
To get started, you need to start the New Virtual Machine Wizard. Follow these steps:
- From Server Manager, choose Tools ⇒ Hyper-V Manager.
- Right-click your host server’s name, and then select New ⇒ Virtual Machine (see Figure 2-1).

FIGURE 2-1: Launching the New Virtual Machine Wizard.
- On the Before You Begin screen, click Next.
On the Specify Name and Location screen, name your virtual machine.
I’ll name mine VM1 (creative, I know).
Select the Store the Virtual Machine in a Different Location check box if you want the VM’s storage to be somewhere other than the default location.
I will leave that unchecked.
- Click Next.
On the Specify Generation screen, select Generation 2 and click Next.
 Hyper-V supports Generation 1 and Generation 2 VMs. In most cases, you want Generation 2 VMs because they provide support for more advanced features. Generation 2 provides Unified Extensible Firmware Interface (UEFI) support, which is required if you need to use Secure Boot. Generation 1 is useful if you need to install a 32-bit operating system or if you need to support legacy hardware.
On the Assign Memory screen, specify startup memory for the VM and, if you want, select the Use Dynamic Memory for This Virtual Machine check box.
For Windows Server 2022, I set the startup memory to 4096MB, and I do select the Use Dynamic Memory for This Virtual Machine check box.
Startup memory is just that: memory used by the system at startup. This should not be confused with minimum random access memory (RAM), which you can set later on. Dynamic memory allows the host to control memory for the VM. As far as the VM knows, it has 4096MB of RAM, but when it’s sitting idle, the host may let something else use the RAM if needed.- Click Next.
On the Configure Networking screen, choose the virtual switch that you want to connect to.
In Figure 2-2, you can see that I’ve chosen the virtual switch that was created when I installed the Hyper-V role.
- Click Next.
On the Connect Virtual Hard Disk screen, you can choose to create a hard disk, attach to an existing hard disk, or choose to attach a hard disk later.
I’ll create a hard disk, but I’ll change the default 127GB size to 40GB, as shown in Figure 2-3. I’m creating a smaller disk because this is in my lab environment. You should create an appropriately sized disk based on what you’re installing.
- Click Next.
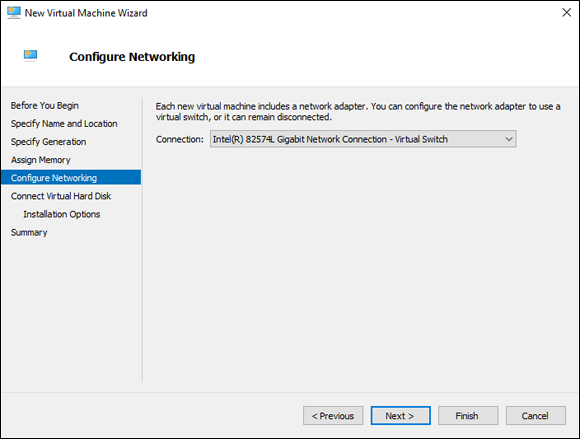
FIGURE 2-2: Selecting a virtual switch allows your virtual machine to connect over your network to other resources it may need, just like a traditional switch.
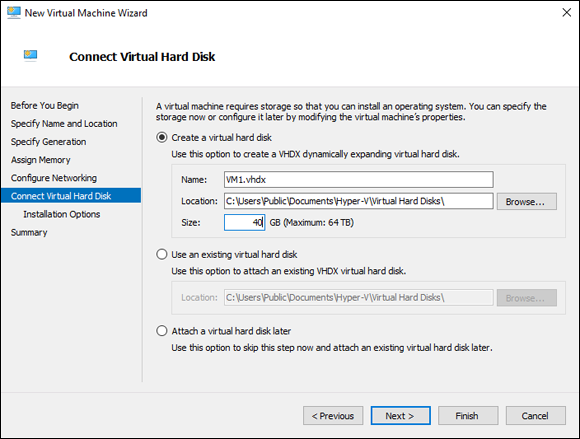
FIGURE 2-3: To create the virtual hard disk, you specify the name, size, and location of the disk.
On the Installation Options screen, you can choose to install an operating system (OS) later, install from an ISO file, or install the OS from a network installation server like WDS.
For now, I’ll leave Install an Operating System Later selected.
- Click Next.
On the Completing the New Virtual Machine Wizard screen, if everything looks correct, click Finish.
Assuming there were no issues encountered during creation, you’ll find yourself on a screen similar to Figure 2-4 with your newly create VM powered off and ready to be worked with.

FIGURE 2-4: Your newly created virtual machine is listed in the Virtual Machines pane in Hyper-V Manager.
Configuring a Virtual Machine
When you create the VM, you have a limited set of initial configuration options. In most cases, you’re going to want to customize the VM further. Similar to changing settings on a Hyper-V host, you can get into the configuration menu for a VM by right-clicking the VM and choosing Settings.
 The screenshots in this chapter are from a Generation 2 VM. Some of the options will be slightly different if you created a Generation 1 VM because the Generation 1 VM has legacy device support and does not support newer features.
Add Hardware
The Add Hardware section allows you to additional Small Computer System Interface (SCSI) controllers, network adapters, or Fibre Channel adapters. Simply select the device that you want, and click Add. The new device shows up in the menu on the left.
Firmware
The Firmware section allows you to set the boot order of the attached devices and allows you to entry in the boot file for each device. You can change the boot order if desired by selecting the device you want to move, and then by using the Move Up or Move Down buttons on the right side, shown in Figure 2-5.
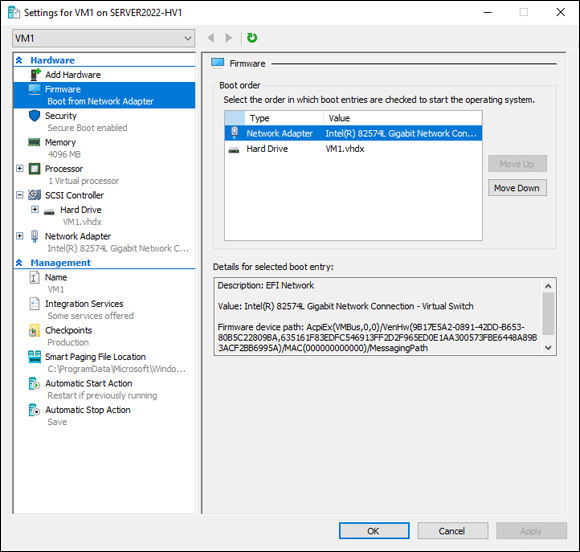
FIGURE 2-5: The Firmware screen allows you to change the boot order of the devices attached to your virtual machine.
Security
The Security section contains check boxes that allow you to provide further security to your VMs. Specifically, you can enable the following:
- Secure Boot: This feature was added with Windows Server 2012 R2 and is only supported on Generation 2 VMs because of its reliance of UEFI. This feature ensures that every driver and software component that is loaded during boot time is digitally signed and validated as being legitimate.
- Trusted Platform Module: The Trusted Platform Module (TPM) is a special chip that is used for cryptographic operations like the full disk encryption offered by BitLocker. The check box for the VM enables a virtual TPM (vTPM). As of Windows Server 2016, you can enable this even if the host system doesn’t have a physical TPM. It does, however, require a Generation 2 VM. If you enable this setting, you can also enable encryption of system state and VM migration traffic. I highly recommend doing this.
- Shielding: This feature, which was introduced with Windows Server 2016, is only available on Generation 2 VMs. Shielded VMs take advantage of both Secure Boot and BitLocker to protect the integrity of their boot files and the privacy of their data. Shielding protects a VM from system administrators that are only supposed to administer the host. Those administrators will be able to power cycle the servers in question but will not be able to view the contents of the VM or change any of its settings.
Memory
The Memory section allows you to finetune how your VM will be assigned its memory. When you created the VM, you were only asked how much startup RAM you wanted to assign the machine. The value that you specified there becomes the amount that the host will present to the VM.
If you enable dynamic memory, you can set the minimum and maximum amount of RAM that you want the host to be able to assign. If the VM absolutely needs 512MB to run, you’ll want to ensure that the Minimum RAM is set to 512MB. You can set the maximum RAM if you need to make sure that the VM is not allowed to go over a certain amount of RAM. Make sure that you’re giving the VM what it needs. If it doesn’t have enough memory assigned to it, the performance will suffer or the system may crash.
 Some applications do not play well with dynamic memory. Your vendor will let you know if this is the case. If it isn’t able to take advantage of dynamic memory, then the amount you specified as the startup RAM is the amount of RAM the system will have.
The memory buffer is used to tell Hyper-V how much memory it should set aside for a VM, when you’re using dynamic memory. Think of it as the Hyper-V equivalent of a rainy-day fund. When the VM needs more memory, the buffer is used in between the time that the VM makes it known that it needs the RAM and when the RAM is actually granted. So the VM gets the memory it needs, even though it hasn’t technically been allotted yet. By default, this value is set to 20%.
The last setting on this screen is Memory Weight. This is where you can tell the host how important this VM is. If, for example, a mission-critical application is running on it, and you need to make sure that it’s never starved for resources, you would set the Memory Weight to High. By default, this setting is on Medium, which you can see in Figure 2-6.
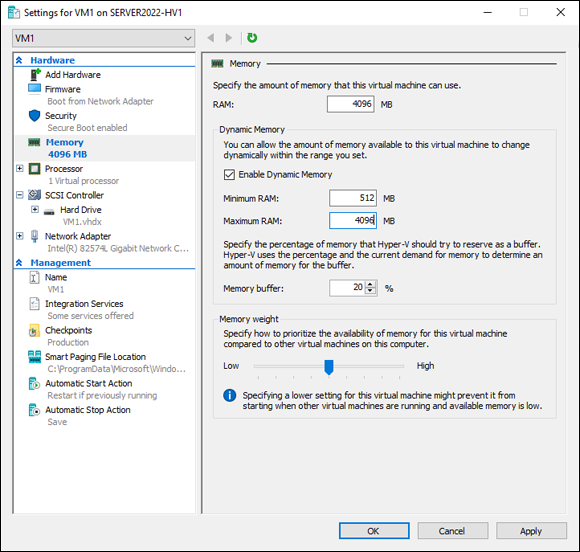
FIGURE 2-6: The Memory screen allows you to adjust how memory is handled by the host for each individual virtual machine.
Processor
The Processor section allows you to set the number of virtual processors that are assigned to the VM. If you click the plus (+) sign next to Processor, you get additional screens for Compatibility and NUMA. If you check the check box on the Compatibility screen, the processor features presented to the VM will be limited, but this will allow you to move to a system with a different processor version. The NUMA configuration screen allows you to set things specifically for NUMA node use. This can improve performance on VMs that have more than one processor assigned to them, if they’re sharing CPU resources made available by a NUMA node.
SCSI Controller
The SCSI Controller section allows you to add additional hard drives, DVD drives, or shared drives. When you select the device that you want to add, all you need to do is click the Add button and the new device will appear in the menu. With each device, you’re taken to a page that will allow you to configure the new device that you’ve added.
If you click the plus (+) sign next to SCSI Controller, you see all the SCSI-based devices that are currently connected to your VM. If you select one of the devices (the hard drive, for instance), you can see its location, you’re presented with a few options to work with the virtual hard disk file, and you’re also presented with the option to remove the hard disk file completely (as shown in Figure 2-7).
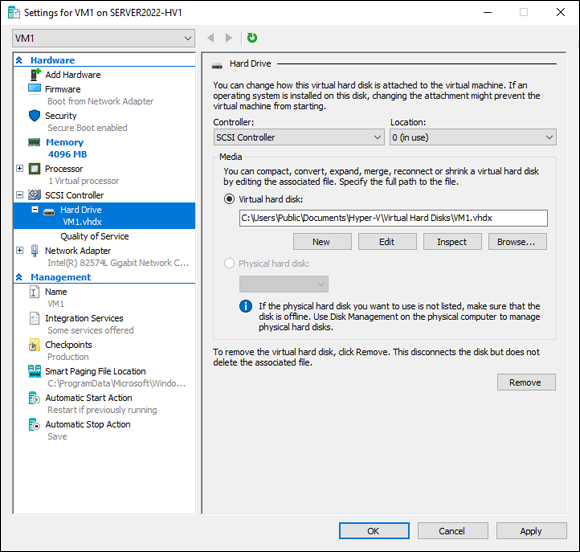
FIGURE 2-7: Each SCSI device has a configuration page that allows you to configure the device or remove it.
Below your hard drive in SCSI Controller, you see an option for Quality of Service. If the VM is hosting an application that has specific Input/Output Operations Per Second (IOPS) needs, you can specify minimum and maximum IOPS on this screen. The vendor will usually specify minimum IOPS if its application is really dependent on low-latency storage. The storage you’re using must be capable of meeting the IOPS requirements; making the setting change here only tells Hyper-V to potentially give greater importance to storage traffic for this drive.
Network Adapter
The network adapter section allows you to do several things. You can change the virtual switch that the network adapter is attached to, you can enable vLAN identification to support vLAN tagging, and you can enable and configure bandwidth management. If you click the plus sign (+) next to Network Adapter, you have two options:
A virtual LAN (vLAN) is a logical network made up of endpoints that are on different physical LANs. This allows devices on the same vLAN to communicate as if they were on the same physical wire.
- Hardware Acceleration: Hardware Acceleration includes the following:
- Virtual Machine Queue (VMQ): Improves performance by delivering packets from outside virtual networks directly to a virtualized system. To use this feature, the physical host’s network adapter must support it.
- IPSec Task Offloading: Allows Hyper-V to offload IPSec-related tasks to the physical host’s network adapter assuming it supports the feature.
- Single-Root I/O Virtualization (SR-IOV): Lowers latency and improves bandwidth by allowing network traffic to go directly to a VM instead of having to go through the virtual switch.
- Advanced Features: Advanced Features includes the following:
- DHCP Guard: Ensures that you’re only communicating with authorized DHCP servers.
- Router Guard: Ensures that you’re only communicating with authorized DHCP routers.
- Protected Network: If the network is ever disconnected, the VM can automatically move to another node if that VM is in a cluster and is highly available.
- Port Mirroring: Makes a copy of the traffic going to a VM and sends the traffic to another VM. This is very useful if you need to be able to do traffic inspection.
NIC Teaming: Allows you to create a NIC team for the VM. The operating system of your VM needs to support NIC teaming for this to work.
NIC teaming allows you to logically join multiple network adapters, so that they behave as if they were one big network adapter. NIC teaming offers some fault tolerance, assuming the connections in the team are going to separate infrastructure switches. NIC teaming can also be used to load-balance traffic coming to the server.- Device Naming: Used to ensure that the VM knows the name of the Hyper-V network. This is helpful when a system has multiple network adapters, especially if the system is multi-homed.
Name
The Name section allows you to change the name of the VM and add any notes that you want to have visible when someone clicks on the VM within Hyper-V Manager.
Integration Services
The Integration Services section allows you to expose services on the host Hyper-V server to the VM you’re configuring. This includes things like operating system shutdown, time synchronization, data exchange, heartbeat, backup, and guest services.
Checkpoints
Checkpoints are a point-in-time backup of your VM. They’re very useful before a change is made within the operating system that could potentially be destructive. They should not be used in place of backups.
By default, checkpoints are enabled and will be created as production checkpoints. You have the choice between production and standard checkpoints.
- Production checkpoint: Uses whatever backup technology is available within the VM’s operating system to create checkpoints that can protect data, but that are not aware of running applications.
- Standard checkpoint: Captures information on running applications.
You can set your VMs to create automatic checkpoints, and you can also set the save location for all your checkpoints.
Smart Paging File Location
This screen allows you to set the location for the smart paging file for the VM. Smart paging is only used at boot time and can be used to ensure that a VM will be able to boot, even if the host can’t provide the minimum startup RAM that the VM requires.
Automatic Start Action
The Automatic Start Action section allows you to set what you want the VM to do when the host is started. You have a choice between doing nothing, automatically starting if it was running when the service stopped, and always starting this VM automatically.
Automatic Stop Action
The Automatic Stop Action section determines what the VM will do if the Hyper-V host is shut down. The options are to save the VM state, turn off the VM, or shut down the guest operating system.
Shielded Virtual Machines
In the “Configuring a Virtual Machine” section, earlier in this chapter, I show you the check box that allows you to turn a VM into a shielded VM. Shielded VMs require more than that simple check box to function properly. You must set up the appropriate server infrastructure to support shielded VMs.
In Windows Server 2016, the Host Guardian Service was introduced. The Host Guardian Service protects shielded VMs by ensuring that the host they’re on is a trusted Hyper-V host (guarded host). Essentially, a shielded VM may only run on a Hyper-V host that is able to pass its health attestation to the system or systems running the Host Guardian Service. There are two types of attestation that a guarded host can use:
- TPM-trusted attestation: Verifies the guarded host’s identity using the guarded host’s TPM chip. This method of attestation provides the best security but is more complicated to set up.
- Host key attestation: Verifies the guarded host’s identity with a key. It’s easier to set up than the TPM-based type and is intended to be used on systems that don’t have a TPM chip.
For VMs to support being shielded VMs, they must be Generation 2 VMs and have a virtual TPM. Shielded VMs are encrypted by BitLocker.
 You can convert existing VMs into shielded VMs if you want. They just need to be running at least Windows Server 2012.