
Chapter 5
Paying Employees
IN THIS CHAPTER
![]() Setting up a payroll service
Setting up a payroll service
![]() Setting up payroll runs
Setting up payroll runs
![]() Getting your employees paid
Getting your employees paid
![]() Revising checks
Revising checks
![]() Handling payroll liabilities
Handling payroll liabilities
QuickBooks provides a do-it-yourself option for paying employees: Enhanced Payroll, which means that QuickBooks helps you with the payroll tax forms. A second payroll option would be QuickBooks Assisted Payroll. With this option, you handle paying your employees within QuickBooks; then Intuit handles making the tax payments and filing the necessary payroll tax forms.
 Yet another option to consider in case you’re not an accountant and are in need of payroll: Consider splurging a bit and going with one of the full-service payroll providers, such as ADP, Paychex, and Gusto. Having one of them process your payroll greatly simplifies the accounting work and — in my experience — saves you money over time.
If you go with a payroll provider, you can stop reading this chapter right now. Seriously. All you need to do is telephone the payroll service company and say, “Help!”
Setting Up Payroll
To set up do-it-yourself payroll, you step through a web-based interview. To start this interview, choose Employees ⇒ Payroll ⇒ Turn on Payroll in QuickBooks. QuickBooks displays the page shown in Figure 5-1.
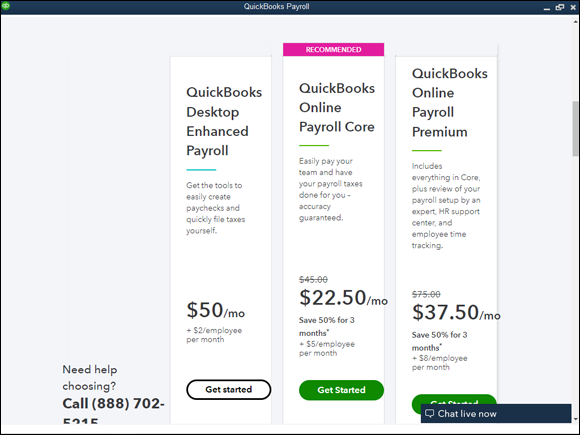
FIGURE 5-1: The first payroll setup web page.
You have three payroll options: Enhanced Payroll, Payroll Core, and Payroll Premium. If you choose the Enhanced option, QuickBooks will help you remit the payroll tax deposits and then prepare (or mostly prepare) the payroll tax returns for you. The Payroll Core and Payroll Premium options are full-service; QuickBooks prepares the paychecks, direct deposits, and payroll tax forms, and remits payroll tax deposits on your behalf.
You can choose any option by clicking the appropriate Get Started button. If you know you do not want to mess around with payroll tax filings, paying a bit more for the Core or Premium options probably makes sense.
Intuit’s pricing for its payroll services changes from time to time; at the time I’m writing (summer 2022), Enhanced service costs approximately $600 per year, and the full-service options are about $550 to $900 per year. The cost of each plan increases as the number of employees and the number of checks you issue increases.
Even though you have three QuickBooks payroll options, in this chapter I assume that you want to use the Enhanced option, which requires a more hands-on approach than the others. You do some of the work. You need to understand federal and state payroll tax rules, but the benefit is lower cost, which adds up if you are paying for the service year after year.
To choose the Enhanced option, click the Get Started button. QuickBooks gives you the option to pay for a full year, which saves you $100, or pay in monthly installments. Then QuickBooks collects your credit card information (so that it can bill you for the service).
Signing up for a payroll service
To sign up for the payroll service after you’ve selected a particular option, you fill in a series of web-page forms. Along the way, you enter your business name and address and give your firm’s employer identification number (EIN). To move through the web-page forms, click the Continue and Back buttons. QuickBooks steps you through the sign-up process very efficiently. Simply follow the onscreen instructions to describe how your company processes payroll.
 But let me issue a warning: When you do set up your company information for payroll, QuickBooks asks for a bunch of information. I won’t repeat the instructions that the web pages provide, but you do need to fully describe how you pay your employees, to whom you remit deductions, and other stuff like that. Carefully read the instructions that QuickBooks provides, which takes some time. If you get into trouble, you may want to get an outside accountant’s help to set up the Enhanced service or consider the Assisted option.
Setting up employees
After you set up your company information for payroll, you’re ready to set up employees for payroll. As part of the Enhanced setup process, QuickBooks displays a web page where you can add your employees. You can also add employees by displaying the Employee Center. (Choose Employees ⇒ Employee Center and click the New Employee button.) When you click the New Employee button, QuickBooks displays the Personal tab of the New Employee window, as shown in Figure 5-2.
To describe an employee, you complete the fields supplied on the Personal tab. All this stuff is self-explanatory. You enter the person’s name in the Legal Name boxes. The employee’s first name goes in the First box, the middle initial goes in the M.I. box, and so forth.
You click the Address & Contact tab (not shown) to collect and store the employee’s mailing address and other contact information, such as their telephone number.
If you want to collect and store additional information for an employee (such as their bank account number for direct deposit), you click the Additional Info tab (also not shown). This tab provides a Define Field button that you can use to collect custom bits of information about an employee. To use the Custom Field option, click the Define Field button and then use the Define Field dialog box to define the fields that you want to add.
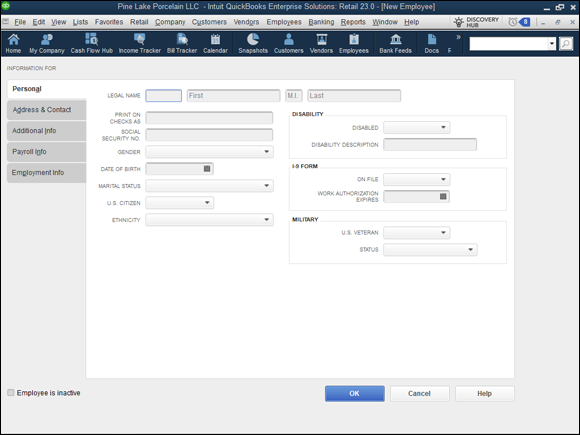
FIGURE 5-2: The Personal tab of the New Employee window.
Providing payroll and tax information
Use the Payroll Info tab to describe how an employee’s salary or wages are calculated, as shown in Figure 5-3. Use the Payroll Schedule drop-down list to set up a regular payroll schedule (such as weekly or semimonthly) and to assign the employee to the payroll schedule. Use the Pay Frequency drop-down list to identify the pay period. Optionally, if you’ve turned on QuickBooks’s class tracking feature, use the Class drop-down list to classify payments to this employee. You enter the payroll item in the Earnings area. If an employee earns an annual salary of $30,000, for example, you enter the salary payroll item in the Item Name column. Then you enter the annual salary of $30,000 in the Hourly/Annual Rate column. If you’ve set up QuickBooks to handle other additions or deductions on a payroll check (expense reimbursements or pension deductions), use the Additions, Deductions and Company Contributions area to describe these items and the item amounts.
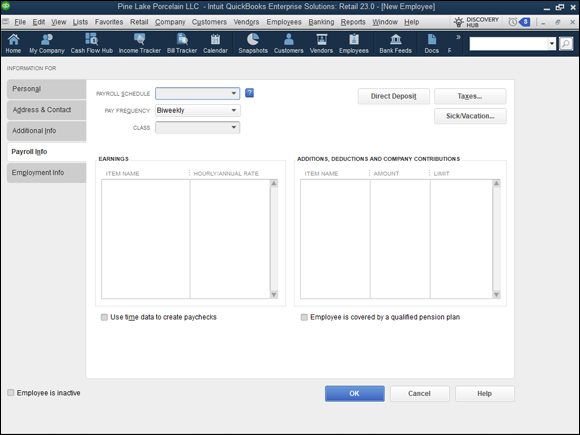
FIGURE 5-3: The Payroll Info tab of the New Employee window.
To describe which taxes an employee pays, click the Taxes button. QuickBooks displays the Taxes dialog box. Use the Federal tab (shown in Figure 5-4) to identify the year of the W4 on file, employee’s filing status, number of dependents claimed, other income, deductions, and any extra withholding specified. In addition, use the Subject To check boxes to indicate whether this employee is subject to Medicare, Social Security, or federal unemployment tax, or whether the employee is eligible for an earned income credit. Note that not all employees are subject to Medicare and Social Security taxes. Consult your tax adviser for more information.
The State tab supplies boxes that you can use to describe state taxes, obviously. I don’t show the State tax tab here because this tab varies depending on the state you’re in.
The Other tab lets you describe and store any local tax information, such as a city income tax. Again, what you see on the Other tab depends on your locality. For this reason, I don’t show it here.
If you click the Sick/Vacation button on the Payroll Info tab of the New Employee dialog box, you see the Sick and Vacation dialog box, shown in Figure 5-5. This dialog box lets you specify how sick or vacation pay and personal leave time are accrued payroll period by payroll period. You can specify the number of sick or vacation leave hours in the Hours Available As Of field at the time you’re setting up payroll. You can use the Accrual Period drop-down list to specify how often sick or vacation pay should be accrued. If sick or vacation pay is accrued, use the Hours Accrued field to identify how many hours of sick or vacation time an employee earns each paycheck or hour, or at the beginning of the year. If you’ve set a maximum number of sick hours or vacation hours that an employee can accumulate, enter this value in the Maximum Number of Hours field. If you want to reset the sick hours and vacation hours to zero at the beginning of each year, select the Reset Hours Each New Year? check box.
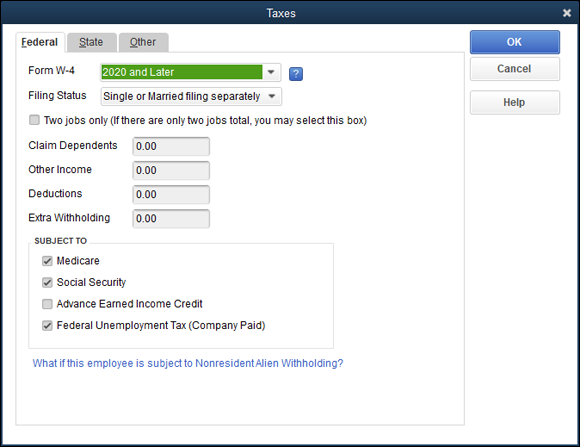
FIGURE 5-4: The Federal tab of the Taxes dialog box.
The Vacation area of the Sick and Vacation dialog box works the same way as the Sick area. Enter the number of vacation hours available in the Hours Available As Of field. Use the Accrual Period drop-down list to specify how often employees earn vacation time. Use the Hours Accrued and Maximum Number of Hours fields to control how vacation-time accrual calculations work. Finally, select the Reset Hours Each New Year? check box to zero out vacation time at the beginning of each new year.
If you’ve chosen to use the direct-deposit option, click the Direct Deposit button on the Payroll Info tab of the New Employee dialog box (refer to Figure 5-3). QuickBooks prompts you to supply the information necessary to directly deposit checks for employees.
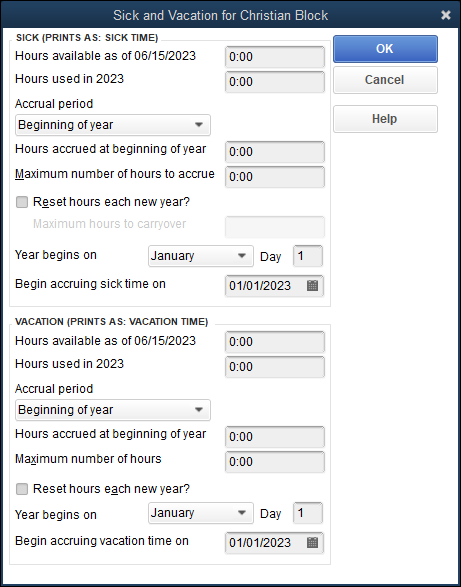
FIGURE 5-5: The Sick and Vacation dialog box.
Providing other employment-related information
If you select the Employment Info tab of the New Employee dialog box, QuickBooks displays the tab you use to store the hire date, fire date, and similar bits of employment data.
Setting up year-to-date amounts
If you’re setting up the Enhanced payroll service at the very beginning of the business’s operation or at the beginning of the year, you don’t have to set up any year-to-date amounts (because all the year-to-date amounts equal zero). If you’re switching to the service sometime in midyear, however, you do need to set up year-to-date amounts. For this reason, a QuickBooks wizard walks you through the process of recording year-to-date amounts.
If an outside service bureau such as ADP or Paychex has been doing your payroll processing, the final payroll report from this outside service bureau probably supplies all the information you need to set up the Enhanced payroll service. If you’ve been working with a bookkeeper or accountant to get payroll done, you should be able to get this person’s help to describe year-to-date payroll amounts.
Checking your payroll setup data
As part of the Enhanced payroll setup process, QuickBooks (or you) may identify payroll data that doesn’t seem right. Perhaps an employee whom you know you’ve paid shows no year-to-date wages. In this case, you correct the incorrect data by following the onscreen instructions. Note, however, that the Enhanced setup process may also identify suspicious payroll data that is in fact correct. In the state of Washington (where I live), for example, officers aren’t subject to state unemployment insurance if they so elect. QuickBooks doesn’t know this, however, so it flags officers who aren’t marked as being subject to state unemployment insurance as possible errors.
Again, if you don’t feel comfortable answering some of these payroll setup questions, get an accountant’s help. Quite frankly, when you have an outside service bureau prepare your payroll checks, you’re really paying for that firm’s expertise and knowledge about how all this payroll processing stuff works. You’re not really paying for the computer time and the paper on which the checks are written.
Scheduling Payroll Runs
The Enhanced payroll setup process also steps you through the work of scheduling your payroll runs. In other words, if you’ll run your payroll every week, twice a month, or at whatever interval, the setup process asks you to describe the schedule. Again, as with the other tasks that the Enhanced setup process helps you with, all you need to do is provide a few bits and pieces of information.
Paying Employees
After you go through the steps required to set up the QuickBooks payroll processing capability, paying employees — thank goodness — is pretty easy. To pay employees, follow these steps:
Choose Employees ⇒ Pay Employees ⇒ Scheduled Payroll.
QuickBooks displays the Employee Center: Payroll Center window (see Figure 5-6).
- Click the Start Scheduled Payroll button.
- Supply the payroll check date and use the Check Date box to supply the date that you want to appear on payroll checks.
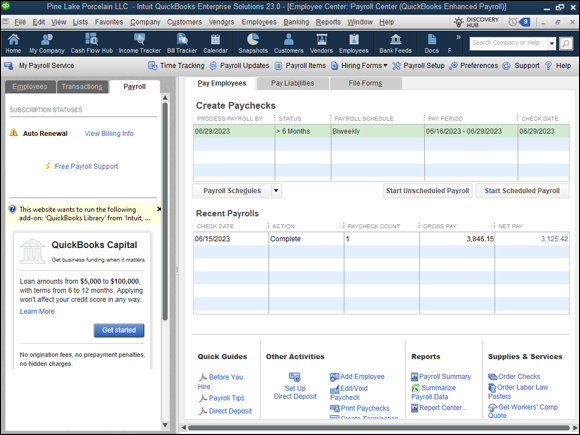
FIGURE 5-6: The Employee Center: Payroll Center window.
- Identify the date on which the payroll period ends in the Pay Period Ends box.
- Use the Bank Account drop-down list to identify the bank account on which you want to write checks.
Verify the employees whom you want to pay.
QuickBooks lists the active employees included in the scheduled payroll. You want to make sure that the list of selected employees is right. You can click listed employees to select and unselect them.
Click Continue.
QuickBooks calculates the payroll checks and payroll deduction amounts for each of the selected employees.
To accept a previewed paycheck described or shown in the dialog box, click its Create Paychecks button.
QuickBooks displays a dialog box that lets you print paychecks or pay stubs for direct deposit.
Click the Print Paychecks or Print Pay Stubs button and follow the onscreen instructions.
When you click either button, QuickBooks displays the Select Paychecks/Pay Stubs to Print dialog box. You should confirm the bank account on which you want to write the checks. If you’re printing checks, you should also use the First Check Number box to supply the preprinted form number shown on the first payroll check that you’ll print. You should also confirm that the employee paychecks listed in the dialog box are those that you want to print.
After you confirm that the paycheck printing information is correct, click OK.
QuickBooks displays the Print Checks dialog box (the same one that you use to print any check).
Print checks in the usual fashion.
If you want to deselect a paycheck for printing, click the check column to remove the check mark and, thereby, deselect the paycheck.Distribute the paychecks or pay stubs.
Obviously, after you print the checks, you sign and then distribute them. I’ll leave you to your own devices here. I’m sure that you know how to find employees whom you need to pay and, furthermore, how to hand them their paychecks. Heck, they’re probably standing beside your desk right now, waiting for you to finish the payroll checks anyway.
Editing and Voiding Paychecks
Be careful when you want to change payroll check information. Payroll checks are a little trickier than regular checks because the information from the payroll checks affects a bunch of payroll counters. Payroll checks bump up someone’s gross wages for the year, for example, and affect the deduction amounts. For this reason, when you want to make a change or void a paycheck that you previously created, you choose the Employees ⇒ Edit/Void Paychecks command. When you do this, QuickBooks displays the Edit/Void Paychecks window (not shown). This window lists paychecks that you’ve previously created and printed. To change one of the paychecks listed, double-click the paycheck. When QuickBooks displays the Paychecks window, click the Paycheck Detail button. When QuickBooks displays the Review Paychecks window, use it to make the appropriate change to the paycheck. Note that you can change other details, such as the name or address, by using the Paycheck window.
To void the paycheck shown in the Paycheck window, choose the Edit ⇒ Void Paycheck command.
After you edit or void a check, click the Save & Close or the Save & New button to save your changes to the paycheck.
Paying Payroll Liabilities
Amounts that you withhold from employees’ paychecks become liabilities that you later need to pay. If you withhold federal income tax deductions, you need to remit those payments to the Internal Revenue Service.
To pay payroll tax liabilities, choose Employees ⇒ Payroll Taxes and Liabilities ⇒ Pay Scheduled Liabilities. QuickBooks displays the Employee Center window, which lets you select the payroll liabilities you want to pay. Click the liability you want to pay and then click the View/Pay button. QuickBooks writes a check to pay the selected liability. You print this check in the usual way.
How quickly you need to remit any payroll taxes triggered by payroll depends on a variety of factors, including the size of the deposit. But a good practice is to immediately remit any amounts you owe. Typically, the government agency in question allows you to easily and electronically make tax deposits by using a website. The U.S. Treasury’s www.eftps.gov/eftps website, for example, lets you make federal tax deposits easily in this manner. In fact, you’re required to use this system if you pay more than $2,500 in payroll taxes a quarter.