
CHAPTER 31
Regular Expressions and Other Packages
When Java was originally released, it included a set of eight packages, called the core API. Each subsequent release added to the API. Today, the Java API contains a very large number of packages. Many of the packages support areas of specialization that are beyond the scope of this book. However, several packages warrant an introduction here. Four are java.util.regex, java.lang.reflect, java.rmi, and java.text. They support regular expression processing, reflection, Remote Method Invocation (RMI), and text formatting, respectively. The chapter ends by introducing the date and time API in java.time and its subpackages.
The regular expression package lets you perform sophisticated pattern matching operations. This chapter provides an introduction to this package along with extensive examples. Reflection is the ability of software to analyze itself. It is an essential part of the Java Beans technology that is covered in Chapter 35. Remote Method Invocation (RMI) allows you to build Java applications that are distributed among several machines. This chapter provides a simple client/server example that uses RMI. The text formatting capabilities of java.text have many uses. The one examined here formats date and time strings. The date and time API supplies an up-to-date approach to handling date and time.
Regular Expression Processing
The java.util.regex package supports regular expression processing. Beginning with JDK 9, java.util.regex is in the java.base module. As the term is used here, a regular expression is a string of characters that describes a character sequence. This general description, called a pattern, can then be used to find matches in other character sequences. Regular expressions can specify wildcard characters, sets of characters, and various quantifiers. Thus, you can specify a regular expression that represents a general form that can match several different specific character sequences.
There are two classes that support regular expression processing: Pattern and Matcher. These classes work together. Use Pattern to define a regular expression. Match the pattern against another sequence using Matcher.
Pattern
The Pattern class defines no constructors. Instead, a pattern is created by calling the compile( ) factory method. One of its forms is shown here:
static Pattern compile(String pattern)
Here, pattern is the regular expression that you want to use. The compile( ) method transforms the string in pattern into a pattern that can be used for pattern matching by the Matcher class. It returns a Pattern object that contains the pattern.
Once you have created a Pattern object, you will use it to create a Matcher. This is done by calling the matcher( ) method defined by Pattern. It is shown here:
Matcher matcher(CharSequence str)
Here str is the character sequence that the pattern will be matched against. This is called the input sequence. CharSequence is an interface that defines a read-only set of characters. It is implemented by the String class, among others. Thus, you can pass a string to matcher( ).
Matcher
The Matcher class has no constructors. Instead, you create a Matcher by calling the matcher( ) factory method defined by Pattern, as just explained. Once you have created a Matcher, you will use its methods to perform various pattern matching operations. Several are described here.
The simplest pattern matching method is matches( ), which determines whether the character sequence matches the pattern. It is shown here:
boolean matches( )
It returns true if the sequence and the pattern match, and false otherwise. Understand that the entire sequence must match the pattern, not just a subsequence of it.
To determine if a subsequence of the input sequence matches the pattern, use find( ). One version is shown here:
boolean find( )
It returns true if there is a matching subsequence and false otherwise. This method can be called repeatedly, allowing it to find all matching subsequences. Each call to find( ) begins where the previous one left off.
You can obtain a string containing the last matching sequence by calling group( ). One of its forms is shown here:
String group( )
The matching string is returned. If no match exists, then an IllegalStateException is thrown.
You can obtain the index within the input sequence of the current match by calling start( ). The index one past the end of the current match is obtained by calling end( ). The forms used in this chapter are shown here:
int start( )
int end( )
Both throw IllegalStateException if no match exists.
You can replace all occurrences of a matching sequence with another sequence by calling replaceAll( ). One version is shown here:
String replaceAll(String newStr)
Here, newStr specifies the new character sequence that will replace the ones that match the pattern. The updated input sequence is returned as a string.
Regular Expression Syntax
Before demonstrating Pattern and Matcher, it is necessary to explain how to construct a regular expression. Although no rule is complicated by itself, there are a large number of them, and a complete discussion is beyond the scope of this chapter. However, a few of the more commonly used constructs are described here.
In general, a regular expression is comprised of normal characters, character classes (sets of characters), wildcard characters, and quantifiers. A normal character is matched as-is. Thus, if a pattern consists of "xy", then the only input sequence that will match it is "xy". Characters such as newline and tab are specified using the standard escape sequences, which begin with a . For example, a newline is specified by . In the language of regular expressions, a normal character is also called a literal.
A character class is a set of characters. A character class is specified by putting the characters in the class between brackets. For example, the class [wxyz] matches w, x, y, or z. To specify an inverted set, precede the characters with a ^. For example, [^wxyz] matches any character except w, x, y, or z. You can specify a range of characters using a hyphen. For example, to specify a character class that will match the digits 1 through 9, use [1-9].
The wildcard character is the . (dot) and it matches any character. Thus, a pattern that consists of "." will match these (and other) input sequences: "A", "a", "x", and so on.
A quantifier determines how many times an expression is matched. The basic quantifiers are shown here:

For example, the pattern "x+" will match "x", "xx", and "xxx", among others. As you will see, variations are supported that affect how matching is performed.
One other point: In general, if you specify an invalid expression, a PatternSyntaxException will be thrown.
Demonstrating Pattern Matching
The best way to understand how regular expression pattern matching operates is to work through some examples. The first, shown here, looks for a match with a literal pattern:

The output from the program is shown here:
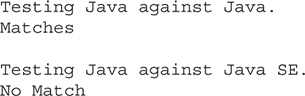
Let’s look closely at this program. The program begins by creating the pattern that contains the sequence "Java". Next, a Matcher is created for that pattern that has the input sequence "Java". Then, the matches( ) method is called to determine if the input sequence matches the pattern. Because the sequence and the pattern are the same, matches( ) returns true. Next, a new Matcher is created with the input sequence "Java SE" and matches( ) is called again. In this case, the pattern and the input sequence differ, and no match is found. Remember, the matches( ) function returns true only when the input sequence precisely matches the pattern. It will not return true just because a subsequence matches.
You can use find( ) to determine if the input sequence contains a subsequence that matches the pattern. Consider the following program:

The output is shown here:
Looking for Java in Java SE.
subsequence found
In this case, find( ) finds the subsequence "Java".
The find( ) method can be used to search the input sequence for repeated occurrences of the pattern because each call to find( ) picks up where the previous one left off. For example, the following program finds two occurrences of the pattern "test":

The output is shown here:
test found at index 0
test found at index 11
As the output shows, two matches were found. The program uses the start( ) method to obtain the index of each match.
Using Wildcards and Quantifiers
Although the preceding programs show the general technique for using Pattern and Matcher, they don’t show their power. The real benefit of regular expression processing is not seen until wildcards and quantifiers are used. To begin, consider the following example that uses the + quantifier to match any arbitrarily long sequence of Ws:

The output from the program is shown here:
Match: W
Match: WW
Match: WWW
As the output shows, the regular expression pattern "W+" matches any arbitrarily long sequence of Ws.
The next program uses a wildcard to create a pattern that will match any sequence that begins with e and ends with d. To do this, it uses the dot wildcard character along with the + quantifier.

You might be surprised by the output produced by the program, which is shown here:
Match: extend cup end
Only one match is found, and it is the longest sequence that begins with e and ends with d. You might have expected two matches: "extend" and "end". The reason that the longer sequence is found is that the pattern "e.+d" matches the longest sequence that fits the pattern. This is called greedy behavior. You can specify reluctant behavior by adding the ? to the pattern, as shown in this version of the program. It causes the shortest matching pattern to be obtained.

The output from the program is shown here:
Match: extend
Match: end
As the output shows, the pattern "e.+?d" will match the shortest sequence that begins with e and ends with d. Thus, two matches are found.
In general, to convert a greedy quantifier into a reluctant quantifier, add a ?. You can also specify possessive behavior by appending a +. For example, you might want to try the pattern "e.?+d" and observe the result. You can also specify a number of times to match by using {min, limit}, which matches min times, up to limit times. Also supported are {min} and {min,} which match min times, and min times but possibly more, respectively.
Working with Classes of Characters
Sometimes you will want to match any sequence that contains one or more characters, in any order, that are part of a set of characters. For example, to match whole words, you want to match any sequence of the letters of the alphabet. One of the easiest ways to do this is to use a character class, which defines a set of characters. Recall that a character class is created by putting the characters you want to match between brackets. For example, to match the lowercase characters a through z, use [a-z]. The following program demonstrates this technique:
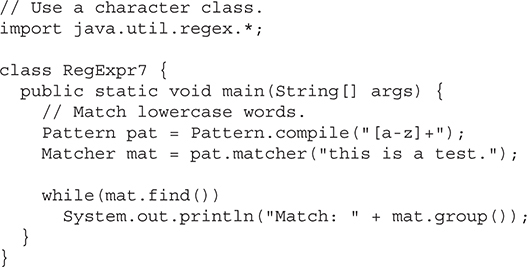
The output is shown here:
Match: this
Match: is
Match: a
Match: test
Using replaceAll( )
The replaceAll( ) method supplied by Matcher lets you perform powerful search and replace operations that use regular expressions. For example, the following program replaces all occurrences of sequences that begin with "Jon" with "Eric":

The output is shown here:
Original sequence: Jon Jonathan Frank Ken Todd
Modified sequence: Eric Eric Frank Ken Todd
Because the regular expression "Jon.*? " matches any string that begins with Jon followed by zero or more characters, ending in a space, it can be used to match and replace both Jon and Jonathan with the name Eric. Such a substitution is not easily accomplished without pattern matching capabilities.
Using split( )
You can reduce an input sequence into its individual tokens by using the split( ) method defined by Pattern. One form of the split( ) method is shown here:
String[ ] split(CharSequence str)
It processes the input sequence passed in str, reducing it into tokens based on the delimiters specified by the pattern.
For example, the following program finds tokens that are separated by spaces, commas, periods, and exclamation points:

The output is shown here:
Next token: one
Next token: two
Next token: alpha9
Next token: 12
Next token: done
As the output shows, the input sequence is reduced to its individual tokens. Notice that the delimiters are not included.
Two Pattern-Matching Options
Although the pattern-matching techniques described in the foregoing offer the greatest flexibility and power, there are two alternatives which you might find useful in some circumstances. If you only need to perform a one-time pattern match, you can use the matches( ) method defined by Pattern. It is shown here:
static boolean matches(String pattern, CharSequence str)
It returns true if pattern matches str and false otherwise. This method automatically compiles pattern and then looks for a match. If you will be using the same pattern repeatedly, then using matches( ) is less efficient than compiling the pattern and using the pattern-matching methods defined by Matcher, as described previously.
You can also perform a pattern match by using the matches( ) method implemented by String. It is shown here:
boolean matches(String pattern)
If the invoking string matches the regular expression in pattern, then matches( ) returns true. Otherwise, it returns false.
Exploring Regular Expressions
The overview of regular expressions presented in this section only hints at their power. Since text parsing, manipulation, and tokenization are a large part of programming, you will likely find Java’s regular expression subsystem a powerful tool that you can use to your advantage. It is, therefore, wise to explore the capabilities of regular expressions. Experiment with several different types of patterns and input sequences. Once you understand how regular expression pattern matching works, you will find it useful in many of your programming endeavors.

Table 31-1 Classes Defined in java.lang.reflect
Reflection
Reflection is the ability of software to analyze itself. This is provided by the java.lang.reflect package and elements in Class. Beginning with JDK 9, java.lang.reflect is part of the java.base module. Reflection is an important capability, especially when using components called Java Beans. It allows you to analyze a software component and describe its capabilities dynamically, at run time rather than at compile time. For example, by using reflection, you can determine what methods, constructors, and fields a class supports. Reflection was introduced in Chapter 12. It is examined further here.
The package java.lang.reflect includes several interfaces. Of special interest is Member, which defines methods that allow you to get information about a field, constructor, or method of a class. There are also 11 classes in this package. These are listed in Table 31-1.
The following application illustrates a simple use of the Java reflection capabilities. It prints the constructors, fields, and methods of the class java.awt.Dimension. The program begins by using the forName( ) method of Class to get a class object for java.awt.Dimension. Once this is obtained, getConstructors( ), getFields( ), and getMethods( ) are used to analyze this class object. They return arrays of Constructor, Field, and Method objects that provide the information about the object. The Constructor, Field, and Method classes define several methods that can be used to obtain information about an object. You will want to explore these on your own. However, each supports the toString( ) method. Therefore, using Constructor, Field, and Method objects as arguments to the println( ) method is straightforward, as shown in the program.

Here is the output from this program. (The output you see when you run the program may differ slightly from that shown.)
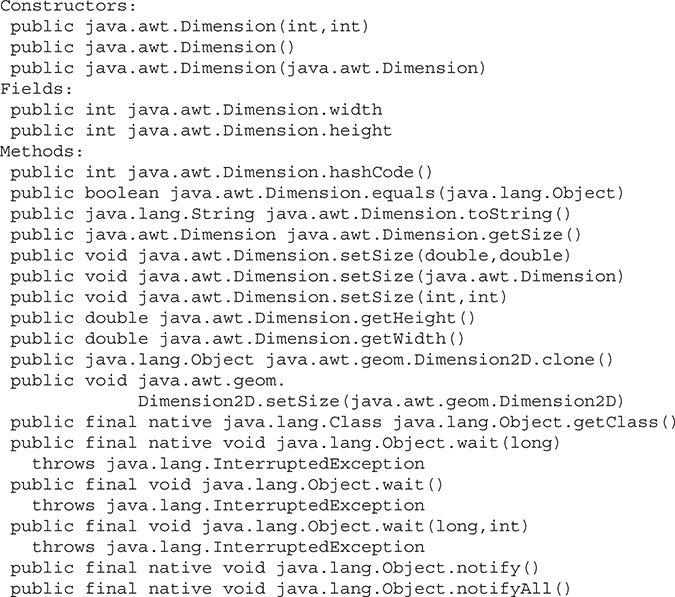

Table 31-2 The “is” Methods Defined by Modifier That Determine Modifiers
The next example uses Java’s reflection capabilities to obtain the public methods of a class. The program begins by instantiating class A. The getClass( ) method is applied to this object reference, and it returns the Class object for class A. The getDeclaredMethods( ) method returns an array of Method objects that describe only the methods declared by this class. Methods inherited from superclasses such as Object are not included.
Each element of the methods array is then processed. The getModifiers( ) method returns an int containing flags that describe which modifiers apply for this element. The Modifier class provides a set of isX methods, shown in Table 31-2, that can be used to examine this value. For example, the static method isPublic( ) returns true if its argument includes the public modifier. Otherwise, it returns false. In the following program, if the method supports public access, its name is obtained by the getName( ) method and is then printed.
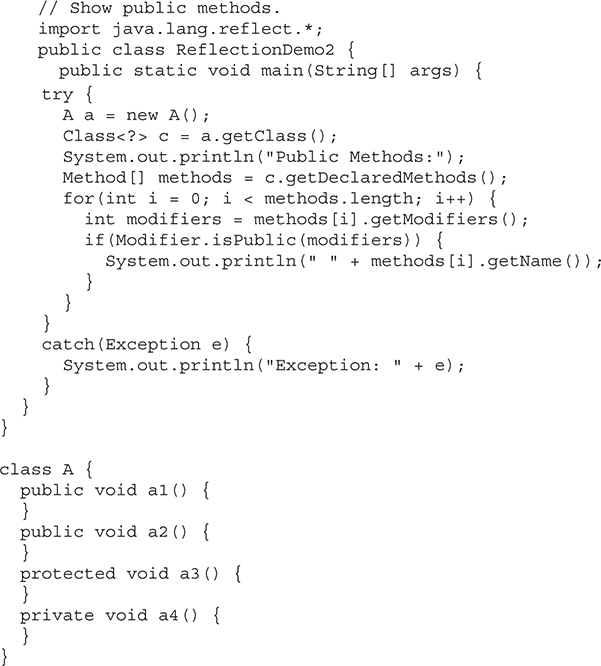
Here is the output from this program:

Modifier also includes a set of static methods that return the type of modifiers that can be applied to a specific type of program element. These methods are
static int classModifiers( )
static int constructorModifiers( )
static int fieldModifiers( )
static int interfaceModifiers( )
static int methodModifiers( )
static int parameterModifiers( )
For example, methodModifiers( ) returns the modifiers that can be applied to a method. Each method returns flags, packed into an int, that indicate which modifiers are legal. The modifier values are defined by constants in Modifier, which include PROTECTED, PUBLIC, PRIVATE, STATIC, FINAL, and so on.
Remote Method Invocation (RMI)
Remote Method Invocation (RMI) allows a Java object that executes on one machine to invoke a method of a Java object that executes on another machine. This is an important feature, because it allows you to build distributed applications. While a complete discussion of RMI is outside the scope of this book, the following simplified example describes the basic principles involved. RMI is supported by the java.rmi package. Beginning with JDK 9, it is part of the java.rmi module.
A Simple Client/Server Application Using RMI
This section provides step-by-step directions for building a simple client/server application by using RMI. The server receives a request from a client, processes it, and returns a result. In this example, the request specifies two numbers. The server adds these together and returns the sum.
Step One: Enter and Compile the Source Code
This application uses four source files. The first file, AddServerIntf.java, defines the remote interface that is provided by the server. It contains one method that accepts two double arguments and returns their sum. All remote interfaces must extend the Remote interface, which is part of java.rmi. Remote defines no members. Its purpose is simply to indicate that an interface uses remote methods. All remote methods can throw a RemoteException.

The second source file, AddServerImpl.java, implements the remote interface. The implementation of the add( ) method is straightforward. Remote objects typically extend UnicastRemoteObject, which provides functionality that is needed to make objects available from remote machines.

The third source file, AddServer.java, contains the main program for the server machine. Its primary function is to update the RMI registry on that machine. This is done by using the rebind( ) method of the Naming class (found in java.rmi). That method associates a name with an object reference. The first argument to the rebind( ) method is a string that names the server as "AddServer". Its second argument is a reference to an instance of AddServerImpl.

The fourth source file, AddClient.java, implements the client side of this distributed application. AddClient.java requires three command-line arguments. The first is the IP address or name of the server machine. The second and third arguments are the two numbers that are to be summed.
The application begins by forming a string that follows the URL syntax. This URL uses the rmi protocol. The string includes the IP address or name of the server and the string "AddServer". The program then invokes the lookup( ) method of the Naming class. This method accepts one argument, the rmi URL, and returns a reference to an object of type AddServerIntf. All remote method invocations can then be directed to this object.
The program continues by displaying its arguments and then invokes the remote add( ) method. The sum is returned from this method and is then printed.

After you enter all the code, use javac to compile the four source files that you created.
Step Two: Manually Generate a Stub if Required
In the context of RMI, a stub is a Java object that resides on the client machine. Its function is to present the same interfaces as the remote server. Remote method calls initiated by the client are actually directed to the stub. The stub works with the other parts of the RMI system to formulate a request that is sent to the remote machine.
A remote method may accept arguments that are simple types or objects. In the latter case, the object may have references to other objects. All of this information must be sent to the remote machine. That is, an object passed as an argument to a remote method call must be serialized and sent to the remote machine. Recall from Chapter 21 that the serialization facilities also recursively process all referenced objects.
If a response must be returned to the client, the process works in reverse. Note that the serialization and deserialization facilities are also used if objects are returned to a client.
Prior to Java 5, stubs needed to be built manually by using rmic. This step is not required for modern versions of Java. However, if you are working in a very old legacy environment, then you can use the rmic compiler, as shown here, to build a stub:
rmic AddServerImpl
This command generates the file AddServerImpl_Stub.class. When using rmic, be sure that CLASSPATH is set to include the current directory.
Step Three: Install Files on the Client and Server Machines
Copy AddClient.class, AddServerImpl_Stub.class (if needed), and AddServerIntf.class to a directory on the client machine. Copy AddServerIntf.class, AddServerImpl.class, AddServerImpl_Stub.class (if needed), and AddServer.class to a directory on the server machine.
Step Four: Start the RMI Registry on the Server Machine
The JDK provides a program called rmiregistry, which executes on the server machine. It maps names to object references. First, check that the CLASSPATH environment variable includes the directory in which your files are located. Then, start the RMI Registry from the command line, as shown here:
start rmiregistry
When this command returns, you should see that a new window has been created. You need to leave this window open until you are done experimenting with the RMI example.
Step Five: Start the Server
The server code is started from the command line, as shown here:
java AddServer
Recall that the AddServer code instantiates AddServerImpl and registers that object with the name "AddServer".
Step Six: Start the Client
The AddClient software requires three arguments: the name or IP address of the server machine and the two numbers that are to be summed together. You may invoke it from the command line by using one of the two formats shown here:
java AddClient server1 8 9
java AddClient 11.12.13.14 8 9
In the first line, the name of the server is provided. The second line uses its IP address (11.12.13.14).
You can try this example without actually having a remote server. To do so, simply install all of the programs on the same machine, start rmiregistry, start AddServer, and then execute AddClient using this command line:
java AddClient 127.0.0.1 8 9
Here, the address 127.0.0.1 is the “loop back” address for the local machine. Using this address allows you to exercise the entire RMI mechanism without actually having to install the server on a remote computer. (If you are using a firewall, then this approach may not work.)
In either case, sample output from this program is shown here:
The first number is: 8
The second number is: 9
The sum is: 17.0
Formatting Date and Time with java.text
The package java.text allows you to format, parse, search, and manipulate text. Beginning with JDK 9, java.text is part of the java.base module. This section examines two of java.text's most commonly used classes: those that format date and time information. However, it is important to state at the outset that the new date and time API described later in this chapter offers a modern approach to handling date and time that also supports formatting. Of course, legacy code will continue to use the classes shown here for some time.
DateFormat Class
DateFormat is an abstract class that provides the ability to format and parse dates and times. The getDateInstance( ) method returns an instance of DateFormat that can format date information. It is available in these forms:
static final DateFormat getDateInstance( )
static final DateFormat getDateInstance(int style)
static final DateFormat getDateInstance(int style, Locale locale)
Here, style is one of the following values: DEFAULT, SHORT, MEDIUM, LONG, or FULL. These are int constants defined by DateFormat. They cause different details about the date to be presented. The parameter locale specifies the locale (refer to Chapter 20 for details on Locale). If the style and/or locale is not specified, defaults are used.
One of the most commonly used methods in this class is format( ). It has several overloaded forms, one of which is shown here:
final String format(Date d)
The argument is a Date object that is to be displayed. The method returns a string containing the formatted information.
The following listing illustrates how to format date information. It begins by creating a Date object. This captures the current date and time information. Then it outputs the date information by using different styles and locales.

Sample output from this program is shown here:
Japan: 2021/06/30
Korea: 2021. 6. 30.
United Kingdom: 30 June 2021
United States: Wednesday, June 30, 2021
The getTimeInstance( ) method returns an instance of DateFormat that can format time information. It is available in these versions:
static final DateFormat getTimeInstance( )
static final DateFormat getTimeInstance(int style)
static final DateFormat getTimeInstance(int style, Locale locale)
Here, style is one of the following values: DEFAULT, SHORT, MEDIUM, LONG, or FULL. These are int constants defined by DateFormat. They cause different details about the time to be presented. The parameter locale specifies the locale. If the style and/or locale is not specified, defaults are used.
The following listing illustrates how to format time information. It begins by creating a Date object. This captures the current date and time information. Then it outputs the time information by using different styles and locales.

Sample output from this program is shown here:
Japan: 13:03
United Kingdom: 13:03:31 GMT-05:00
Canada: 1:03:31 PM Central Daylight Time
The DateFormat class also has a getDateTimeInstance( ) method that can format both date and time information. You may wish to experiment with it on your own.
SimpleDateFormat Class
SimpleDateFormat is a concrete subclass of DateFormat. It allows you to define your own formatting patterns that are used to display date and time information.
One of its constructors is shown here:
SimpleDateFormat(String formatString)
The argument formatString describes how date and time information is displayed. An example of its use is given here:
SimpleDateFormat sdf = SimpleDateFormat("dd MMM yyyy hh:mm:ss zzz");
The symbols used in the formatting string determine the information that is displayed. Table 31-3 lists these symbols and gives a description of each.
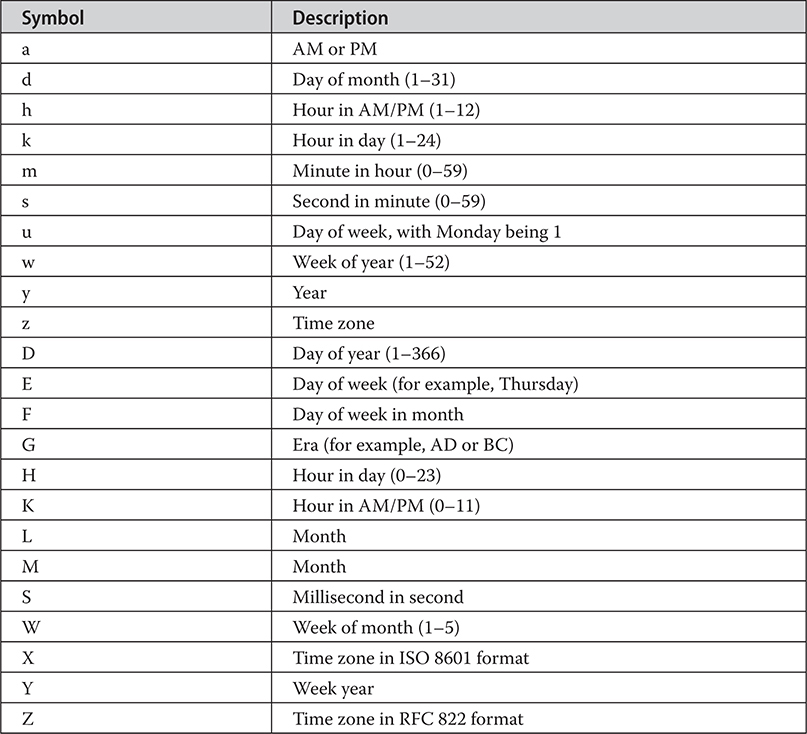
Table 31-3 Formatting String Symbols for SimpleDateFormat
In most cases, the number of times a symbol is repeated determines how that data is presented. Text information is displayed in an abbreviated form if the pattern letter is repeated less than four times. Otherwise, the unabbreviated form is used. For example, a zzzz pattern can display Pacific Daylight Time, and a zzz pattern can display PDT.
For numbers, the number of times a pattern letter is repeated determines how many digits are presented. For example, hh:mm:ss can present 01:51:15, but h:m:s displays the same time value as 1:51:15.
Finally, M or MM causes the month to be displayed as one or two digits. However, three or more repetitions of M cause the month to be displayed as a text string.
The following program shows how this class is used:
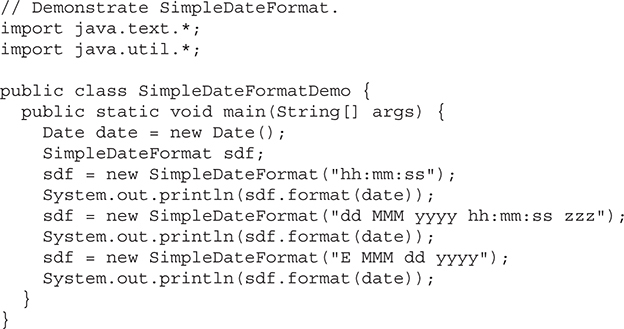
Sample output from this program is shown here:
01:30:51
30 Jun 2021 01:30:51 CDT
Wed Jun 30 2021
The java.time Time and Date API
In Chapter 20, Java’s long-standing approach to handling date and time through the use of classes such as Calendar and GregorianCalendar was discussed. It is expected that this traditional approach will remain in widespread use for some time and is, therefore, something that all Java programmers need to be familiar with. Since JDK 8, Java has included another approach to handling time and date. This approach is defined in the following packages:
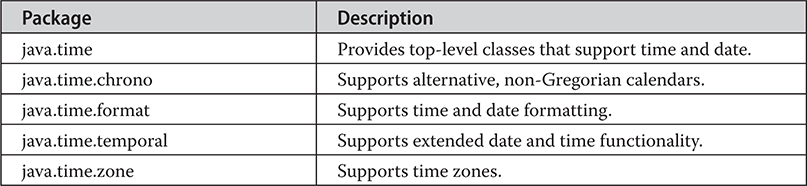
These packages define a large number of classes, interfaces, and enumerations that provide extensive, finely grained support for time and date operations. Because of the number of elements that comprise the new time and date API, it can seem fairly intimidating at first. However, it is well organized and logically structured. Its size reflects the detail of control and flexibility that it provides. Although it is far beyond the scope of this book to examine each element in this extensive API, we will look at several of its main classes. As you will see, these classes are sufficient for many uses. Beginning with JDK 9, these packages are in the java.base module.
Time and Date Fundamentals
In java.time are defined several top-level classes that give you easy access to the time and date. Three of these are LocalDate, LocalTime, and LocalDateTime. As their names suggest, they encapsulate the local date, time, and date and time. Using these classes, it is easy to obtain the current date and time, format the date and time, and compare dates and times, among other operations. These classes are value-based, as are many others in java.time. (See Chapter 13 for information on value-based classes.)
LocalDate encapsulates a date that uses the default Gregorian calendar as specified by ISO 8601. LocalTime encapsulates a time, as specified by ISO 8601. LocalDateTime encapsulates both date and time. These classes contain a large number of methods that give you access to the date and time components, allow you to compare dates and times, add or subtract date or time components, and so on. Because a common naming convention for methods is employed, once you know how to use one of these classes, the others are easy to master.
LocalDate, LocalTime, and LocalDateTime do not define public constructors. Rather, to obtain an instance, you will use a factory method. One very convenient method is now( ), which is defined for all three classes. It returns the current date and/or time of the system. Each class defines several versions, but we will use its simplest form. Here is the version we will use as defined by LocalDate:
static LocalDate now( )
The version for LocalTime is shown here:
static LocalTime now( )
The version for LocalDateTime is shown here:
static LocalDateTime now( )
As you can see, in each case, an appropriate object is returned. The object returned by now( ) can be displayed in its default, human-readable form by use of a println( ) statement, for example. However, it is also possible to take full control over the formatting of date and time.
The following program uses LocalDate and LocalTime to obtain the current date and time and then displays them. Notice how now( ) is called to retrieve the current date and time.

Sample output is shown here:
2021-06-30
14:57:29.621839100
The output reflects the default format that is given to the date and time. (The next section shows how to specify a different format.)
Because the preceding program displays both the current date and the current time, it could have been more easily written using the LocalDateTime class. In this approach, only a single instance needs to be created and only a single call to now( ) is required, as shown here:
LocalDateTime curDateTime = LocalDateTime.now();
System.out.println(curDateTime);
Using this approach, the default output includes both date and time. Here is a sample:
2021-06-30T14:58:56.498907300
One other point: from a LocalDateTime instance, it is possible to obtain a reference to the date or time component by using the toLocalDate( ) and toLocalTime( ) methods, shown here:
LocalDate toLocalDate( )
LocalTime toLocalTime( )
Each returns a reference to the indicated element.
Formatting Date and Time
Although the default formats shown in the preceding examples will be adequate for some uses, often you will want to specify a different format. Fortunately, this is easy to do because LocalDate, LocalTime, and LocalDateTime all provide the format( ) method, shown here:
String format(DateTimeFormatter fmtr)
Here, fmtr specifies the instance of DateTimeFormatter that will provide the format.
DateTimeFormatter is packaged in java.time.format. To obtain a DateTimeFormatter instance, you will typically use one of its factory methods. Three are shown here:
static DateTimeFormatter ofLocalizedDate(FormatStyle fmtDate)
static DateTimeFormatter ofLocalizedTime(FormatStyle fmtTime)
static DateTimeFormatter ofLocalizedDateTime(FormatStyle fmtDate,
FormatStyle fmtTime)
Of course, the type of DateTimeFormatter that you create will be based on the type of object it will be operating on. For example, if you want to format the date in a LocalDate instance, then use ofLocalizedDate( ). The specific format is specified by the FormatStyle parameter.
FormatStyle is an enumeration that is packaged in java.time.format. It defines the following constants:
FULL
LONG
MEDIUM
SHORT
These specify the level of detail that will be displayed. (Thus, this form of DateTimeFormatter works similarly to java.text.DateFormat, described earlier in this chapter.)
Here is an example that uses DateTimeFormatter to display the current date and time:
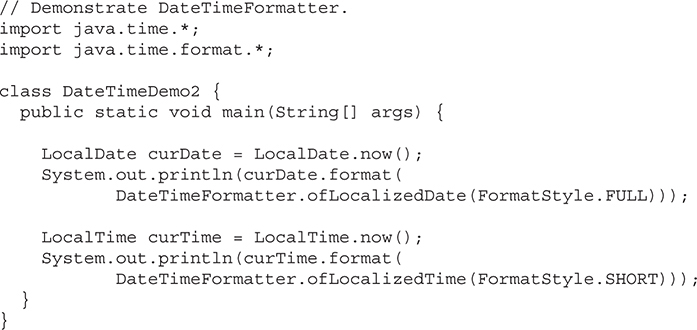
Sample output is shown here:
Wednesday, June 30, 2021
2:16 PM
In some situations, you may want a format different from the ones you can specify by use of FormatStyle. One way to accomplish this is to use a predefined formatter, such as ISO_DATE or ISO_TIME, provided by DateTimeFormatter. Another way is to create a custom format by specifying a pattern. To do this, you can use the ofPattern( ) factory method of DateTimeFormatter. One version is shown here:
static DateTimeFormatter ofPattern(String fmtPattern)
Here, fmtPattern specifies a string that contains the date and time pattern that you want. It returns a DateTimeFormatter that will format according to that pattern. The default locale is used.
In general, a pattern consists of format specifiers, called pattern letters. A pattern letter will be replaced by the date or time component that it specifies. The full list of pattern letters is shown in the API documentation for ofPattern( ). Here is a sampling. Note that the pattern letters are case-sensitive.

In general, the precise output that you see will be determined by how many times a pattern letter is repeated. (Thus, DateTimeFormatter works a bit like java.text.SimpleDateFormat, described earlier in this chapter.) For example, assuming that the month is April, the patterns:
M MM MMM MMMM
produce the following formatted output:
4 04 Apr April
Frankly, experimentation is the best way to understand what each pattern letter does and how various repetitions affect the output.
When you want to output a pattern letter as text, enclose the text between single quotation marks. In general, it is a good idea to enclose all non-pattern characters within single quotation marks to avoid problems if the set of pattern letters changes in subsequent versions of Java.
The following program demonstrates the use of a date and time pattern:

Sample output is shown here:
June 30, 2021 2:22 PM
One other point about creating custom date and time output: LocalDate, LocalTime, and LocalDateTime define methods that let you obtain various date and time components. For example, getHour( ) returns the hour as an int; getMonth( ) returns the month in the form of a Month enumeration value; and getYear( ) returns the year as an int. Using these, and other methods, you can manually construct output. You can also use these values for other purposes, such as when creating specialized timers.
Parsing Date and Time Strings
LocalDate, LocalTime, and LocalDateTime provide the ability to parse date and/or time strings. To do this, call parse( ) on an instance of one of those classes. It has two forms. The first uses the default formatter that parses the date and/or time formatted in the standard ISO fashion, such as 03:31 for time and 2021-08-02 for date. The form of this version of parse( ) for LocalDateTime is shown here. (Its form for the other classes is similar except for the type of object returned.)
static LocalDateTime parse(CharSequence dateTimeStr)
Here, dateTimeStr is a string that contains the date and time in the proper format. If the format is invalid, an exception will be thrown.
If you want to parse a date and/or time string that is in a format other than ISO format, you can use a second form of parse( ) that lets you specify your own formatter. The version specified by LocalDateTime is shown next. (The other classes provide a similar form except for the return type.)
static LocalDateTime parse(CharSequence dateTimeStr,
DateTimeFormatter dateTimeFmtr)
Here, dateTimeFmtr specifies the formatter that you want to use.
Here is a simple example that parses a date and time string by use of a custom formatter:

Sample output is shown here:
June 30, 2021 12:01 AM
Other Things to Explore in java.time
Although you will want to explore all of the date and time packages, a good place to start is with java.time. It contains a great deal of functionality that you may find useful. Begin by examining the methods defined by LocalDate, LocalTime, and LocalDateTime. Each has methods that let you add or subtract dates and/or times, adjust dates and/or times by a given component, compare dates and/or times, and create instances based on date and/or time components, among others. Other classes in java.time that you may find of particular interest include Instant, Duration, and Period. Instant encapsulates an instant in time. Duration encapsulates a length of time. Period encapsulates a length of date. You will also want to explore the new InstantSource interface added by JDK 17, which is implemented by the Clock class.