
CHAPTER 2
Programming Survival Skills
In this chapter, we cover the following topics:
• C programming language
• Computer memory
• Intel processors
• Assembly language basics
• Debugging with gdb
• Python survival skills
Why study programming? Ethical hackers should study programming and learn as much about the subject as possible in order to find vulnerabilities in programs and get them fixed before unethical hackers and black hats take advantage of them. Many security professionals come at programming from a nontraditional perspective, often having no programming experience prior to beginning their career. Bug hunting is very much a foot race: if a vulnerability exists, who will find it first? The purpose of this chapter is to give you the survival skills necessary to understand upcoming chapters and then later to find the holes in software before the black hats do.
C Programming Language
The C programming language was developed in 1972 by Dennis Ritchie from AT&T Bell Labs. The language was heavily used in Unix and is therefore ubiquitous. In fact, many of the staple networking programs and operating systems, as well as large applications such as Microsoft Office Suite, Adobe Reader, and browsers, are written in combinations of C, C++, Objective-C, assembly, and a couple of other lower-level languages.
Basic C Language Constructs
Although each C program is unique, some common structures can be found in most programs. We’ll discuss these in the next few sections.
main()
All C programs “should” (see the “For Further Reading” section for an exception) contain a main() function (lowercase) that follows the format

where both the return value type and arguments are optional. If no return value type is specified, a return type of int is used; however, some compilers may throw warnings if you fail to specify its return value as int or attempt to use void. If you use command-line arguments for main(), you could use the format
![]()
(among others), where the argc integer holds the number of arguments and the argv array holds the input arguments (strings). The name of the program is always stored at offset argv[0]. The parentheses and brackets are mandatory. The brackets are used to denote the beginning and end of a block of code. Although procedure and function calls are optional, the program would do nothing without them. A procedure statement is simply a series of commands that performs operations on data or variables and normally ends with a semicolon.
Functions
Functions are self-contained bundles of code that can be called for execution by main() or other functions. They are nonpersistent and can be called as many times as needed, thus preventing us from having to repeat the same code throughout a program. The format is as follows:
![]()
The function name and optional argument list comprise the signature. By looking at it, you can tell if the function requires arguments that will be used in processing the procedures of the function. Also notice the optional return value; this tells you if the function returns a value after executing and, if so, what type of data that is.
The call to the function may look like this:
![]()
The following is a simple example:
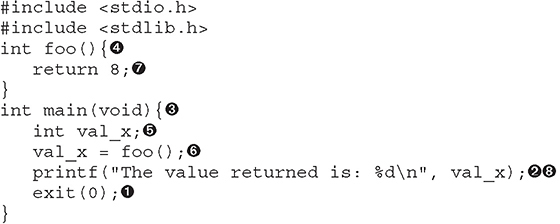
Here, we are including the appropriate header files, which include the function declarations for exit and printf. The exit ![]() function is defined in stdlib.h, and printf
function is defined in stdlib.h, and printf ![]() is defined in stdio.h. If you do not know what header files are required based on the dynamically linked functions you are using in a program, you can simply look at the manual entry, such as man sscanf, and refer to the synopsis at the top. We then define the main
is defined in stdio.h. If you do not know what header files are required based on the dynamically linked functions you are using in a program, you can simply look at the manual entry, such as man sscanf, and refer to the synopsis at the top. We then define the main ![]() function with a return value of int. We specify void
function with a return value of int. We specify void ![]() in the arguments location between the parentheses because we do not want to allow arguments passed to the main function. We then create a variable called x with a data type of int
in the arguments location between the parentheses because we do not want to allow arguments passed to the main function. We then create a variable called x with a data type of int ![]() . Next, we call the function foo
. Next, we call the function foo ![]() and assign the return value to x. The foo function simply returns the value 8
and assign the return value to x. The foo function simply returns the value 8 ![]() . This value is then printed onto the screen using the printf function, using the format string %d to treat x as a decimal value
. This value is then printed onto the screen using the printf function, using the format string %d to treat x as a decimal value ![]() .
.
Function calls modify the flow of a program. When a call to a function is made, the execution of the program temporarily jumps to the function. After execution of the called function has completed, control returns to the calling function at the virtual memory address directly below the call instruction. This process will make more sense during our discussion of stack operations in Chapter 10.
Variables
Variables are used in programs to store pieces of information that may change and may be used to dynamically influence the program. Table 2-1 shows some common types of variables.
When the program is compiled, most variables are pre-allocated memory of a fixed size according to system-specific definitions of size. Sizes in Table 2-1 are considered typical; there is no guarantee you will get those exact sizes. It is left up to the hardware implementation to define the size. However, the function sizeof() is used in C to ensure that the correct sizes are allocated by the compiler.
Variables are typically defined near the top of a block of code. As the compiler chews up the code and builds a symbol table, it must be aware of a variable before that variable is used in the code later. The word “symbol” is simply a name or identifier. This formal declaration of variables is done in the following manner:
![]()

Table 2-1 Types of Variables
For example, in the line
int a = 0;
an integer (normally 4 bytes) is declared in memory with a symbol of a and an initial value of 0.
Once a variable is declared, the assignment construct is used to change the value of the variable. For example, the statement
x=x+1;
is an assignment statement that changes the value of the variable x. The new value of x is the current value of x modified by the + operator. It is common to use the format
destination = source <with optional operators>
where destination is the location in which the final outcome is stored.
printf
The C language comes with many useful constructs bundled into the libc library. One of many commonly used constructs is the printf command, generally used to print output to the screen. There are two forms of the printf command:
printf(<string>);
printf(<format string>, <list of variables/values>);
The first format is straightforward and is used to display a simple string to the screen. The second format allows for more flexibility through the use of a format type that can be composed of normal characters and special symbols that act as placeholders for the list of variables following the comma. Commonly used format symbols are listed and described in Table 2-2.
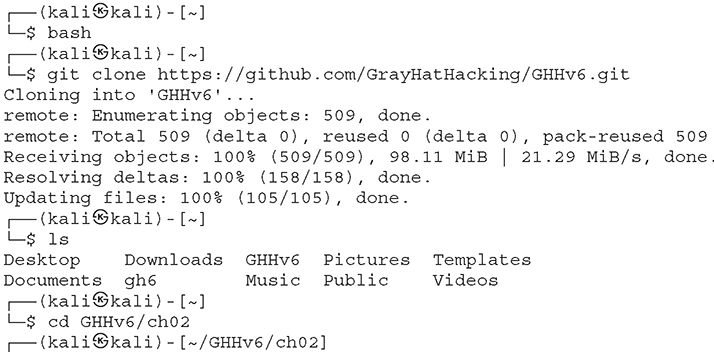
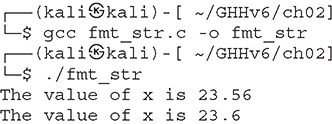
These format types allow the programmer to indicate how they want data displayed to the screen, written to a file, or other possibilities through the use of the printf family of functions. As an example, say you know a variable to be a float and you want to ensure that it is printed out as such, and you also want to limit its width, both before and after the floating point. In this case, you could use the code in the following lab in Kali, where we first change our shell to bash and then get the code from GitHub using git clone.
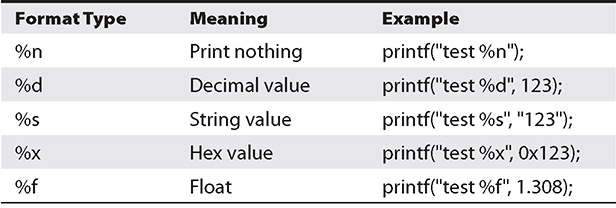
Table 2-2 printf Format Types
Lab 2-1: Format Strings
In this lab, we download the code for all the labs in this chapter and then focus on format strings, which will allow us to format the output of our program as we wish.
Now, we can look at our code:
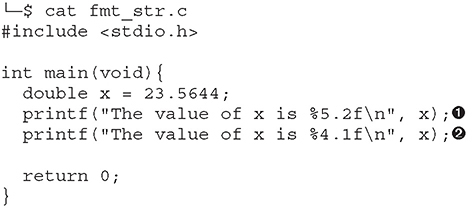
In the first printf call ![]() , we use a total width of 5, with 2 values after the floating point. In the second call to printf
, we use a total width of 5, with 2 values after the floating point. In the second call to printf ![]() , we use a total width of 4, with 1 value after the floating point.
, we use a total width of 4, with 1 value after the floating point.
Now, let’s compile it with gcc and run it:

NOTE The examples in this chapter use 2020.4 64-bit Kali Linux. If you are using 32-bit Kali Linux, you may need to change your compiler options.
scanf
The scanf command complements the printf command and is generally used to get input from the user. The format is
scanf(<format string>, <list of variables/values>);
where the format string can contain format symbols such as those shown for printf in Table 2-2. For example, the following code will read an integer from the user and store it in a variable called number:
scanf("%d", &number);
Actually, the & symbol means we are storing the value in the memory location pointed to by number. This will make more sense when we talk about pointers later in the chapter in the “Pointers” section. For now, realize that you must use the & symbol before any variable name with scanf. The command is smart enough to change types on the fly, so if you were to enter a character in the previous command prompt, the command would convert the character into the decimal (ASCII) value automatically. Bounds checking is not done in regard to string size, however, which may lead to problems, as discussed later in Chapter 10.
strcpy/strncpy
The strcpy command is one of the most dangerous functions used in C. The format of the command is as follows:
strcpy(<destination>, <source>);
The purpose of the command is to copy each character in the source string (a series of characters ending with a null character, �) into the destination string. This is particularly dangerous because there is no checking of the source’s size before it is copied over to the destination. In reality, we are talking about overwriting memory locations here, which is something that will be explained later in this chapter. Suffice it to say, when the source is larger than the space allocated for the destination, overflow conditions are likely present, which could result in the control of program execution. When used properly, a safer alternative function is the strncpy command. Here is the format of that command:
strncpy(<destination>, <source>, <width>);
The <width> field is used to ensure that only a certain number of characters are copied from the source string to the destination string, allowing for greater control by the programmer. The width parameter should be based on the size of the destination, such as an allocated buffer. Another alternative function with the ability to control the size and handle errors is snprintf. Overall, the C programming language’s handling of strings has always been debated and highly scrutinized due to the requirement of the developer to handle memory allocation.

CAUTION Using unbounded functions like strcpy is unsafe; however, many traditional programming courses do not cover the dangers posed by these functions in enough detail. In fact, if programmers would simply properly use the safer alternatives, such as snprintf, then the entire class of buffer overflow attacks would be less prevalent. Many programmers clearly continue to use these dangerous functions because buffer overflows are still commonly discovered. Legacy code containing bad functions is another common problem. Luckily, most compilers and operating systems support various exploit-mitigation protections that help to prevent exploitation of these types of vulnerabilities. That said, even bounded functions can suffer from incorrect buffer size calculations.
Lab 2-2: Loops
Loops are used in programming languages to iterate through a series of commands multiple times. The two common types are for and while loops.
for loops start counting at a beginning value, test the value for some condition, execute the statement, and increment the value for the next iteration. The format is as follows:
for(<beginning value>; <test value>; <change value>){
 <statement>;
}
Therefore, a for loop like
for(i=0; i<10; i++){
 printf("%d", i);
}
will print the numbers 0 to 9 on the same line (since is not used), like this: 0123456789.
With for loops, the condition is checked prior to the iteration of the statements in the loop, so it is possible that even the first iteration will not be executed. When the condition is not met, the flow of the program continues after the loop.
NOTE It is important to note the use of the less-than operator (<) in place of the less-than-or-equal-to operator (<=), which allows the loop to proceed one more time until i=10. This is an important concept that can lead to off-by-one errors. Also, note that the count started with 0. This is common in C and worth getting used to.
The while loop is used to iterate through a series of statements until a condition is met. A basic example follows:
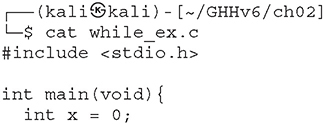

Loops may also be nested within each other.
Lab 2-3: if/else
The if/else construct is used to execute a series of statements if a certain condition is met; otherwise, the optional else block of statements is executed. If there is no else block of statements, the flow of the program will continue after the end of the closing if block bracket (}). The following is an example of an if/else construct nested within a for loop:
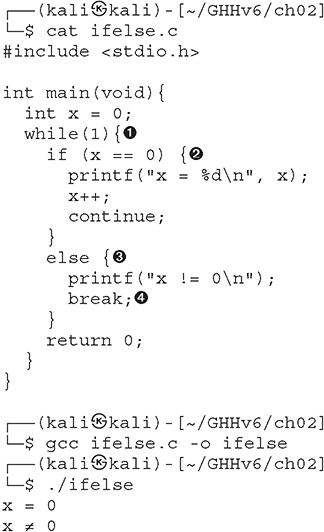
In this example, we use a while ![]() loop to loop through the if/else statements. Before we go into the loop, we set the variable x to 0. Because x is equal to 0, we meet the condition in the if statement
loop to loop through the if/else statements. Before we go into the loop, we set the variable x to 0. Because x is equal to 0, we meet the condition in the if statement ![]() . Then we call the printf function, increment x by 1, and then continue. Since x is now 1, we don’t meet the condition for the if statement during the second iteration through the loop. Therefore, we move on to the else statement
. Then we call the printf function, increment x by 1, and then continue. Since x is now 1, we don’t meet the condition for the if statement during the second iteration through the loop. Therefore, we move on to the else statement ![]() , which calls the printf function and then breaks
, which calls the printf function and then breaks ![]() out of the loop. The braces may be omitted for single statements.
out of the loop. The braces may be omitted for single statements.
Comments
To assist in the readability and sharing of source code, programmers include comments in the code. You can use one of two ways to place comments in code: // or /* and */. The // comment type indicates that any characters on the rest of that line are to be treated as comments and not acted on by the computer when the program executes. The /* and */ pair starts and stops a block of comments that may span multiple lines. In this case, /* is used to start the comment, and */ is used to indicate the end of the comment block.
Sample Programs
You are now ready to review your first program.
Lab 2-4: hello.c
We will start by showing the program with // comments included and will follow up with a discussion of the program.
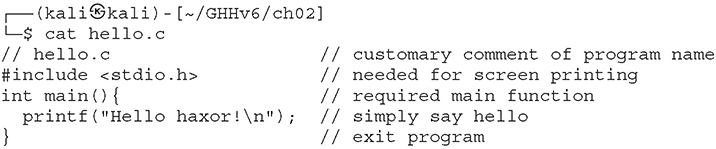
This very simple program prints “Hello haxor!” to the screen using the printf function, included in the stdio.h library. Try to compile it, now that you know how, and run it!
Lab 2-5: meet.c
Now for something that’s a little more complex. This program will take input, store it, then print it:

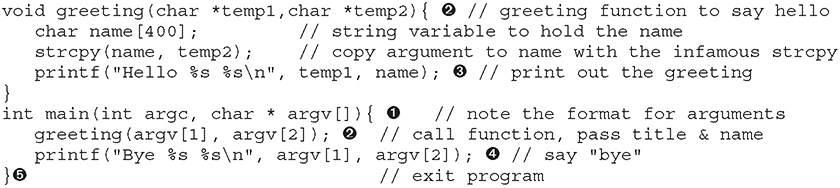
This program takes two command-line arguments ![]() and calls the greeting()
and calls the greeting() ![]() function, which prints “Hello” and the name given, followed by a carriage return
function, which prints “Hello” and the name given, followed by a carriage return ![]() . When the greeting() function finishes, control is returned to main(), which prints out “Bye” and the name given
. When the greeting() function finishes, control is returned to main(), which prints out “Bye” and the name given ![]() . Finally, the program exits
. Finally, the program exits ![]() .
.
Compiling with gcc
Compiling is the process of turning human-readable source code into machine-readable binary files that can be digested by the computer and executed. More specifically, a compiler takes source code and translates it into an intermediate set of files called object code. These files are nearly ready to execute but may contain unresolved references to symbols and functions not included in the original source code file. These symbols and references are resolved through a process called linking, as each object file is linked together into an executable binary file. We have simplified the process for you here, but these are the main steps.
When programming with C on Unix systems, most programmers prefer to use the GNU C Compiler (gcc). gcc offers plenty of options when compiling. The most commonly used flags are listed and described in Table 2-3.
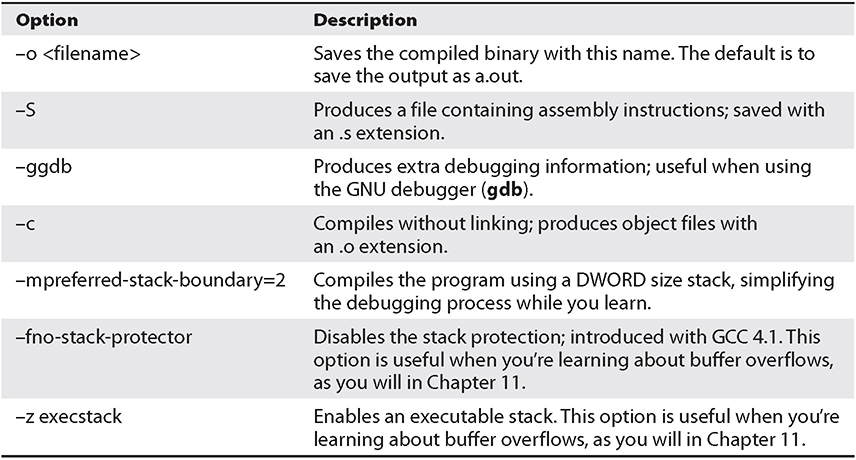
Table 2-3 Commonly Used gcc Flags
Lab 2-6: Compiling meet.c
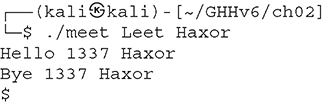
To compile our meet.c program, you would type the following in Kali 2020.4 64-bit:
![]()
Then, to execute the new program, you type
You will use various compiler options to compile programs in this book and beyond; see the “For Further Reading” section for more information on using gcc.
Computer Memory
In the simplest terms, computer memory is an electronic mechanism that has the ability to store and retrieve data. The smallest amount of data that can be stored is 1 bit, which can be represented by either a 1 or a 0 in memory. When you put 4 bits together, it is called a nibble, which can represent values from 0000 to –1111. There are exactly 16 binary values, ranging from 0 to 15, in decimal format. When you put two nibbles, or 8 bits, together, you get a byte, which can represent values from 0 to (28 – 1), or 0 to 255 in decimal. When you put 2 bytes together, you get a word, which can represent values from 0 to (216 – 1), or 0 to 65,535 in decimal. Continuing to piece data together, if you put two words together, you get a double word, or DWORD, which can represent values from 0 to (232 – 1), or 0 to 4,294,967,295 in decimal. Two DWORDs together is a quadruple word, or QWORD, which can represent values from 0 to (264 – 1), or 0 to 18,446,744,073,709,551,615 in decimal. In terms of memory addressing on 64-bit AMD and Intel processors, only the lower 48 bits are used, which offers 256 terabytes of addressable memory. This is well documented in countless online resources.
There are many types of computer memory; we will focus on random access memory (RAM) and registers. Registers are special forms of memory embedded within processors, which will be discussed later in this chapter in the “Registers” section.
Random Access Memory
In RAM, any piece of stored data can be retrieved at any time—thus, the term random access. However, RAM is volatile, meaning that when the computer is turned off, all data is lost from RAM. When we’re discussing modern Intel- and AMD-based products (x86 and x64), the memory is 32-bit or 48-bit addressable, respectively, meaning that the address bus the processor uses to select a particular memory address is 32 or 48 bits wide. Therefore, the most memory that can be addressed in an x86 processor is 4,294,967,295 bytes or 281,474,976,710,655 bytes (256 terabytes). On an x64 64-bit processor, addressing can be expanded in the future by adding more transistors, but 248 is plenty for current systems.
Endian
In Internet Experiment Note (IEN) 137, “On Holy Wars and a Plea for Peace,” from 1980, Danny Cohen summarized Swift’s Gulliver’s Travels, in part, as follows in his discussion of byte order:
Gulliver finds out that there is a law, proclaimed by the grandfather of the present ruler, requiring all citizens of Lilliput to break their eggs only at the little ends. Of course, all those citizens who broke their eggs at the big ends were angered by the proclamation. Civil war broke out between the Little-Endians and the Big-Endians, resulting in the Big-Endians taking refuge on a nearby island, the kingdom of Blefuscu.1
The point of Cohen’s paper was to describe the two schools of thought when writing data into memory. Some feel that the low-order bytes should be written first (called “Little-Endians” by Cohen), whereas others think the high-order bytes should be written first (called “Big-Endians”). The difference really depends on the hardware you are using. For example, Intel-based processors use the little-endian method, whereas Motorola-based processors use big-endian.
Segmentation of Memory
The subject of segmentation could easily consume a chapter itself. However, the basic concept is simple. Each process (oversimplified as an executing program) needs to have access to its own areas in memory. After all, you would not want one process overwriting another process’s data. Therefore, memory is broken down into small segments and handed out to processes as needed. Registers, discussed later in the chapter, are used to store and keep track of the current segments a process maintains. Offset registers are used to keep track of where in the segment the critical pieces of data are kept. Segmentation also describes the memory layout within a process’s virtual address space. Segments such as the code segment, data segment, and stack segment are intentionally allocated in different regions of the virtual address space within a process to prevent collisions and to allow for the ability to set permissions accordingly. Each running process gets its own virtual address space, and the amount of space depends on the architecture (such as 32-bit or 64-bit), system settings, and the OS. A basic 32-bit Windows process by default gets 4GB, where 2GB is assigned to the user-mode side of the process and 2GB is assigned to the kernel-mode side of the process. Only a small portion of this virtual space within each process is mapped to physical memory, and depending on the architecture, there are various ways of performing virtual-to-physical memory mapping through the use of paging and address translation.
Programs in Memory
When processes are loaded into memory, they are basically broken into many small sections. We are only concerned with six main sections, which we discuss in the following subsections.
.text Section
The .text section, also known as the code segment, basically corresponds to the .text portion of the binary executable file. It contains the machine instructions to get the task done. This section is marked as readable and executable and will cause an access violation if a write attempt is made. The size is fixed at runtime when the process is first loaded.
.data Section
The .data section is used to store global initialized variables, such as
int a = 0;
The size of this section is fixed at runtime. It should only be marked as readable.
.bss Section
The below stack section (.bss) is used to store certain types of global uninitialized variables, such as
int a;
The size of this section is fixed at runtime. This segment needs to be readable and writable but should not be executable.
Heap Section
The heap section is used to store dynamically allocated variables and grows from the lower-addressed memory to the higher-addressed memory. The allocation of memory is controlled through the malloc(), realloc(), and free() functions. For example, to declare an integer and have the memory allocated at runtime, you would use something like this:
![]()
The heap section should be readable and writable but should not be executable because an attacker who gains control of a process could easily perform shellcode execution in regions such as the stack and heap.
Stack Section
The stack section is used to keep track of function calls (recursively) and grows from the higher-addressed memory to the lower-addressed memory on most systems. If the process is multithreaded, each thread will have a unique stack. As you will see, the fact that the stack grows from high memory toward low memory allows the subject of buffer overflows to exist. Local variables exist in the stack section. The stack segment is further explained in Chapter 10.
Environment/Arguments Section
The environment/arguments section is used to store a copy of system-level variables that may be required by the process during runtime. For example, among other things, the path, shell name, and hostname are made available to the running process. This section is writable, allowing its use in format string and buffer overflow exploits. Additionally, the command-line arguments are stored in this area. The sections of memory reside in the order presented. The memory space of a process looks like this:

Buffers
The term buffer refers to a storage place used to receive and hold data until it can be handled by a process. Since each process can have its own set of buffers, it is critical to keep them straight; this is done by allocating the memory within the .data or .bss section of the process’s memory. Remember, once allocated, the buffer is of fixed length. The buffer may hold any predefined type of data; however, for our purpose, we will focus on string-based buffers, which are used to store user input and text-based variables.
Strings in Memory
Simply put, strings are just continuous arrays of character data in memory. The string is referenced in memory by the address of the first character. The string is terminated or ended by a null character (� in C). The � is an example of an escape sequence. Escape sequences enable the developer to specify a special operation, such as a newline with or a carriage return with . The backslash ensures that the subsequent character is not treated as part of the string. If a backslash is needed, one can simply use the escape sequence \, which will show only a single . Tables of the various escape sequences can be found online.
Pointers
Pointers are special pieces of memory that hold the address of other pieces of memory. Moving data around inside of memory is a relatively slow operation. It turns out that instead of moving data, keeping track of the location of items in memory through pointers and simply changing the pointers is much easier. Pointers are saved in 4 or 8 bytes of contiguous memory, depending on whether the application is 32-bit or 64-bit. For example, as mentioned, strings are referenced by the address of the first character in the array. That address value is called a pointer. The variable declaration of a string in C is written as follows:

Note that even though the size of the pointer is set at 4 or 8 bytes, depending on the architecture, the size of the string has not been set with the preceding command; therefore, this data is considered uninitialized and will be placed in the .bss section of the process memory.
Here is another example; if you wanted to store a pointer to an integer in memory, you would issue the following command in your C program:
![]()
To read the value of the memory address pointed to by the pointer, you dereference the pointer with the * symbol. Therefore, if you want to print the value of the integer pointed to by point1 in the preceding code, you would use the command
printf("%d", *point1);
where * is used to dereference the pointer called point1 and display the value of the integer using the printf() function.
Putting the Pieces of Memory Together
Now that you have the basics down, we will look at a simple example that illustrates the use of memory in a program.
Lab 2-7: memory.c
First we will list the contents of the program by using cat:
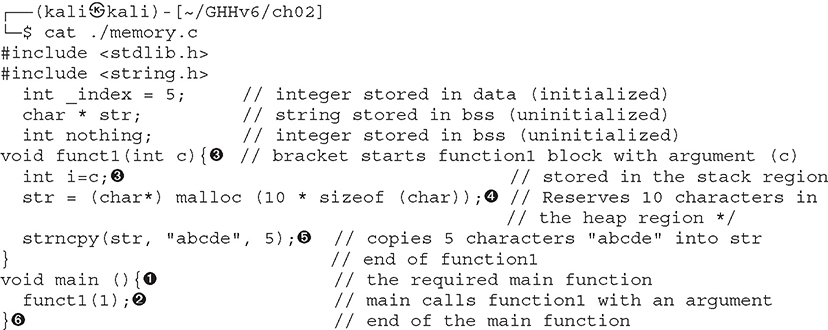
This program does not do much. First, several pieces of memory are allocated in different sections of the process memory. When main is executed ![]() , funct1() is called with an argument of 1
, funct1() is called with an argument of 1 ![]() . Once funct1() is called, the argument is passed to the function variable called c
. Once funct1() is called, the argument is passed to the function variable called c ![]() . Next, memory is allocated on the heap for a 10-byte string called str
. Next, memory is allocated on the heap for a 10-byte string called str ![]() . Finally, the 5-byte string “abcde” is copied into the new variable called str
. Finally, the 5-byte string “abcde” is copied into the new variable called str ![]() . The function ends, and then the main() program ends
. The function ends, and then the main() program ends ![]() .
.
CAUTION You must have a good grasp of this material before moving on in the book. If you need to review any part of this chapter, please do so before continuing.
Intel Processors
There are several commonly used computer architectures. In this chapter, we focus on the Intel family of processors or architecture. The term architecture simply refers to the way a particular manufacturer implemented its processor. The x86 (32-bit) and x86-64 (64-bit) architectures are still the most commonly used today, with other architectures such as ARM growing each year. Each architecture uses a unique instruction set. Instructions from one processor architecture are not understood by another processor.
Registers
Registers are used to store data temporarily. Think of them as fast 8- to 64-bit chunks of memory for use internally by the processor. Registers can be divided into four categories (32-bit registers are prefixed with an E, and 64-bit registers are prefixed with an R, as in EAX and RAX). These are listed and described in Table 2-4.
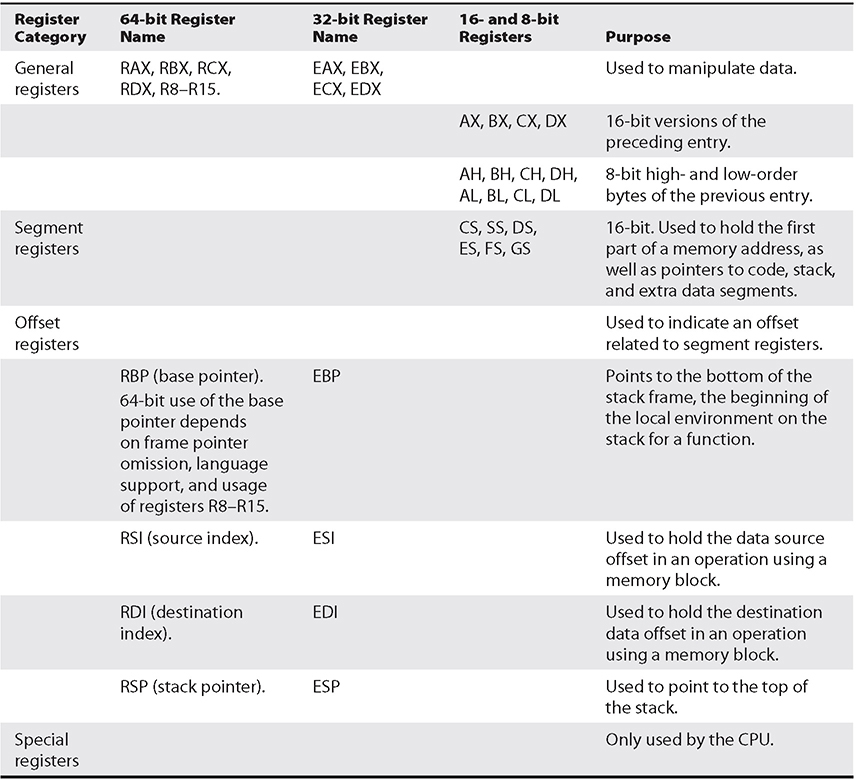
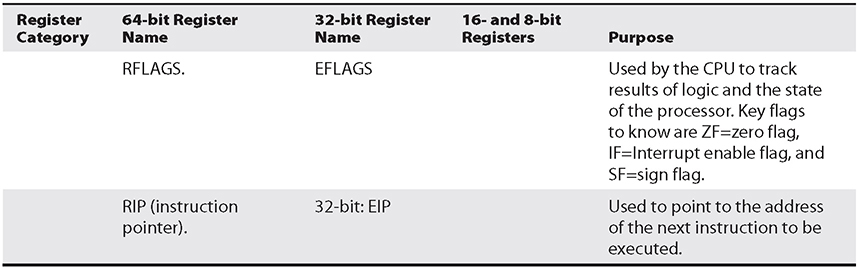
Table 2-4 Categories of Registers for x86 and x86-64 Processors
Assembly Language Basics
Though entire books have been written about the ASM language, you can easily grasp a few basics to become a more effective ethical hacker.
Machine vs. Assembly vs. C
Computers only understand machine language—that is, a pattern of 1s and 0s. Humans, on the other hand, have trouble interpreting large strings of 1s and 0s, so assembly was designed to assist programmers with mnemonics to remember the series of numbers. Later, higher-level languages were designed, such as C and others, which remove humans even further from the 1s and 0s. If you want to become a good ethical hacker, you must resist societal trends and get back to basics with assembly.
AT&T vs. NASM
The two main forms of assembly syntax are AT&T and Intel. AT&T syntax is used by the GNU Assembler (gas), contained in the gcc compiler suite, and is often used by Linux developers. Of the Intel syntax assemblers, the Netwide Assembler (NASM) is the most commonly used. The NASM format is used by many Windows assemblers and debuggers. The two formats yield effectively the same machine language; however, there are a few differences in style and format:
• The source and destination operands are reversed, and different symbols are used to mark the beginning of a comment:
• NASM format CMD <dest>, <source> <; comment>
• AT&T format CMD <source>, <dest> <# comment>
• AT&T format uses a % before registers; NASM does not. The % means “indirect operand.”
• AT&T format uses a $ before literal values; NASM does not. The $ means “immediate operand.”
• AT&T handles memory references differently than NASM.
This section shows the syntax and examples in NASM format for each command. Additionally, it shows an example of the same command in AT&T format for comparison. In general, the following format is used for all commands:
<optional label:> <mnemonic> <operands> <optional comments>
The number of operands (arguments) depends on the command (mnemonic). Although there are many assembly instructions, you only need to master a few. These are described in the following sections.
mov
The mov command copies data from the source to the destination. The value is not removed from the source location.

Data cannot be moved directly from memory to a segment register. Instead, you must use a general-purpose register as an intermediate step. Here’s an example:
![]()
add and sub
The add command adds the source to the destination and stores the result in the destination. The sub command subtracts the source from the destination and stores the result in the destination.

push and pop
The push and pop commands push and pop items from the stack, respectively.

xor
The xor command conducts a bitwise logical “exclusive or” (XOR) function—for example, 11111111 XOR 11111111 = 00000000. Therefore, one option is to use XOR value, value to zero out or clear a register or memory location. Another commonly used bitwise operator is AND. We could perform a bitwise AND to determine whether a specific bit within a register or memory location is set or unset, or to determine if a call to a function such as malloc returns back the pointer to a chunk as opposed to a null. This could be accomplished with assembly such as test eax, eax after a call to malloc. If the call to malloc returns a null, then the test operation will set the “zero flag” in the FLAGS register to a 1. The path followed during a conditional jump instruction such as jnz after this test can be based on the result of the AND operation. The following is how it would look in assembly:
call malloc(100)
test eax, eax
jnz loc_6362cc012

jne, je, jz, jnz, and jmp
The jne, je, jz, jnz, and jmp commands branch the flow of the program to another location based on the value of the eflag “zero flag.” jne/jnz jumps if the zero flag equals 0; je/jz jumps if the zero flag equals 1; and jmp always jumps.

call and ret
The call instruction redirects execution to another function. The virtual memory address after the call instruction is first pushed onto the stack, serving as the return pointer, and then redirection of execution to the called function is performed. The ret command is used at the end of a procedure to return the flow to the command after the call.

inc and dec
The inc and dec commands increment and decrement the destination, respectively.

lea
The lea command loads the effective address of the source into the destination. This can often be seen when passing the destination argument to a string-copying function, such as in the following AT&T syntax gdb disassembly example, where we are writing the destination buffer address to the top of the stack as an argument to the gets function:
lea -0x20(%ebp), %eax
mov %eax, (%esp)
call 0x8048608 <gets@plt>

System Calls: int, sysenter, and syscall
System calls are a mechanism for a process to request a privileged operation to be performed where the context and execution of code are switched from user mode to kernel mode. The legacy x86 instruction to invoke a system call is int 0x80. This is considered deprecated but is still supported on 32-bit OSs. The sysenter instruction is its successor for 32-bit applications. For 64-bit Linux-based OSs and applications, the syscall instruction is required. The various methods used to invoke a system call and set up the appropriate arguments must be well understood when you’re writing shellcode and other specialized programs or payloads.
Addressing Modes
In assembly, several methods can be used to accomplish the same thing. In particular, there are many ways to indicate the effective address to manipulate in memory. These options are called addressing modes and are summarized in Table 2-5. Remember, registers that start with “e” are 32 bits (4 bytes) and those with an “r” are 64 bits (8 bytes).
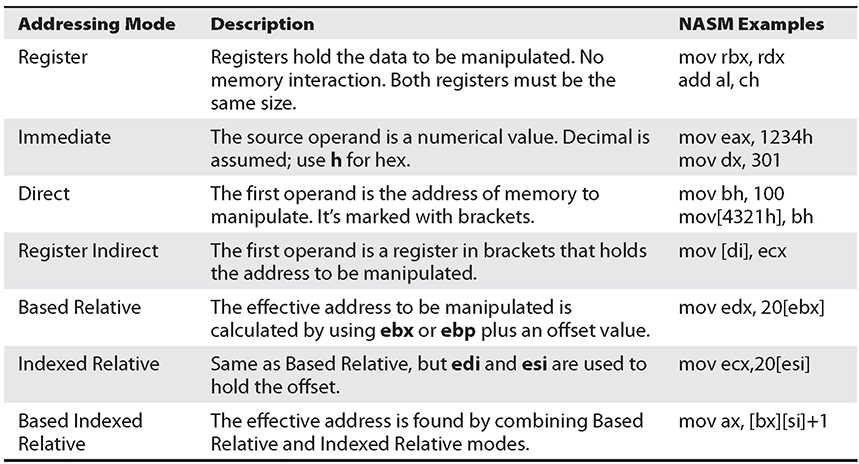
Table 2-5 Addressing Modes
Assembly File Structure
An assembly source file is broken into the following sections:
• .model The .model directive indicates the size of the .data and .text sections.
• .stack The .stack directive marks the beginning of the stack section and indicates the size of the stack in bytes.
• .data The .data directive marks the beginning of the .data section and defines the variables, both initialized and uninitialized.
• .text The .text directive holds the program’s commands.
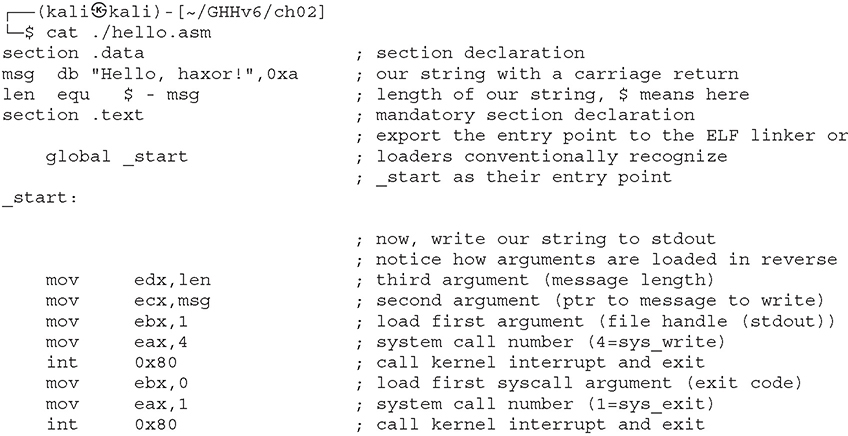
Lab 2-8: Simple Assembly Program
The following 64-bit assembly program prints “Hello, haxor!” to the screen:
The first step in assembling is to convert the assembly into object code (32-bit example):
![]()
Next, you invoke the linker to make the executable:
![]()
Finally, you can run the executable:

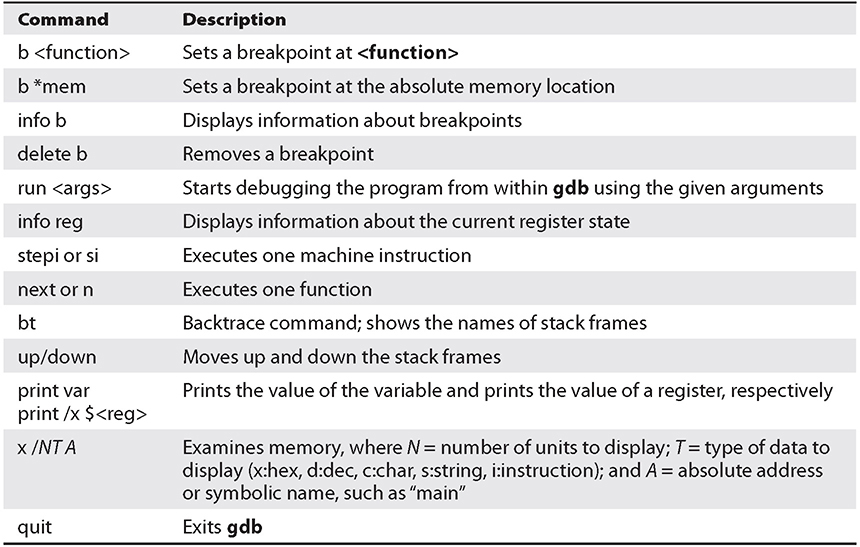
Table 2-6 Common gdb Commands
Debugging with gdb
The debugger of choice for programming with C on Unix systems is gdb. It provides a robust command-line interface, allowing you to run a program while maintaining full control. For example, you can set breakpoints in the execution of the program and monitor the contents of memory or registers at any point you like. For this reason, debuggers like gdb are invaluable to programmers and hackers alike. For those looking for a more graphical debugging experience on Linux, alternatives or extensions such as ddd and edb are available.
gdb Basics
Commonly used commands in gdb are listed and described in Table 2-6.
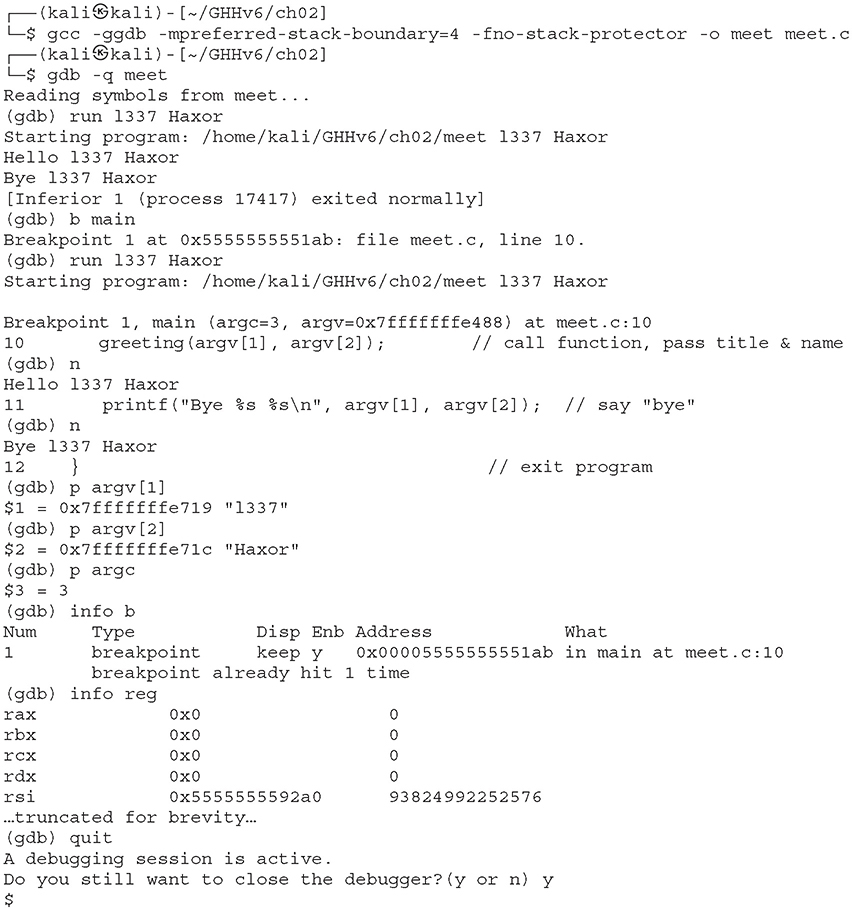
Lab 2-9: Debugging
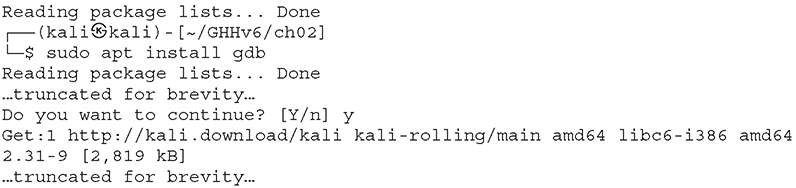
To debug our sample program, first install gdb into your Kali instance:

Now, we issue the following commands. The first command will recompile our meet program with debugging symbols and other useful options (refer to Table 2-3).
Lab 2-10: Disassembly with gdb
To conduct disassembly with gdb, you need the following two commands:
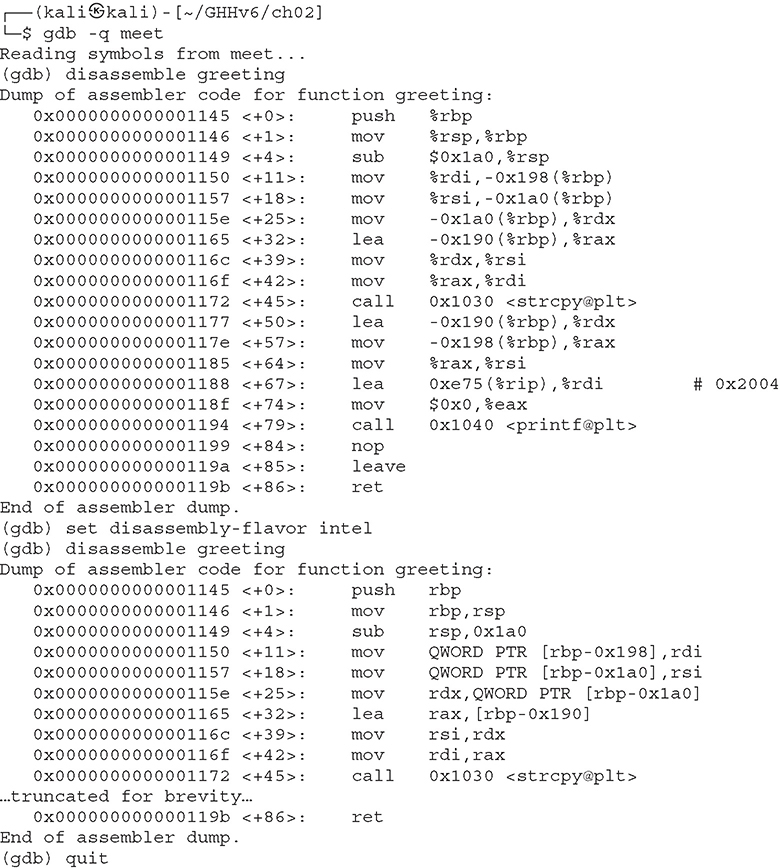
set disassembly-flavor <intel/att>
disassemble <function name>
The first command toggles back and forth between Intel (NASM) and AT&T format. By default, gdb uses AT&T format. The second command disassembles the given function (to include main, if given). For example, to disassemble the function called greeting in both formats, you type this:
Here are a couple more commonly used commands:
info functions
disassemble /r <function name>
The info functions command shows all dynamically linked functions, as well as all internal functions, unless the program has been stripped. Using the disassemble function with the /r <function name> option dumps out the opcodes and operands as well as the instructions. Opcodes are essentially the machine code representations of the preassembled assembly code.
Python Survival Skills
Python is a popular interpreted, object-oriented programming language. Hacking tools (and many other applications) use Python because it is a breeze to learn and use, is quite powerful, and has a clear syntax that makes it easy to read. This introduction covers only the bare minimum you need to understand. You’ll almost surely want to know more, and for that you can check out one of the many good books dedicated to Python or the extensive documentation at www.python.org. Python 2.7 was retired on January 1, 2020. Many practitioners are still fond of 2.7 and would tell you over the years that if you want to learn Python to be able to use and modify or extend existing Python projects, you should first learn Python 2.7. However, at this time, if your goal is to get working on new Python development, you should focus on Python 3, as it cleans up a lot of the issues in Python 2.7. There are still countless programs with dependencies on Python 2.6 or Python 2.7, so be aware of what version you are using.
Getting Python
We’re going to blow past the usual architecture diagrams and design goals spiel and tell you to just go download the Python version for your OS from www.python.org/download/ so you can follow along here. Alternatively, try just launching it by typing python at your command prompt—it comes installed by default on many Linux distributions and Mac OS X 10.3 and later.
Python for macOS and Kali Users
For macOS users, Apple does not include Python’s IDLE user interface, which is handy for Python development. You can grab it from www.python.org/download/mac/, or you can choose to edit and launch Python from Xcode, Apple’s development environment, by following the instructions at http://pythonmac.org/wiki/XcodeIntegration. If you already have Python but need to upgrade to Python 3 and set that as the default, the correct way, using pyenv, then see the “For Further Reading” section for a link to a good tutorial.
For Kali users, as of the writing of this chapter, Kali 2020.4 is the latest version, and in that version, python2 is still the default linked version, for backward compatibility, until all the scripts are updated to python3. See the “For Further Reading” section for a link to change this.
Because Python is interpreted (not compiled), you can get immediate feedback from Python using its interactive prompt. We’ll use it for the next few pages, so you should start the interactive prompt now by typing python.
Lab 2-11: Launching Python
If you have Kali 2020.4, you will still need to manually launch version 3 by running the command python3, like so:

Lab 2-12: “Hello, World!” in Python
Every language introduction must start with the obligatory “Hello, world!” example, and here it is for Python 3.8.6 on Kali 2020.4, launched with the previous python3 command:
>>> print("Hello, world!")
Hello, world!
>>>
Notice that in Python 3, print is a formal function and requires parentheses2. If you wish to exit this Python shell, type exit().
Python Objects
The main things you need to understand really well are the different types of objects that Python can use to hold data and how it manipulates that data. We’ll cover the big five data types: strings, numbers, lists, dictionaries, and files. After that, we’ll cover some basic syntax and the bare minimum you will need to know about Python and networking.
Lab 2-13: Strings
You already used one string object in Lab 2-12. Strings are used in Python to hold text. The best way to show you how easy it is to use and manipulate strings is to demonstrate the technique, again using the Python 3 shell, as follows:
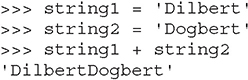
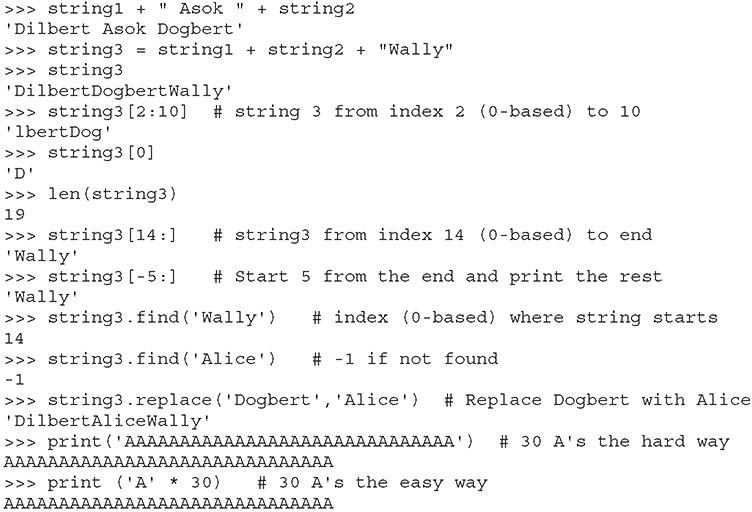
These are the basic string-manipulation functions you’ll use when working with simple strings. The syntax is simple and straightforward, just as you’ll come to expect from Python. One important distinction to make right away is that each of those strings (we named them string1, string2, and string3) is simply a pointer—for those familiar with C—or a label for a blob of data out in memory someplace. One concept that sometimes trips up new programmers is the idea of one label (or pointer) pointing to another label. The following code and Figure 2-1 demonstrate this concept:
>>> label1 = 'Dilbert'
>>> label2 = label1
At this point, we have a blob of memory somewhere with the Python string 'Dilbert' stored. We also have two labels pointing at that blob of memory. If we then change label1’s assignment, label2 does not change:
... continued from above
>>> label1 = 'Dogbert'
>>> label2
'Dilbert'
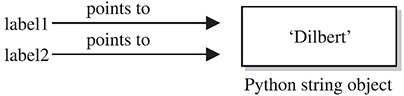
Figure 2-1 Two labels pointing at the same string in memory
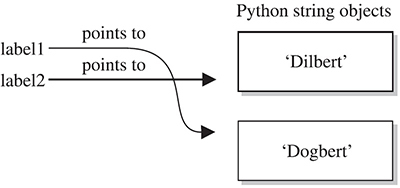
Figure 2-2 Label1 is reassigned to point to a different string
As you can see in Figure 2-2, label2 is not pointing to label1, per se. Rather, it’s pointing to the same thing label1 was pointing to until label1 was reassigned.
Lab 2-14: Numbers
Similar to Python strings, numbers point to an object that can contain any kind of number. This data type can hold small numbers, big numbers, complex numbers, negative numbers, and any other kind of number you can dream up. The syntax is just as you’d expect:
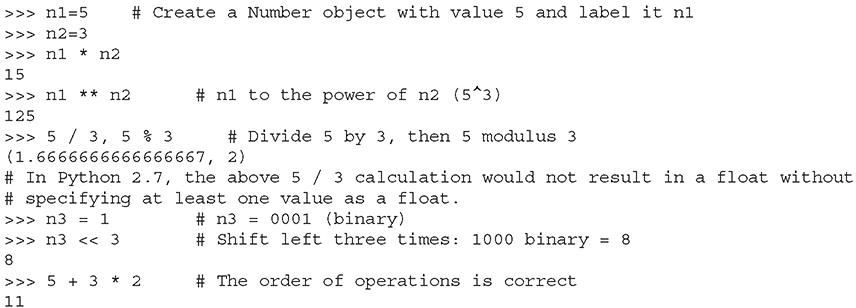
Now that you’ve seen how numbers work, we can start combining objects. What happens when we evaluate a string plus a number?
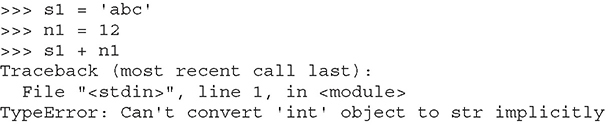
Error! We need to help Python understand what we want to happen. In this case, the only way to combine 'abc' and 12 is to turn 12 into a string. We can do that on the fly:
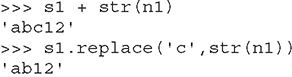
When it makes sense, different types can be used together:
![]()
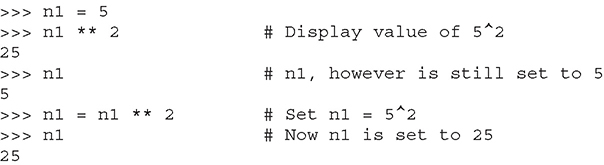
And one more note about objects—simply operating on an object often does not change the object. The object itself (number, string, or otherwise) is usually changed only when you explicitly set the object’s label (or pointer) to the new value, as follows:
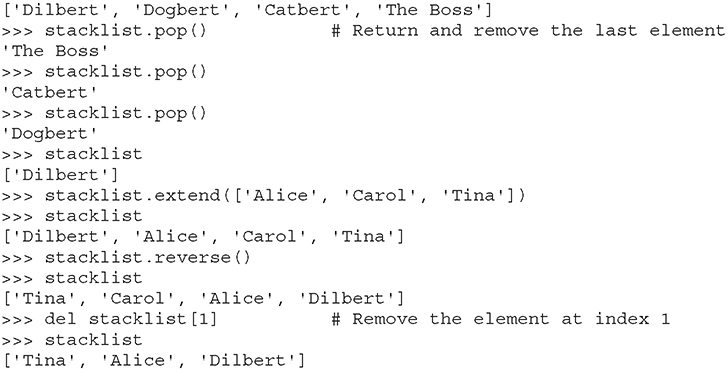
Lab 2-15: Lists
The next type of built-in object we’ll cover is the list. You can throw any kind of object into a list. A list is usually created by adding [ and ] around an object or a group of objects. You can do the same kind of clever “slicing” as with strings. Slicing refers to our string example of returning only a subset of the object’s values—for example, from the fifth value to the tenth with label1[5:10]. Let’s look at how the list type works:
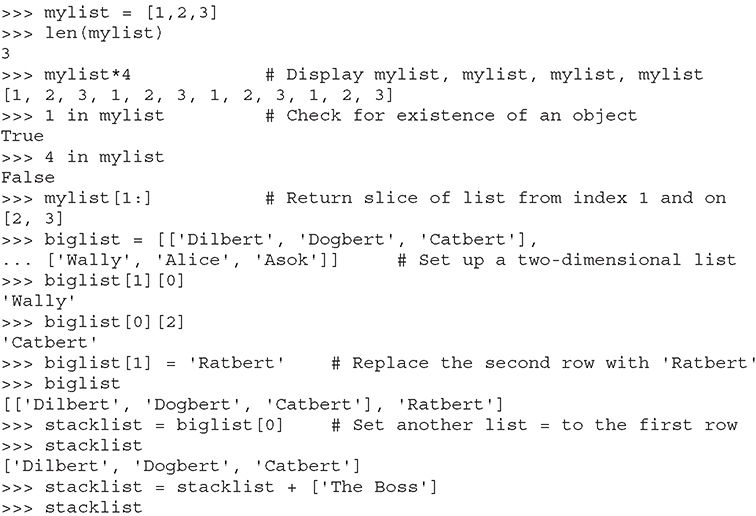
Next, we’ll take a quick look at dictionaries and then files, and then we’ll put all the elements together.
Lab 2-16: Dictionaries
Dictionaries are similar to lists, except that an object stored in a dictionary is referenced by a key, not by the index of the object. This turns out to be a very convenient mechanism for storing and retrieving data. A dictionary is created by adding { and } around a key-value pair, like this:
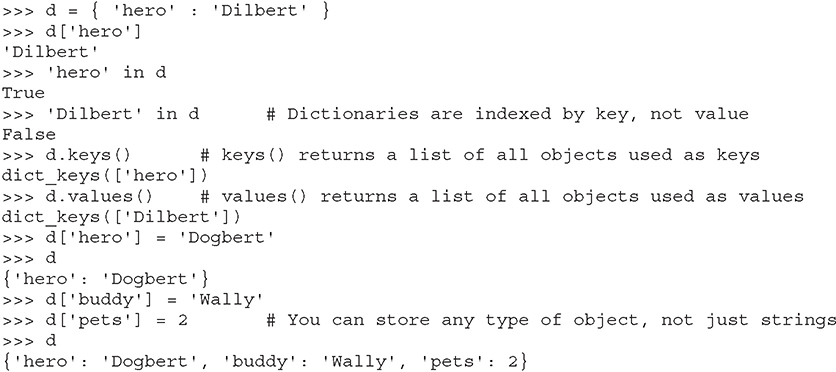
We’ll use dictionaries more in the next section as well. Dictionaries are a great way to store any values that you can associate with a key, where the key is a more useful way to fetch the value than a list’s index.
Lab 2-17: Files with Python
File access is as easy as the rest of Python’s language. Files can be opened (for reading or for writing), written to, read from, and closed. Let’s put together an example using several of the different data types discussed here, including files. This example assumes that we start with a file named targets and that we transfer the file contents into individual vulnerability target files. (We can hear you saying, “Finally, an end to the Dilbert examples!”) Note the required indentation being used within blocks. In this example, we use the Python 3 shell to parse a file and move the contents of that file into two other files. We use two shells in Kali, each in the same directory. Comments, which start with the # symbol, are given within the code. You obviously don’t need to type them.
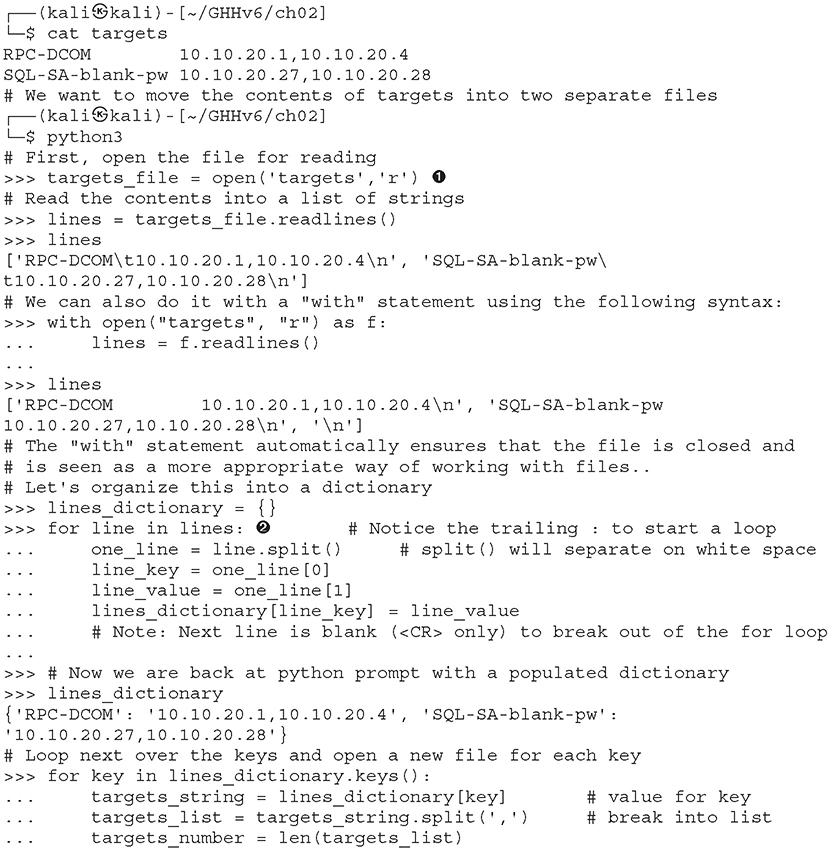
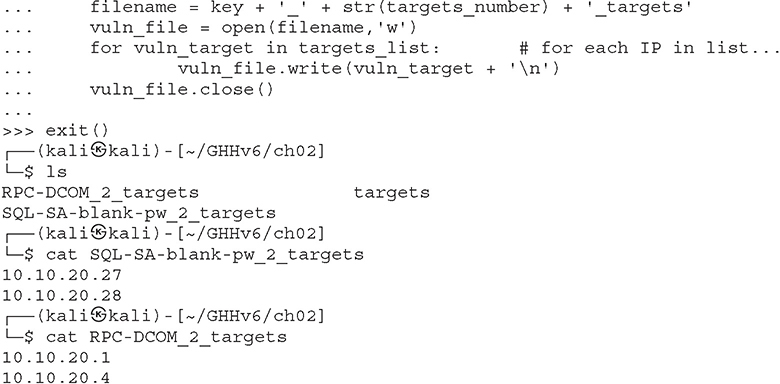
This example introduces a couple new concepts. First, you now see how easy it is to use files; open() takes two arguments ![]() : the first is the name of the file you’d like to read or create, and the second is the access type. You can open the file for reading (r), writing (w), and appending (a). Adding a + after the letter adds more permissions; for example, r+ results in read and write access to the file. Adding a b after the permission opens it in binary mode.
: the first is the name of the file you’d like to read or create, and the second is the access type. You can open the file for reading (r), writing (w), and appending (a). Adding a + after the letter adds more permissions; for example, r+ results in read and write access to the file. Adding a b after the permission opens it in binary mode.
Second, you now have a for loop example ![]() . The structure of a for loop is as follows:
. The structure of a for loop is as follows:

CAUTION In Python, white space matters, and indentation is used to mark code blocks. Most Python programmers stick with an indentation of four spaces. The indentation must be consistent throughout a block. See the link to the Python style guide in the “For Further Reading” section.
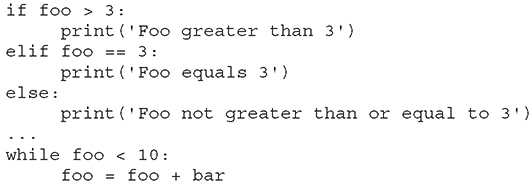
Unindenting one level or a placing a carriage return on a blank line closes the loop. No need for C-style curly brackets. Also, if statements and while loops are similarly structured. Here is an example:
Lab 2-18: Sockets with Python
The final topic we need to cover is Python’s socket object. To demonstrate Python sockets, let’s build a simple client that connects to a remote (or local) host and then sends 'Say something:'. To test this code, we need a “server” to listen for this client to connect. We can simulate a server by binding a netcat listener to port 4242 with the following syntax (you need to launch nc in a new shell):
![]()
The client code (which should be run in a separate shell) follows:

You do need to remember to import the socket library. The socket instantiation line also has some socket options to remember, but the rest is easy. You connect to a host and port ![]() , send what you want
, send what you want ![]() , then use recv to store the data into an object
, then use recv to store the data into an object ![]() , and then close the socket
, and then close the socket ![]() . When you execute this in a separate shell, by typing python3 client.py, you should see “Say something:” show up on your netcat listener. Anything you type into the listener should be returned to the client
. When you execute this in a separate shell, by typing python3 client.py, you should see “Say something:” show up on your netcat listener. Anything you type into the listener should be returned to the client ![]() . For extra credit, figure out how to simulate that netcat listener in Python with the bind(), listen(), and accept() statements.
. For extra credit, figure out how to simulate that netcat listener in Python with the bind(), listen(), and accept() statements.
Summary
This chapter provides you with introductory programming concepts and security considerations. An ethical hacker must have programming skills to create exploits and review source code, and they need to understand assembly code when reversing malware or finding vulnerabilities. Last but not least, debugging is a must-have skill in order to analyze the malware at runtime or to follow the execution of shellcode in memory. The only way to learn a programming language or reverse engineering is through practice, so get working!
For Further Reading
Style Guide for Python www.python.org/dev/peps/pep-0008/
Example of C Program without Main stackoverflow.com/questions/42328165/compile-and-run-program-without-main-in-c
Using GNU C Compiler (gcc) gcc.gnu.org/onlinedocs/gcc-3.2/gcc/Invoking-GCC.html
Kali and Python 3 www.kali.org/docs/general-use/python3-transition/
Upgrading to python 3 on mac (correct way) opensource.com/article/19/5/python-3-default-mac
“A CPU History,” PC Mech, March 23, 2001 (Nik) www.pcmech.com/article/a-cpu-history
Art of Assembly Language Programming and HLA (Randall Hyde) www.randallhyde.com
ddd debugger frontend www.gnu.org/software/ddd/
Debugging with NASM and gdb www.csee.umbc.edu/help/nasm/nasm.shtml
edb debugger github.com/eteran/edb-debugger
“Endianness,” Wikipedia en.wikipedia.org/wiki/Endianness
Good Python tutorial docs.python.org/3/tutorial/
“How C Programming Works,” How Stuff Works (Marshall Brain) computer.howstuffworks.com/c.htm
“Byte and Bit Order Dissection,” Linux Journal, September 2, 2003 (Kevin Kaichuan He) www.linuxjournal.com/article/6788
Notes on x86 assembly, 1997 (Phil Bowman) www.ccntech.com/code/x86asm.txt
64 bit tutorial, Sonictk sonictk.github.io/asm_tutorial/
“Programming Methodology in C” (Hugh Anderson) www.comp.nus.edu.sg/~hugh/TeachingStuff/cs1101c.pdf
Python home page www.python.org
Python Tutor www.pythontutor.com
“Smashing the Stack for Fun and Profit” (Aleph One) www.phrack.org/issues.html?issue=49&id=14#article
x86 registers www.eecg.toronto.edu/~amza/www.mindsec.com/files/x86regs.html
x64 architecture docs.microsoft.com/en-us/windows-hardware/drivers/debugger/x64-architecture
References
1. Danny Cohen, “On Holy Wars and a Plea for Peace.” Internet Experiment Note (IEN) 137, April 1, 1980, www.ietf.org/rfc/ien/ien137.txt.
2. Guido Van Rossum, “[Python-Dev] Replacement for Print in Python 3.0,” September 4, 2006, mail.python.org, https://mail.python.org/pipermail/python-dev/2005-September/056154.html.