CHAPTER 6
USING NODE.JS WITH CASSANDRA
The client/server paradigm is the most commonly used paradigm in Web applications. Typically, however, a client/server application requires an application/Web server. Node.js is a lightweight, efficient platform based on the event-driven model and built on Chrome’s JavaScript runtime for developing fast, scalable, data-intensive, real-time, network applications. Node.js is suitable for the cloud environment because Node.js applications can run on distributed devices. This chapter discusses accessing Cassandra with Node.js and making data modifications in the database using the Node.js driver for Cassandra.
OVERVIEW OF NODE.JS DRIVER FOR CASSANDRA CQL
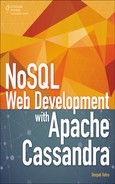
The Node.js driver for Cassandra is a JavaScript-based library for accessing Cassandra. It provides several features such as connection pooling, load balancing, automatic failover, and support for prepared statements and query batches. The Node.js driver for Cassandra provides two classes, Client and Connection, as illustrated in Figure 6.1.
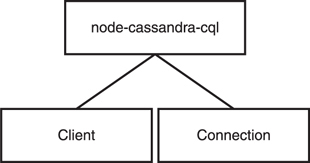
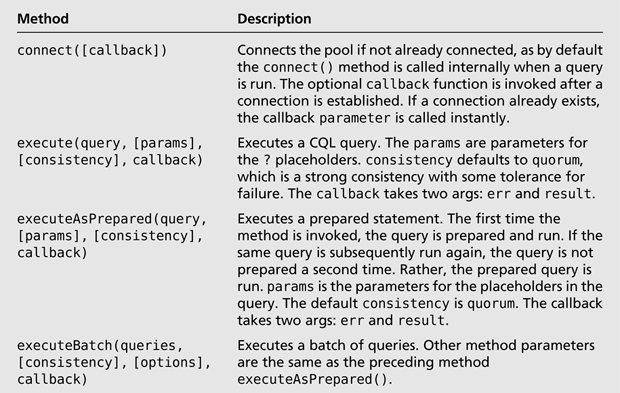
The classes are discussed in Table 6.1.
The Client Class
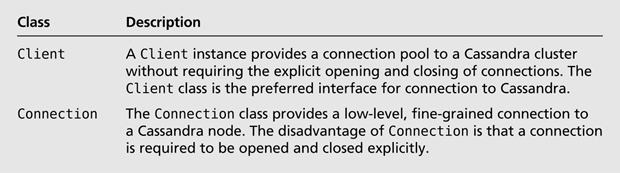
A Client class function may be created with the class constructor using new Client(options). The options discussed in Table 6.2 are supported.
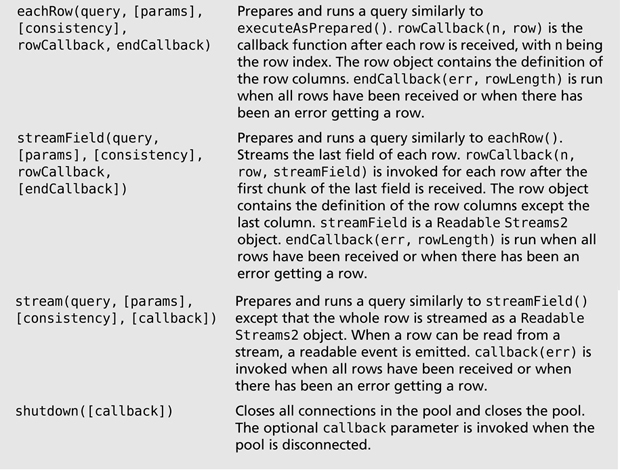
The Client class provides several methods, as discussed in Table 6.3.
The Connection Class
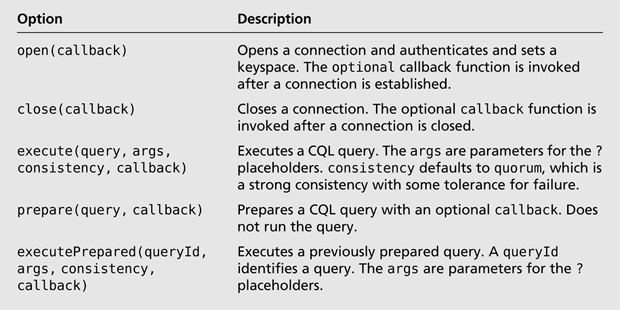
An instance of the Connection class can be created with the class constructor using new Connection(options). The options are the same as for the Client class. The Connection class provides the methods discussed in Table 6.4.
EVENT-DRIVEN LOGGING
Node.js is event-driven and provides the EventEmitter class in the events module for emitting events. An example of using EventEmitter would be to first import the events module using require(). Subsequently, an instance of EventEmitter may be created.
var events=require('events'),
var eventEmitter=new events.EventEmitter();
var logEvent= function logEvent(){
console.log('A logging event occurred'),
}
eventEmitter.on('log', logEvent);
eventEmitter.emit('log'),
You don’t need to create EventEmitter instances because Client and Connection classes are instances of EventEmitter. The Client and Connection classes emit the log event for logging. The function that is invoked when a log event occurs may be defined as follows:
var logEvent= function logEvent(level, message){
console.log('log event: %s -- %j', level, message);
}
Register the log event using the on() method and emit the log event using the emit method:
client.on('log', logEvent);
client.emit('log'),
The log level can be info or error.
MAPPING DATA TYPES
The Node.js driver for Cassandra provides mapping of JavaScript types to Cassandra data types, and all Cassandra data types are supported. The mapping from Cassandra data types to JavaScript data types is discussed in Table 6.5.

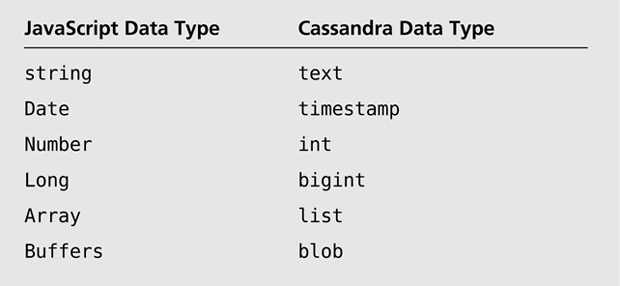
The mapping from JavaScript data types to Cassandra data types is discussed in Table 6.6.
SETTING THE ENVIRONMENT
The Node.js driver for Cassandra does not provide an API for creating a keyspace and a column family. You will create a keyspace and a column family in Cassandra-Cli. In this section, you will also install Node.js and the Node.js driver for Cassandra.
The following software is required for this chapter:
![]() Apache Cassandra 2.04 or later
Apache Cassandra 2.04 or later
![]() Node.js
Node.js
![]() Node.js driver for Apache Cassandra
Node.js driver for Apache Cassandra
Follow these steps:
1. Download Apache Cassandra apache-cassandra-2.0.4-bin.tar.gz (or later version) from http://cassandra.apache.org/download/.
2. Extract the tar.gz file to a directory.
3. Add the bin directory from the Apache Cassandra installation to the PATH environment variable.
Creating a Keyspace and a Column Family
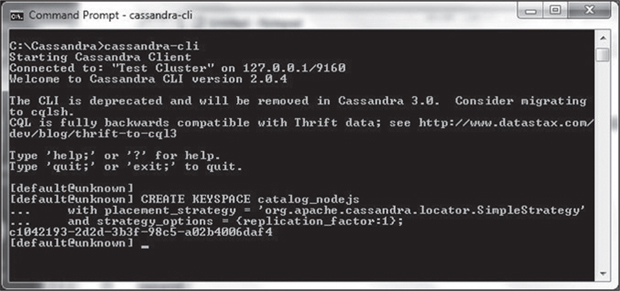
To create a keyspace called catalog_nodejs with a replica placement_strategy of SimpleStrategy and a replication_factor of 1, run the following command in Cassandra-Cli:
CREATE KEYSPACE catalog_nodejs
with placement_strategy = 'org.apache.cassandra.locator.SimpleStrategy'
and strategy_options = {replication_factor:1};
The output in Cassandra-Cli indicates that the keyspace has been created, as shown in Figure 6.2.
Next, run the following command in Cassandra-Cli to use the catalog_nodejs keyspace:
USE catalog_nodejs;
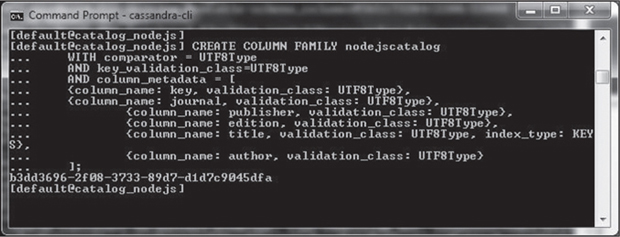
Create a column family called nodejscatalog with a UTF8Type Comparator and a UTF8Type key validation class. The column family definition must include a column called key, which is the primary key of the table. Also define columns named journal, publisher, edition, title, and author, all of type UTF8Type. The title column is indexed.
CREATE COLUMN FAMILY nodejscatalog
WITH comparator = UTF8Type
AND key_validation_class=UTF8Type
AND column_metadata = [
{column_name: key, validation_class: UTF8Type},
{column_name: journal, validation_class: UTF8Type},
        {column_name: publisher, validation_class: UTF8Type},
        {column_name: edition, validation_class: UTF8Type},
        {column_name: title, validation_class: UTF8Type, index_type: KEYS},
        {column_name: author, validation_class: UTF8Type}
];
A column family called nodejscatalog is created, as shown in Figure 6.3.
Installing Node.js
To install Node.js, follow these steps:
1. Download the node-v0.10.26-x64.exe application from http://Node.js.org/.
2. Double-click the EXE application to install Node.js. The Node.js version may be found with the node –version command.
3. To test that Node.js has been installed, run the sample Node.js script provided on http://Node.js.org/. The sample script creates a Node.js server and responds with a “Hello” message for every request. Copy the following script to example.js:
    var http = require('http'),
    http.createServer(function (req, res) {
      res.writeHead(200, {'Content-Type': 'text/plain'});
      res.end('Hello World
'),
    }).listen(1337, '127.0.0.1'),
    console.log('Server running at http://127.0.0.1:1337/'),
4. To run the server, run the example.js script with the following command:
node example.js
The message “Server running at http://127.0.0.1:1337/” indicates that the server is running, as shown in Figure 6.4.

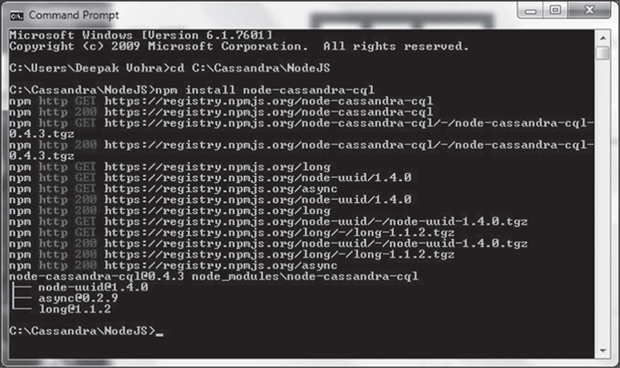
Installing Node.js driver for Apache Cassandra
To install the Node.js driver for Cassandra, run the following command:
npm install node-cassandra-cql
Node.js driver for Cassandra is installed, as shown in Figure 6.5.
You also need to start Apache Cassandra with the following command:
cassandra -f
CREATING A CONNECTION WITH CASSANDRA
As discussed, the Client and Connection classes are used to connect to Cassandra. The Client class is preferred because it provides a connection pool without the need to explicitly open a connection to a node. Create a JavaScript file, connection-cassandra.js, for connecting to Cassandra. Import the Node.js driver for Cassandra using the following statement:
var cql = require('node-cassandra-cql'),
Create an instance of the Client class using the class constructor with the hosts: option set to localhost:9042 and the keyspace option set to catalog_Node.js:
var client = new cql.Client({hosts: ['localhost:9042'], keyspace:
'catalog_Node.js'});
Although a Client connection pool automatically connects to a Cassandra cluster when a query is run, a connection may be made explicitly using the connect(callback) method. The callback function takes an err parameter and may be defined as follows to log an error message if an error is generated or to output a message if an error is not generated:
function established(err){
       if (err)
              console.log(err);
       else
              console.log('Connection with Cassandra established'),
}
The other option for creating a connection is the Connection class. Create an instance of the Connection class with the same two options as arguments, hosts and keyspace, as for the Client class example:
var client2 = new cql.Connection({hosts: ['localhost:9042'], keyspace:
'catalog_Node.js'});
The Connection class’s similarity with the Client class ends with the constructor use. While a Client instance is connected to Cassandra without requiring an explicit connection, the Connection class requires an explicit connection using the open(callback) method.
client2.open(function established(err){
       if (err)
              console.log(err);
       else
              console.log('Connection with Cassandra established'),
              });
The connection-cassandra.js script appears in Listing 6.1.
Listing 6.1 The connection-cassandra.js Script
var cql = require('node-cassandra-cql'),
var client = new cql.Client({hosts: ['localhost:9042'], keyspace:
'catalog_nodejs'});
client.connect(function established(err){if (err) console.log(err);
else console.log('Connection with Cassandra established'),});
 var client2 = new cql.Connection({hosts: ['localhost:9042'], keyspace:
'catalog'});
 client2.open(function established(err){if (err) console.log(err);
else console.log('Connection with Cassandra established'),});
Run the connection-cassandra.js script with the following command:
node connection-cassandra.js
Output from both the Client and the Connection classes is the message to indicate that a connection has been established, as shown in Figure 6.6.
Figure 6.6
Establishing a connection with the Client and Connection class.

Source: Microsoft Corporation.
The Cassandra database must be running to be able to connect to it. If the database is not running, the following error is generated:
{ name: 'PoolConnectionError',
  info: 'Represents a error while trying to connect the pool, all the
connections failed.',
  individualErrors:
   [ { [Error: connect ECONNREFUSED]
        code: 'ECONNREFUSED',
        errno: 'ECONNREFUSED',
        syscall: 'connect' } ] }
{ name: 'PoolConnectionError',
  info: 'Represents a error while trying to connect the pool, all the
connections failed.',
individualErrors:
 [ { [Error: connect ECONNREFUSED]
      code: 'ECONNREFUSED',
      errno: 'ECONNREFUSED',
      syscall: 'connect' } ] }
ADDING DATA TO A TABLE
In this section, you will add two rows of data to the nodejscatalog column family (table). Create a JavaScript script, add.js. Create a Client instance to establish a connection pool with Cassandra.
var cql = require('node-cassandra-cql'),
var client = new cql.Client({hosts: ['localhost:9042'], keyspace:
'catalog_nodejs'});
Invoke the execute(query, [params], [consistency], callback) method to run a CQL3 query to add a row. The CQL query statement is an INSERT statement. consistency is specified as cql.types.consistencies.quorum, which is also the default. callback takes an err parameter to log an error message if an error message is generated or, if not, to log a message to indicate that a table row has been added.
client.execute("INSERT INTO nodejscatalog (key, journal, publisher, edition,
title,author) VALUES ('catalog1','Oracle Magazine', 'Oracle Publishing',
'November-December 2013', 'Engineering as a Service','David A.   Kelly')",
   cql.types.consistencies.quorum,
   function(err) {
     if (err) console.log(err);
     else console.log('table row added'),
   }
 );
Similarly, add a second row. The add.js script appears in Listing 6.2.
var cql = require('node-cassandra-cql'),
var client = new cql.Client({hosts: ['localhost:9042'], keyspace:
'catalog_nodejs'});
client.execute("INSERT INTO nodejscatalog (key, journal, publisher, edition,
title,author) VALUES ('catalog1','Oracle Magazine', 'Oracle Publishing',
'November-December 2013', 'Engineering as a Service','David A.   Kelly')",
   cql.types.consistencies.quorum,
   function(err) {
     if (err) console.log(err);
     else console.log('table row added'),
   }
 );
client.execute("INSERT INTO nodejscatalog (key, journal, publisher, edition,
title,author) VALUES ('catalog2','Oracle Magazine', 'Oracle Publishing',
'November-December 2013', 'Quintessential and Collaborative','Tom Haunert')",
  cql.types.consistencies.quorum,
  function(err) {
    if (err) console.log(err);
    else console.log('table row added'),
  }
);
Run the add.js script with the following command:
node add.js
The output message indicates that a table row has been added, as shown in Figure 6.7.

You provided a column value for all the columns in the column family, but the flexible schema supported by Cassandra does not require each column value in a row except that the key column value is required. For example, the following CQL query would add a two-column row excluding the key column, which is required:
client.execute("INSERT INTO nodejscatalog (title,author) VALUES
('catalog1',''Engineering as a Service','David A.   Kelly')",
   function(err) {
     if (err) console.log(err);
     else console.log('table row added'),
   }
);
A column called key is required to add a row with the Node.js driver for Cassandra. If the key column is not provided, the following error message is generated:
{ name: 'ResponseError',
   message: 'Missing mandatory PRIMARY KEY part key',
   info: 'Represents a error message from the server',
   code: 8704,
   isServerUnhealthy: false,
   query: 'INSERT INTO nodejscatalog (journal, publisher, edition,title,author)
VALUES ('Oracle Magazine', 'Oracle Publishing', 'November-December 2013',
'Engineering as a Service','David A. Kelly')'
}
RETRIEVING DATA FROM A TABLE
Next, you will retrieve data from Cassandra. To do so, create a script, get.js. Then create a Client instance as before. Run a SELECT CQL query to get a result set. The consistency and callback functions may be defined as before or omitted. The get.js script appears in Listing 6.3 below.
var cql = require('node-cassandra-cql'),
var client = new cql.Client({hosts: ['localhost:9042'], keyspace:
'catalog_Node.js'});
client.execute("SELECT key, journal, publisher, edition,title,author FROM
Node.jscatalog",
  cql.types.consistencies.quorum,
  function(err, result) {
    if (err) console.log(err);
    else console.log(result);
  }
);
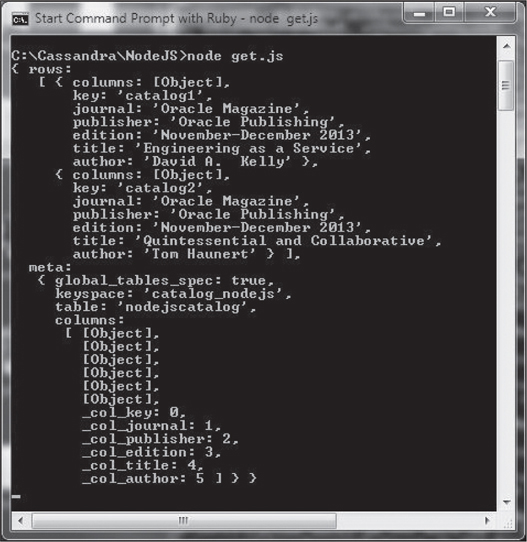
Run the get.js script with the following command:
node get.js
The two rows in the nodejscatalog table are retrieved, as shown in Figure 6.8.
FILTERING THE QUERY
In the preceding section, you selected all the rows from the nodejscatalog column family. If necessary, however, you can filter rows using the WHERE clause. Create a JavaScript file, getfilter.js. Create a connection to Cassandra using a Client class instance. Run a CQL query using the execute(query, [params], [consistency], callback) method and include a WHERE clause to select row with the key 'catalog2'. The callback function takes two args, err and result. If an error is generated, log the error to the console. If an error is not generated, access the rows returned in the result and output the row properties, which are the row column values. For example, output the journal column value in the first row in the result as follows:
result.rows[0].journal
The getfilter.js script appears in Listing 6.4.
Listing 6.4 The getfilter.js Script
var cql = require('node-cassandra-cql'),
var client = new cql.Client({hosts: ['localhost:9042'], keyspace:
'catalog_nodejs'});
client.execute("SELECT key, journal, publisher, edition,title,author FROM
nodejscatalog WHERE key=?",['catalog2'],
  cql.types.consistencies.quorum,
  function(err, result) {
    if (err) console.log(err);
    else {console.log('key: ' +result.rows[0].key);
console.log(' journal: ' +result.rows[0].journal);
console.log(' publisher: ' +result.rows[0].publisher);
console.log(' edition: ' +result.rows[0].edition);
console.log(' title: ' +result.rows[0].title);
console.log(' author: ' +result.rows[0].author);
}
  }
);
Run the getfilter.js script with the following command:
node getfilter.js
The row with key catalog2 is retrieved and output in the console, as shown in Figure 6.9.

QUERYING WITH A PREPARED STATEMENT
A prepared statement is a CQL query with placeholders using ?. When the prepared statement is run, parameter values are provided to substitute the placeholders. The executeAsPrepared() method in the Client class is used to run a prepared statement. The first time a CQL query with placeholders (?) is run, the CQL query is prepared, and a prepared statement is generated for subsequent use to run the same query multiple times, if required. The advantage of using a prepared statement consisting of placeholders is that the CQL query does not have to be compiled each time the query is run.
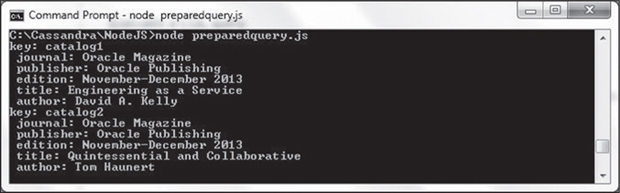
Create a JavaScript file, preparedquery.js, to run a prepared statement. Create a Client instance for a connection with the Cassandra database. Invoke the executeAsPrepared() method with the prepared statement query as SELECT key, journal, publisher, edition, title, author FROM nodejscatalog WHERE key=?. This has a placeholder for the key column. In the first invocation of the executeAsPrepared() method, supply the parameter as 'catalog2'. In the second invocation, supply the parameter as 'catalog1'. Output the result as in the preceding section. The preparedquery.js script appears in Listing 6.5.
Listing 6.5 The preparedquery.js Script
var cql = require('node-cassandra-cql'),
var client = new cql.Client({hosts: ['localhost:9042'], keyspace:
'catalog_nodejs'});
client.executeAsPrepared("SELECT key, journal, publisher, edition,title,author
FROM nodejscatalog WHERE key=?",['catalog2'],
  cql.types.consistencies.quorum,
  function(err, result) {
    if (err) console.log(err);
    else {console.log('key: ' +result.rows[0].key);
console.log(' journal: ' +result.rows[0].journal);
console.log(' publisher: ' +result.rows[0].publisher);
console.log(' edition: ' +result.rows[0].edition);
console.log(' title: ' +result.rows[0].title);
console.log(' author: ' +result.rows[0].author);
}
  }
);
client.executeAsPrepared("SELECT key, journal, publisher, edition,title,author
FROM nodejscatalog WHERE key=?",['catalog1'],
  cql.types.consistencies.quorum,
  function(err, result) {
    if (err) console.log(err);
    else {console.log('key: ' +result.rows[0].key);
console.log(' journal: ' +result.rows[0].journal);
console.log(' publisher: ' +result.rows[0].publisher);
console.log(' edition: ' +result.rows[0].edition);
console.log(' title: ' +result.rows[0].title);
console.log(' author: ' +result.rows[0].author);
}
  }
);
Run the preparedquery.js script with the following command:
node preparedquery.js
The rows catalog1 and catalog2 are output in the console, as shown in Figure 6.10.
STREAMING QUERY ROWS
The eachRow(query, [params], [consistency], rowCallback, endCallback) method is used to stream rows as they are received. The rowCallback(n, row) callback function is invoked after each row is received, and the endCallback(err, rowLength) function is invoked after all rows have been received. The rowCallback(n, row) function may be used to output the row and the row number. Row columns are properties of the row object. For example, the row.title property is the value of the title column. The endCallback(err, rowLength) callback function may be used to output an error (if any) or the row length.
Create a JavaScript file, streaming_query_row.js, and create an instance of the Client class. Invoke the eachRow() method to run the CQL query SELECT key, journal, publisher, edition, title, author FROM nodejscatalog. In the row callback function, output the row number and the title and author columns.
function(n, row) {
    //the callback will be invoked per each row as soon as they are received
    console.log('title: ', n, row.title);
    console.log('author: ', n, row.author);
  }
In the callback function called after all rows have been received, output the error (if any) or the row length:
  function (err, rowLength) {
    if (err) console.log(err);
    console.log('%d rows where returned', rowLength);
  }
The streaming_query_row.js script appears in Listing 6.6.
Listing 6.6 The streaming_query_row.js Script
var cql = require('node-cassandra-cql'),
var client = new cql.Client({hosts: ['localhost:9042'], keyspace:
'catalog_nodejs'});
client.eachRow('SELECT key, journal, publisher, edition,title,author FROM
nodejscatalog',
  function(n, row) {
    //the callback will be invoked per each row as soon as they are received
    console.log('title: ', n, row.title);
    console.log('author: ', n, row.author);
  },
  function (err, rowLength) {
    if (err) console.log(err);
    console.log('%d rows where returned', rowLength);
  }
);
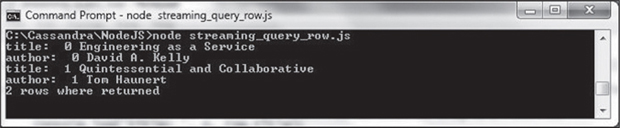
Run the streaming_query_row.js script with the following command:
node streaming_query_row.js
The row number and the title and author columns are output for each row. The total number of rows received is also output after all rows have been received, as shown in Figure 6.11.
STREAMING A FIELD
Suppose you want to stream the last field in the result to a text file. The streamField (query, [params], [consistency], rowCallback, [endCallback]) method streams the last field in a row as the first chunk of the field is received. The callback function rowCallback(n, row, streamField)—in which n is the row index, row is the row object, and streamField is the last field to stream—is used to stream the last field. The rowCallback function is invoked as the first few raw bytes of the last field are received. streamField is a Readable Streams2 object. The row in the rowCallback function is also an object similar to the row object in the rowCallback function in the eachRow() method. The row object does not include the last column/field of the row, however, because the last column is to be streamed and included in the streamField object.
Create a JavaScript file, streaming_field.js, to stream the last field of row(s) as it is received. Import the Node.js driver for Cassandra as in other scripts. Also import the File System module fs.
var fs = require('fs'),
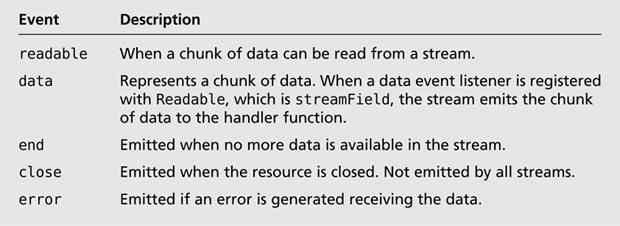
The File System module is used to create a WriteStream object to which to stream the last field. Create a Client instance for a connection to Cassandra. Invoke the streamField (query, [params], [consistency], rowCallback, [endCallback]) method with the CQL query as a prepared statement query, SELECT key, journal, publisher, edition, title, author FROM nodejscatalog WHERE key=?, with a placeholder (?) for the key column. Provide the key value in the params arg as ['catalog']. Define the rowCallback function to stream the last field to a text file, output.txt. The streamField object is an instance of the stream.Readable class, which is an abstraction of a data source. Data is emitted by a Readable stream, but only after a destination is ready to receive the data. The Readable class generates the events discussed in Table 6.7.
In the rowCallback function called function(n, row, streamField), create a WriteStream object from the File System object fs using the createWriteStream() method. Set output.txt as the destination file.
var writable = fs.createWriteStream('output.txt'),
Log the row index and the row object to the console:
console.log(n);
console.log(row);
The Readable class provides the pipe(destination, [options]) method to pipe the stream to a destination such as a file. The destination must be a Writable Stream, which is a WriteStream object you created for the output.txt file. The pipe method pulls data out of the readable stream and pipes it to the writable destination such that the destination is not overwhelmed by the fast readable stream. Invoke the pipe method on the streamField object, which is a Readable type, with the writable object as the argument.
streamField.pipe(writable);
Register the data event with the streamField object and provide a callback function to handle the chunk of data. Log the chunk length to the console.
streamField.on('data', function(chunk) {
  console.log('got %d bytes of data', chunk.length);
}
In the endCallback function, log the error message if an error is generated. Alternatively, log the row length if a row is returned.
function (err, rowLength) {
    if (err) console.log(err);
    console.log('%d rows where returned', rowLength);
  }
The streaming_field.js script appears in Listing 6.7.
Listing 6.7 The streaming_field.js Script
var cql = require('node-cassandra-cql'),
var fs = require('fs'),
var client = new cql.Client({hosts: ['localhost:9042'], keyspace:
'catalog_nodejs'});
client.streamField('SELECT key, journal, publisher, edition, title, author   FROM
nodejscatalog WHERE key=?', ['catalog1'],
  function(n, row, streamField) {
    //the callback will be invoked per each row as soon as they are received.
     var writable = fs.createWriteStream('output.txt'),
     console.log(n);
console.log(row);
streamField.pipe(writable);
streamField.on('data', function(chunk) {
  console.log('got %d bytes of data', chunk.length);
});
      //The stream is a Readable Stream2 object
  }, function (err, rowLength) {
    if (err) console.log(err);
    console.log('%d rows were returned', rowLength);
  }
);
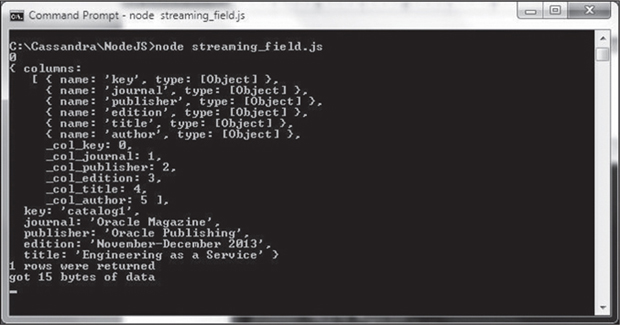
Run the streaming_field.js script with the following command:
node streaming_field.js
In the console output, the row index is logged as 0. Next, the row object is logged. The last field in the row, author, is not logged to the console because it is streamed to the output.txt file. The endCallback function logs that “1 rows were returned.” When the data event is emitted by the streamField object, the callback function registered for the data event outputs the bytes of data emitted, as shown in Figure 6.12.
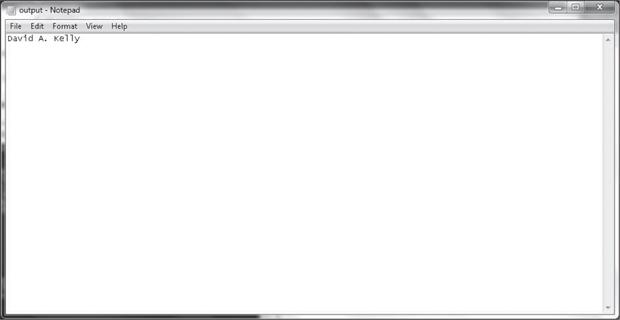
The output.txt file is generated in the same directory as the one in which the streaming_field.js script is run. The output.txt file has only the last field in the catalog1 row, which is David A. Kelly, as shown in Figure 6.13.
STREAMING THE RESULT
The stream(query, [params], [consistency], [callback]) method streams each row as a row becomes available. The method returns a Readable Streams2 object and emits the readable event when a row can be read from a stream. The readable event is discussed in Table 6.7. The stream may be piped to a text file.
Create a JavaScript file, streaming_result.js, and import the File System module as in the previous section. Create a Client instance for a connection with Cassandra. Invoke the stream method using a CQL query for a prepared statement, SELECT key, journal, publisher, edition, title, author FROM nodejscatalog WHERE key=?. Provide the params argument as ['catalog1']. The method returns a stream.Readable object. Register the readable event with the Readable object.
client.stream('SELECT key, journal, publisher, edition, title, author   FROM
nodejscatalog WHERE key=?', ['catalog1']).on('readable', function () {
}
In the callback function, create a WriteStream object for a text file output2.txt, which is to be the destination of the query result steam.
var writable = fs.createWriteStream('output2.txt'),
The readable event is emitted as soon as a row is received and parsed. Readable streams are either in flowing mode or non-flowing mode. The streamField in the previous section switches to flowing mode when the data event is registered with the stream. The stream returned by the stream method is in non-flowing mode and switches to flowing mode when the read() method is invoked on the stream.
var row;
    while (row = this.read()) {
}
Invoke the writable.write(chunk, [encoding], [callback]) method to write a chunk of data to output2.txt.
writable.write(row.journal+' '),
writable.write(row.publisher+ ' '),
writable.write(row.edition+' '),
writable.write(row.title+ ' '),
writable.write(row.author+ ' '),
Log the title and author to the console.
console.log('title %s and author %s', row.title, row.author);
Callback functions for other events emitted by Readable may also be registered with the Readable stream. For example, a callback function for the end event may be registered to indicate that a stream has ended. A callback function for the error event may be registered to indicate an error. The streaming_result.js script appears in Listing 6.8.
Listing 6.8 The streaming_result.js Script
var cql = require('node-cassandra-cql'),
var fs = require('fs'),
var client = new cql.Client({hosts: ['localhost:9042'], keyspace:
'catalog_nodejs'});
client.stream('SELECT key, journal, publisher, edition, title, author   FROM
nodejscatalog WHERE key=?', ['catalog1']).on('readable', function () {
var writable = fs.createWriteStream('output2.txt'),
    //readable is emitted as soon a row is received and parsed
    var row;
    while (row = this.read()) {
writable.write(row.journal+' '),
writable.write(row.publisher+ ' '),
writable.write(row.edition+' '),
writable.write(row.title+ ' '),
writable.write(row.author+ ' '),
      console.log('title %s and author %s', row.title, row.author);
    }
  })
  .on('end', function () {
    //stream ended, there aren't any more rows
  })
  .on('error', function (err) {
     console.log(err);
    //Something went wrong: err is a response error from Cassandra
});
Invoke the streaming_result.js script with the following command:
node streaming_result.js
The title and author columns for row catalog1 are output to the console, as shown in Figure 6.14.

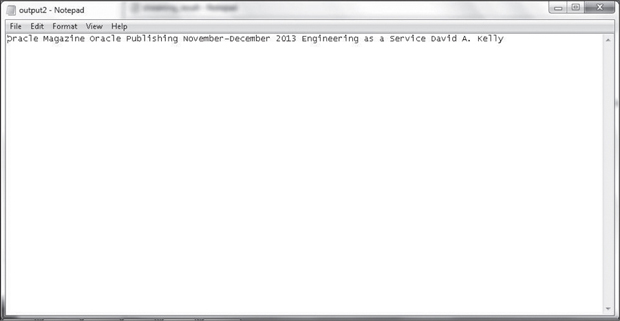
The complete row, including the title and author columns, is streamed to an output file, as shown in Figure 6.15.
UPDATING DATA IN TABLE
In this section, you will update row data. You can use the execute(query, [params], [consistency], callback) method to run an UPDATE CQL statement. Create a script, update.js, and create a Client connection as before. Run the prepared statement UPDATE Node.jscatalog SET edition=? WHERE key=? and provide the params as ['11/12 2013','catalog1']. Output an error (if any) in the callback function or output a message to indicate that a row has been updated. Then run a CQL query to select the catalog1 row to find out if the row got updated. The update.js script appears in Listing 6.9.
Listing 6.9 The update.js Script
var cql = require('node-cassandra-cql'),
 var client = new cql.Client({hosts: ['localhost:9042'], keyspace:
'catalog_Node.js'});
 client.execute("UPDATE Node.jscatalog SET edition=? WHERE key=?",['11/12
2013','catalog1'],
   cql.types.consistencies.quorum,
   function(err) {
     if (err) console.log(err);
     else console.log('table row updated'),
   }
 );
 client.execute("SELECT key, journal, publisher, edition,title,author FROM
Node.jscatalog WHERE key=?",['catalog1'],
  cql.types.consistencies.quorum,
  function(err, result) {
    if (err) console.log(err);
    else {console.log('key: ' +result.rows[0].key);
console.log(' journal: ' +result.rows[0].journal);
console.log(' publisher: ' +result.rows[0].publisher);
console.log(' edition: ' +result.rows[0].edition);
console.log(' title: ' +result.rows[0].title);
console.log(' author: ' +result.rows[0].author);
}
  }
);
Run the update.js script with the following command:
node update.js
As indicated in the output in Figure 6.16, the catalog1 row is updated.

DELETING A COLUMN
You can use the execute(query, [params], [consistency], callback) method to delete a column from a row. Create a script, deleteColumn.js, and create a connection with the Cassandra database using a Client instance. Run the CQL prepared statement DELETE journal FROM Node.jscatalog where key=? with params as catalog1 to delete the journal column from the catalog1 row. Then run a CQL query to select all columns from the catalog1 row to find out if a column got deleted. The deleteColumn.js script appears in Listing 6.10.
Listing 6.10 The deleteColumn.js Script
 var cql = require('node-cassandra-cql'),
 var client = new cql.Client({hosts: ['localhost:9042'], keyspace:
'catalog_nodejs'});
 client.execute("DELETE journal FROM nodejscatalog where key=?",['catalog1'],
   cql.types.consistencies.quorum,
   function(err) {
     if (err) console.log(err);
     else {console.log('table column deleted'),
client.execute("SELECT * FROM nodejscatalog WHERE key=?",['catalog1'],
  cql.types.consistencies.quorum,
  function(err, result) {
    if (err) console.log(err);
    else {console.log(result);
}
  }
);
}
    }
 );
Run the deleteColumn.js script with the following command:
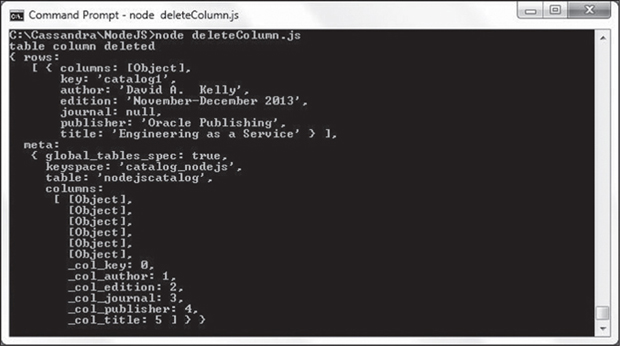
node deleteColumn.js
As indicated in the output in Figure 6.17, the journal column is null.
DELETING A ROW
Next, you will delete an entire row using the execute(query, [params], [consistency], callback) method. Create a script, deleteRow.js, and create a connection with the Cassandra cluster using a Client instance. Run a CQL prepared statement DELETE FROM Node.jscatalog where key=? with params as catalog1 to delete the row with the key catalog1. Then run a CQL query to select all columns from the row for the catalog1 key. The deleteRow.js script appears in Listing 6.11.
Listing 6.11 The deleteRow.js Script
 var cql = require('node-cassandra-cql'),
 var client = new cql.Client({hosts: ['localhost:9042'], keyspace:
'catalog_nodejs'});
client.execute("DELETE FROM nodejscatalog where key=?",['catalog1'],
   cql.types.consistencies.quorum,
   function(err) {
     if (err) console.log(err);
     else {
console.log('table row deleted'),
client.execute("SELECT * FROM nodejscatalog WHERE key=?",['catalog1'],
  cql.types.consistencies.quorum,
  function(err, result) {
    if (err) console.log(err);
    else {console.log(result);
}
  }
);
}
    }
 );
Run the deleteRow.js script with the following command:
node deleteRow.js
The row for the key catalog1 is deleted and the subsequent query to select the catalog1 row returns an empty result set, as shown in Figure 6.18.

SUMMARY
In this chapter, you used the Node.js driver for Apache Cassandra to connect with Cassandra, add data, select data, update data, and delete data. In the next chapter, you will migrate MongoDB, another NoSQL database, to Apache Cassandra.