
Choosing Effective Utility-Based Considerations
Theatrical actors are (perhaps stereotypically) known for asking the pointed question, “What’s my motivation?” AI designers and implementers often must ask the same thing on behalf of their digital creations. In fact, entire systems of AI architecture center on that very idea: why would a creature or NPC do some specific action at a given moment in time?
In particular, utility theory offers a powerful and compelling model for game AI (Graham 2014). In a nutshell, available decisions are scored using some mathematical formulas, and the agent selects a course of action from among the best-scoring options. There are several available models for utility-based architectures described in existing literature and lectures (Dill 2015, Mark 2013).
Interestingly, most of the resources available until now have focused on the architectural side. The specifics of building decision-making systems are often left as a proverbial exercise to the reader, often with vague allusions to “game-specific” details.
Throughout the next several pages, we will explore some of those specific details, taking a tour of some of the decisions available to NPCs in Guild Wars 2: Heart of Thorns. Each decision will be broken down into the considerations that affect whether or not the decision is considered optimal at any given point in time. From there, we will look at the rationale for choosing each specific consideration. We will conclude with a series of general-purpose tips that can be applied to consideration selection in any utility-based architecture.
The Heart of Thorns AI implementation is modeled on the Infinite Axis Utility System (Mark 2013). A major guiding principle of the design is that the AI should be data driven as much as possible. This allows for maximum flexibility and configurability, while simultaneously easing the load on engineers and empowering the design team (Lewis and Mark 2015).
To this end, AI characters are allotted a certain selection of decisions—actions which the AI can take at various points in time. Different archetypes or “species” of character may have very different sets of available decisions. Each possible action for a given AI agent is mapped to a decision score evaluator, or DSE. During a think cycle, each DSE for an agent is scored, and the best-scoring option determines the action the AI takes for that think cycle.
The scoring of a DSE consists of accumulating all the scores of the considerations assigned to that DSE. Each consideration is essentially a raw numeric input, normalized to the interval [0, 1]. This score is processed through a response curve, which remaps the original number to a final score, again normalized. These scores are then multiplied together to obtain the overall score of the DSE itself.
Suppose a DSE has two considerations: distance to target and health of the target. Health can be a simple fraction, abstracting away the detail of “hit points” or other mechanics that describe the healthiness of the target. Distance can be normalized by providing “bookends”—so, for example, a distance of 100 m might be “maximum,” and 0 m might be “minimum.” The normalization process will take any distance between 0 and 100 m and map it onto a score of 0–1. Any distance above the maximum automatically scores 1.
The next step is to process these raw numbers via the response curves. In this case, imagine that closer targets are more appealing than distant ones. Given a target at 25 m, the “raw” consideration score would be 25/100 = 0.25. Passed through a suitable function, however, 25 m might score as, say, 0.95. This remapped score allows the designer fine-grained control over the relative importance of each consideration. As the setup of the response curve (as well as the choice of input that is fed into it) is entirely data driven, there is no engineering burden for modifying the preferences of an AI character.
A key trait of this design is that any consideration can disqualify an entire decision from being selected simply by scoring zero. As soon as a consideration drops the decision score to zero, the system stops processing further considerations and early-outs, moving on to the next decision. This makes it trivial to encode rules for when a decision is absolutely not supposed to be used. Additionally, it allows AI designers to optimize the decision evaluation process itself, since cheaper considerations can be ordered first and early-out to avoid processing more expensive ones.
Given these building blocks, the real art of building a character’s AI lies in selecting considerations and pairing them with appropriate response curves. To properly explore the nuances of this process, let us take a closer look at some DSEs used in Heart of Thorns.
A considerable portion of the combat-related work that went into Heart of Thorns focused on the moment-to-moment, “tactical” positioning and maneuvering of individual NPCs. Many characters have an archetypical “style” or “flavor” that they represent, and the choices driving the movement of those characters on the battlefield have a substantial impact on how well the designer’s intent is actually conveyed during gameplay.
However, there are also common and widely used sorts of movement—the type of things that basically every reasonably intelligent character is expected to do during a fight. A perfect example of such a common movement is “Evade Dangerous Areas.” This DSE examines the environment for magical spells, mechanical traps, and other hazards created by players as well as hostile NPCs. If the AI character is too close to such a danger zone, they will rapidly exit the area, often playing a specific “dodge” animation and momentarily avoiding any incoming attacks.
13.3.1 Evade Dangerous Areas
The DSE for this action is relatively simple but highly instructive. There are only six considerations used. The first two are binary on/off switches that prevent the action from being chosen in the middle of another decision, or if the character has been prevented from moving by, say, a rooting spell. Virtually all DSEs use basic switches like these to help ensure that the AI does not do something ridiculous, like trying to move while frozen in place.
It would of course be possible to hard-code these switches into every DSE—and indeed there are a small number of other control factors which are hardwired into the engine. However, we chose to simply prepopulate newly created DSEs with a few commonly required switches. The more hard-coded logic that gets added, the more brittle the system becomes when exceptions are desired. Inevitably, someone will think of a good use case for bypassing those switches. When that day comes, it is beneficial to be able to simply omit a consideration versus having to add more hard-coded logic for bypassing the first bit of hard-coded logic.
Moving on, the third consideration on the Evade Dangerous Areas DSE is the real workhorse. This consideration uses an infinite-resolution influence map to detect nearby dangerous activities and locales (Lewis 2015). The influence map is populated every few frames with data on all potential hazards. Creating more hazards in a particular location results in a higher score for that area.
The input from this consideration is mapped through a response curve that effectively amplifies the perceived danger of moderately dangerous areas, while simultaneously squelching the perceived danger of unimportant hazards. The goal of this is to ensure that characters on the fringes of a hazard will still get out of the way, whereas characters will stay put if they are near a hazard but not inside its effective radius. The graph of the response curve is shown in Figure 13.1.
Coming in fourth and fifth are a pair of considerations designed to break cycles of repetitive behavior. They are termed runtime and cooldown, respectively. Runtime’s job is to guarantee that the decision will stop being chosen after a certain number of repetitions. In this case, a response curve is used to drop the score of the consideration (and therefore the decision as a whole) to zero after a short time. This ensures that, even if the decision is otherwise valid, it will not be chosen too many times back-to-back. This mechanism is extremely useful for avoiding edge cases where the character constantly evades and becomes impossible to hit.
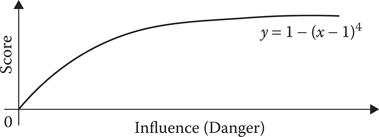
Figure 13.1
Response curve for influence map filtering on Evade Dangerous Areas.
Cooldown is a standard timer that forces the decision to score zero (or nearly zero) until a given delay has elapsed. This is useful for avoiding strobing between two otherwise competing decisions and also helps ensure that a single decision is not selected too frequently. The response curve on cooldowns returns very small scores until near the end of the cooldown period, at which time the score spikes back up to its full potential (subject, of course, to the other considerations on the decision). Graphs of the standardized runtime and cooldown response curves can be seen in Figure 13.2.
The final consideration for Evade Dangerous Areas is based on the health value of the character itself. It simply dials back the score of the DSE if the character has plenty of health to absorb the damage of whatever hazard it may be standing in. This mechanism lends a bit of flavor and personality to the AI characters, since they will become willing to withstand some pain in order to, say, land a blow on an enemy player. Moreover, the same characters will become more conservative as they take damage and lose health.
13.3.2 Close to Melee when Invisible
Much like its Evade Dangerous Areas counterpart, Close to Melee When Invisible is a DSE that attempts to move a character into a more advantageous position on the battlefield. However, it is much less widely applicable; only a few characters can be invisible at all, and not all of them want to get closer to their enemies when they are hidden from view.
As before, the DSE begins with two switch considerations that prevent the decision from activating for immobilized or otherwise occupied characters. The third consideration simply queries the game rules to see if the character is presently invisible to its target. It, too, is a binary on/off switch, rendering the decision unavailable if the AI is not in fact invisible.
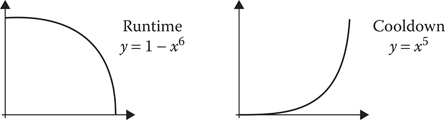
Figure 13.2
Runtime and cooldown response curves.
Where things get interesting is the fourth consideration. This factors in the distance between the AI and its target, and elects to move closer to the target if and only if it can reach the target before regaining visibility. (In truth this is a constant time value, but the time was deliberately chosen to attain this effect. More complex queries may be warranted if the design rules are more sophisticated, but this was sufficient for our purposes.) The approximation for this is handled quite easily by a single response curve, which tapers off at the extreme long-range end.
The next consideration is again based on health, making the decision score lower if the AI does not have enough health to justify a sneaky attack maneuver. Finally, there is a runtime limitation of a few seconds to avoid traveling extreme distances while invisible—something which could be confusing and frustrating to players.
Overall, the effect of these considerations is striking. AI characters might engage in relatively standard combat behavior for a time, then suddenly cloak themselves and vanish from sight. As the bewildered player tries to figure out where his or her foe disappeared to, the AI is making a mad dash toward the player. Once within striking distance, the AI reappears and delivers a surprise volley of damage to the unsuspecting target.
During prototyping on Heart of Thorns, this behavior (among others) was used to illustrate the power of carefully chosen considerations. A stealthy predator, an assassin, and even a cheeky thief could all use the basic pattern constructed here to great effect. Such predefined patterns proved so handy during implementation that over one hundred of them were made and used in the final game. The a la carte power of the architecture allowed designers to mix and match ready-made behaviors and preference patterns into new creatures in a mere handful of minutes (Lewis and Mark 2015).
In addition to tactical movement, characters in Heart of Thorns have access to an array of “skills”—abilities that are typically combat focused, aiming to deal damage to enemy targets or reinforce allies. Selection of considerations for these skills is worth exploring in its own right, since the various types of offensive and defensive abilities often require specially tailored scoring to be effective.
For the sake of increased modularity and ease of reuse, skill-related DSEs can be assigned to premade sets of considerations. This allows related skills to reuse the same decision scoring logic across the game. In addition to making the AI more discoverable and recognizable to the player, this dramatically cuts down on the number of custom-tuned DSEs that must be created during the design process.
13.4.1 Charge Attacks
The skill DSE for a basic rushing or charging attack begins with two familiar faces: considerations to avoid using the attack in the middle of another activity and while unable to move. The third consideration looks at the distance to the target. This particular consideration carries a special response curve, which scores higher for targets at moderate range; it does not make sense to burn a rush attack skill on a target which is already within easy striking distance, for example. By the same token, it makes no sense to use the charge if the actual attack will not reach the target at all.
An interesting new consideration on this DSE examines the influence map to see if there are already a reasonable number of allies in the area of the target. This is designed to ensure that players are not overwhelmed by enemy characters. A player already fighting two opponents should not need to worry about a third suddenly charging in and piling on. This is a fantastic example of a design constraint that can be easily expressed using utility AI and supporting modular AI information systems.
The next consideration simply prefers the attack to be used when the character’s health is at least moderately high. It does not usually look good to charge into a horde of enemies when near death, so this consideration helps maintain some sensibility in the character’s behavior. Of course, a more reckless, even suicidal type of enemy might find that the opposite is true—deploying an attack into a nearby group of enemies at low health may be just the thing for that character. This is trivial to accomplish by tweaking the response curve on the health consideration.
Another new consideration is the relative direction check. This is tuned for charge attacks in such a way as to prefer to charge at targets that are mostly in front of the AI. By imposing this limitation, we avoid ugly animation snaps and directional flip-flopping. The AI will not choose to charge at something behind itself, because that looks bad and typically does not make as much sense to the observing player.
Bringing up the rear is a simple line-of-sight consideration. This is another on/off switch that avoids deploying the charge attack at something that cannot be directly reached. Of course due to the limited nature of line-of-sight, it is possible for the AI to “see” a target but not be able to navigate to it on the navmesh. In Heart of Thorns, we mostly ignored this restriction, because of processing power limitations—it was too expensive to compute paths to all targets all the time, and the edge cases where it made a visible difference were mercifully rare.
13.4.2 Side and Rear Attacks
As a variant on the usual frontal assault style of combat, some characters in Heart of Thorns prefer to be a little sneakier, attacking primarily when their target is facing away from them. For melee attacks, this is handled largely by a single skill DSE. Remember that the same DSE can be used for many different skills, allowing designers to create consistent mechanics without duplicated data.
The flanking/backstab attack DSE is similar to most others in that it starts with an early-out switch to prevent the skill from being used if another action is already running for that AI character. However, unlike DSEs that involve movement, this one does not turn off for immobilized characters. This is a great example of why hard-coding the rules can be a net negative; instead of having to wire in some logic to allow this particular skill DSE to activate on rooted AIs, we simply omit the consideration that would otherwise turn it off.
As such, the second consideration on this DSE checks to make sure that the target is facing away from the AI character. This is done by checking the normalized facing direction of the target and taking the dot product of that vector by the normalized vector from the target to the AI. The closer this dot product is to 1, the closer the target is to pointing directly at the AI character. Therefore, the response curve for this consideration simply tapers off as the dot product’s value reaches 1. The net result is that the character will score targets facing perpendicularly (or completely away) more highly.
The next consideration limits the DSE to avoid making flanking attacks when the character is badly wounded. Accomplishing this with a response curve is trivial: simply keep the curve value high until some arbitrary health value threshold, then drop off quickly as health continues to decline to zero.
Following the health check, there are three prioritization considerations that are used to help determine which targets are most eligible for the attack. All other things being equal, the DSE will prefer closer targets, weaker (lower health) targets, and targets that are in the AI’s cone of vision.
Checking for closer targets is as simple as looking at the distance to a prospective target and scoring lower as the distance increases. By contrast, the enemy health check uses a gradual tapering effect to diminish the priority of full-health targets but not zero it.
For prioritizing targets in front of the AI (or, roughly speaking, in its vision cone), there is again a directional check. This time, however, the check looks at the AI’s facing direction and compares it to the offset vector pointing toward the target. As a result, the score will drop off toward zero the more the character is looking away from the target.
Finally, the DSE finishes off with a simple line-of-sight check, which operates much the same as the one used for charge attacks and other skills. The order of this is actually significant, since the raycast used for the check is fairly expensive; if we can early-out from the DSE before having to do an actual check here, so much the better. This sort of optimization is a large part of what made the Heart of Thorns AI sufficiently performant.
On a general level, the considerations we have seen can be broken down into three basic categories. There are those which are mandatory for a decision to function at all; those which distinguish the decision from other, similar behavioral patterns; and those which mostly affect balance and the “feel” of the AI.
Mandatory considerations are the easiest to select from the toolbox. The commonly used switches and toggles enumerated earlier are all mandatory—things like “don’t interrupt a running action” or “don’t move when immobilized.” When building a utility-based AI, it is immensely helpful to know what considerations absolutely must be in place in order for the logic to operate correctly.
Many of these rules can be hard-coded into the game rather than data driven; however, as remarked upon before, it is often beneficial not to hard-code mandatory considerations on the chance that someone will want to bypass or circumvent them as part of a design.
Distinguishing one behavioral pattern from another is typically a matter of tapping into game rules. For Heart of Thorns, there are numerous status flags (“buffs”) that can be applied to a given character. As we saw with the Close to Melee When Invisible example, a consideration that looks at these buffs or status flags can go a long way.
Balance and “feel” considerations are probably the trickiest to get right. Selecting a response curve can be difficult. Within the Heart of Thorns architecture, it is common place to use runtime and cooldown considerations to control the timing and repetition of decisions. All of these considerations use standardized response curves to simplify the design process.
As a matter of fact, the vast majority of the response curves used in the game are chosen from a small palette of preset curves. Permitting arbitrary curves is immensely powerful but has the substantial drawback of being intimidating and possibly even unintuitive. When using an architecture that permits this sort of configurability, it is worth hiding it behind an “advanced mode” and favoring preset curves for the majority of use cases.
13.5.1 Selecting Consideration Inputs
Before reaching the point of building a response curve (or other general scoring function), it is important to gather a list of the input factors that might contribute to making a particular decision.
Some generic inputs that are broadly applicable to most AI simulations include distance (both straight-line and pathfinding distance can be useful), time, relative direction/heading, line-of-sight, and so on. These are nearly universal concepts that can be applied to most decisions in some way. Moreover, they are conceptually portable between game applications and even into nongame AI usage.
More game-specific ideas may include things like health, mobility, special status effects, relative proximity of other characters, and so on. Feeding these sorts of considerations with game data is typically straightforward and can yield remarkable results. An especially useful approach is to adapt the data from other game systems via a translation layer that converts game rules into consideration inputs. Coupled with parameters on the considerations themselves, this layer helps keep the AI data-driven and flexible without requiring huge amounts of code for each unique type of character.
As one example of pulling data from the game itself, Heart of Thorns uses influence maps heavily, as noted earlier. There are several common queries that extract useful AI decision-making data from those influence maps. The presence or absence of allies and enemies can be obtained individually or even combined to yield a metric that estimates how much conflict is present at a given location (Mark 2015). Environmental hazards and artificial danger zones (spells, traps, etc.) are also represented in the influence map.
When building a DSE, it is important to consider all the relevant inputs so that the character will ultimately make the “right” decisions. Some inputs may also need further parameterization, such as distance ranges, time limits, which in-game status effects to query, and so on. Although the options may seem overwhelming at first, it helps to do a little bit of applied role-play.
Suppose the character is a thief who wishes to stealthily approach targets and pickpocket them, avoiding overt combat as much as possible. Put yourself in the character’s shoes, so to speak, and think about why you would (or would not!) want to decide to do a particular action. Distill these reasons into concrete metrics. Deciding to approach a mark should probably be based on considering things like the perceived value of the target, relative distance, whether they are facing away from the thief, and so on.
Once a variety of input factors have been identified, it is time to score the decision based on the relative importance of each factor. This is where finely tuned scoring functions come in—in the case of Heart of Thorns, we used response curves.
13.5.2 Constructing Response Curves
Even if most response curves used by the engine are presets, it can be very helpful to follow a few simple guidelines for choosing which curve makes the most sense. To that end, there are essentially three characteristics of the curve to consider.
An increasing curve tends toward higher y-values as the x-value increases, while decreasing curves do the exact opposite. This can be thought of as whether the curve climbs or dips as it moves to the right on a graph. Increasing curves make a decision more relevant toward the upper end of the input range, whereas decreasing curves will make the same decision less relevant.
Once the overall direction of a curve is established, the next characteristic is whether the curve is monotonic or not. An increasing curve is monotonic if it never “turns around” and begins decreasing instead. Recall that we only care about the response curve’s behavior in the domain [0, 1] and the range [0, 1]—that is, the square from the origin to (1, 1) on the coordinate plane. Therefore, many simple monomial functions (for example) can be considered monotonic on the relevant interval even though they are strictly speaking not monotonic in the domain of the reals.
Monotonicity is important because it greatly simplifies the process of understanding how a consideration’s score works. Most response curves in Heart of Thorns are monotonic, although it is occasionally useful to use nonmonotonic curves to get specific effects. A great example is keeping an enemy at arm’s length. Using a distance consideration and an upside-down U-shaped response curve, we can make a character approach its enemy only if the enemy is not already too close or too far away.
The last characteristic to consider is the curve’s endpoints. The endpoints of the curve are simply the function’s values at x = 0 and x = 1. These points describe the score of the consideration at the minimum and maximum of the input range, respectively. For monotonic curves, these will also correspond to the minimum and maximum scores of the consideration. An increasing, monotonic curve will score its minimum value at x = 0 and its maximum at x = 1. By contrast, a decreasing monotonic curve will score its maximum at 0 and its minimum at 1.
Selection of response curves can make or break a utility-based AI. Broadly speaking, the scoring function (whether using a response curve or a more general function) is the heart and soul of how the AI will decide to do one thing versus another. A simple checklist can be invaluable for choosing an appropriate scoring function.
The first key question is to determine what input is being scored. For each input type, decide on bookends for the input—a clamped range that controls what input value carries a significance of 0, and what input value translates to 1 on the x-axis.
Given a well-defined range of input to work with, the next key component is the slope of the curve. Does the importance of making this decision increase as the input nears 1, or does it decrease instead? For a thief considering the perceived wealth of a target, an increasing curve makes sense. The same thief thinking about the distance to a target will probably favor a decreasing curve for that consideration—the farther away a mark is, the more danger is involved in reaching them, and therefore the less opportune that target will be.
Monotonicity is generally preferable for a response curve unless some specific behavior is needed. Think carefully about whether there should be an artificial “high point” or “low point” to the consideration’s score in between the input extremes of 0 and 1. Configure this peak or valley such that it corresponds to the appropriate input value.
Finally, it is important to plan out the endpoints of the scoring curve. As noted earlier, these correspond to the consideration’s score at the low and high ends of the input range. Endpoints have a strong influence on the decision’s overall score when the inputs are at extremes. Should the score drop to zero when an input reaches minimum/maximum? Or should it simply deprioritize the decision instead of invalidating it altogether?
Most of the time, it is simplest to have a minimum/maximum input correspond to a consideration score of 1. In other words, if a consideration is in a perfect situation, it should yield a perfect score—subject of course to the scores of other considerations for the same decision. The primary exception is when considering the interplay of multiple decisions with similar considerations. However, there are many factors to take into account for this scenario.
13.5.3 Interleaving Decision Scores
A commonly referenced strength of utility-based systems is their organic, fluid nature. As scores rise and fall in the heat of the moment, the AI will always pick something sensible from the list of options—even if it is just doing something, anything rather than stand still. In practice, this is a powerful tool for ensuring robust behavior, but it can also be a double-edged blade.
Done carefully, interleaving decision scores can produce interesting effects. For example, creating a sequence of decisions is as simple as setting up cooldowns, and then having each subsequent decision weighted slightly lower than the prior action. As successive actions are chosen by the AI, they will enter cooldown, leaving the AI to choose the next best thing—which, by construction, is the next action in the sequence.
One scenario where decisions can clash is when the considerations and response curves happen to generate very similar scores for different decisions. Even if the absolute best-scoring decision is always selected (highly recommended), the two may oscillate or ping-pong as their respective scores rise and fall. There are a few ways to combat this: give a “commitment bonus” (small score boost factor) to the last-chosen decision, increasing the odds of it being chosen again; add weights to each decision so that their total score could be, say, 3 or 4 instead of just 1; and make judicious use of runtime and cooldown considerations.
Unfortunately, all of these methods (useful as they are) share a single common drawback. In effect, they do not eliminate the possibility of two decisions oscillating—they simply shift where the scores will land when the oscillation happens. It could be that those scores land far enough away from the problem zone that the oscillation is irrelevant or easily dominated by other scores in the mix. But it can also happen that scores will continue to compete in harder and harder to recognize ways.
The simplest fix to this issue is to add another consideration to one of the decisions. Although it may be counterintuitive, this will add more variation to the overall scoring process, increasing the chances that the competing decision will consistently win (or lose)—thereby eliminating the oscillation.
However, there may be situations where design constraints simply do not allow for any other consideration to “make sense.” This is readily encountered when working with highly specialized set pieces and other similar sorts of AI characters. If another suitable consideration cannot be found, the next best thing is to adjust the involved response curves to minimize the zone of oscillation.
Although most of the time there is a closed-form, analytical solution to the problem, it is often not worth the effort to solve the equations on paper. Instead, it is much more effective to build a tool that allows AI developers to manipulate the various inputs for a consideration using simple sliders. Providing a visual mechanism for experimenting with considerations (and, by extension, multiple competing decisions) can radically improve the accessibility and discoverability of any utility-based AI system.
13.6 Choosing Effective Considerations
We can use the rules discussed thus far as a starting point for defining how considerations should factor into making a decision in a utility-based AI model. But even before the selection and tuning of scoring functions (such as response curves), it can be tricky to determine which specific inputs should be used at all.
Broadly speaking, answering this question requires getting into the mind of the AI agent itself, and thinking in terms of what would motivate (or deter) that agent with regards to the particular decision being modeled. Many inputs—like distance, speed, relative directions, health, and so on—are fairly easy to take into account. But what about the case where a decision is nuanced, complex, possibly expensive to evaluate, and hard to capture in a single equation?
Recall the example from earlier with the invisible character trying to get into melee range of a target before its invisibility wears off. This could be done by modeling the duration of invisibility explicitly in the model, measuring the relative velocities of the invisible agent and the target, and so on. However, we preferred a simple and elegant proxy variable, which is just a time constant.
In practice, the difference between the explicit, detailed model of “before invisibility wears off” and the simplified proxy time is visible only extremely rarely. When the differences are visible, the player herself actually offers the best solution to explaining away the problem. Players will, in general, be eager to add their own narrative reasons for why AI does what it does. As a result, there will almost always be a tiny story in the player’s mind about what happens when the time constant is too short or too long.
We can extrapolate from this example to general-purpose consideration design. Always be on the lookout for situations where a complex or hard-to-capture metric can be substituted for a proxy variable. Moreover, keep in mind that the best proxy may not even be the same kind of metric.
The first question to ask is “why would I do (or not do) this action?” Once a list of potential motivations is amassed, the next order of business is to look for what data are available (or can be readily made available) that best match those abstract motivations. Look for proxy variables that can capture multiple considerations at a time, such as modular influence map combinations (Mark 2015). Lastly, consider the relative importance of each input and design a suitable scoring function or response curve.
Utility theory offers a compelling model for building AI agents. Yet even with a robust architecture for utility-based AI in hand, it is not always immediately apparent how to actually create good decision-making and behavior. Seeking to address this, we explored some of the specifics of how decision modeling was done for Guild Wars 2: Heart of Thorns and a set of general principles that should hopefully carry forward to any project using utility-based AI.
Dill, K. 2015. Dual-utility reasoning. In Game AI Pro Vol. 2, ed. S. Rabin. Boca Raton, FL: CRC Press, pp. 23–26.
Graham, R. 2014. An introduction to utility theory. In Game AI Pro Vol. 1, ed. S. Rabin. Boca Raton, FL: CRC Press, pp. 113–126.
Lewis, M. 2015. Escaping the grid: Infinite-resolution influence mapping. In Game AI Pro Vol. 2, ed. S. Rabin. Boca Raton, FL: CRC Press, pp. 327–342.
Lewis, M. and Mark, D. 2015. Building a better centaur: AI at massive scale. Lecture, Game Developers Conference 2015. http://gdcvault.com/play/1021848/Building-a-Better-Centaur-AI (accessed May 24, 2016).
Mark, D. 2013. Architecture tricks: Managing behaviors in time, space, and depth. Lecture, Game Developers Conference 2013. http://www.gdcvault.com/play/1018040/Architecture-Tricks-Managing-Behaviors-in (accessed May 9, 2016).
Mark, D. 2015. Modular tactical influence maps. In Game AI Pro Vol. 2, ed. S. Rabin. Boca Raton, FL: CRC Press, pp. 343–364.