
C H A P T E R 4
DNS Load Balancing
DNS load balancing is the simplest form of load balancing. That said, it’s also very powerful. It can be used to solve many performance problems very quickly as it allows you to direct incoming traffic to any one of a set of servers. But as with all quick and easy solutions, there are many things that DNS load balancing can’t do. If it was a panacea, after all, we would not have had to write this book.
DNS Details
First, let’s talk a little about DNS: specifically what it is and what it does. Without DNS, the Internet as we know it today could not function. DNS is really that important. However, it’s also something that even experienced developers often know little about. So let’s get stuck in.
The IP Address
Let’s start at the beginning: the basics that underlie DNS. The key thing that DNS, and consequently the whole Internet, is built on is called the Internet Protocol (IP for short). Each machine has at least one unique address (imaginatively called an IP address) that allows other machines to communicate with it. For example, your home has an address that people can use when sending letters by mail. This address is unique to your home and no other residence in the world has the same address. If two places had the same address, how would the postman know which should get a certain letter? It would be most inconvenient!
Once you have your unique address, you then require the name of the recipient. This really means “At this physical location, there is a person called Peter.” Again, this sounds simple enough. Families share a home, they each have unique names, and so it is obvious to whom it is directed. Even when people share the same name, they often have a suffix such as “Senior” or “Junior” to tell them apart. However, if two people have the same initials, such as John and Jane Doe, and a letter arrives for “J Doe,” it’s impossible to know to whom it is directed.
So what does any of this have to do with the Internet, IP addresses, DNS, and load balancing? IP works in a very similar way. First, each computer (or, more accurately, each network interface on a computer) has a unique IP address. This makes sense; otherwise the network wouldn’t know to which computer it should be delivering the data. As for the addresses’names in the mail example, that ties in nicely with port numbers. Each program that listens to the network uses a unique port to identify traffic directed to it. Port 80 is the standard port for HTTP traffic. Port 443 is the standard port for HTTPS or secure web traffic. (You don’t need to worry about port numbers at this stage). As you can see, an IP network really has a lot in common with the postal service.
There are two IP protocols in use today. The most common is IPv4, which has been the foundation of the Internet since its inception (well, since 1981 anyway). The other is IPv6, which was created to overcome the limited number of IP addresses in IPv4 (no one expected the Internet to explode the way it did). In theory, IPv4 has run out of addresses, so everyone is migrating to IPv6 as fast as they can. The reality is that IPv4 isn’t going anywhere and most ISPs don’t provide IPv6 addresses to their end customers anyway. For a much more in-depth look at IPv4 and IPv6, Chapter 14 covers both protocols, their limitations, and how they impact load balancing.
An IPv4 address looks like this:
127.0.0.1
It is also known as a dotted quad number (a number made up of four decimal numbers ranging from 0-255 and separated by periods). Each machine attached to a network (such as the Internet) has one of more of these addresses assigned to it.
The Problem
The problem is that people are generally very bad at remembering numbers. It’s one thing to remember www.google.com but quite another to remember 74.125.237.81. And that’s just one web site. So, humans can’t remember numbers and computers can’t readily use textual addresses. What’s to be done?
The solution turned out to be very simple. You create a file called hosts and in this file you write each IP address and its equivalent hostname. That way whenever the computer sees www.google.com, it looks in the hosts file, finds the IP address, and tries to connect. Seriously, this is how it used to work: each machine had a huge list of names and addresses. In fact, this file still exists. Under Unix (Linux and Mac), you will find it in /etc/hosts. It can also be found under Windows in C:windowssystem32driversetchosts.
The problem with this solution is that you need to know all the names in advance, which is something of a fatal flaw. However, back when this solution was devised, the number of hosts on the Internet was in the hundreds, not the hundreds of millions we have now. In short, it was a simple solution that worked. Even back then, though, it was noticed that there were some fairly obvious issues of scale.
First, you need to make sure that everyone has the same contents in that file. If you’ve ever tried working on a Word document with other people, you know that it gets messy very quickly. When you take into account that each machine needs this file and ideally they should be the same, trying to keep them all in sync is a challenge of Herculean proportions.
The original hosts file was maintained by a single group of people. The file was then put on a server where everyone could download it. This solved the problem of people overwriting each others’ changes but it meant that all the work involved in maintaining the file fell onto just a handful of people. This quickly proved to scale badly as more and more people were requesting changes. Also, the bandwidth used by thousands of people downloading the updated version every few hours was problematic.
The Solution
What was needed was a system that would spread out the workload—for both humans (updating files) and computers (bandwidth mostly). To do this, the system needed strong caching support and it needed to be distributed. In other words, it needed to be built in such a way that the people responsible for a particular domain were the ones who had to maintain and update it. This system became DNS, and it is still in use today. It has scaled extremely well, especially considering when it was first designed and how much the Internet has grown since then.
Taking a Step Back
So, DNS maps names to IP addresses and vice versa. Although it’s good practice to properly map an IP address to the correct hostname, don’t be surprised if you come across IP addresses that map to some weird, wonderful, and completely unexpected names. Reverse DNS is more difficult to set up because the people in charge of the IP address block have to handle the changes. For an ISP, this can be something of an administrative nightmare, and as very few applications actually care about reverse DNS (mail servers being one), it’s rarely a problem. It won’t affect your load balancing so let’s ignore it.
For a given hostname, then, you can have one more or more addresses. This is affectionately known as “poor man’s load balancing.”The IP addresses are handed out in a round robin fashion. For example if you had
www.example.com    192.168.1.1

www.example.com    192.168.1.2
the DNS server would alternate between these addresses whenever anyone asked for www.example.com. In effect, this means you can send requests to as many different servers as you wish. The reason it isn’t considered an ideal technique is because there are inherent problems. For example, if one of the servers were to fail, the DNS server wouldn’t be aware of it and would still send out the IP address of that server to the client.
DNS in Depth
Now let’s discuss how DNS actually works! The basic principle is something akin to a distributed version of the hosts file. The distribution of these hosts files is central to an understanding of DNS. This distribution is called a tree hierarchy (so called because its structure looks like an upside down tree). In Figure 4-1, you can see how from the single top (called a root) node, it expands down, and each of these branches forks further.
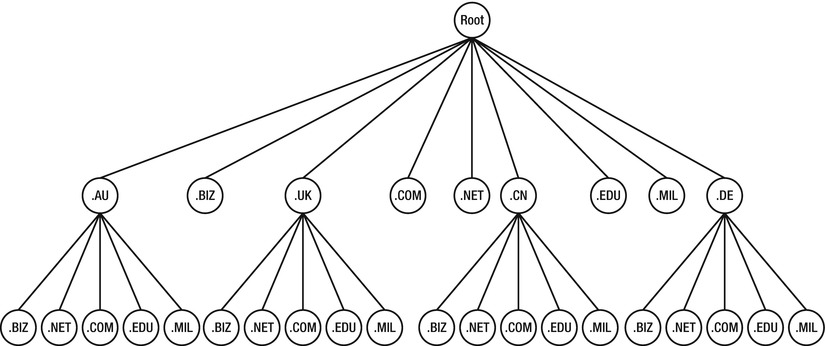
Figure 4-1. DNS hierarchy
Although there is a single root zone, for scalability and redundancy purposes it is replicated across several servers. Currently there are 13 geographically distant servers dedicated to this task. These servers (also known colloquially as root servers) don’t hold any host information themselves but instead point to another tier of servers that look after top level domains such as .com and .net. If you’re thinking that this looks suspiciously like a URL, you’re right; each dot in a URL points to the next level down in the tree (which may or may not be on a different server). The structure of the URLs we all know and love is simply a manifestation of the way DNS manages the tree.
So, if tier one consists of 13 core servers, what exactly is tier two? Well, they are broken down like parts of a URL. So think about the following URL: www.google.com.hk. There are four parts www, google, com, and hk. Each part represents a different portion of its makeup by DNS.
- hk: Short for Hong Kong, this portion represents the location. Every country has one (except the USA because it is the “base” of the Internet).
- com: Short for commercial, this means that the domain is owned by a business.
- google: The name of the entity you are searching for; this is Google’s domain.
- www: The World Wide Web subdomain of the google domain, this tells it to go the World Wide Web server that is attached to the
google.com.hkdomain.
Now that you know how a URL is put together, you might guess how a DNS query (the process of looking up the name itself) works. A basic DNS query goes to one of the 13 core nodes. From there it queries the top level domain for the first portion of the URL, the region. Once it has queried the region, it goes to the regional DNS server and queries it for the commercial domain server.
From that server it makes a request for the google domain and then finally it reaches the name server for the google domain itself, Google’s DNS Server. From here you can retrieve the IP address of www.google.com.hk, but you could potentially retrieve the google.com.hk domain’s IP or the mail.google.com.hk domain as all of these domains could have entries within the google.com.hk DNS Server.
Querying Yourself
Now that you understand how DNS works, try it for yourself! There are a large number of tools to query DNS servers. The first and by far the most common is dig. Dig is short for Domain Information Groper and is one of the most widely used tools for performing queries on a domain. Syntactically, dig is very simple to use. The invocation is just
dig <domainname>
As a trial, we executed a lookup for www.google.com.hk.
root@archie:~$ dig www.google.com.hk


; <<>> DiG 9.7.3 <<>> www.google.com.hk

;; global options: +cmd

;; Got answer:

;; ->>HEADER<<- opcode: QUERY, status: NOERROR, id: 57130

;; flags: qr rd ra; QUERY: 1, ANSWER: 2, AUTHORITY: 0, ADDITIONAL: 0
;; QUESTION SECTION:

;www.google.com.hk.             IN      A


;; ANSWER SECTION:

www.google.com.hk.      19994   IN      CNAME   www-hk.l.google.com.

www-hk.l.google.com.    172     IN      A       74.125.237.88


;; Query time: 21 msec

;; SERVER: 10.0.0.1#53(10.0.0.1)

;; WHEN: Mon Jan 23 22:31:56 2012

;; MSG SIZE  rcvd: 84
As you can see, it has returned two answers from our one query: www.google.com.hk, which in actuality is the server www-hk.l.google.com, and this server has the IP address 74.125.237.88. If you wish to check this, you can perform a simple ping to www.google.com.hk and you will see the ping routed to the IP address of the domain name.
root@archie:~$ ping www.google.com.hk

PING www-hk.l.google.com (74.125.237.88) 56(84) bytes of data.

64 bytes from syd01s06-in-f24.1e100.net (74.125.237.88): icmp_req=1 ttl=56 time=17.9 ms
Voila!
Advanced DNS Queries
A more advanced query is called a DNS traversal or a DNS walk. This means that it will attempt to query all the name servers that lead to the goal. To perform this, we again invoke dig. This time, however, we gave dig the +trace option, which tells dig to provide the full trace of all the servers it queries when looking up the DNS entry for the domain in question. Again, we queried www.google.com.hk for the information.
root@archie:~$ dig  www.google.com.hk +trace


; <<>> DiG 9.7.3 <<>> www.google.com.hk +trace

;; global options: +cmd

.                       105602  IN      NS      g.root-servers.net.

.                       105602  IN      NS      e.root-servers.net.

.                       105602  IN      NS      i.root-servers.net.

.                       105602  IN      NS      k.root-servers.net.

.                       105602  IN      NS      j.root-servers.net.

.                       105602  IN      NS      d.root-servers.net.

.                       105602  IN      NS      b.root-servers.net.

.                       105602  IN      NS      l.root-servers.net.

.                       105602  IN      NS      a.root-servers.net.

.                       105602  IN      NS      m.root-servers.net.

.                       105602  IN      NS      f.root-servers.net.

.                       105602  IN      NS      c.root-servers.net.

.                       105602  IN      NS      h.root-servers.net.

;; Received 512 bytes from 10.0.0.1#53(10.0.0.1) in 22 ms
hk.                     172800  IN      NS      b.dns.tw.

hk.                     172800  IN      NS      z.hkirc.net.hk.

hk.                     172800  IN      NS      ns1.hkirc.net.hk.

hk.                     172800  IN      NS      ns2.cuhk.edu.hk.

hk.                     172800  IN      NS      ns2.hkirc.net.hk.

hk.                     172800  IN      NS      sec3.apnic.net.

hk.                     172800  IN      NS      adns1.berkeley.edu.

hk.                     172800  IN      NS      hk-ns.pch.net.

;; Received 500 bytes from 128.63.2.53#53(h.root-servers.net) in 245 ms


google.com.hk.          28800   IN      NS      NS2.GOOGLE.COM.

google.com.hk.          28800   IN      NS      NS3.GOOGLE.COM.

google.com.hk.          28800   IN      NS      NS1.GOOGLE.COM.

google.com.hk.          28800   IN      NS      NS4.GOOGLE.COM.

;; Received 117 bytes from 137.189.6.21#53(ns2.cuhk.edu.hk) in 244 ms


www.google.com.hk.      86400   IN      CNAME   www-hk.l.google.com.

www-hk.l.google.com.    300     IN      A       74.125.237.24

;; Received 84 bytes from 216.239.38.10#53(NS4.GOOGLE.COM) in 191 ms
The output for the dig with trace is much more complex. The first thing to notice is that there are 13 servers in the top section. These are the actual root servers of the Internet and we queried them directly! Then it goes into the query of the hk domain; you can see all of the Hong Kong name servers that were resolved. From the Hong Kong name servers, it resolves directly to google.com.hk’s, resolving domains NS1 to NS4 of the google.com domain. These NS servers are called nameservers and they provide DNS functions for the domain name google.com. This shows that there are actually four DNS servers working in concert to provide DNS name resolution for google.com.hk!
DNS Caching
By now, you must have realized that this is nowhere near efficient enough. To query the root nodes every time you want to browse www.google.com.hk would be extremely taxing on the root DNS servers. You have seen the output of dig; there can be quite a bit of information for one web site alone. Now multiply that by the number of web sites on the Internet and then again by the number of people who browse the net. Take that number and multiply again for every Smartphone, nettop (Internet desktop), and Internet-enabled device out there. Needless to say, it’s quite a lot.
Although all of the core DNS servers are actually clusters of servers that respond to queries as a group (which gives them a lot of power and bandwidth), it’s still nowhere near enough to power every single DNS query for the whole planet! The solution is called caching. Caching means that your system will keep its own list of known servers and DNS servers to allow it to look them up from its own storage. This cuts down on the amount of time it would take to do a full walk of the DNS tree for a server you have visited before. It also reduces the number of queries sent to the primary nodes. For example, our server that has been doing the dig lookups of www.google.com.hk will already have in its memory the nameserver for the hk domain that it has looked up and the DNS entry for Google.
Querying your DNS Cache
If you are a regular Windows user (and who isn’t, willingly or otherwise), you can perform a simple query to inspect your current DNS cache. To show your current DNS cache, open a Windows command prompt and then execute ipconfig /displaydns.
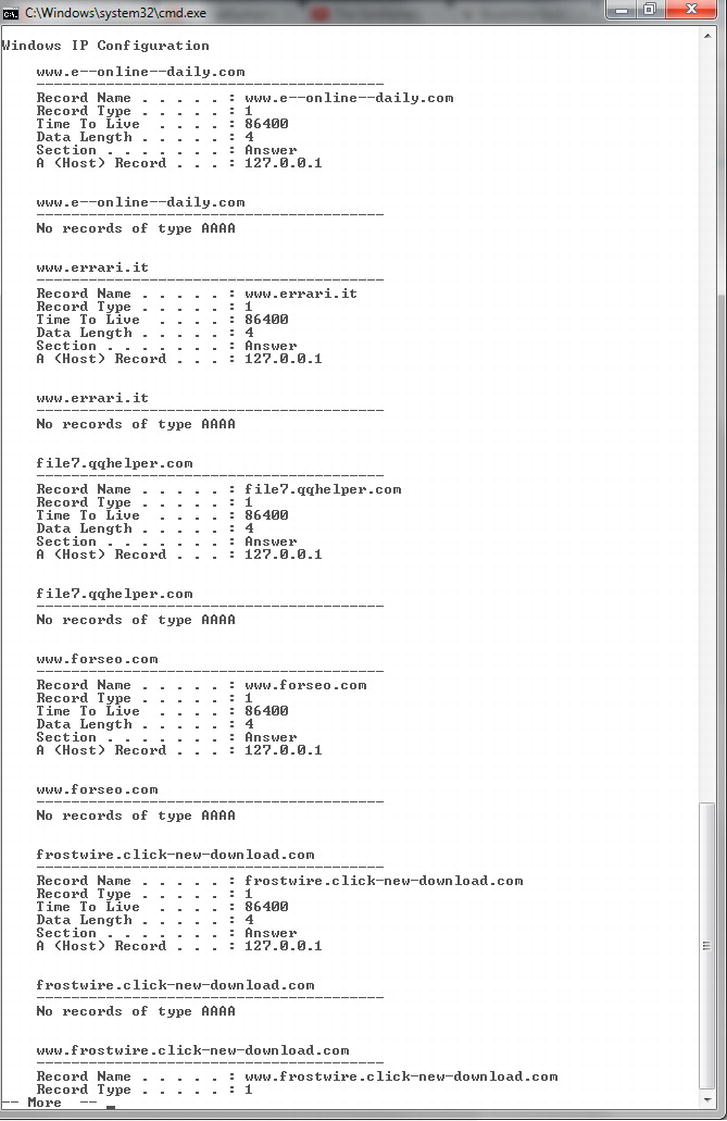
Figure 4-2. Windows DNS cache
Figure 4-2 shows a snippet from our DNS cache. As you can see, there are a large number of entries pointing to 127.0.0.1. This address is a special reserved IP address called a Loopback or Localhost address. Computers use the Loopback address as a quick way of referring to themselves. Having these web sites appear in our DNS cache with 127.0.0.1 means that they are resolved automatically to our local machine. As we obviously don’t run those sites and there isn’t a web server running on this machine, we will never be able to open a connection to the remote server. This can be an especially effective way to prevent your computer from connecting to unwanted servers such as those serving adverts on web pages.
If you wish to empty your DNS cache, you can execute ipconfig/flushdns. While this is never an ideal solution, it can be useful when web sites are not resolving because they have changed their IP address or moved.
DNS Cache in Linux
By default, many server distributions of Linux don’t come with DNS caching enabled. There are a number of applications that can perform this function; one of the easiest to install is nscd, the Name Service Cache Daemon. While we will cover nscd here, we don’t recommend running nscd on a DNS server because having cached addresses requires additional maintenance and adds nothing to the function of your DNS server.
To install nscd, execute the following code.
Ubuntu:
sudo apt-get install nscd
CentOS:
yum install nscd
You will also need to enable nscd caching for DNS by editing
/etc/nscd.conf and ensuring that the line
enable-cache hosts yes
is set within your configuration. To start, simply execute
/etc/init.d/nscd restart
Now that you have nscd running, you can perform the following commands to play with your DNS cache: nscd –g shows statistical information about usage rates of your cache and nscd -i hosts flushes and clears your DNS cache by invalidating all of the entries currently stored within it.
The Real Stuff
You may be wondering why we spent so much time covering DNS. Well, it’s really important. Without a fundamental understanding of what DNS is and how it is used on the Internet, you won’t be able to take full advantage of DNS load balancing. So, without further ado, let’s start configuring your DNS server.
The first thing you need to set up your DNS server is a Domain name, a static (unchanging) Internet-facing IP address, and another name server to provide lookups for your DNS Server. When you purchase a domain name, the registrar will often ask for an IP address to point to for your name server. This should be the static Internet-facing IP address of the server you are building now!
With this basic information in hand, you can begin. Probably the world’s most abundantly used DNS server is BIND, the Berkley Internet Naming Daemon.
BIND9
Start by installing BIND on your server!
Ubuntu:
apt-get install bind9
CentOS:
yum install bind
Now that you have installed BIND, you need to configure it. BIND is notorious for being hard to configure; while it can be complex, it’s not beyond the skills of mortal man to configure. To start, go to /etc/bind and check the file list. You can see there are a few files, but for your purposes you only really need to worry about a few.
bind.keysdb.0db.127db.255db.emptydb.localdb.rootnamed.confnamed.conf.default-zonesnamed.conf.localnamed.conf.optionsrndc.keyzones.rfc1918
CentOS doesn’t store its files in the same place as Ubuntu and instead stores them in /var/named. It also does not install the example configuration files directly for you; instead they can be found in /usr/share/doc/bind-9.x.x/sample/. You can copy the files over with
cp /usr/share/doc/bind-9.x.x/sample/named.conf /etc/

cp –rf /usr/share/doc/bind-9.x.x/sample/var/ /var/named
The list of files shows the standard config files plus some db files. These db files are the key to BIND; they are databases of key DNS entries. When you configure a DNS server, you create your own DNS database. A DNS database has two discrete sections, the first of which is the header and looks like the following:
$TTL    604800

@       IN      SOA     ns1.example.com. info.example.com. (

                            2011102401         ; Serial

                                  7200         ; Refresh

                                   900          ; Retry

                               2419200         ; Expire

                                604800)        ; Min

;
The first portion of a BIND database is the TTL, or Time To Live, flag. This is a throwback configuration and isn’t used by DNS for tracking. Its purpose is in fact duplicated by the expiry configuration. The 604800 represents 7 days (60 seconds *60 minutes *24 hours* 7 days) and it means that a server will keep this information in its own cache of nameserver information for 7 days.
After this comes @ IN SOA ns1.example.com. info.example.com. This line represents the domain you are managing. This line says that the domain @ (wildcard meaning the one hosted locally) is provided here; you are the Start of Authority server for the listed domain and are issuing as ns1.example.com; and the administrator can be contacted at [email protected]. (That’s not a typo. The e-mail @ symbol is denoted by a period in a BIND configuration file, as the @ symbol is used to donate a self reference.) Next is an open bracket, which MUST be on the same line as the SOA.
![]() Note In this example, there are periods at the end of the domain names. This is because you are providing fully qualified domain names. The period at the end is a required part of this syntax.
Note In this example, there are periods at the end of the domain names. This is because you are providing fully qualified domain names. The period at the end is a required part of this syntax.
DNS DB Header
The next section is about the information that will come from your nameserver. The first part is everyone’s favorite, the serial. The serial is a unique identifier placed in your DNS database that is the equivalent of a version tracking number. It provides a single field entry that allows other servers to determine if things have been updated and if they should perform a full refresh of their entries for your server. Every time you change your DNS db you must change the serial; this can’t be stressed enough. The format used in the previous example is the year, the month, the day, and then a two-digit revision number. This means on a given day you can theoretically go through 100 entries without issue—and that is normally plenty. When doing your initial testing, you can simply use incremental numbers from 1 onwards until you have a final version, which also removes any chance of needing to re-use a serial.
![]() Note Everyone forgets to change the serial (even when they are reminded mere seconds before saving their changes).
Note Everyone forgets to change the serial (even when they are reminded mere seconds before saving their changes).
Refresh
Refresh represents the amount of time a server should wait before querying this server again to perform another lookup. It is recommended that this number be between 1200 and 43200. This represents 30 minutes to 12 hours. Your example uses 2 hours as the refresh time, a value that represents a decent length for a user session.
Retry
Next is retry, which is the value that says how often this server should be retried if the server is unavailable when performing a refresh. Standard values range between 120 and 900, representing 2 to 15 minutes (although higher is possible).
Expire
After retry comes Expire. This is how long the entry should remain valid in another server before it should be re-queried. The expire value means that if a request to refresh the DNS data is made and the nameserver for this domain is down, then the current DNS information will still be available from the time of the last refresh until the time of the expire. The standard length of an expiry is from 1209600 to 2419200 (2-4 weeks); this means that DNS entries will last for plenty of time and continue working despite an extended outage of a domain’s nameserver.
Min
The final value is Min, which is the negative caching length value. So, if given a negative answer to a DNS query on a server, this is how long the negative answer should remain valid. This is a new addition in BIND9 and it won’t take a value over 10800 (3 hours).
In your example, you can see that, following the Min value, there needs to be a closing bracket ‘)’ on that line to close the header for the file. The semicolons represent comments, so anything after the semicolon is ignored. Now, onto the actual meat portion of a DNS database!
DNS Database Entries
Now that you know how the DNS data is to be managed by other servers, you can make a database of entries. A DNS database entry contains a few things.
- The name of the address you are providing the entry for.
- The keyword IN
- The type of record
- The value for that entry
Next you’ll see a large number of examples of a basic DNS configuration.
@                       IN      NS      ns1.example.com.

@                       IN      NS      ns2.example.com.


example.com.            IN      MX      10      mail.example.com.


example.com.            IN      A       123.123.123.123

mail                    IN      A       123.123.123.123
ns1                     IN      A       234.234.234.234

ns2                     IN      A       234.234.234.234


www                     IN      CNAME   example.com.

ftp                     IN      CNAME   example.com.
Here are four example styles of DNS entries: an NS entry that denotes a nameserver entry; an MX entry (which is a mail exchanger and is normally the mailserver for a domain); an A record that links an IP address to a name; and a CNAME entry, which is a Canonical Name entry or an alias.
![]() Note There are additional DNS types, but the ones covered here are all you should need for a basic to medium setup.
Note There are additional DNS types, but the ones covered here are all you should need for a basic to medium setup.
Nameserver (NS)
The first thing you will notice is the two nameservers have “@” symbols. These are self reference elements and both state that this server is both ns1.example.com and ns2.example.com. These entries allow you to serve the names of the nameservers to the public. Additionally, the address of this server has also been lodged with an upstream provider as the Authority on this domain. “Authority” in this case means that the server has the ability to speak as the authority as to where members of that domain may be contacted.
Mail Exchange (MX)
Note the number value in the MX entry. This is an additional field in MX entries called the pref, which is a simple performance and load balancing metric for name servers! This value (normally set to 10) says how much preference should be showed to a particular mail server. In this example, it represents the primary mail server for the domain. Sub mail servers would use values such as 20, 30, and so on.
A Records
Next are A records. These are the bread and butter of a DNS setup. They represent all the domain names that run under a domain’s header. In this example, there are entries for the fully qualified domain, the mail server, and ns1 and ns2. Any of the domain names that end in a period are considered to be fully qualified domain names, as discussed earlier; those without are sub domains of the fully qualified domain set in the header. This means that the entries for mail, ns1, and ns2 are actually entries for mail.example.com., ns1.example.com. and ns2.example.com..
![]() Note The IPv6 implications to DNS are covered in Chapter 14.
Note The IPv6 implications to DNS are covered in Chapter 14.
Canonical Name (CNAME)
The final entry that you are concerned with in this chapter is the CNAME entry. A CNAME entry takes a name just like an A entry, but instead of providing an IP address, it provides another name. This is the equivalent of saying that something is also the same IP address something else. So in the example, www.example.com. is the same as example.com., which is also the same as ftp.example.com.
Loading your DB
Once you have your DB file written correctly, you need to tell BIND that it should load it. The configuration file is /etc/bind/named.conf.default-zones (or /etc/named.conf if you’re on CentOS). This file is called a zone file. This file contains a list of entries that allow you to add multiple DNS databases, so you could in fact host multiple domains off the one DNS server. The format can be seen in the following example (remember for CentOS the files will point to /var/named/data/):f
zone "." {

        type hint;

        file "/etc/bind/db.root";

};


zone "localhost" {

        type master;

        file "/etc/bind/db.local";

};


zone "example.com " {

        type master;

        file "/etc/bind/db.example.com";

};
The zone file contains a list of entries for each zone that is owned by the server. The first two zones in this example are two internal references that contain entries for the root servers (db.root) and for your local machine’s internal DNS (db.local). The third entry is that of the example.com domain. The entry starts with zone “example.com”, which says that the entry below is for the zone example.com.
Following the zone header is a curly brace and then a type entry. For your purposes you will make a master entry, which says that the zone you are serving is the master authority for that domain. Finally, you need to link your own DB file that you have created. This is done the same way as when you linked the db you created earlier to the zone entry.
Checking the Config
Once you have written your config, you can check it with named-checkzone. The syntax is named-checkzone <Domain> <DB File>. An example of a working config is
root@archie:/var/log$ named-checkzone example.com /etc/bind/db.example.com

zone example.com/IN: loaded serial 2012013001

OK
root@archie:/var/log$ named-checkzone example.com /var/named/data/db.example.com

zone example.com/IN: loaded serial 2012013001

OK
Once you have checked over your config and linked it in the zone file (and double and triple checked that darn serial value), you can start or restart BIND.
Common Issues
To diagnose issues with your BIND installation, we suggest first reading over your system logfile (normally found in /var/log). Look for entries relating to Named and something akin to
“Jan 30 20:11:56 archie named[10120]: zone example.com.in-addr.arpa/IN: loaded serial

2012013001”.
This shows that the server started correctly, loaded the serial, and is serving that domain. However, read further and look for entries like “/etc/bind/db.example.com:12: ignoring out-of-zone data (example.com)”, which denotes that a portion of your DNS table has not loaded correctly. If so, perform the following checks:
- You are using semicolons for comments.
- The open bracket is on the first line.
- The close bracket is on the last line with the Min value.
- Your MX entries have MX values.
- All fully qualified domain names have periods on the end.
- Your zone name is the name of the domain you are trying to provide for, so if your db contains entries for
example.com., your zone should beexample.com.
Again, once you have made any changes, check again with named-checkzone.
Testing your DNS
Now that your DNS is running, you can test it by using the nslookup command. NS, as you’ll probably remember, is shorthand for name server, so you are doing a nameserver lookup. nslookup is a significantly cut-down version of dig. You could use dig in this situation, but we find that nslookup is just as effective (not to mention far easier) for these kind of simple queries. The usage of nslookup is nslookup <server to look for> <dns server to use>.
In this example, you are going to look up the example.com domain using the 127.0.0.1 special loopback address. (Yes, you’re going to talk to yourself!)
root@debian:/etc/bind# nslookup example.com 127.0.0.1

Server:         127.0.0.1

Address:        127.0.0.1#53


Name:   example.com

Address: 123.123.123.123
And that’s it! If you were unable to resolve the IP address for the domain you set up, check that BIND is running and that you have no errors. Go over the config checks, validate your BIND config (see “Common Issues” section for a refresher), and ensure you have updated (and triple and quadruple checked) your serial value.
DNS Load Balancing
As for the actual load balancing, it is fairly dumb in how it works. It uses a simple method called round robin to distribute connections over the group of servers it knows for a specific domain. It does this sequentially (by going first, second, third, etc.). To add DNS load balancing to your server, you simply need to add multiple A records for a domain. Yes, it really is that easy! BIND takes care of the rest!
For example, consider the following setup, which provides four servers that will resolve to the name example.com. As ever, when you configure your server, remember to check your config with named-checkzone and to increment your serial!
example.com.        IN      A       123.123.123.123

example.com.        IN      A       123.123.123.124

example.com.        IN      A       123.123.123.125

example.com.        IN      A       123.123.123.126
Or you can provide a number of IP addresses to one entry, like so:
example.com.        IN      A       123.123.123.123

                    IN      A       123.123.123.124

                    IN      A       123.123.123.125

                    IN      A       123.123.123.126
To check that your DNS load balancing has taken effect, you simply need to nslookup the address in question. Just as you did earlier, you can test with nslookup; your results should look something like the following:
root@archie:~# nslookup example.com 127.0.0.1

Server:         127.0.0.1

Address:        127.0.0.1#53


Name:   example.com

Address: 123.123.123.123

Name:   example.com

Address: 123.123.123.126

Name:   example.com

Address: 123.123.123.124

Name:   example.com

Address: 123.123.123.125
Advantages of DNS Load Balancing
DNS load balancing provides several important advantages.
- Simplicity: As mentioned earlier, there may be situations where you can simply increase your load by adding an additional duplicate system to allow you to process more traffic. Or you may have multiple low bandwidth Internet addresses that you route to one server to provide a larger amount of total bandwidth to the server.
- Easy to configure: As you have seen, configuring DNS load balancing is a breeze. You simply add the additional addresses into your DNS database and off you go! It can’t get much easier!
- Simple to debug: There are a plethora of tools that you can use to debug and work with DNS including dig, ping and nslookup. Additionally, BIND includes tools to validate your config, and all the testing can be done using the local loopback adapter.
- Builds into additional infrastructure: Because you have a web-based system, you will need to have a DNS server to have a domain name. This means that without a doubt you will have a DNS server at some point down the line. Adding DNS-based load balancing allows you to quickly extend using your existing platform!
Issues with DNS Load Balancing
DNS load balancing also has its fair share of limitations. As with everything we share with you in this book, you should consider a blended solution to maximize effectiveness, and you should use the information we provide to come up with a full plan on how to achieve maximum performance within your system.
- Stickiness: This is a problem suffered by dynamic applications and rarely affects static sites. As discussed in Chapter 2, HTTP (and thus the Web) is a stateless protocol. It has chronic amnesia and can’t remember from one request to the next. To get around this, you send a unique identifier to accompany each request. This identifier is the cookie, although there are other sneaky ways to achieve something similar. This unique identifier allows the web browser to keep a collection of information relating to your current interaction with the web site, all tied to that one key. The issue here is that this data isn’t available between servers, so if a new DNS request is made to determine the IP, there is no guarantee that you will return to the server that has all the previously established information.
- Processing load: As mentioned, you can wind up in a situation where one out of every two requests is a high intensity request, and one out of every two is easy. If the absolute worst possible situation occurs, all the high intensity requests could wind up going to only one of the servers and all the low intensity to the other. This is not a very balanced situation and something you should avoid lest you ruin the web site for half of the visitors.
- Fault tolerance. The DNS load balancer can’t tell if one web server goes down so it will still send traffic to the empty space left by the downed server. This means that half of all requests would die, and the end user could sit there refreshing to get to a working server ad infinitum.
So given all the issues, why use DNS load balancing at all? Well, it’s a very simple system and that really counts for something. You don’t need to debug a complicated infrastructure to figure out what went wrong; it should be pretty easy to spot. Simplicity is highly underrated, and this simple form of load balancing might be more than sufficient or can be used as one part of a much larger load balancing effort.
Summary
This chapter covered the configuration and usage of the Berkeley Internet Naming Daemon (BIND to its friends) to provide DNS for your domain. You now know the strengths and simplicity of configuring DNS load balancing and how you can do simple diagnostics to confirm that both your DNS and DNS load balancing are working.