
C H A P T E R 11
SSL Load Balancing
This chapter on SSL load balancing aims to provide you with an understanding of
- SSL and TLS: what they are and what they do.
- The advantages and disadvantages of encryption.
- What public-key cryptography is and how it relates to encryption online.
- Why there is a need for TLS load balancing.
- How to load balance a TLS connection.
TLS is an important part of the infrastructure of the Internet. And with the ever-increasing focus on security and privacy it is essential to be able to provide this for your users while minimizing the impact to your web site. After all, what good is a web site that is so secure you can't use it?
This chapter will provide you with a good working knowledge of SSL so that you can offer security and privacy to your users. You'll also learn how to configure a SSL system to negate some of the performance impacts of providing SSL to your user base.
What are SSL and TLS?
First you need to understand TLS and SSL! TLS stands for Transport Layer Security and refers to the protocol that is used to provide secure connectivity over the Internet. SSL is the predecessor protocol to TLS and stands for Secure Socket Layer. Given that TLS is the more modern protocol, you might be wondering why we called this chapter “SSL Load Balancing.”
This is one of those Internet history moments: in this instance I'm not referring to the TLS protocol but the most popular implementation of TLS called OpenSSL. This historic throwback also appears in many systems that still refer to their TLS implementation as an SSL implementation. Now that you understand the naming and background, we can begin in earnest.
TLS as a security protocol is an implementation of public-key cryptography; it aims to provide secure communications and the ability to validate that a given message comes from the indented sender (this last part is called non-repudiation). TLS as a protocol sits on top of TCP and UDP (for information on TCP and UDP please see Chapter 10 on network load balancing) to provide security to the communications that are occurring over them.
This is extremely important as neither TCP nor UDP provide any security; they are, by design, simply data transportation protocols. TLS and SSL as forms of secure communications rely on the security of public-key cryptography, which provides you with the ability to secure communications and validate senders. To understand how a TLS connection is established and functions, you need to understand public-key cryptography.
Public-Key Cryptography
Public-key cryptography, or asymmetric cryptography, is a form of mathematically derived encryption. That's a lot of terms all at once, so I'll start from the beginning. The purpose of this type of cryptography is to create a key (think password) that is used to change the content of a given message so that you can't change it back without knowing the key.
The use of one secret key to alter (encrypt) the content of a message is called symmetric key encryption because the key used to encrypt and decrypt is the same. Asymmetric key cryptography differs from symmetric key cryptography because, as you would expect given the names, it uses two different keys: one to encrypt and another to decrypt.
The big jump here is that only the decryption key is secret (called the private key); the other key is made “public,” thus the name. This means that anyone can create a message, secure it, and send it with the knowledge that only the intended recipient will be able to read it—and all using publically available information. The reason all this is possible is that the two keys are mathematically related, with the public key being derived from the private key. It is this relationship that makes the private key the only thing that can decrypt messages encrypted with the public key.
We will not go into the particular mathematics involved—that would take more than a full chapter—but public-key cryptography uses number factorization and discreet logarithm problems to create keys that are linked; knowing the public key will not allow someone to readily divine the private key. Figure 11-1 shows how public-key cryptography works at a high level.
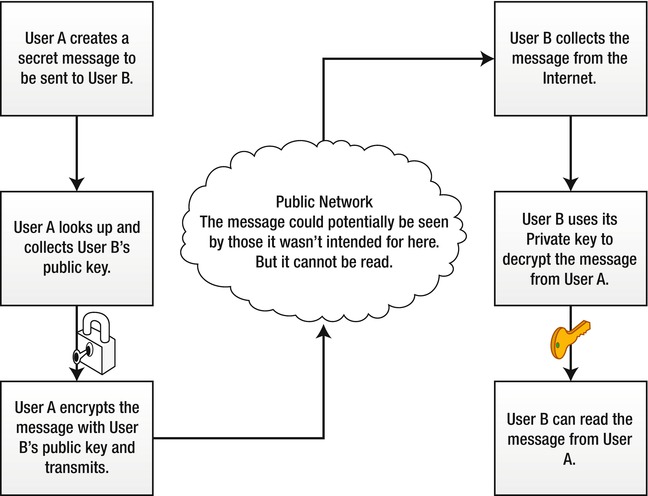
Figure 11-1. Public key cryptography overview
Trust and Certificate Authorities
At this point, you have established that you can create a secure one-way communication using a public key. The duplication of having two of these sets of communications at once would allow you to have secure two-way communication. However, even if you exchange one set of keys over the secure channel—say you collect a public key from an end user after establishing a connection—how can you be certain that the person you are sending the message to is indeed the person you WANT to send it to—and not just some impersonator who has released a public key and says they are the one with whom you wish to communicate?
This is where trust comes in. Trust is the basis on which the secure portion of the Internet works.
The concept is similar to a spider's web. To begin with, you start with highly trusted groups called certificate authorities (CAs, for short). These CAs are trusted third parties and act to vouch that the owner of a web site is the one whose key you have by issuing them a digital certificate that contains the web site name and public key. These CAs issue what are called root certificates that are installed into your browser's cache of certificates.
When you wish to make a connection via TLS with a web site, you download its certificate, ensure it is the certificate for the site you are visiting, validate that it comes from a known and trusted certificate authority, and then establish a secure connection.
TLS Encryption
Now that you have an understanding of public-key cryptography, you can look at TLS encryption.
- TLS establishes its connections by performing a secure handshake, like that used by TCP, where cryptographic protocols are set and keys exchanged.
- The handshake begins with the client sending a request along with a list of the common cryptographic systems that are available to it.
- The server picks the strongest cryptographic system available from the list and informs the client of the decision.
- The server sends back its digital certificate as a form of ID. The certificate normally contains the server name, the server's public encryption key, and a trusted authority who can vouch for the certificate.
- The client may contact the server that issued the certificate (the trusted CA, as above) and confirm the validity of the certificate before proceeding.
- In order to generate the session keys used for the secure connection, the client encrypts a random number with the server's public key and sends the result to the server. Only the server should be able to decrypt it with its private key.
- From the random number, both parties generate key material for encryption and decryption.
This handshake will last for the duration of the connection and provides both ends of the connection with the ability to communicate securely, knowing only the other party can see the contents of their conversation.
TLS Load Balancing
Now that you understand what goes into encrypting something using TLS, you can see that it adds a significant layer of complexity to a normal HTTP connection. The complexities exist both in the establishment and in the effort spent to encrypt and decrypt a transaction. Thus the load placed on a normal HTTP server can be significantly increased with the added overhead of a TLS layer of communications.
This means that there is real benefit in load balancing the TLS portion of a communication as it will alleviate a significant amount of stress from your servers. The unfortunate thing about SSL load balancing is that it introduces a requirement that each connection needs to continue using one certificate and one session, meaning you can't readily divert SSL traffic between servers. Given the above, there are two ways that you can continue working on SSL going forward. These methods are called SSL acceleration and SSL termination.
SSL termination refers to setting a termination point for an SSL connection and then setting these connections to be passed to your web servers. There are several ways to manage this, but the most common is the use of a reverse proxy, which is simply a server that acts as the secure face of your web site, deals with the SSL portion of the connections, and forwards normally insecure connections back to your site.
In short, you can create a point to terminate all SSL to your web site before sending it to your servers, which means they simply don't have to deal with it.
SSL acceleration, on the other hand, involves specialized hardware. It means adding a specialized cryptographic processing card to your server and then directing all the SSL processing to be done by this piece of hardware. These two systems have several implications between them that you need to be aware of when choosing which path to go down.
Both require that on top of ensuring that your traffic is load balanced, you need to establish connection persistence to allow one client to be constantly connect with the server providing its SSL connection.
SSL termination implications include the following:
- It creates an insecure area between your end user and your server, which needs to be taken into account.
- Depending on your setup, it can require more or less hardware; it will always require an additional server at minimum.
SSL acceleration implications are more cut and dry.
- You will need an SSL accelerator per server that you wish to work with.
- Your web server will need to support the particular web server you are working with.
Configuring SSL on Your Web Server
In order to use SSL on your server, you need to have configured your server to use a set of digital certificates and to accept incoming HTTPS connections. The following steps will allow you to create your own self-signed certificate.
![]() Warning A self-signed certificate provides no validity to users that you are who you say you are. It will show SSL warnings with regard to your web site on your client's browsers. If you wish to avoid these, you need to purchase a digital certificate and install it in the same manner used to install the self-signed certificates (discussed next).
Warning A self-signed certificate provides no validity to users that you are who you say you are. It will show SSL warnings with regard to your web site on your client's browsers. If you wish to avoid these, you need to purchase a digital certificate and install it in the same manner used to install the self-signed certificates (discussed next).
To begin, you will need to have OpenSSL installed; this can be done with your favorite package manager. To start creating an SSL certificate, perform the following and answer all the questions the application puts to you:
openssl genrsa -des3 -out private.key 1024

openssl req -new -key private.key -out private.csr

cp private.key private.key.bkp

openssl rsa -in private.key.bkp -out private.key
![]() Note You can change the number of bits encryption by modifying the 1024 at the end; you simply need to use a factorial of 2 such as 512, 1024, 2048, etc.
Note You can change the number of bits encryption by modifying the 1024 at the end; you simply need to use a factorial of 2 such as 512, 1024, 2048, etc.
The previous code has created a private.key file and a private.csr file, which are your private key and your certificate signing request. The .key file uses a 1024-bit number as the encryption key. It has also removed the password you added upon generation. This is very useful when adding it to a web server because you will be asked for the key on a restart of your web server.
Now that you have created the key, you will need to create a certificate. The following command will create a certificate valid for 365 days:
openssl x509 -req -days 365 -in private.csr -signkey private.key -out private.crt
Here is our example execution of the steps to create a new key:
root@loadbalancer:~# openssl genrsa -des3 -out private.key 1024

Generating RSA private key, 1024 bit long modulus

.....................++++++

.++++++

e is 65537 (0x10001)

Enter pass phrase for private.key:

Verifying - Enter pass phrase for private.key:

root@loadbalancer:~# openssl req -new -key private.key -out private.csr

Enter pass phrase for private.key:

You are about to be asked to enter information that will be incorporated

into your certificate request.

What you are about to enter is what is called a Distinguished Name or a DN.

There are quite a few fields but you can leave some blank

For some fields there will be a default value,

If you enter '.', the field will be left blank.

-----

Country Name (2 letter code) [AU]:

State or Province Name (full name) [Some-State]:

Locality Name (eg, city) []:

Organization Name (eg, company) [Internet Widgits Pty Ltd]:

Organizational Unit Name (eg, section) []:

Common Name (eg, YOUR name) []:

Email Address []:


Please enter the following 'extra' attributes

to be sent with your certificate request

A challenge password []:

An optional company name []:

root@loadbalancer:~# cp private.key private.key.bkp

root@loadbalancer:~# openssl rsa -in private.key.bkp -out private.key

Enter pass phrase for private.key.bkp:

writing RSA key

root@loadbalancer:~# ls

private.csr  private.key  private.key.bkp
root@loadbalancer:~# openssl x509 -req -days 365 -in private.csr -signkey private.key -out private.crt

Signature ok

subject=/C=AU/ST=Some-State/O=Internet Widgits Pty Ltd

Getting Private key

root@loadbalancer:~# ls

private.crt  private.csr  private.key  private.key.bkp

root@loadbalancer:~#
Now that you have created a certificate, you can install it into your Apache config. On Ubuntu this means executing
sudo mv privkey.key /etc/ssl/private/

sudo mv private.crt /etc/ssl/certs/
On Centos this means executing
mkdir –p /etc/ssl

ln -s /etc/pki/tls/private/ /etc/ssl/private/

mv private.key /etc/ssl/private/

mv private.crt /etc/ssl/certs/
![]() Note Centos differs slightly from Ubuntu but still maintains a
Note Centos differs slightly from Ubuntu but still maintains a /etc/ssl/certs directory. For consistency's sake, we have simply created the second link for the /etc/ssl/private directory.
Now that you have added your keys, you can begin using them.
Apache
Within Apache you need to modify your server configuration by creating a virtual host entry for a HTTPS server. Here is a short example:
<IfModule mod_ssl.c>

<VirtualHost *:443>

    DocumentRoot /var/www/example.com

    ServerName example.com

    SSLEngine on

    SSLCertificateFile /etc/ssl/certs/private.crt

    SSLCertificateKeyFile /etc/ssl/private/private.key

</VirtualHost>

</IfModule>
Note that there is an IfModule command, which says if you have loaded mod_ssl.c you will create this virtual host. Please check that your httpd.conf loads mod_ssl by searching for
LoadModule ssl_module modules/mod_ssl.so
If this doesn't exist, you need to install mod_ssl using either
Centos:
yum install mod_ssl
then add the LoadModule line to your httpd.conf
or Ubuntu:
ln -s /etc/apache2/mods-available/ssl.conf /etc/apache2/mods-enabled/ssl.conf

ln -s /etc/apache2/mods-available/ssl.load /etc/apache2/mods-enabled/ssl.load
Following all this, restart your Apache server and check your log file. You should see something resembling
Apache/2.2.17 (Ubuntu) PHP/5.3.5-1ubuntu7.2 with Suhosin-Patch mod_ssl/2.2.17 OpenSSL/0.9.8o configured
The mention of mod_ssl shows that it has been added successfully.
Nginx
Within nginx, you simply need to add the following directive into your nginx config:
server {

  listen 443 default_server ssl;

  server_name localhost;

  root html;

  index index.html index.htm;


  ssl on;

  ssl_certificate      /etc/ssl/certs/private.crt;

  ssl_certificate_key  /etc/ssl/private/private.key;

}
It is also important to remember that if you are downloading nginx from your package manager to use one of the more complete bundles that includes SSL (such as nginx or ngnix-full). If you are compiling from source, be sure to add --with-http_ssl_module when you execute ./configure to begin your build, as this will compile the module.
SSL Acceleration
It's time to start working with SSL acceleration. SSL acceleration in this context requires additional specialized hardware to perform specialist cryptographic processing and thus give accelerated performance. We won't instruct you on how to install an SSL accelerator card, nor will we recommend any particular brands. There are more than a dozen brands; each has its own specific installation instructions and each will perform better at specific functions. To demonstrate how to configure SSL acceleration, we have found that there is a SSL accelerator included within the CPU of one of the test servers.
From this point, we will assume you have successfully set up the hardware and the web server of your choice. Next you'll learn how to enable an SSL accelerator within Apache and then in nginx.
Apache
Adding an SSL accelerator to Apache is relatively simple. Open your web site's Host or VirtualHost entry and add the following:
SSLCryptoDevice <Device>
Nginx
Adding an SSL accelerator to nginx is just as simple as in Apache. Open your web site's Server entry within the nginx config and add
ssl_engine <Device>
The Device directive is simply the device identifier that OpenSSL knows your SSL accelerator as. If your new device has not come with an OpenSSL device name, run the following:
root@ubuntu:/var/log# openssl engine

(aesni) Intel AES-NI engine (no-aesni)

(dynamic) Dynamic engine loading support
This lists the device names that your current OpenSSL configuration allows for. (In our case, we would probably use the aesni engine because Dynamic is a reserved name that allows for the specific loading of other modules dynamically without need for a re-initialization.)
The aesni engine is a SSL accelerator on board certain Intel processors that allows increased processing speed to AES transactions. (From this point, you can aesni to your config as the SSL device of your choice and your web server will use it to accelerate its SSL processing.)
SSL Termination
SSL termination represents the use of a server to act as your SSL endpoint. You set this up to process all your SSL connections before they reach your web servers (meaning they won't need to perform any of the SSL processing we have suggested and will simply function as normal HTTP web servers). The concept here is to create a de-militarized zone (or DMZ) behind your SSL server, as shown in Figure 11-2.
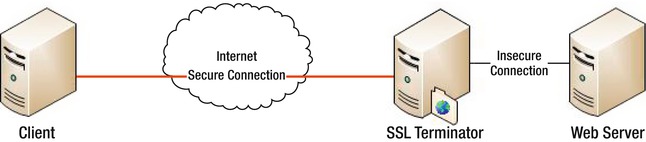
Figure 11-2. SSL terminator diagram
As you can see, there is a DMZ behind the SSL terminator where all the HTTPS traffic is decrypted. This means that you must have a secure environment within your DMZ or else some or all of the secure traffic you are sending can be intercepted. For your purposes, you will be using a piece of software called reverse proxy, which acts as a transparent pass-through. The reverse proxy strips the TLS off the packets and passes them forward, leaving everyone none the wiser of its actions.
The easiest reverse proxy to install is, in fact, nginx. We have found the setup and configuration of nginx to be incredibly straightforward and simple. Moreover, reusing the same pieces of software keeps it simple! To begin, install nginx.
Configuring Nginx
Now you will configure nginx in the vein of Figure 11-2. The configuration is relatively simple; you just need to add a new (or replace the existing) server config.
In Ubuntu, this is /etc/nginx/sites-enabled/default.
In Centos, this is /etc/nginx/nginx.conf.
![]() Reminder Do a backup before proceeding.
Reminder Do a backup before proceeding.
Open your nginx config and add the following (ensure that this is the only server listing for this host on port 443):
server {

        #Basic server information

        listen          443;

        server_name     memcache.plb.membrey.hk;

        #Enable SSL and set the details

        ssl             on;

        ssl_certificate      /etc/ssl/certs/private.crt;

        ssl_certificate_key  /etc/ssl/private/private.key;

        keepalive_timeout    60;


        #Logfiles

        access_log      /var/log/ssl-access.log;

        error_log       /var/log/ssl-error.log;


        location / {

         #setup the Proxy for our server

         #ADD THE WEB SERVERS LOCAL IP BELOW

                proxy_pass  http://192.168.1.2;
         #Timeout if the real server is dead

                proxy_next_upstream error timeout invalid_header http_500 http_502 http_503;


                # Basic Proxy Config

                proxy_set_header Host $host;

                proxy_set_header X-Real-IP $remote_addr;

                proxy_set_header X-Forwarded-For $proxy_add_x_forwarded_for;

                proxy_set_header X-Forwarded-Proto https;

                proxy_redirect     off;

      }

}
This config specifies a basic nginx web server that will take connections on port 443. It enables SSL with the certificates you have made and set up earlier. Finally, you set the root location (location /) as a proxy to your actual web server and use the HTTP protocol.
You then set the basic proxy configuration so it can send the default headers, and you also set the proxy to timeout if the back-end server is dead with the correct HTTP return codes.
Now that this is done, you can restart your nginx server with /etc/init.d/nginx restart.
Testing the SSL
Now it's time to test your SSL connection. Trying to telnet to port 443 is out, as telnet doesn't support SSL directly, so you need to use the OpenSSL application to test. Execute the following command (but change the hostname to your server's hostname):
openssl s_client -showcerts -connect memcache.plb.membrey.hk:443
![]() Note Press Ctrl+C to exit OpenSSL.
Note Press Ctrl+C to exit OpenSSL.
You should see something like this:
root@loadbalancer:~# openssl s_client -showcerts -connect memcache.plb.membrey.hk:443

CONNECTED(00000003)

depth=0 /C=AU/ST=Some-State/O=Internet Widgits Pty Ltd

verify error:num=18:self signed certificate

verify return:1

depth=0 /C=AU/ST=Some-State/O=Internet Widgits Pty Ltd

verify return:1

---

Certificate chain

 0 s:/C=AU/ST=Some-State/O=Internet Widgits Pty Ltd

   i:/C=AU/ST=Some-State/O=Internet Widgits Pty Ltd

-----BEGIN CERTIFICATE-----

MIICATCCAWoCCQDg0bNIdJnMPzANBgkqhkiG9w0BAQUFADBFMQswCQYDVQQGEwJB

VTETMBEGA1UECBMKU29tZS1TdGF0ZTEhMB8GA1UEChMYSW50ZXJuZXQgV2lkZ2l0

cyBQdHkgTHRkMB4XDTExMDgxMDEyMTAxMVoXDTEyMDgwOTEyMTAxMVowRTELMAkG

A1UEBhMCQVUxEzARBgNVBAgTClNvbWUtU3RhdGUxITAfBgNVBAoTGEludGVybmV0
IFdpZGdpdHMgUHR5IEx0ZDCBnzANBgkqhkiG9w0BAQEFAAOBjQAwgYkCgYEAvioR

IXxpypoKKsrtx9C020630ean+Wg+GQO1pH1TQIYKfIwYRpoGZ+92ABLYOz9ckIzc

PWTizr9NDl5VseUKFtFOCTnnSdIfRDzKCjGP0+n5fTDvRT6TM82AZkCC9t+aOa7v

KFCX/s8wave19C/3FVJnhlHiXTyg21PJxgzSfwMCAwEAATANBgkqhkiG9w0BAQUF

AAOBgQC4arPP069h1m9uRbZCeUwvgRNrsmLXvDGriE/LGZhrc7YdvSrSzSiwJJvE

0sJL2knID0pceLdqppF/6IjUj0XcbD2jn1v/qk2KcQZlsf727f2vjJVtcjipPxce

wYv03U6jjTJi0N+TBQDJS3oPsRg2CGEHLP3v4ecQTRFx9TLzQQ==

-----END CERTIFICATE-----

---

Server certificate

subject=/C=AU/ST=Some-State/O=Internet Widgits Pty Ltd

issuer=/C=AU/ST=Some-State/O=Internet Widgits Pty Ltd

---

No client certificate CA names sent

---

SSL handshake has read 1088 bytes and written 319 bytes

---

New, TLSv1/SSLv3, Cipher is DHE-RSA-AES256-SHA

Server public key is 1024 bit

Secure Renegotiation IS supported

Compression: NONE

Expansion: NONE

SSL-Session:

    Protocol  : TLSv1

    Cipher    : DHE-RSA-AES256-SHA

    Session-ID: A9DED7E88A5C30F9404749A0DF28DE526F1DE12F34999E76ED2BB6F6D6EA6EBC

    Session-ID-ctx:

    Master-Key: 015446465E9F9F95FA03DC4442ADD4EF34EA7B31F96133C859AFA7C2030643C1EAFF183CE6030EC3B6F451BE26FF4C65

    Key-Arg   : None

    Start Time: 1313017806

    Timeout   : 300 (sec)

    Verify return code: 18 (self signed certificate)

---

^C

root@loadbalancer:~#
Looking through it you can see all of the details of the certificate you added when you created it (in our case the defaults). If you are getting any errors, try the following:
- Go back over your configs; you may have mistyped something.
- Check and re-create your certificates and their storage location.
- Check that nginx has booted correctly and look over its logs for any errors.
Now you can try the next trick: loading your page.
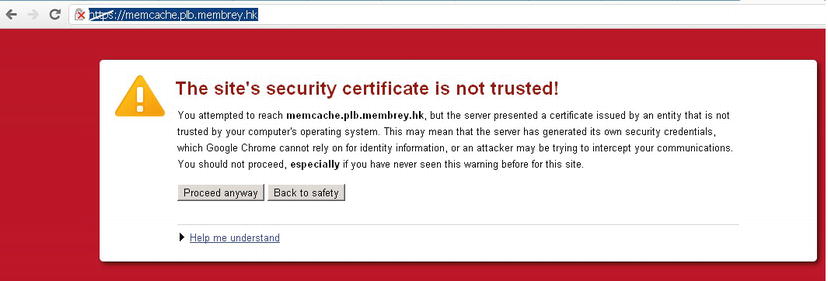
Figure 11-3. The greatest warning message ever (browser depending)!
The error in Figure 11-3 is an SSL error because you are using an untrusted self-signed certificate. This is great because it shows that TLS is WORKING!
If we press the proceed button, it will load the page of our web server. Everything works!
If it doesn't, check the following:
- That your web server is running and available on port 80 at the IP you specified.
- Ping testing between your SSL terminator and your web server.
- That your SSL connections are working as expected.
- If necessary, add the basic nginx web site into your config and attempt to connect to this via normal HTTP. If you can view it, this confirms your nginx is working and that the issue is with your web server.
- If your web site is using specialist headers (such as other CGIs), you may need to modify the proxy_set_header entries or add a new one.
Further Configurations
Now that you have set up the basic SSL terminator, you can add some additional features to improve its performance. These commands can be used in either Apache or nginx; both versions are shown here.
Engine
You can now combine the SSL accelerator settings from earlier into your SSL terminator, which is a great way to improve performance of your terminator. This can be enabled with the following:
Nginx: ssl_engine <Device>
Apache: SSLCryptoDevice <Device>
And, just as in the section on SSL acceleration, your currently available devices can be found with
openssl engine
Caching
You can allow browsers to reuse the same SSL session over a period, which cuts down on session establishment. But it does add the risk that those sessions can be reused or taken over after the initial user has closed off. To limit the potential for problems, you can also set a time limit on the life of these sessions.
Nginx
ssl_session_cache <options>
Within the ssl_session_cache command there are a number of options: off, none, builtin, and shared.
- Off means that you aren't offering SSL caching to clients.
- None means you lie; you offer SSL caching but actually perform a recalculation every time.
- Builtin means you use the built-in cache within a single OpenSSL worker. After the built-in, you need to provide a size such as builtin:1000, which provides a kilobyte.
- Shared means you use a shared cache over all of the OpenSSL worker processes. In this case, you need to provide a name for this shared cache and a size. OpenSSL suggests that 1MB of memory can support 4,000 simultaneous connections in cache, such as (shared:SSL:10m), which says you are creating a shared cache called SSL that will provide 10m of memory (approx 30,000 connections).
You can also combine built-in and shared memory by adding them together, such as (ssl_session_cache builtin:1000 shared:SSL:5m). The timeouts of these cached sessions are set with
ssl_session_timeout <time>
This can be set to something like ssl_session_timeout 600 or ssl_session_timeout 5m, which sets the timeout to 10 and 5 minutes, respectively. It is also important to note that the defaults for these parameters (if they are left unset) are
ssl_session_cache off

ssl_session_timeout 5m
Apache
SSLSessionCache <options>
Within SSLSessionCache you can set one of three options: none, dbm, or shm.
- None means session caching is unavailable.
- dbm means that to use a database file to cache all the sessions, the dbm is followed by a : and the name of a file to be used. This caching uses a hard disk file to store its cache so it's limited by your hard disk's speed.
- shm is a high performance mode of DBM that creates a file handle but stores the cache in RAM (which is much faster). This caching isn't supported on all platforms and you will need to check beforehand. The file is configured by a : and the filename; an optional size limit in bytes can be added after in brackets (), like so:
SSLSessionCache shm:/var/tmp/ssl_cache(1024000)
Timeouts are controlled with a time limit value with SSLSessionCacheTimeout and a value in sessions.
SSLSessionCacheTimeout <time>
The defaults for these options are
SSLSessionCache none

SSLSessionCacheTimeout 300
Protocols
You can limit the particular protocols that can be used to establish a TLS or SSL session to your SSL terminator with the ssl_protocols option. This command allows you to specify which protocols you wish to use and can therefore remove older protocols that may have weaknesses. (See the breaking of the Enigma cipher in World War II for a real life example!) The command simply requires you to specify the protocols you wish to support.
This command allows for all the protocols to be used:
Nginx: ssl_protocols SSLv2 SSLv3 TLSv1
Apache: SSLProtocol SSLv2 SSLv3 TLSv1
This command allows for only TLSv1 protocol to be used:
Nginx: ssl_protocols TLSv1
Apache: SSLProtocol TLSv1
Specific Ciphers
You can also limit the ciphers used (if, for example, you want to only use a specific set that works with your SSL accelerator). You can list the available ciphers to your OpenSSL implementation with
openssl ciphers
The specific lists of ciphers can be managed using ssl_ciphers.
Nginx: ssl_ciphers <OpenSSL Cyperspec>
Apache: SSLCipherSuite <OpenSSL Cyperspec>
The SSL cipher spec is a part of OpenSSL and is fairly complex. You can validate which spec you are using with the following command, which will list all the ciphers being used:
openssl ciphers -v '<OpenSSL Cyperspec>'
The basics of a cipher spec are ALL and cypher name, then the use of + to add and ! to remove. Finally, every item on this list is separated by a colon (:) so you can build them like this:
ALL:!DES which includes everything, except those that have DES as part of the cipher.
AES:+SHA which includes only the ciphers that are AES and SHA.
root@loadbalancer:~# openssl ciphers -v 'AES:+SHA'

ADH-AES256-SHA          SSLv3 Kx=DH       Au=None Enc=AES(256)  Mac=SHA1

DHE-RSA-AES256-SHA      SSLv3 Kx=DH       Au=RSA  Enc=AES(256)  Mac=SHA1

DHE-DSS-AES256-SHA      SSLv3 Kx=DH       Au=DSS  Enc=AES(256)  Mac=SHA1

AES256-SHA              SSLv3 Kx=RSA      Au=RSA  Enc=AES(256)  Mac=SHA1

ADH-AES128-SHA          SSLv3 Kx=DH       Au=None Enc=AES(128)  Mac=SHA1

DHE-RSA-AES128-SHA      SSLv3 Kx=DH       Au=RSA  Enc=AES(128)  Mac=SHA1

DHE-DSS-AES128-SHA      SSLv3 Kx=DH       Au=DSS  Enc=AES(128)  Mac=SHA1

AES128-SHA              SSLv3 Kx=RSA      Au=RSA  Enc=AES(128)  Mac=SHA1
AES:SHA, however, is very different; it includes both AES and SHA.
root@loadbalancer:~# openssl ciphers -v 'AES:SHA'

ADH-AES256-SHA          SSLv3 Kx=DH       Au=None Enc=AES(256)  Mac=SHA1

DHE-RSA-AES256-SHA      SSLv3 Kx=DH       Au=RSA  Enc=AES(256)  Mac=SHA1

DHE-DSS-AES256-SHA      SSLv3 Kx=DH       Au=DSS  Enc=AES(256)  Mac=SHA1

AES256-SHA              SSLv3 Kx=RSA      Au=RSA  Enc=AES(256)  Mac=SHA1

ADH-AES128-SHA          SSLv3 Kx=DH       Au=None Enc=AES(128)  Mac=SHA1

DHE-RSA-AES128-SHA      SSLv3 Kx=DH       Au=RSA  Enc=AES(128)  Mac=SHA1

DHE-DSS-AES128-SHA      SSLv3 Kx=DH       Au=DSS  Enc=AES(128)  Mac=SHA1

AES128-SHA              SSLv3 Kx=RSA      Au=RSA  Enc=AES(128)  Mac=SHA1

ADH-DES-CBC3-SHA        SSLv3 Kx=DH       Au=None Enc=3DES(168) Mac=SHA1

ADH-DES-CBC-SHA         SSLv3 Kx=DH       Au=None Enc=DES(56)   Mac=SHA1

EXP-ADH-DES-CBC-SHA     SSLv3 Kx=DH(512)  Au=None Enc=DES(40)   Mac=SHA1 export

EDH-RSA-DES-CBC3-SHA    SSLv3 Kx=DH       Au=RSA  Enc=3DES(168) Mac=SHA1

EDH-RSA-DES-CBC-SHA     SSLv3 Kx=DH       Au=RSA  Enc=DES(56)   Mac=SHA1

EXP-EDH-RSA-DES-CBC-SHA SSLv3 Kx=DH(512)  Au=RSA  Enc=DES(40)   Mac=SHA1 export

EDH-DSS-DES-CBC3-SHA    SSLv3 Kx=DH       Au=DSS  Enc=3DES(168) Mac=SHA1

EDH-DSS-DES-CBC-SHA     SSLv3 Kx=DH       Au=DSS  Enc=DES(56)   Mac=SHA1

EXP-EDH-DSS-DES-CBC-SHA SSLv3 Kx=DH(512)  Au=DSS  Enc=DES(40)   Mac=SHA1 export

DES-CBC3-SHA            SSLv3 Kx=RSA      Au=RSA  Enc=3DES(168) Mac=SHA1

DES-CBC-SHA             SSLv3 Kx=RSA      Au=RSA  Enc=DES(56)   Mac=SHA1

EXP-DES-CBC-SHA         SSLv3 Kx=RSA(512) Au=RSA  Enc=DES(40)   Mac=SHA1 export

RC4-SHA                 SSLv3 Kx=RSA      Au=RSA  Enc=RC4(128)  Mac=SHA1

NULL-SHA                SSLv3 Kx=RSA      Au=RSA  Enc=None      Mac=SHA1
In addition to these lists, you can use the HIGH, MEDIUM, and LOW keywords to list ciphers according to their strength.
Finally, as an example with our aesni engine, we want to use only AES ciphers so we can simply type 'AES' as our cipher suite; if we only want to use high-strength AES, we can type 'HIGH:+AES', like so:
root@loadbalancer:~# openssl ciphers -v 'HIGH:+AES'

ADH-DES-CBC3-SHA        SSLv3 Kx=DH       Au=None Enc=3DES(168) Mac=SHA1

EDH-RSA-DES-CBC3-SHA    SSLv3 Kx=DH       Au=RSA  Enc=3DES(168) Mac=SHA1

EDH-DSS-DES-CBC3-SHA    SSLv3 Kx=DH       Au=DSS  Enc=3DES(168) Mac=SHA1

DES-CBC3-SHA            SSLv3 Kx=RSA      Au=RSA  Enc=3DES(168) Mac=SHA1

DES-CBC3-MD5            SSLv2 Kx=RSA      Au=RSA  Enc=3DES(168) Mac=MD5

ADH-AES256-SHA          SSLv3 Kx=DH       Au=None Enc=AES(256)  Mac=SHA1

DHE-RSA-AES256-SHA      SSLv3 Kx=DH       Au=RSA  Enc=AES(256)  Mac=SHA1

DHE-DSS-AES256-SHA      SSLv3 Kx=DH       Au=DSS  Enc=AES(256)  Mac=SHA1

AES256-SHA              SSLv3 Kx=RSA      Au=RSA  Enc=AES(256)  Mac=SHA1

ADH-AES128-SHA          SSLv3 Kx=DH       Au=None Enc=AES(128)  Mac=SHA1
DHE-RSA-AES128-SHA      SSLv3 Kx=DH       Au=RSA  Enc=AES(128)  Mac=SHA1

DHE-DSS-AES128-SHA      SSLv3 Kx=DH       Au=DSS  Enc=AES(128)  Mac=SHA1

AES128-SHA              SSLv3 Kx=RSA      Au=RSA  Enc=AES(128)  Mac=SHA1
By now you can see the power you can add to your simple SSL terminator or SSL accelerator by fine-tuning the inner workings of your SSL system.
LVS and Your SSL Terminator
You have newly configured a SSL terminator. This terminator will provide your servers with a SSL face to the Internet. This means you will need to make some changes in order to allow you to link the new SSL terminator with your load balancer from before. The answer is actually very simple: you place the SSL terminator in front of the load balancer, as shown in Figure 11-4.
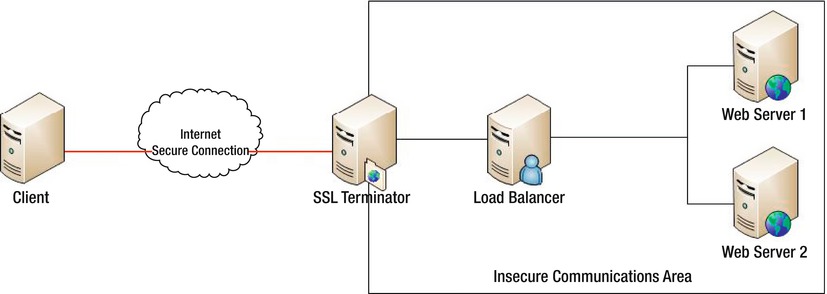
Figure 11-4. SSL terminator and load balancer
The only change you need to make is to let the SSL terminator be the face of your web site and ensure that the SSL terminator points to the load balancer. That's it. The connections will now flow transparently through each layer of your system, from SSL from the Internet to the terminator, and then it becomes a normal HTTP connection, just as the load balancer expects. An alternate way to structure this setup is to place the SSL servers between the load balancer and each web server, as shown in Figure 11-5.

Figure 11-5. Multiple SSL terminators
The key different between the two approaches is the number of SSL servers available for processing. The tradeoff is simply the number of servers involved; by adding a new server you can increase your potential load—at a higher cost. To configure this, simply replace the web servers' addresses with the SSL terminators' addresses in your load balancer, and then point your SSL terminators towards your web servers.
With these two configurations you can deploy both a load balancer and an SSL terminator in a manner that will allow you to tailor your system to allow you to increase your SSL throughput. You can expand upon this by using a combination of SSL terminators and SSL accelerators to minimize cost and maximize throughput.
Integrated Load Balancer/SSL Terminator
It is possible to host both your SSL terminator and load balancer on one server. Just alter the following from the nginx config for an SSL terminator from earlier:
proxy_pass http://127.0.0.1;
This will mean that any requests that come in as HTTPS are directed via the reverse proxy back to itself via the 127.0.0.1 on port 80 as HTTP traffic. From here, the load balancer will treat these as normal web connections and things can proceed as normal!
Summary
Over the course of this chapter you learned what SSL and TLS are, how they are valuable, and how they work. As part of this understanding you should also now be familiar with public-key cryptography and digital certificates. You should also now be able to generate your own self-signed digital certificates and then install them into your web server. Finally, you should be familiar with the SSL options available to you on a web server to increase performance, including SSL acceleration, and you should be able to configure an nginx server to work as a reverse proxy to accelerate an SSL connection.