Chapter 5
Working With Dates, Times, and Timers
This chapter covers how to work with dates and timers using the Foundation framework with Objective-C.
The recipes in this chapter will show you how to:
- Create today’s date using
NSDate - Create custom dates using
NSDateComponents - Compare dates
- Convert strings to dates
- Format dates for display on user interfaces
- Add and subtract dates
- Use a timer to schedule repeating and non-repeating code
5.1 Creating a Date Object for Today
Problem
You need to represent today’s date in your application.
Solution
Use the NSDate class method date to create a date object instance for the current date.
How It Works
NSDate is a class that is generally used with other classes (covered in the upcoming recipes). By itself, NSDate can get today’s date, which you can use to present to the console or to the user. To get today’s date, use the date function and assign the results of that to an NSDate object variable.
NSDate *todaysDate = [NSDate date];
See Listing 5-1 for the code.
The Code
Listing 5-1. main.m
#import <Foundation/Foundation.h>


int main (int argc, const char * argv[])

{


   @autoreleasepool {


        NSDate *todaysDate = [NSDate date];


        NSLog(@"Today's date is %@", todaysDate);


}

    return 0;

}
Usage
To use this code, build and run your Mac app from Xcode. View the log to see today’s date printed out.
Today's date is 2012-06-27 13:14:30 +0000
5.2 Creating Custom Dates by Component
Problem
You need to reference dates other than the current date in your application.
Solution
Use NSDateComponents to define a specific date and then use NSCalendar with your date components to return an NSDate object reference that you can use in your application.
How It Works
To create custom dates, you need to use three Foundation classes: NSDate, NSDateComponents, and NSCalendar. NSDate acts as the most basic class here to represent dates.
The NSDateComponents class represents the details that make up a date and time: day, month, year, and hour. NSDateComponents has many date and time details that you can set to completely customize your date.
The NSCalendar class is used to represent a real world calendar. This is used to manage the complexities involved with working with calendars. You can specify what calendar to use or simply get the calendar in use by the users’ system. Usually, you can assume that you are working with the Gregorian calendar, but you may specify other calendars like the Hebrew or Islamic calendar instead.
To create a custom date, the first thing you do is create a new instance of NSDateComponents.
NSDateComponents *dateComponents = [[NSDateComponents alloc] init];
Then you set all the properties of interest for the custom date. In this recipe, I’m setting the components necessary to represent the original iPhone release date in California, USA.
dateComponents.year = 2007;

dateComponents.month = 6;

dateComponents.day = 29;

dateComponents.hour = 12;

dateComponents.minute = 01;

dateComponents.second = 31;

dateComponents.timeZone = [NSTimeZone timeZoneWithAbbreviation:@"PDT"];
All you need to do here is use dot notation to set the date properties that you are interested in. The last property requires a special NSTimeZone object. You can specify any time zone that you wish or simply leave this property alone to use the system time zone.
Finally, to actually create your NSDate object, you need a reference to a calendar (usually the current system calendar). You get this reference with the currentCalendar message, [NSCalendar currentCalendar]. Once you have that, you use the dateWithComponents: function to get the date object that matches the specifications that you set out with your date components.
NSDate *iPhoneReleaseDate = [[NSCalendar currentCalendar]

dateFromComponents:dateComponents];
See Listing 5-2 for the code.
The Code
Listing 5-2. main.m
#import <Foundation/Foundation.h>


int main (int argc, const char * argv[])

{


    @autoreleasepool {


        NSDateComponents *dateComponents = [[NSDateComponents alloc] init];

        dateComponents.year = 2007;

        dateComponents.month = 6;

        dateComponents.day = 29;

        dateComponents.hour = 12;

        dateComponents.minute = 01;

        dateComponents.second = 31;

        dateComponents.timeZone = [NSTimeZone timeZoneWithAbbreviation:@"PDT"];


        NSDate *iPhoneReleaseDate = [[NSCalendar currentCalendar]

dateFromComponents:dateComponents];


        NSLog(@"The original iPhone went on sale: %@", iPhoneReleaseDate);


    }

    return 0;

}
Usage
To use this code, build and run your Mac app from Xcode. You can see the printout of the iPhone release date by inspecting the log.
The original iPhone went on sale: 2007-06-29 19:01:31 +0000
5.3 Comparing Two Dates
Problem
In your application, you have at least two dates and you need to know how they relate to each other. For instance, did one date come before another? How many days separate these two dates?
Solution
For simple comparisons, use the built-in NSDate comparison functions. To figure out how many days have passed since another date, you need a reference to the system calendar as well as both dates.
How It Works
For this recipe, I’m going to assume that you have the iPhone release date set up still from Recipe 5.2. Let’s compare it to today’s date. You can get today’s date by using the NSDate function date.
The first comparison is whether the iPhone release date was today or not. To find that out, use the isEqualToDate: function and pass it the date that you would like to compare. This function returns a BOOL.
NSDate *todaysDate = [NSDate date];


if([todaysDate isEqualToDate:iPhoneReleaseDate])

    NSLog(@"The iPhone was released today!");

else

    NSLog(@"The iPhone was released on some other date");
To find out if your date is earlier than another date, use the earlierDate: function with the other date as a parameter. This function returns whatever date is the earlier date.
You can also do the reverse to find out which date is the later date.
NSDate *laterDateIs = [todaysDate laterDate:iPhoneReleaseDate];
To find out the number of seconds that separate one date from another, use timeIntervalSinceDate: passing the second date as a parameter. You get a double value equal to the number of seconds between both dates. This is a typedef called NSTimeInterval (you will see NSTimeInterval referenced in other date methods).
You can get richer detail in date comparisons by using the system calendar along with the NSDateComponents class. This gives you the time between two dates in the format that you need. So, if you want to know the number of days, hours, minutes, years, months, or some combination of these, you are in luck.
The first step is getting a reference to the user’s system calendar.
NSCalendar *systemCalendar = [NSCalendar currentCalendar];
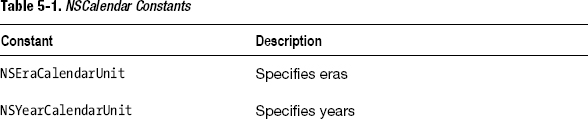
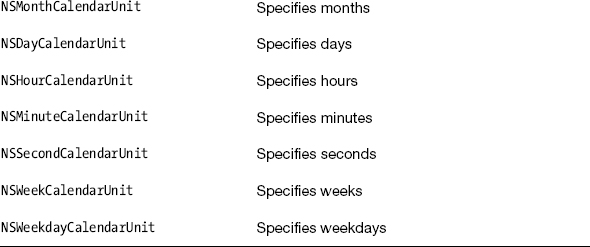
Next, specify the units you want to use via a bitwise OR of NSCalendar constants.
unsigned int unitFlags = NSYearCalendarUnit | NSMonthCalendarUnit |

NSDayCalendarUnit;
NOTE: Bitwise operations are a way of working with information at a very low level in binary. As you may know, computers represent information in a series of ones and zeros (such as 00000011 for the number three). Bitwise operators compare binary representations of two pieces of information and create a result based on these comparisons. Bitwise OR means that result has a one if either of the pieces of information has a one.
In other words, I want to see the time separating my two dates by year, month, and day. See Table 5-1 for a list of constants that you can use here.
You can use the NSCalendar function components:fromDate:toDate:options to return an NSDateComponents object filled with data that describes the time difference between the two dates based on what NSCalendar constants you specified.
NSDateComponents *dateComparisonComponents = [systemCalendar components:unitFlags

                                                               fromDate:iPhoneReleaseDate

                                                                 toDate:todaysDate

                                                                options:NSWrapCalendarComponents];
You can access the corresponding properties to get the information you need. For instance, to get the number of years, look at the dateComparisonComponents.year property. See Listing 5-3 for the code.
The Code
Listing 5-3. Caption
#import <Foundation/Foundation.h>


int main (int argc, const char * argv[])

{


    @autoreleasepool {


        NSDateComponents *dateComponents = [[NSDateComponents alloc] init];

        dateComponents.year = 2007;

        dateComponents.month = 6;

        dateComponents.day = 29;

        dateComponents.hour = 12;
        dateComponents.minute = 01;

        dateComponents.second = 31;

        dateComponents.timeZone = [NSTimeZone timeZoneWithAbbreviation:@"PDT"];


        NSDate *iPhoneReleaseDate = [[NSCalendar currentCalendar]

dateFromComponents:dateComponents];


        NSLog(@"The original iPhone went on sale: %@", iPhoneReleaseDate);


        NSDate *todaysDate = [NSDate date];


        NSLog(@"Today's date is: %@", todaysDate);


        if([todaysDate isEqualToDate:iPhoneReleaseDate])

            NSLog(@"The iPhone was released today!");

        else

            NSLog(@"The iPhone was released on some other date");


        NSDate *earlierDateIs = [todaysDate earlierDate:iPhoneReleaseDate];


        NSLog(@"The earlier date is: %@", earlierDateIs);


        NSDate *laterDateIs = [todaysDate laterDate:iPhoneReleaseDate];


        NSLog(@"The later date is: %@", laterDateIs);


        NSTimeInterval timeBetweenDates = [todaysDate

 timeIntervalSinceDate:iPhoneReleaseDate];


        NSLog(@"The iPhone was released %f seconds ago", timeBetweenDates);


        NSCalendar *systemCalendar = [NSCalendar currentCalendar];


        unsigned int unitFlags = NSYearCalendarUnit | NSMonthCalendarUnit|

 NSDayCalendarUnit;


        NSDateComponents *dateComparisonComponents =

        [systemCalendar components:unitFlags

                          fromDate:iPhoneReleaseDate

                            toDate:todaysDate

                           options:NSWrapCalendarComponents];


        NSLog(@"The iPhone was released %ld years, %ld months and %ld days ago",

              dateComparisonComponents.year,

              dateComparisonComponents.month,

              dateComparisonComponents.day

              );


    }

    return 0;
}
Usage
To use this code, build and run your Mac app from Xcode. View the log messages to see the dates and the results of the comparisons between them.
The original iPhone went on sale: 2007-06-29 19:01:31 +0000

Today's date is: 2012-06-27 20:54:56 +0000

The earlier date is: 2007-06-29 19:01:31 +0000

The later date is: 2012-06-27 20:54:56 +0000

The iPhone was released on some other date

The iPhone was released 143776405.074785 seconds ago

The iPhone was released 4 years, 6 months and 20 days ago
Note that your output messages will look different than mine because you will be running this code at a different date than me.
5.4 Converting a String to a Date
Problem
You have a string with date information from a strings file and you would like to use this information as a date object.
Solution
Use NSDateFormatter to specify the string format and create the new date object.
How It Works
For this recipe, let’s assume that you have date information stored as a string.
NSString *dateString = @"02/14/2012";
First, you need a date formatter, so use the NSDateFormatter class to create one.
NSDateFormatter *df = [[NSDateFormatter alloc] init];
Then set the dateFormat property with the format of your string.
df.dateFormat = @"MM/dd/yyyy";
NOTE: Date formatters use the Unicode date format patterns. See http://unicode.org/reports/tr35/tr35-10.html#Date_Format_Patterns for a complete list of the available date format patterns.
To create the date object, use the dateFromString: date formatter function.
NSDate *valentinesDay = [df dateFromString:dateString];
See Listing 5-4 for the code.
The Code
Listing 5-4. Caption
#import <Foundation/Foundation.h>


int main (int argc, const char * argv[])

{


    @autoreleasepool {


        NSString *dateString = @"02/14/2012";


        NSDateFormatter *df = [[NSDateFormatter alloc] init];


        df.dateFormat = @"MM/dd/yyyy";


        NSDate *valentinesDay = [df dateFromString:dateString];


        NSLog(@"Valentine's Day = %@", valentinesDay);


    }

    return 0;

}
Usage
To use this code, build and run your Mac app from Xcode. View the log message to see the date object that was created from the string.
Valentine's Day = 2012-02-14 05:02:00 +0000
Your result may appear different than mine as this is based on your local timezone.
5.5 Formatting Dates for Display
Problem
You would like to present your date objects to your user in a format that they recognize and one that looks good in your user interface.
Solution
Use NSDateFormatter to create date formats and get data objects formatted as strings that you can present to your users.
How It Works
You specify date formatter dates using the same Unicode data format patterns that you used in Recipe 5.4. So, if you have the date from Recipe 5.4 already in but you want a different format presented to the user, you can set the date format like this:
df.dateFormat = @"EEEE, MMMM d";
This presents the weekday name of the week, the name of the month, and the numerical day that this date falls on.
To see the results, use the NSDateFormatter’s stringFromDate: function.
NSLog(@"Another Formatted Valentine's Day = %@", [df

stringFromDate:valentinesDay]);
This presents the date in a format like this:
Tuesday, February 14
See Listing 5-5 for the code.
The Code
Listing 5-5. Caption
#import <Foundation/Foundation.h>


int main (int argc, const char * argv[])

{


    @autoreleasepool {


        NSString *dateString = @"02/14/2012";


        NSDateFormatter *df = [[NSDateFormatter alloc] init];


        df.dateFormat = @"MM/dd/yyyy";


        NSDate *valentinesDay = [df dateFromString:dateString];


        NSLog(@"Unformatted Valentine's Day = %@", valentinesDay);


        NSLog(@"Formatted Valentine's Day = %@", [df stringFromDate:valentinesDay]);


        df.dateFormat = @"EEEE, MMMM d";


        NSLog(@"Another Formatted Valentine's Day = %@",

[df stringFromDate:valentinesDay]);


    }

    return 0;

}
Usage
To use this code, build and run your Mac app from Xcode. View the log message to see the formatted date objects.
Unformatted Valentine's Day = 2012-02-14 05:00:00 +0000

Formatted Valentine's Day = 02/14/2012

Another Formatted Valentine's Day = Tuesday, February 14
5.6 Adding and Subtracting Dates
Problem
You want to add or subtract dates in your application.
Solution
Use the NSDateComponents and NSCalendar classes along with your date object to add or subtract dates. NSDateComponents specifies a time length (one day, one week, or another time interval). NSCalendar gives you a method to create a new date using the user’s calendar along with the specification that you set up in the date components object.
How It Works
Let’s keep working with the Valentine’s Day date that you created in Recipe 5.4. For this example, you want to get the date for one week before Valentine’s Day (perhaps to use as a shopping day).
The first thing you need is a date components object. The alloc and init constructor is used to create this.
NSDateComponents *weekBeforeDateComponents = [[NSDateComponents alloc] init];
To work with the interval, you can set any of the properties that you need. For this example, you are only interested in subtracting one week so set the week property of the date components object to -1.
weekBeforeDateComponents.week = -1;
Now you can get the date for one week in the past by using the user’s calendar and the dateByAddingComponents:toDate:options: function.
NSDate *vDayShoppingDay = [[NSCalendar currentCalendar]

  dateByAddingComponents:weekBeforeDateComponents

                  toDate:valentinesDay

                 options:0];
This function returns a new date for the previous week. Also, note that to subtract dates you use this function with negative integers (there is no dateBySubtractingComponents). See Listing 5-6 for the code.
The Code
Listing 5-6. Caption
#import <Foundation/Foundation.h>


int main (int argc, const char * argv[])

{


    @autoreleasepool {


        NSString *dateString = @"02/14/2012";


        NSDateFormatter *df = [[NSDateFormatter alloc] init];


        df.dateFormat = @"MM/dd/yyyy";


        NSDate *valentinesDay = [df dateFromString:dateString];


        NSLog(@"Valentine's Day = %@", valentinesDay);


        NSDateComponents *weekBeforeDateComponents = [[NSDateComponents alloc] init];


        weekBeforeDateComponents.week = -1;


        NSDate *vDayShoppingDay = [[NSCalendar currentCalendar]

        dateByAddingComponents:weekBeforeDateComponents

                        toDate:valentinesDay

                       options:0];


        NSLog(@"Shop for Valentine's Day by %@", vDayShoppingDay);


    }

    return 0;

}
Usage
To use this code, build and run your Mac app from Xcode. Check the console to see the result of the date subtraction.
Valentine's Day = 2012-02-14 05:00:00 +0000

Shop for Valentine's Day by 2012-02-07 05:00:00 +0000
5.7 Using a Timer to Schedule and Repeat Tasks
Problem
Your app needs to schedule code to execute at a particular time. You also want to repeat this task.
Solution
Use NSTimer to schedule code to run at a particular time. NSTimer needs a date object and a reference to the run loop of an application to work.
NOTE: NSTimer requires a run loop, which you will have if you are using your timer from a Mac or iOS app. This recipe requires an app with a run loop. See Recipes 1.11 and 1.12 for procedures on creating Mac and iOS apps, respectively.
How It Works
For this recipe, I will locate the code in the app delegate. Often you will locate timers in custom classes or your app controllers.
Timers work by sending messages to objects starting at a particular date and time. Timers may send messages at intervals if you require repetition in your app. First, you need a date object to represent the date and time the timer will start sending the message to the object.
NSDate *scheduledTime = [NSDate dateWithTimeIntervalSinceNow:10.0];
This scheduled time is ten seconds after this line of code is reached. You may use any date that you wish here.
Next, create the timer by using the initWithFireDate:interval:target:selector:userInfo:repeats: constructor.
NSString *customUserObject = @"To demo userInfo";


NSTimer *timer = [[NSTimer alloc] initWithFireDate:scheduledTime

                                          interval:2
                                            target:self

                                          selector:@selector(task)

                                          userInfo:customUserObject

                                           repeats:YES];
There are a few things going on here that need some explanation. The first parameter is the date object, which specifies when you want your timer to become active. Next, you have interval, which is the number of seconds the timer will wait before sending the message again. And after that is the target parameter descriptor. The target is the object where the method is located. The selector parameter requires the name of the method in parentheses preceded by the @selector keyword. Since you have the method coded right in the app delegate in the same place as the timer, you can use the self keyword here.
The userInfo is something you can use for custom specifications for the timer. You can put any object in here and you will have the ability to get a reference to the object in the message that you are executing (the selector parameter above). Here I use a string, but it’s common to use a dictionary or other collection for more complex activities.
The repeats parameter is where you can specify whether this timer will send the message one time or repeat based on the time interval you provided in the second parameter.
The next thing that you need is a reference to the run loop. You can do that via the NSRunLoop currentRunLoop function.
NSRunLoop *runLoop = [NSRunLoop currentRunLoop];
Now, it’s just a matter of adding the timer to the run loop.
[runLoop addTimer:timer forMode:NSDefaultRunLoopMode];
After ten seconds, the timer will start sending the task message to the app every two seconds.
To stop a timer after you have set it up, you can send the timer the invalidate message. This removes the timer from the run loop. It looks like this:
[timer invalidate];
See Listing 5-7 for the code.
The Code
Listing 5-7. Caption
#import "AppDelegate.h"
@implementation AppDelegate


@synthesize window = _window;


- (void)applicationDidFinishLaunching:(NSNotification *)aNotification{


    NSDate *scheduledTime = [NSDate dateWithTimeIntervalSinceNow:10.0];


    NSString *customUserObject = @"To demo userInfo";


    NSTimer *timer = [[NSTimer alloc] initWithFireDate:scheduledTime

                                              interval:2

                                                target:self

                                              selector:@selector(task)

                                              userInfo:customUserObject

                                               repeats:YES];


    NSRunLoop *runLoop = [NSRunLoop currentRunLoop];


    [runLoop addTimer:timer forMode:NSDefaultRunLoopMode];


}


-(void)task:(id)sender{

    NSTimer *localTimer = (NSTimer *)sender;


    NSLog(@"Schedule task has executed with this user info: %@", [localTimer userInfo]);

}


@end
Usage
To use this code, build and run your Mac app from Xcode. Pay attention to the console window and notice when the messages start to get written to the log. I’ve left in the time stamps so you can see how the time interval worked when I did this recipe.
2012-01-19 15:23:28.651 Timer[31067:707] Schedule task has executed with this user

info: To demo userInfo

2012-01-19 15:23:30.651 Timer[31067:707] Schedule task has executed with this user

info: To demo userInfo

2012-01-19 15:23:32.651 Timer[31067:707] Schedule task has executed with this user

info: To demo userInfo