
Chapter 4
File System
This chapter covers working with the file system on Mac and iOS.
The recipes in this chapter will show you how to:
- Get a reference to the file manager
- Reference key directories for Mac and iOS
- Discover and change a file’s attributes
- Get a listing of files in a given directory
- Manage files and directories
- Use delegation with file manager
- Work with data using the
NSDataclass - Manage caching objects that take up lots of memory
4.1 Referencing and Using the File Manager
Problem
You need to work with your app’s file system.
Solution
Get a reference to your app’s NSFileManager to work with the file system.
How It Works
NSFileManager is an Objective-C singleton object (see the note below for an explanation of singleton) that you use to deal with the file system. You can use NSFileManager in both iOS and Mac applications, but be aware that folder locations in iOS apps are restricted to the iOS app’s documents directory because iOS apps are sandboxed. Mac apps may reference any folder on the user’s computer.
NOTE: Singleton is a design pattern that restricts a class to only one instantiation. Singleton is seen in a few places in Objective-C, including UIApplication and NSApplication.
To work with the file system using NSFileManager, you first need to get a reference to the file manager for this application. You can use the defaultManager function to get this reference.
NSFileManager *fileManager = [NSFileManager defaultManager];
Once you have this reference, you can perform the operations that you expect. For instance, to find out the current directory, you can access the currentDirectoryPath property of the file manager.
NSString *currentDirectoryPath = [fileManager currentDirectoryPath];
To change the current directory, send the changeCurrentDirectoryPath message to the file manager.
[fileManager changeCurrentDirectoryPath:@"/Users/Shared"];
This line of code will change the current directory path to the Mac’s shared folder. See Listing 4-1 for the code.
The Code
Listing 4-1. main.m
#import <Foundation/Foundation.h>


int main (int argc, const char * argv[])

{


    @autoreleasepool {


        NSFileManager *fileManager = [NSFileManager defaultManager];
        NSString *currentDirectoryPath = [fileManager currentDirectoryPath];


        NSLog(@"currentDirectoryPath = %@", currentDirectoryPath);


        [fileManager changeCurrentDirectoryPath:@"/Users/Shared"];


        currentDirectoryPath = [fileManager currentDirectoryPath];


        NSLog(@"currentDirectoryPath = %@", currentDirectoryPath);


    }

    return 0;

}
Usage
To use this code, build and run your Mac app from Xcode. View the log to see the current directory before and after the current directory was changed.
currentDirectoryPath = /Users/[YOUR-USER-NAME]/Library/Developer/Xcode

/DerivedData/GetFileManagerReference-

bdycvqvpjxccqqfvchrjapqmvgpj/Build/Products/Debug


currentDirectoryPath = /Users/Shared
4.2 Getting Mac System Directory References
Problem
Your Mac application needs to reference key directories such as the user’s documents and downloads directories.
Solution
Use NSSearchPathForDirectoriesInDomains to get the information your app needs to reference your user’s key directories. Use NSBundle to get a reference to the application bundle, which is where you include files that will be distributed with your applications.
How It Works
To get a reference to your application’s bundle, you can use the main bundle’s bundlePath function.
NSString *bundlePath = [[NSBundle mainBundle] bundlePath];
The main bundle is a singleton that you can get by using the NSBundle function mainBundle.
NSSearchPathForDirectoriesInDomains is a function that returns back a directory reference based on three parameters: the directory that you are interested in, the domain (user, machine, network, all), and a BOOL indicating whether you want the tilde expanded.
For instance, if you want to find the location of the user’s documents directory, you do this:
NSString *directoryPathName = [NSSearchPathForDirectoriesInDomains

(NSDocumentDirectory,  NSAllDomainsMask, YES) lastObject];
The first parameter specifies the directory in which you are interested. See Table 4-1 for a listing of the directory constants you can use here.
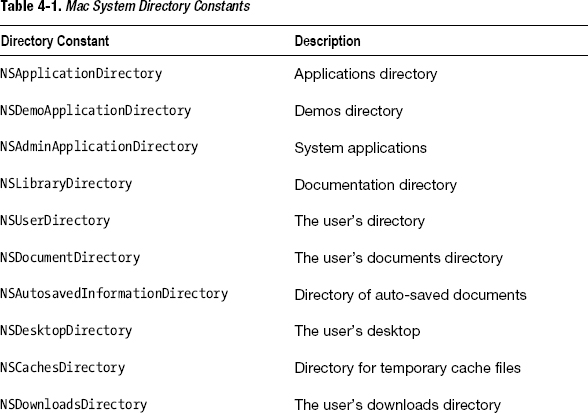
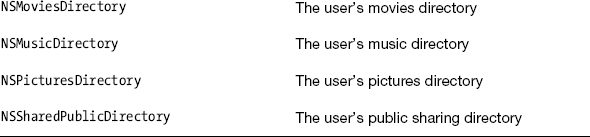
The second parameter is used to specify what domain that you want included in the search. See Table 4-2 for a listing of the domains that you can search on. The last parameter gives you the option to expand the tilde character (~).
NSSearchPathForDirectoriesInDomains returns an array. Listing 4-2 uses the NSArray lastObject function to return the last object in the array and assign this to the string.
The Code
Listing 4-2. main.m
#import <Foundation/Foundation.h>


int main (int argc, const char * argv[])

{


    @autoreleasepool {


        NSString *bundlePath = [[NSBundle mainBundle] bundlePath];
        NSLog(@"bundlePath = %@", bundlePath);


        NSString *directoryPathName = [NSSearchPathForDirectoriesInDomains

(NSDocumentDirectory, NSAllDomainsMask, YES) lastObject];


        NSLog(@"directoryPathName = %@", directoryPathName);


    }

    return 0;

}
Usage
To use this code, build and run your Mac app from Xcode. You can see the location of the documents directory and the application bundle reflected in the console log.
bundlePath = /Users/[YOUR-USER-NAME]/Library/Developer/Xcode

/DerivedData/GetKeyMacFolderReferences-

belypecqtyqdumeenpjlbpeeaxun/Build/Products/Debug


directoryPathName = /Users/[YOUR-USER-NAME]/Documents
4.3 Getting Key iOS Directory References
Problem
Your iOS application needs to reference key directories like the app documents directory and the bundle directory.
Solution
Your application bundle contains the resources that you include with your app. Use NSBundle to get a reference to this directory so that you can extract your resources as needed. To get references to iOS directories designated for documents, libraries, and caches, use NSSearchPathForDirectoriesInDomains, as in Recipe 4.2.
NOTE: iOS apps can’t reference all your Mac directories because iOS apps can only run in the iOS Simulator or on an iOS device and therefore can only access the simulator’s or device’s directories.
How It Works
To get a reference to your application’s bundle, you can use the main bundle’s bundlePath function.
NSString *bundlePath = [[NSBundle mainBundle] bundlePath];
The main bundle is a singleton that you can get by using the NSBundle function mainBundle. If you look up this directory in Finder, you will find your app name with the .app extension. Control+click this app name and choose “Show Package Contents” to see your app executable and the supporting files (including any that you added yourself). This package is what ultimately gets posted to the app store.
NOTE: iOS app bundle directories are read-only so you must copy any files from the app bundle and place them into a writeable directory in the app sandbox before modifying the files.
NSSearchPathForDirectoriesInDomains returns back a directory reference based on three parameters: the directory that you are interested in, the domain (user, machine, network, all), and a BOOL indicating whether you want the tilde expanded.
For instance, if you want to find the location of the user’s documents directory, you do this:
NSString *documentsDirectory = [NSSearchPathForDirectoriesInDomains

(NSDocumentDirectory, NSUserDomainMask, YES) lastObject];
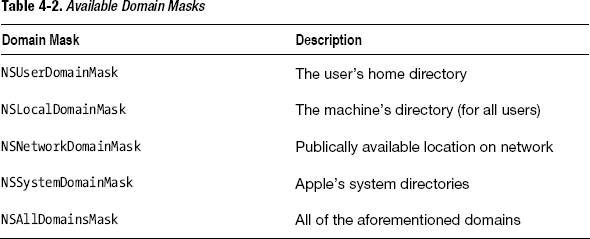
See Table 4-3 for a list of the directories that you can reference with this function and Listing 4-3 for the code.
Apple provides automatic backup with both iTunes and iCloud for some of these directories. Generally, you use the documents directory for user-generated content that you want backed up, the library directory to store information that your app needs as a reference, and the cache directory to store temporary files (the cache is not backed up).
The Code
Listing 4-3. main.m
#import "AppDelegate.h"


@implementation AppDelegate


@synthesize window = _window;


- (BOOL)application:(UIApplication *)application

didFinishLaunchingWithOptions:(NSDictionary  *)launchOptions{


    //app bundle not backed up, readonly

    NSString *bundlePath = [[NSBundle mainBundle] bundlePath];


    NSLog(@"bundlePath = %@", bundlePath);


    //documents directory is backed up

    NSString *documentsDirectory = [NSSearchPathForDirectoriesInDomains

(NSDocumentDirectory, NSUserDomainMask, YES) lastObject];


    NSLog(@"documentsDirectory = %@", documentsDirectory);


    //Library directory is backed up

    NSString *libraryDirectory = [NSSearchPathForDirectoriesInDomains

(NSLibraryDirectory, NSUserDomainMask, YES) lastObject];


    NSLog(@"libraryDirectory = %@", libraryDirectory);
    //Cache directory is not backe up

    NSString *cacheDirectory = [NSSearchPathForDirectoriesInDomains

(NSCachesDirectory, NSUserDomainMask, YES) lastObject];


    NSLog(@"cacheDirectory = %@", cacheDirectory);


    self.window = [[UIWindow alloc] initWithFrame:[[UIScreen mainScreen] bounds]];


    self.window.backgroundColor = [UIColor whiteColor];

    [self.window makeKeyAndVisible];

    return YES;

}


@end
Usage
This code must be located in an iOS app to work as expected; I put the code into the app delegate’s didFinishLaunchingWithOptions: method. Build your app to see the directory strings being written out to your log.
bundlePath = /Users/[YOUR-USER-NAME]/Library/Application Support/iPhone

Simulator/5.0/Applications/18AF23E1-9CAB-4FA6-9D5D-

39994AD355D7/GetiOSDirectories.app


documentsDirectory = /Users/[YOUR-USER-NAME]/Library/Application Support/iPhone

Simulator/5.0/Applications/18AF23E1-9CAB-4FA6-9D5D-39994AD355D7/Documents


libraryDirectory = /Users/[YOUR-USER-NAME]/Library/Application Support/iPhone

Simulator/5.0/Applications/18AF23E1-9CAB-4FA6-9D5D-39994AD355D7/Library


cacheDirectory = /Users/[YOUR-USER-NAME]/Library/Application Support/iPhone

Simulator/5.0/Applications/18AF23E1-9CAB-4FA6-9D5D-39994AD355D7/Library/Caches
You can also copy and paste these directory strings into Finder to be directed to the location on your Mac that iOS Simulator temporarily used for these directories. For instance, copy and paste the app bundle pathname from your log, go to Finder ![]() Go
Go ![]() Go to Folder, and then paste the pathname into the dialog box and click Go. You will see all the temporary directories that the iOS Simulator created for your app here.
Go to Folder, and then paste the pathname into the dialog box and click Go. You will see all the temporary directories that the iOS Simulator created for your app here.
4.4 Getting File Attributes
Problem
Your application needs information about files and folders such as creation date, modification date, and file type.
Solution
Use the NSFileManager attributesOfItemAtPath:error: function to return a dictionary listing all the attributes for the file or folder of interest.
How It Works
This recipe assumes that you have a file reference handy that you can inspect. You will need a reference to the file manager and the file (or folder) to follow along.
NSFileManager *fileManager = [NSFileManager defaultManager];


NSString *filePathName = @"/Users/Shared/textfile.txt";
Next you need an error object. You will find that when you are working with the file system it often pays to use an error object. This gives your app a good chance to recover from common problems like wrong filenames.
NSError *error = nil;
Now you need a dictionary, which you can get by using the file manager’s attributesOfItemAtPath:error: function. You need to give this function the file path name and a reference to the error object. The reference to the error object requires the & to indicate that the error object is being passed by reference (so you can test it later to see if an error occurred).
NSDictionary *fileAttributes = [fileManager attributesOfItemAtPath:filePathName

                                                             error:&error];
In the next step, you check to make sure there is no error and then use a key to retrieve the desired information from the dictionary that you just retrieved.
if(!error){


    NSDate *dateFileCreated = [fileAttributes valueForKey:NSFileCreationDate];


    NSString *fileType = [fileAttributes valueForKey:NSFileType];
}
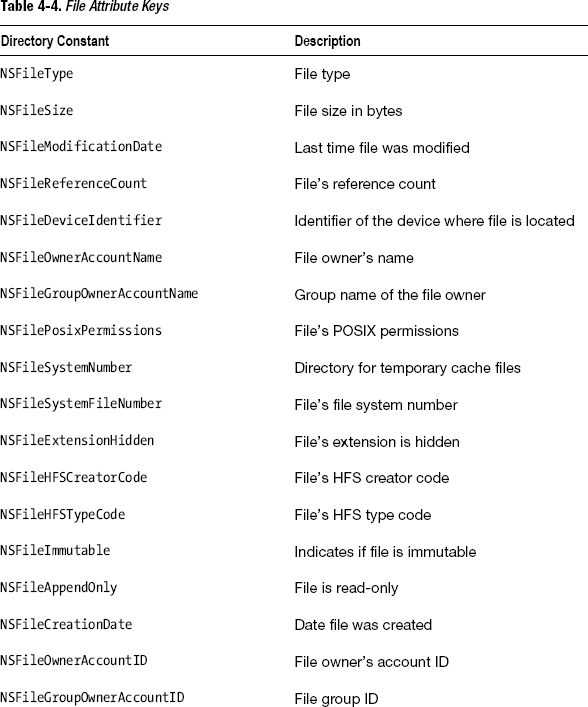
You look up the file creation date as well as the file type. See Table 4-4 for a list of file attribute keys and Listing 4-4 for the code.
The Code
Listing 4-4. main.m
#import <Foundation/Foundation.h>


int main (int argc, const char * argv[])

{


    @autoreleasepool {

        NSFileManager *fileManager = [NSFileManager defaultManager];


        NSString *filePathName = @"/Users/Shared/textfile.txt";


        NSError *error = nil;


        NSDictionary *fileAttributes = [fileManager attributesOfItemAtPath:filePathName

                                                                     error:&error];


        if(!error){


            NSDate *dateFileCreated = [fileAttributes valueForKey:NSFileCreationDate];

            NSString *fileType = [fileAttributes valueForKey:NSFileType];


            NSLog(@"This %@ file was created on %@",fileType, dateFileCreated);


        }


    }

    return 0;

}
Usage
To use this code, replace the file reference that I used with one from your own Mac. Then build and run your Mac app from Xcode. View the log to see the file attributes.
This NSFileTypeRegular file was created on 2012-01-03 15:21:47 +0000
4.5 Getting the List of Files and Sub-Directories in a Directory
Problem
You want to find out what files and folders are in a given directory.
Solution
Use the NSFileManager contentsOfDirectoryAtPath:error: to get an array of all the file and folder path names contained in a directory. To get a listing of all the files and folders in a directory and all subdirectories, use NSFileManager subpathsOfDirectoryAtPath: function.
How It Works
This recipe assumes that you have a directory reference handy that you can inspect. You will need a reference to the file manager and a directory to follow along.
NSFileManager *fileManager = [NSFileManager defaultManager];


NSString *sharedDirectory = @"/Users/Shared";
To simply get a listing of all the contents in a directory, you can use contentsOfDirectoryAtPath:error: to get an array of file path names. Note that you will get path names for all the files in the directory as well as all the sub-directories in the directory.
NSError *error = nil;


NSArray *listOfFiles = [fileManager contentsOfDirectoryAtPath:sharedDirectory

                                                        error:&error];
As with most file system operations, you should use an NSError object, which you should test before working on the results of a file system operation. This function just provides files and directory paths for the top level of the directory that you specified.
To recursively get all the file and directory path names starting from the directory that you specify, you can use subpathsOfDirectoryAtPath:error.
See Listing 4-5 for the code.
The Code
Listing 4-5. main.m
#import <Foundation/Foundation.h>
int main (int argc, const char * argv[])
{
@autoreleasepool {
NSFileManager *fileManager = [NSFileManager defaultManager];
NSString *sharedDirectory = @"/Users/Shared";
NSError *error = nil;
NSArray *listOfFiles = [fileManagercontentsOfDirectoryAtPath:sharedDirectory
error:&error];
if(!error)
NSLog(@"Contents of shared directory: %@", listOfFiles);
NSArray *listOfSubPaths = [fileManager subpathsOfDirectoryAtPath:sharedDirectory

                                                           error:&error];
if(!error)
NSLog(@"Sub Paths of shared directory”: %@", listOfSubPaths);
}
return 0;
}
Usage
To use this code, replace the directory reference that I used with one from your own Mac. Then build and run your Mac app from Xcode. Here is the output from my run; I edited out some of the sub-directories because the listing became very long.
Contents of shared directory: (
    "array.txt",

    "dictionary.txt",

    "textfile.txt"

        [EDITED SUB-DIRECTORIES OUT]

)

Sub Paths of shared directory: (

    ".DS_Store",

    ".ioSharedDefaults.W80152WTAGV",

    ".ioSharedDefaults.W8815GRB0P0",

    ".localized",

    ".localized (from old Mac)",

    ".SharedUserDB",

    "array.txt",


        [EDITED SUB-DIRECTORIES OUT]


    subversion,

    "subversion/.DS_Store",

    "subversion/HelloWorld",


        [EDITED SUB-DIRECTORIES OUT]


    "textfile.txt"

)
NOTE: Be careful when recursively getting these pathnames of every subdirectory. Complex directory hierarchies can make this an expensive proposition.
4.6 Managing Directories
Problem
Your application needs to add, move, copy, and remove directories.
Solution
Use the NSFileManager createDirectoryAtPath:withIntermediateDirectories:attributes:error: to create a new directory, moveItemAtPath:toPath:error: to move a directory, removeItemAtPath:error: to remove a directory, and copyItemAtPath:toPath:error: to copy a directory.
How It Works
You will need a reference to the file manager and the directory that you want to create to follow along.
NSFileManager *fileManager = [NSFileManager defaultManager];


NSString *sharedDirectory = @"/Users/Shared/NewDirectory1/NewSubDirectory1";
As with most of the NSFileManager functions, you need an error object.
NSError *error = nil;
Use createDirectoryAtPath:withIntermediateDirectories:attributes:error: to create a new directory. This function needs the new directory path name to create, a BOOL indicating whether you want to create any intermediate directories in the path name that do not yet exist, a dictionary of attributes to be applied to the new directory, and an error object reference.
BOOL directoryCreated = [fileManager createDirectoryAtPath:newDirectory

                               withIntermediateDirectories:YES

                                               attributes:nil

                                                    error:&error];
The function returns a BOOL, which tells you whether the operation was successful, but you should use the error object to test it just to be safe. In this recipe, I left the attributes parameter as nil but you can supply an NSDictionary object filled with file attributes here if need. See Table 4-4 (in Recipe 4.4) for a list of file attributes that you can use here.
You can also move a directory with the moveItemAtPath:toPath:error function. You need to specify the old and new directory locations along with an error object reference.
NSString *directoryMovedTo = @"/Users/Shared/NewSubDirectory1";


BOOL directoryMoved = [fileManager moveItemAtPath:newDirectory

                                           toPath:directoryMovedTo

                                            error:&error];
To remove a directory, use the file manager’s removeItemAtPath:error function. Pass the directory to be removed along with a reference to an error object.
NSString *directoryToRemove = @"/Users/Shared/NewDirectory1";
BOOL directoryRemoved =[fileManager removeItemAtPath:directoryToRemove

                                               error:&error];
To copy a directory, use copyItemAtPath:toPath:error: from your file manager.
NSString *directoryToCopy = @"/Users/Shared/NewSubDirectory1";

NSString *directoryToCopyTo = @"/Users/Shared/CopiedDirectory";


BOOL directoryCopied =[fileManager copyItemAtPath:directoryToCopy

                                           toPath:directoryToCopyTo

                                            error:&error];
See Listing 4-6 for the code.
The Code
Listing 4-6. main.m
#import <Foundation/Foundation.h>


int main (int argc, const char * argv[])

{


    @autoreleasepool {


        NSFileManager *fileManager = [NSFileManager defaultManager];


        NSString *newDirectory =

@"/Users/Shared/NewDirectory1/NewSubDirectory1";


        NSError *error = nil;


        BOOL directoryCreated = [fileManager createDirectoryAtPath:newDirectory

                                       withIntermediateDirectories:YES

                                                        attributes:nil

                                                             error:&error];

        if(!error)

            NSLog(@"directoryCreated = %i with no error", directoryCreated);

        else

            NSLog(@"directoryCreated = %i with error %@", directoryCreated, error);


        NSString *directoryMovedTo = @"/Users/Shared/NewSubDirectory1";


        BOOL directoryMoved = [fileManager moveItemAtPath:newDirectory

                                                   toPath:directoryMovedTo

                                                    error:&error];


        if(!error)
            NSLog(@"directoryMoved = %i with no error", directoryMoved);

        else

            NSLog(@"directoryMoved = %i with error %@", directoryMoved, error);


        NSString *directoryToRemove = @"/Users/Shared/NewDirectory1";


        BOOL directoryRemoved =[fileManager removeItemAtPath:directoryToRemove

                                                       error:&error];


        if(!error)

            NSLog(@"directoryRemoved = %i with no error", directoryRemoved);

        else

            NSLog(@"directoryRemoved = %i with error %@", directoryRemoved, error);


        NSString *directoryToCopy = @"/Users/Shared/NewSubDirectory1";

        NSString *directoryToCopyTo = @"/Users/Shared/CopiedDirectory";


        BOOL directoryCopied =[fileManager copyItemAtPath:directoryToCopy

                                                   toPath:directoryToCopyTo

                                                    error:&error];


        if(!error)

            NSLog(@"directoryCopied = %i with no error", directoryCopied);

        else

            NSLog(@"directoryCopied = %i with error %@", directoryCopied, error);

    }

    return 0;

}
Usage
To use this code, replace the directory reference that I used with one from your own Mac. Then build and run your Mac app from Xcode. Use Finder to see if your directories modified in the way you expected. You can also view the console log output to see if the operations were successful.
directoryCreated = 1 with no error

directoryMoved = 1 with no error

directoryRemoved = 1 with no error

directoryCopied = 1 with no error
4.7 Managing Files
Problem
Your application needs to add, move, copy, and remove files.
Solution
Use the NSFileManager createFileAtPath:contents:attributes: to create a new file, moveItemAtPath:toPath:error: to move a file, removeItemAtPath:error: to remove a file, and copyItemAtPath:toPath:error: to copy a file.
How It Works
You will need a reference to the file manager before you can do anything else.
NSFileManager *fileManager = [NSFileManager defaultManager];
To create a file, you need to use NSData, which is used to work with data and content. For this recipe, I’m going to use NSData to get a picture from my blog. To do this, I need to start with NSURL so I can reference this resource.
NSURL *url = [NSURL URLWithString:@"http://howtomakeiphoneapps.com/wp-

content/uploads/2012/01/apples-oranges.jpg"];
Once I have the NSURL object, I can use the NSData function dataWithContentsOfURL to download the content directly into my app.
NSData *dataObject = [NSData dataWithContentsOfURL:url];
With this data object set up for use, I can now use the file manager function createFileAtPath:contents:attributes: to create the file on the Mac’s file system.
NSString *newFile = @"/Users/Shared/apples-oranges.jpg";


BOOL fileCreated = [fileManager createFileAtPath:newFile

                                        contents:dataObject

                                      attributes:nil];
This function uses the data stored in the NSData object along with any attributes that you would like to specify and stores the data as a file.
You can also move a file with the moveItemAtPath:toPath:error function. You need to specify the old and new file path names along with an error object reference.
NSError *error = nil;


NSString *fileMovedTo = @"/Users/Shared/apples-oranges-moved.jpg";


BOOL fileMoved = [fileManager moveItemAtPath:newFile

                                      toPath:fileMovedTo

                                       error:&error];
To remove a file, use the file manager’s removeItemAtPath:error function. Pass the file to be removed along with a reference to an error object.
NSString *fileToRemove = @"/Users/Shared/apples-oranges-moved.jpg";


BOOL fileRemoved =[fileManager removeItemAtPath:fileToRemove

                                          error:&error];
To copy a file, use copyItemAtPath:toPath:error: from your file manager.
NSString *fileToCopy = @"/Users/Shared/apples-oranges-moved.jpg";

NSString *copiedFileName = @"/Users/Shared/apples-oranges-backup-copy.jpg";


BOOL fileCopied = [fileManager copyItemAtPath:fileToCopy

                                       toPath:copiedFileName

                                        error:&error];
See Listing 4-7 for the code.
The Code
Listing 4-7. main.m
#import <Foundation/Foundation.h>


int main (int argc, const char * argv[])

{


    @autoreleasepool {


        NSFileManager *fileManager = [NSFileManager defaultManager];


        NSURL *url = [NSURL URLWithString:@"http://howtomakeiphoneapps.com/wp-

content/uploads/2012/01/apples-oranges.jpg"];


        NSData *dataObject = [NSData dataWithContentsOfURL:url];
        NSString *newFile = @"/Users/Shared/apples-oranges.jpg";


        BOOL fileCreated = [fileManager createFileAtPath:newFile

                                                contents:dataObject

                                              attributes:nil];


        NSLog(@"fileCreated = %i with no error", fileCreated);


        NSError *error = nil;


        NSString *fileMovedTo = @"/Users/Shared/apples-oranges-moved.jpg";


        BOOL fileMoved = [fileManager moveItemAtPath:newFile

                                              toPath:fileMovedTo

                                               error:&error];


        if(!error)

            NSLog(@"fileMoved = %i with no error", fileMoved);

        else

            NSLog(@"fileMoved = %i with error %@", fileMoved, error);


        NSString *fileToCopy = @"/Users/Shared/apples-oranges-moved.jpg";

        NSString *copiedFileName = @"/Users/Shared/apples-oranges-backup-copy.jpg";


        BOOL fileCopied = [fileManager copyItemAtPath:fileToCopy

                                               toPath:copiedFileName

                                                error:&error];


        if(!error)

            NSLog(@"fileCopied = %i with no error", fileCopied);

        else

            NSLog(@"fileCopied = %i with error %@", fileCopied, error);


        NSString *fileToRemove = @"/Users/Shared/apples-oranges-moved.jpg";


        BOOL fileRemoved =[fileManager removeItemAtPath:fileToRemove

                                                  error:&error];


        if(!error)

            NSLog(@"fileRemoved = %i with no error", fileRemoved);

        else

            NSLog(@"fileRemoved = %i with error %@", fileRemoved, error);


    }

    return 0;

}
Usage
To use this code, replace the directory reference with the file that I used with a directory that will work from your own Mac. Then build and run your Mac app from Xcode. Use Finder to see if your directories modified in the way you expected. You can also view the console log output to see if the operations were successful.
fileCreated = 1 with no error

fileMoved = 1 with no error

fileCopied = 1 with no error

fileRemoved = 1 with no error
4.8 Checking File Status
Problem
You want to know if the file you’re interested in is writeable or if it even exists at all before you attempt to work on it.
Solution
Use the appropriate NSFileManager functions to test for various states of interest. Each of these functions returns a BOOL indicating the state of the file in question:
fileExistsAtPath:isReadableFileAtPath:isWritableFileAtPath:isExecutableFileAtPath:isDeletableFileAtPath:.
NOTE: Be careful if you are using these functions to predicate the behavior of your app based solely on the results of these functions. In Apple’s documentation, it’s recommended that you use these in conjunction with the proper error handling with NSError. You will find examples of NSError in Recipes 4.6 and 4.7.
How It Works
To follow this recipe, you will need a reference to a file on your Mac, like the one I’m using below. You also need a reference to the file manager.
NSFileManager *fileManager = [NSFileManager defaultManager];


NSString *filePathName = @"/Users/Shared/textfile.txt";
The first thing that you are going to test is whether the file exists at this location. Use the fileExistsAtPath: function and assign the results to a BOOL variable that you can later use to test.
BOOL fileExists = [fileManager fileExistsAtPath:filePathName];
To find out if the file can be read, use isReadableFileAtPath:.
BOOL fileIsReadable = [fileManager isReadableFileAtPath:filePathName];
Follow the same pattern to find out if the file can be written to using isWriteableFileAtPath:.
BOOL fileIsWriteable = [fileManager isWritableFileAtPath:filePathName];
To find out if the file is an executable, use the function isExecutableFileAtPath:.
Finally, to figure out whether you can delete the file, use the isDeletableFileAtPath: function and follow the same pattern as before.
BOOL fileIsDeleteable = [fileManager isDeletableFileAtPath:filePathName];
See Listing 4-8 for the code.
The Code
Listing 4-8. main.m
#import <Foundation/Foundation.h>
int main (int argc, const char * argv[])

{


    @autoreleasepool {


        NSFileManager *fileManager = [NSFileManager defaultManager];


        NSString *filePathName = @"/Users/Shared/textfile.txt";


        BOOL fileExists = [fileManager fileExistsAtPath:filePathName];


        if(fileExists)

            NSLog(@"%@ exists", filePathName);

        else

            NSLog(@"%@ doesn't exist", filePathName);


        BOOL fileIsReadable = [fileManager isReadableFileAtPath:filePathName];


        if(fileIsReadable)

            NSLog(@"%@ is readable", filePathName);

        else

            NSLog(@"%@ isn't readable", filePathName);


        BOOL fileIsWriteable = [fileManager isWritableFileAtPath:filePathName];


        if(fileIsWriteable)

            NSLog(@"%@ is writable", filePathName);

        else

            NSLog(@"%@ isn't writable", filePathName);


        BOOL fileIsExecutable = [fileManager isExecutableFileAtPath:filePathName];


        if(fileIsExecutable)

            NSLog(@"%@ is an executable", filePathName);

        else

            NSLog(@"%@ isn't an executable", filePathName);


        BOOL fileIsDeleteable = [fileManager isDeletableFileAtPath:filePathName];


        if(fileIsDeleteable)

            NSLog(@"%@ is deletable", filePathName);

        else

            NSLog(@"%@ isn't an deletable", filePathName);


    }

    return 0;

}
Usage
Build and run this code from a Mac command line app to test. Each test of the file status has a corresponding log entry printed out based on the results of the test. Here is my output:
/Users/Shared/textfile.txt exists

/Users/Shared/textfile.txt is readable

/Users/Shared/textfile.txt is writable

/Users/Shared/textfile.txt isn't an executable

/Users/Shared/textfile.txt is deletable
4.9 Changing File Attributes
Problem
Your application needs to change a file’s attributes.
Solution
Use the file manager’s setAttributes:ofItemAtPath:error: function to change the attributes of a file or directory.
How It Works
You will need a reference to the file manager, a file, and an error object.
NSFileManager *fileManager = [NSFileManager defaultManager];


NSString *filePathName = @"/Users/Shared/textfile.txt";


NSError *error = nil;
The first step is to set up a dictionary with the file attributes that you want to apply to the file. See Table 4-4 (in Recipe 4.4) for a list of file attributes.
NSMutableDictionary *attributes = [[NSMutableDictionary alloc] init];


[attributes setObject:[NSDate date] forKey:NSFileModificationDate];
For this recipe, you are going to change just the file modification date. Use the NSFileManager function setAttributes:ofItemPath:error: and pass the dictionary, file path name, and error object as parameters.
BOOL attributeChanged = [fileManager setAttributes:attributes

                                      ofItemAtPath:filePathName

                                             error:&error];
Make sure to check the error object and returned BOOL value when you use this function. See Listing 4-9 for the code.
The Code
Listing 4-9. main.m
#import <Foundation/Foundation.h>


int main (int argc, const char * argv[])

{


    @autoreleasepool {


        NSFileManager *fileManager = [NSFileManager defaultManager];


        NSString *filePathName = @"/Users/Shared/textfile.txt";


        NSError *error = nil;


        //Get the file attributes so you can compare later on:

        NSDictionary *fileAttributes = [fileManager attributesOfItemAtPath:filePathName

                                                                     error:&error];


        if(!error)

            NSLog(@"%@ file attributes (before): %@",filePathName, fileAttributes);


        NSMutableDictionary *attributes = [[NSMutableDictionary alloc] init];


        [attributes setObject:[NSDate date] forKey:NSFileModificationDate];


        BOOL attributeChanged = [fileManager setAttributes:attributes

                                              ofItemAtPath:filePathName

                                                     error:&error];


        if(error)

            NSLog(@"There was an error: %@", error);

        else{

            NSLog(@"attributeChanged = %i", attributeChanged);


            //Get the file attributes to see the change:

            NSDictionary *fileAttributes = [fileManager
attributesOfItemAtPath:filePathName

                 error:&error];


            if(!error)

                NSLog(@"%@ file attributes (after): %@",filePathName, fileAttributes);

        }


    }

    return 0;

}
Usage
Build and run this code from a Mac command line app to test. View the log output to see if an error occurred and to see if the file attribute was changed in the way that you expected.
/Users/Shared/textfile.txt file attributes (before): {

        NSFileCreationDate = "2012-01-26 14:17:04 +0000";

    NSFileExtensionHidden = 0;

    NSFileGroupOwnerAccountID = 0;

    NSFileGroupOwnerAccountName = wheel;

    NSFileHFSCreatorCode = 0;

    NSFileHFSTypeCode = 0;

    NSFileModificationDate = "2012-01-07 13:09:03 +0000";

    NSFileOwnerAccountID = 502;

    NSFileOwnerAccountName = [YOUR-USER-NAME];

    NSFilePosixPermissions = 511;

    NSFileReferenceCount = 1;

    NSFileSize = 37;

    NSFileSystemFileNumber = 40320513;

    NSFileSystemNumber = 234881026;

    NSFileType = NSFileTypeRegular;

}

attributeChanged = 1

/Users/Shared/textfile.txt file attributes (after): {

        NSFileCreationDate = "2012-01-26 14:17:04 +0000";

    NSFileExtensionHidden = 0;

    NSFileGroupOwnerAccountID = 0;

    NSFileGroupOwnerAccountName = wheel;

    NSFileHFSCreatorCode = 0;

    NSFileHFSTypeCode = 0;

    NSFileModificationDate = "2012-01-26 15:03:18 +0000";

    NSFileOwnerAccountID = 502;

    NSFileOwnerAccountName = [YOUR-USER-NAME];

    NSFilePosixPermissions = 511;

    NSFileReferenceCount = 1;

    NSFileSize = 37;
    NSFileSystemFileNumber = 40320513;

    NSFileSystemNumber = 234881026;

    NSFileType = NSFileTypeRegular;

}
4.10 Using Delegation with NSFileManager
Problem
You want more control over file system operations like copying and moving files and directories, and you need to make an additional action when a file is about to be copied or moved.
Solution
Create your own instance of NSFileManager instead of using the default file manager that is associated with your process. You must set your file manager’s delegate to an object that has been instantiated from a class that implements the NSFileManagerDelegate protocol. Implement the delegate methods in the class that has adopted the NSFileManagerDelegate protocol to get more control over copy, move, and remove operations.
How It Works
Using NSFileManager in this way requires you to have a class available that can adopt the NSFileManagerDelegate protocol because you will be using the Delegation design pattern. This means that you need an object that will act on behalf of the file manager. Often this is simply a view controller or other class that you are using already. But, since you are only using a command line Mac app in this recipe, you need to add a custom class just for the file manager.
For the purposes of this recipe, let’s assume that your application needs more control over the copy operation than you get from the NSFileManager’s copyItemAtPath:toPath:error: function. You’re going to intercept this operation and test to make sure you are not copying into your “protected” directory.
The first step is to add a new class to the application that has a file manager property (see Recipe 1.3 for more details on how to add custom classes). The header for such a class looks like this:
#import <Foundation/Foundation.h>
@interface MyFileManager : NSObject


@property(strong)NSFileManager *fileManager;


@end
The implementation for this class looks like this:
#import "MyFileManager.h"


@implementation MyFileManager

@synthesize fileManager;


@end
Note that your class is called MyFileManager and is acting mostly as a container for a file manager.
Now you want to adopt the NSFileManagerDelegate protocol so that this class can act on behalf of the file manager. You do this in the interface located in the header file.
#import <Foundation/Foundation.h>


@interface MyFileManager : NSObject<NSFileManagerDelegate>


@property(strong)NSFileManager *fileManager;


@end
The code <NSFileManagerDelegate> above means that this class is adopting the NSFileManagerDelegate protocol and objects instantiated from this class may act on behalf of NSFileManager objects. This protocol has no required methods, but there is an optional method that you want to implement because you are interested in getting a little bit more control over the copy operation.
So, implement the delegate method fileManager:shouldCopyItemAtPath:toPath:. This delegate method executes right before the file is copied, which gives you a chance to test to see if the copy operation should happen. From within this function you can return a BOOL indicating whether it’s ok to go through with the copy operation or not.
This code belongs in the implementation file for MyFileManager.
- (BOOL)fileManager:(NSFileManager *)fileManager shouldCopyItemAtPath:

 (NSString *)srcPath  toPath:(NSString *)dstPath{


    if([dstPath hasPrefix:@"/Users/Shared/Book/Protected"]){
        NSLog(@"We cannot copy files into the protected folder and so this file was

 not copied");


        return NO;

    }

    else{


        NSLog(@"We just copied a file successfully");


        return YES;

    }

}
What you’re doing here is testing to see if the destination directory matches the protected directory by using the NSString function hasPrefix (see Recipe 2.6). Based on these findings, the function returns YES or NO and writes out a message to the log.
You can override the MyFileManager init method to add your custom initialization code so you can instantiate a new file manager here and set the file manager’s delegate to MyFileManager using the self keyword.
Of course, this also belongs in MyFileManager’s implementation.
- (id)init {

    self = [super init];

    if (self) {

        self.fileManager = [[NSFileManager alloc] init];

        self.fileManager.delegate = self;

    }

    return self;

}
NOTE: I suggest that you look over Listings 4-10 through 4-12. It will be much clearer to see the code in context once you understand the general pattern I’m following here.
What you’ve done so far is essentially wrap up a file manager in your own custom class that supports the delegation pattern that you require. Now you can move on to main.m and use the class you just created.
#import <Foundation/Foundation.h>

#import "MyFileManager.h"


int main (int argc, const char * argv[])

{
    @autoreleasepool {

        MyFileManager *myFileManager = [[MyFileManager alloc] init];


        NSString *protectedDirectory = @"/Users/Shared/Book/Protected";


        NSString *cacheDirectory = @"/Users/Shared/Book/Cache";


        NSString *fileSource = @"/Users/Shared/Book/textfile.txt";


        NSString *fileDestination1 = @"/Users/Shared/Book/Protected/textfile.txt";


        NSString *fileDestination2 = @"/Users/Shared/Book/Cache/textfile.txt";


        NSError *error = nil;


    }

    return 0;

}
The key points in this code are the import statement for myFileManager and the instantiation of the myFileManager object. The rest of the code is simply file and directory references as well as the error object you always need when using the file manager.
Now, instead of using the default file manager directly, you will be using your own file manager that you can reference via myFileManager.
BOOL fileCopied1 = [myFileManager.fileManager copyItemAtPath:fileSource

                                                      toPath:fileDestination1

                                                       error:&error];
As you can see, you use the same file manager functions as in the other recipes. But you now reference the file manager property myFileManager and you can expect the corresponding delegate method that you just implemented to execute right before the item is copied.
NOTE: This method clearly is more labor intensive than simply using the default file manager, but it does give a tad more control over the process as well as error handling.
The Code
Listing 4-10. MyFileManager.h
#import <Foundation/Foundation.h>


@interface MyFileManager : NSObject<NSFileManagerDelegate>


@property(strong)NSFileManager *fileManager;


@end
Listing 4.11. MyFileManager.m
#import "MyFileManager.h"


@implementation MyFileManager

@synthesize fileManager;


- (id)init {

    self = [super init];

    if (self) {

        self.fileManager = [[NSFileManager alloc] init];

        self.fileManager.delegate = self;

    }

    return self;

}


- (BOOL)fileManager:(NSFileManager *)fileManager shouldCopyItemAtPath:

(NSString *)srcPath toPath:(NSString *)dstPath{


    if([dstPath hasPrefix:@"/Users/Shared/Book/Protected"]){


        NSLog(@"We cannot copy files into the protected folder and so this file was

not copied");


        return NO;

    }

    else{


        NSLog(@"We just copied a file successfully");


        return YES;

    }

}


@end
#import <Foundation/Foundation.h>

#import "MyFileManager.h"


int main (int argc, const char * argv[])

{


    @autoreleasepool {

        MyFileManager *myFileManager = [[MyFileManager alloc] init];


        NSString *protectedDirectory = @"/Users/Shared/Book/Protected";


        NSString *cacheDirectory = @"/Users/Shared/Book/Cache";


        NSString *fileSource = @"/Users/Shared/Book/textfile.txt";


        NSString *fileDestination1 =

@"/Users/Shared/Book/Protected/textfile.txt";


        NSString *fileDestination2 = @"/Users/Shared/Book/Cache/textfile.txt";


        NSError *error = nil;


        NSArray *listOfFiles;


        NSLog(@"Look at directories BEFORE attempting to copy");


        listOfFiles = [myFileManager.fileManager

contentsOfDirectoryAtPath:protectedDirectory

                    error:&error];


        NSLog(@"List of files in protected directory (before):%@", listOfFiles);


        listOfFiles = [myFileManager.fileManager

contentsOfDirectoryAtPath:cacheDirectory

                    error:&error];


        NSLog(@"List of files in cache directory (before):%@", listOfFiles);


        //Attempt to copy into protected folder:

        BOOL fileCopied1 = [myFileManager.fileManager copyItemAtPath:fileSource

                                                              toPath:fileDestination1

                                                               error:&error];


        if(error)

            NSLog(@"There was an error, %@.  fileCopied1 = %i", error, fileCopied1);


        //Attempt to copy into cache folder:
        BOOL fileCopied2 =  [myFileManager.fileManager copyItemAtPath:fileSource

                                                               toPath:fileDestination2

                                                                error:&error];


        if(error)

            NSLog(@"There was an error, %@.  fileCopied2 = %i", error, fileCopied2);


        NSLog(@"Look at directories AFTER attempting to copy");


        listOfFiles = [myFileManager.fileManager

contentsOfDirectoryAtPath:protectedDirectory

                    error:&error];


        NSLog(@"List of files in protected directory (after):%@", listOfFiles);


        listOfFiles = [myFileManager.fileManager

contentsOfDirectoryAtPath:cacheDirectory

                    error:&error];


        NSLog(@"List of files in cache directory (after):%@", listOfFiles);


    }

    return 0;

}
Usage
Build and run this code from a Mac command line app to test. View the log output to see the log messages that print out the before and after directory listings to see if and when the file was copied. Also note the log entries that print out from the delegate method located in the MyFileManager implementation.
Look at directories BEFORE attempting to copy


List of files in protected directory (before):(

    ".DS_Store",

    "AAAA.txt"

)


List of files in cache directory (before):(

    ".DS_Store",

    "1.txt",

    "2.txt"

)


We cannot copy files into the protected folder and so this file was not copied
We just copied a file successfully


Look at directories AFTER attempting to copy


List of files in protected directory (after):(

    ".DS_Store",

    "AAAA.txt"

)


List of files in cache directory (after):(

    ".DS_Store",

    "1.txt",

    "2.txt",

    "textfile.txt"

)
4.11 Working with Data Using NSData
Problem
You need to work with data from files and other sources from within your application.
Solution
Use NSData and NSMutableData to work data from many sources. NSData brings data into your app via files, URLs, bytes, and other NSData objects. You can use NSMutableData to modify data, and you can save NSData objects back to the file system. NSData is also used with many other Foundation classes.
How It Works
This recipe demonstrates using NSData and NSMutableData by using these classes to combine two character arrays together and then saving them as a file to the file system.
The first thing you need is two arrays that you can use as your data source.
NSUInteger length = 3;


char bytes1[length];
bytes1[0] = 'A';

bytes1[1] = 'B';

bytes1[2] = 'C';


char bytes2[length];

bytes2[0] = 'D';

bytes2[1] = 'E';

bytes2[2] = 'F';
NOTE: These arrays are both things are you would code in regular C. Don’t confuse the arrays here with the NSArray and NSMutableArray Foundation classes, which are both object-oriented collections that work with objects only. The byte1 and byte2 arrays here only work with primitive types. You can do this because Objective-C is a superset of the C programming language, and you can use C code in conjunction with Objective-C code at any time.
Now that you have data, you’re ready to start using a data object. For this recipe, you use NSMutableData because you want to be able to modify the data.
NSMutableData *mutableData = [[NSMutableData alloc] init];
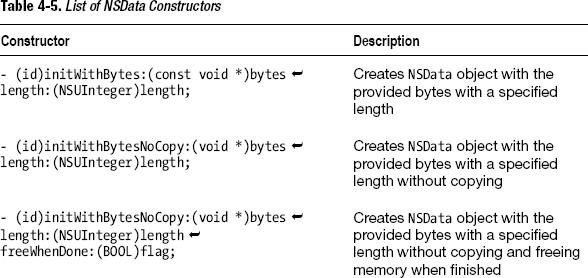
NSData and NSMutableData have other constructors that you will find helpful as you work with different data sources. See Table 4-5 for a complete list.

Now you can move on to modifying the data object. Use the NSMutableData function appendBytes:length: to add the first byte array to the data object.
[mutableData appendBytes:bytes1

                  length:length];
This adds the characters A, B, C to the data object. To add the remaining characters, repeat the process with the next byte array.
[mutableData appendBytes:bytes2

                  length:length];
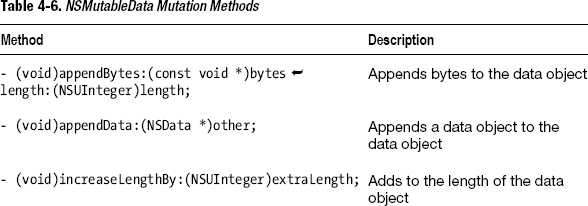
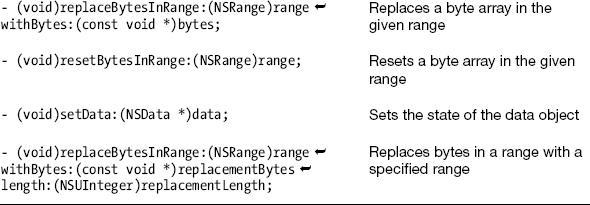
At this point, the data object contains both byte arrays. Appending bytes is one way of modifying a data object, but there are more things you can do to modify data with mutable data objects. See Table 4-6 for complete list.
If you need to use the new array in your application, you can retrieve the new array using the NSData byte function.
char *bytesFromData = (char *)[mutableData bytes];
To save the contents of the data object to the file system, you can use the writeToFile:options:error: function and supply a file path name, an options parameter, and an error object.
NSError *error = nil;


BOOL dataSaved = [mutableData writeToFile:@"/Users/Shared/Book/datadump.txt"

                                  options:NSDataWritingAtomic

                                    error:&error];
See Listing 4-13 for the code.
The Code
Listing 4-13. main.m
#import <Foundation/Foundation.h>


int main (int argc, const char * argv[])

{


    @autoreleasepool {


        NSUInteger length = 3;


        char bytes1[length];

        bytes1[0] = 'A';

        bytes1[1] = 'B';
        bytes1[2] = 'C';


        for (int i=0;i<sizeof(bytes1);i++)

            NSLog(@"bytes1[%i] = %c", i, bytes1[i]);


        char bytes2[length];

        bytes2[0] = 'D';

        bytes2[1] = 'E';

        bytes2[2] = 'F';


        for (int i=0;i<sizeof(bytes2);i++)

            NSLog(@"bytes2[%i] = %c", i, bytes2[i]);


        NSMutableData *mutableData = [[NSMutableData alloc] init];


        [mutableData appendBytes:bytes1

                          length:length];


        [mutableData appendBytes:bytes2

                          length:length];


        NSLog(@"mutableData = %@", mutableData);


        char *bytesFromData = (char *)[mutableData bytes];


        for (int i=0;i<length*2;i++)

            NSLog(@"bytesFromData[%i] = %c", i, bytesFromData[i]);


        NSError *error = nil;


        BOOL dataSaved = [mutableData writeToFile:@"/Users/Shared/datadump.txt"

                                          options:NSDataWritingAtomic

                                            error:&error];


        if(dataSaved)

            NSLog(@"mutableData successfully wrote contents to file system");

        else

            NSLog(@"mutableData was unsuccesful in writing out data because of

%@", error);


    }

    return 0;

}
Usage
Build and run this code from a Mac command line app to test. View the log output to see the log messages to view the contents of the various data objects. Use a text editor to inspect the file that was created to see the content written to the file system.
bytes1[0] = A

bytes1[1] = B

bytes1[2] = C

bytes2[0] = D

bytes2[1] = E

bytes2[2] = F


mutableData = <41424344 4546>


bytesFromData[0] = A

bytesFromData[1] = B

bytesFromData[2] = C

bytesFromData[3] = D

bytesFromData[4] = E

bytesFromData[5] = F


mutableData successfully wrote contents to file system
4.12 Caching Content with NSCache
Problem
Your application has to operate in limited memory conditions so you need to be able to cache content.
Solution
Use NSCache to maintain a collection of objects that may be cached in memory. When used with NSPurgeableData, NSCache will keep an object in memory until the device or desktop application needs to reclaim the memory.
How It Works
NSCache works like NSDictionary in that NSCache stores objects that are indexed with keys. What is different about NSCache is that NSCache will get rid of objects when certain conditions are met. Usually, NSCache will react to low memory conditions but you can define other conditions if desired.
NOTE: The behavior described here only works when the objects in the cache adopt the NSDiscardableContent protocol. The easiest way to make sure that a class adopts this protocol is to use the NSPurgeableData class, which adopts this protocol and can be used like NSData.
What makes NSCache very useful is that while it will get rid of objects smartly, it will also keep the key to the object in place. This gives you a chance to attempt to retrieve the object and then test to see if a nil value came back (indicating that an object has either been removed or not created yet). If the return value is nil, then you have the opportunity to recreate or reload the object.
NOTE: When using NSCache to retrieve objects, make sure to test to see if the object is still cached. If the object is not cached anymore, then include code to recreate the object and insert the object back into the cache.
This recipe assumes that you have an iOS app set up with a view controller. See Listings 4-14 through 4-17 to see exactly how the user interface was set up. To get more information on how to set up iOS apps and user controls, see Recipes 1.12 and 1.13. For now, take a look at the view controller header file so you can see that the NSCache object is included as a property.
#import <UIKit/UIKit.h>


@interface ViewController : UIViewController


@property (strong) NSCache *cache;

@property (assign) BOOL regularLogo;

@property (strong) UIImageView *myImageView;

@property (strong) UIButton *loadImageButton;


- (void)presentImage;


@end
First, you need to instantiate the NSCache object itself. Here, you do this in the view controller viewDidLoad delegate method.
#import "ViewController.h"


@implementation ViewController
-(void)viewDidLoad{

    [super viewDidLoad];


    //set up the cache

    self.cache = [[NSCache alloc] init];


}


@end
NOTE: You may locate your NSCache object anywhere in your application. One popular location is the app delegate because you can get a reference to the app delegate anywhere in your app so it’s easy to share the cache. To keep this recipe as simple as possible, the cache is simply located in the view controllers as a property.
Putting the cache in the view controller as a property and instantiating the cache in viewDidLoad means that you can use the cache as long as the view controller is active.
Now you can retrieve an object from the cache. You need a key, which can be a string, and you can use this key with the cache’s objectForKey: function to attempt to retrieve the object.
NSString *key = @"regular-logo";

NSPurgeableData *data = [cache objectForKey:key];
Here you are trying to retrieve an NSPurgeableData object from the cache. In the next step, you must immediately test the object that comes back to see if a nil value was returned. You use an if statement to do this.
if(!data){


}
!data means that the data object is equal to nil. If the object is nil, you can recreate the object in the code that is between the curly braces. The data that you want to retrieve here is an image that is stored in the app bundle. So, you need to reference the app bundle (see Recipe 4.3 for more on this) and to construct the image file’s path name.
NSString *key = @"regular-logo";

NSPurgeableData *data = [cache objectForKey:key];

if(!data){

    NSString *bundlePath = [[NSBundle mainBundle] bundlePath];
    NSString *imagePath = [NSString stringWithFormat:@"%@/MobileAppMastery-Log.png",

bundlePath];


}
Once you have the file path reference, you can use it to instantiate an NSPurgeableData object with the contents of the file. Then you insert that object into the cache.
NSString *key = @"regular-logo";

NSPurgeableData *data = [cache objectForKey:key];

if(!data){

    NSString *bundlePath = [[NSBundle mainBundle] bundlePath];

    NSString *imagePath = [NSString stringWithFormat:@"%@/MobileAppMastery-Log.png",

bundlePath];


   data = [NSPurgeableData dataWithContentsOfFile:imagePath];

   [cache setObject:data forKey:key];

}
Now the object is cached and available to be used again whenever you ask for it with the key. If something happens and the object needs to be purged, you can still ask for the object with the key but you will get a nil result so you have to repeat the object creation process again.
The Code
Listing 4-14. AppDelegate.h
#import <UIKit/UIKit.h>


@class ViewController;


@interface AppDelegate : UIResponder <UIApplicationDelegate>


@property (strong, nonatomic) UIWindow *window;


@property (strong, nonatomic) ViewController *viewController;


@end
Listing 4-15. AppDelegate.m
#import "AppDelegate.h"


#import "ViewController.h"


@implementation AppDelegate
@synthesize window = _window;

@synthesize viewController = _viewController;


- (BOOL)application:(UIApplication *)application

didFinishLaunchingWithOptions:(NSDictionary *)launchOptions

{

    self.window = [[UIWindow alloc] initWithFrame:[[UIScreen mainScreen] bounds]];

    // Override point for customization after application launch.

    self.viewController = [[ViewController alloc]

initWithNibName:@"ViewController"

 bundle:nil];

    self.window.rootViewController = self.viewController;

    [self.window makeKeyAndVisible];

    return YES;

}


@end
Listing 4-16. ViewController.h
#import <UIKit/UIKit.h>


@interface ViewController : UIViewController


@property (strong) NSCache *cache;

@property (assign) BOOL regularLogo;

@property (strong) UIImageView *myImageView;

@property (strong) UIButton *loadImageButton;


- (void)presentImage;


@end
Listing 4-17. ViewController.m
#import "ViewController.h"


@implementation ViewController

@synthesize cache, regularLogo, myImageView, loadImageButton;


-(void)viewDidLoad{

    [super viewDidLoad];


    //Change the view's background color to white

    self.view.backgroundColor = [UIColor whiteColor];


    //Load the regular logo first

    self.regularLogo = YES;
    //set up the cache

    self.cache = [[NSCache alloc] init];


    //Setup the button

    self.loadImageButton = [UIButton buttonWithType:UIButtonTypeRoundedRect];

    self.loadImageButton.frame = CGRectMake(20, 415, 280, 37);

    [self.loadImageButton addTarget:self

                             action:@selector(presentImage)

                   forControlEvents:UIControlEventTouchUpInside];

    [loadImageButton setTitle:@"Present Image" forState:UIControlStateNormal];

    [self.view addSubview:loadImageButton];


    //Setup the UIImageView

    self.myImageView = [[UIImageView alloc] init];

    self.myImageView.frame = CGRectMake(0, 0, 320, 407);

    self.myImageView.contentMode = UIViewContentModeScaleAspectFit;

    [self.view addSubview:self.myImageView];

}


- (void)presentImage{

    if(regularLogo){

        NSString *key = @"regular-logo";

        NSPurgeableData *data = [cache objectForKey:key];

        if(!data){

            NSString *bundlePath = [[NSBundle mainBundle] bundlePath];

            NSString *imagePath = [NSString stringWithFormat:

@"%@/MobileAppMastery-Log.png", bundlePath];

            data = [NSPurgeableData dataWithContentsOfFile:imagePath];

            [cache setObject:data forKey:key];

            NSLog(@"Retrieved resource(%@) and added to cache", key);

        }

        else

            NSLog(@"Just retrieved resource(%@)", key);;

        self.myImageView.image = [UIImage imageWithData:data];

        regularLogo = NO;

    }

    else{

        NSString *key = @"greyscale-logo";

        NSPurgeableData *data = [cache objectForKey:key];

        if(!data){

            NSString *bundlePath = [[NSBundle mainBundle] bundlePath];

            NSString *imagePath = [NSString

stringWithFormat:@"%@/MAM_Logo_Square_No_Words_Grayscale.png", bundlePath];

            data = [NSPurgeableData dataWithContentsOfFile:imagePath];

            [cache setObject:data forKey:key];

            NSLog(@"Retrieved resource(%@) and added to cache", key);

        }

        else

            NSLog(@"Just retrieved resource(%@)", key);
        self.myImageView.image = [UIImage imageWithData:data];

        regularLogo = YES;

    }

}


@end
Usage
The application used in this recipe is an iOS single view application. This application type was chosen because the iOS Simulator has the ability to simulate a low memory situation, which makes it possible to see how the NSCache works under this condition. If you need to know how to build your own iOS single view application, see Recipe 1.12.
This example also uses two user controls: a button and an image view. If you want to know more about how to add and use user controls like these, see Recipe 1.13. The images used in the example are mine; if you want to try with your own images, all you need to do is drag your image files into the Supporting Files folder in your Xcode project. Make sure to click “Copy into destination folder” to ensure that the image files are included in the application bundle.
How this application works in general is that the user is presented with a blank screen with a button at the bottom. Each time the user presses the button one of two images is presented. You can see what the application looks like in Figure 4-1.
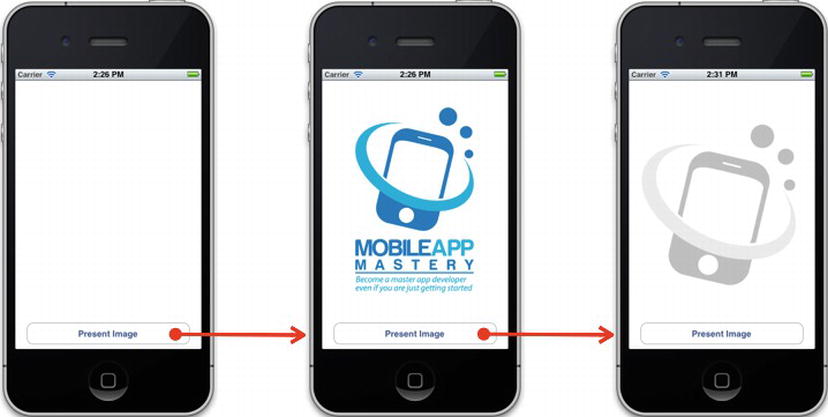
Figure 4-1. iOS application UI
Each time the user touches the button, one of the two images is retrieved from the cache. The code knows which image to choose based on the BOOL variable regularLogo.
To test this code once you have everything set up, run the iOS application in the iOS Simulator and then press the Present Image button twice to see both images loaded. If you check in the log, you should see two messages indicating that the images were created for the first time.
Retrieved resource(regular-logo) and added to cache

Retrieved resource(greyscale-logo) and added to cache
Now press the button twice again. You should see the images presented again in sequence. Check the log again how this worked.
Just retrieved resource(regular-logo)

Just retrieved resource(greyscale-logo)
This time the images didn’t need to be created at all and they were just retrieved from the cache.
Now, let’s create a low memory situation in the iOS Simulator to see how the cache helps you. Go to iOS Simulator ![]() Hardware
Hardware ![]() Simulate Memory Warning. Press the button two times again to see the results.
Simulate Memory Warning. Press the button two times again to see the results.
Received memory warning.

Retrieved resource(regular-logo) and added to cache

Just retrieved resource(greyscale-logo)
As you can see from this output, the regular-logo image had to be re-created because NSCache removed the object when the memory warning was received. The second image didn’t get removed (because it was still retained by the image view).