
![]()
Sample Application: Application Structure and Domain Model
There are two main approaches to learning new stuff: learning by practicing or learning the theory first. If the first one is your preferred option, the next three chapters are for you. If you prefer knowing theory first, you might want to skip to Chapter 8 and continue reading to Chapter 18 before coming back here. In the next three chapters I’ll help you build a sample application using ASP.NET Web API. Also, Chapter 7 will cover implementing a .NET wrapper around our HTTP API to make its consumption easy from .NET applications. We’ll then use this wrapper to build a client application based on ASP.NET MVC. However, the client application doesn’t have to be an ASP.NET MVC application. It could be an HTML5 application that makes AJAX calls to the HTTP API, a Windows Store application, or an iOS application. Any platform that knows how to talk HTTP can consume our HTTP API.
PingYourPackage: An Overview
The application to be implemented during the next three chapters is called PingYourPackage; it covers a few scenarios you may already be familiar with. Let’s say you’re ordering some printed books at Amazon.com or a similar site; if the books you ordered are in stock, you’ll receive an e-mail indicating that they will be shipped soon. Once they’re shipped, you’ll receive an e-mail notifying you of the fact. Furthermore, you’ll get a tracking number for that shipment. Using that tracking ID, you can trace your package. At every stage of shipment, you’ll have information about where your package is at that moment.
To simplify the domain model a bit, we added some constraints:
- We, the company running the PingYourPackage application, have affiliates that can assign shipment orders to us using the HTTP API.
- Each shipment contains one package.
Of course, in implementing the PingYourPackage application in the next chapters and sections, we won’t cover the entire process described above. We’ll look at the most important aspects from the business perspective, as well as from that of implementing a Web API using ASP.NET Web API.
In this section, to understand more clearly what will be implemented and to set up some context before starting the implementation, I’ll describe the above scenario in more detail. I’ll first define our application features and extract a domain language. After that, I’ll define the resources for our API and how to identify them using URIs.
![]() Note You can download the entire application’s source code, along with the other samples, from the Apress web site. In addition, the application source code is hosted on GitHub (https://github.com/tugberkugurlu/PingYourPackage). Go to the ReadMe section for more information (https://github.com/tugberkugurlu/PingYourPackage#readme).
Note You can download the entire application’s source code, along with the other samples, from the Apress web site. In addition, the application source code is hosted on GitHub (https://github.com/tugberkugurlu/PingYourPackage). Go to the ReadMe section for more information (https://github.com/tugberkugurlu/PingYourPackage#readme).
Application Features and Domain Language
There are several ways to start implementing an application. I’ve chosen to specify the requirements first before writing any lines of code. As the main goal here is to put forward the ASP.NET Web API, we won’t go into many details of the application features. I’ll touch on just the most specific ones.
As mentioned above, the PingYourPackage project allows companies to delegate shipment to another delivery company by consuming the public HTTP API. This API requires authentication via the HTTP Basic Authentication mechanism (you’ll see how to implement it in Chapter 6). So each allowed request arriving at our HTTP API will be attached to a user, and each user record has a specified role. For our application, the roles required to distinguish borders for security reasons are these:
- Admin
- Affiliate
- Employee
Each part of the API allows access to users associated with specific roles (more about this in Chapter 6). With the roles identified, let’s try to extract the domain language and define the key words in it. The domain language consists of substantives naming objects, processes, or conditions. By extracting them from the user stories, we get the following list of objects, which become the domain entities at the PingYourPackage application:
- Affiliate. An affiliate is a customer. Affiliates can assign shipments to us to get packages sent to their customers.
- PackageReceiver. Under PackageReceiver are listed the customers of an affiliate. They order goods, which we ship to them. Customers can track shipments until they reach them.
- Shipment. A shipment consists of a package, assigned by the affiliate to us, to be sent to the PackageReceiver customer.
- ShipmentType. The ShipmentType declares which type the package being shipped is. Values include parcel, envelope, and sachet.
In addition to the domain entities, there are two more necessary entities.
- User. Everyone interacting with the PingYourPackage API is a user.
- Role. A role defines a group of users with specific permissions.
The overall scope of PingYourPackage can also be visualized as a work flow chart, as shown in Figure 5-1.

Figure 5-1. Simple real-world workflow of the delivery company
Now that the business scope of the sample application, its entities, and the user stories have been defined, let’s dig into some technical concepts and the architecture of the application.
Project Structure and Architecture
Based on the goals and cases specified in the previous sections, we can create an architectural overview of the application and set up a new Visual Studio solution containing all the application’s parts. Let’s start with the architecture.
Architecture
The architecture of the PingYourPackage sample application to be created in the next three chapters consists of a database and several other elements, including .NET class libraries and web applications. Figure 5-2 shows the high-level structure of the application.
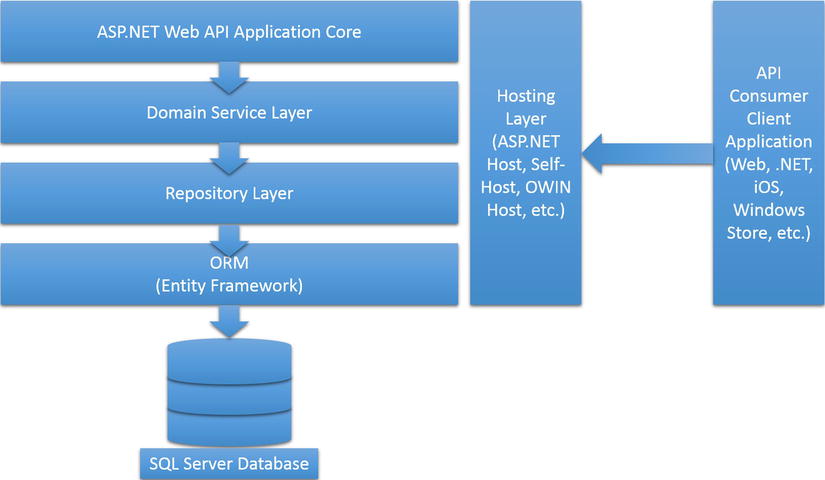
Figure 5-2. Architecture of the PingYourPackage application
The entire project is based on the SQL Server database. However, since our API will not talk directly to the database itself with raw .NET SQL-client APIs, we will separate it into several layers. Let’s use an ORM (object-relational mapping) library to communicate with the database (I’ve chosen Entity Framework as the ORM library). Also, let’s leverage the “code-first” feature of the Entity Framework to create the schema of our SQL Server database through .NET objects. Let’s also create a generic repository (more on this in upcoming sections) to abstract away the Entity Framework DbContext object.Some operations will require talking to two different repositories or maybe performing a few validations that requires a trip to the database. Since such things will get messy if we try to perform them inside the controller action itself, let’s introduce a layer, called a service layer, between the ASP.NET Web API core application and the repositories.
Project Structure
The next subsections will guide you through the process of adding the appropriate projects to that solution and including the dependencies for Data Access, Unit Testing, IoC, and the like. They’ll also explain the purpose of each project inside the solution. The only additions will be the projects for the server part of our applications; new projects will be added as needed in the next two chapters. At the end, our solution will look like Figure 5-3.

Figure 5-3. How the complete solution will look at the end
To achieve the structure shown in Figure 5-3, we first need to create a new, empty Visual Studio solution by clicking the File entry on the menu bar, then New, followed by Project . . . in the Visual Studio 2012 start page, as shown in Figure 5-4.
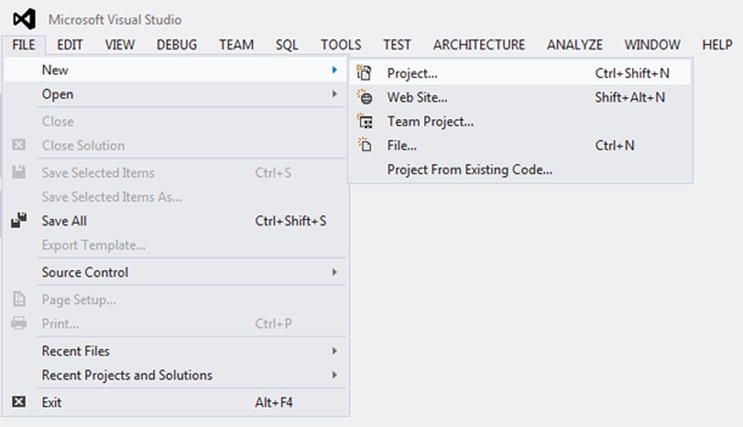
Figure 5-4. Starting a new project inside Visual Studio 2012
Clicking New ![]() Project . . . will cause a dialog to pop up; in it you can choose the type of project to create. Figure 5-5 shows Blank Solutionand the name PingYourPackage as the choices made.
Project . . . will cause a dialog to pop up; in it you can choose the type of project to create. Figure 5-5 shows Blank Solutionand the name PingYourPackage as the choices made.
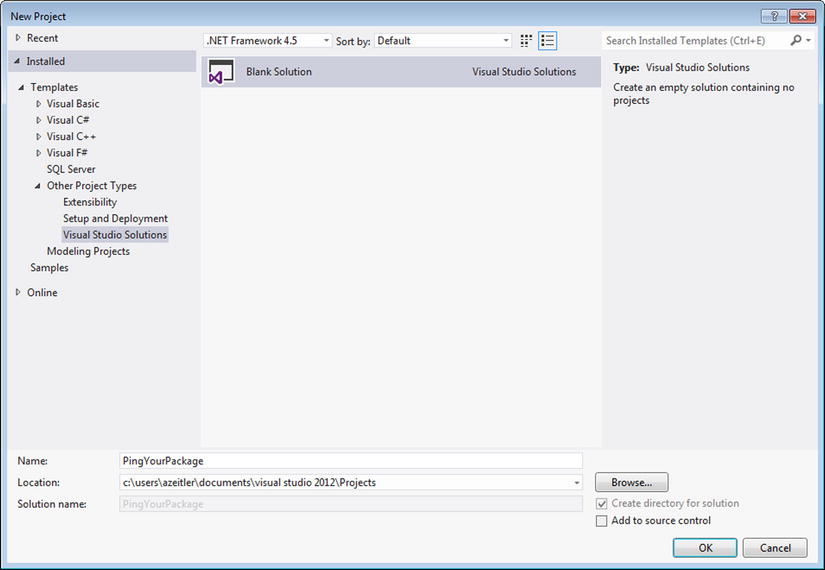
Figure 5-5. Creating a blank solution in Visual Studio 2012
Visual Studio 2012 now creates the new, blank solution name PingYourPackage and displays it in the Solution Explorer. That solution is the container for all projects needed to implement the PingYourPackage sample application. In the next sections we’ll add Visual Studio projects of different types, according to the technical need they have to fulfill. We are splitting the application into several logical projects so that we can create reusable components from them and deploy the Web API in different hosting environments, if necessary.
PingYourPackage.Domain Project
The first project, which we now take a closer look at, is the project containing the domain entities, data access logic (repositories), and application logic (service layer). So let’s add Class Library project for our domain-entity objects. To do this, right-click the PingYourPackage solution entry in the Solution Explorer window and choose Add, followed by New Project . . . in the context menu shown. Figure 5-6 shows that click sequence.
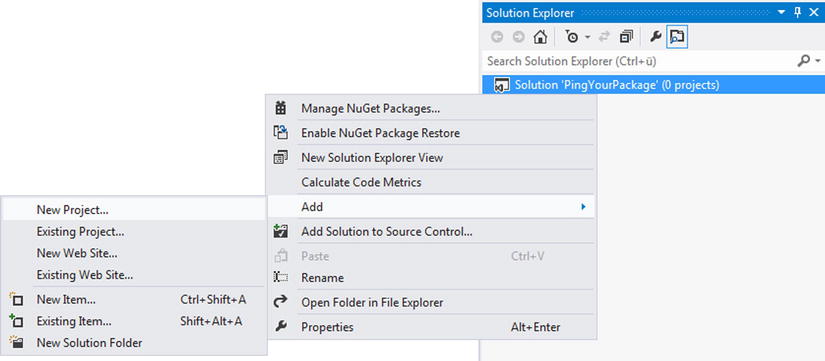
Figure 5-6. Starting to add a new project to the PingYourPackage solution in Visual Studio 2012
As was said, we want to add a new Class Library project; select it from the upcoming dialog and name it PingYourPackage.Domain, as shown in Figure 5-7.
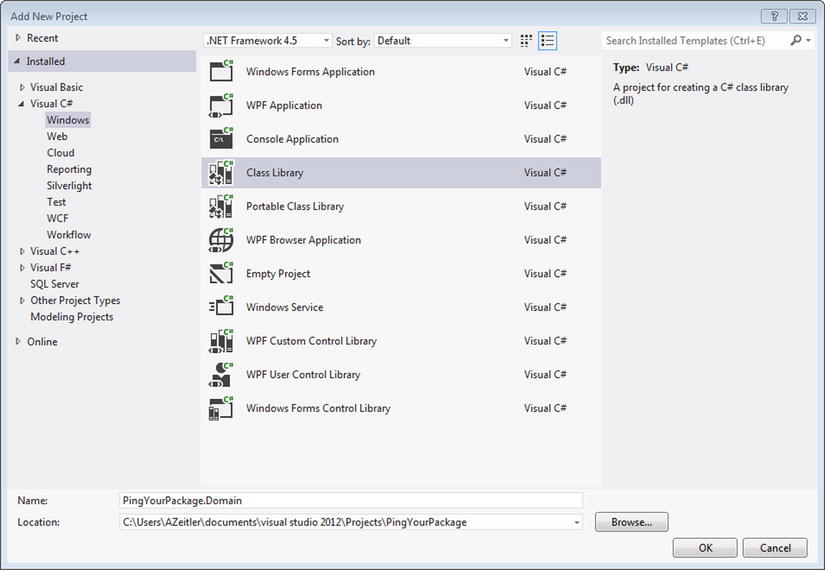
Figure 5-7. Adding the PingYourPackage.Domain Class Library project to the solution
After Visual Studio has added the PingYourPackage.Domain project, delete the file Class1.cs, which has also been created by default but makes no sense here. The necessary references and entities will be added to this project later on, when we describe the database schema and how to use EntityFramework with the Code First approach.
The PingYourPackage.API project will hold the ASP.NET Web API components for building the HTTP API logic itself. These components contain controllers, message handlers, filters, custom parameter bindings, and other tools to maintain the project over time by separating the concerns. The PingYourPackage.API will hold the authentication and authorization logic, too.
The PingYourPackage.API project will be a class library project, too; it contains no host-specific information. First, much as in the process shown in the previous section, we here add a class library project to the solution. This one is called PingYourPackage.API. The Class1.cs file can safely be deleted. Now our solution should look similar to the one in Figure 5-8.
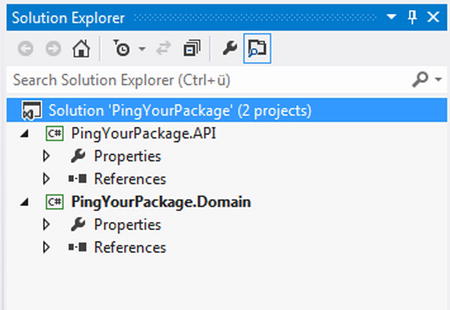
Figure 5-8. PingYourPackage solution after adding the PingYourPackage.API project
The next step is to add ASP.NET Web API components to the PingYourPackage.API project. Thanks to Microsoft NuGet, this is done easily and without worry about where to store the dependent DLL files. In the NuGet Package Manager Console, just type the following:
Install-Package Microsoft.AspNet.WebApi.Core -ProjectName PingYourPackage.API
After Visual Studio resolves all dependencies correctly, downloads it from the NuGet server, and references the core ASP.NET Web API DLLs, your NuGet Package ManagerConsole should look like the one shown in Figure 5-9.
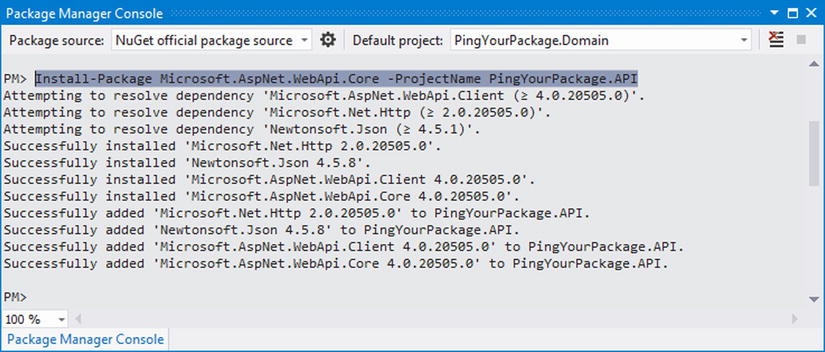
Figure 5-9. Referencing ASP.NET Web API package using NuGet Package Manager Console
Another dependency that should be added is the Autofac IoC Container. It is used to inject required dependencies, like repositories, into our controllers. The Autofac container neatly integrates with ASP.NET Web API and the appropriate NuGet package, for this is Autofac.WebApi, which refers to the core Autofac container. Type the following in the NuGet Package Manager Console:
Install-Package Autofac.WebApi -ProjectName PingYourPackage.API
Now let’s add folders and classes to the PingYourPackage.API project. Start with the folders for the overall structure. Folders are added by right-clicking the project file or the folder under which the new one is to be created.
One of the folders to be added is the Config folder; it will hold the ASP.NET Web API configuration files, such as the general ASP.NET Web API configuration (WebAPIConfig.cs), Web API routes configuration (RouteConfig.cs), and IoC container configuration (AutofacConfig.cs). See Figure 5-10.
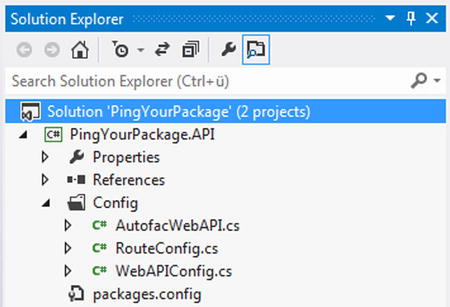
Figure 5-10. The temporary structure of the PingYourPackage.API project
The reason why we have separated these into different files and classes is to make them more maintainable. Each static class will have static methods to get their job done, and they will be called through the hosting layer once per application life cycle. We’ll invoke these static methods during integration testing.
Now that a coarse structure of the PingYourPackage.API project is in place, we can add some infrastructural code to it. First, we’ll add code baseframe to the AutofacWebAPI.cs class file, which is shown in Listing 5-1.
Listing 5-1. Code Baseframe for Autofac Used in the PingYourPackage.API Project
public class AutofacWebAPI {

    public static void Initialize(HttpConfiguration config) {

        Initialize(config,
            RegisterServices(new ContainerBuilder()));
    }

    public static void Initialize(
        HttpConfiguration config, IContainer container) {

        config.DependencyResolver =
            new AutofacWebApiDependencyResolver(container);
    }

    private static IContainer RegisterServices(ContainerBuilder builder) {

        builder.RegisterApiControllers(Assembly.GetExecutingAssembly());

        // registration goes here

        return builder.Build();
    }
}
As Listing 5-1 shows, there are two Initialize methods: Initialize(HttpConfiguration config), which will be called by the hosting layer, and Initialize(HttpConfiguration config, IContainer container), which will be called through the integration tests by providing an IContainer instance. The first Initialize method calls the second one by providing an IContainer instance through the RegisterServices private method, which is where our dependencies are registered. Inside the second Initialize method a new AutofacWebApiDependencyResolver instance, which accepts an implementation of IContainer through its constructor, is assigned to the passed-in HttpConfiguration instance DependencyResolver property.
The WebAPIConfig and RouteConfig classes will be touched on in Chapter 6, when the core Web API logic is being built.
PingYourPackage.API.Test
Not only is ASP.NET Web API a great framework, in the sense of implementing the HTTP specification, but it also promotes easy testing. To test Web API–specific elements like controllers for our PingYourPackage implementation, add another class library project to the PingYourPackage solution, one named PingYourPackage.API.Test, and as before, also remove the Class1.cs file. As you learned in Chapter 1, we’re writing tests for ASP.NET Web API using the xUnit.net testframework. As xUnit.net is a state-of-the-art unit-testing framework, it may be easily added to your projects via NuGet packages. To reference xUnit.net in our PingYourPacakage.API.Test project, execute the following command in the NuGet Package Manager Console:
Install-Package xunit -ProjectName PingYourPackage.API.Test
When it comes to unit testing, the need may arise to mock dependent objects or, to be more specific, their behavior and properties. You can write mock objects or stubs by hand, but you can also choose a mocking framework. The latter has been my choice; we use the mocking framework called Moq, which was touched upon in Chapter 1, as well as xUnit.net. Moq also provides NuGet packages; the command to reference it is quite similar to the one for xUnit.net:
Install-Package Moq -ProjectName PingYourPackage.API.Test
As we’re going to test the parts of our Web API core application which depend on ASP.NET Web API itself, we need to reference ASP.NET Web API in the PingYourPackage.API.Test project:
Install-Package Microsoft.AspNet.WebApi.Core -ProjectName PingYourPackage.API.Test
To check whether PingYourPackage.API.Test contains all required NuGet package references, execute the following command:
Get-Package -ProjectName PingYourPackage.API.Test
The output should contain the NuGet packages shown in Figure 5-11 (note that the versions shown may differ as the projects are in continuous development).
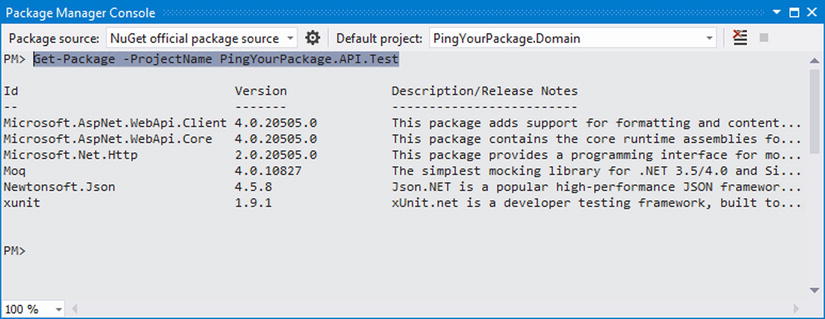
Figure 5-11. Installed NuGet packages for PingYourPackage.API.Test
As we implement the controllers for PingYourPackage in the next chapter, we’ll also write the test for them at that time. For now, we’re done with the PingYourPackage.API.Test project.
PingYourPackage.WebHost Project
Look back at Figure 5-2, and you’ll see that the next step up in the PingYourPackage architecture is the web hosting environment for the PingYourPackage HTTP API. This is accomplished by adding another project to the PingYourPackage solution. This time, you’ll add a new project type of ASP.NET Empty Web Application named PingYourPackage.API.WebHost (see Figure 5-12).
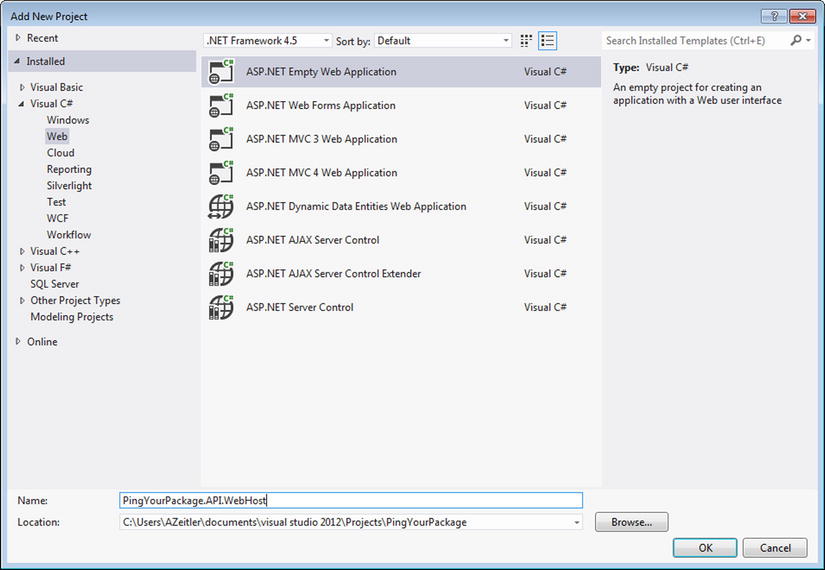
Figure 5-12. Adding an empty ASP.NET Web application project to PingYourPackage
The first NuGet package to add is Microsoft.AspNet.WebApi.WebHost, which resolves all necessary ASP.NET Web API dependencies and also references them. The Microsoft.AspNet.WebApi.WebHost NuGet package depends on the Microsoft.AspNet.WebApi.Core package and brings a specific hosting component for ASP.NET.
In order to wire up the PingYourPackage API implementation with our ASP.NET web hosting environment, we need to add a so-called Global Application Class to our PingYourPackage.API.WebHost project. This is done by right-clicking the PingYourPackage.API.WebHost project entry in the Solution Explorer, followed by a click to the Add entry and then another on the New Item . . . entry, as shown in Figure 5-13. In the following dialog, you have to choose the Global Application Class entry and keep the Global.asax name, according to Figure 5-14.
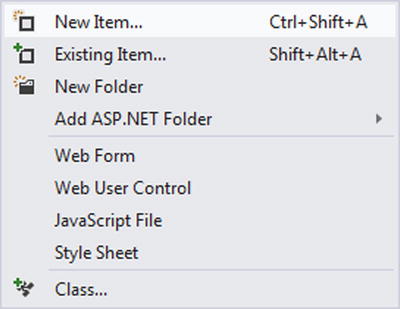
Figure 5-13. Adding a new item to the PingYourPackage.API.WebHost project
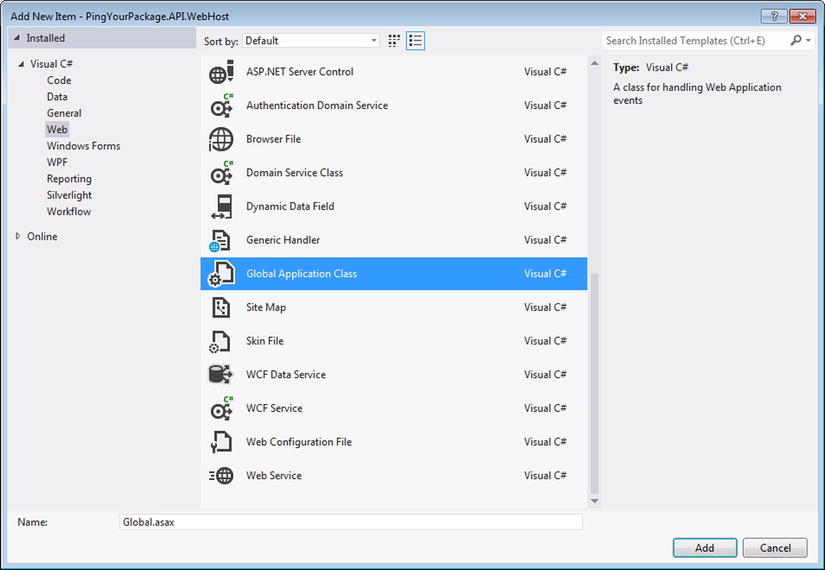
Figure 5-14. Selecting the Global Application Class
After the Global Application Class is added, replace the autogenerated Application_Start method stub with the implementation from Listing 5-2.
Listing 5-2. Wiring Up the Parts of the PingYourPackage Application
protected void Application_Start(object sender, EventArgs e) {

    var config = GlobalConfiguration.Configuration;

    RouteConfig.RegisterRoutes(config);
    WebAPIConfig.Configure(config);
    AutofacWebAPI.Initialize(config);
}
The code shown in Listing 5-2 initializes the configuration for the PingYourPackage application by calling the static configuration methods created previously. Every part of that configuration and the objects being configured will be covered in the next sections and chapters.
These projects needed to be added to our solution, but they are enough for now. We will add a few more projects along the way.
Before going further with our API design and implementation, it would be a good idea to build the domain model, because knowing what we are working with in our API application is desirable.
![]() Note Opinions differ as to whether starting a project this way is a good idea or not, but we favor this approach. Remember, this book focuses on ASP.NET Web API; the tools used and the approach followed are just for our sample application. In fact, each tool used in this project can be replaced by your own favorite relevant tool. These chapters only explain our sample application; they aren’t intended to give guidance on how you should design your application. Design needs vary with the application in question and are outside this book’s scope. The main purpose here is to explain how to create a maintainable application, one where advantage can be taken of the ASP.NET Web API framework and of how pieces fit together for our specific scenario.
Note Opinions differ as to whether starting a project this way is a good idea or not, but we favor this approach. Remember, this book focuses on ASP.NET Web API; the tools used and the approach followed are just for our sample application. In fact, each tool used in this project can be replaced by your own favorite relevant tool. These chapters only explain our sample application; they aren’t intended to give guidance on how you should design your application. Design needs vary with the application in question and are outside this book’s scope. The main purpose here is to explain how to create a maintainable application, one where advantage can be taken of the ASP.NET Web API framework and of how pieces fit together for our specific scenario.
For our sample application, we decided to use an object-relational mapping (ORM) framework to access our data on the SQL Server; the Microsoft Entity Framework is the one that we’ve chosen.
Brief Introduction to Entity Framework
Entity Framework (commonly abbreviated EF) is an ORM framework that enables us to work with relational data using domain-specific objects. It is one of the most frequently used data access technologies in .NET applications.
![]() Note Entity Framework is also an open source project at ASP.NET Web API and accepts contributions from the community.
Note Entity Framework is also an open source project at ASP.NET Web API and accepts contributions from the community.
With Entity Framework, we can issue queries against our database using LINQ and then retrieve and manipulate data as strongly typed objects. EF also eliminates the need for focusing on the data access fundamentals; this enables us to focus more on the business logic of our application. On the other hand, EF provides Code First experience to create entity models using code; this will be the approach we take. Along with the Code First model, EF has a few more advantages as a data access technology.
- It is compatible with multiple database technologies, including Microsoft SQL Server, Microsoft SQL Server Compact, and Oracle.
- It has high-level integration with Visual Studio for a better experience.
- It has language-integrated query (LINQ) support.
- It provides several models to work with the database: Code First, Database First, Model First.
- When using the Code First model, EF provides the migrations feature to update the database schema during the development or at runtime.
To include Entity Framework in our project, we’ll use NuGet and install the Entity Framework package in the domain application (PingYourPackage.Domain), as shown in Figure 5-15. We also need to include this package in our core API application (PingYourPackage.API), API host application (PingYourPackage.API.WebHost) and API test project (PingYourPackage.API.Test).
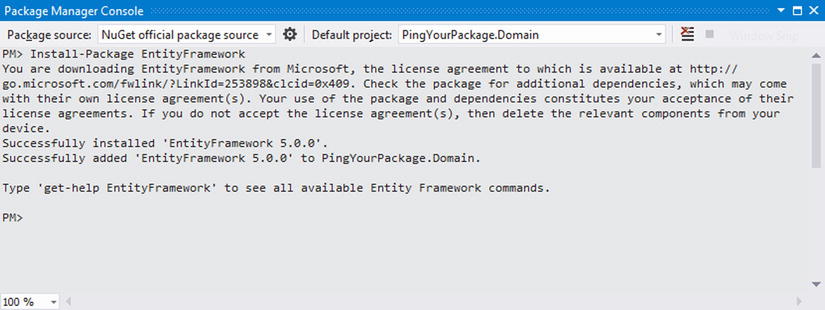
Figure 5-15. Installation of the Entity Framework NuGet package through the Package Manager Console
Installation of the Entity Framework NuGet package will get all the necessary components we need, such as EntityFramework.dll and the migration parts. We’ll talk about them later in the chapter.
Building Entity Objects and DbContext
If you know your business needs, it won’t be hard to structure the database in your mind. However, our SQL Server database won’t be created through SQL Server Management Studio or an SQL script code, but it could be if it had to. Instead, let’s work directly with the C# code to build our database structure.
It was briefly mentioned earlier that the Code First with Entity Framework enables the creation of CLR classes that define our models and generate a database based on these classes. The beauty here is that these classes are noting but plain old CLR objects, commonly known as POCO classes.
The most desirable database schema is the one shown in Figure 5-16.
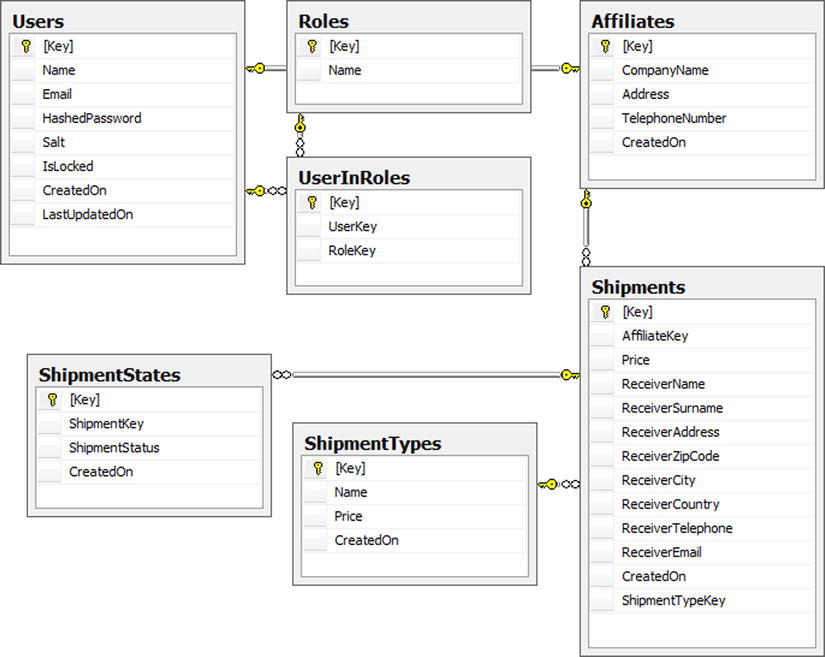
Figure 5-16. PingYourPackage application database schema
Working with Entity Framework Code First
First off, let’s create an interface to use as a common construct for our entity classes. It doesn’t have to be done to work with Entity Framework Code First, but it will help create a better repository structure, as you’ll soon see. This simple interface is shown in Listing 5-3.
Listing 5-3. IEntity Interface for the Entity Classes
public interface IEntity {

    Guid Key { get; set; }
}
As you see, the interface contains only the Key property, a type of Guid; it will be mapped to the primary key for all our tables. We decided to use Guid, which is equivalent to uniqueidentifier in SQL Server, as the primary key type but it’s not necessary to do so.
Our API application requires authentication and role-based authorization; so we need some sort of membership system. To get this type of system, we don’t want to use ASP.NET’s built-in membership system; we need a simpler approach, and so we’ll implement our own. We don’t encourage you to use this system for your own application, because security is very hard to get right. You need to consider all the facts of your application and build security accordingly. For our sample application, this membership system, which we’ll now explain, is good enough.
We have three classes for our membership system: the User class, which will hold user information such as Name, Email, and so on (Listing 5-4); the Role class, which contains the roles (Listing 5-5), and the UserInRole class, which will log which user is in which role (Listing 5-6).
Listing 5-4. User Class
public class User : IEntity {

    [Key]
    public Guid Key { get; set; }

    [Required]
    public string Name { get; set; }

    public string Email { get; set; }

    [Required]
    public string HashedPassword { get; set; }

    [Required]
    public string Salt { get; set; }

    public bool IsLocked { get; set; }
    public DateTime CreatedOn { get; set; }
    public DateTime? LastUpdatedOn { get; set; }

    public virtual ICollection<UserInRole> UserInRoles { get; set; }

    public User() {

        UserInRoles = new HashSet<UserInRole>();
    }
}
Listing 5-5. Role Class
public class Role : IEntity {

    [Key]
    public Guid Key { get; set; }

    [Required]
    public string Name { get; set; }

    public virtual ICollection<UserInRole> UserInRoles { get; set; }

    public Role() {

        UserInRoles = new HashSet<UserInRole>();
    }
}
Listing 5-6. UserInRole Class
public class UserInRole : IEntity {

    [Key]
    public Guid Key { get; set; }
    public Guid UserKey { get; set; }
    public Guid RoleKey { get; set; }

    public User User { get; set; }
    public Role Role { get; set; }
}
There are a few important things to mention here regarding Entity Framework Code First. We use IEntity interface for these three classes and implement the Key property for them. Each Key property also has a KeyAttribute (located under the System.ComponentModel.DataAnnotations namespace) applied to it. This attribute indicates that the property serves as the primary key for the entity. Another attribute used here is the RequiredAttribute; it marks the column Not Null at the corresponding SQL Server database table. We don’t need to put the RequiredAttribute for other types, except for string, because they will be already marked Not Null. If we need those types of properties to be marked Null, we need to make them Nullable properties with either the ? operator at the end or by using the Nullable generic type.
There is also a UserInRoles property in both User and Role classes; that property is a type of ICollection<UserInRole>. It’s also a virtual property, because Entity Framework will generate proxy classes for those behind the scenes. We also need to initialize those collection properties inside the parameterless constructor. For the UserInRole class, we have two properties, UserKey and RoleKey, besides the Key property. They are types of User and Role. These properties—UserKey and RoleKey—will serve as “foreign keys,” because Entity Framework will pick them up from the structure we have just put in place.
Now with three classes in our hands, let’s move forward and generate the database based on them. But to build up that database, we’ll need to create our DbContext class first. We’ll talk about that next.
The Entity Framework DbContext class is the main class we’ll draw from for our database context class. This class will represent the unit of work, so that it can be used to query from a database and group changes together. They in turn will be written back to the database as a unit. Listing 5-7 shows the initial structure of EntitiesContext, a derived class from the DbContext class.
Listing 5-7. EntitiesContext Class
public class EntitiesContext : DbContext {

    public EntitiesContext() : base("PingYourPackage") {
    }
}
By convention, if we use the parameterless constructor of the base DbContext class, the class name will also be the database name on creation. However, we want the database name to be PingYourPackage. One of the constructors of the DbContext class allows passage of this information, just as we do in our sample. As for the database type, Entity Framework will use conventions to figure out which type you specify. However, let’s specify a connection string inside the PingYourPackage.API.WebHost project configuration file. We will name this connection string "PingYourPackage", as shown in Listing 5-8.
Listing 5-8. “PingYourPackage” Connection String
<add name="PingYourPackage"
     connectionString="Data Source=.SQLEXPRESS;Initial Catalog=PingYourPackage;Integrated Security=True"
     providerName="System.Data.SqlClient" />
We specified that the connection string use SQL Express here; when we are ready for production, we can change the connection string on the fly (e.g., with a build script) to target the production database.
Currently, we have three classes to represent our membership system; we can add those to the EntitiesContext class, as shown in Listing 5-9.
Listing 5-9. EntitiesContext Class with Properties
public class EntitiesContext : DbContext {

    public EntitiesContext() : base("PingYourPackage") {
    }

    public IDbSet<User> Users { get; set; }
    public IDbSet<Role> Roles { get; set; }
    public IDbSet<UserInRole> UserInRoles { get; set; }
}
Being now completely set, we can create the database. We’ll use Entity Framework Code First Migrations to create the database; we’ll also set up the infrastructure we need to automate this process.
Working with Entity Framework Migrations
Code First Migrations allows you to implement database changes all through the code. Database migrations through the code itself have been around for a while; they aren’t a feature specific to Entity Framework. Installing the Entity Framework through NuGet yields the Code First Migrations components as well. When you open up the packages folder inside the root solution directory and navigate to the EntityFramework.5.0.0 ools folder from there, you’ll find some files—most of them for the Code First Migrations feature (see Figure 5-17).
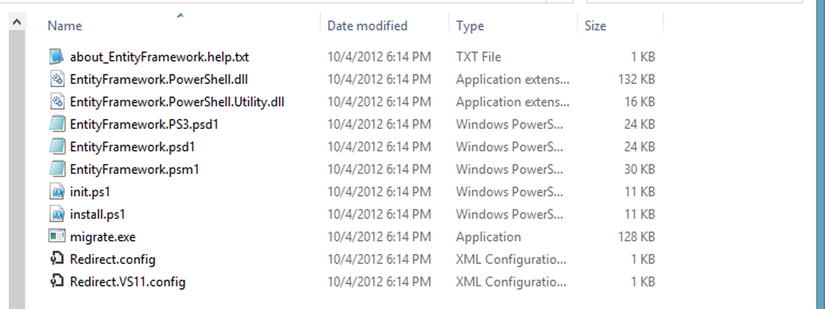
Figure 5-17. Entity Framework NuGet package tools folder
Migrations can be worked with in different ways, such as directly with the migration.exe file and using the NuGet Package Manager Console (PMC) commands, which are installed when the Entity Framework NuGet package is installed. For our sample application, we’ll work with PMC to scaffold migrations. Let’s see this in action.
![]() Note The Entity Framework Code First Migrations feature is straightforward, but depending on your scenario, it may not be your best choice. As this book is not about Entity Framework, it won’t explore the migrations feature in depth. Its main focus is to create a fully functioning application with ASP.NET Web API.
Note The Entity Framework Code First Migrations feature is straightforward, but depending on your scenario, it may not be your best choice. As this book is not about Entity Framework, it won’t explore the migrations feature in depth. Its main focus is to create a fully functioning application with ASP.NET Web API.
First, we need to enable migrations. To do so, we’ve opened the PMC and set the Default project to PingYourPackage.Domain. This is the project where our DbContext instance, which is EntitiesContext class, lives (see Figure 5-18).
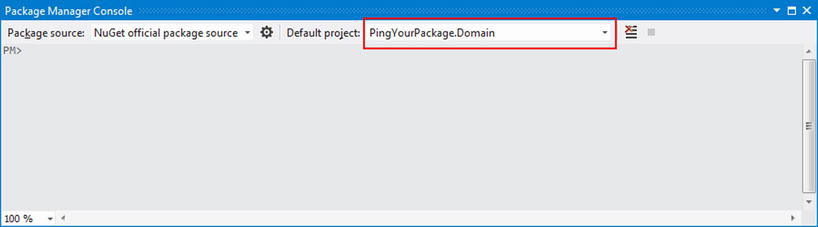
Figure 5-18. Setting the Default project in Package Manager Console
Now we can run the Enable-Migrations command to enable EF Code First Migrations. We’ll pass StartUpProjectName as PingYourPackage.API.WebHost, because this is where the connection string of our database lives (see Figure 5-19).
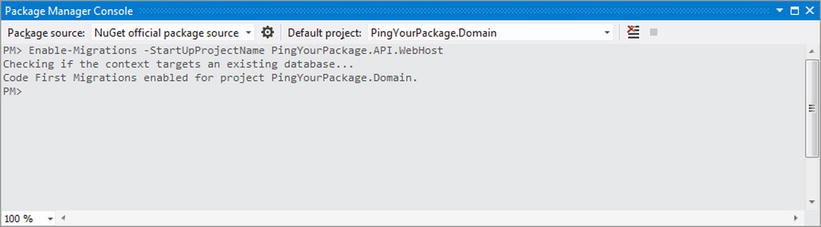
Figure 5-19. Enabling EF Code First migrations
After running this command, you’ll see that a folder named Migrations has been created inside our target project (see Figure 5-20).
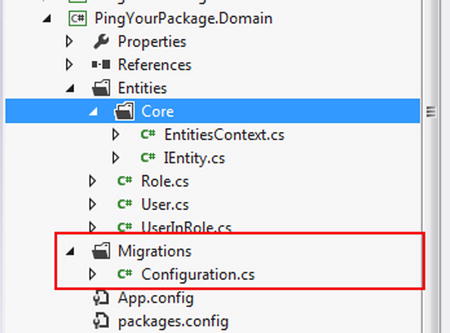
Figure 5-20. Migrations folder has been added to the specified project automaticaly when EF Code First Migrations is enabled
The Configuration.cs file, which is also generated automatically in the Migrations folder, includes the code shown in Listing 5-10.
Listing 5-10. Configuration.cs File Content
namespace PingYourPackage.Domain.Migrations
{
    using System;
    using System.Data.Entity;
    using System.Data.Entity.Migrations;
    using System.Linq;
    using PingYourPackage.Domain.Entities;

    internal sealed class Configuration : DbMigrationsConfiguration<EntitiesContext>
    {
        public Configuration()
        {
            AutomaticMigrationsEnabled = false;
        }

        protected override void Seed(EntitiesContext context)
        {
            //  This method will be called after migrating to the latest version.

            //  You can use the DbSet<T>.AddOrUpdate() helper extension method
            //  to avoid creating duplicate seed data. E.g.
            //
            //    context.People.AddOrUpdate(
            //      p => p.FullName,
            //      new Person { FullName = "Andrew Peters" },
            //      new Person { FullName = "Brice Lambson" },
            //      new Person { FullName = "Rowan Miller" }
            //    );
            //
        }
    }
}
This class is internal, but it should be made a public class, as it will be used from our WebHost project. To avoid using automatic migrations, leave the AutomaticMigrationsEnabled property set to false.
Inside the Seed method, we can provide seed data, which will be inserted as soon as the database has been created. Use the AddOrUpdate method to ensure that each record is added only once between migrations. For this scenario, we need three roles for our membership system: Admin, Employee, and Affiliate. These roles will be included inside the Seed method when we initialize the database (see Listing 5-11).
Listing 5-11. Overriden Seed Method of DbMigrationsConfiguration
protected override void Seed(EntitiesContext context) {

    context.Roles.AddOrUpdate(role => role.Name,
        new Role { Key = Guid.NewGuid(), Name = "Admin" },
        new Role { Key = Guid.NewGuid(), Name = "Employee" },
        new Role { Key = Guid.NewGuid(), Name = "Affiliate" }
    );
}
The next thing to do is add the initial migration to define the initial database schema. To apply a migration, run the Add-Migration command inside the PMC. Specify the StartUpProjectName parameter as PingYourPackage.API.WebHost. We also need to give this migration a name (see Figure 5-21).
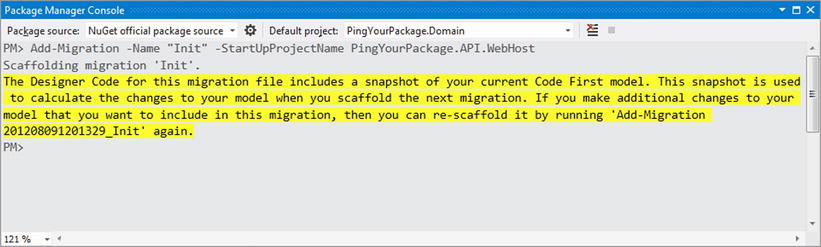
Figure 5-21. Add-Migration command use
After running the Add-Migration command, a file is added to the Migrations folder (see Figure 5-22). It contains the database schema information based on our EntitiesContext class.
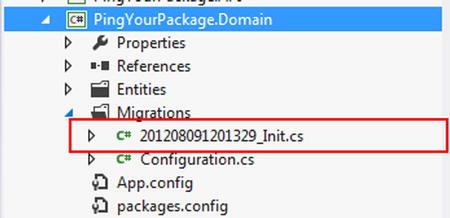
Figure 5-22. Migration file added after the Add-Migration command has run
When a change is made to the EntitiesContext class itself or to any related classes in EntitiesContext (User, Role, etc.), we can add another migration, as we did here. The migration will drop another file inside the Migrations folder, but it will contain only differences, not the whole database definition.
We can finally create the database! In doing so, we have a few options. We could use the PMC, as we did in creating our migrations, but instead we could kick this off when our Web API application starts. Let’s add a class to the WebHost project, as shown in Listing 5-12.
Listing 5-12. The EFConfig Class That Runs the Migrations
public class EFConfig {

    public static void Initialize() {

        RunMigrations();
    }

    private static void RunMigrations() {

        var efMigrationSettings = new PingYourPackage.Domain.Migrations.Configuration();
        var efMigrator = new DbMigrator(efMigrationSettings);

        efMigrator.Update();
    }
}
Then we register the migrations to run at the application startup (see Listing 5-13).
Listing 5-13. Registering the Entity Framework Migrations to Run at the Application Startup
protected void Application_Start(object sender, EventArgs e) {

    //Lines omitted for brevity

    EFConfig.Initialize();
}
When we now start the WebHost application, the database will be created as expected (see Figure 5-23).
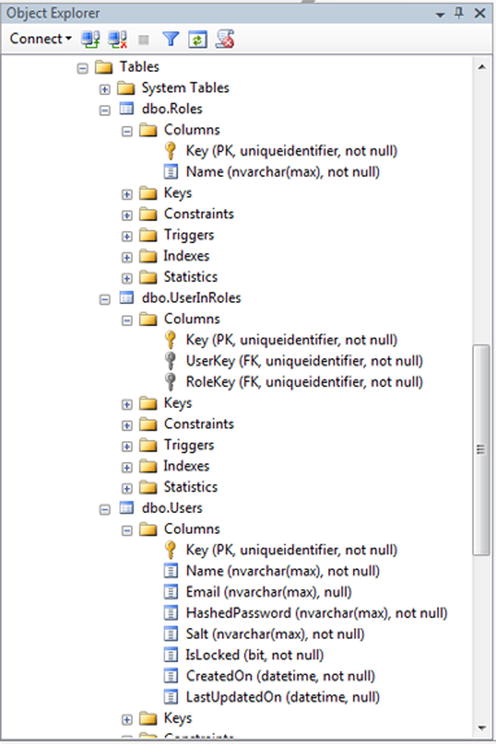
Figure 5-23. The database created on the basis of our initial migration
Notice that relationships between tables are also set, and the properties set as Required inside the classes are reflected as not null columns. We have our initial structure here, but there are things we’d like to modify in it. For example, string properties have been created as a NVARCHAR(MAX) column inside the database, but we’d like to restrict the number, and the Email column inside the Users table is set as a null column, though it shouldn’t be.
Applying the Validation Attributes
Entity Framework permits use of several data annotations attributes for validation; some of them are reflected directly to the database.
So far, we have used the RequiredAttribute, which specifies that a data field value is required. We’ll also be using one more attribute extensively: StringLengthAttribute. This attribute specifies the minimum and maximum length of characters allowed in a data field.
We can change the User class by adding StringLengthAttribute for several properties and RequiredAttribute for the Email property (see Listing 5-14).
Listing 5-14. The User Class with Validation Attribute Changes
public class User : IEntity {

    [Key]
    public Guid Key { get; set; }

    [Required]
    [StringLength(50)]
    public string Name { get; set; }

    [Required]
    [StringLength(320)]
    public string Email { get; set; }

    [Required]
    public string HashedPassword { get; set; }

    [Required]
    public string Salt { get; set; }

    public bool IsLocked { get; set; }
    public DateTime CreatedOn { get; set; }
    public DateTime? LastUpdatedOn { get; set; }

    public virtual ICollection<UserInRole> UserInRoles { get; set; }

    public User() {

        UserInRoles = new HashSet<UserInRole>();
    }
}
Also, we add the StringLengthAttribute for the Name property of Role class (see Listing 5-15).
Listing 5-15. The Role Class with Validation Attribute Changes
public class Role : IEntity {

    [Key]
    public Guid Key { get; set; }

    [Required]
    [StringLength(50)]
    public string Name { get; set; }

    public virtual ICollection<UserInRole> UserInRoles { get; set; }

    public Role() {

        UserInRoles = new HashSet<UserInRole>();
    }
}
We need to reflect these changes to our database. To do so, we create another migration (see Figure 5-24). This one will include only changes; it will modify the database accordingly when the WebHost application is run.
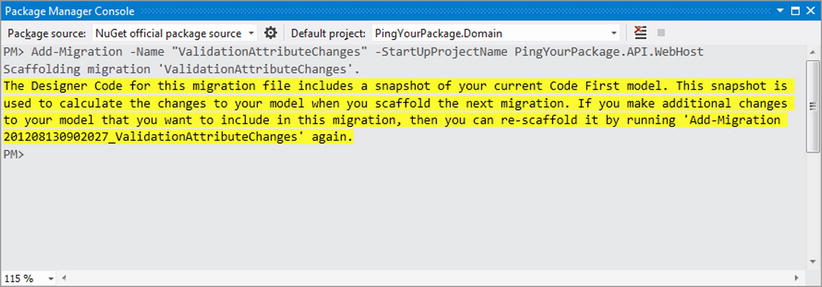
Figure 5-24. Adding a new migration to reflect the latest changes to the database
With the database updated based on our latest migration, we should be able to see the changes applied (see Figure 5-25).
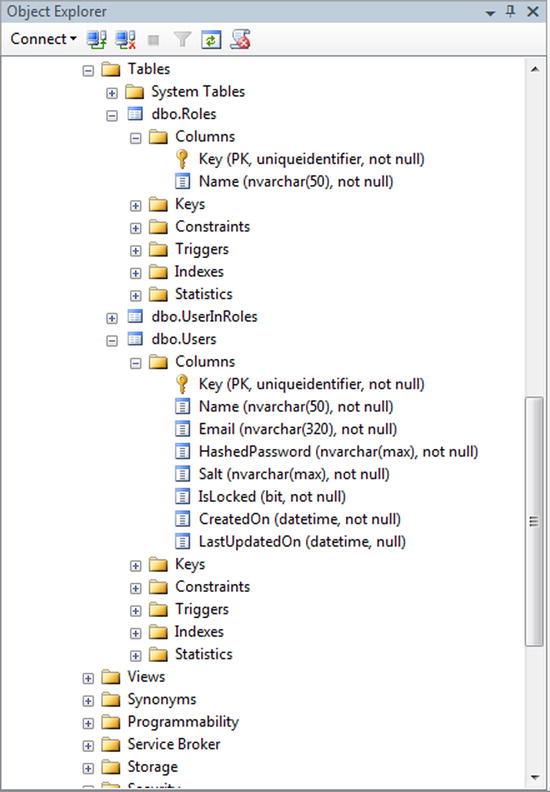
Figure 5-25. The database as changed after our latest migration was applied
So far, we have set up the initial structure of the database only for our membership system, modified the entity classes after the initial creation by applying several validation attributes, and reflected the changes to the database through Entity Framework migrations. The next step involves completing our entities and reflecting those changes to the database, as well.
Completing the Entities and DbContext Implementation
First of all, we create the Affiliate class, which will hold the affiliate information and have a one-to-one relationship with the Users table. Listing 5-16 shows the Affiliate class and that one-to-one relationship configuration.
Listing 5-16. The Affiliate Class
public class Affiliate : IEntity {

    [Key]
    public Guid Key { get; set; }

    [Required]
    [StringLength(50)]
    public string CompanyName { get; set; }

    [Required]
    [StringLength(50)]
    public string Address { get; set; }

    [StringLength(50)]
    public string TelephoneNumber { get; set; }

    [Required]
    public DateTime CreatedOn { get; set; }

    [Required]
    public User User { get; set; }
}
We applied the RequiredAttribute on the User property; it is a type of User created as shown in Listing 5-14; it will configure the one-to-one relationship along with the modifications we will make to the User class (see Listing 5-17).
Listing 5-17. The Modified User Class
public class User : IEntity {

    //Lines omitted for brevity

    public virtual Affiliate Affiliate { get; set; }

    public User() {

        UserInRoles = new HashSet<UserInRole>();
        Affiliate = new Affiliate();
    }
}
Now let’s create the ShipmentType class, which will provide the price information according to the shipment type (see Listing 5-18).
Listing 5-18. The ShipmentType Class
public class ShipmentType : IEntity {

    [Key]
    public Guid Key { get; set; }

    [Required]
    [StringLength(50)]
    public string Name { get; set; }

    public decimal Price { get; set; }

    public DateTime CreatedOn { get; set; }
}
We have created the necessary classes around the Shipment class. The Shipment class will hold such information as the type of the shipment, the price, and the receiver information (see Listing 5-19).
Listing 5-19. The Shipment Class
public class Shipment : IEntity {

    [Key]
    public Guid Key { get; set; }
    public Guid AffiliateKey { get; set; }
    public Guid ShipmentTypeKey { get; set; }

    public decimal Price { get; set; }

    [Required]
    [StringLength(50)]
    public string ReceiverName { get; set; }

    [Required]
    [StringLength(50)]
    public string ReceiverSurname { get; set; }

    [Required]
    [StringLength(50)]
    public string ReceiverAddress { get; set; }

    [Required]
    [StringLength(50)]
    public string ReceiverZipCode { get; set; }

    [Required]
    [StringLength(50)]
    public string ReceiverCity { get; set; }

    [Required]
    [StringLength(50)]
    public string ReceiverCountry { get; set; }

    [Required]
    [StringLength(50)]
    public string ReceiverTelephone { get; set; }

    [Required]
    [StringLength(320)]
    public string ReceiverEmail { get; set; }

    public DateTime CreatedOn { get; set; }

    public Affiliate Affiliate { get; set; }
    public ShipmentType ShipmentType { get; set; }
}
As you can see, the Shipment class’s properties are types of the Affiliate and PackageType classes. Two other properties, AffiliateKey and ShipmentTypeKey, will serve as a foreign key inside the database. A shipment entry always has a reference to one Affiliate and one ShipmentType entry, but an Affiliate and a ShipmentType entry can have references to one or multiple Shipment entries. In order to represent those collections, we need to modify the Affiliate and ShipmentType classes, as Listings 5-20 and 5-21 show.
Listing 5-20. Modified Affiliate Class
public class Affiliate : IEntity {

    //Lines omitted for brevity

    public virtual ICollection<Shipment> Shipments { get; set; }

    public Affiliate() {

        Shipments = new HashSet<Shipment>();
    }
}
Listing 5-21. Modified ShipmentType Class
public class ShipmentType : IEntity {

    //Lines omitted for brevity

    public virtual ICollection<Shipment> Shipments { get; set; }

    public ShipmentType() {

        Shipments = new HashSet<Shipment>();
    }
}
Another useful feature is being able to track the shipment state. For this feature, we will create another class, ShipmentState. The ShipmentState class will appear as the ShipmentStates table inside our database and hold the shipment state entries. Listing 5-22 shows the ShipmentState class.
Listing 5-22. The ShipmentState Class
public class ShipmentState : IEntity {

    [Key]
    public Guid Key { get; set; }
    public Guid ShipmentKey { get; set; }

    [Required]
    public ShipmentStatus ShipmentStatus { get; set; }
    public DateTime CreatedOn { get; set; }

    public Shipment Shipment { get; set; }
}
The ShipmentState class also has a property, named ShipmentStatus, which is a type of ShipmentStatus enumeration, as shown in Listing 5-23.
Listing 5-23. The ShipmentStatus Enumeration
public enum ShipmentStatus {

    Ordered = 1,
    Scheduled = 2,
    InTransit = 3,
    Delivered = 4
}
The ShipmentStatus data field represents the status of the shipment as an integer value inside the database. With the addition of the ShipmentState class, the Shipment class needs to be modified (see Listing 5-24).
Listing 5-24. The Modified Shipment Class
public class Shipment : IEntity {

    //Lines omitted for brevity

    public virtual ICollection<ShipmentState> ShipmentStates { get; set; }

    public Shipment() {

        ShipmentStates = new HashSet<ShipmentState>();
    }
}
The last step for our domain model structure involves modifying the EntitiesContext class accordingly, as shown in Listing 5-25.
Listing 5-25. The Modified EntitiesContext Class
public class EntitiesContext : DbContext {

    public EntitiesContext() : base("PingYourPackage") {
    }

    public IDbSet<ShipmentType> PackageTypes { get; set; }
    public IDbSet<Affiliate> Affiliates { get; set; }
    public IDbSet<Shipment> Shipments { get; set; }
    public IDbSet<ShipmentState> ShipmentStates { get; set; }

    public IDbSet<User> Users { get; set; }
    public IDbSet<Role> Roles { get; set; }
    public IDbSet<UserInRole> UserInRoles { get; set; }
}
To end, we should reflect the changes to the database by adding another migration (see Figure 5-26) and apply it by running our WebHost application.
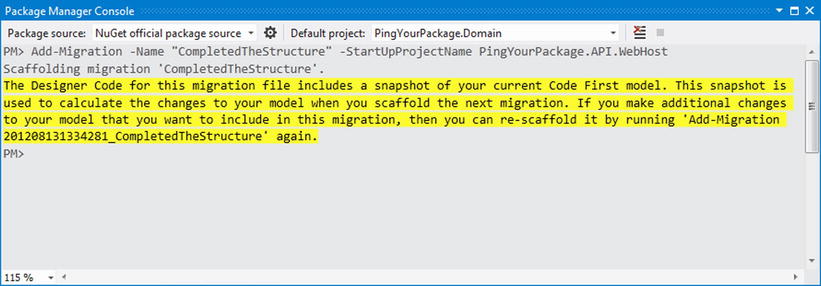
Figure 5-26. Adding a new migration to reflect the latest changes to the database
When this migration is applied, the database should be modified accordingly, as shown in Figure 5-27.
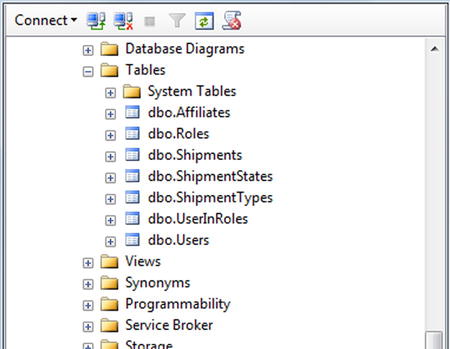
Figure 5-27. The complete look of the database as modified
Working with the Repository Pattern
With our DbContext implementation, we can work with data directly through EntitiesContext. However, doing so would make testing harder, since it is not possible to completely mock or fake the DbContext instance. We might easily extract an interface for EntitiesContext and work with a fake DbContext, but still, some parts are hard or impossible to fake. Besides, maintaining our application would be hard if we allowed arbitrary data access through our DbContext instance. Finally, we should also encapsulate the repetitive data access code.
To solve these problems, we can work with a specific pattern, known as Repository Pattern, and centralize data access logic. However, instead of implementing a separate repository for each entity, we create a generic repository to be used for all our entities without repeating ourselves.
Listing 5-26 shows the IEntityRepository<T> interface for our generic repository.
Listing 5-26. The IEntityRepository Interface
public interface IEntityRepository<T> where T : class, IEntity, new() {

    IQueryable<T> AllIncluding(
        params Expression<Func<T, object>>[] includeProperties);
    IQueryable<T> All { get; }
    IQueryable<T> GetAll();
    T GetSingle(Guid key);
    IQueryable<T> FindBy(Expression<Func<T, bool>> predicate);

    PaginatedList<T> Paginate<TKey>(
        int pageIndex, int pageSize,
        Expression<Func<T, TKey>> keySelector);

    PaginatedList<T> Paginate<TKey>(
        int pageIndex, int pageSize,
        Expression<Func<T, TKey>> keySelector,
        Expression<Func<T, bool>> predicate,
        params Expression<Func<T, object>>[] includeProperties);

    void Add(T entity);
    void Delete(T entity);
    void Edit(T entity);
    void Save();
}
This structure holds all the basic and generic functionality for our data access. When we need to work with the data—for example, inside a controller—we will be working with IEntityRepository<T> (e.g., IEntityRepository<User>), and the implementation will be injected through an IoC container, which is the Autofac for our application.
Notice, too, that we require the entity classes to implement IEntity; in that way we can have a generic GetSingle method based on the Key property. Besides, we have a custom type named PaginatedList. This is a class that is derived from List<T> and makes paginating the collection of items easy. Listing 5-27 shows the implementation of the PaginatedList<T> class.
Listing 5-27. The PaginatedList Class
public class PaginatedList<T> : List<T> {

    public int PageIndex { get; private set; }
    public int PageSize { get; private set; }
    public int TotalCount { get; private set; }
    public int TotalPageCount { get; private set; }

    public PaginatedList(
        int pageIndex, int pageSize,
        int totalCount, IQueryable<T> source) {

        AddRange(source);

        PageIndex = pageIndex;
        PageSize = pageSize;
        TotalCount = totalCount;
        TotalPageCount = (int)Math.Ceiling(totalCount / (double)pageSize);
    }

    public bool HasPreviousPage {

        get {
            return (PageIndex > 1);
        }
    }

    public bool HasNextPage {

        get {
            return (PageIndex < TotalPageCount);
        }
    }
}
The generic PaginatedList<T> class has one constructor and accepts four parameters: current page index, the size of the objects per page, the total collection, and the collection itself. The PaginatedList<T> class doesn’t provide pagination logic. This class represents only a paginated collection of objects. To perform pagination logic, there is an extension method for the IQueryable interface; it converts a collection of objects to a PaginatedList object, as shown in Listing 5-28.
Listing 5-28. ToPaginatedList Extension Method for the IQueryable Interface
public static class IQueryableExtensions {

    public static PaginatedList<T> ToPaginatedList<T>(
        this IQueryable<T> query, int pageIndex, int pageSize) {

        var totalCount = query.Count();
        var collection = query.Skip((pageIndex - 1) * pageSize).Take(pageSize);

        return new PaginatedList<T>(
            pageIndex, pageSize,
            totalCount, collection);
    }
}
The ToPaginatedList<T> extension method first performs the pagination logic with the Skip and Take LINQ methods. Then it goes to the database to retrieve the total count of the collection. Finally, it constructs a new PaginatedList<T> instance and returns it. The pagination logic inside the ToPaginatedList<T> extension method generates the optimum T-SQL query to execute at the SQL Server. So what will be retrieved is only the number of rows, just as was indicated. It is also the effect desired here.
With these extensions in place, we can now implement our generic repository.
Implementing the Generic Repository
The implementation of the IEntityRepository<T> is very straightforward. The implementation class will be the EntityRepository<T> class; it will use the DbContext class directly to perform such data access operations as retrieving, inserting, editing, and deleting data. So we’ll have no direct dependency on EntitiesContext, even inside the repository implementation. Instead, there will be only one constructor for this class; it accepts a parameter that is a type of DbContext class. We will pass an instance of EntitiesContext here. Thus, we won’t be decoupling our specific context class and repository implementation. Also, we’ll be able to use a per-request DbContext (more on this in Chapter 6) when we hook up our IoC container to the ASP.NET Web API infrastructure.
Listing 5-29 shows the EntityRepository<T> implementation.
Listing 5-29. The EntityRepository<T> Class Implementation
public class EntityRepository<T> : IEntityRepository<T>
    where T : class, IEntity, new() {

    readonly DbContext _entitiesContext;

    public EntityRepository(DbContext entitiesContext) {

        if (entitiesContext == null) {

            throw new ArgumentNullException("entitiesContext");
        }

        _entitiesContext = entitiesContext;
    }

    public virtual IQueryable<T> GetAll() {

        return _entitiesContext.Set<T>();
    }

    public virtual IQueryable<T> All {

        get {
            return GetAll();
        }
    }

    public virtual IQueryable<T> AllIncluding(
        params Expression<Func<T, object>>[] includeProperties) {

        IQueryable<T> query = _entitiesContext.Set<T>();
        foreach (var includeProperty in includeProperties) {

            query = query.Include(includeProperty);
        }

        return query;
    }

    public T GetSingle(Guid key) {

        return GetAll().FirstOrDefault(x => x.Key == key);
    }

    public virtual IQueryable<T> FindBy(Expression<Func<T, bool>> predicate) {

        return _entitiesContext.Set<T>().Where(predicate);
    }

    public virtual PaginatedList<T> Paginate<TKey>(
                int pageIndex, int pageSize,
                Expression<Func<T, TKey>> keySelector) {

        return Paginate(pageIndex, pageSize, keySelector, null);
    }

    public virtual PaginatedList<T> Paginate<TKey>(
        int pageIndex, int pageSize,
        Expression<Func<T, TKey>> keySelector,
        Expression<Func<T, bool>> predicate,
        params Expression<Func<T, object>>[] includeProperties) {

        IQueryable<T> query =
            AllIncluding(includeProperties).OrderBy(keySelector);

        query = (predicate == null)
            ? query
            : query.Where(predicate);

        return query.ToPaginatedList(pageIndex, pageSize);
    }

    public virtual void Add(T entity) {

        DbEntityEntry dbEntityEntry = _entitiesContext.Entry<T>(entity);
        _entitiesContext.Set<T>().Add(entity);
    }

    public virtual void Edit(T entity) {

        DbEntityEntry dbEntityEntry = _entitiesContext.Entry<T>(entity);
        dbEntityEntry.State = EntityState.Modified;
    }

    public virtual void Delete(T entity) {

        DbEntityEntry dbEntityEntry = _entitiesContext.Entry<T>(entity);
        dbEntityEntry.State = EntityState.Deleted;
    }

    public virtual void Save() {

        _entitiesContext.SaveChanges();
    }
}
This will be the only repository class used throughout the application. For example, we can construct an EntityRepository<User> object by simply passing the EntitiesContext instance and can work with User data through this repository class.
Repository Extension Methods
At some point, we’ll need more than our generic repository offers. For example, we have the EntityRepository<User> class instance and can get a single user based on the primary key value through the GetSingle method.However, if we want to get a single user based on the user name, we’d need to use the FindBy method and provide a lambda expression.
If this is something you do often, consider centralizing to reduce code redundancy. You might create a separate repository class for a User entity derived from EntityRepository<User>—but this is not a clean solution. Instead, consider creating extension methods for repositories. Listing 5-30 shows an example that allows you to get a single User entity based on the user name.
Listing 5-30. The UserRepositoryExtensions Static Class
public static class UserRepositoryExtensions {

    public static User GetSingleByUsername(
        this IEntityRepository<User> userRepository, string username) {

        return userRepository.GetAll().FirstOrDefault(x => x.Name == username);
    }
}
An extension method named GetSingleByUsername has been added for the IEntityRepository<User> type. It allows extension of each repository’s specific type. Listing 5-31 has a similar example for the IEntityRepository<Role> type.
Listing 5-31. The RoleRepositoryExtensions Class
public static class RoleRepositoryExtensions {

    public static Role GetSingleByRoleName(
        this IEntityRepository<Role> roleRepository, string roleName) {

        return roleRepository.GetAll().FirstOrDefault(x => x.Name == roleName);
    }
}
In the coming pages, you will see how to take advantage of these extensions when the MembershipService class is built.
Creating the Service Layer
We’ve just created our repository infrastructure for the data access logic. Yet we also have our business logic, which we intend to process inside our controller. But as our business logic matures and grows, maintaining the application will be difficult if we try to handle business logic inside the controller directly. The controller should be the place where the data access logic and the business logic are glued together. A main goal in the design of our ASP.NET Web API application is to keep the controllers as thin as possible.
To get this type of application design, we’ll work with the service layer model. A service layer is a layer added to our ASP.NET Web API application that is responsible for communication between a controller and the repository layer. A service class at the service layer can work with multiple repositories at once if it needs to. However, there are some service classes that don’t need to work with any repositories.
This section will cover two of our services: the CryptoService and the MembershipService. Additional services will be covered in Chapter 6.
CryptoService
The CryptoService is a stand-alone service that doesn’t deal with data; it provides method for password encryption. Instead of creating a utility class for encrypting passwords, we decided to create a service to do this. The signature of the ICryptoService interface is shown in Listing 5-32.
Listing 5-32. The ICryptoService Interface
public interface ICryptoService {

    string GenerateSalt();
    string EncryptPassword(string password, string salt);
}
Basically, there are two responsibilities here: generating the salt for the password and encrypting the password. Implementation of this service is shown in Listing 5-33.
Listing 5-33. The CryptoService Class
public class CryptoService : ICryptoService {

    public string GenerateSalt() {

        var data = new byte[0x10];
        using (var cryptoServiceProvider = new RNGCryptoServiceProvider()) {

            cryptoServiceProvider.GetBytes(data);
            return Convert.ToBase64String(data);
        }
    }

    public string EncryptPassword(string password, string salt) {

        if (string.IsNullOrEmpty(password)) {

            throw new ArgumentNullException("password");
        }

        if (string.IsNullOrEmpty(salt)) {

            throw new ArgumentNullException("salt");
        }

        using (var sha256 = SHA256.Create()) {

            var saltedPassword = string.Format(
                "{0}{1}", salt, password);

            byte[] saltedPasswordAsBytes =
                Encoding.UTF8.GetBytes(saltedPassword);

            return Convert.ToBase64String(
                sha256.ComputeHash(saltedPasswordAsBytes));
        }
    }
}
For the salt generation, we used .NET cryptography features; we used SHA256 hashing algorithm for the password hashing. This service will mainly be used by the MembershipService.
MembershipService
As we mentioned, we won’t be using the built-in ASP.NET membership system. Instead, we have created a lightweight infrastructure in our database. In order to process the membership logic involved in creating the user, changing the user password, and adding a user to a role, we create a service layer.
The IMembershipService interface signature is shown in Listing 5-34.
Listing 5-34. The IMembershipService Interface
public interface IMembershipService {

    ValidUserContext ValidateUser(string username, string password);

    OperationResult<UserWithRoles> CreateUser(
        string username, string email, string password);

    OperationResult<UserWithRoles> CreateUser(
        string username, string email,
        string password, string role);

    OperationResult<UserWithRoles> CreateUser(
        string username, string email,
        string password, string[] roles);

    UserWithRoles UpdateUser(
        User user, string username, string email);

    bool ChangePassword(
        string username, string oldPassword, string newPassword);

    bool AddToRole(Guid userKey, string role);
    bool AddToRole(string username, string role);
    bool RemoveFromRole(string username, string role);

    IEnumerable<Role> GetRoles();
    Role GetRole(Guid key);
    Role GetRole(string name);

    PaginatedList<UserWithRoles> GetUsers(int pageIndex, int pageSize);
    UserWithRoles GetUser(Guid key);
    UserWithRoles GetUser(string name);
}
Notice that a few methods of IMembershipService return an OperationResult or OperationResult<T> object. These are the classes that were created in order to let a caller know about operation status. For example, we don’t want to create the user if the picked user name is already present inside the database. The OperationResult and OperationResult<T> classes can be seen in Listing 5-35.
Listing 5-35. OperationResult and OperationResult<T> Classes
public class OperationResult {

    public OperationResult(bool isSuccess) {
        IsSuccess = isSuccess;
    }

    public bool IsSuccess { get; private set; }
}

public class OperationResult<TEntity> : OperationResult {

    public OperationResult(bool isSuccess)
        : base(isSuccess) { }

    public TEntity Entity { get; set; }
}
The MembershipService itself has dependencies on a few repositories and on the CryptoService. Instead of referencing them directly, MembershipService accepts them as parameters through its only constructor. The constructor of the MembershipService is shown in Listing 5-36.
Listing 5-36. The Constructor of the MembershipService
public class MembershipService : IMembershipService {

    private readonly IEntityRepository<User> _userRepository;
    private readonly IEntityRepository<Role> _roleRepository;
    private readonly IEntityRepository<UserInRole> _userInRoleRepository;
    private readonly ICryptoService _cryptoService;

    public MembershipService(
        IEntityRepository<User> userRepository,
        IEntityRepository<Role> roleRepository,
        IEntityRepository<UserInRole> userInRoleRepository,
        ICryptoService cryptoService) {

        _userRepository = userRepository;
        _roleRepository = roleRepository;
        _userInRoleRepository = userInRoleRepository;
        _cryptoService = cryptoService;

    }
}
Also notice that we are working with interfaces; this will make it easier to test the MembershipService. The IoC container will handle the dependencies and inject the provided implementations of these interfaces.
Let’s look at the ValidateUser method implementation first (see Listing 5-37).
Listing 5-37. The ValidateUser Method Implementation
public class MembershipService : IMembershipService {

    //Lines omitted for brevity

    public ValidUserContext ValidateUser(string username, string password) {

        var userCtx = new ValidUserContext();
        var user = _userRepository.GetSingleByUsername(username);
        if (user != null && isUserValid(user, password)) {

            var userRoles = GetUserRoles(user.Key);
            userCtx.User = new UserWithRoles() {
                User = user, Roles = userRoles
            };

            var identity = new GenericIdentity(user.Name);
            userCtx.Principal = new GenericPrincipal(
                identity,
                userRoles.Select(x => x.Name).ToArray());
        }

        return userCtx;
    }

    //Lines omitted for brevity

    private bool isUserValid(User user, string password) {

        if (isPasswordValid(user, password)) {

            return !user.IsLocked;
        }

        return false;
    }

    private IEnumerable<Role> GetUserRoles(Guid userKey) {

        var userInRoles = _userInRoleRepository
            .FindBy(x => x.UserKey == userKey).ToList();

        if (userInRoles != null && userInRoles.Count > 0) {

            var userRoleKeys = userInRoles.Select(
                x => x.RoleKey).ToArray();

            var userRoles = _roleRepository
                .FindBy(x => userRoleKeys.Contains(x.Key));

            return userRoles;
        }

        return Enumerable.Empty<Role>();
    }

    private bool isPasswordValid(User user, string password) {

        return string.Equals(
                _cryptoService.EncryptPassword(
                    password, user.Salt), user.HashedPassword);
    }
}
The ValidateUser method returns a value that is a type of IPrincipal, which defines the basic functionality of a principal object. If the return value is not null, the user is validated, and the user information will be returned. The validation logic is also straightforward. First of all, we try to get the user from the database based on the username parameter. An extension method named GetSingleByUsername is used; it was implemented earlier to perform this query on the database. If the User object is null, we will return null. If it is not null, we move to the next step: checking the password’s validity. If it is valid, we then create the identity using the GenericIdentity class of the .NET Framework. Finally, we retrieve the roles the user is currently on and create the GenericPrincipal object based on these roles and the GenericIdentity.
Like the user validation logic, the CreateUser logic is straightforward. We have three overloads for the CreateUser method, but only one of them implements the actual logic, which is shown in Listing 5-38.
Listing 5-38. Implementation of the CreateUser Method and Its Overloads
public class MembershipService : IMembershipService {

    //Lines omitted for brevity

    public OperationResult<UserWithRoles> CreateUser(
        string username, string email, string password) {

        return CreateUser(username, password, email, roles: null);
    }

    public OperationResult<UserWithRoles> CreateUser(
        string username, string email, string password, string role) {

        return CreateUser(username, password, email, roles: new[] { role });
    }

    public OperationResult<UserWithRoles> CreateUser(
        string username, string email, string password, string[] roles) {

        var existingUser = _userRepository.GetAll().Any(
            x => x.Name == username);

        if (existingUser) {

            return new OperationResult<UserWithRoles>(false);
        }

        var passwordSalt = _cryptoService.GenerateSalt();

        var user = new User() {
            Name = username,
            Salt = passwordSalt,
            Email = email,
            IsLocked = false,
            HashedPassword =
                _cryptoService.EncryptPassword(password, passwordSalt),
            CreatedOn = DateTime.Now
        };

        _userRepository.Add(user);
        _userRepository.Save();

        if (roles != null || roles.Length > 0) {

            foreach (var roleName in roles) {

                addUserToRole(user, roleName);
            }
        }

        return new OperationResult<UserWithRoles>(true) {
            Entity = GetUserWithRoles(user)
        };
    }

    //Lines omitted for brevity

    private void addUserToRole(User user, string roleName) {

        var role = _roleRepository.GetSingleByRoleName(roleName);
        if (role == null) {

            var tempRole = new Role() {
                Name = roleName
            };

            _roleRepository.Add(tempRole);
            _roleRepository.Save();
            role = tempRole;
        }

        var userInRole = new UserInRole() {
            RoleKey = role.Key,
            UserKey = user.Key
        };

        _userInRoleRepository.Add(userInRole);
        _userInRoleRepository.Save();
    }
}
The CreateUser methods return UserWithRoles instances wrapped inside the OperationResult. If the user has been created successfully, the return value indicates the unsuccessful operation. This is not the best way of handling this situation—we might want to show the actual cause of the failure—but for our sample application, we didn’t want to expand this logic.
Implementation of other MembershipService methods aren’t shown here, as they aren’t used in our sample application. However, we have implemented them anyway, and you can have a look at them from the source code.
This section has shown how to implement a service layer that talks to one or many repositories to perform the specified operation. There is one more service interface, IShipmentService, and its implementation, ShipmentService. However, the processing of creating it won’t be elaborated in this book. You’ll find the implementation under PingYourPackage.Domain project, along with other service classes.
Summary
We believe that the best way to show the capabilities of a framework is by providing a real-world sample application; that’s why we dedicated three chapters to explaining every step of an application creation process with ASP.NET Web API. This chapter explained the main idea of the application, set up the fundamental parts by implementing the domain layer with Entity Framework, and utilized some patterns, including the Repository Pattern and Service Layer Pattern. In the next chapter, we will start building our ASP.NET Web API application to create the HTTP API for our application.