
![]()
Sample Application: Building the Web API
In Chapter 5, you set up the infrastructure of the HTTP API application. You created your database models by leveraging the Entity Framework code–first approach and created a generic repository to gain access to the data. You also introduced the service layer by implementing the membership and crypto services.
This chapter will leverage the infrastructure you have built and use it to build the HTTP API application. From typical configuration to extending the Web API infrastructure, you’ll experience how it feels to build a real-world HTTP API with ASP.NET Web API. Throughout this chapter, unless otherwise stated, we will be working with the PingYourPackage.API project that was created earlier.
We’ll show how to write unit and integration tests against several parts of ASP.NET Web API throughout this chapter. We’ll be using xUnit as our testing framework and Moq as the mocking framework.
Infrastructure of Our Web API Application
Before jumping into building the core components of our application, we’ll lay out its infrastructure such as routes, configuration, and setting up the Inversion of Control (IoC) container.
Creating Routes
First, you must register the routes to reflect what you need for the HTTP API resources. In Chapter 5, we explained the URI structure that we want to provide, and in many cases, our default route will cover your needs; but you still need a few extra to produce a better-structured HTTP API.
To register the routes, you’ll use the RouteConfig class inside the PingYourPackage.API project, created earlier during our initial set up (see Figure 6-1).
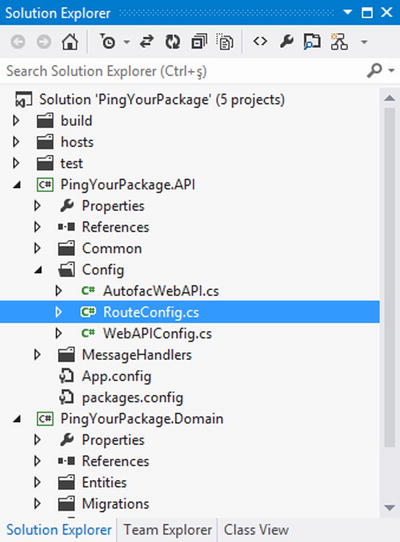
Figure 6-1. RouteConfig.cs file inside PingYourPackage.API project
Inside the RouteConfig class, you’ll only have one static method that returns void: RegisterRoutes. The RegisterRoutes method accepts one parameter, which is of type HttpRouteCollection. By separating route registration like this, you’ll be able to pass the configuration of the ASP.NET Web API host into RegisterRoutes method and register the routes easily.
![]() Note If you would like to learn more about ASP.NET Web API routing, you can look at Chapter 8, which is entirely dedicated to routing. Also, you will find detailed information about action selection and the effect of routing during this process in Chapter 9.
Note If you would like to learn more about ASP.NET Web API routing, you can look at Chapter 8, which is entirely dedicated to routing. Also, you will find detailed information about action selection and the effect of routing during this process in Chapter 9.
First, you’ll register the default route, which will accommodate most of your needs (see Listing 6-1).
Listing 6-1. RegisterRoutes Static Method of RouteConfig Class
public static void RegisterRoutes(HttpRouteCollection routes) {

    routes.MapHttpRoute(
        "DefaultHttpRoute",
        "api/{controller}/{key}",
        defaults: new { key = RouteParameter.Optional },
        constraints: new { key = new GuidRouteConstraint() });
}
As you can see, a static segment was used at the beginning of the route: api. You’ll use this convention with each route.
With this registered route in place, you can map a URI to any controller you want. For example, we’ll implement a ShipmentTypesController later in this chapter and the request will go through this route to get to that controller; for example, through a GET request against /api/shipmenttypes. Notice also that the key parameter’s default value is set as RouteParameter.Optional, which indicates this parameter is optional.
Also, a constraint has been set for the key parameter in order to only allow values that can be parsed as Guid. The implementation of the GuidRouteConstraint is shown in Listing 6-2.
Listing 6-2. The GuidRouteConstraint Implementation
public class GuidRouteConstraint : IHttpRouteConstraint {

    private const string _format = "D";

    public bool Match(
        HttpRequestMessage request,
        IHttpRoute route,
        string parameterName,
        IDictionary<string, object> values,
        HttpRouteDirection routeDirection) {

        if (values[parameterName] != RouteParameter.Optional) {

            object value;
            values.TryGetValue(parameterName, out value);
            string input = Convert.ToString(
                value, CultureInfo.InvariantCulture);

            Guid guidValue;
            return Guid.TryParseExact(
                input, _format, out guidValue);
        }

        return true;
    }
}
The GuidRouteConstraint looks at its associated value and determines if it is in the desired Guid format. Chapter 8 will cover route constraints more in depth, so we won’t go into details here.
You’ll configure the API application through the WebAPIConfig, which was created inside the PingYourPackage.API project in Chapter 5. You haven’t started developing the Web API application yet, but there are a few configuration changes that need to be done for the API up front.
The WebAPIConfig has only one method, named Configure, and this method accepts one parameter, which is a type of HttpConfiguration. The configuration was separated by putting it inside another class for the same reason this was done for the RouteConfig class.
The initial look of the Configure method is shown in Listing 6-3.
Listing 6-3. Static Configure Method of the WebAPIConfig Class
public class WebAPIConfig {

    public static void Configure(HttpConfiguration config) {

        //Formatters
        var jqueryFormatter = config.Formatters.FirstOrDefault(
            x => x.GetType() ==
                typeof(JQueryMvcFormUrlEncodedFormatter));

        config.Formatters.Remove(
            config.Formatters.FormUrlEncodedFormatter);

        config.Formatters.Remove(jqueryFormatter);

        foreach (var formatter in config.Formatters) {

            formatter.RequiredMemberSelector =
                new SuppressedRequiredMemberSelector();
        }

        //Default Services
        config.Services.Replace(
            typeof(IContentNegotiator),
            new DefaultContentNegotiator(
                excludeMatchOnTypeOnly: true));

        config.Services.RemoveAll(
            typeof(ModelValidatorProvider),
            validator => !(validator
                is DataAnnotationsModelValidatorProvider));
    }
}
First, we removed the unnecessary formatters that won’t be needed: JQueryMvcFormUrlEncodedFormatter and FormUrlEncodedFormatter, which only have reading ability for the application/x-www-form-urlencoded media type.
Second, we replaced the default implementation of the IContentNegotiator service. By default, the DefaultContentNegotiator class is registered as a content negotiator, but its ExcludeMatchOnTypeOnly property is set to false. If the ExcludeMatchOnTypeOnly property of the DefaultContentNegotiator is set to false, it will find the best possible media type match and negotiate on it. For example, if there is no support for application/xml media type but only for application/json and a request accepts responses in XML format, the negotiator will send back the response as application/json format. This may be the desired functionality for your application, but we decided to be strict with our API and set the ExcludeMatchOnTypeOnly property of the DefaultContentNegotiator to true. If ExcludeMatchOnTypeOnly is set to true, then it doesn’t match on type only. This means that the Negotiate method of the DefaultContentNegotiator will return null if it can’t match anything in the request. This is useful for generating 406 (Not Acceptable) status codes if there is no media type match, and this is the exact behavior desired here.
The RequiredMemberSelector properties of all the formatters have been set, and you will have to do your own implementation to prevent generating duplicate error messages for required members, as explained in Chapter 13 in detail. The IRequiredMemberSelector implementation is shown in Listing 6-4.
Listing 6-4. The SuppressedRequiredMemberSelector Class
public class SuppressedRequiredMemberSelector
    : IRequiredMemberSelector {

    public bool IsRequiredMember(MemberInfo member) {

        return false;
    }
}
Finally, we removed every validation provider except for the DataAnnotationsModelValidatorProvider because only Data Annotations validation functionality is needed. You can check Chapter 13 for more information about validation providers.
A few parts the application have been configured, but later you’ll tweak the Configure method of the WebAPIConfig class.
Registering Dependencies
In Chapter 5, you created a class named AutofacWebAPI inside the PingYourPackage.API application. Inside this class, you also set up the infrastructure to register dependencies for this application through the Autofac IoC container.
The RegisterServices private method is the place to register the dependencies, and there are three kinds of dependency you need to be concerned with for now (see Listing 6-5).
Listing 6-5. The RegisterServices Method of the AutofacWebAPI Class
public class AutofacWebAPI {

    // Lines removed for brevity

    private static IContainer RegisterServices(
        ContainerBuilder builder) {

        builder.RegisterAssemblyTypes(
            Assembly.GetExecutingAssembly())
            .PropertiesAutowired();

        //EF DbContext

        //Repositories

        //Services

        return builder.Build();
    }
}
As you can see in Listing 6-5, the repositories and the services will be registered through the IoC container. You’ll register the DbContext instance through the IoC container, too. Let’s register our DbContext instance, the EntitiesContext class, first and explain the benefits of doing this (see Listing 6-6).
Listing 6-6. Registering the DbContext Instance Through the IoC Container
private static IContainer RegisterServices(
    ContainerBuilder builder) {

    // Lines removed for brevity

    //EF DbContext
    builder.RegisterType<EntitiesContext>()
        .As<DbContext>().InstancePerApiRequest();

    // Lines removed for brevity
}
The Autofac ASP.NET Web API integration package has support for instance per-request dependency registration. By registering the EntitiesContext instance through the IoC container, as shown in Listing 6-6, you will be able to use only one instance of DbContext per request. Autofac also will inject the registered DbContext instance through the only constructor of our repositories.
As you learned in Chapter 5, there is only one repository implementation, which is the generic EntityRepository class. You can register a separate EntityRepository instance through the IoC container for every entity class there is. The code for registering the repositories is nearly the same as for the DbContext with a different method for registering generic methods (see Listing 6-7).
Listing 6-7. Registering the Repositories Through the IoC Container
private static IContainer RegisterServices(
    ContainerBuilder builder) {

    // Lines removed for brevity

    // Register repositories by using Autofac's OpenGenerics feature
    // More info:  http://code.google.com/p/autofac/wiki/OpenGenerics
    builder.RegisterGeneric(typeof(EntityRepository<>))
        .As(typeof(IEntityRepository<>))
        .InstancePerApiRequest();

    // Lines removed for brevity
}
Notice that we didn’t indicate anything about the constructor of the EntityRepository and which DbContext type it should be injected into. The Autofac ContainerBuilder has a registration for a DbContext instance and it will use that instance to construct the repositories. If you need to use more than one type of repository for a request, only one instance of DbContext will be used to create repositories, which is a desirable approach here.
Lastly, there are two services that were created in Chapter 5 to register through the IoC container: the MembershipService and the CryptoService. The CryptoService has only a parameterless constructor, but the MembershipService class has a constructor that accepts a few repositories and the ICryptoService implementation (see Listing 6-8).
Listing 6-8. The MembershipService Constructor
public class MembershipService : IMembershipService {

    private readonly IEntityRepository<User> _userRepository;
    private readonly IEntityRepository<Role> _roleRepository;
    private readonly IEntityRepository<UserInRole>
        _userInRoleRepository;
    private readonly ICryptoService _cryptoService;

    public MembershipService(
        IEntityRepository<User> userRepository,
        IEntityRepository<Role> roleRepository,
        IEntityRepository<UserInRole> userInRoleRepository,
        ICryptoService cryptoService) {

        _userRepository = userRepository;
        _roleRepository = roleRepository;
        _userInRoleRepository = userInRoleRepository;
        _cryptoService = cryptoService;

    }

    // Lines removed for brevity
}
Let’s register the services (see Listing 6-9) and then explain what would happen when the IMembershipService implementation is requested from the IoC container.
Listing 6-9. Registering the Services Through the IoC Container
private static IContainer RegisterServices(
    ContainerBuilder builder) {

    // Lines removed for brevity

    // Services
    builder.RegisterType<CryptoService>()
        .As<ICryptoService>()
        .InstancePerApiRequest();

    builder.RegisterType<MembershipService>()
        .As<IMembershipService>()
        .InstancePerApiRequest();

    builder.RegisterType<ShipmentService>()
        .As<IShipmentService>()
        .InstancePerApiRequest();

    // Lines removed for brevity
}
Now when you request an IMembershipService implementation from the IoC container, it will first resolve the constructor parameters. Each repository also has a constructor that accepts a DbContext implementation. Because the DbContext was registered through the IoC container, the container will pull that down and construct the required repositories. Finally, the container will use the constructed repositories and the crypto service to construct the MembershipService class.
![]() Tip If you register a type through the Autofac IoC container and that type has multiple constructors, you can always use the UsingConstructor extension method for the IRegistrationBuilder instance (the As<TService> method returns an IRegistrationBuilder instance and you can use the UsingConstructor extension method on that). The UsingConstructor method has two overloads. One of them allows you to specify the signature of the constructor by indicating the types of the parameters in order. The other accepts an IConstructorSelector instance, which allows you to specify the policy to be used when selecting a constructor.
Tip If you register a type through the Autofac IoC container and that type has multiple constructors, you can always use the UsingConstructor extension method for the IRegistrationBuilder instance (the As<TService> method returns an IRegistrationBuilder instance and you can use the UsingConstructor extension method on that). The UsingConstructor method has two overloads. One of them allows you to specify the signature of the constructor by indicating the types of the parameters in order. The other accepts an IConstructorSelector instance, which allows you to specify the policy to be used when selecting a constructor.
Implementing the Security
Before moving forward and implementing the controllers of the Web API application, let’s set up the security fundamentals to have the following authentication and authorization requirements for the Web API application:
- Force the client to communicate over HTTPS
- Implement Basic Authentication through a message handler
- Implement the authorization for the resources
This section will complete the first two items of this list, and you’ll apply authorization to the resources (in a case of an ASP.NET Web API application, the resources are the controller actions) later.
First, you’ll simply separate the authentication and authorization by delegating them to different components of the framework.
Implementing the Message Handler for Forcing HTTPS
In order to force the communication over HTTPS, you need to intercept the request on its way in and check whether it is being communicated over HTTPS. A message handler is the best place to perform such actions. So, let’s create the RequireHttpsMessageHandler, as shown in Listing 6-10.
Listing 6-10. The RequireHttpsMessageHandler Implementation
public class RequireHttpsMessageHandler : DelegatingHandler {

    protected override Task<HttpResponseMessage> SendAsync(
        HttpRequestMessage request,
        CancellationToken cancellationToken) {

        if (request.RequestUri.Scheme != Uri.UriSchemeHttps) {

            HttpResponseMessage forbiddenResponse =
                request.CreateResponse(HttpStatusCode.Forbidden);

            forbiddenResponse.ReasonPhrase = "SSL Required";
            return Task.FromResult<HttpResponseMessage>(
                forbiddenResponse);
        }

        return base.SendAsync(request, cancellationToken);
    }
}
Here, if the request is communicated over HTTPS, no further action is required, and it is simply executed by the inner handler by calling the SendAsync method of the base class. As you’ll see in Chapter 10, the Web API framework infrastructure will create the so-called Russian doll effect by chaining the message handlers together. So, calling the SendAsync method of the base DelegatingHandler class will allow us to invoke the next message handler inside the pipeline. This basically means “Keep going!” for the Web API pipeline.
If the communication is not over HTTPS, the request will terminate immediately and stop processing further. This is achieved by retuning a new Task<HttpResponseMessage> object instead of calling the SendAsync method of the base class. The response message indicates that the request is forbidden and the reason is included as a reason phrase. Also, as you learned in Chapter 2, you use the FromResult<T> method of the Task class to return a precompleted Task object instead of spinning up another thread unnecessarily just to return the HttpResponseMessage instance.
Finally, you’ll register this message handler as the first handler inside the static WebAPIConfig.Configure method because you want this message handler to see the request first before other handlers (see Listing 6-11).
Listing 6-11. Registering the RequireHttpsMessageHandler
public class WebAPIConfig {

    public static void Configure(HttpConfiguration config) {

        // Message Handlers
        config.MessageHandlers.Add(
            new RequireHttpsMessageHandler());

        // Lines removed for brevity
    }
}
Testing the RequireHttpsMessageHandler
You have created the RequireHttpsMessageHandler and now you’ll write some unit tests to see its behaviors. It is trivial to write unit tests against the RequireHttpsMessageHandler because it contains a simple logic, but this will give you a solid idea on how to write tests against the message handlers. You’ll put these tests under the PingYourPackage.API.Test project and run them using the xUnit.net Runner for Visual Studio 2012.
Before creating the test methods, you’ll create a fairly simple helper class, which will allow you to invoke a message handler independently (see Listing 6-12).
Listing 6-12. The Static DelegatingHandlerExtensions Class
internal static class DelegatingHandlerExtensions {

    internal static Task<HttpResponseMessage> InvokeAsync(
        this DelegatingHandler handler,
        HttpRequestMessage request,
        CancellationToken cancellationToken =
            default(CancellationToken)) {

        handler.InnerHandler = new DummyHandler();
        var invoker = new HttpMessageInvoker(handler);
        return invoker.SendAsync(request, cancellationToken);
    }

    private class DummyHandler : HttpMessageHandler {

        protected override Task<HttpResponseMessage> SendAsync(
            HttpRequestMessage request,
            CancellationToken cancellationToken) {

            var response =
                new HttpResponseMessage(HttpStatusCode.OK);

            return Task.FromResult(response);
        }
    }
}
The InvokeAsync extension method for DelegatingHandler type will allow you to invoke a DelegatingHandler without any problems. Because you have set a dummy HttpMessageHandler as the inner handler of the DelegatingHandler, it will not throw any exceptions if the DelegatingHandler implementation calls the base.SendAsync method, which requires an inner handler to be attached.
There are two test methods for RequireHttpsMessageHandler. One of them will test the behavior that is performed when the request is made over HTTP and the other will test the reverse behavior (see Listing 6-13).
Listing 6-13. The RequireHttpsMessageHandlerTest Class
public class RequireHttpsMessageHandlerTest {

    [Fact]
    public async Task Returns_Forbidden_If_Request_Is_Not_Over_HTTPS() {

        // Arange
        var request = new HttpRequestMessage(
            HttpMethod.Get, "http://localhost:8080");

        var requireHtttpsMessageHandler =
            new RequireHttpsMessageHandler();

        // Act
        var response = await
            requireHtttpsMessageHandler.InvokeAsync(request);

        // Assert
        Assert.Equal(
            HttpStatusCode.Forbidden,
            response.StatusCode);
    }

    [Fact]
    public async Task Returns_Delegated_StatusCode_When_Request_Is_Over_HTTPS() {

        // Arange
        var request = new HttpRequestMessage(
            HttpMethod.Get, "https://localhost:8080");

        var requireHtttpsMessageHandler =
            new RequireHttpsMessageHandler();

        // Act
        var response = await
            requireHtttpsMessageHandler.InvokeAsync(request);

        // Assert
        Assert.Equal(
            HttpStatusCode.OK,
            response.StatusCode);
    }
}
The xUnit can handle Task returning methods as well. So, here you’ll make use of C# 5.0 language features inside the unit test methods, too. There are a few ways to run these tests. You can navigate to Test ![]() Windows
Windows ![]() Test Explorer from the main Visual Studio menu and bring up the Text Explorer window (see Figure 6-2). Then you can select the test you would like to run.
Test Explorer from the main Visual Studio menu and bring up the Text Explorer window (see Figure 6-2). Then you can select the test you would like to run.
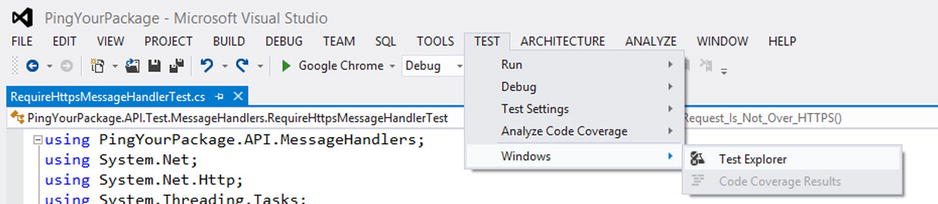
Figure 6-2. Bringing up the Test Explorer window
The other way to run tests is to right-click inside the test class and click Run Tests, as shown in Figure 6-3.
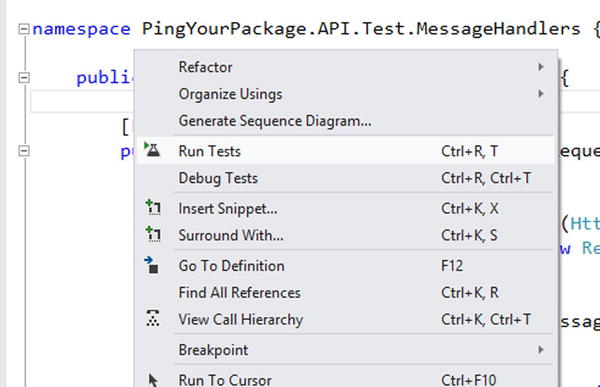
Figure 6-3. Right-click inside the test class and click Run Tests to run all the tests inside that class
When you run these tests, you should see them passed inside the Test Explorer (see Figure 6-4).
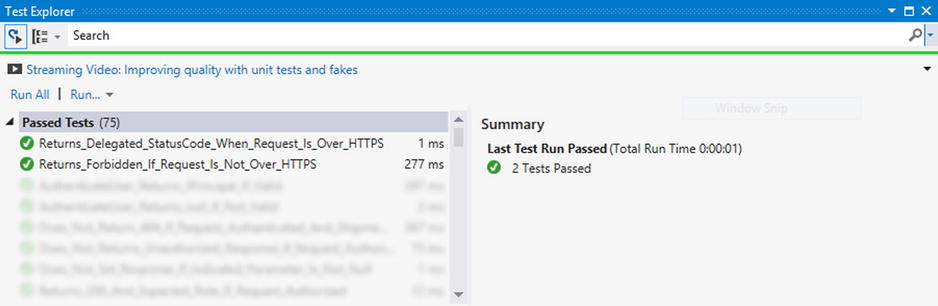
Figure 6-4. Test Explorer shows the status of the tests after they were run
This was a simple message handler and, thus, the tests were simple. You’ll create one more message handler, but we won’t go through creating tests against that in this chapter because it is fairly similar. You will find those tests under the PingYourPackage.API.Test project.
Implementing the Message Handler for Basic Authentication
For this application, you’ll authenticate requests with basic authentication, which you’ll implement through a message handler. This may not be the best option for your own application, but this will give you an idea about the authentication and authorization separation inside an ASP.NET Web API project.
Before you start implementing the basic authentication message handler, you must install a NuGet package for an open source library named WebAPIDoodle (see Figure 6-5). The WebAPIDoodle is an ASP.NET Web API extension library that contains several useful components such as filters, message handlers, and so forth, and you’ll use a few of them for this application.
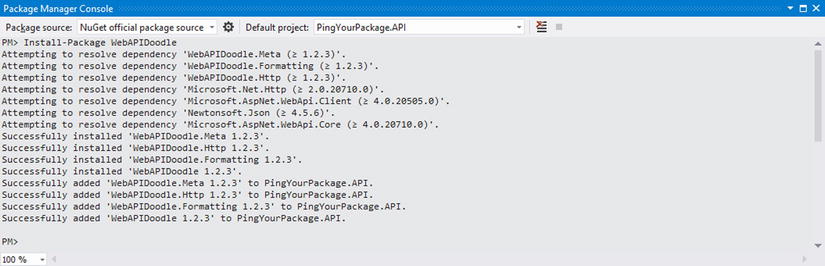
Figure 6-5. Installing WebAPIDoodle NuGet package
The WebAPIDoodle contains an abstract message handler called BasicAuthenticationHandler and you can use this as the base class for our handler. By using this abstract class, you’ll get all the standard operations out of the box, such as extracting the username and password from the WWW-Authenticate header and decoding the password.
![]() Note This chapter won’t go into details of how you can create the base BasicAuthenticationHandler. Also, we don’t recommend the use of Basic authentication for every application. Security is a tough topic and should be considered carefully for your specific type of scenario. Apress has a book by Badrinarayanan Lakshmiraghavan, called Pro ASP.NET Web API Security, which covers this topic in considerable detail (Apress, 2013).
Note This chapter won’t go into details of how you can create the base BasicAuthenticationHandler. Also, we don’t recommend the use of Basic authentication for every application. Security is a tough topic and should be considered carefully for your specific type of scenario. Apress has a book by Badrinarayanan Lakshmiraghavan, called Pro ASP.NET Web API Security, which covers this topic in considerable detail (Apress, 2013).
Here you’ll create a message handler named PingYourPackageAuthHandler based on the BasicAuthenticationHandler, as shown in Listing 6-14.
Listing 6-14. The PingYourPackageAuthHandler Implementation
public class PingYourPackageAuthHandler :
    BasicAuthenticationHandler {

    protected override Task<IPrincipal> AuthenticateUserAsync(
        HttpRequestMessage request,
        string username,
        string password,
        CancellationToken cancellationToken) {

        var membershipService = request.GetMembershipService();

        var validUserCtx = membershipService
            .ValidateUser(username, password);

        return Task.FromResult(validUserCtx.Principal);
    }
}

internal static class HttpRequestMessageExtensions {

    internal static IMembershipService GetMembershipService(
        this HttpRequestMessage request) {

        return request.GetService<IMembershipService>();
    }

    private static TService GetService<TService>(
        this HttpRequestMessage request) {

        IDependencyScope dependencyScope =
            request.GetDependencyScope();

        TService service =
            (TService)dependencyScope
            .GetService(typeof(TService));

        return service;
    }
}
The BasicAuthenticationHandler will invoke the AuthenticateUserAsync method if the basic authentication credentials are sent in a correct format. Inside the AuthenticateUserAsync method, it is supposed to return back an Task<IPrincipal> instance if the user is authenticated. As you can see, you delegate that work to the IMembershipService implementation, which was obtained through the dependency resolver and returns the result as a precompleted Task object.
If the request is not authenticated, the ValidateUser method of IMembershipService implementation returns null, which is what is desired here. The default behavior when the request is not authenticated is that the BasicAuthenticationHandler terminates the request and sends back the unauthorized response with the WWW-Authenticate header. This is a fine approach for your needs here because you won’t allow any unauthenticated requests at all, but depending on your situation, you may want to override the HandleUnauthenticatedRequest method of the BasicAuthenticationHandler to handle the unauthenticated requests with your own behavior.
However, if the request is successfully authenticated, an IPrincipal implementation is returned from the ValidateUser method of IMembershipService implementation. The BasicAuthenticationHandler uses this object to set the current authenticated user.
![]() Note It is obvious that you don’t perform any kind of authorization here. You’ll perform authorization at the controller level, as each controller has its own authorization requirements. We’ll discuss this in the upcoming section.
Note It is obvious that you don’t perform any kind of authorization here. You’ll perform authorization at the controller level, as each controller has its own authorization requirements. We’ll discuss this in the upcoming section.
Lastly, you’ll register this handler as the second handler inside the pipeline (see Listing 6-15).
Listing 6-15. Registering the PingYourPackageAuthHandler
public class WebAPIConfig {

    public static void Configure(HttpConfiguration config) {

        // Message Handlers
        config.MessageHandlers.Add(
            new RequireHttpsMessageHandler());

        config.MessageHandlers.Add(
            new PingYourPackageAuthHandler());

        // Lines removed for brevity
    }
}
If the HTTPS requirements that have been established with RequireHttpsMessageHandler are fulfilled by the request, the PingYourPackageAuthHandler will be invoked. At that point, if the request is successfully authenticated, the request will go up one level inside the pipeline and the associated dispatcher will take over from there, which we’ll talk about in the “Per-Route Message Handler for AffiliateShipmentsController” section.
AuthorizeAttribute
Web API framework has a concept of filters that allows you to execute a piece of code to take action at different levels of the controller pipeline. Chapter 11 goes through filters in depth and you’ll leverage filters with the sample application, too.
There are three types of filters, one of which is the authorization filter, and the framework provides a default implementation for this filter type—AuthorizeAttribute—which you’ll use to authorize the requests. The AuthorizeAttribute checks against the System.Threading.Thread.CurrentPrincipal to see whether the user associated with the current request is authenticated. You can also pass usernames and roles through the AuthorizeAttribute properties to authorize against those.
You haven’t implemented the controllers yet, but you’ll have a controller named AffiliatesController, which only users in admin and employee roles can have access to. You’ll apply the AuthorizeAttribute to the AffiliatesController and apply the necessary authorization to each controller, as shown in Listing 6-16.
Listing 6-16. The AffiliatesController with AuthorizeAttribute
[Authorize(Roles = "Admin,Employee")]
public class AffiliatesController : ApiController {

    // Lines removed for brevity
}
Implementing Controllers
You might think of controllers inside an ASP.NET Web API application as converters for our business data. A controller will consist of actions, and each action should be tiny and shouldn’t perform too many operations. For example, a controller action can perform the necessary operation through another layer based on the input it received. Then, it can convert the output of that operation into a data transfer object and return it back. Chapter 9 is specifically dedicated to controllers and actions. So, we won’t dive deep into their behavior here. Instead, you’ll see how you’ll structure them to meet the needs of our application, as described in Chapter 5.
To be able to employ the requirements explained in Chapter 5, you’ll have seven different controllers, as shown in Figure 6-6.
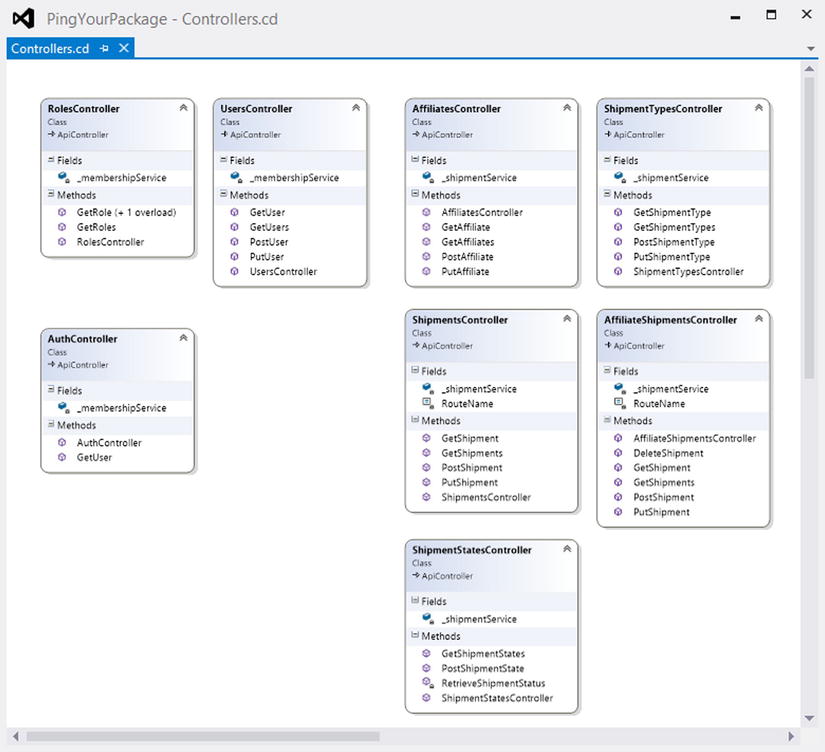
Figure 6-6. PingYourPackage.API project’s controller structure
In general, we took a hierarchical approach for our API design and tried to reflect that structure to the controllers. For example, all shipment records can be retrieved by an admin or employee by sending an HTTP GET request against /api/shipments. Besides that, each affiliate needs to view their shipment records. We could have designed our API so that an affiliate would retrieve its shipment records by sending an HTTP GET request against /api/shipments?affiliateKey={key}. Although there is nothing wrong with this approach, it doesn’t look good hierarchically.
As an alternative approach to this, an affiliate can send an HTTP GET request against /api/affiliates/{affiliateKey}/shipments to retrieve the associated shipment records. In order to retrieve the single shipment record, an affiliate needs to send an HTTP GET request against /api/affiliates/{affiliateKey}/shipments/{shipmentKey}.
To be able to cleanly handle the above scenarios, there are two controllers to serve shipment records: ShipmentsController and AffiliateShipmentsController. By separating these into two controllers, you’ll cleanly handle the authorization, record ownership and record existence, as you’ll see in upcoming sections.
This chapter won’t go through all the controllers to show how they were implemented because they are fairly similar. Instead, we have picked ShipmentsController and AffiliateShipmentsController as case examples. These two controllers have different structures. So, we’ll be describing a new approach with each one.
Before moving further, let’s create another project named PingYourPackage.API.Model to hold the data transfer objects (DTOs), input validation logic, request commands, and request models. The next section will explain why another project is needed for these.
PingYourPackage.API.Model Project
In Chapter 5, you created the domain model and domain entities. Those entity classes will represent our data, but we don’t want to send everything through the wire by our HTTP API. In order to represent the data that will be sent through the API, you will create DTOs. Besides DTO classes, there will be request commands and request models. Those classes will represent the data and metadata that our API is going to receive as input.
These type of objects are the ones that both our HTTP API application and the .NET client of that HTTP API (this could also be called the .NET wrapper of the HTTP API) need. You don’t want to repeat yourself by creating these objects twice. So, you’ll put those in a separate project and have a reference to that project from the PingYourPackage.API project and the PingYourPackage.API.Client project, which we’ll explain in Chapter 7.
When you open the complete solution, you should see the PingYourPackage.API.Model project structure, as shown in Figure 6-7.
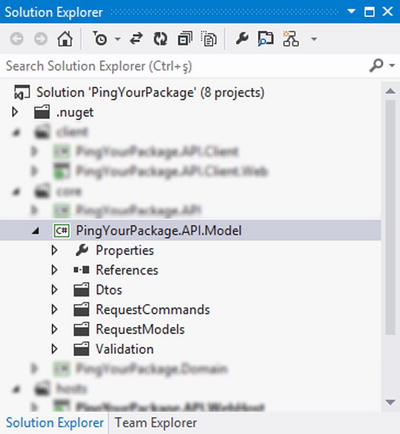
Figure 6-7. PingYourPackage.API.Model project structure
Data Transfer Objects
DTO classes are the .NET POCO (Plain Old CLR Object) entities that will represent our outbound data. Any DTO class under our model project should either implement the IDto (see Listing 6-17) or IPaginatedDto (see Listing 6-18) interface.
Listing 6-17. IDto Interface
public interface IDto {

    Guid Key { get; set; }
}
Listing 6-18. IPaginatedDto Interface
public interface IPaginatedDto<out TDto> where TDto : IDto {

    int PageIndex { get; set; }
    int PageSize { get; set; }
    int TotalCount { get; set; }
    int TotalPageCount { get; set; }

    bool HasNextPage { get; set; }
    bool HasPreviousPage { get; set; }

    IEnumerable<TDto> Items { get; }
}
The IDto interface contains only one property and is fairly simple, whereas the IPaginatedDto interface has a few properties to represent paginated data.
You’ll only have one implementation of the IPaginatedDto interface, as shown in Listing 6-19.
Listing 6-19. The PaginatedDto Class
public class PaginatedDto<TDto> :
    IPaginatedDto<TDto> where TDto : IDto {

    public int PageIndex { get; set; }
    public int PageSize { get; set; }
    public int TotalCount { get; set; }
    public int TotalPageCount { get; set; }

    public bool HasNextPage { get; set; }
    public bool HasPreviousPage { get; set; }

    public IEnumerable<TDto> Items { get; set; }
}
You’ll be able to cleanly represent the paginated data using this PaginatedDto<TDto> generic class. You’ll also create the individual DTO classes by implementing the IDto interface. Listing 6-20 shows the ShipmentDto class implementation as a sample.
Listing 6-20. The ShipmentDto Class
public class ShipmentDto : IDto {

    public Guid Key { get; set; }
    public Guid AffiliateKey { get; set; }

    public decimal Price { get; set; }
    public string ReceiverName { get; set; }
    public string ReceiverSurname { get; set; }
    public string ReceiverAddress { get; set; }
    public string ReceiverZipCode { get; set; }
    public string ReceiverCity { get; set; }
    public string ReceiverCountry { get; set; }
    public string ReceiverTelephone { get; set; }
    public string ReceiverEmail { get; set; }
    public DateTime CreatedOn { get; set; }

    public ShipmentTypeDto ShipmentType { get; set; }
    public IEnumerable<ShipmentStateDto>
        ShipmentStates { get; set; }
}
The ShipmentDto class has a property named ShipmentStates, which represents a collection of ShipmentStateDto, which is another DTO class (see Listing 6-21).
Listing 6-21. The ShipmentStateDto Class
public class ShipmentStateDto : IDto {

    public Guid Key { get; set; }
    public Guid ShipmentKey { get; set; }
    public string ShipmentStatus { get; set; }
    public DateTime CreatedOn { get; set; }
}
We don’t cover all DTO classes here. You can always check them from the project. They are all similar to the ShipmentDto class.
Request Commands
Request commands are .NET classes that will represent the data obtained from the request URI. You could use separate simple-type objects to represent URI data, but with request commands, you can employ desired input validation.
Each request command class needs to implement the IRequestCommand interface, as shown in Listing 6-22.
Listing 6-22. The IRequestCommand Interface
public interface IRequestCommand {

}
This is an empty interface, but you’ll use this interface as a reference while registering the parameter binding rule for request commands.
For this application, you only need one request command class to represent the pagination information. The PaginatedRequestCommand class is shown in Listing 6-23.
Listing 6-23. The PaginatedRequestCommand Class
public class PaginatedRequestCommand : IRequestCommand {

    [Minimum(1)]
    public int Page { get; set; }

    [Minimum(1)]
    [Maximum(50)]
    public int Take { get; set; }
}
As you can see, there are some validation attributes associated with each property. The MinimumAttribute and MaximumAttribute are not validation attributes provided by the .NET Framework itself. We have implemented these custom validation attributes, which we’ll explain later in this chapter.
By default, ASP.NET Web API isn’t going to bind URI data to complex type action parameters (see Chapter 9 for more information), but you can apply the FromUriAttribute to complex type parameters where you want them to be bound from the URI. This attribute is provided by the framework and gives the parameter binding layer a hint about where to get the data from (request body, from URI parts, etc.). You can also register global parameter binding rules, and we’ll follow this approach for our request commands (see Listing 6-24).
Listing 6-24. Registering the Paramater Binding Rule for IRequestCommand
public class WebAPIConfig {

    public static void Configure(HttpConfiguration config) {

        // Lines removed for brevity

        config.ParameterBindingRules.Insert(0,
            descriptor => typeof(IRequestCommand)
                          .IsAssignableFrom(
                              descriptor.ParameterType)
                          ? new FromUriAttribute()
                              .GetBinding(descriptor) : null);

        // Lines removed for brevity

      }
}
With this configuration code, you can now get the request command object through the action method as a parameter without any additional configuration.
![]() Note Complex type action parameters that are bound from the URI may cause action selection problems if you have multiple action methods that accept these types of parameters inside one controller. This depends on the case you have. However, the WebAPIDoodle NuGet package contains a custom action selector that can be used to support complex types for action selection. You will find more information about this from www.tugberkugurlu.com/archive/complex-type-action-parameters-with-complextypeawareactionselector-in-asp-net-web-api-part-1 and www.tugberkugurlu.com/archive/complex-type-action-parameters-with-complextypeawareactionselector-in-asp-net-web-api-part-2.
Note Complex type action parameters that are bound from the URI may cause action selection problems if you have multiple action methods that accept these types of parameters inside one controller. This depends on the case you have. However, the WebAPIDoodle NuGet package contains a custom action selector that can be used to support complex types for action selection. You will find more information about this from www.tugberkugurlu.com/archive/complex-type-action-parameters-with-complextypeawareactionselector-in-asp-net-web-api-part-1 and www.tugberkugurlu.com/archive/complex-type-action-parameters-with-complextypeawareactionselector-in-asp-net-web-api-part-2.
Request Models
Request models will represent the message body of the HTTP request, which our controller action receives as an object. In our application, HTTP POST and PUT requests will contain a message body, and this input should also be validated. We’ll discuss validation in the next section. Listing 6-25 shows a sample request model class: ShipmentRequestModel.
Listing 6-25. The ShipmentRequestModel Class
public class ShipmentRequestModel : ShipmentBaseRequestModel {

    [Required]
    public Guid? AffiliateKey { get; set; }

    [Required]
    public Guid? ShipmentTypeKey { get; set; }
}
Notice that the ShipmentRequestModel class inherits from the ShipmentBaseRequestModel class. The ShipmentBaseRequestModel class holds the properties that are needed on both POST and PUT requests (see Listing 6-26).
Listing 6-26. The ShipmentBaseRequestModel Class
public abstract class ShipmentBaseRequestModel {

    [Required]
    public decimal? Price { get; set; }

    [Required]
    [StringLength(50)]
    public string ReceiverName { get; set; }

    [Required]
    [StringLength(50)]
    public string ReceiverSurname { get; set; }

    [Required]
    [StringLength(50)]
    public string ReceiverAddress { get; set; }

    [Required]
    [StringLength(50)]
    public string ReceiverZipCode { get; set; }

    [Required]
    [StringLength(50)]
    public string ReceiverCity { get; set; }

    [Required]
    [StringLength(50)]
    public string ReceiverCountry { get; set; }

    [Required]
    [StringLength(50)]
    public string ReceiverTelephone { get; set; }

    [Required]
    [EmailAddress]
    [StringLength(320)]
    public string ReceiverEmail { get; set; }
}
Listing 6-27 also shows the ShipmentUpdateRequestModel class, which inherits from the ShipmentBaseRequestModel class and doesn’t have any other properties.
Listing 6-27. The ShipmentUpdateRequestModel Class
public class ShipmentUpdateRequestModel
    : ShipmentBaseRequestModel {

}
When you start building your controllers, use of the request model classes will become clearer.
Validation
ASP.NET Web API has a built-in validation mechanism, and Chapter 13 explains this topic in depth. Briefly, you can annotate the properties of the request model class with the desired validation attributes, and you can detect their validation state at certain points such as before the action method is executed.
The .NET Framework provides some useful validation attributes out of the box, which are explained in Chapter 13. However, you can create your custom validation attributes, too. For example, our PaginatedRequestCommand class, seen earlier in Listing 6-23, uses two custom validation attributes to restrict the page size per request: MinimumAttribute and MaximumAttribute. The implementation of the MinimumAttribute is shown in Listing 6-28.
Listing 6-28. The MinimumAttribute Class
[AttributeUsage(AttributeTargets.Property, AllowMultiple = false)]
public class MinimumAttribute : ValidationAttribute {

    private readonly int _minimumValue;

    public MinimumAttribute(int minimum) :
        base(errorMessage: "The {0} field value must be minimum {1}.") {

        _minimumValue = minimum;
    }

    public override string FormatErrorMessage(string name) {

        return string.Format(
            CultureInfo.CurrentCulture,
            base.ErrorMessageString,
            name,
            _minimumValue);
    }

    public override bool IsValid(object value) {

        int intValue;
        if (value != null && int.TryParse(value.ToString(),
            out intValue)) {

            return (intValue >= _minimumValue);
        }

        return false;
    }
}
![]() Note You need to add the framework reference of System.ComponentModel.DataAnnotations for the PingYourPackage.API.Model project in order to get access to .NET Framework’s data annotations infrastructure.
Note You need to add the framework reference of System.ComponentModel.DataAnnotations for the PingYourPackage.API.Model project in order to get access to .NET Framework’s data annotations infrastructure.
Each validation attribute needs to inherit from the ValidationAttribute class, which is under the System.ComponentModel.DataAnnotations namespace. You have also overridden the IsValid method of the ValidationAttribute inside the MinimumAttribute class to check the validity of the value. The MaximumAttribute attribute has the reverse functionality of the MinimumAttribute and nearly the same implementation (see Listing 6-29).
Listing 6-29. The MaximumAttribute Class
[AttributeUsage(AttributeTargets.Property, AllowMultiple = false)]
public class MaximumAttribute : ValidationAttribute {

    private readonly int _maximumValue;

    public MaximumAttribute(int maximum) :
        base(errorMessage: "The {0} field value must be maximum {1}.") {

        _maximumValue = maximum;
    }

    public override string FormatErrorMessage(string name) {

        return string.Format(
            CultureInfo.CurrentCulture,
            base.ErrorMessageString,
            name,
            _maximumValue);
    }

    public override bool IsValid(object value) {

        int intValue;
        if (value != null && int.TryParse(value.ToString(),
            out intValue)) {

            return (intValue <= _maximumValue);
        }

        return false;
    }
}
As indicated earlier, ASP.NET Web API has a built-in mechanism to check against validation attributes after the parameter binding process and provides the result of that action through a ModelStateDictionary instance. You can inspect this object instance through an action filter before the controller action is executed and returns the 400 Bad Request HTTP response. The WebAPIDoodle NuGet package provides a built-in action filter for this functionality: InvalidModelStateFilterAttribute. You’ll register this action filter globally through the WebAPIConfig.Configure method under the PingYourPackage.API project, as shown in Listing 6-30.
Listing 6-30. Globally Registering the InvalidModelStateFilterAttribute
public class WebAPIConfig {

    public static void Configure(HttpConfiguration config) {

        // Lines removed for brevity

        // Filters
        config.Filters.Add(
            new InvalidModelStateFilterAttribute());

        // Lines removed for brevity
    }
}
We have explained each piece of the API.Model project, so we can now move on to implement the controllers. However, this is not the complete view of the API.Model project. We didn’t go through every class inside the project for brevity. You can see the complete view of the project inside this sample application’s source code.
Implementing the ShipmentsController
The ShipmentsController is responsible for retrieving, updating, and inserting new shipment records. However, you only want to allow users under the admin or employee role to have access to this controller. So, you will applied the AuthorizeAttribute, as shown in Listing 6-31.
Listing 6-31. The ShipmentsController with the AuthorizeAttribute
[Authorize(Roles = "Admin,Employee")]
public class ShipmentsController : ApiController {

    // Lines removed for brevity
}
The shipment controller will interact with the IShipmentService implementation. Because our dependency resolver has been registered, you can now just pass the IShipmentService as a constructor parameter through the controller’s constructor (see Listing 6-32).
Listing 6-32. Passing the IShipmentService Implementtaion as a Constructor Parameter
[Authorize(Roles = "Admin,Employee")]
public class ShipmentsController : ApiController {

    private readonly IShipmentService _shipmentService;

    public ShipmentsController(IShipmentService shipmentService) {

        _shipmentService = shipmentService;
    }

    // Lines removed for brevity
}
Now our controller is ready to implement the action methods.
Creating the First Action Method
With this controller, you’ll allow four simple operations through the following URIs:
- GET /api/shipments
- GET /api/shipments/{key}
- POST /api/shipments
- PUT /api/shipments/{key}
First, let’s implement the GetShipments action method, which will return the shipment records within the specific range (see Listing 6-33).
Listing 6-33. GetShipments Action Method of the ShipmentsController
public PaginatedDto<ShipmentDto>
    GetShipments(PaginatedRequestCommand cmd) {

    var shipments = _shipmentService
        .GetShipments(cmd.Page, cmd.Take);

    return shipments.ToPaginatedDto(
        shipments.Select(sh => sh.ToShipmentDto()));
}
One of our aims was to keep the controller actions as few as possible, and by separating the concerns, this was achieved through the GetShipments action method. The GetShipments action accepts a parameter that is of type PaginatedRequestCommand. As seen earlier, the PaginatedRequestCommand class implements IRequestCommand and any type is registered that implements the IRequestCommand to use FromUriAttribute by default. For example, the client can now send a request against /api/shipments?page=1&take=20 to receive the first 20 shipment records.
Also, properties of the PaginatedRequestCommand class carry some validation attributes. So, if the model state is not valid, the globally registered action filter will terminate the request and return the 400 Bad Request response. If the model state is valid, the request will eventually arrive at the action method and the requested data can be retrieved through the IShipmentService.GetShipments method. At that point, that controller action method doesn’t care where the data are coming from or how. It only knows that IShipmentService.GetShipments will be returning the PaginatedList<Shipment> object, which will represent the collection of shipment records along with the pagination information.
After receiving the PaginatedList<Shipment> object, it is best not to return the database entity as it is because not all the data are appropriate to transfer over the wire. Here is the place where the entity objects map into DTOs. There are some great open source projects to make this mapping easier (such as AutoMapper), but we have created some extension methods in the PingYourPackage.API project to achieve this action. First, you need to map the PaginatedList<T> to PaginatedDto<T> (see Listing 6-34).
Listing 6-34. ToPaginatedDto<TDto> Extension Method for PaginatedList<TEntity>
internal static class PaginatedListExtensions {

    internal static PaginatedDto<TDto>
        ToPaginatedDto<TDto, TEntity>(
        this PaginatedList<TEntity> source,
        IEnumerable<TDto> items) where TDto : IDto {

        return new PaginatedDto<TDto> {
            PageIndex = source.PageIndex,
            PageSize = source.PageSize,
            TotalCount = source.TotalCount,
            TotalPageCount = source.TotalPageCount,
            HasNextPage = source.HasNextPage,
            HasPreviousPage = source.HasPreviousPage,
            Items = items
        };
    }
}
You also needed to map the shipment objects to ShipmentDto objects. For this reason, we created the ToShipmentDto extension method, as shown in Listing 6-35.
Listing 6-35. ToShipmentDto Extension Method for Shipment Class
internal static class ShipmentExtensions {

    internal static ShipmentDto ToShipmentDto(
        this Shipment shipment) {

        return new ShipmentDto {
            Key = shipment.Key,
            AffiliateKey = shipment.AffiliateKey,
            Price = shipment.Price,
            ReceiverName = shipment.ReceiverName,
            ReceiverSurname = shipment.ReceiverSurname,
            ReceiverAddress = shipment.ReceiverAddress,
            ReceiverZipCode = shipment.ReceiverZipCode,
            ReceiverCity = shipment.ReceiverCity,
            ReceiverCountry = shipment.ReceiverCountry,
            ReceiverTelephone = shipment.ReceiverTelephone,
            ReceiverEmail = shipment.ReceiverEmail,
            CreatedOn = shipment.CreatedOn,
            ShipmentType =
                shipment.ShipmentType.ToShipmentTypeDto(),
            ShipmentStates =
                shipment.ShipmentStates.Select(
                    ss => ss.ToShipmentStateDto())
        };
    }
}
The first controller action is now complete, so let’s look at our options on how to write tests for this action method. Because we used the service interface instead of its direct implementation, it is easy to provide a fake or mock of that service. As for the testing itself, there are two options here:
- Directly write unit tests against the controller action method as you did with the message handler in Listing 6-13.
- Write integration tests against the endpoints because it is easy to host the application in memory with the HttpClient. To do is, you would initialize an System.Web.Http.HttpServer instance and set this as the inner handler of the HttpClient.
Getting Ready for Integration Testing
There are a few helper methods that can be used while writing the integration tests. Some of them are for the HttpConfiguration object, as shown in Listing 6-36.
Listing 6-36. IntegrationTestHelper Class for Configuration and DependencyResolver Helper Methods
internal static class IntegrationTestHelper {

    internal static Guid[] GetKeys(int count) {

        var array = new Guid[count];
        for (int i = 0; i < count; i++) {
            array[i] = Guid.NewGuid();
        }

        return array;
    }

    internal static HttpConfiguration
        GetInitialIntegrationTestConfig() {

        var config = new HttpConfiguration();
        RouteConfig.RegisterRoutes(config);
        WebAPIConfig.Configure(config);

        return config;
    }

    internal static HttpConfiguration
        GetInitialIntegrationTestConfig(IContainer container) {

        var config = GetInitialIntegrationTestConfig();
        AutofacWebAPI.Initialize(config, container);

        return config;
    }

    internal static ContainerBuilder
        GetEmptyContainerBuilder() {

        var builder = new ContainerBuilder();

        builder.RegisterAssemblyTypes(
            Assembly.GetAssembly(typeof(WebAPIConfig)));

        return builder;
    }

    // Lines removed for brevity
}
For these integration tests, you won’t be directly invoking the Web API application’s methods. Hence, it’s not possible to provide mocked version of these services. However, they are provided through the dependency resolver. You can achieve this by providing an IContainer implementation to the AutofacWebAPI.Initialize method inside the GetInitialIntegrationTestConfig method, as shown in Listing 6-36.
![]() Note Testing and dependency injection will be covered in detail in Chapter 14 and 15.
Note Testing and dependency injection will be covered in detail in Chapter 14 and 15.
There is another class named IntegrationTestHelper that has a few static methods to set up the in-memory host to send a request through the HttpClient (see Listing 6-37).
Listing 6-37. IntegrationTestHelper Class for HttpRequestMessage Helper Methods
internal static class IntegrationTestHelper {

    // Lines removed for brevity

    internal static async Task<PaginatedDto<TDto>>
        TestForPaginatedDtoAsync<TDto>(
            HttpConfiguration config,
            HttpRequestMessage request,
            int expectedPageIndex,
            int expectedTotalPageCount,
            int expectedCurrentItemsCount,
            int expectedTotalItemsCount,
            bool expectedHasNextPageResult,
            bool expectedHasPreviousPageResult)
                where TDto : IDto {

        // Act
        var userPaginatedDto = await
            GetResponseMessageBodyAsync<PaginatedDto<TDto>>(
                config, request, HttpStatusCode.OK);

        // Assert
        Assert.Equal(
            expectedPageIndex, userPaginatedDto.PageIndex);

        Assert.Equal(
            expectedTotalPageCount,
            userPaginatedDto.TotalPageCount);

        Assert.Equal(
            expectedCurrentItemsCount,
            userPaginatedDto.Items.Count());

        Assert.Equal(
            expectedTotalItemsCount,
            userPaginatedDto.TotalCount);

        Assert.Equal(
            expectedHasNextPageResult,
            userPaginatedDto.HasNextPage);

        Assert.Equal(
            expectedHasPreviousPageResult,
            userPaginatedDto.HasPreviousPage);

        return userPaginatedDto;
    }

    internal static async Task<TResult>
        GetResponseMessageBodyAsync<TResult>(
            HttpConfiguration config,
            HttpRequestMessage request,
            HttpStatusCode expectedHttpStatusCode) {

        var response = await GetResponseAsync(config, request);
        Assert.Equal(expectedHttpStatusCode, response.StatusCode);
        var result = await
            response.Content.ReadAsAsync<TResult>();

        return result;
    }

    internal static async Task<HttpResponseMessage>
        GetResponseAsync(
            HttpConfiguration config, HttpRequestMessage request) {

        using (var httpServer = new HttpServer(config))
        using (var client =
            HttpClientFactory.Create(innerHandler: httpServer)) {

            return await client.SendAsync(request);
        }
    }
}
The GetResponseAsyncin Listing 6-34 is the base method that all the other helpers are using. It initializes the HttpClient with an HttpServer instance. Now when you call the SendAsync method of the HttpClient instance, you won’t be actually making an HTTP call because you have swapped the HttpClientHandler with the HttpServer as an inner handler.
As discussed in previous sections, there is a message handler registered to provide the HTTP basic authentication check and to act on the request accordingly. So you will be using that message handler during the integration tests, too. Listing 6-14 shows how to authenticate the request, and you’ll see that you get the IMembershipService implementation through the dependency resolver. You will invoke its ValidateUser method to indicate whether the request is authenticated. There is another helper class named ServicesMockHelper that has a static method named GetInitialMembershipServiceMock, which will provide a IMembershipService mock that can be used to register through the dependency resolver (see Listing 6-38).
Listing 6-38. The ServicesMockHelper Class
internal static class ServicesMockHelper {

    internal static Mock<IMembershipService>
        GetInitialMembershipServiceMock() {

        var membershipServiceMock =
            new Mock<IMembershipService>();

        var users = new[] {
            new {
                Name = Constants.ValidAdminUserName,
                Password = Constants.ValidAdminPassword,
                Roles = new[] { "Admin" }
            },
            new {
                Name = Constants.ValidEmployeeUserName,
                Password = Constants.ValidEmployeePassword,
                Roles = new[] { "Employee" }
            },
            new {
                Name = Constants.ValidAffiliateUserName,
                Password = Constants.ValidAffiliatePassword,
                Roles = new[] { "Affiliate" }
            }
        }.ToDictionary(
            user => user.Name, user => user
        );

        membershipServiceMock.Setup(ms => ms.ValidateUser(
            It.IsAny<string>(), It.IsAny<string>())
        ).Returns<string, string>(
            (username, password) => {

                var user = users.FirstOrDefault(x => x.Key.Equals(
                    username,
                    StringComparison.OrdinalIgnoreCase)).Value;

                var validUserContext = (user != null)
                    ? new ValidUserContext {
                        Principal = new GenericPrincipal(
                            new GenericIdentity(user.Name),
                            user.Roles
                        )
                    } : new ValidUserContext();

                return validUserContext;
            }
        );

        return membershipServiceMock;
    }
}
The GetInitialMembershipServiceMock method obtains the users from the Constants class, as shown in Listing 6-39. The Constants class stores the valid and invalid users and these credentials are used when the request messages are constructed with the HTTP authorization header.
Listing 6-39. The Constants Class
internal static class Constants {

    internal const string ValidAffiliateUserName = "tugberkAff";
    internal const string ValidAffiliatePassword = "86421";
    internal const string ValidEmployeeUserName = "tugberkEmp";
    internal const string ValidEmployeePassword = "13579";
    internal const string ValidAdminUserName = "tugberkAdmin";
    internal const string ValidAdminPassword = "12345678";
    internal const string InvalidUserName = "tgbrk";
    internal const string InvalidPassword = "87654321";
}
In order to make constructing HttpRequestMessage instances easier, you’ll use another helper class named HttpRequestMessageHelper, as shown in Listing 6-40.
Listing 6-40. The HttpRequestMessageHelper Class for HttpRequestMessage Helper Methods
internal static class HttpRequestMessageHelper {

    internal static HttpRequestMessage ConstructRequest(
        HttpMethod httpMethod, string uri) {

        return new HttpRequestMessage(httpMethod, uri);
    }

    internal static HttpRequestMessage ConstructRequest(
        HttpMethod httpMethod, string uri, string mediaType) {

        return ConstructRequest(
            httpMethod,
            uri,
            new MediaTypeWithQualityHeaderValue(mediaType));
    }

    internal static HttpRequestMessage ConstructRequest(
        HttpMethod httpMethod, string uri,
        IEnumerable<string> mediaTypes) {

        return ConstructRequest(
            httpMethod,
            uri,
            mediaTypes.ToMediaTypeWithQualityHeaderValues());
    }

    internal static HttpRequestMessage ConstructRequest(
        HttpMethod httpMethod, string uri, string mediaType,
        string username, string password) {

        return ConstructRequest(
            httpMethod, uri,
            new[] { mediaType }, username, password);
    }

    internal static HttpRequestMessage ConstructRequest(
        HttpMethod httpMethod, string uri,
        IEnumerable<string> mediaTypes,
        string username, string password) {

        var request = ConstructRequest(
            httpMethod, uri, mediaTypes);

        request.Headers.Authorization =
            new AuthenticationHeaderValue(
                "Basic",
                EncodeToBase64(
                    string.Format(
                        "{0}:{1}", username, password)));

        return request;
    }

    // Private helpers
    private static HttpRequestMessage ConstructRequest(
        HttpMethod httpMethod, string uri,
        MediaTypeWithQualityHeaderValue mediaType) {

        return ConstructRequest(
            httpMethod,
            uri,
            new[] { mediaType });
    }

    private static HttpRequestMessage ConstructRequest(
        HttpMethod httpMethod, string uri,
        IEnumerable<MediaTypeWithQualityHeaderValue> mediaTypes) {

        var request = ConstructRequest(httpMethod, uri);
        request.Headers.Accept.AddTo(mediaTypes);

        return request;
    }

    private static string EncodeToBase64(string value) {

        byte[] toEncodeAsBytes = Encoding.UTF8.GetBytes(value);
        return Convert.ToBase64String(toEncodeAsBytes);
    }
}
In one extension method, you can use an extension method for the ICollection interface: AddTo (see Listing 6-41).
Listing 6-41. AddTo Extension method for ICollection Interface
internal static class ICollectionExtensions {

    internal static void AddTo<T>(
        this ICollection<T> destination,
        IEnumerable<T> source) {

        foreach (T item in source) {
            destination.Add(item);
        }
    }
}
Now you’re ready to write the actual integration tests against the HTTP API application.
Integration Tests for the First Action Method
After setting up the global helper methods for integration testing, you can now implement the tests themselves. You’ll create a class for each controller and have subclasses under it for controller actions. To be able to mock the dependent services, you’ll also have a few helper methods for this class and the GetShipments class (see Listing 6-42).
Listing 6-42. The ShipmentsControllerIntegrationTest Class
public class ShipmentsControllerIntegrationTest {

    private static readonly string ApiBaseRequestPath =
        "api/shipments";

    public class GetShipments {

        // Lines removed for brevity
        // Tests for GetShipments action method will come here

        private static IContainer GetContainer() {

            var shipments = GetDummyShipments(new[] {
                Guid.NewGuid(), Guid.NewGuid(), Guid.NewGuid()
            });

            Mock<IShipmentService> shipmentSrvMock =
            new Mock<IShipmentService>();
            shipmentSrvMock.Setup(ss =>
                ss.GetShipments(
                    It.IsAny<int>(), It.IsAny<int>()
                )
            ).Returns<int, int>(
                (pageIndex, pageSize) =>
                    shipments.AsQueryable()
                        .ToPaginatedList(pageIndex, pageSize)
            );

            return GetContainerThroughMock(shipmentSrvMock);
        }
    }

    // Lines removed for brevity

    private static IEnumerable<Shipment>
        GetDummyShipments(Guid[] keys) {

        var shipmentTypeKeys = new Guid[] {
            Guid.NewGuid(), Guid.NewGuid(), Guid.NewGuid()
        };

        for (int i = 0; i < 3; i++) {

            yield return new Shipment {
                Key = keys[i],
                AffiliateKey = Guid.NewGuid(),
                ShipmentTypeKey = shipmentTypeKeys[i],
                Price = 12.23M * (i + 1),
                ReceiverName =
                    string.Format("Receiver {0} Name", i),
                ReceiverSurname =
                    string.Format("Receiver {0} Surname", i),
                ReceiverAddress =
                    string.Format("Receiver {0} Address", i),
                ReceiverCity =
                    string.Format("Receiver {0} City", i),
                ReceiverCountry =
                    string.Format("Receiver {0} Country", i),
                ReceiverTelephone =
                    string.Format("Receiver {0} Country", i),
                ReceiverZipCode = "12345",
                ReceiverEmail = "[email protected]",
                CreatedOn = DateTime.Now,
                ShipmentType = new ShipmentType {
                    Key = shipmentTypeKeys[i],
                    Name = "Small",
                    Price = 4.19M,
                    CreatedOn = DateTime.Now,
                },
                ShipmentStates = new List<ShipmentState> {
                    new ShipmentState {
                        Key = Guid.NewGuid(),
                        ShipmentKey = keys[i],
                        ShipmentStatus = ShipmentStatus.Ordered
                    },
                    new ShipmentState {
                        Key = Guid.NewGuid(),
                        ShipmentKey = keys[i],
                        ShipmentStatus = ShipmentStatus.Scheduled
                    }
                }
            };
        }
    }

    private static ContainerBuilder GetInitialContainerBuilder() {

        var builder = IntegrationTestHelper
            .GetEmptyContainerBuilder();

        var mockMemSrv = ServicesMockHelper
            .GetInitialMembershipServiceMock();

        builder.Register(c => mockMemSrv.Object)
            .As<IMembershipService>()
            .InstancePerApiRequest();

        return builder;
    }

    private static IContainer GetContainerThroughMock(
        Mock<IShipmentService> shipmentSrvMock) {

        var containerBuilder = GetInitialContainerBuilder();

        containerBuilder.Register(c => shipmentSrvMock.Object)
            .As<IShipmentService>()
            .InstancePerApiRequest();

        return containerBuilder.Build();
    }
}
Most of these methods initialize the IoC container and create mocks, but the GetDummyShipments static method provides the fake data that are needed. The GetContainer method under the GetShipments class creates the mock object for IShipmentService and uses the GetDummyShipments method to provide the fake data. After all this set up, you can now write the first integration test to check if you get expected shipments when the request is authenticated and authorized (see Listing 6-43).
Listing 6-43. The GetShipments Integration Test
public class ShipmentsControllerIntegrationTest {

    // Lines removed for brevity

    public class GetShipments {

        [Fact, NullCurrentPrincipal]
        public Task
            Returns_200_And_Shipments_If_Request_Authorized() {

            // Arrange
            var config = IntegrationTestHelper
                .GetInitialIntegrationTestConfig(GetContainer());

            var request = HttpRequestMessageHelper
                .ConstructRequest(
                    httpMethod: HttpMethod.Get,
                    uri: string.Format(
                        "https://localhost/{0}?page={1}&take={2}",
                        ApiBaseRequestPath, 1, 2),
                    mediaType: "application/json",
                    username: Constants.ValidAdminUserName,
                    password: Constants.ValidAdminPassword);

            return IntegrationTestHelper
                .TestForPaginatedDtoAsync<ShipmentDto>(
                    config,
                    request,
                    expectedPageIndex: 1,
                    expectedTotalPageCount: 2,
                    expectedCurrentItemsCount: 2,
                    expectedTotalItemsCount: 3,
                    expectedHasNextPageResult: true,
                    expectedHasPreviousPageResult: false);
        }

        // Lines removed for brevity
    }

    // Lines removed for brevity
}
Thanks to the helper methods that were put in place, you have an unobtrusive test method. First, you initialized an HttpConfiguration object by passing the IoC container. Then, you constructed an HttpRequestMessage instance. Finally, you used these two objects to invoke the IntegrationTestHelper.TestForPaginatedDtoAsync method to actually run the assertions. Also notice that you have applied an attribute named NullCurrentPrincipalAttribute to this test method. This is an xUnit BeforeAfterTestAttribute implementation to set the Thread.CurrentPrincipal to null (see Listing 6-44).
Listing 6-44. The NullCurrentPrincipalAttribute Class
public class NullCurrentPrincipalAttribute :
    BeforeAfterTestAttribute {

    public override void Before(MethodInfo methodUnderTest) {

        Thread.CurrentPrincipal = null;
    }
}
Now when you run this test, you should see the results passed as shown in Figure 6-8.
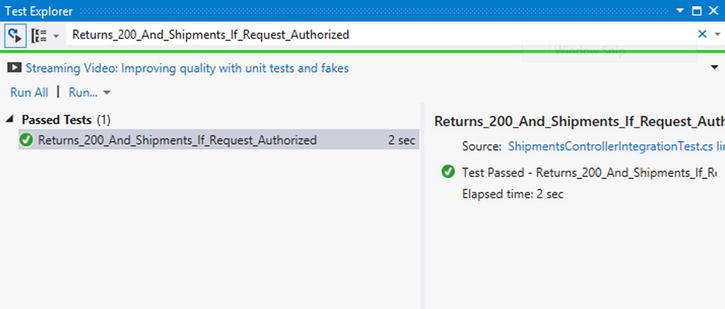
Figure 6-8. The Returns_200_And_Shipments_If_Request_Authorized test results
Other Action Methods for ShipmentsController
Let’s implement some other action methods to complete the ShipmentsController. With this controller, you can process one other HTTP GET request to retrieve a single entity. The GetShipment action method will enable this feature and it returns the ShipmentDto instance (see Listing 6-45).
Listing 6-45. GetShipment Action Method of the ShipmentsController
public ShipmentDto GetShipment(Guid key) {

    var shipment = _shipmentService.GetShipment(key);
    if (shipment == null) {

        throw new HttpResponseException(HttpStatusCode.NotFound);
    }

    return shipment.ToShipmentDto();
}
Inside the GetShipment action method, you want to get the Shipment object first based on the key value that you received as an action parameter. If the shipment record based on the received key doesn’t exist, it will throw an HttpResponseException to return a 404 Not Found HTTP response.
![]() Note We don’t cover all the integration tests in this chapter but we implemented nearly all of them for our application. For example, you can find integration tests for ShipmentsController inside the ShipmentsControllerIntegrationTest.cs file in the PingYourPackage.API.Test.Integration project.
Note We don’t cover all the integration tests in this chapter but we implemented nearly all of them for our application. For example, you can find integration tests for ShipmentsController inside the ShipmentsControllerIntegrationTest.cs file in the PingYourPackage.API.Test.Integration project.
To be able to add new shipment records through this API, we added the PostShipment method, which accepts a ShipmentRequestModel instance, as was implemented in Listing 6-25, as an action parameter. Then, you can try to add the shipment though the IShipmentService instance. If the operation is a success, it will return the 201 Created HTTP response message with the created shipment record in the message body. If the operations fails, it will simply return the 409 Conflict HTTP response message. The PostShipment action method is shown in Listing 6-46.
Listing 6-46. PostShipment Action Method of the ShipmentController
public HttpResponseMessage PostShipment(
    ShipmentRequestModel requestModel) {

    var createdShipmentResult =
        _shipmentService.AddShipment(requestModel.ToShipment());

    if (!createdShipmentResult.IsSuccess) {

        return new HttpResponseMessage(HttpStatusCode.Conflict);
    }

    var response = Request.CreateResponse(HttpStatusCode.Created,
        createdShipmentResult.Entity.ToShipmentDto());

    response.Headers.Location = new Uri(
        Url.Link(RouteName, new {
            key = createdShipmentResult.Entity.Key
        })
    );

    return response;
}
However, there is a small issue with the PostShipment action method here. The consumer of our API can send a POST request with an empty message body against a URI, which will eventually correspond to the PostShipment action method. Validation attributes were applied to members of the ShipmentRequestModel class, but if the message body is empty, the validation attributes won’t get executed and the ShipmentRequestModel parameter for the action method will be passed as null. There are a few ways to handle this behavior, but we created an action filter that is going to check against the parameter whose name is supplied through the constructor of the action filter object. Look inside the HttpActionContext.ActionArgumenets collection to retrieve the action parameter value and then check it to see whether it’s null. If so, the HttpActionContext.Response is set to return a 400 Bad Request response with the validation error message (see Listing 6-47).
Listing 6-47. The EmptyParameterFilterAttribute Class
[AttributeUsage(AttributeTargets.Method, AllowMultiple = true)]
public class EmptyParameterFilterAttribute
    : ActionFilterAttribute {

    public string ParameterName { get; private set; }

    public EmptyParameterFilterAttribute(string parameterName) {

        if (string.IsNullOrEmpty(parameterName)) {

            throw new ArgumentNullException("parameterName");
        }

        ParameterName = parameterName;
    }

    public override void OnActionExecuting(
        HttpActionContext actionContext) {

        object parameterValue;
        if (actionContext.ActionArguments.TryGetValue(
            ParameterName, out parameterValue)) {

            if (parameterValue == null) {

                actionContext.ModelState.AddModelError(
                    ParameterName, FormatErrorMessage(
                                       ParameterName));

                actionContext.Response = actionContext
                    .Request.CreateErrorResponse(
                        HttpStatusCode.BadRequest,
                        actionContext.ModelState);
            }
        }
    }

    private string FormatErrorMessage(string parameterName) {

        return string.Format(
            "The {0} cannot be null.", parameterName);
    }
}
You can now apply the EmptyParameterFilterAttribute to the PostShipment method (see Listing 6-48).
Listing 6-48. EmptyParameterFilterAttribute Applied PostShipment Method
[EmptyParameterFilter("requestModel")]
public HttpResponseMessage PostShipment(
    ShipmentRequestModel requestModel) {

    // Lines omitted for brevity
}
If you send a request to invoke the PostShipment method with an empty message body, you should now get the 400 Bad Request HTTP response (see Figure 6-9).
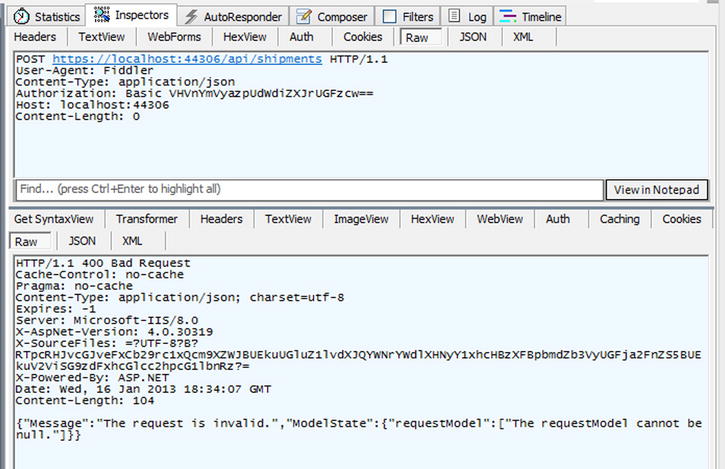
Figure 6-9. POST Request against /api/shipments with empty message body
You also need to cover the update operations for a shipment record. In the HTTP world, update operations are usually performed through the PUT HTTP method. When there is an HTTP PUT request to a resource, the message body content is supposed to replace the existing record on the server. Listing 6-49 shows the implementation to respond to a PUT request for ShipmentsController.
Listing 6-49. The PutShipment Action Method
[EmptyParameterFilter("requestModel")]
public ShipmentDto PutShipment(
    Guid key,
    ShipmentUpdateRequestModel requestModel) {

    var shipment = _shipmentService.GetShipment(key);
    if (shipment == null) {

        throw new HttpResponseException(HttpStatusCode.NotFound);
    }

    var updatedShipment = _shipmentService.UpdateShipment(
        requestModel.ToShipment(shipment));

    return updatedShipment.ToShipmentDto();
}
You first try to get the shipment record whose key has been supplied. If the shipment record doesn’t exist, you throw an HttpResponseException to return a 404 Not Found HTTP response message. If the shipment record exists, you continue, update the shipment record, and return back the updated shipment record.
![]() Note In some cases, you may want to replace only certain properties of a record instead of replacing it entirely. Semantically, doing this type operation through the HTTP PATCH method is the right way. There is a great blog by Filip Wojcieszyn that explains how to handle PATCH operations in ASP.NET Web API: http://www.strathweb.com/2013/01/easy-asp-net-web-api-resource-updates-with-delta.
Note In some cases, you may want to replace only certain properties of a record instead of replacing it entirely. Semantically, doing this type operation through the HTTP PATCH method is the right way. There is a great blog by Filip Wojcieszyn that explains how to handle PATCH operations in ASP.NET Web API: http://www.strathweb.com/2013/01/easy-asp-net-web-api-resource-updates-with-delta.
Also, notice that the EmptyParameterFilterAttribute was applied to the PutShipment action method, too. So, if you send a PUT request with an empty message body to this resource, you’ll get the 400 Bad Request response.
Lastly, you must provide an endpoint to remove a shipment record. You can enable this operation through the HTTP DELETE request. However, some shipment records cannot be deleted. As explained in Chapter 5, a shipment record has states that indicate the movement of a shipment. If the shipment’s current state is InTransit or beyond, the shipment cannot be deleted. The IShipmentService.RemoveShipment method will handle this operation. Let’s look at the DeleteShipment action method (see Listing 6-50).
Listing 6-50. The DeleteShipment Action Method
public HttpResponseMessage DeleteShipment(Guid key) {

    var shipment = _shipmentService.GetShipment(key);
    if (shipment == null) {

        throw new HttpResponseException(HttpStatusCode.NotFound);
    }

    var shipmentRemoveResult =
        _shipmentService.RemoveShipment(shipment);

    if (!shipmentRemoveResult.IsSuccess) {

        return new HttpResponseMessage(HttpStatusCode.Conflict);
    }

    return new HttpResponseMessage(HttpStatusCode.NoContent);
}
If the shipment is removed successfully, it will return the 204 No Content response. If not, the response status code will state 409 Conflict.
Implementing the AffiliateShipmentsController
At this point, you might be wondering how an affiliate would be able to add shipment records through the HTTP API. There are a few concerns you need to consider before moving on for this:
- The affiliate should indicate its key through the URI.
- The existence of the affiliate should be ensured before moving forward.
- If the existence of the affiliate is checked, the currently authenticated user needs to be related to that affiliate.
- If a single shipment record is requested at the further level inside the pipeline, that shipment should belong to the currently authenticated affiliate.
To be able to cleanly handle these scenarios, you won’t allow affiliates to access the ShipmentController. In other words, affiliate requests against the /api/shipments URI won’t be authorized. You’ll have a separate controller to handle shipment records of affiliates: the AffiliateShipmentsController. There is also a different approach that can be followed by leveraging the per-route message handler feature.
Per-Route Message Handler for AffiliateShipmentsController
Previously you created a few message handlers to handle operations such as authentication and placed them into the HttpConfiguration.MessageHandlers collection. These handlers are applied globally and are run for every single request. The ASP.NET Web API also has a notion of applying message handlers per route. By providing a per-route message handler, you are completely suppressing the controller pipeline, which includes filters, parameter bindings, and validation. In other words, you are telling the framework to replace the HttpControllerDispatcher message handler with your own supplied message handler for any request that matches that route. Figure 6-10 shows the high-level view of the message handler pipeline of the ASP.NET Web API framework.
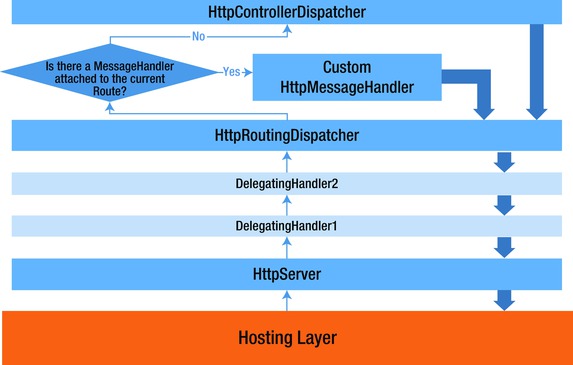
Figure 6-10. ASP.NET Web API message handler pipeline
However, in order to get inside the controller pipeline, you only need to hand off the request to HttpControllerDispatcher at the right place. As the message handler pipeline applies the chain of responsibility pattern, and you can simply chain the custom message handler and HttpControllerDispatcher together. In order to do that, you need to create a custom message handler by taking DelegatingHandler as the base class.
So, why would you want to create a custom per-route message handler here for this case? You can understand this by looking at the URI templates for possible HTTP requests for this controller:
- GET api/affiliates/{key}/shipments
- GET api/affiliates/{key}/shipments/{shipmentKey}
- POST api/affiliates/{key}/shipments
- PUT api/affiliates/{key}/shipments/{shipmentKey}
- DELETE api/affiliates/{key}/shipments/{shipmentKey}
As you can see, the affiliate key needs to be supplied for every request that an affiliate will make. So, you should be confident about the fact that the supplied affiliate key really corresponds to an affiliate in the database. This is where our custom per-route message handler enters the scene. Let’s look at the complete implementation of our per-route message handler, the AffiliateShipmentsDispatcher (see Listing 6-51).
Listing 6-51. The AffiliateShipmentsDispatcher Message Handler
public class AffiliateShipmentsDispatcher : DelegatingHandler {

    protected override Task<HttpResponseMessage> SendAsync(
        HttpRequestMessage request,
        CancellationToken cancellationToken) {

        // We know at this point that the {key}
        // route variable has been supplied.
        // Otherwise, we wouldn't be here.
        // So, just get it.
        IHttpRouteData routeData = request.GetRouteData();
        Guid affiliateKey =
            Guid.ParseExact(
                routeData.Values["key"].ToString(), "D");

        IShipmentService shipmentService =
            request.GetShipmentService();

        if (shipmentService.GetAffiliate(affiliateKey) == null) {

            return Task.FromResult(
                request.CreateResponse(HttpStatusCode.NotFound));
        }

        return base.SendAsync(request, cancellationToken);
    }
}

internal static class HttpRequestMessageExtensions {

    internal static IShipmentService GetShipmentService(
        this HttpRequestMessage request) {

        return request.GetService<IShipmentService>();
    }

    // Line omitted for brevity
}
This is a fairly simple implementation that can be digested easily. At this point inside the SendAsync method, you know that the affiliate key has been supplied and you can just grab it through the match route data object. Then, you get the IShipmentService implementation through the dependency resolver. The GetShipmentService extension method uses the GetService extension method for HttpRequestMessage, as you saw in Listing 6-14, to get the IShipmentService implementation. Lastly, you check if the affiliate exists or not. If it doesn’t exist, it will terminating the chain and returning a 404 Not Found response. Otherwise, you call the base SendAsync method, which will eventually call the inner handler’s SendAsync method and that inner handler will be HttpControllerDispatcher.
Before moving on, you should register this message handler for the route. You do that by chaining AffiliateShipmentsDispatcher and HttpControllerDispatcher together, then setting the created pipeline as the handler for the route. Use the static HttpClientFactory.CreatePipeline method to chain these handlers together (see Listing 6-52).
Listing 6-52. Registering Per-Route Message Handler for AffiliateShipmentsHttpRoute
public static void RegisterRoutes(HttpConfiguration config) {

    var routes = config.Routes;

    // Pipelines
    HttpMessageHandler affiliateShipmentsPipeline =
        HttpClientFactory.CreatePipeline(
            new HttpControllerDispatcher(config),
            new[] { new AffiliateShipmentsDispatcher() });

    // Routes
    routes.MapHttpRoute(
        "AffiliateShipmentsHttpRoute",
        "api/affiliates/{key}/shipments/{shipmentKey}",
        defaults: new {
            controller = "AffiliateShipments",
            shipmentKey = RouteParameter.Optional
        },
        constraints: new {
            key = new GuidRouteConstraint(),
            shipmentKey = new GuidRouteConstraint()
        },
        handler: affiliateShipmentsPipeline
    );

    routes.MapHttpRoute(
        "DefaultHttpRoute",
        "api/{controller}/{key}",
        defaults: new { key = RouteParameter.Optional },
        constraints: new { key = new GuidRouteConstraint() });
}
This setup will give you the confidence that the affiliate really exists. So, you can now move on to solve the next problem.
Creating a Custom AuthorizeAttribute for AffiliateShipmentsController
When the request arrives inside the controller pipeline, you need to ensure that the affiliate, whose key has been supplied and existence has been checked, and the authenticated user are related to each other. You can make this check through an authorization filer, which will be applied at the controller level. Because you also need to check if the authenticated user is in the Affiliate role, you can take the AuthorizeAttribute as the base class for the custom authorization filter and run its logic before your own because you don’t need to perform any further checks if the user is not inside the Affiliate role.
Let’s have a look at the complete implementation of the AffiliateShipmentsAuthorizeAttribute (see Listing 6-53).
Listing 6-53. The AffiliateShipmentsAuthorizeAttribute
[AttributeUsage(AttributeTargets.Class, AllowMultiple = false)]
public class AffiliateShipmentsAuthorizeAttribute :
    AuthorizeAttribute {

    public AffiliateShipmentsAuthorizeAttribute() {

        base.Roles = "Affiliate";
    }

    public override void OnAuthorization(
        HttpActionContext actionContext) {

        base.OnAuthorization(actionContext);

        // If not authorized at all, don't bother
        // checking for the user - affiliate relation
        if (actionContext.Response == null) {

            // We are here sure that the request
            // has been authorized and the user is
            // in the Affiliate role. We also don't need
            // to check the existence of the affiliate
            // as it has been also already done
            // by AffiliateShipmentsDispatcher.

            HttpRequestMessage request = actionContext.Request;
            Guid affiliateKey =
                GetAffiliateKey(request.GetRouteData());
            IPrincipal principal = Thread.CurrentPrincipal;
            IShipmentService shipmentService =
                request.GetShipmentService();

            bool isAffiliateRelatedToUser =
                shipmentService.IsAffiliateRelatedToUser(
                    affiliateKey, principal.Identity.Name);

            if (!isAffiliateRelatedToUser) {

                // Set Unauthorized response
                // as the user and  affiliate isn't
                // related to each other. You might want to
                // return "404 NotFound" response here
                // if you don't want to expose the existence
                // of the affiliate.
                actionContext.Response =
                    request.CreateResponse(
                        HttpStatusCode.Unauthorized);
            }
        }
    }

    private static Guid GetAffiliateKey(
        IHttpRouteData routeData) {

        var affiliateKey = routeData.Values["key"].ToString();
        return Guid.ParseExact(affiliateKey, "D");
    }
}
Because the authorization filter is derived from the AuthorizeAttribute, the OnAuthorization method will be called to authorize the request. So, you have overridden it and run its own logic before yours. Then, you check if the HttpActionContext.Response is set or not. If it’s not set, it means that the request is authorized and the user is in the Affiliate role because you have set the Roles property to Affiliate inside the constructor. Then, you check whether the authenticated user is related to the affiliate. If it is, you do nothing and let the request flow through the pipeline. If the user is not related to the affiliate record, you construct a new 401 Unauthorized response and set it to HttpActionContext.Response property to terminate the request. You may want to return the 404 Not Found response instead if you don’t want to expose the existence of the affiliate for security reasons.
You can now apply this to your AffiliateShipmentsController and for every request that is eventually routed to AffiliateShipmentsController, this authorization filter will be invoked (see Listing 6-54).
Listing 6-54. The AffiliateShipmentsController’s Initial Look
[AffiliateShipmentsAuthorize]
public class AffiliateShipmentsController : ApiController {

    private readonly IShipmentService _shipmentService;
    private const string RouteName =
        "AffiliateShipmentsHttpRoute";

    public AffiliateShipmentsController(
        IShipmentService shipmentService) {

        _shipmentService = shipmentService;
    }

    // Lines omitted for brevity
}
From now on, you can be sure through the action methods of AffiliateShipmentsController that the affiliate exists and is related to the currently authenticated user.
Creating the GetShipment and GetShipments Action Methods
Inside the GetShipments action method, you will receive the PaginatedRequestCommand as usual and you will also have the affiliate key that you can use to filter the shipment records (see Listing 6-55).
Listing 6-55. GetShipments Action Method
public PaginatedDto<ShipmentDto> GetShipments(
    Guid key, PaginatedRequestCommand cmd) {

    var shipments = _shipmentService
        .GetShipments(cmd.Page, cmd.Take, affiliateKey: key);

    return shipments.ToPaginatedDto(
        shipments.Select(sh => sh.ToShipmentDto()));
}
The GetShipment method, which will return the single shipment record, is a little different for this controller. Let’s look at the implementation first, then we’ll discuss it more (see Listing 6-56).
Listing 6-56. GetShipment Action Method
[EnsureShipmentOwnership]
public ShipmentDto GetShipment(
    Guid key,
    Guid shipmentKey,
    [BindShipment]Shipment shipment) {

    return shipment.ToShipmentDto();
}
There are two parts here that we haven’t touched on yet. The method is marked with the EnsureShipmentOwnership attribute and it is receiving a parameter that is of the type Shipment and it is applying the BindShipmentAttribute to this parameter. Let’s see what these indicate and why they are needed here.
Ensuring Shipment Ownership
The resource URI for the GET request, which corresponds to the GetShipment method, will look like this:
/api/affiliates/041f765a-1019-4956-b610-370d05be95ac/shipments
/6527CA96-9491-4755-A89D-3FA2A01A2D1C
Here, the affiliate key and the shipment key are expressed to retrieve the shipment record that belongs to the affiliate in question. So, you need to be sure that the affiliate really owns this shipment record before returning the result. The EnsureShipmentOwnershipAttribute enables this. This could be handled inside the action method itself, but keeping the action methods as thin as possible is one of our intents with this application. Also, this behavior will also be needed for PUT and DELETE requests, too. The EnsureShipmentOwnershipAttribute implementation is shown in Listing 6-57.
Listing 6-57. The EnsureShipmentOwnershipAttribute Implementation
[AttributeUsage(AttributeTargets.Method, AllowMultiple = false)]
public class EnsureShipmentOwnershipAttribute
    : Attribute, IAuthorizationFilter {

    private const string ShipmentDictionaryKey =
        "__AffiliateShipmentsController_Shipment";

    public Task<HttpResponseMessage>
        ExecuteAuthorizationFilterAsync(
        HttpActionContext actionContext,
        CancellationToken cancellationToken,
        Func<Task<HttpResponseMessage>> continuation) {

        // We are here sure that the user is
        // authanticated and request can be kept executing
        // because the AuthorizeAttribute has  been invoked
        // before this filter's OnActionExecuting method.
        // Also, we are sure that the affiliate is
        // associated with the currently authanticated user
        // as the previous action filter has checked against this.
        IHttpRouteData routeData =
            actionContext.Request.GetRouteData();
        Uri requestUri =
            actionContext.Request.RequestUri;

        Guid affiliateKey =
            GetAffiliateKey(routeData);
        Guid shipmentKey =
            GetShipmentKey(routeData, requestUri);

        // Check if the affiliate really owns the shipment
        // whose key came from the request. We don't need
        // to check the existence of the affiliate as this
        // check has been already performed by
        // the AffiliateShipmentsDispatcher.
        IShipmentService shipmentService =
            actionContext.Request.GetShipmentService();
        Shipment shipment =
            shipmentService.GetShipment(shipmentKey);

        // Check the shipment existance
        if (shipment == null) {

            return Task.FromResult(
                new HttpResponseMessage(HttpStatusCode.NotFound));
        }

        // Check the shipment ownership
        if (shipment.AffiliateKey != affiliateKey) {

            // You might want to return "404 NotFound"
            // response here if you don't want
            // to expose the existence of the shipment.
            return Task.FromResult(
                new HttpResponseMessage(
                    HttpStatusCode.Unauthorized));
        }

        // Stick the shipment inside the Properties
        // dictionary so that we won't need to have
        // another trip to database. The ShipmentParameterBinding
        // will bind the Shipment param if needed.
        actionContext.Request
            .Properties[ShipmentDictionaryKey] = shipment;

        // The request is legit, continue executing.
        return continuation();
    }

    private static Guid GetAffiliateKey(
        IHttpRouteData routeData) {

        var affiliateKey = routeData.Values["key"].ToString();
        return Guid.ParseExact(affiliateKey, "D");
    }

    private static Guid GetShipmentKey(
        IHttpRouteData routeData, Uri requestUri) {

        // We are sure at this point that the
        // shipmentKey value has been supplied
        // (either through route or quesry string)
        // because it wouldn't be possible for the
        // request to arrive here if it wasn't.
        object shipmentKeyString;
        if (routeData.Values.TryGetValue(
            "shipmentKey", out shipmentKeyString)) {

            return Guid.ParseExact(
                shipmentKeyString.ToString(), "D");
        }

        // It's now sure that query string has
        // the shipmentKey value.
        var quesryString = requestUri.ParseQueryString();
        return Guid.ParseExact(quesryString["shipmentKey"], "D");
    }

    public bool AllowMultiple {
        get { return false; }
    }
}
The EnsureShipmentOwnershipAttribute is itself an authorization filter, as you can see. So, it will run just after the controller level authorization filter. Briefly, you are retrieving the shipment inside the ExecuteAuthorizationFilterAsync method and first checking whether it exists. If not, it will return a 404 Not Found response. If it exists, you will move on and compare the affiliate key of the shipment against the one that was retrieved through the route data object. When it sees that both are the same, it will put the found shipment record inside the request properties bag so that it can be retrieve later and reduce the trips that are made to the database. This is where BindShipmentAttribute comes into play, which we’ll explain in the next section, but for now imagine you have the BindShipmentAttribute implementation and look at the retrieve process in action first.
Let’s send a valid request to retrieve a single shipment record (see Figure 6-11).
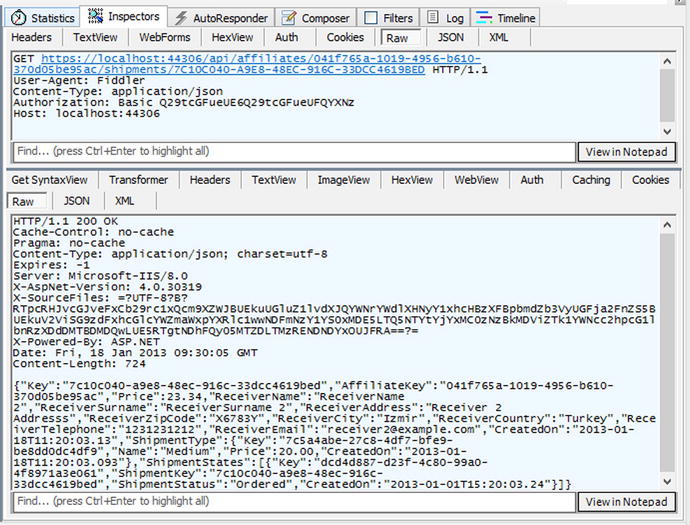
Figure 6-11. Valid affiliate HTTP GET request
You will get the expected result back. Now, let’s try to retrieve some other affiliate’s shipment record and see what comes back this time (see Figure 6-12).
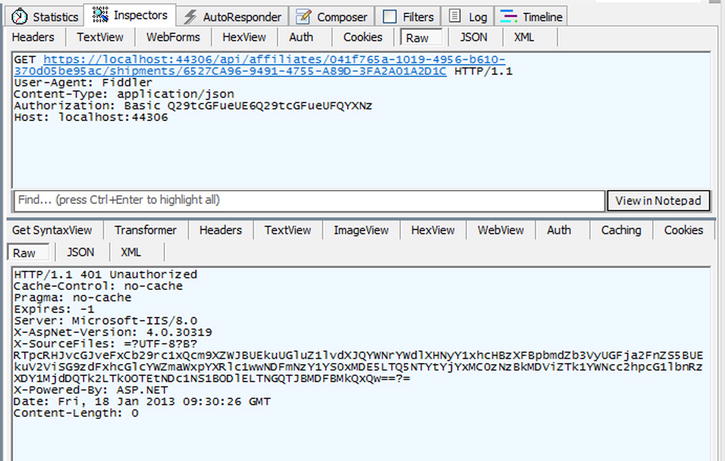
Figure 6-12. Invalid affiliate HTTP GET request
The 401 Unauthorized response is returned this time. Again, you would want to return 404 Not Found here instead for security reasons because you wouldn’t be exposing the existence of that shipment.
Creating the ShipmentParameterBinding
Now that the shipment record has been retrieved for the request once inside the EnsureShipmentOwnershipAttribute, the same record for the GetShipment action method can be used to avoid another trip to the database for that same record.
The question is whether to retrieve this inside the action method. One way to do this is to directly retrieve it through the Request.Properties collection inside the action method. However, you can leverage one of the great features of ASP.NET Web API for this: parameter binding. You can apply a parameter binding attribute for an action parameter and that parameter will be bound by using the HttpParameterBinding instance supplied by the applied parameter binding attribute. For our case here, the BindShipmentAttribute implementation is shown in Listing 6-58.
Listing 6-58. The BindShipmentAttribute Implementation
public class BindShipmentAttribute : ParameterBindingAttribute {

    public override HttpParameterBinding GetBinding(
        HttpParameterDescriptor parameter) {

        return new ShipmentParameterBinding(parameter);
    }
}
The responsibility of the parameter binding attribute is to supply an HttpParameterBinding instance and BindShipmentAttribute returns the ShipmentParameterBinding for that. The ShipmentParameterBinding class is derived from HttpParameterBinding and is responsible for retrieving and binding the parameter value (see Listing 6-59).
Listing 6-59. The ShipmentParameterBinding Implementation
public class ShipmentParameterBinding : HttpParameterBinding {

    private readonly string _parameterName;
    private const string ShipmentDictionaryKey =
        "__AffiliateShipmentsController_Shipment";

    public ShipmentParameterBinding(
        HttpParameterDescriptor descriptor)
        : base(descriptor) {

        _parameterName = descriptor.ParameterName;
    }

    public override Task ExecuteBindingAsync(
        ModelMetadataProvider metadataProvider,
        HttpActionContext actionContext,
        CancellationToken cancellationToken) {

        // It is safe to assume that the Shipment
        // instance exists inside the
        // HttpRequestMessage.Properties dictionary
        // because we woulnd't be here if it doesn't.
        var shipment = actionContext.Request
            .Properties[ShipmentDictionaryKey] as Shipment;

        actionContext.ActionArguments.Add(
            _parameterName, shipment);

        return Task.FromResult(0);
    }
}
As you’ll recall, the found Shipment object is inside the request properties bag. So, you are retrieving it through the HttpActionContext.Request.Properties collection and sticking it into HttpActionContex.ActionArguments collection for it to be passed inside the action method.
If you put a breakpoint on the GetShipment method in debug mode, you should see that the shipment parameter is supplied (see Figure 6-13).
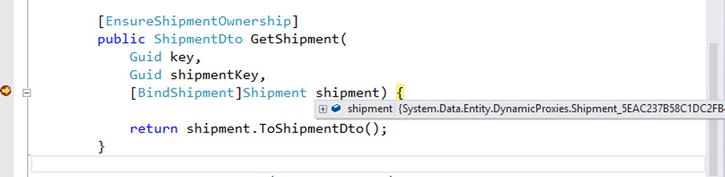
Figure 6-13. GetShipment method’s shipment parameter is being bound
Creating Remaining Action Methods
There are a few other controller action methods that need to be implemented. One of them will handle the POST HTTP method for creating new shipment entries for an affiliate (see Listing 6-60).
Listing 6-60. The PostShipment Action Method
[EmptyParameterFilter("requestModel")]
public HttpResponseMessage PostShipment(
    Guid key,
    ShipmentByAffiliateRequestModel requestModel) {

    var createdShipmentResult =
        _shipmentService.AddShipment(
            requestModel.ToShipment(key));

    if (!createdShipmentResult.IsSuccess) {

        return new HttpResponseMessage(
            HttpStatusCode.Conflict);
    }

    var response = Request.CreateResponse(
        HttpStatusCode.Created,
        createdShipmentResult.Entity.ToShipmentDto());

    response.Headers.Location = new Uri(
        Url.Link(RouteName, new {
            key = createdShipmentResult.Entity.AffiliateKey,
            shipmentKey = createdShipmentResult.Entity.Key
        })
    );

    return response;
}
The PostShipment action method has a very straightforward implementation. Also, see the PutShipment action method shown in Listing 6-61 for updating an existing shipment record.
Listing 6-61. The PutShipment Action Method
[EnsureShipmentOwnership]
[EmptyParameterFilter("requestModel")]
public ShipmentDto PutShipment(
    Guid key,
    Guid shipmentKey,
    ShipmentByAffiliateUpdateRequestModel requestModel,
    [BindShipment]Shipment shipment) {

    var updatedShipment = _shipmentService.UpdateShipment(
        requestModel.ToShipment(shipment));

    return updatedShipment.ToShipmentDto();
}
Finally, there is the DeleteShipment action method for removing a shipment entry (see Listing 6-62).
Listing 6-62. The DeleteShipment Action Method
[EnsureShipmentOwnership]
public HttpResponseMessage DeleteShipment(
    Guid key,
    Guid shipmentKey,
    [BindShipment]Shipment shipment) {

    var operationResult =
        _shipmentService.RemoveShipment(shipment);

    if (!operationResult.IsSuccess) {

        return new HttpResponseMessage(HttpStatusCode.Conflict);
    }

    return new HttpResponseMessage(HttpStatusCode.NoContent);
}
Summary
This chapter looked at implementing the API layer by examining several parts of the ASP.NET Web API framework: message handlers, filters, route registrations, dependency resolver, controllers, and so forth. We also discussed how easy it is to write in-memory integration tests against the exposed API endpoints. You now have the API endpoints ready to be hit, so it is time to build a client application that will consume this API. The next chapter will explain how to build a reusable .NET client wrapper around the HTTP API to make it easy to consume. By using this client wrapper, you will have an ASP.NET MVC client application that an affiliate can use to manage its shipment records.