
![]()
Documents and Records Management
Walk into any enterprise organization and ask someone in a department to describe his or her document storage and processing operations, and the person will likely give you a story about how management of documents and data is far from ideal.
In the time that I have been working with SharePoint and various clients looking to implement an information management system in SharePoint, the situation has been typical—documents and files scattered on a shared drive or file share, no categorization, multiple copies of the same document floating around in e-mails. Even the more organized groups have issues with multiple document and information silos.
Documents Management Systems and Records Management Systems are about the “management” of documents and data at an enterprise level. This chapter focuses on documents and records management features in SharePoint.
Before diving into the topics of document management and records management, I should mention that both of these fall under the umbrella of Enterprise Content Management (ECM) in SharePoint.
What Is a Documents Management System?
Even though the name implies management of documents in an organization, document management is really about empowering users who create and collaborate around documents to do so with more structure and control. Consider asking users of your organization the following questions:
- How many documents does your organization produce in a year?
- Are these documents stored on a central file-share with any form of structure?
- How do users search and browse for particular documents?
- Does your organization suffer from multiple versions of the same document in your document store?
- Are users’ e-mail copies of documents, or links to documents, stored in a central location?
- Are any documents in your organization security-sensitive? If so, how does your organization secure them?
- Does your organization have a business policy or practices for the location of documents, movement of documents, and archiving?
- How does your IT department back up the organization document silo?
- Does your organization use non–Microsoft Office type documents?
- Do you know of any approval or manual workflow for documents, such as proposal management?
The preceding questions are a small subset of those that I send new clients who are looking to move from a file-share document silo to a Documents Management System. A Documents Management System aims to provide a secure, central location for storage of all documents in an organization. Typical features of a Documents Management System include the following capabilities:
- Apply metadata to categorize documents
- Promote browsing and searching of documents based on document content or metadata
- Manage versions and change control of documents
- Secure sensitive documents to groups of users without intervention of the IT department
- Provide a consistent reference link to a document, so that despite the location of the document in the Documents Management System, users can still access the document from a shared link
- Scale to handle growth of document and metadata content
Any good Documents Management System provides features/functionality to address some or all of the questions raised previously. The next section introduces the features of SharePoint 2013 document management.
Document Management in SharePoint 2013
At the core platform, SharePoint provides document libraries for storage of documents. This feature addresses an immediate need to prevent e-mailing of multiple copies of a document under construction. Instead, users can e-mail a link to the most recent document in a SharePoint site. This is collaboration in basic form.
SharePoint offers many more features in the document management suite. The best way to get started exploring these features is to create a new site collection with the Document Center features installed, as in the following steps:
- Open Central Administration.
- If you need to create a new IIS web application, see Chapter 2 for instructions.
- Click the Application Management heading on the Central Administration home page.
- Under Site Collections, click the Create Site Collection link.
- SharePoint displays the Create Site Collection page.
- Change the web application to the application you want to host the new site collection.
- Give the site a name, and a URL suffix if it is not a root site collection.
- In the Site Templates section, click the Enterprise tab and then select Document Center as the template type.
- Provide the primary and secondary (optional) site administrators.
- Click the OK button and wait for SharePoint to finish creating the Document Center, which is our Documents Management System.
![]() Note You may install/activate all the features available in the Document Center in another site template, but for the purpose of this chapter, it is easier to create a Document Center site collection. The Document Center site template is an easy way to create a new site collection with all the document management features included. Some document management features default to document libraries, so users may make use of these features in any site that uses document libraries.
Note You may install/activate all the features available in the Document Center in another site template, but for the purpose of this chapter, it is easier to create a Document Center site collection. The Document Center site template is an easy way to create a new site collection with all the document management features included. Some document management features default to document libraries, so users may make use of these features in any site that uses document libraries.
- 11. Navigate to the new Document Center site, and you should see a page like that in Figure 11-1.
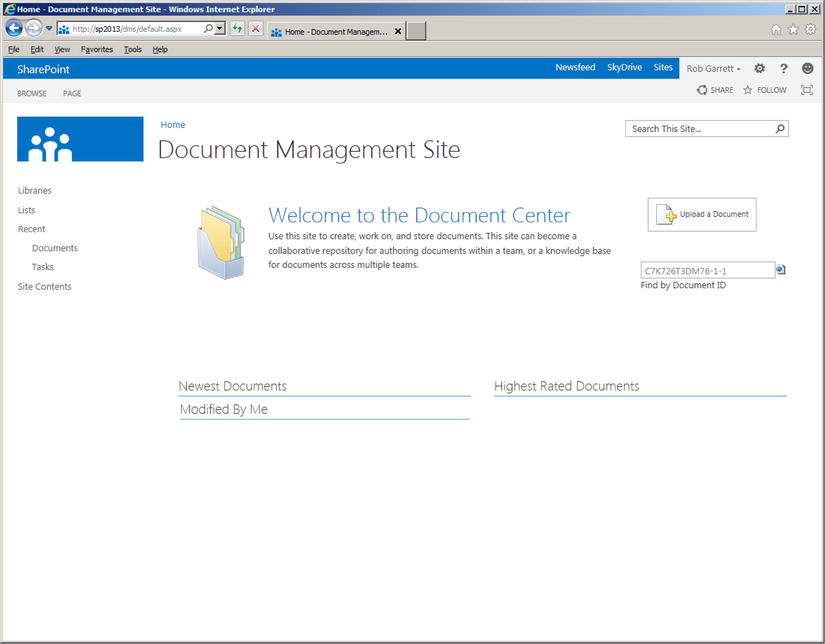
Figure 11-1. Document Management Site
The home page of the SharePoint 2013 Document Center consists of various content Web Parts, some content query Web Parts, to display recent documents, and the Find by Document ID Web Part. You may arrange these Web Parts differently by editing the page, and you may place these Web Parts on any other page in the site collection that includes Web Part zones.
Overview of Documents Management System Features
With the Document Center, created in the previous section, you are now ready to explore the document management features in SharePoint. The first place I would like you to look is in the Site Collection Features page:
- Click the settings gear icon.
- Select Site Settings from the menu.
- In the Site Collection Administration section, click the Site Collection Features link.
- Notice the activated Document ID Service and Document Sets features.
Table 11-1 describes the Documents Management System capabilities in SharePoint 2013 at a high level, and I will discuss each capability in greater depth in the following sections in this chapter. Some of the capabilities listed are not specific to Documents Management System but part of the core functionality and list behavior in SharePoint.
![]() Note The capabilities/functions listed in Table 11-1 may belong to specific SharePoint site or site collection features or be part of the core platform.
Note The capabilities/functions listed in Table 11-1 may belong to specific SharePoint site or site collection features or be part of the core platform.
Table 11-1. Documents Management Features in SharePoint 2013
| Capability/Function | Description |
|---|---|
| Document Libraries | Available in the core, document libraries derive from a basic list and allow users to upload, edit, and manage documents (files) to a library. Document libraries provide all the niceties of lists—workflow, versioning, custom content types, and so on. |
| Document Content Types | All document libraries contain the document content type, by default. This content type inherits the item content type and includes the site column to contain the file name of the document. |
| Document Sets | Document sets provide a special content type and function that allows users to encapsulate multiple document files in a single document library item. Document sets apply nicely to those documents that constitute multiple parts, such as proposal documents, where users need to work on the component parts as documents in their own right. Document sets allow users to assign document components their own content type. |
| Document IDs and Barcodes | The Document ID Service assigns newly uploaded documents a unique ID (included in the document URL on the site). If a document moves location within the site collection then SharePoint keeps track of the location and the Document ID still allows users to access the document. This feature allows users to e-mail links to documents without worrying about the links breaking because another user moved a document or changed the document library structure. This feature gives users of the Documents Management System peace of mind in uniquely identifying a document link. |
| Workflows | SharePoint Server includes a number of out-of-the-box workflows, which users may apply to lists, libraries, and sites. Notable is the Approval workflow, which routes tasks to users for document approval, either serially or in parallel. Other workflows, including Collect Signatures, Collect Feedback, and Disposition Approval, execute on document library items. |
| Document Versions | Document libraries and lists maintain versions and change (when enabled) so users may roll back to prior versions of a list item in time. SharePoint supports Major Version numbers, in which each major version constitutes publication of the list item for non-approver users, and Major/Minor Versions, in which a minor version denotes draft version, and users need to publish the item as a major version to make the changes available to non-approvers. In addition to versioning, SharePoint lists and libraries also support check in/out, so any one user may ensure another does not change a document while he or she has it checked out for edit. |
| Document Workspaces | Document workspaces provide user collaboration for a document. At any time, a user with collaboration rights to a document, and site creation rights, may elect to create a new document workspace site, which contains lists and libraries to collaborate on the document. For example, a proposal document may require a team of people to complete, who meet regularly and keep detailed notes and managed tasks for their work on the document. |
| Drop off Libraries | Rather than leaving users the arduous task of deciding or knowing where to upload/save documents to a library in a site collection hierarchy, a drop off library provides a single upload point for all documents. Based on metadata and document content, administrators of the drop off libraries may then apply rules to uploaded documents to move them to correct locations automatically. |
| Search within Documents | SharePoint indexes the content of typical Microsoft Office documents (Word, Excel, PowerPoint, Access, Visio, and so on). SharePoint 2013 can access other non-MS document types as long as an IFILTER exists. New in SharePoint 2013 is the ability to search within PDF documents out-of-the-box. When users search for documents by keyword, SharePoint will use the data found in documents, as well as the metadata applied to each document list item, to provide search results. |
| Document Conversion Service | The Document Conversion Service is a SharePoint Managed Service Application, which handles the load balancing and conversion of documents converted from one format to another. |
Document Library Settings Page
The typical approach to navigating to the Document Library Settings page is to click the Library tab on the ribbon and then click the Library Settings button in the settings section. However, you may also access the same library settings as follows. Throughout this chapter, when I reference navigating to the Library Settings page, I assume that you will either follow the steps below or click the Library Settings icon on the ribbon within the Library tab.
- Click the settings gear icon.
- Click the View Site Contents menu item.
- SharePoint shows you a page that looks like Figure 11-2.
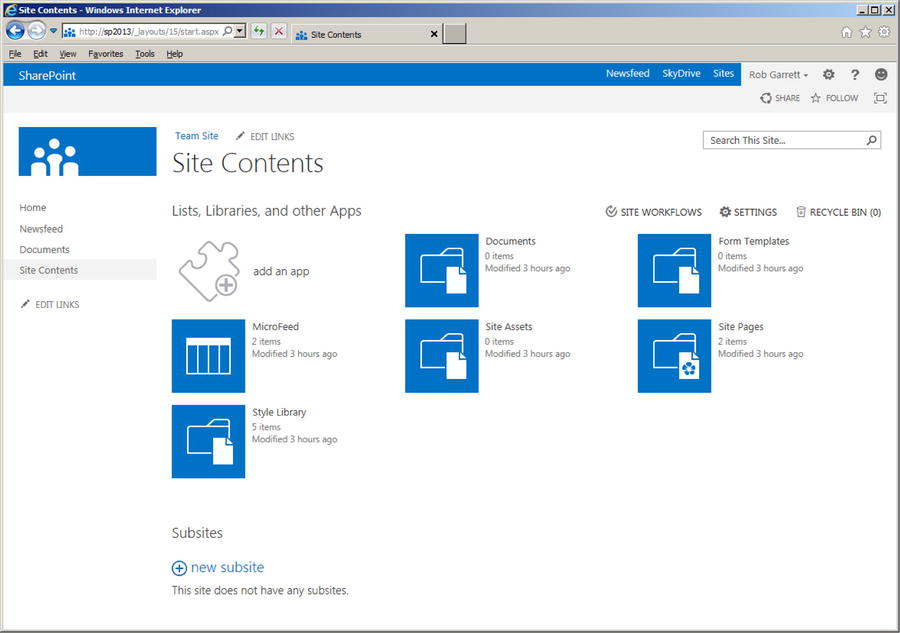
Figure 11-2. Site Contents
- Hover over the document library.
- Click the ellipses.
- Click the settings link on the details box that appears.
Document Content Types and Document Sets
In Chapter 9, I discussed content types at length. I showed you how to create new custom content types and how to use them in lists and libraries. If you are new to content types, I recommend taking a quick look back at this chapter to familiarize yourself with creation of content types.
Document Content Types
Why are content types important in a Documents Management System? Any good Documents Management System must allow users to distinguish one document type from another, without expecting users to open documents. Metadata, and thus content types, provide the baseline functionality to allow content owners to categorize their content with properties—the fields of content types.
The action of creating a content type and applying a content type to a document constitutes basic categorization—without even adding fields/properties to the aforementioned content type. For example, in my project management system I may need documents for Project Plans, Statement of Work, Client Presentation, Invoice, and so on. Creating custom content types, which derive from the stock document content type, and then adding these content types to a document library allows users to upload Office documents of the designated aforementioned types.
![]() Note A good practice is to remove the stock Document and Item content types from the document library, which forces users to choose a content type that classifies the document.
Note A good practice is to remove the stock Document and Item content types from the document library, which forces users to choose a content type that classifies the document.
The following lists some best practices to consider when creating new content types for documents in your Documents Management System:
- Avoid ambiguous content type names. Ironically, “Document” itself is a bad example of a content type name because it is too generic, but it suffices as a base type.
- Try not to create content types too specific to context. For example, “Customer Name Weekly Meeting Notes” restricts the content type to a particular client and meeting context. A better example (in this case) is “Meeting Notes.”
- Create content types at the root site collection., This way you may repurpose them throughout the Documents Management System site collection.
- Avoid adding too many properties/fields to any one content type. This suggests that the content type is too specific to context. Abstracting properties to a base content type is more effective and manageable.
- Use Choice, Lookup, and Manage Metadata fields when possible. This will ease the population of metadata for the end user. If you insist on too many string or text fields, users will likely skip filling them in when uploading or saving a document, thus defeating the point of metadata. Best practice with SharePoint is to use the Managed Metadata fields because the Managed Metadata Service gives the greatest flexibility to manage taxonomy and tagging.
- Use just the right blend of required and optional fields in your content types. SharePoint will insist that users provide values for all required fields before allowing them to upload/save a document. If you specify too many required fields, users will become frustrated; if there are no required fields, some users might not populate any metadata.
- Limit the choice of content types for your document library to a finite amount. A good rule of thumb is ten or fewer. Too many content types, especially when they are similar, will cause your users confusion.
Once a user adds a document to a document library in SharePoint, and then applies metadata via content type, subsequent editing of the document from SharePoint integrates the field/properties in Microsoft Office applications (I cover this in Chapter 14). Say I create a content type for a Statement of Work (SOW) document, including properties for client, contract type, and cost estimate, and then upload an SOW document to a library and then classify the document as an SOW. When I open the same document from SharePoint, I can see and edit the properties directly from the Office application. The following series of steps demonstrates this example:
- Navigate to the Document Center site we created earlier.
- Click the settings gear icon.
- Click the Site Settings menu item.
- From the Site Settings page, click the Site Content Types link under Web Designer Galleries.
- Click the Create link.
- Give the new content type the name Statement of Work.
- Inherit from the parent Document content type in Document Content Types.
- Choose an existing or custom group in which to place your content type.
 Note It is usually a good idea to put all custom content types in a separate group from the stock content types.
 - Click OK to create the content type.
- Click the Add from New Site Column link.
- Add a new Choice column to the content type, called Estimate Range. Assign the Choice column the values: Less than $50k, $50k to $100k, More than $100k.
- Choose an existing group or custom group in which to place the site column.
- Leave all other options as default and click the OK button.
- Add a Single Line of Text column, called Client Name, using similar steps to that of the Choice column you created.
- This concludes the creation of your content type.
- Navigate to the Documents Library Settings page.
- Scroll to the Content Types section, notice the presence of the link to Document and Document Set content types—I will discuss these later.
- Click the Add from Existing Site Content Types link.
- Add the Statement of Work content type (this is where groups come in handy).
- Navigate back to the All Documents view of the document library.
- Click the Files tab on the ribbon; then click the lower portion of the New Document icon; see Figure 11-3.
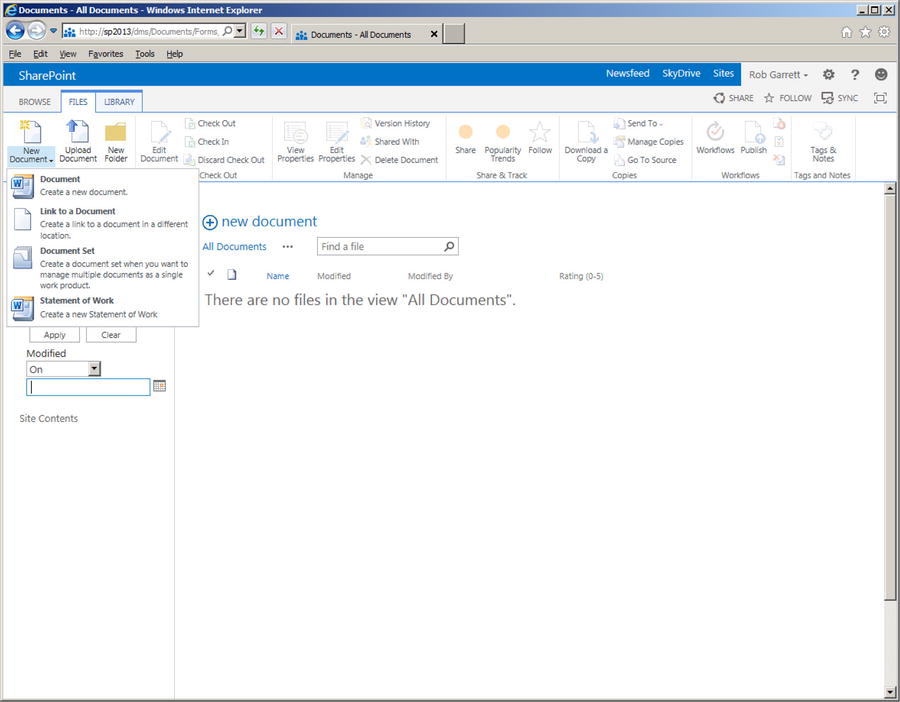
Figure 11-3. Create a new document with content type
- You might be tempted to click the Add Document link. However, this assumes the default content type and does not demonstrate use of our Statement of Work content type.
- Click the Statement of Work menu item.
- If you have Microsoft Word installed, it will open with a new document.
- Notice the Document Information Panel in Word, as shown Figure 11-4 (Office 2007, 2010, and 2013 versions only).
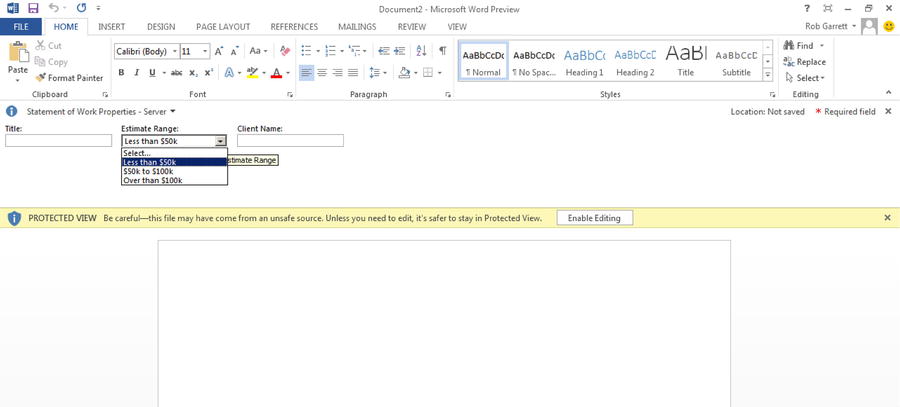
Figure 11-4. Microsoft Word with Document Information Panel
How did SharePoint know how to open a Word document? Navigate back to the Statement of Work content type in the Content Types Gallery to see.
- In the settings page of the content type, click the Advanced Settings link.
SharePoint displays a page like Figure 11-5. The Document Template section governs the document template to use when creating a new list item of this content type. Figure 11-5 shows the template as the default template.dotx; thus, SharePoint defaults to opening Microsoft Word.
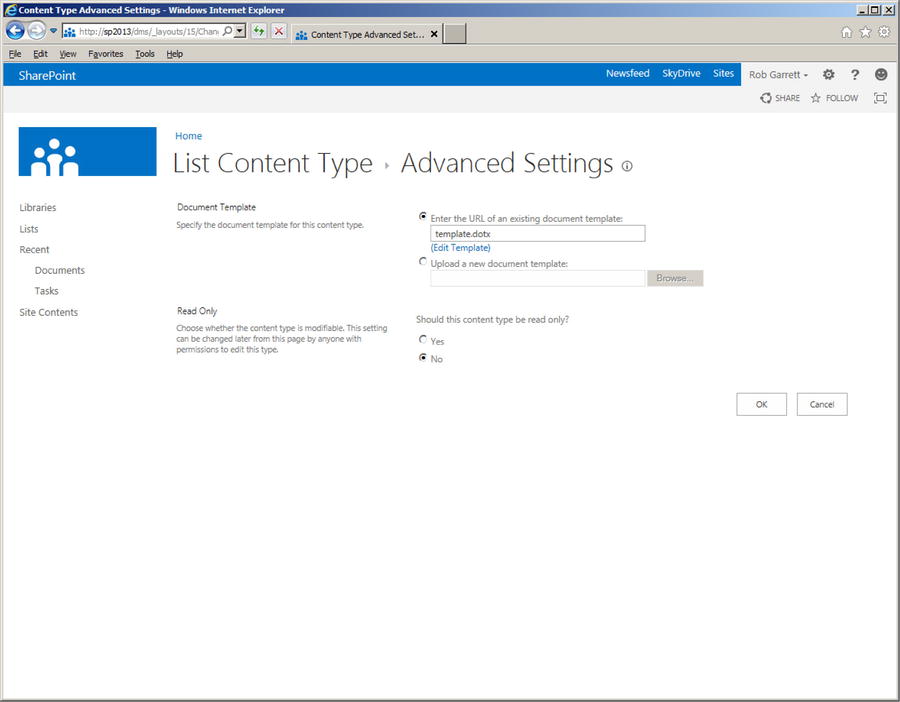
Figure 11-5. Advanced Settings page for our custom content type
- 2. Compare this setting with that of other stock content types to see how this setting influences the default document.
- 3. Before leaving the content type settings page, click the Document Information Panel settings link.
- 4. In this settings page, SharePoint allows you to specify the XSN of a custom InfoPath form, or the URL location of a custom page to render from the Office application.
![]() Note Document Information Panel requires at least Office 2007, 2010, or 2013.
Note Document Information Panel requires at least Office 2007, 2010, or 2013.
Perhaps you have a document on disk and want to upload it to a SharePoint document library. How does SharePoint know which content type to assign? It asks you.
- Navigate back to the All Documents view of the document library.
- Click the Files tab on the ribbon.
- Click the Upload Document icon (if your browser supports it and your SharePoint site is in the Intranet or Trusted Sites zone, you can upload multiple documents).
- Navigate to a document on disk.
- You can upload the document as a new version, if the file already exists, by checking the check box.
- Click the OK button.
- After a brief moment during the document upload, SharePoint displays a dialog like that in Figure 11-6.
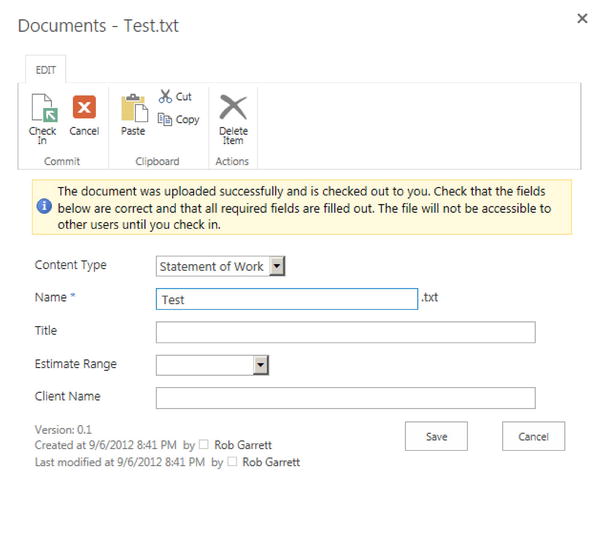
Figure 11-6. Select document content type after upload
- Change the drop-down to the desired content type and fill in the fields.
- Click the Save button to commit the metadata to the document and complete the upload process.
Using the Save As feature in an Office application and then specifying the location as a SharePoint document library renders a similar dialog to choose the content type (Figure 11-7).
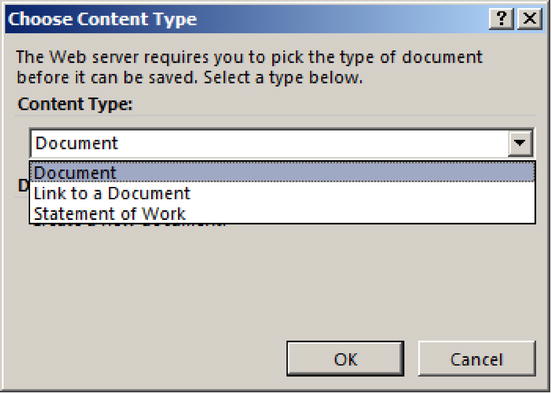
Figure 11-7. Choose Content Type from Microsoft Word
![]() Note SharePoint will assume the library default content type and field values when uploading multiple documents.
Note SharePoint will assume the library default content type and field values when uploading multiple documents.
Saving a Document to SharePoint from Office
Office 2007, 2010, and 2013 applications allow you to save directly to a SharePoint location from within the application. The following steps demonstrate how to save an open Word 2013 document to an existing document library in SharePoint 2013:
- From inside Microsoft Word 2013, click the File tab in the top left corner.
- Click the Save As link from the left navigation.
- Click the Browse button.
- In the Save As dialog, provide the URL of the document library in the file name field.
- Click the OK button to save the file.
- Choose the content type in the dialog that appears (Figure 11-7).
- Click the OK button to complete the save.
![]() Note The easiest way to get the URL of a document library is to navigate to the library page in your browser and then strip off the /Forms/AllItems.aspx part from the URL. For example, http://server/site/DocumentLibName/ .
Note The easiest way to get the URL of a document library is to navigate to the library page in your browser and then strip off the /Forms/AllItems.aspx part from the URL. For example, http://server/site/DocumentLibName/ .
SharePoint allows users to add links in a document library to another document in a different document library. SharePoint achieves this with a simple content type that contains a URL field and an ASPX page that allows a user to enter the name and URL of the linked document.
- Navigate back to the All Documents view of the document library in SharePoint.
- Click the Files tab on the ribbon.
- Click the lower portion of the New Document icon.
- Choose the Link to a Document menu item.
- SharePoint shows a page, asking for the name and URL of the remote document.
- Provide any name you desire for the name of the document link.
- Provide the full URL to the linked document.
- You can test the URL by clicking the link to test.
- Click the OK button to create the link.
- When you click the link in the document library, SharePoint will open the document at the end of the link.
A document set consists of several documents in a single list item of a document library. The purpose of document sets is to group related documents and manage the set as a single item, just like a regular document list item.
A good example of the use of a document sets is for a proposal document. Typically, in business, a proposal is a large document and requires contributions from many authors to complete. One way to accomplish the creation of the proposal is to have authors write independent documents for the various sections and then combine these documents into a finished proposal document at the end. I have seen this approach in action on earlier versions of SharePoint (pre-2010), and the authors maintained the document pieces in a folder of a larger project document library. Document sets now allow users to continue to work on document pieces but manage them together in a document set of a document library. Since a document set is a special content type, each document set has its own metadata, in addition to the metadata specified by the content types of the documents contained inside the document set.
The following steps demonstrate how document sets operate using Document Center and default document library:
- Navigate back to the All Documents view of the document library in SharePoint.
- Click the Files tab on the ribbon.
- Click the lower portion of the New Document icon.
- Choose the Document Set menu item.
Note If you do not see the Document Set menu item, follow the steps at the bottom of this section for adding document sets to existing document libraries.
- SharePoint asks for the name and description of the document set.
- Give the document set the name Proposal and click the OK button.
- SharePoint displays a Document Set page, like that in Figure 11-8.
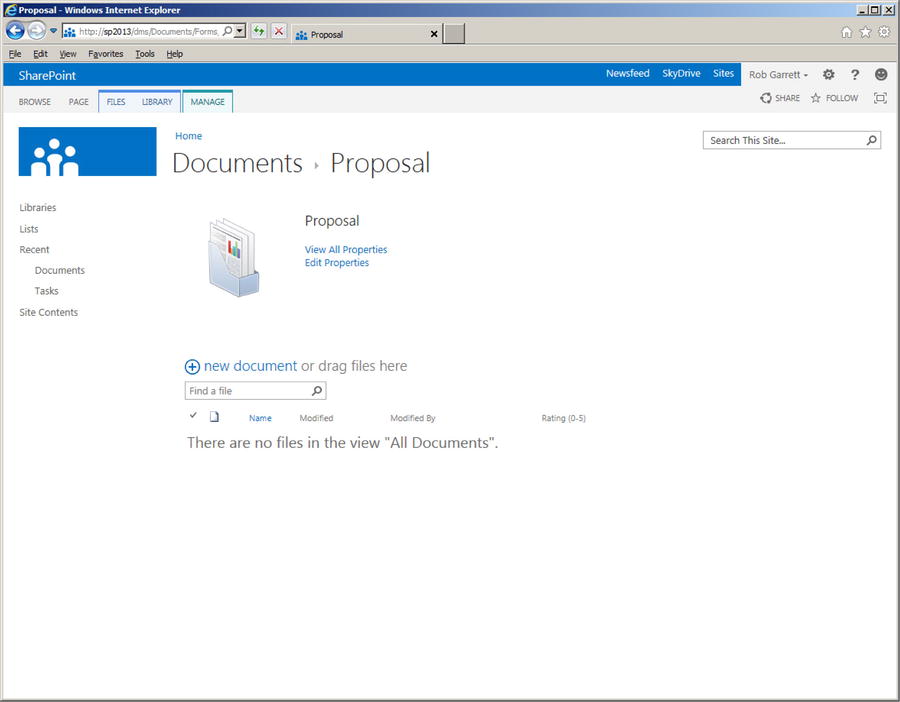
Figure 11-8. Document Set page
The Document Set page provides a similar interface to that of a regular document library. Click the Manage tab on the ribbon (Document Set). The ribbon shows various options for the document set (Figure 11-9), such as
- Edit Properties: Populate the fields, defined in the Document Set content type
- Permissions: Permissions for the document set
- Delete: Delete the document set
- E-mail a Link: Send a link of this document set to a colleague
- Capture Version: Create a version label of documents in the set
- Version History: See the history of changes
- Workflows: Apply workflow to the document set
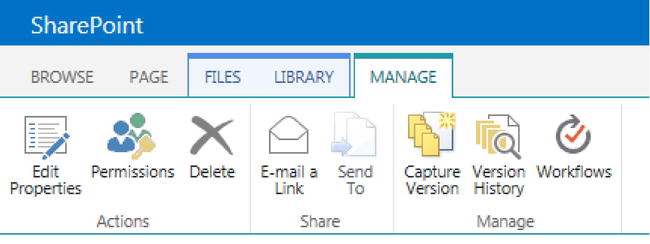
Figure 11-9. Manage tab for a document set
Adding Document Sets to an Existing Document Library
You are not required to use the Document Center site template to use document sets. Document sets exist as a feature at the site collection level, and as a content type, which you must add to your document library as follows:
- Open a site that is not a Document Center.
- Click the settings gear icon and select the Site Settings menu.
- Click the Site Collection Features link, under the Site Collection Administration heading.
- Activate the Document Sets feature.
- Navigate to the Documents Library Settings page.
- If you do not see the Content Types section on the Documents Library Settings page, then follow steps 7-11; otherwise, skip to step 12.
- Click the Advanced settings link.
- Toggle the Allow Management of Content Types setting to Yes.
- Scroll to the bottom of the page and click OK.
- Click the Add from Existing Site Content Types link.
- On the next page, add the Document Set content type, and then click OK.
- Navigate back to the default view of the document library, and you can now add document sets, per the information preceding this subsection.
Like many of the topics in SharePoint, workflow is the subject of whole books. A workflow is a process, either automated by computer or manual with human intervention. Workflow may consist of both human and automated elements, but the premise is the same—a workflow management system keeps track of the steps in a process (the activities) and alerts different actors in the process of tasks to complete an activity/step in the process chain. Microsoft workflows come in two flavors: sequential, meaning that each step succeeds the next; and state machine, in which the workflow system tracks overall state at any time and transition from state to state via activities.
SharePoint uses Microsoft Workflow Foundation (WF) to provide business process on documents, web pages, forms, and list items. SharePoint allows attachment of workflow to sites, lists, libraries, and content types. Since workflow in SharePoint uses WF, developers may create custom workflows to automate the process of documents and list items, or process data in a site. SharePoint Designer allows developers to create sequential workflows, with drag-and-drop ease, and Visual Studio provides for creating more elaborate coded workflow. Even though SharePoint allows for the adoption of custom workflow, the platform provides out-of-the-box workflow for use of document approval, signature collection, disposition approval, and so on. Table 11-2 describes the out-of-the-box workflows available.
Table 11-2. SharePoint 2013 Workflows
| Workflow Name | Description | Available in SharePoint Foundation |
|---|---|---|
| Three-State | Tracks the business state of a document through three defined phases | Yes |
| Publishing Approval | Sends a document for approval, typically before publishing | No |
| Disposition | Handles document expiration and disposition | No |
![]() Note SharePoint 2010 included the Collect Feedback, Collect Signatures, and Approval workflows. These workflows are still available by activating the site collection workflows feature.
Note SharePoint 2010 included the Collect Feedback, Collect Signatures, and Approval workflows. These workflows are still available by activating the site collection workflows feature.
In the days of SharePoint 2007, users could only apply workflow activation to lists. Since SharePoint 2010, users are able to apply workflows to sites and content types. Because content types provide portability of metadata in a site collection, applying workflow to content types now means that users can provide business process with reusable workflows. If a content type exists for a proposal document in an organization site collection, the organization can attach the workflow process whenever someone creates a new proposal document—anywhere in the site collection, not just in a particular list instance.
Adding a Workflow to a Library or List
Take the following steps to add a workflow to a library or list:
- Browse to the list or library.
- Click the List or Library tab on the ribbon.
- Click the Workflow Settings icon on the ribbon.
- On the Workflow Settings page (Figure 11-10), click the Add a Workflow link.
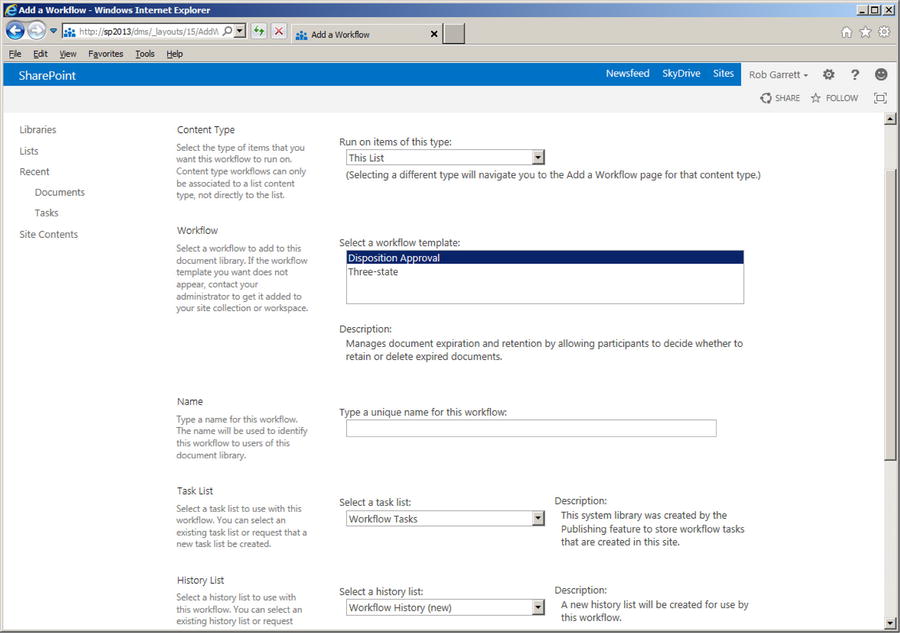
Figure 11-10. Add a workflow to a list
- Select the workflow.
- Assign the tasks and history lists.
- Apply the appropriate options.
Adding a Workflow to a Library or List Content Type
Take the following steps to add a workflow to a library or list content type:
- Navigate to the List or Libraries Settings page.
- Scroll to the Content Types section (if it is missing, enable Content Types under Advanced Settings).
- Click the name of the content type to associate with the workflow.
- Click the Workflow Settings link.
- On the Workflow Settings page, click the Add a Workflow link.
- Select the workflow.
- Assign the tasks and history lists.
- Apply the appropriate options.
Adding a Workflow to a Site Content Type
Adding a workflow to a site content type is a similar process to that of adding to a list content type, only you access the content type via the Content Type Gallery instead of the list.
Take the following steps to add a workflow to a site content type:
- Click the settings gear icon.
- Choose the Site Settings menu item.
- Click the Site Content Types link under Galleries.
- Click the name of the content type to associate the workflow.
- Click the Workflow Settings link.
- On the Workflow Settings page, click the Add a Workflow link.
- Select the workflow.
- Assign the tasks and history lists.
- Apply the appropriate options.
Editing and Developing Custom Workflow
With a whole workflow platform and plenty of ideas to automate business process, it is natural that users will want to create their own custom workflows. Creation of custom workflow falls under development and is out of the scope of this administration book. However, I do wish to mention some of the new enhancements that SharePoint brings to workflow in the platform.
- SharePoint Designer 2013 allows editing of out-of-the-box workflow.
- SharePoint Designer 2013 deploys custom workflow as WSP (SharePoint Package) files, which developers may then open and edit in Visual Studio.
- SharePoint 2013 brings many more SharePoint-based activities, for inclusion as workflow steps.
- SharePoint 2013 provides more events to subscribe workflow.
Any good Documents Management System allows users to reference documents from the system, without concern about other users changing the location of such documents in the Documents Management System. The blog sphere addressed this very topic with permalinks—links that do not directly link to blog articles but provide virtual links, which the blog engine translates into the physical link. SharePoint 2007 pretty much ignored the issue of document link tracking, but fortunately, SharePoint 2010 and now SharePoint 2013 provide this functionality. I shall describe the various methods for document tracking in the following sections.
SharePoint incorporates a Document ID Service feature for keeping track of the location of documents and providing users with virtual URLs for documents with unique ID. The platform does not enable the Document ID Service feature by default, although the Document Center template does enable it. To confirm the existence of Document ID tracking, follow these steps:
- From the root of the site collection, click the settings gear icon.
- Click the Site Settings menu item.
- Click the Site Collection Features link in the Site Collection Administration section.
- Scroll down the list and see if the Document ID Service feature is activated.
- Navigate back to the Site Settings page for the site collection.
- Click the Document ID Settings link in the Site Collection Administration section.
- SharePoint displays a page like that in Figure 11-11.
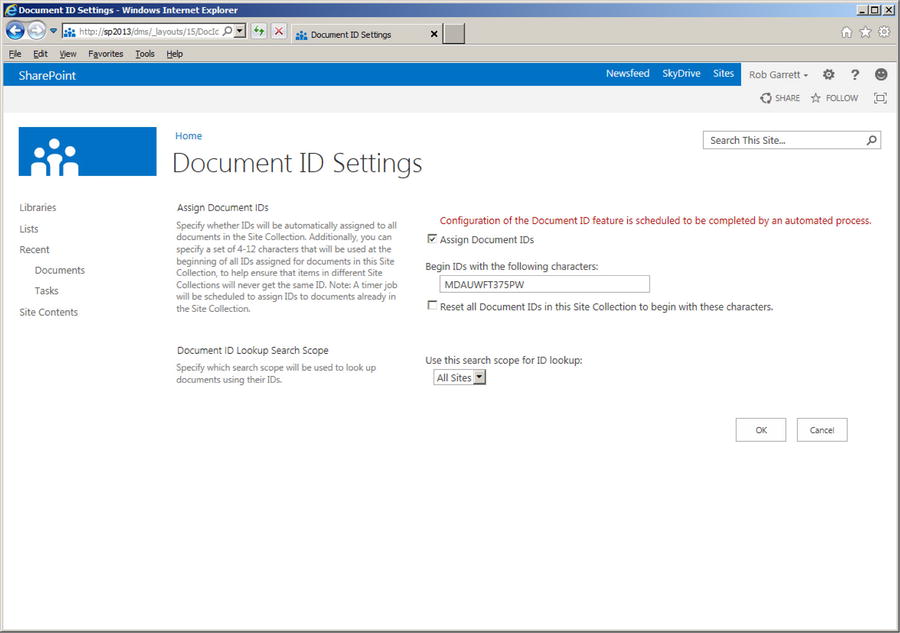
Figure 11-11. Document ID Settings for the site collection
- Ensure that the box for Assign Document IDs is checked.
- You may optionally change the prefix for all document IDs and change the search scope for lookup search.
- Upload a new document to one of the document libraries in the site.
- From the All Documents view, select the name of the document you just uploaded.
- Click the ellipses to show the document summary.
- Click the ellipses on the summary popup (Figure 11-12).
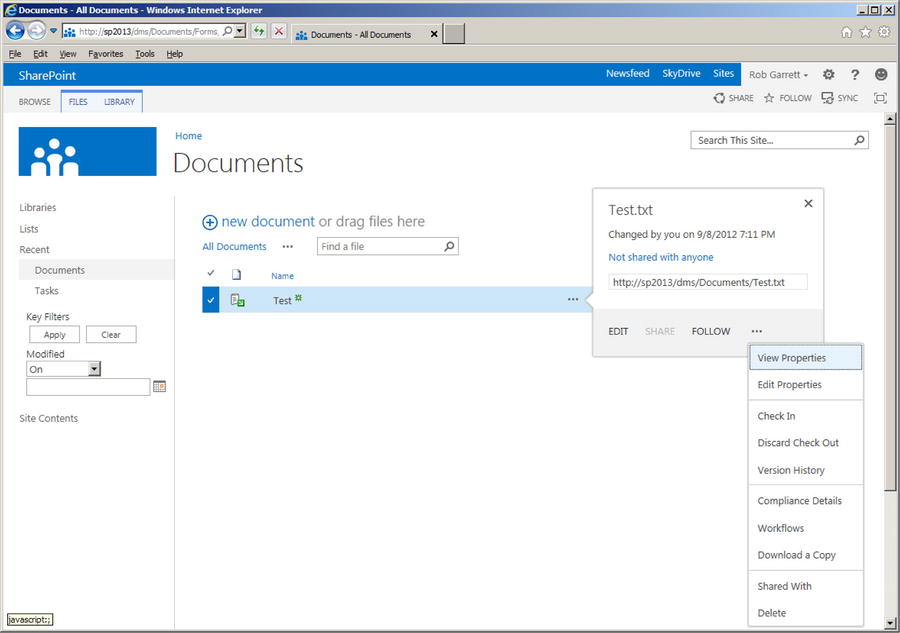
Figure 11-12. View properties of a document
- Click the View Properties link in the menu.
- Look for the Document ID field and assigned Document ID on the displayed page.
- Hover over the Document ID and get the properties of the hyperlink from your browser. It should look something like this: http://site-collection/_layouts/15/DocIdRedir.aspx?ID=MDAUWFT375PW-1-3.
Note The document ID link does not reference any particular document library, just a common redirection page, and the document ID.
- Move the document to another document library and repeat the steps to get the Document ID—notice that the link remains the same. Users may e-mail this link around the organization without fear of the link breaking because the document has moved.
- Try deleting the document and then accessing the Document ID link from the earlier step. Notice that the user receives a nice message about no document, not a 404 or convoluted error message.
Barcodes have become an accepted method for providing unique identification to objects. Next time you visit the grocery store, peek at the back of every packaged product and you will find a barcode. A barcode consists of a unique pattern of lines, of varying thickness, that combine to provide a unique stamp for the object.
![]() Note Although SharePoint 2013 still supports barcodes, there is talk that Microsoft may depreciate this feature in later versions of SharePoint and Office: http://office.microsoft.com/en-us/sharepoint-help/discontinued-features-and-modified-functionality-in-microsoft-sharepoint-2013-preview-HA102892827.aspx#_Toc330374495.
Note Although SharePoint 2013 still supports barcodes, there is talk that Microsoft may depreciate this feature in later versions of SharePoint and Office: http://office.microsoft.com/en-us/sharepoint-help/discontinued-features-and-modified-functionality-in-microsoft-sharepoint-2013-preview-HA102892827.aspx#_Toc330374495.
SharePoint includes functionality for adding unique barcodes to documents, so users may track documents when printed or part of a manual processing workflow. The following steps detail how to enable barcodes at the site collection level and then for a particular document library:
- From the root of the site collection, click the settings gear icon.
- Choose the Site Settings menu item.
- Click the Site Collection Policies link under the Site Collection Administration heading.
- Click the Create link to create a new policy.
- Give the policy a name and policy statement.
- Check the option to enable barcodes.
- Click OK.
- Navigate to the list to apply the new policy.
- Navigate to the Library Settings page.
- Click the content type to apply the policy (ensure that content types are applied to the library under Advanced Settings).
- Click the Information Management Policy Settings link.
- Change the radio button option to Use a Site Collection Policy, and select the new policy you created.
- Click OK.
- From the desired view for the document library, add the Barcode and Barcode Value columns (modify this view from the ellipses).
- Upload a document and select the correct content type, and see that SharePoint assigns barcodes (Figure 11-13).
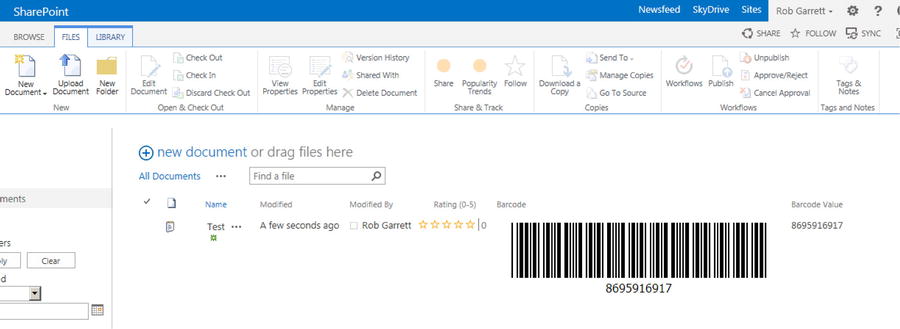
Figure 11-13. Barcodes added to a document library
Document Conversion
SharePoint includes a Document Conversion Service for converting documents of one type to another, such as Word document to PDF. Document conversion is important in any Documents Management System because it allows users to upload documents of a type and allow other users to read and edit these documents in another type, typically a common type that most users can access. Office 2010 and upward uses an XML format for document data, and the Document Conversion Service converts documents of these types to viewable web pages for those users who do not have Microsoft Office 2010 or 2013 installed on their desktop.
The Document Conversion Service consists of two parts: a Load Balancer Service and a Launcher Service. SharePoint requires both services configured and running to enable the Documents Conversion Service. The following steps detail how to configure document conversion in your SharePoint farm.
![]() Note You must start the Load Balancer Service before the Launcher Service for document conversion to work. The Launcher Service stops if the Load Balancer Service is not started or is stopped.
Note You must start the Load Balancer Service before the Launcher Service for document conversion to work. The Launcher Service stops if the Load Balancer Service is not started or is stopped.
- Open Central Administration.
- Click the Manage Services on Server link, under System Settings (Figure 11-14).
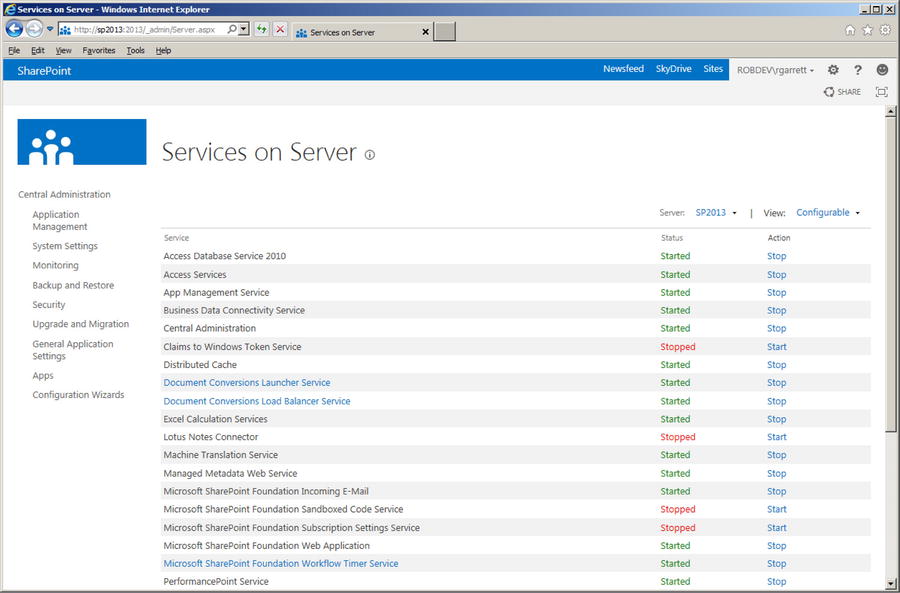
Figure 11-14. Services on Server, showing the Document Conversion Services
- Click the Start link for the Document Conversions Load Balancer Service.
- Click the Start link for the Document Conversions Launcher Service.
- Select the server for the launcher, load balance server, and port number.
- Click OK.
- You may change the settings of either service by clicking the name of the service; options include choosing the server on which the service is running and port numbers.
The next set of steps demonstrates how to enable document conversion in a web application.
- Open Central Administration.
- Click the General Application Settings section title.
- Click the Configure Document Conversions link under External Service Connections.
- Select the web application in the drop-down control.
- Flip the setting to enable document conversion.
- Specify the load balancer server.
- Configure schedule for blocks of conversion.
- SharePoint lists the current installed converters at the bottom of the page as a series of links (Figure 11-15). Click the link to configure the converter.
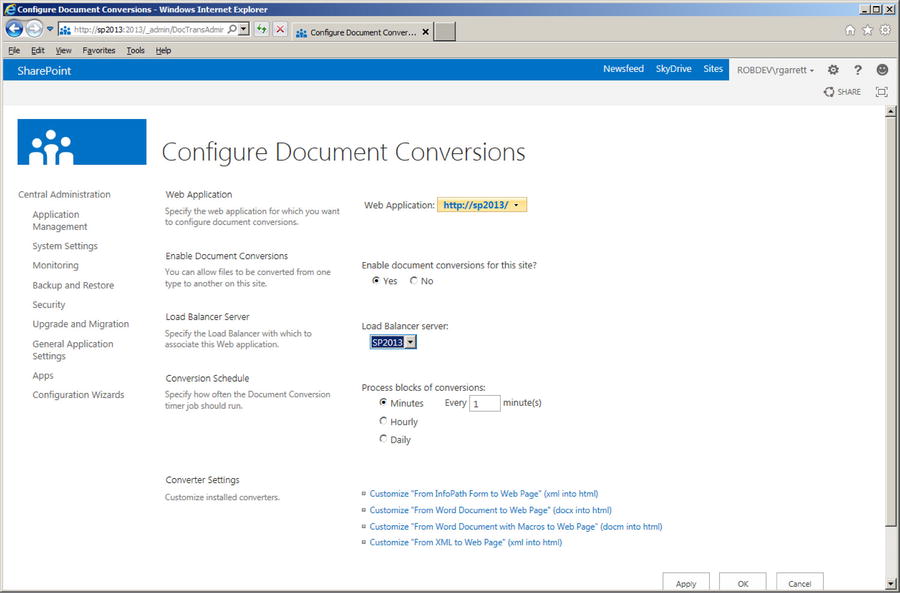
Figure 11-15. Configure Document Conversions
- Click the OK button when done configuring.
With the conversion services started, and the web application configured for document conversion, navigate to any document library in a site/site collection hosted by the web application. Upload a Word DOCX document, and then follow these steps to convert the document:
- Click the ellipses for the document in the list.
- In the popup properties box, click the ellipses.
- Select the Convert Document menu item (Figure 11-16).
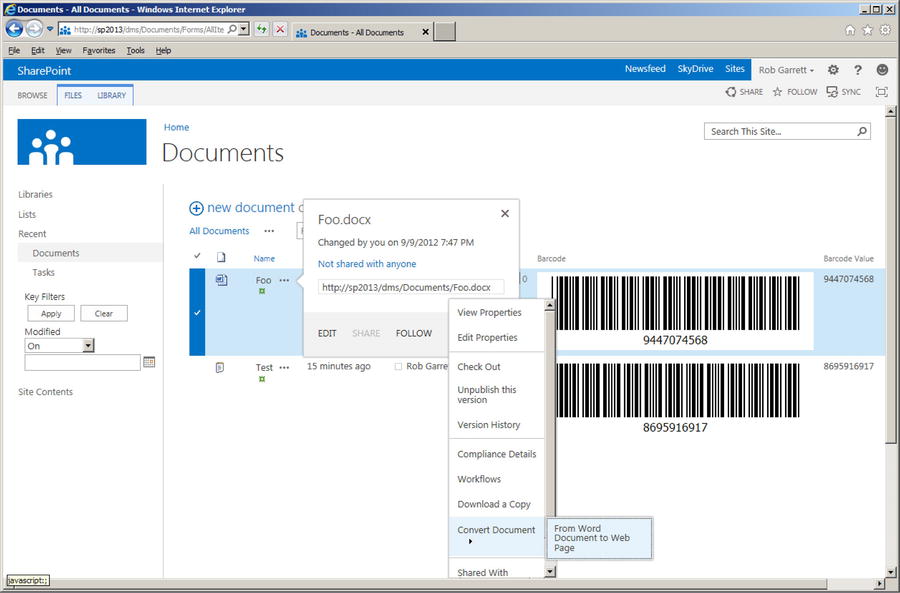
Figure 11-16. Convert Document menu item
- Choose the conversion.
- SharePoint will display a page for obtaining settings for the conversion process (e.g., Figure 11-17).
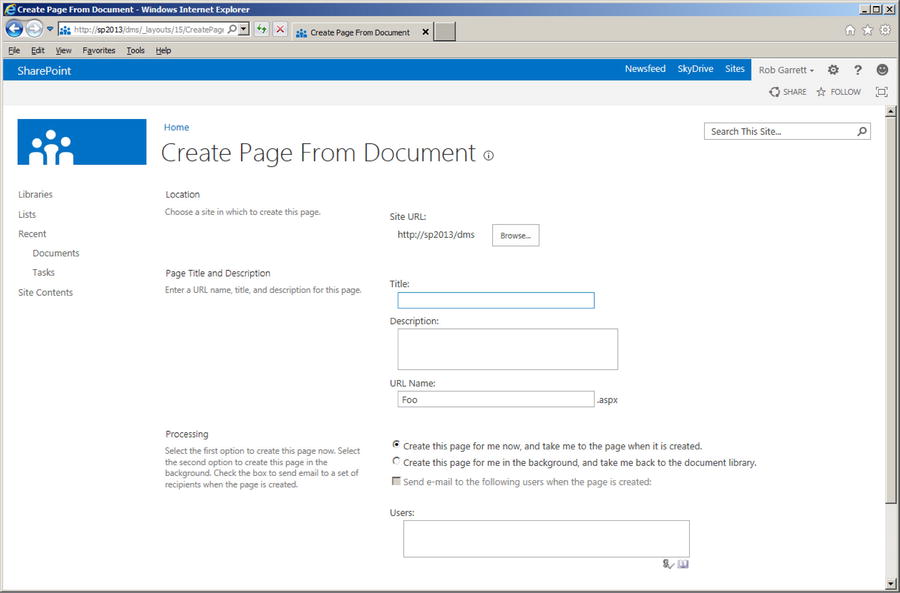
Figure 11-17. Create Page from Document
If you are not seeing the menu option to convert a document, ensure the following:
- The document is in an Office XML (DOCX, XLSX, PPTX) format
- The Document Conversions Load Balancer Service is started
- The Document Conversions Launcher Service is started (after the load balancer)
- The web application has document conversion enabled
- The site content type (as opposed to the list content type) allows document conversion
SharePoint has always been great at providing space for users to collaborate. At the core of the platform, Foundation offers basic and team sites, which include task lists, calendars, document libraries, and so on for users of the space to share and collaborate on a topic of interest.
SharePoint 2007 and 2010 included document workspace site templates for users to collaborate on a specific document. Microsoft depreciated the document workspace in SharePoint 2013, and users should now utilize team sites for document collaboration.
![]() Note Microsoft depreciated document workspaces in SharePoint 2013—use SharePoint 2013 team sites to collaborate on document life cycle. You can re-enable them by editing the WEBTEMP.XML file in the templates folder on the hive.
Note Microsoft depreciated document workspaces in SharePoint 2013—use SharePoint 2013 team sites to collaborate on document life cycle. You can re-enable them by editing the WEBTEMP.XML file in the templates folder on the hive.
Records Management in SharePoint 2013
A record is an object in a Records Management System that adheres to set of policy rules. A Records Management System is a system responsible for storing many records and asserting information policy. Information policies are rules, adopted by an organization, to impose restriction on the use of content and the life cycle of content in the organization. Just like document management, the industry provides a number of sophisticated Records Management Systems. Microsoft has included records management in with SharePoint.
SharePoint includes the Records Center site template, which includes functionality for centralized collection and management of records, adhering to policy. One of the many jobs of the Records Center is to manage the long-term archive of documents—converting them to records. The Records Center is just another site template with a set of features pre-activated, but owners of other site collections can also enable records management features. Since version 2010, SharePoint allows in-place records management, meaning that any site owner may convert documents of a document library to records, with assigned policy.
Table 11-3 lists some of the features included in the Records Center, which I shall discuss further in this section.
Table 11-3. Features Included in the Records Center
| Feature | Description |
|---|---|
| Document ID | See the earlier section of this chapter about document management, which discusses the Document ID feature. |
| Content Organizer | Routes documents and records in the Records Center based on defined policy. |
| Drop Off Libraries | Let the user drop documents in the drop off library and have the Content Organizer route dropped documents, based on policy. |
| Records Retention | Determines when documents and records expire and how SharePoint handles deposition. |
| Hold and e-Discovery | Provides auditing and tracking of external actions that might interrupt normal document life cycle (for example, because of litigation). |
To start, the following steps demonstrate how to create a new instance of a Records Center. I created a managed path (see Chapter 2) to host my Records Center in my default web application.
- Open Central Administration.
- Ensure that you have a web application provisioned to host your Records Center (see Chapter 2).
- Click the Create Site Collections link (under Application Management).
- Select the web application to host the new Records Center site collection.
- Give the site collection a name (such as Records Center).
- Select the desired URL to host the site collection.
- In the Template Selection, click the Enterprise tab, and then select Records Center.
- Provide user names for the administrators.
- Click OK.
- Once it is complete, navigate to the new Records Center site collection (Figure 11-18).
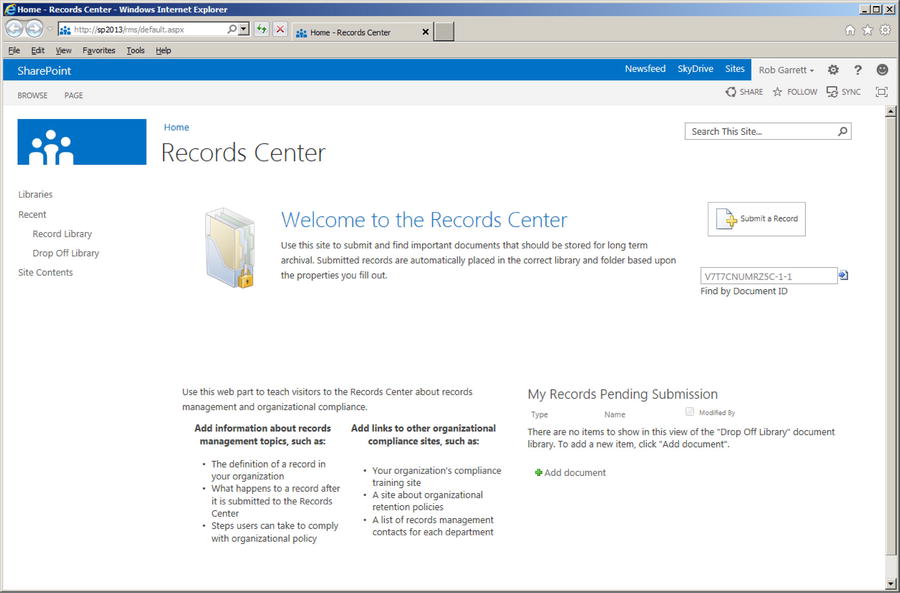
Figure 11-18. Records Center in SharePoint 2013
The Records Center home page includes a handful of helpful Web Parts to assist you with management of records in the Records Center. Remember, a record is an object (typically a document) in Records Management System with policy applied. The SharePoint Records Center deals primarily in list item and document records. Click the Submit a Record button and SharePoint will prompt you for a file to upload (Figure 11-19) and convert to a record. SharePoint leverages the Content Organizer to route the file to a correct location, based on policy rules. I shall discuss the Content Organizer in the next section.

Figure 11-19. Submit a document as a record
Setting Up the Content Organizer
The Content Organizer feature is responsible for routing documents to other areas in SharePoint. In the next section, I take a closer look at the Content Organizer in the context of the Records Center, which you created in the previous section. First, look at the Content Organizer settings in the Records Center site settings, as follows:
- Navigate to the Records Center.
- Click the settings gear icon.
- Click the Site Settings menu item.
- Click the Content Organizer Settings link, under the Site Administration heading.
- SharePoint shows a page like that in Figure 11-20.
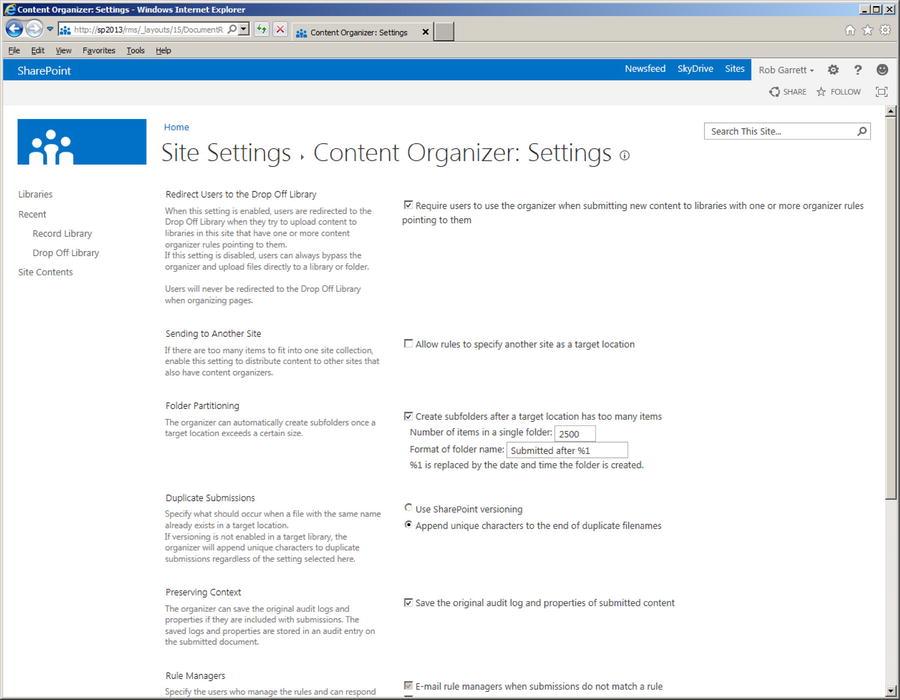
Figure 11-20. The Settings page for the Content Organizer
The Content Organizer Settings page provides the following settings:
- Redirect Users to the Drop Off Library: Ensures that users cannot upload documents to document libraries that have content organizer rules assigned. This forces the user to comply with using the drop off library to route content to final location in SharePoint, rather than decide manually.
- Sending to Another Site: Check this option if you would like to submit documents to another location. Check it for this exercise so you can try this capability later.
- Folder Partitioning: Ensures that target document libraries do not become too large by partitioning them into several folders of a maximum number of documents per folder.
- Duplicate Submissions: Tells the Content Organizer how to handle repeat submissions of the same document.
- Preserving Context: When checked, SharePoint will preserve audit and document properties with the submitted document.
- Rule Managers: Specifies the users who can execute rules for incoming content and who receive notification for rules mismatch.
- Submission Points: URLs for other sites to submit documents to this site collection Content Organizer.
![]() Note Content Organizer settings and rules apply to sites and subsites. Each discrete subsite may have Content Organizer rules different from another subsite.
Note Content Organizer settings and rules apply to sites and subsites. Each discrete subsite may have Content Organizer rules different from another subsite.
Ordinarily, when configuring Content Organizer rules in a Records Center, you would likely want documents routed to a document or record library. For the purpose of demonstration, I am going to show you how to specify the Documents Center site collection as a destination location. Once configured, users can submit a record (document) and have the document routed to the Document Center.
- Open Central Administration.
- Click the General Application Settings link from the left navigation.
- Click the Configure Send To Connections link, under External Service Connections.
- Add a new connection to a documents library in the Document Center, such as http://server/sites/dms/_vti_bin/officialfile.asmx .
- You may need to enable the Content Organizer feature for the destination site. I did, because it was not enabled in my Documents Center.
- You may configure the connection properties with action to copy, move, or move and leave a link to the new destination.
- To establish the destination URL for the connection, visit the Content Organizer settings for a site in the destination site collection—in my case, my Documents Center.
- See Figure 11-21 for how I configured a Send To link for my Documents Center.
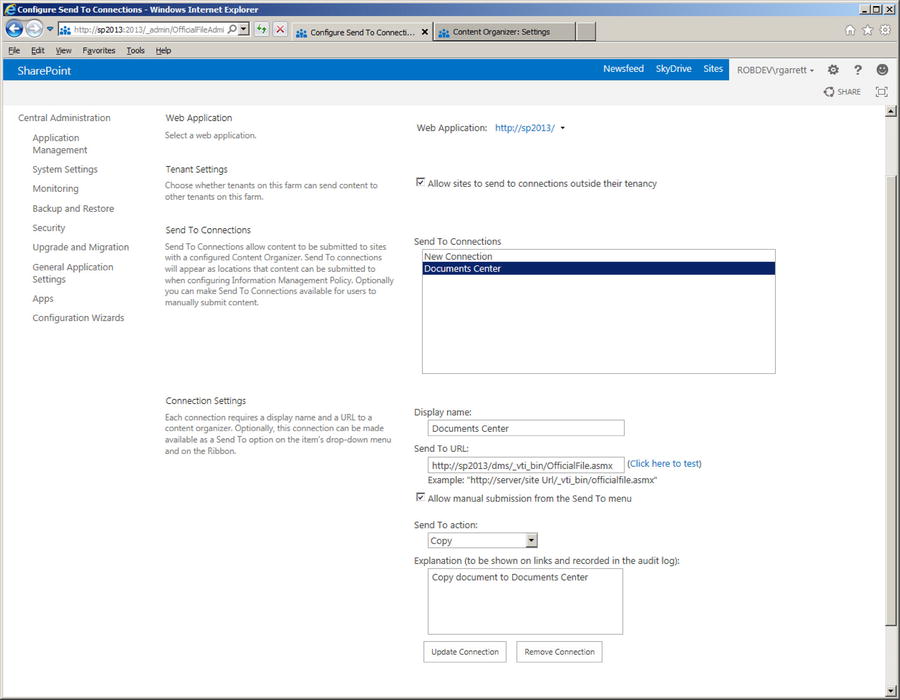
Figure 11-21. New Send To location for my Documents Center
Note The URL http://server/sites/dms/_vti_bin/officialfile.asmx is specific to the structure of the target site. - Navigate to the Document Center site collection.
- Navigate to the site that has the target location to route documents, in my case the root of the site collection.
- Click the settings gear icon, and then click the Site Settings menu item.
- Click the Manage Site Features link.
- Activate the Content Organizer feature (if not already activated).
Assuming you followed the steps in the earlier section, you now have a new Records Center site collection. The following steps detail setting up the Records Center to accept documents as records.
- Navigate to the Records Center.
- Click the settings gear icon.
- Notice the new menu item Manage Records Center; click it.
- The Manage Records Center page provides high-level steps for establishing tasks and file plans so the new Records Center may accept documents as records (Figure 11-22).
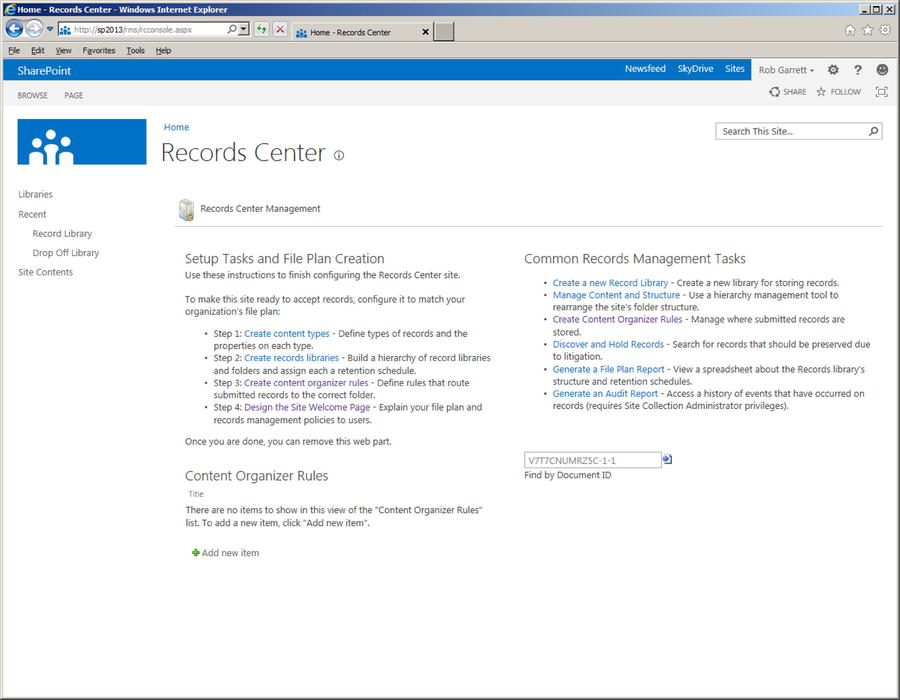
Figure 11-22. Records Center Management
- Click the Step1: Create content types link, and SharePoint navigates you to the site collection Content Type Gallery.
- Create content types for all documents you wish to store as records in the Records Center. Please review Chapter 9, on metadata, for steps for creating content types.
- Navigate back to the management page.
- Click the Step2: Create records libraries link. SharePoint navigates you to a page to create new libraries.
- Under Libraries, click Record Library.
- In the resulting page, give the new library a name and click the Create button.
Note The Records Center has a default record library and drop off library.
- Navigate back to the management page.
- Click the Step3: Create content organizer rules link.
- SharePoint navigates you to a list of rules. Each contains a list item based on the rule content type. Take this opportunity to create a new rule.
- Click the new item link.
- Give the rule a name, and make sure the rule is active.
- Choose the content type; rules apply to documents added to the records list with designated content type. In this case, choose the default Document content type.
- Add any conditions, based on the properties of the content type, name, or title.
- Specify the target location for the document. I chose the documents library in my Document Center site—shown in the drop-down, if you completed the steps in the previous section.
- Click OK.
- At this stage, you have a Content Organizer rule to route all documents submitted to the drop off library in the Records Center to the Document Center drop off library. You now need a similar Content Organizer rule to route documents in the Document Center.
- Navigate to the Document Center.
- Click the settings gear icon and click the Site Settings menu item.
- Click the Content Organizer Rules link, under Site Administration.
- Repeat the previous steps to create a new rule to route documents, only this time from the Document Center drop off library to a library in the Documents Center.
This procedure is a lot to digest, so allow me to recap.
- You provisioned a new Documents Center (earlier in the chapter).
- You provisioned a new Records Center site collection.
- You created Send To rules for the Documents Center in Central Administration.
- You set up the Content Organizer to route documents from the Records Center drop off library to the Documents Center drop off library.
- You set up the Content Organizer to route documents from the Documents Center drop off library to a document library in the Documents Center.
Assuming all is well, you can now click the Submit a Record button, on the home page of the Records Center, specify a document, and see the document route to the Document Center.
- Click the Submit a Record button on the home page of the Records Center. This effectively is the same process as dropping a document in the drop off library in the Records Center.
- Choose a document from your computer.
- Click OK.
- SharePoint shows a dialog to provide a title and confirm the file name.
- Click the Submit button.
- SharePoint pauses to think and then shows a dialog with status. If all worked, then the status indicates that the Content Organizer routed your document to the drop off library in the Document Center.
- Head over to the Document Center drop off library, and notice that it is empty; this is because the Content Organizer rule in the Document Center routed the document to the documents library. The net effect here is that the document passed from Record Center drop off library, to Document Center drop off library, and then to a final document library in the Document Center.
Hold and e-Discovery
Any organization that maintains a large enough collection of documents, and defines policy that warrants the use of Records Management, may need to locate documents and put policy on hold. One common example in US business is that of litigation—when a court wants to review an organization’s documents, the organization may want to isolate documents from typical routing and retention polices. This is where the Hold and e-Discovery feature of SharePoint comes in handy.
SharePoint 2013 includes a new site template for e-Discovery, called the e-Discovery Center. The e-Discovery Center allows management of discovery cases and holds placed on content, such that an organization may analyze and collaborate around the content for a given case. Each new e-Discovery subsite represents a case and consists of a document library to store documents relating to the case, lists of queries and exports for the case, and various sources of content (Exchange mailboxes, SharePoint sites, and file shares).
Follow these steps to create a new e-Discovery site collection for an already provisioned web application or managed path.
- Open Central Administration.
- Ensure that you have a web application provisioned to host your e-Discovery Center (see Chapter 2).
- Click the Create Site Collections link (under Application Management).
- Select the web application to host the new e-Discovery Center site collection.
- Give the site collection a name (such as Discovery Center).
- Select the desired URL to host the site collection.
- In the Template Selection, click the Enterprise tab, and then select Discovery Center.
- Provide usernames for the administrators.
- Click OK.
- Once it is complete, navigate to the new e-Discovery Center site collection (see Figure 11-23).
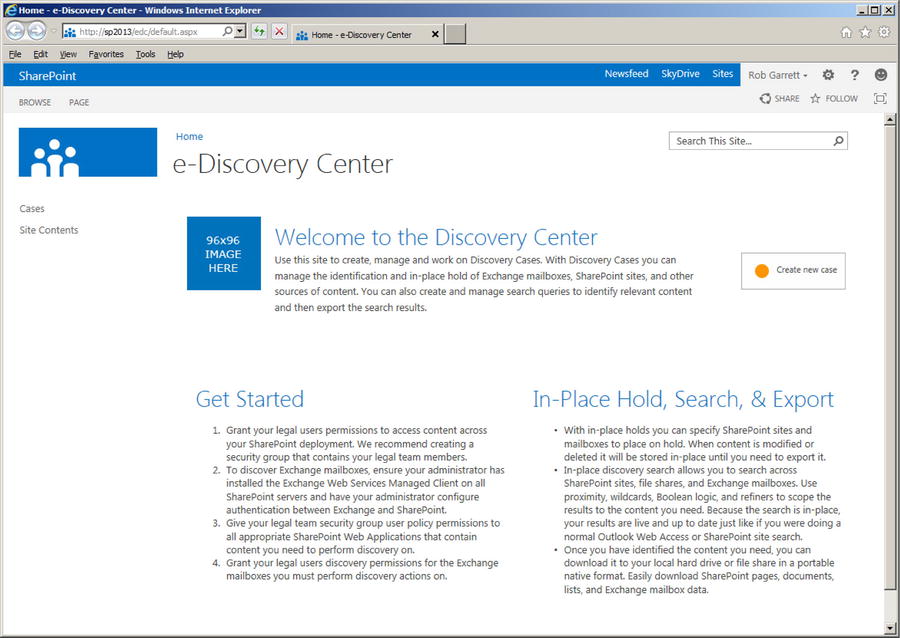
Figure 11-23. e-Discovery Center
The home page of the e-Discovery Center provides helpful information to set up security and permissions for your legal team, working on discovery cases. A good practice is to create a new group for all members of your legal team (in Active Directory) and then grant rights to this group to review content in SharePoint sites, file shares, and Exchange mailboxes (specific steps outside the scope of this chapter).
Creating a Case
Imagine that the legal team has taken on a big case to audit all content across the organization. I will now demonstrate the functionality of the e-Discovery Center, using a fictitious case. Exchange and file share discovery is outside the scope of this book, so I shall concentrate on discovery of SharePoint sites. Start by creating a new case.
- Open the e-Discovery Center.
- On the home page, click the button to create a new case.
- SharePoint displays a page to create a new e-Discovery subsite for the new case (Figure 11-24).
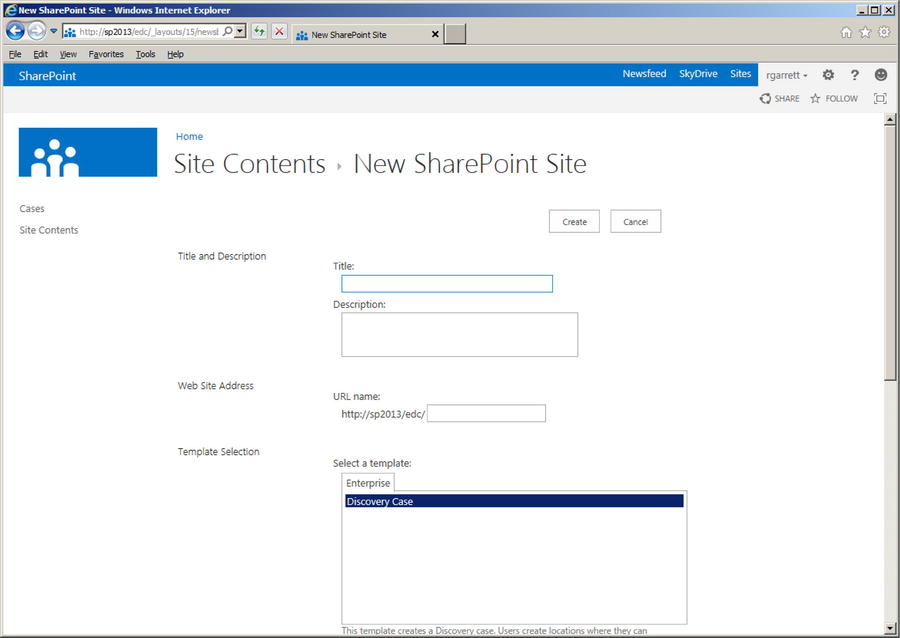
Figure 11-24. Create a new e-Discovery subsite for a case
- The page to create a new e-Discovery subsite is not too different from that of creating any other subsite.
- Give the case site a name, description, and URL.
- Decide if the site should inherit permissions from the parent e-Discovery Center.
- Decide on navigation options for left and top bar.
- Click the OK button to create the case subsite.
- SharePoint displays the home page of the new case subsite (Figure 11-25).

Figure 11-25. Home page of an e-Discovery case subsite
![]() Note The look and feel of the e-Discovery Center and case subsites is subject to change once SharePoint 2013 releases to market.
Note The look and feel of the e-Discovery Center and case subsites is subject to change once SharePoint 2013 releases to market.
Now that you have a new case collaboration site, the next task is to start collecting content to review, which is where Discovery Sets come in.
- Click the new item link, next to the tile for Discovery Sets.
- I created a new Discovery Set for the Documents Center and Records Center sites, created earlier in this chapter.
- Provide a name for the Discovery Set.
- Click the link to add and manage sources.
- SharePoint displays a dialog to add new sources and manage existing sources (Figure 11-26).
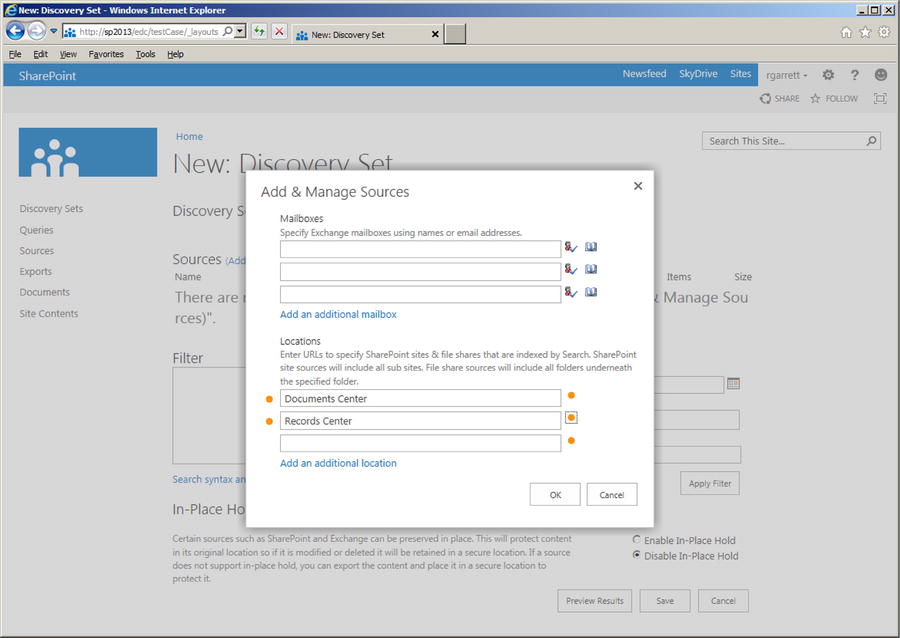
Figure 11-26. Add and manage Discovery Set sources
Note Discovery of SharePoint content requires the content to be indexed by search and permissions to view the content. I cover search in Chapter 15. - Make sure that you have crawled the SharePoint sites with search.
- Add the sources and click the icon on the right to validate each source.
- Click the OK button.
- Apply any filters, such as content by a particular author or for a date range.
- Select to enable/disable in-place holds.
Note Enabling in-place hold means the content stays in the source location until someone modifies or deletes it, in which case the held content moves to a secured location.
- Click the Preview Results button.
- Click the SharePoint tab on the dialog.
- SharePoint shows a summary of sites, lists, libraries, list/document items (Figure 11-27).
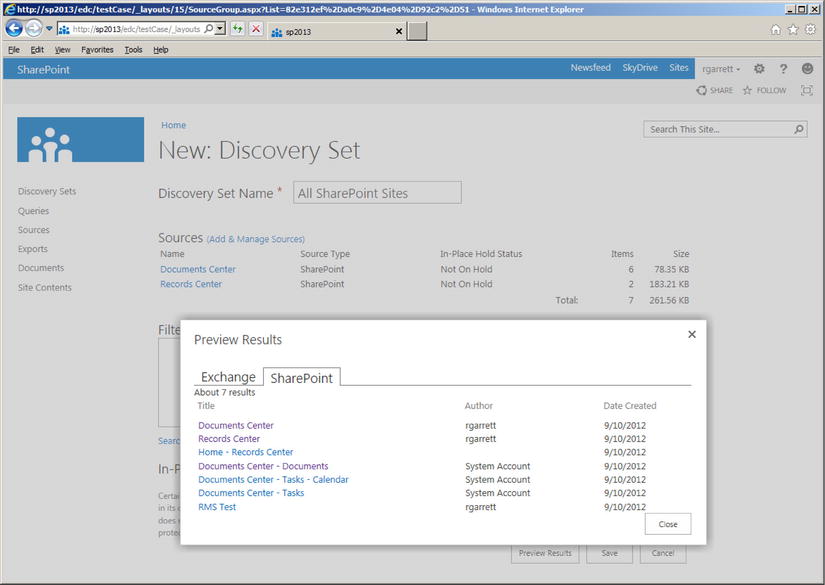
Figure 11-27. Summary of the discovered content
- Click the Close button on the dialog.
- Click the Save button on the Discovery Set page.
- SharePoint is now busy discovering content, using the sources you provided.
- Click the In-place Holds link (top-right tile) to see a summary of the holds status.
- While the status shows “processing” SharePoint is applying holds to the content.
- Once the discovery and holds process completes, the status of the in-place holds shows like that in Figure 11-28 (at least for my configuration).
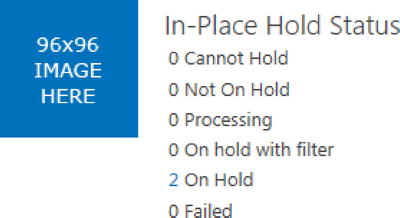
Figure 11-28. In-place holds summary
In my example, I have created discovery of two SharePoint site collections and applied holds to them. I enabled in-place hold so that any changes to content do not affect the original discovered content. If I were to change content in either of the site collections, defined in Discovery Sets, SharePoint would move the original content to a secured location in the site collection. Now that there is some held content, I shall demonstrate how to query this content, which is typically the role of the legal team, as part of their content reviewing tasks.
In the previous section, you created a new Discovery Case, defined a Discovery Set within the case, and successfully held SharePoint sources (defined within the Discovery Set). As part of their job, the legal team must present reports of discovered content and export the content for review. The following steps demonstrate how to accomplish these tasks:
- Navigate to the e-Discovery Center Case subsite.
- Click the new item link next to the Queries tile.
- SharePoint displays a page to create a query (Figure 11-29).

Figure 11-29. Create a new query of held content
- Provide a name for the query.
- Enter the search query syntax in the query box.
- Provide optional filters for date range and author.
- Click the Search button, and SharePoint will indicate found data.
- Click the SharePoint tab.
- You may restrict results by file extension and additional properties.
- When done, click the Save button to save the query.
- At this point you may close the Query page, or begin the export process.
- Click the Export button to create an export job.
- SharePoint displays a page for the creation of a new export (Figure 11-30).
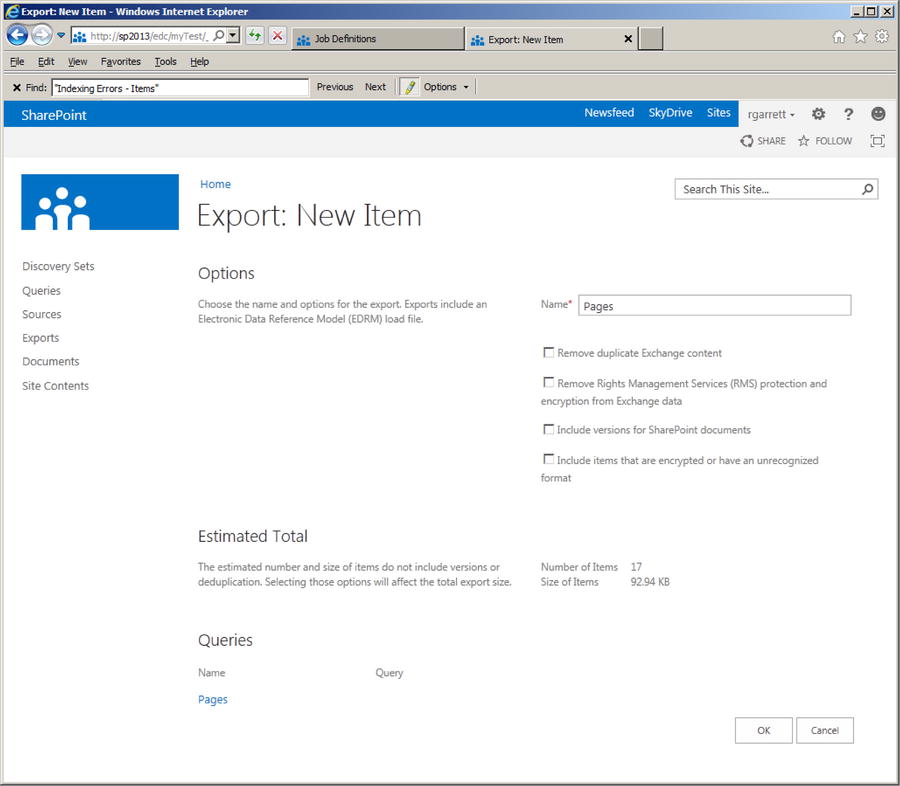
Figure 11-30. Export held content
- Decide on any of the options to include version information, remove rights management protection, include encrypted content, and remove duplicates, etc.
- Click the OK button.
- SharePoint displays a page, where you may download the content (Results) and a report of the queried content (Report). (Figure 11-31).
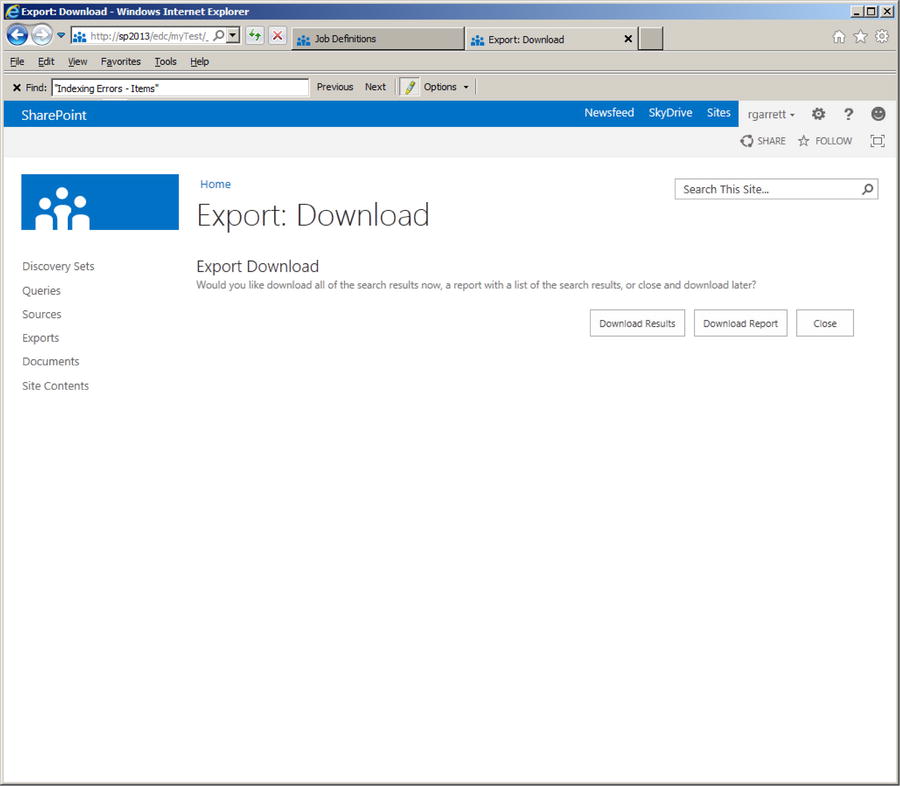
Figure 11-31. Download results and reports for held content
- Click the button to Download Results.
- Specify a folder on disk to save the exported content.
- Click the button to Download Report.
- Specify a folder on disk to save Excel reports of the exportable content.
- When finished, click the Close button.
- The discovered, held, and exported content is now on your disk—in a folder you designated.
- You also have a report of discovered, held, and exported content.
When the legal team has completed their work, it is time to close the case. Case closure releases any holds on content and marks the case subsite as closed. The following steps allow you to close the case:
- Navigate to the e-Discovery Center Case subsite.
- Click the gear icon for the site.
- Click the Case Closure menu item.
- SharePoint will display a brief message about undoing holds.
- Click the Close This Case button.
Records retention and deposition is the process of managing the life cycle of a document, from inception to depreciation. Records retention is vitally important in some organizations that deal with sensitive information, which they must ensure is current and that older versions are depreciated over a finite time.
The good news is that SharePoint provides records retention and deposition functionality at the very core of its records management features. SharePoint considers every list item or document a record, once it has undergone adoption of policy—policy that defines retention and deposition. In this section, my aim is to show you the core functionality inherent in SharePoint for records management.
In an earlier section, we created a Records Center site collection. For the purpose of this section, I shall continue use of this Records Center in my demonstration steps. To begin, I will review records retention for SharePoint sites, which is new in SharePoint 2013.
Sites Records Retention
New in SharePoint 2013 is records retention for site. SharePoint 2010 supported records retention at the list/library and content type level. Now, site owners may apply similar policies to the life cycle of their sites within SharePoint. I shall demonstrate this functionality with a new subsite within the Records Center, which you can create now by following these steps.
- Navigate to the Records Center site collection.
- Click the Site Contents link in the left navigation.
- Scroll to the bottom of the page.
- Click the New Subsite link.
- Give the subsite a name, description, and URL.
- Choose a site template; for demonstration, I chose the blank site template.
- Click the Create button to create the subsite.
With your new subsite created, you can now define a retention policy, which you configure at the site collection level. You may define multiple different retention policies for different sites, but they all reside at the site collection level.
- Navigate to the Records Center top level site (root of the site collection).
- Click the gear icons.
- Select the Site Settings menu item.
- Click the link for Site Policies, under the Site Collection Administration heading.
- Click the Create button to create a new site policy.
- SharePoint shows a page like that in Figure 11-32.
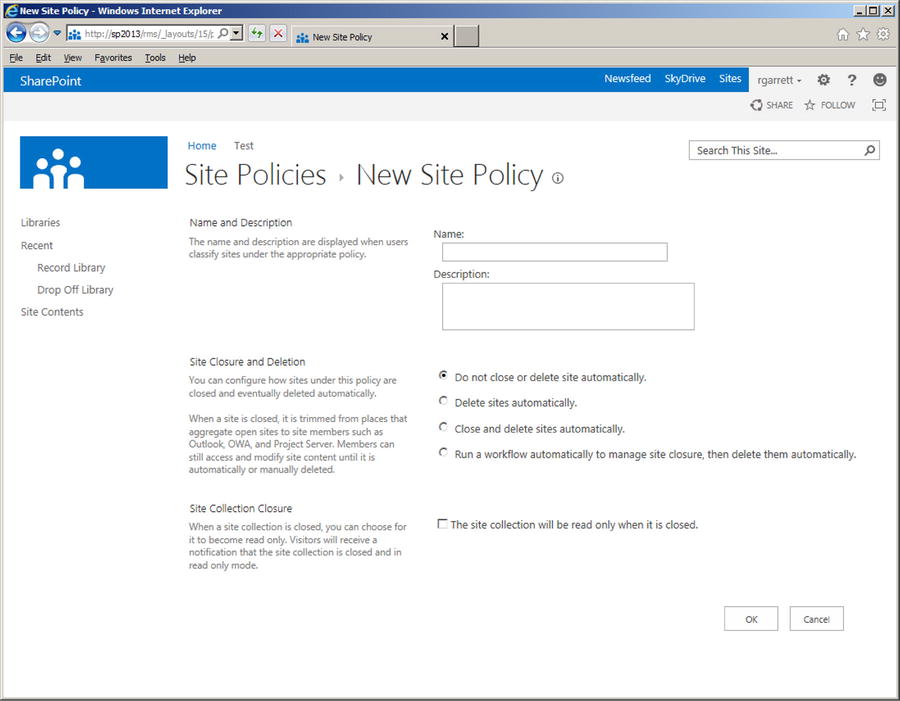
Figure 11-32. New Site Policy
- Give the policy a name and description.
- Choose the site closure policy type (see Table 11-4).
Table 11-4. Site Deletion Policies
| Policy | Description |
|---|---|
| Do not close or delete site automatically | Default option—the policy ensures that a site is never deleted automatically and only site owners and administrators may delete the site manually. |
| Delete site automatically | Provide a time after site created or closed that SharePoint deletes a site, define times when site owners receive notifications and how many times they may postpone deletion. |
| Close and delete sites automatically | Provide a time when SharePoint should close a site, and when SharePoint should delete a site, define times when site owners receive notifications and how many times they may postpone deletion. |
| Run a workflow automatically to manage site closure | Run a workflow at a time after site creation and optionally repeat the workflow until the site closes. Provide a time after closure that SharePoint deletes the site, and define times when site owners receive notifications and how many times they may postpone deletion. |
![]() Note You may optionally make a site collection read-only when closed via site policy, by checking the check box on the Site Policy creation page.
Note You may optionally make a site collection read-only when closed via site policy, by checking the check box on the Site Policy creation page.
- 9. Once you have defined site policies for sites, navigate to the subsite you created earlier.
- 10. Click the gear icon, then select site settings from the menu.
- 11. Click the link for site closure and deletion, under the Site Administration heading.
- 12. Choose the site policy for this subsite (Figure 11-33).
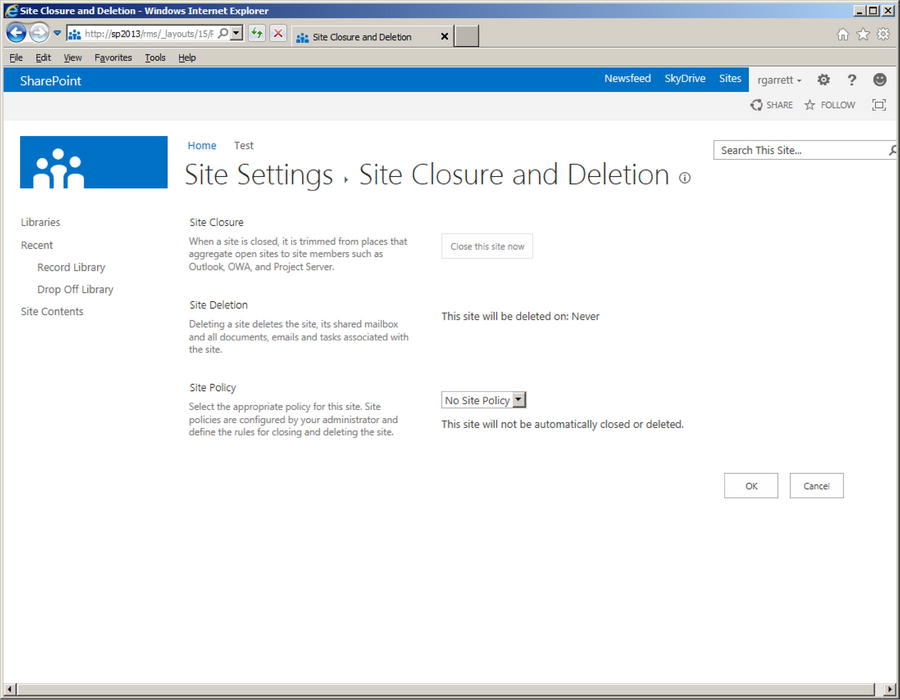
Figure 11-33. Apply site policy to a site
- 13. You may use this page to close the site now, assuming you assign a policy.
![]() Note Users may continue to access closed sites in read-only mode.
Note Users may continue to access closed sites in read-only mode.
Content types provide good portability in a site collection. A site content type defines an entity—list item or document—in a site collection to which the content type belongs. Applying retention policy to a content type instructs SharePoint to apply the policy to all list items or documents that use the content type. In the same way that content types provide abstraction of metadata (site columns), they also provide abstraction and portability of policy. This is because the policy is not restricted to one specific list item, document, or containing list.
In this section, I shall demonstrate the steps involved in creating a new retention policy and applying it to a document content type. As previously, start by using the Records Center.
- Navigate to the Records Center site collection.
- Click the settings gear icon.
- Select the Site Settings menu item.
- Click the Site Content Types link under Galleries.
- Click the content type name to add a retention schedule; I chose the Document content type.
- Click the Information Management Policy Settings link.
- Check the Enable Retention check box (wait for the page to post back). (See Figure 11-34.)
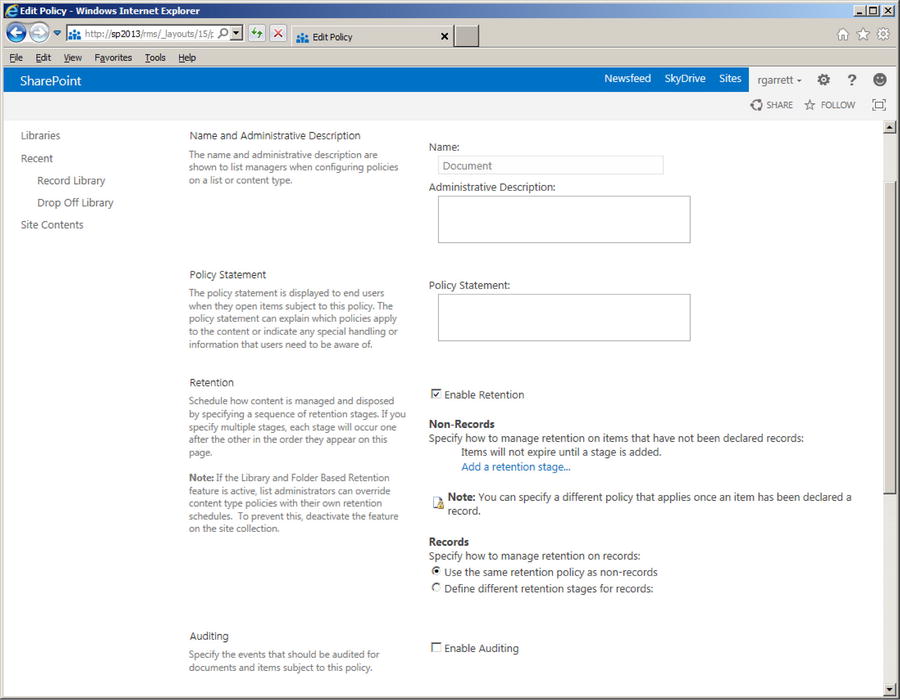
Figure 11-34. Add retention policy to a content type
I am sure that you have already gathered that content type retention policies apply to records and non-records. Non-records are essentially list items or documents that a user has not converted to a record. Why allow different retention policies for non-records and records? Content owners may wish to treat non-records differently from records. For example, a content owner may decide that records undergo more stringent retention policy than that of non-records, and content owners define documents as records when they require special consideration. In my example, I shall define different retention policies for records and non-records, as follows:
- 8. Click the link to add a retention stage for non-records.
- 9. SharePoint displays a dialog, like that in Figure 11-35.
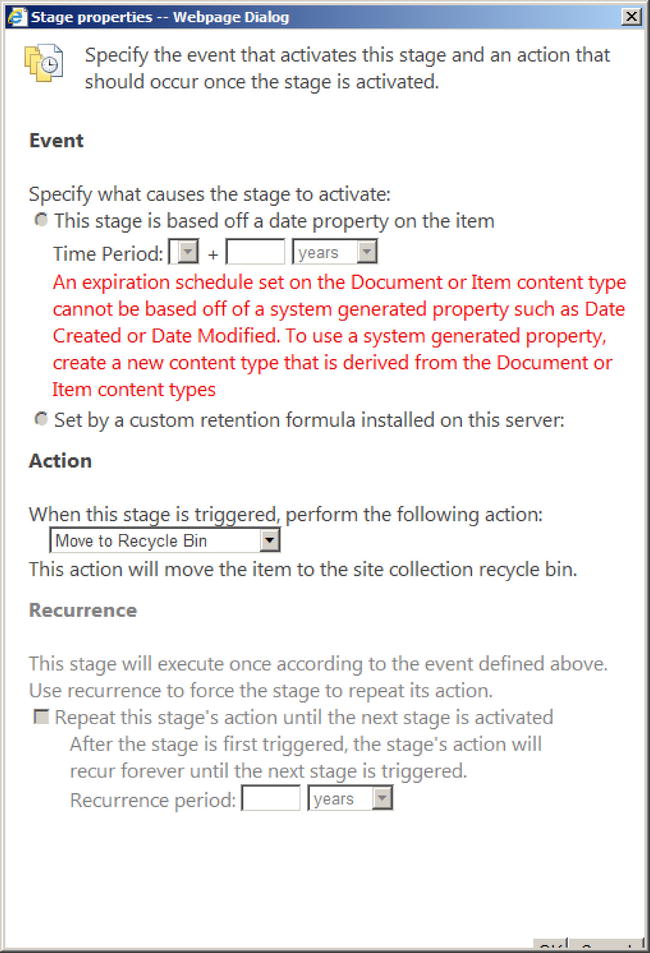
Figure 11-35. Add a retention stage for a system content type
- 10. SharePoint has indicated that you should use a derived content type for stage based on date time, so do that.
- 11. I created a new content type, called Statement of Work, which derives from the Document content type.
- 12. Following the previous steps to add retention policy to the new Statement of Work content type, I now see the dialog in Figure 11-35, without the warning.
- 13. Choose a time after the non-record is created, to execute the policy.
- 14. Choose an action, as shown in Figure 11-36.
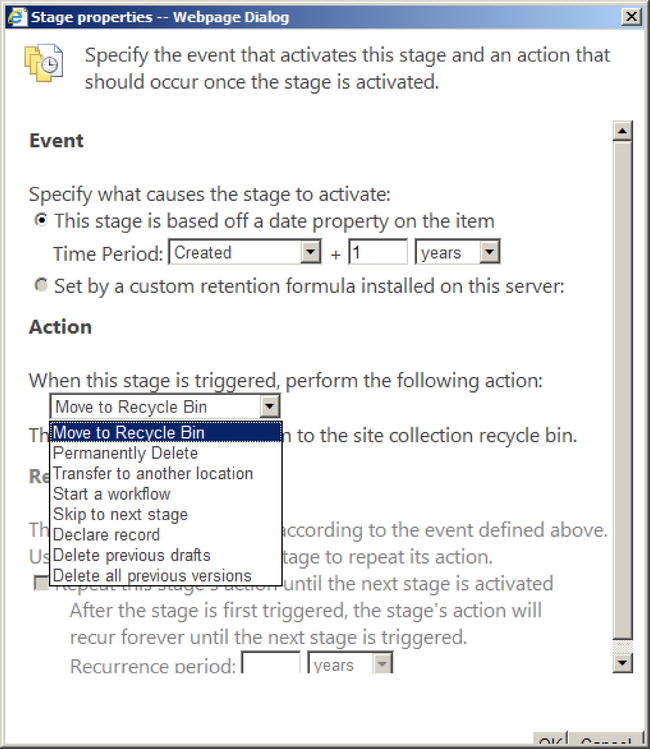
Figure 11-36. Add a retention stage for non-system content type
- 15. Click the OK button to save the retention stage.
![]() Note You may only set a custom retention formula from custom code.
Note You may only set a custom retention formula from custom code.
- 16. You should be back at the Information Policy Settings page (Figure 11-34).
- 17. Choose the radio button to define a different retention stage for a record.
- 18. Repeat the earlier steps, listed previously, to create a new retention stage, only this time for records.
- 19. Click OK.
I think a quick recap is in order. . . You created a new content type, derived from a document and applied retention policy to the content type as a non-record and also applied retention policy to the content type as a record. Now, let us see the policy in action. Follow the next steps to add the content type to an existing document library and to see the different retention policies when a document converts to a record.
- Navigate to any documents library in the site collection (I created a new documents library in the root of the Records Center).
- Navigate to the Library Settings page.
- Make sure the library allows management of content types (advanced settings).
- Click the link to add new content types from existing.
- Add the Statement of Work content type you created earlier.
- Upload a new file to the document library and classify it as a Statement of Work.
- Click the ellipses for the newly uploaded document.
- Click the ellipses on the popup list item settings.
- Select the Compliance Details menu item.
- You should see a dialog like that in Figure 11-37.
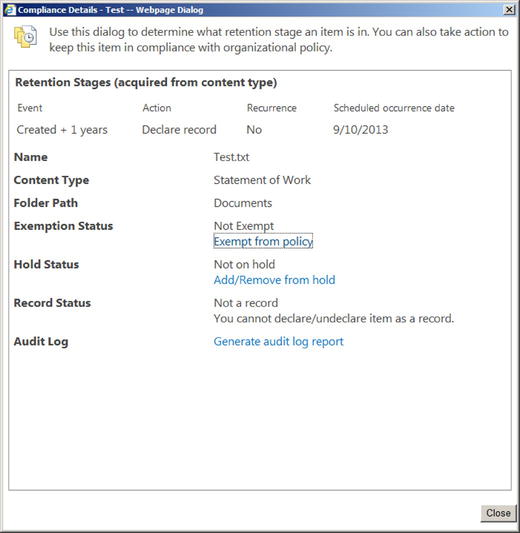
Figure 11-37. Compliance details for a document
- Notice the policy details at the top of the dialog.
- Next convert the document to a record.
- Close the dialog, shown in Figure 11-37.
- Navigate to the Document Library Settings page.
- Click the link for records declaration settings.
- By default, my Records Center does not allow manual declaration of records, so I set this option for the document library.
- Navigate back to the All Documents view of the library.
- Select the earlier uploaded document.
- Click the Files tab on the ribbon.
- Click the icon to declare the document as a record.
- Accept the warning message.
- Follow the earlier steps to view the compliance details of what is now a record.
List retention policies follow closely those of content type retention policies. Because list retention policies bind to a specific list instance, they are not portable, like content type policies. However, list policies can override content type policies, which you may desire in cases where the overarching policy defined by a site collection is not what you intend for a given list.
The following steps detail how to apply retention policies to items within a list. I will not provide too many steps, as many of the steps are similar to those taken when creating content type retention policies.
- Navigate to any document library or list in the site (I chose a document library for this example).
- Navigate to the List/Library Settings page.
- Click the link for information management policy settings.
- Click the link to change the source from adhering to content type policy.
- Add retention stages for all items in the list (see the steps in the section “Content Type Retention Policy”).
SharePoint includes the ability to define documents as records in regular document libraries. Prior to SharePoint 2010, you had to move documents to a Records Center with a records library to use records retention and policies (different from those defined for documents). SharePoint now allows for “in-place records management” for document libraries and lists, with configuration starting at the site collection level.
- Navigate to the root of any site collection.
- Click the gear icon and select the Site Settings menu item.
- Click the Site Collection Features link, under the Site Collection Administration heading.
- Ensure that the In-Place Records Management feature is activated.
- Navigate back to the Site Settings page.
- Click the Record Declaration Settings link, under the Site Collection Administration heading.
- SharePoint presents a page to configure in-place records management (Figure 11-38).
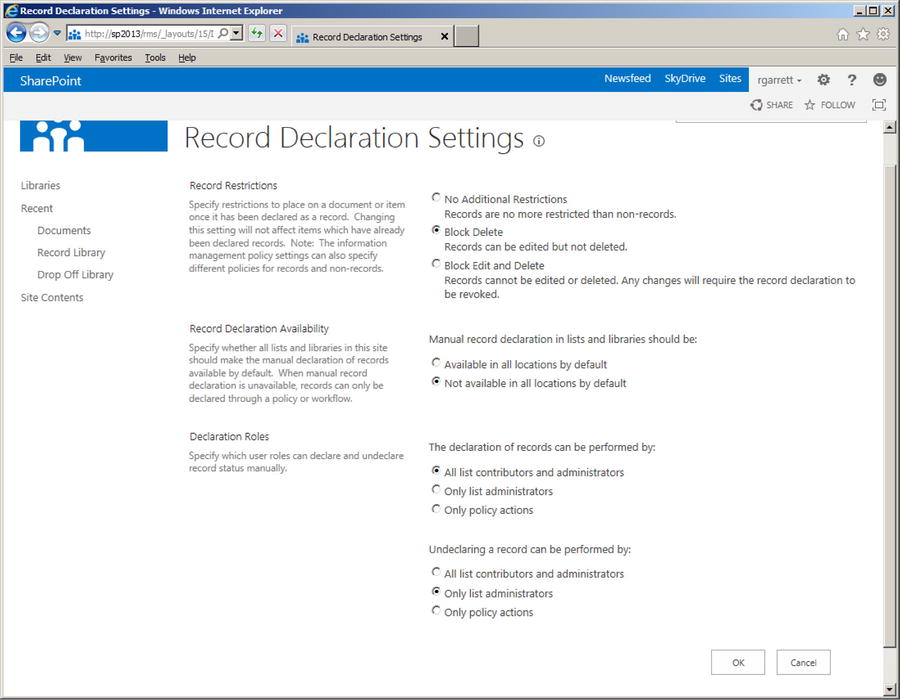
Figure 11-38. Records Declarations Settings
- The page, shown in Figure 11-38, defines settings for the edit/delete restrictions once a document becomes a record, whether in-place records management is available globally in the site collection, and which user roles may turn a document into a record and back again.
- Navigate to any document library in the site collection.
- Navigate to the Library Settings page.
- Click the Record Declaration Settings link.
- In the next page, you may override the setting at that site collection level to enable/disable in-place records management. You may also check the setting so that all documents added to the library become records.
- Enable manual declaration of records for the document library.
- Navigate to the default view page of the document library.
- Select one or many documents in the view, and then click the Files tab on the ribbon.
- Check out the document, and then click the Declare Record icon on the ribbon.
SharePoint provides basic auditing for events in a list or document library. Similar to the way you configured barcodes in a document library, a list owner may configure auditing at the content type level, as follows:
- Navigate to the root of the site collection.
- Click the gear icon, and select the Site Settings menu.
- Select the link for site content types, under Web Designer Galleries.
- Choose a non-system content type (Document, Item, etc.).
- Click the Information Management Policy Settings link.
- Scroll to the auditing section.
- Check the check box to allow auditing.
- Select your choice from the available events to audit.
- Click OK to save the audit settings.
- To view audit reports, navigate to the site collection Site Settings page.
- Click the Audit Log Reports link.
- In addition to auditing at the content type level (or list), you can track auditing events across the site collection.
- From the Site Collection Settings page, click the link for site collection audit settings.
Summary
In this chapter, I described the various features for document management within SharePoint. I demonstrated how some of these features allow your users to organize their document content better—often the lifeblood of any organization that processes information.
Among the interesting areas of records management I covered were information management policy, the Records Center, holds and e-Discovery, and auditing. Records management is all about maintaining the life cycle of documents and data in SharePoint in adherence with organization or business policies.
New to SharePoint 2013 is the e-Discovery Center site template and features for better management of holds and discovery, allowing legal teams to place holds on content for review. Also new to SharePoint 2013 are site retention policies, which you spent some time exploring.
In Chapter 12, I shall introduce business intelligence features within SharePoint 2013—stay tuned.