
![]()
SharePoint Search
What use is a system if users cannot find the information contained within it? It seems like the days of hunting and browsing for content in an information system have passed and users want to type keywords into a text box and retrieve information rapidly. Google revolutionized e-mail by offering its users the ability to store all their e-mail and search it quickly, using Google’s search engine technology. Unlike earlier e-mail systems, users no longer need to store e-mail in folders and sub-folders to find their most important information quickly. Another great example of how search has revolutionized the way we do business is in the phase out of large network drives in favor of document management systems, like SharePoint. We have replaced large laborious network drives with SharePoint document libraries, tagging, metadata, and advanced search capabilities.
In this chapter, you will learn about the SharePoint search platform (ESP—Enterprise Search Platform). I shall start with an overview of the search platform and the components involved and then move on to configuration of search to meet the needs of your organization. I shall spend some time showing you how to get the best out of search and how to structure your data such that search is most effective at retrieving it. Toward the end of this chapter I shall discuss the reporting functionality that SharePoint search provides, which is often overlooked by administrators, in understanding what users search for and the health of the search platform.
Microsoft has redesigned the architecture of SharePoint 2013 search. Unlike previous versions of SharePoint, the search platform is the same across all version types of SharePoint 2013: Foundation, Standard, and Enterprise. SharePoint 2013 search uses a combination of components to create the search platform, and provides pervasive search functionality throughout the product.
SharePoint 2010 provided an Enterprise version of search, to suit the needs of most. In addition, organizations could purchase the FAST version of search, which existed as a true Enterprise Search Platform and came at a premium cost. SharePoint 2013 now includes the major components of FAST in the search offering, and installs them by default as part of SharePoint Enterprise Search, after executing the Farm Configuration Wizard.
SharePoint 2013 brings many new advantages, including but not limited to the following:
- Search-driven navigation
- Better people and expertise search
- Compliance via eDiscovery
- Easier management for administrators
- Catalog-based search and recommendations for business users
- New improved user interface and experience (Figure 15-1)
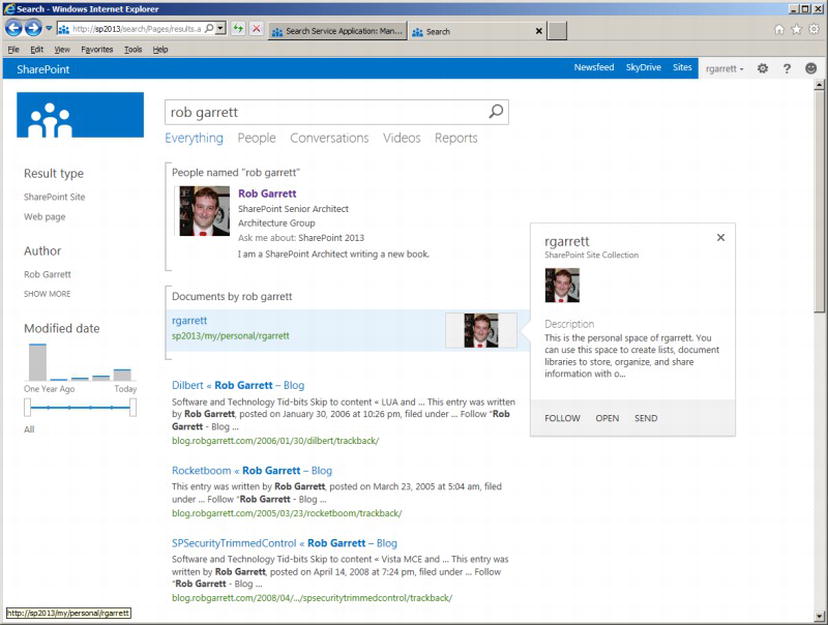
Figure 15-1. Example search results
The new architecture addresses the need for a search platform that caters to configuration and greater redundancy. The architecture consists of several databases and search processing components. Search processing components reside on SharePoint application servers and search databases reside within SQL Server. Both work together cohesively to provide the overall search functionality. In the next few sections, I will review the major components and the part they each play in the overall search platform architecture. Figure 15-2 shows the components within the SharePoint 2013 Logical Architecture.
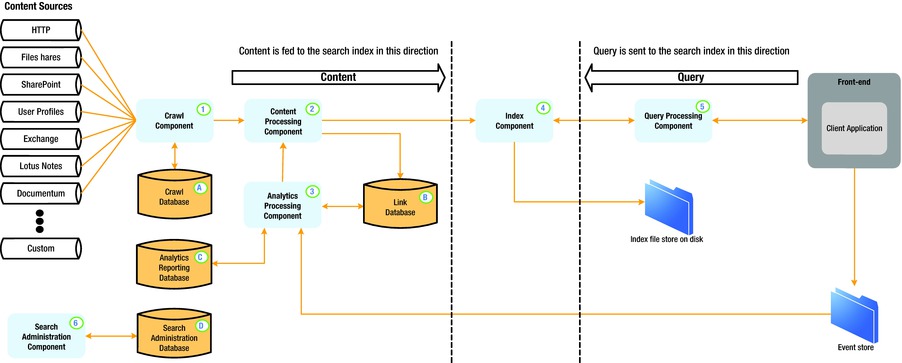
Figure 15-2. SharePoint Search 2013 Logical Architecture
Components
SharePoint 2013 search consists of several components in the overarching search architecture. The search components associate with each Search Service Application (SSA) in the farm, and administrators may scale the components to multiple application servers to distribute load and provide redundancy. The following sections cover each of the search components at a high level.
The crawl component is responsible for crawling over multiple content sources, which might vary in type. The following lists most of the content source types available, and you may create multiple content sources of any type to crawl data for SharePoint search results:
- SharePoint content
- SharePoint user profiles
- Web pages via HTTP
- File shares
- Exchange
- Lotus Notes
- Custom sources
Later in this chapter, I shall demonstrate setting up content sources for SharePoint and web pages over HTTP. In Chapter 13, you read about Business Connectivity Services (BCS) and I demonstrated how to integrate third-party data into SharePoint. Using BCS, SharePoint can crawl over third-party data and expose this data within SharePoint search results.
The content processing component is responsible for processing items crawled by the crawl component and passing these items to the index component. This component is responsible for parsing document content, property mapping, and leveraging IFILTERs to parse content from Office and third-party document types. This component also handles language detection and entity extraction, which were originally features of FAST.
The index component serves two purposes: to take items from the content processing component and index them and to satisfy search queries from the query processing component by providing search results. In both cases, the index component utilizes index files, stored on the disk of the application server. Just like in FAST, the structure of indexes is in tabular format, with rows representing index replicas—redundancy in groups of servers—and columns representing index partitions—indexes split across multiple servers.
The query processing component handles search query linguistics. Functions of this component include processing of words, stemming, spell check, thesaurus, etc. This component understands Keyword Query Language (KQL) and FAST Query Language (FQL) syntax for complex structured queries. The query processing component feeds processed queries to the index component to produce a set of search results.
![]() Note The following URL provides a reference for Keyword Query Language and FAST Query Language: http://msdn.microsoft.com/en-us/library/sharepoint/jj163973%28v=office.15%29 .
Note The following URL provides a reference for Keyword Query Language and FAST Query Language: http://msdn.microsoft.com/en-us/library/sharepoint/jj163973%28v=office.15%29 .
The analytics component monitors search queries, the results produced, and usage of search results. This component effectively learns what the users search and how the search infrastructure provides the results required by users to meet their needs. Organizations often overlook the analytics component, once search is up and running. However, this component provides some valuable insights into how users are searching and leveraging results from searches.
Figure 15-3 shows an example search topology within a SharePoint 2013 farm. The topology assumes multiple application servers, web-front-end (WFE) servers, and databases. In this example, the hosts are physical servers and servers within each host exist as virtual machines.
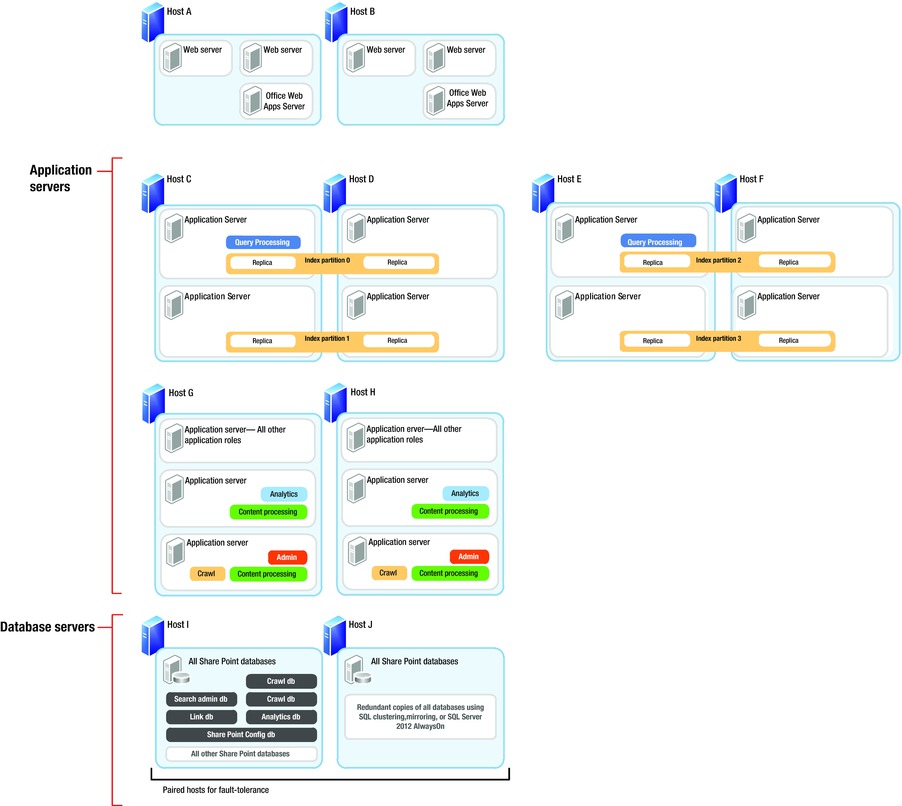
Figure 15-3. Example search topology
Notice how none of the WFE servers host search components—this is advantageous and recommended in highly scalable and highly redundant scenarios, consisting of multiple SharePoint servers. Typically, you want to ensure that your WFE servers do what they do best, which is to server pages to users.
The application servers in Figure 15-3 are where all the search components reside. In this example, hosts C through F maintain replicated indexes, each index replica is a mirror image of another, and there are four replicas. Partitions consist of splitting the index across two web application servers. The replicas ensure redundancy—should one set of servers (host) fail, then the index resides on three other hosts. Partitioning the index replicas across two virtual servers ensures division of load when crawling and querying the index. In Figure 15-3 two query processing components exist (on hosts C and E) to split the job of responding to user search queries. In this case, hosts D and F provide redundancy for partition pairs. We could add additional query processing components on these hosts also, but providing two query processing components is enough coverage in the event that one physical host server fails.
Hosts G and H contain the remaining search components, including a crawl component on one virtual application server of each host. In this example, we have separated query from the rest of the search components because we should ensure query performs well, such that users see search results quickly. Hosts G and H take on the heavy lifting of crawling, indexing, content processing, and analytics. Since we do not need the search administration components all the time, these can also reside on hosts G and H.
Hosts I and J house the SQL databases and provide typical fault tolerance for data storage with SQL mirroring, clustering, or 2012 Always-On.
The topology represented in Figure 15-3 is only one example of distributing search components across multiple servers and hosts in the infrastructure. Depending on the availability of hardware and need for high availability and redundancy, the topology will change accordingly.
Creating a New Search Service Application
Not unlike most other functional areas in SharePoint 2013, search exists as a specific service application in the farm—the Search Service Application—and installs on an application server, within the SharePoint 2013 farm. In this section, I will demonstrate creating a new Search Service Application, to which I shall then refer in later sections of this chapter, as you explore some of the functions that SharePoint search has to offer.
When you installed your SharePoint farm (back in Chapter 2), you more than likely ran the Farm Configuration Wizard. One of the tasks of this wizard is to create a default Search Service Application. Irrespective, SharePoint supports multiple instances of Search Service Application, which is typical when hosting multiple client web sites on a single farm, so you can ignore the default application and create a new one. Once you create the new Search Service Application, I will demonstrate how you associate this Search Service Application with a web application in the farm. You start by opening Central Administration.
- 1. Open Central Administration.
- 2. Click the link to manage service applications (under the Application Management heading).
- 3. Click the New button on the ribbon and then select Search Service Application.
- 4. A dialog appears, like that in Figure 15-4.

Figure 15-4. Create a new Search Service Application (topology)
- 5. Give the Search Service Application a name.
- 6. Select the managed service account—you should have a service account defined already from the install process in Chapter 2.
- 7. Create a new application pool for the administration component, using a managed account for the application pool identity.
- 8. Create a new application pool for the Search Query and Settings web service, using your application pool identity managed account.
- 9. Click the OK button, and then wait while SharePoint creates the new Search Service Application topology.
- 10. Once complete, you should see a dialog like that in Figure 15-5.
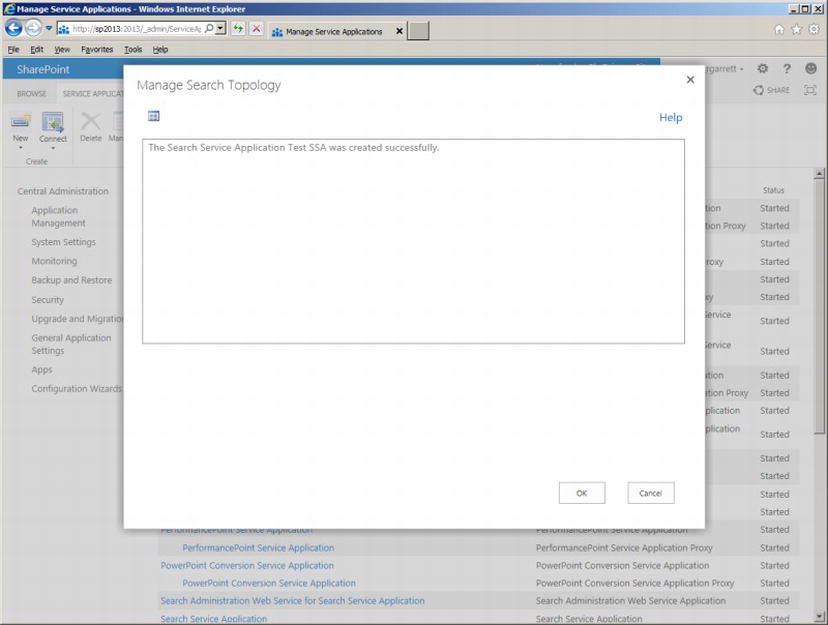
Figure 15-5. New Search Service Application (topology) created
- 11. Click the OK button the exit the dialog.
- 12. Scroll down the list of managed service applications until you find the Search Service Application you just created.
- 13. Click the application name and then press the Manage button on the ribbon to access the new Search Service Application settings.
Splitting Search Service Application Components Across Multiple Servers
Earlier in the chapter, I listed the various components of a Search Service Application and discussed the possibility of scaling these components to different servers. In the “Topology” section, I provided a sample scenario and diagram of the Search Service Application components spread across several hosts and virtual machines. Central Administration does not appear to offer users the capability to distribute Search Service Application components across different servers, so to achieve Search Service Application redundancy and load distribution of these components, use PowerShell.
The UI in Central Administration caters to typical topology situations. The scenario I described earlier in this chapter provides redundancy and load distribution for a large enterprise search solution. On the other hand, what you typically see in the majority of SharePoint deployments are SharePoint farms with dedicated servers for the entirety of a Search Service Application. It is likely for this reason, and to reduce complexity in the UI, that Central Administration provides the simplest creation of a complete Search Service Application.
Of course, you are reading this book so that you may understand how to distribute Search Service Application components for maximum benefit in your SharePoint farm deployments. Therefore, I will demonstrate the various PowerShell commands required to achieve Search Service Application component distribution. I shall assume you are familiar with PowerShell; if not, just flip back to Chapter 3 in this book.
Figure 15-6 shows a screen capture from my SharePoint development farm Search Service Application main administration page. The grid shows the status of the various Search Service Application components and server placement. Unfortunately, my development farm does not have enough capacity to host multiple SharePoint servers, but if it did, they would be listed in the grid. Nonetheless, I shall now cover the steps required to deploy the various Search Service Application components across different servers, using PowerShell. For the purposes of the following steps assume that I have two search servers: SEARCH1 and SEARCH2.
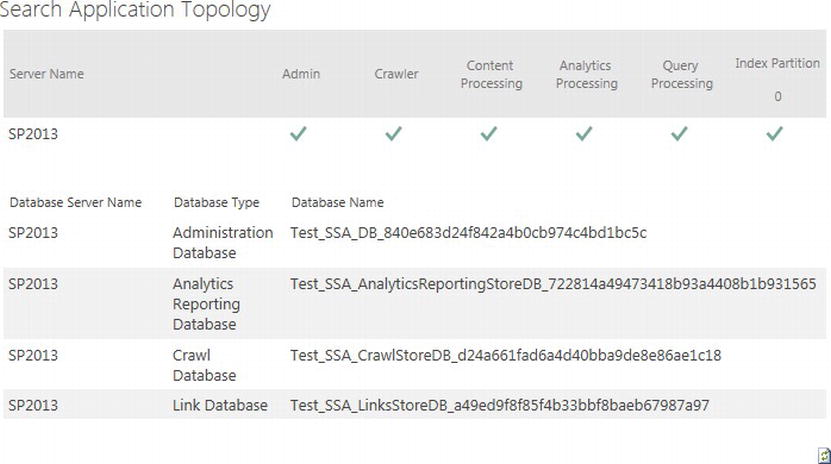
Figure 15-6. Search Service Application Topology
- 1. Open SharePoint 2013 Management Shell (it is usually a good idea to run this elevated) on the application server in your farm.
- 2. If you have already created a Search Service Application, skip to step #7.
- 3. Create a new application pool for the Search Service Application and the administration.
$SearchServiceApplicationPool = New-SPServiceApplicationPool -name "My Search Service Application App Pool" -account Account-Name
$adminPool = New-SPServiceApplicationPool -name "My Search Service Application Admin App Pool" -account Account-Name - 4. Start the search service instances on each server.
Start-SPEnterpriseSearchServiceInstance –identity "SERVER1"
Start-SPEnterpriseSearchServiceInstance –identity "SERVER2"
$srv1 = Get-SPEnterpriseSearchServiceInstance –identity "SERVER1"
$srv2 = Get-SPEnterpriseSearchServiceInstance –identity "SERVER2" - 5. Create a new Search Service Application.
$SearchServiceApplication = New-SPEnterpriseSearchServiceApplication
-Name "My Search Service Application"
-ApplicationPool $SearchServiceApplicationPool
-DatabaseServer  "SERVERNAME"
-DatabaseName "DATABASE NAME" - 6. Create a new Search Service Application proxy.
New-SPEnterpriseSearchServiceApplicationProxy -Name "My Search Service Application Proxy" -SearchApplication "My Search Service Application" - 7. The Search Service Application contains an existing topology, but you want to create your own.
$origTop = $SearchServiceApplication | Get-SPEnterpriseSearchTopology –Active
$newTop = $SearchServiceApplication | New-SPEnterpriseSearchTopology - 8. Now you get to decide where each component goes. For the purposes of demonstration, I shall put the crawl, content processing, and index components on SERVER1 and the administration, query processing, and analytics on SERVER2.
New-SPEnterpriseSearchCrawlComponent -SearchTopology $newTop -SearchServiceInstance $srv1
New-SPEnterpriseSearchContentProcessingComponent -SearchTopology $newTop -SearchServiceInstance $srv1
New-SPEnterpriseSearchIndexComponent -SearchTopology $newTop -SearchServiceInstance $srv1 –RootDirectory Path-for-Index-Files

New-SPEnterpriseSearchAdminComponent -SearchTopology $newTop -SearchServiceInstance $srv2
$SearchServiceApplication | Get-SPEnterpriseSearchAdministrationComponent | Set-SPEnterpriseSearchAdministrationComponent -SearchServiceInstance $srv2
$SearchServiceApplication | Get-SPEnterpriseSearchAdministrationComponent

New-SPEnterpriseSearchQueryProcessingComponent -SearchTopology $newTop -SearchServiceInstance $srv2
New-SPEnterpriseSearchAnalyticsProcessingComponent -SearchTopology $newTop -SearchServiceInstance $srv2 - 9. Now replace the existing Search Service Application topology with the new.
$newTop | Set-SPEnterpriseSearchTopology - 10. Finally, clean up the old topology.
$SearchServiceApplication | Get-SPEnterpriseSearchTopology | Where {$_.State -eq "Inactive" }| Remove-SPEnterpriseSearchTopology -Confirm:$false - 11. After completing these steps, open the Search Service Application Administration page on SERVER2, and confirm the components are associated with the correct server.
I am assuming, at this point, that you have created yourself a new Search Service Application (via the Farm Wizard, manually via Central Administration, or through PowerShell). Your Search Service Application needs to start doing some work of crawling content before you can begin to see search results. Remember from earlier in the chapter that the crawl component takes on the heavy lifting of crawling over content, and the content processing component parses found content from the crawler and passes raw content to the indexing component.
Content SharePoint Sources
The Crawl Component will crawl over a number of content sources, available out of the box. The following is a list of the available content sources that SharePoint provides:
- SharePoint content
- SharePoint user profiles
- Web pages via HTTP
- File shares
- Exchange
- Lotus Notes
Of the previous content sources, the easiest to comprehend is SharePoint content. This content source is also the most popular; after all, you surely want the capability to search content stored in SharePoint, as well as other sources. The following set of steps demonstrates how to set up a new content source to crawl over SharePoint content. For this demonstration, I shall assume a default site collection on my server http://sp2013.
- 1. Open Central Administration.
- 2. Click the General Application Settings header.
- 3. Click the Farm Search Administration link (under the Search heading).
- 4. Click the relevant Search Service Application from the list.
- 5. From herein, I shall generalize the preceding four steps as “Open the Search Service Application Administration page.”
- 6. Figure 15-7 shows a view of my Search Service Application Administration page.

Figure 15-7. Search Service Application Administration page
![]() Note You might want multiple Search Service Applications in a multi-tenant farm, where each web application associates with a different Search Service Application.
Note You might want multiple Search Service Applications in a multi-tenant farm, where each web application associates with a different Search Service Application.
The administration page, shown in Figure 15-7, contains a number of interesting regions. On the left is the search administration navigation—most of the configuration options live here. The grid in the bottom half of the page is that which I discussed a few sections ago; it shows the status of the search components belonging to this Search Service Application and hosting server. The middle-top region of the page displays the system status of the Search Service Application, which includes the status of the crawler, crawler performance, default service account (more on this later), proxy server for federation, alert/log options, and the URL of the default Search Center.
![]() Note In solutions consisting of multiple site collections, it is good practice to create a Search Center to centralize all search results (especially if branding the UI).
Note In solutions consisting of multiple site collections, it is good practice to create a Search Center to centralize all search results (especially if branding the UI).
The steps now resume to configure a content source for SharePoint content.
- 7. Click the Content Sources link (under Crawling in the left navigation).
- 8. You should see a page like that in Figure 15-8.

Figure 15-8. Manage Content Sources
- 9. Notice that your Search Service Application has a default content source already. The “Local SharePoint sites” is an all-encompassing content source for all site collections in the farm (at least at the time the Search Service Application was created).
- 10. However the content source name, and then click the Edit option in the pop-up menu.
- 11. Figure 15-9 shows the page for the content source settings.
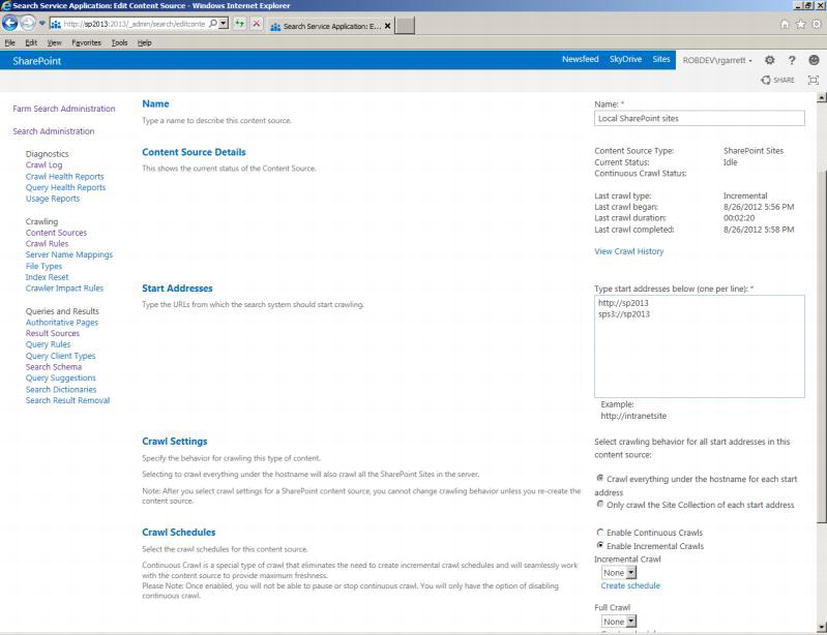
Figure 15-9. Content source settings
- 12. In this page, the start addresses are most important, because they tell the crawler component which SharePoint site collections to crawl.
 Note You cannot include the same start address in multiple SharePoint content sources of the same Search Service Application.
 - 13. The SPS3://sp2013 is a special start address that references the people profiles in the farm. This address instructs the crawler component to crawl the user profiles and surface people in a People search.
- 14. The default content source works fine for most purposes, but for demonstration purposes you will create a new SharePoint content source.
- 15. Since you cannot crawl the same starting address twice within the same Search Service Application with multiple content sources, remove the main HTTP site collection (http://sp2013 in my case).
- 16. Scroll to the bottom of the page and click the OK button.
- 17. You should see the list of content sources again (Figure 15-8).
- 18. Click the New Content Source link.
- 19. You should see a page like that in Figure 15-9, but empty of settings.
- 20. Provide a name for the content source.
- 21. Leave the content source type as SharePoint.
- 22. In the start addresses, add the URL you deleted in the previous default content source. If you forgot to remove it or have included the same URL in another content source, SharePoint will give you an error message when you try to save the content source.
- 23. Under the crawl settings, decide if you want the crawl component to crawl over everything under the start host address, or remain inside the site collection. In my case, I have one site collection at the root of the domain and nothing else. If I had multiple site collections under the host name, the option to crawl everything would include these site collections also.
- 24. New to SharePoint 2013 is the option to crawl continuously. Continuous crawls instruct SharePoint to crawl new content as it becomes available, such as in newsfeeds and blogs. This option avoids the issue of new content not showing up in search results until the incremental schedule kicks in.
- 25. Finally, you have a crawling schedule and priority (if not using continuous crawling).
- 26. Click the OK button to save the new content source.
- 27. Microsoft dropped the option to start a full crawl in the Content Source Settings page, so to start a full crawl, click the new content source, then select the option to “Start a Full Crawl” from the pop-up menu.
The steps in the preceding section are essentially all there is to setting up a content source, although different content source types provide different options. To demonstrate I shall now walk you through the steps to crawl a third-party web site.
- 1. Open the Search Service Application Administration page.
- 2. Click the Content Sources link in the left navigation.
- 3. Click the link to create a new content source.
- 4. Give the content source a name.
- 5. Change the type to Web Sites.
- 6. Provide the home page URL of the web site you intend to crawl.
![]() Note Sites that restrict crawling with a robots.txt will not allow SharePoint to crawl their content.
Note Sites that restrict crawling with a robots.txt will not allow SharePoint to crawl their content.
- 7. Set the crawl settings to crawl the start page—the crawl component will ignore links to other pages, stay within the server of the start address, or configure maximum server hops and page depth from the source.
- 8. Set up the schedule and priority.
- 9. Notice, there is no option to crawl continuously, because this is a feature of SharePoint content sources.
- 10. Click OK, then start a full crawl of the new content source.
- 11. If you have a Search Center configured for the web application associated with the Search Service Application, you can try searching for results against the web site you just crawled.
Other Content Sources
You might be wondering about the other content sources. Table 15-1 lists the details on all the out-of-the-box content source types (including those we already discussed) provided by SharePoint 2013.
Table 15-1. Content Source Types
| Content Source Type | Details |
|---|---|
| SharePoint Sites | Crawls SharePoint site content, including People data from user profiles; you can configure continuous crawling or schedule crawls and designate crawling of a number of SharePoint or single site collections |
| Web Sites | Crawls external web sites; configured with server hops and depth; this content source crawls on a designated schedule |
| File Shares | Crawls file content at one or many UNC path or file:// locations; this content source crawls on a designated schedule; the content processing component uses IFILTERs to extract content from files for known file types |
| Exchange Public Folders | Crawls one or many Exchange public folder locations, using HTTP; this content source crawls on a designated schedule |
| Line of Business Data | Crawls external line of business (external) data, accessible via Business Connectivity Services; this content source crawls on a designated schedule; this content source assumes correct configuration of BCS entities and sources |
| Custom Repository | Crawls custom locations based on registered connectors; custom search connector development is outside the scope of this book; this content source crawls on a designated schedule |
Crawl rules define a set of rules such that the crawl processor can determine whether to process a piece of content for indexing. For example, earlier in the chapter I set up a content source to crawl over my blog site. If I want to exclude some pages or subsites of my blog, I can create crawl rules to restrict what the crawler considers content to index.
There is more to crawl rules than just inclusion or exclusion of entities in the search index. Crawl rules also allow users to instruct the crawler what authentication to apply to given content. By default, the crawler uses a Search Service account (defined when you installed SharePoint 2013) to access content. In the case of external content, you may need to apply alternate authentication methods to crawl the content.
From the Search Service Application Administration page, click the link for Crawl Rules to access a page where you can administer existing crawl rules and new rules. Figure 15-10 shows an example of the Crawl Rules page in my environment. Notice that I already have a crawl rule for the crawling of my blog—it is typically a good idea to create at least one crawl rule for any content source that crawls over external web site content.

Figure 15-10. Crawl Rules page
![]() Note When crawling over external web site content it is a good idea to create a crawl rule to include all content at the given entry URL.
Note When crawling over external web site content it is a good idea to create a crawl rule to include all content at the given entry URL.
At the top of the Crawl Rules page (Figure 15-10), SharePoint provides a test text box and button. This enables you to quickly check if a given URL of a content source matches any of the listed rules. For example, a user complains to you that some of the pages of a web site do not show up in search results. You confirmed that you created a content source for the web site and no errors or warnings surface in the log for the missing results. Entering the URL into the test box of the Crawl Rules page will immediately tell you if any rule exists prohibiting the crawl of the specified page.
The crawler is good at crawling over SharePoint, but when it comes to other sources, the crawler is only as good as the structure of the content. Web sites provide a good example: crawlers and spiders rely on HREF links to pages within web sites to discover new content. In some cases, a web site might contain a number of orphaned pages. Orphaned pages are those where no other parent page in the hierarchy or page within sibling sub trees points to the orphaned page. This can often happen when creating non-navigable subsites or pages in a site, which users access by knowing the direct URL. Since the SharePoint crawler has no way of getting to orphaned pages, the crawler must be instructed to include these locations when crawling. I shall demonstrate this configuration in the following steps:
- 1. Click on the Crawl Rules link in the left navigation of your Search Service Application to access the Crawl Rules page.
- 2. Click the link to add a new crawl rule.
- 3. You should see a page like that in Figure 15-11.

Figure 15-11. Adding a crawl rule
- 4. SharePoint might indicate at the top of the page that the page is unencrypted and to be careful passing credentials—you might see many warnings like this in your dealings with SharePoint 2013 when not using SSL.
- 5. Provide the path to content for your crawl rule. You can use regular expressions by checking the check box. The path allows wildcard characters.
- 6. The Crawl Configuration allows you to specify whether the crawler includes or excludes content matching the rule.
- 7. Depending on whether you choose inclusion or exclusion, you have additional options to crawl complex URLs.
- 8. Finally, the crawl rule allows you to specify the authentication. This part is slightly different from that in SharePoint 2010 in that there are additional options to authenticate via cookies, certificates, etc.
- 9. Click the OK button to save the rule.
- 10. You can test the rule using the text box and test button.
Sometimes content sources are set up for crawling content on an internal domain name. A good example of this is in crawling over line of business (LOB) content, using BCS. The LOB system might reside on a local URI and the content configured as such. An issue arises when the search results, seen by end users, include the internal name locations instead of an addressable URI by the end users. Use server name mappings to solve this issue.
- 1. Click the Server Name Mappings link in the Search Service Application left navigation.
- 2. Click the link to add a new mapping (Figure 15-12).
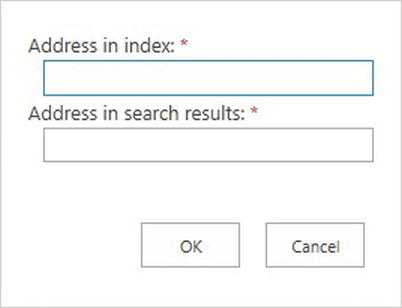
Figure 15-12. Mapping server names
- 3. Provide the server name in use by the crawler (without a protocol prefix—HTTP/HTTPS).
- 4. Provide the domain name for search results.
- 5. Click the OK button to save the rule.
![]() Note Server name mapping rules map only server domain names and will not allow you to convert complete URLs.
Note Server name mapping rules map only server domain names and will not allow you to convert complete URLs.
By default, SharePoint 2013 search will crawl and index only files of known type. Out of the box, SharePoint supports all the Office-type documents, e-mail files, ZIP files, and PDF documents.
![]() Note SharePoint 2007 and 2010 did not natively support PDF documents, and required additional configuration to crawl and index PDF files.
Note SharePoint 2007 and 2010 did not natively support PDF documents, and required additional configuration to crawl and index PDF files.
Using the File Types page, you can add new files types for SharePoint to crawl. Simply click the link for File Types in the Search Service Application Administration page and then add a new extension. Adding an icon for your new extension requires some tinkering in the hive.
- Navigate to the folder on each SharePoint server, as follows:
C:Program FilesCommon FilesMicrosoft SharedWeb Server Extensions15TEMPLATEIMAGES - Add a new icon GIF file to this folder.
- Navigate to the following XML folder on each SharePoint server:
C:Program FilesCommon FilesMicrosoft SharedWeb Server Extensions14TEMPLATEXML - Open the DOCICON.XML file and add a new mapping node for the extension and GIF file.
Adding a new file extension and image file will instruct the crawler to consider files with this extension and to display the designated icon in the search results.
![]() Note Adding a new file extension and icon mapping will not guarantee that SharePoint crawls inside documents of unknown type.
Note Adding a new file extension and icon mapping will not guarantee that SharePoint crawls inside documents of unknown type.
I must point out that adding the extension and icon of a new file type into the search settings for the Search Service Application will not guarantee that the crawler will search inside documents of this type, just that the crawler will not ignore the files to start and that search results will include a nice icon. The content processing component in your Search Service Application is responsible for processing the content of documents, and it accomplishes this with IFILTERs. An IFILTER is a compiled DLL that contains logic to open a designated file type and extract the content as text. Microsoft provides IFILTERs with SharePoint, to extract content from Microsoft Office documents. Prior to this version of SharePoint, the Adobe PDF IFILTER had to be installed to index inside PDF files (as well as adding a file extension and icon mapping). SharePoint 2013 includes support for PDF documents and ships with IFILTER to extract content inside PDF files.
When crawling over content outside of SharePoint—especially web sites—you must observe the impact of searching these sources. Web site administrators are all too familiar with their web sites crashing because of too many concurrent user requests or high activity on their web servers. Search crawlers and spiders are often the culprits in causing slow web site performance. Most crawlers run multiple concurrent requests and queue up page requests until the crawler has covered all pages in a given web site. Typically, crawlers do not pose an issue for large-scale web sites, designed to handle high load, but this is not the case for all web sites. SharePoint incorporates throttling of the search crawler, using impact rules.
- 1. Click the link for Crawler Impact Rules in the left navigation of Search Service Application Administration.
- 2. Click the link to add a rule. You should see a page like that in Figure 15-13.
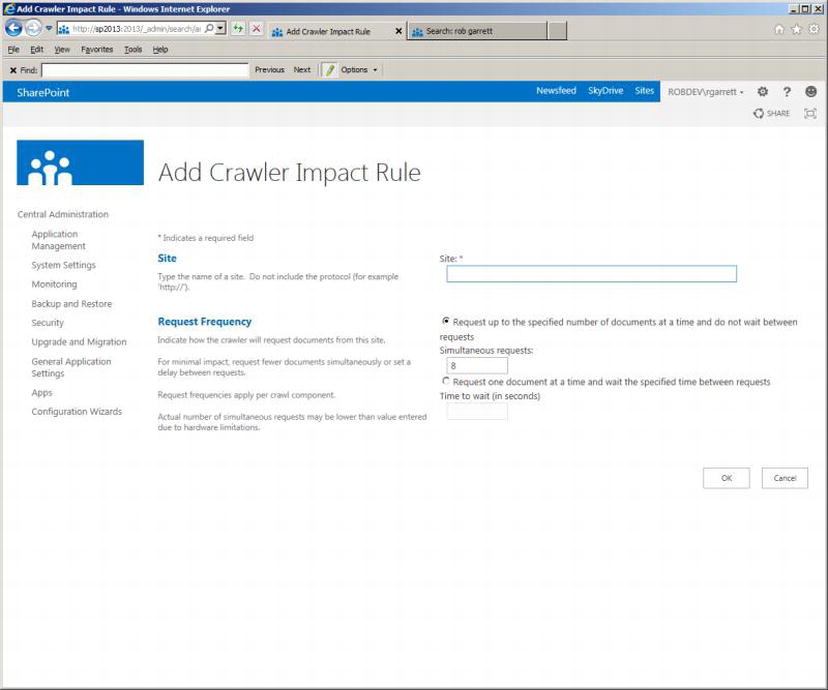
Figure 15-13. Adding a crawler impact rule
- 3. Provide the domain name of the site, without the protocol (HTTP/HTTPS).
- 4. Tweak the number of simultaneous requests or time between single requests.
In the case of a fragile web site, you should lower the number of concurrent requests or choose the option to request pages/documents one at a time with duration in between requests. Lessening the impact of crawling over a web site will cause SharePoint to take longer to crawl over the site, but ensure that the site does not fall over from too much traffic.
In this section of the chapter, I discuss search queries and search results. SharePoint 2013 handles search query processing via the query processing control (within each Search Service Application) and renders results from query of search indexes. The query processor provides many options, configurable via Search Service Application Administration, which I cover in the following subsections.
SharePoint 2013 includes some sophisticated relevance-ranking algorithms, to determine order of search results, based on search criteria, provided by users. In certain cases, you may wish to help SharePoint search by influencing search results based on your own criteria of ranking, which is where Authoritative Pages come in.
Authoritative Pages are pages in SharePoint that you designate as requiring special mention in search results. Within the Authoritative Pages section of Search Service Application Administration, you can designate any number of pages as first-, second-, or third-level authority. SharePoint considers the level of these pages when rendering search results. Pages designated as top-most authority present soonest in search results.
Figure 15-14 shows an example Authoritative Pages configuration page in Search Service Application Administration. Configuring certain pages as authoritative is a simple case of adding them to the first, second, or third box.
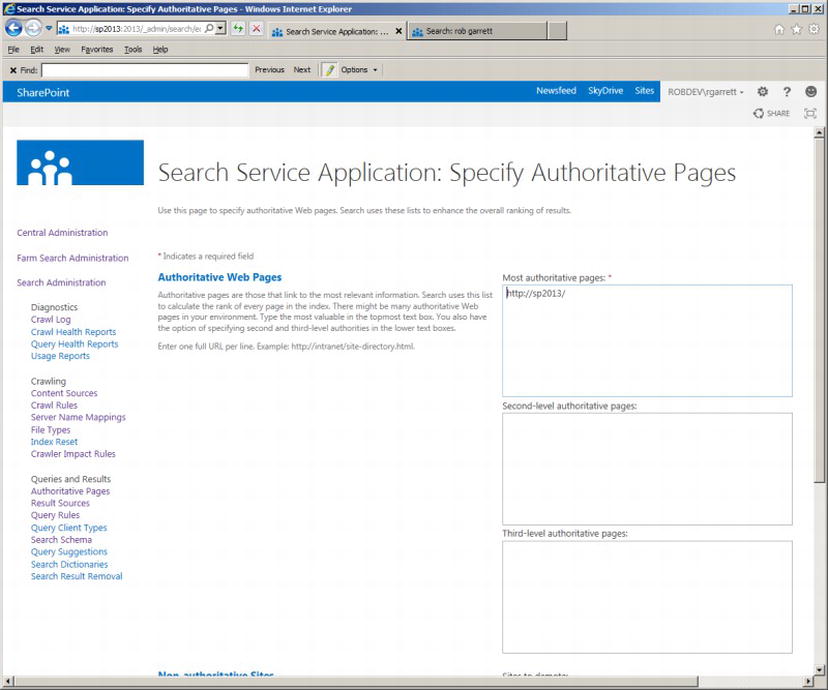
Figure 15-14. Authoritative Pages
Scrolling down the page (not shown in Figure 15-14), you should see a box to enter pages to demote. Demoted pages are those that you feel are unimportant, and those that you do not wish to see high in the list of search results. Sometimes the query processor decides a page is highly relevant because it contains many instances of a keyword, or matches many query rules, but your content owners may feel differently. Having the ability to demote a page ensures that the content owners remain happy.
SharePoint 2013 has done away with search scopes and replaced them with result sources. Search scopes used to allow users to refine search results returned from an index, so that you could scope the results for a particular scenario. For example, a search scope might restrict search results of a particular subsite and below in a site collection, so that users who use this scope in their search see only results for a narrow set of content. Result sources provide a similar function to search scopes, but with greater control over the filtering.
![]() Note Result sources effectively combine search scopes and federated locations, which existed in SharePoint 2010.
Note Result sources effectively combine search scopes and federated locations, which existed in SharePoint 2010.
Clicking on the Result Sources link in the left navigation shows a page like that in Figure 15-15. SharePoint provides a number of result sources, based on what users typically search. Among those on the list are Pages, Documents, Pictures, and Local People Results. To understand how a result source works, you will now explore one of them by clicking the name and selecting the view option in the pop-up menu. I chose the Local People Results entry, which provides a page like that in Figure 15-16.
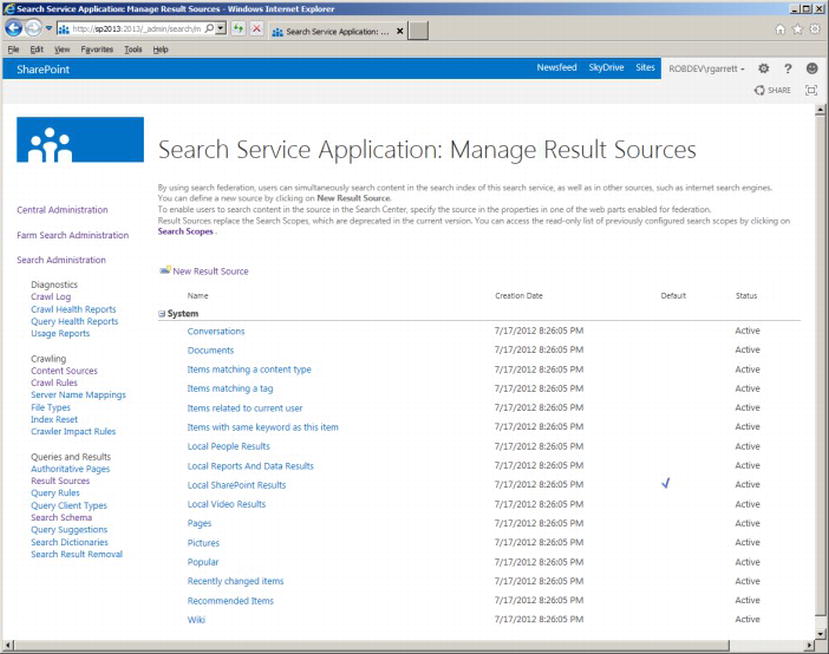
Figure 15-15. Result Sources in SharePoint 2013 Search Service Application
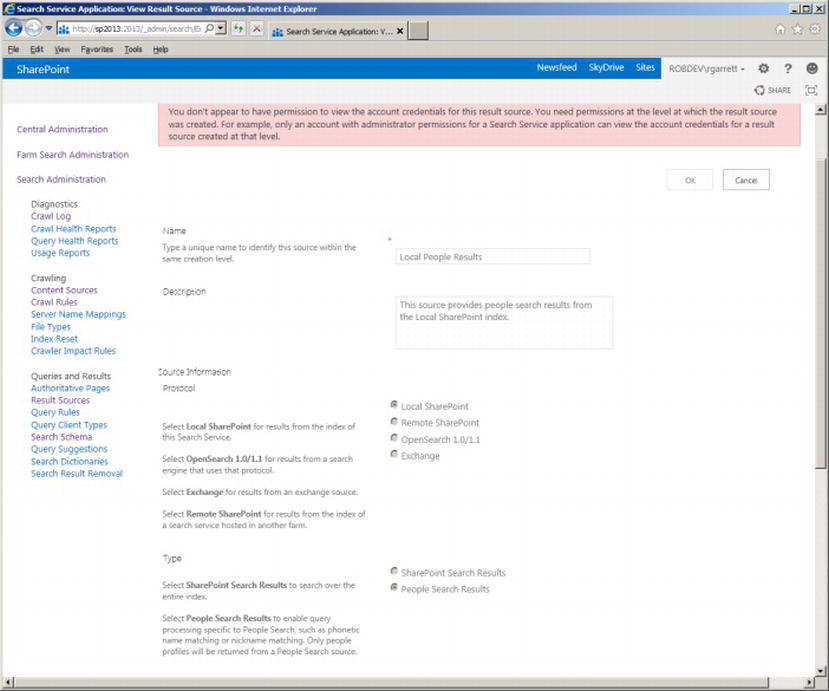
Figure 15-16. Result Source for Local People Results
SharePoint provides a large warning message at the top of the page, indicating that you do not have permissions to modify this result source. This is a little misleading, in this case, because you do not have rights to edit any out-of-the-box result source. I am a farm administrator and administrator of my Search Service Application, so this clearly is not a permissions issue. In a moment, I shall demonstrate creating a new result source, where you do not see this warning.
Every result source has a name and description, and applies to Local SharePoint content, Remote SharePoint content, Open Search 1.0/1.1 content, or Exchange. Open Search is interesting in that you can request result sources from other search engines that support the 1.0/1.1 protocol. For brevity, I shall concentrate on result sources that apply to Local SharePoint content in this book.
The result source type applies to either SharePoint Search Results or People Search Results—SharePoint treats these types of search as distinctly different and applies different result sources to each accordingly.
Scroll to the Query Transform section of the Result Source page and you get into something more interesting. Before moving onto this sub-topic, I shall finish my summary of this result source with a brief mention about the authentication options at the bottom of the page. You have the choice to configure the result source using the common search account identity, or by providing a specific account—this comes in handy if you want results sets that a specific account has read rights to view.
To demonstrate query transform for result sources, I shall back out of the page (Figure 15-16) and return to the list of the Result Sources page (Figure 15-15). To create a new result source, execute the following steps:
- 1. Click the New Result Source link.
- 2. Provide a name and description—I created a result source that shows blog posts from my blog in the last month, so created a name and description as appropriate.
- 3. Choose the Local SharePoint to scope results from SharePoint content in the Search Service Application local index.
- 4. Leave all options default.
- 5. Click the Launch Query Builder button to configure the Query Transform.
- 6. You should see a dialog like that in Figure 15-17.
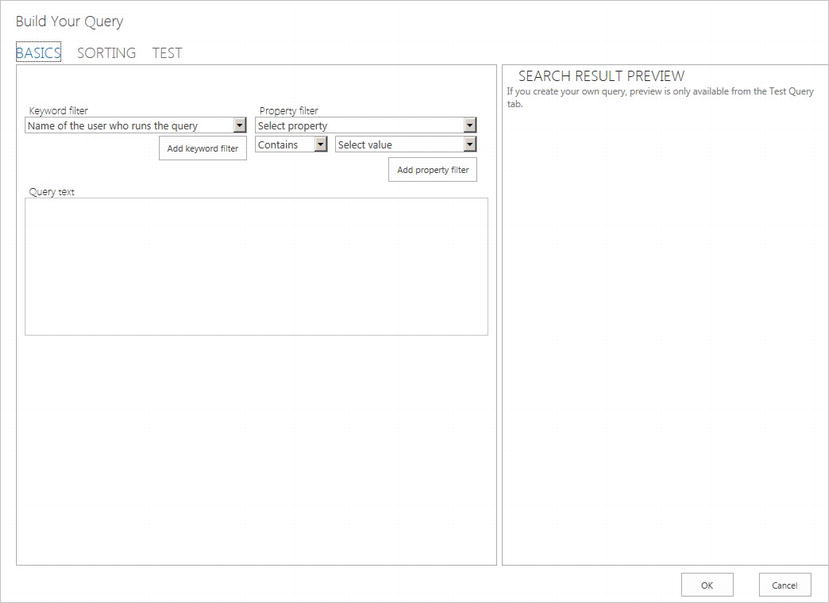
Figure 15-17. Query builder for result source
The query builder understands both Keyword Query Language (KQL) and FAST Query Language (FQL), which are used to define result source criteria. KQL and FQL provide superior query syntax to that of CAML (Collaborative Application Markup Language), used in earlier versions of SharePoint. SharePoint 2013 inherits FQL from that of the FAST ESP, which Microsoft included in the SharePoint 2013 platform. The syntax available for KQL and FQL is vast, so I shall provide you a reference at the following location: http://msdn.microsoft.com/en-us/library/sharepoint/jj163973%28v=office.15%29.
- 7. The keyword filter provides filter capabilities of the entered keywords of a given search. For example, you can easily create a result source that lists recent documents edited by the user performing the search, or include a parameter from the query string in the search criteria. For my example, I only need the query from the search box.
- 8. Choose your keyword filter and then click the button to add the keyword filter.
- 9. The property filter allows you to apply additional filter properties to the search query, such as the Content Type, Author, or one or many managed properties.
- 10. I added a property filter for Content Source and set a manual value to my content source: “My Blog.”
- 11. Adding a restriction for last modified date is not so obvious. In the query text box I added the following to the end of the text: Write>{Today-30}
- 12. My query text now looks as follows: {SearchBoxQuery} ContentSource="My Blog" Write>{Today-30}
- 13. Click the Sorting tab.
- 14. Change the “Sort by value” to desired sorting criteria, and add sort levels as desired.
- 15. Click the Test tab; then click the Show More link.
- 16. My Test tab looks like that in Figure 15-18.
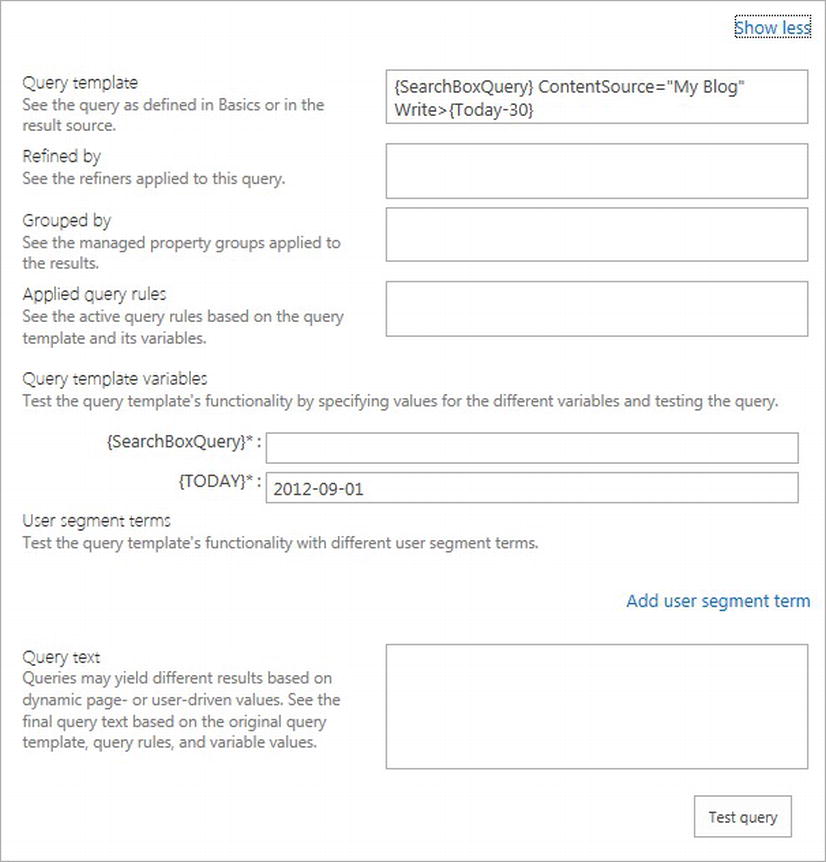
Figure 15-18. Test tab in the query builder
- 17. Provide a search query value to test.
- 18. Click the Test query button to see the results in the right pane.
- 19. Click the OK button to return to the Result Source page.
- 20. Click OK again to save the result source.
At this stage, you might be wondering how to use the result source in your search results. Similar to how SharePoint 2010 allowed you to use scopes in search result Web Parts, SharePoint also allows you to apply result sources to search result Web Parts.
The ResultScriptWebPart now replaces the CoreResultsWebPart and provides greater functionality. One of the more obvious improvements is previous display, which SharePoint 2010 only provided with FAST. The ResultScriptWebPart understands result sources like the CoreResultsWebPart understood scopes. I shall demonstrate this behavior in the following steps:
![]() Note As a good practice, you should create a Search Center to centralize search for various site collections. This provides the added benefit of a single place to apply search result branding.
Note As a good practice, you should create a Search Center to centralize search for various site collections. This provides the added benefit of a single place to apply search result branding.
- 1. I am using a Search Center to render search results—you can just as easily create a page in your site collection and drop the ResultScriptWebPart.
- 2. From the main landing page of the Search Center, execute a search to navigate to the Results page.
- 3. Edit the page.
- 4. Select the Search Results Web Part and then edit the Web Part properties (Figure 15-19).

Figure 15-19. Properties for the Search Results Web Part
- 5. Click the Change query button.
- 6. You should see a query builder dialog appear (similar to that when creating a result source)—see Figure 15-20.
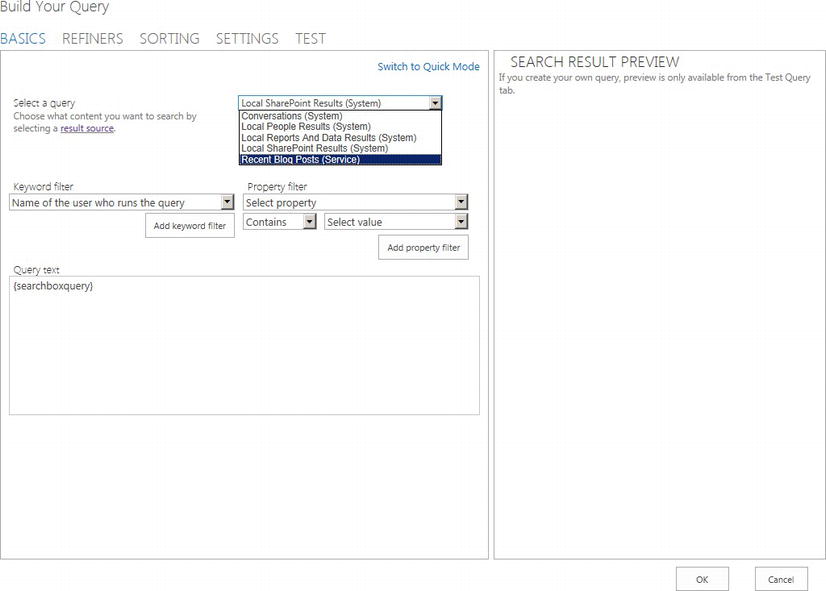
Figure 15-20. Query builder for Search Results Web Part
- 7. Since you have a query builder in front of you, you can create some on-the-fly query filtering. In your case you just need to select the Result Source from the drop-down menu.
- 8. Click the OK button.
- 9. Click OK on the Web Part properties box and then save the page.
- 10. Execute a search via the Search Center, and the results returned will be those filtered by your result source.
Query rules are a new feature of SharePoint 2013 that allows users to tailor search results in a flexible manner. Query rules consist of conditions and actions that SharePoint applies when a search query meets a condition. Think of query rules as a replacement for Best Bets, only smarter.
We are all familiar with Bing and Google, and you have probably seen promoted results when searching for a comment term. You can accomplish the same behavior using query rules in SharePoint 2013.
- Click the Query Rules link in the left navigation of your Search Service Application.
- Change the source drop-down to Local SharePoint Results.
- You should see a page like that in Figure 15-21.
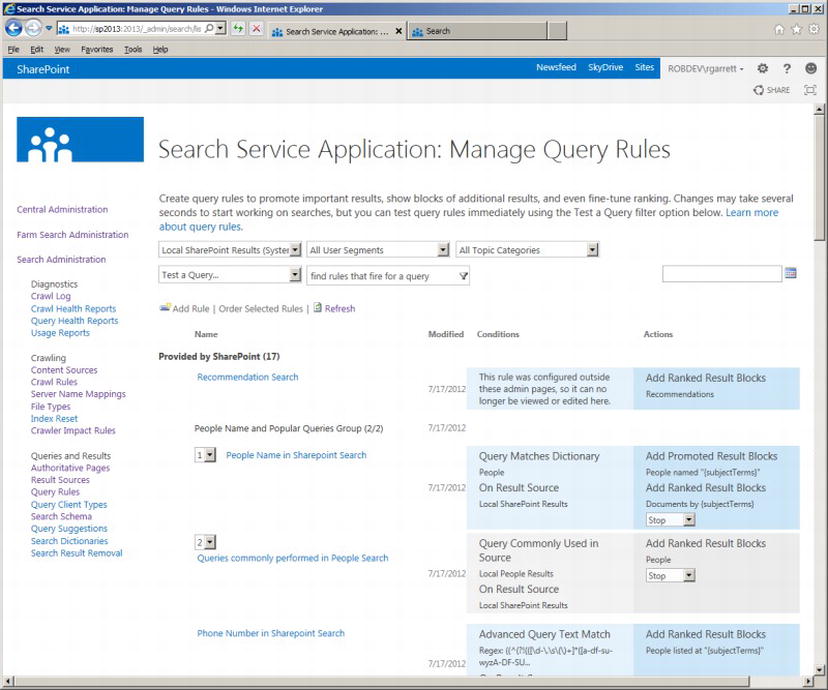
Figure 15-21. Query rules for the Local SharePoint Results source
Figure 15-21 shows a page of query rules for the result source: Local SharePoint Results. The query rules consist of several conditions and matching actions. Take the “People Name in SharePoint Search” as an example. This query rule consists of a condition that matches the search terms with the People dictionary to determine if any of the terms match a person’s name. If the search terms satisfy the condition, the action promotes the search result at the top of all other search results, and additionally executes another sub-search for the last two recent documents modified by the person. When searching for my name in my Search Center, I see the result in Figure 15-22.
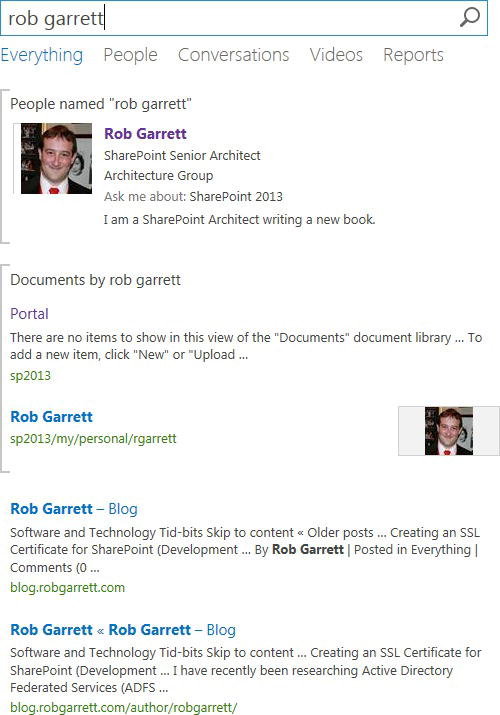
Figure 15-22. Promoted search results with query builder
To demonstrate creation of custom query rules, I shall provide some steps to include a promoted block at the top of the search results when a user searches for the term “SharePoint.” I previously created a content source to crawl my blog, and am using the “Local SharePoint Results” results source in my demonstration.
- Click on Query Rules from the left navigation of the Search Service Application.
- Change the source to Local SharePoint Results (System).
- Click the Add Rule button.
- On the next page, provide a name for the rule.
- Choose the option to match a keyword exactly.
- Provide the keyword: SharePoint.
- Scroll down the page and click the Add Promoted Result link.
- In the dialog that appears, give the promotion a title, URL, and description—I used my blog.
- Click the Save button on the promotion result dialog.
- Click the Save button on the Query Result page.
- Open the Search Center and execute a search, using the keyword “SharePoint” (make sure to type the casing correctly).
- My results look like that in Figure 15-23.
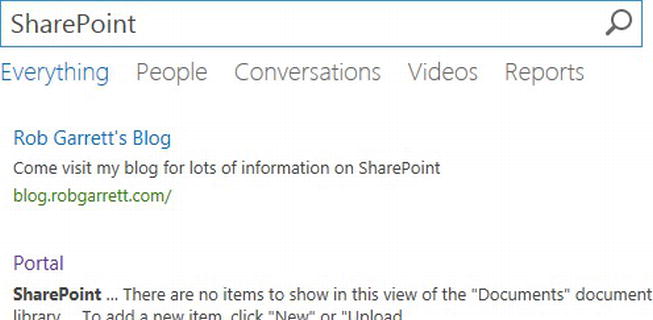
Figure 15-23. Promoted result in search results
Of course, my example was a trivial one. Feel free to add multiple query rules and order them according to your desired rank. You can also arrange certain query rules to fire in certain date ranges, so you can promote content for different times.
There really is not a whole lot to say about query client types—they are a series of labels, used by different applications. Each application that requires the use of SharePoint 2013 search should provide a client type. SharePoint then throttles performance of search result generation based on three tiers: top, middle, or bottom. For example, applications using the client type as “Alerts” get a top tier search classification, whereas applications using the client type “Monitoring” receive a bottom tier classification.
![]() Note SharePoint provides search results at regular performance until exceeding resource limits, and then assumes throttle mode, which attends top tier searches first, then middle, then bottom.
Note SharePoint provides search results at regular performance until exceeding resource limits, and then assumes throttle mode, which attends top tier searches first, then middle, then bottom.
Query client types come in handy when monitoring search query reports. Figure 15-24 shows the query latency report, filtered by query client type. Filtering by client type allows you to see what applications are consuming most resources for search.
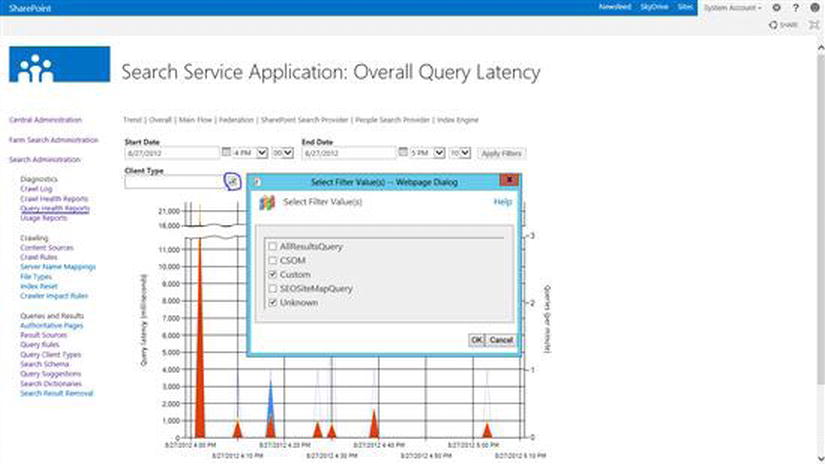
Figure 15-24. Query Latency
Search schema is the new name for managed properties and crawled properties. Managed properties and crawled properties are metadata properties that drive search results and map back to content. SharePoint 2010 introduced refiners, which are essentially facets and allow filtering of search results by different fields, such as Author, Language, etc. Managed and crawled properties facilitate refiners. I shall tackle each of these properties’ types separately.
Crawled properties consist of automatically extracted crawled content, grouped by category based on the protocol handler or IFILTER used by the content processor. In layperson’s terms, the SharePoint crawler crawls content from a content source and extracts metadata—such as that defined by content owners. When the crawler extracts the content for a piece of metadata it creates a new crawled property and assigns it the value of the extracted content. For example, a document might contain title metadata, which defines the title of the document within a content type or document library. When the crawler stumbles upon a document with the title metadata, it will create a new crawled property for the title field.
Why are crawled properties important? They essentially define discrete pieces of information within content and allow users to search by keywords. Without crawled properties, the search index has no real value, because SharePoint indexes consist of many crawled properties that map content to potential searchable keywords.
![]() Note Search is not magic! It requires some assistance with good content organization and classification with metadata (content types) and managed metadata (tags).
Note Search is not magic! It requires some assistance with good content organization and classification with metadata (content types) and managed metadata (tags).
In the beginning of this chapter, I mentioned good structuring of content for search. Contrary to mistaken opinion, search is not magic! I have consulted with many clients who have asked me why their SharePoint search is not providing valuable results. To this question I typically retort with a question about the structure of their content. Search is only as good as the content available and some form of organization. Look at it this way—if I was to point you at a directory of many randomly named files and ask you to pull out all the proposal documents, this might take some time for you to visit every file, laboriously checking the content. If I then told you that all proposal documents lived in a sub-folder, you would have an easier time locating them. Similarly, SharePoint search needs some help identifying and classifying content. SharePoint search is smart enough to understand context of content (sites, document libraries, and lists), and takes advantage of metadata (content types), and managed metadata (tags), to index content for relevant search results.
Crawled properties work hand-in-hand with metadata and managed metadata. As well as searching inside documents with IFILTERs, the content processor can extract content type fields and tags from content and create crawled properties. Before I move on to the topic of managed properties, I will take a quick look at crawled properties in Search Service Application Administration.
Figure 15-25 shows a screenshot from my Search Service Application Administration, listing crawled properties. To navigate to this page, click the Search Schema link in the left navigation of Search Service Application Administration, then click the crawled properties. Notice that each crawled property maps to a managed property. I shall discuss managed properties in the next subsection, but mapping a crawled property to a managed property allows users to then filter search results in keyword searches.

Figure 15-25. Crawled properties
You will not find a link or button to create a new crawled property—remember that the crawler has the responsibility of creating crawled properties, based on discovered content. Looking down the list of available crawled properties (Figure 15-25), you should notice that they do not all have names conducive to their purpose. However, you do not need to concern yourself with the name of crawled properties because you map them to zero or many managed properties, which have friendly names.
Clicking on any of the listed crawled properties shows a page about the crawled property (Figure 15-26). Each crawled property has a Name, Category, Property Set ID, and mappings to managed properties (not all crawled properties map to a managed property, in which case the check box to include the property in the full-text index determines whether values of a given crawled property show up in search results).
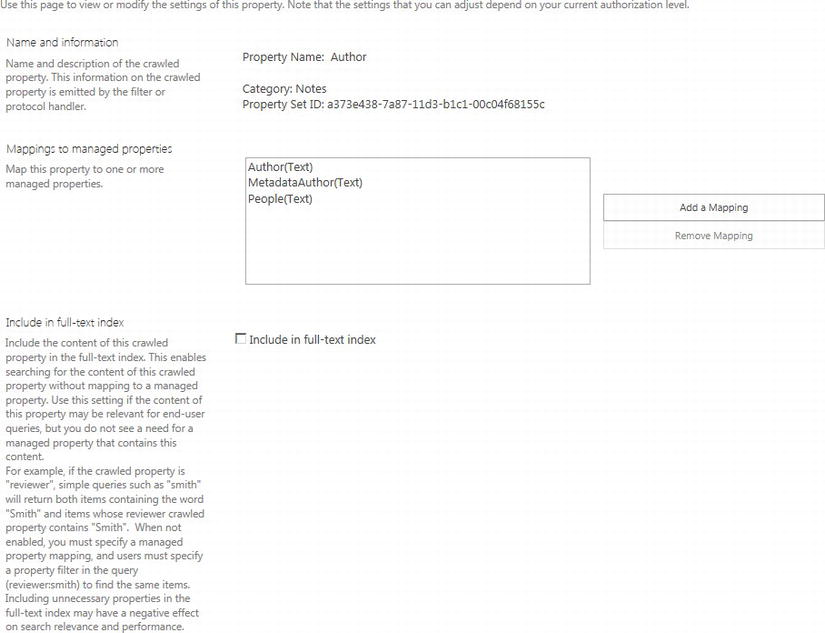
Figure 15-26. Crawled Property Settings page
Microsoft must like the word “Managed,” because SharePoint contains the term in various places: Managed Metadata, Managed Service Applications, Managed Properties, etc. However, in this section I shall focus on managed properties as they belong to search.
Figure 15-27 shows a screenshot from my Managed Properties page in my Search Service Application Administration. To navigate to this page, click the Search Schema link in the left navigation of Search Service Application Administration, then click the Managed Properties. Notice how “Managed Properties” is a nicer name than “Crawled Properties”; this is how managed properties are exposed to end users in search refiners and search filters. Each managed property has a number of settings, as described in Table 15-2.
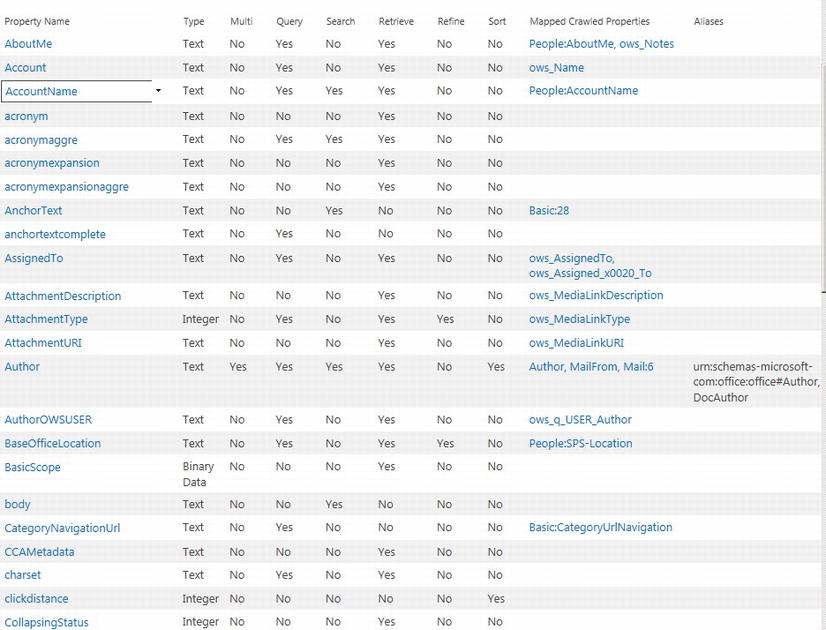
Figure 15-27. Managed properties
Table 15-2. Managed Property Settings
| Setting | Description |
|---|---|
| Property Name | Name of the managed metadata property, name contains no spaces or special characters. |
| Description | Description of the managed property. |
| Type | The type describes the type of data associated with this managed property. Types available are: Text, Integer, Decimal, Date and Time, Yes/No, Double precision float, and Binary. |
| Searchable | SharePoint includes values of this managed property into the full-text index; e.g., if the managed property is “Author” and a user searches for “Smith,” then the search results include all results where the managed property contains an author with the value Smith. |
| Queryable | Allows the search terms to contain the managed property, e.g., Author:Smith, which provides results where the Author property is Smith. This is subtly different from the Searchable settings. |
| Retrievable | SharePoint returns contents of this managed property in search results—this allows you to display managed property values in the search result template. |
| Allow Multiple Values | Allow multiple values of the same type; e.g., if the managed property is Author, and a document has authors Garrett and Kaplan, then searching Author:Garrett or Author:Kaplan will produce the same document result. |
| Refinable | Allows the managed property to appear as a refiner in the search results. Has three values: Yes, No, and Yes Latent. Yes creates a refiner for the property but requires a full crawl; latent does not create a refiner now, but allows flipping from latent to yes, later, without the need of a full crawl. No indicates that this managed property is not a refiner. |
| Sortable | Allows sorting of search results by this managed property, after search execution, such as in cases when the search results are too large to allow search result retrieval and sort at the same time. Has three values: Yes, No, and Yes Latent. Yes allows sorting for the property but requires a full crawl; latent does not allow sorting now, but allows flipping from latent to yes, later, without the need of a full crawl. No indicates that this managed property does not allow sorting. |
| Alias | An alias is another name for a managed property. Use the original managed property name to map to a crawl property and an alias if you would like to use a different name in search results and queries. If you possess insufficient permissions to create managed properties, you may create aliases for existing managed properties. |
| Token Normalization | When checked, the managed properties will return results from the content regardless of case or diacritics (special characters). |
| Complete Matching | When checked, SharePoint will only match results when the value of the managed property matches exactly that of what the user provided; e.g., ID:12345 will only match ID:12345 and not ID:12345678 or ID:12 345 |
| Mappings to Crawled Properties | Maps the managed property to one or many crawled properties. Generally managed properties have at least one crawled property, otherwise they are of little use, whereas crawled properties need no managed property to provide search results. Managed properties can map values to all specified crawled properties, or the first non-empty Crawled Property listed. |
| Company Name Extraction | Enables the system to extract company name entities from the managed property when crawling new or updated items. There is a pre-populated dictionary for company name extraction. The system saves the original managed property content unchanged in the index and, in addition, copies the extracted entities to the managed property “companies.” |
| Custom Entity Extraction | Allows association of custom entity extractor such that content values in this Managed Property appear within custom refiners. |
Query Suggestions show search suggestions as users’ type text into search boxes. SharePoint maintains a list of search terms and a list of terms not to show. You may import and export both lists via text files, as shown in Figure 15-28. The file format calls for one term per line (each term may include spaces).
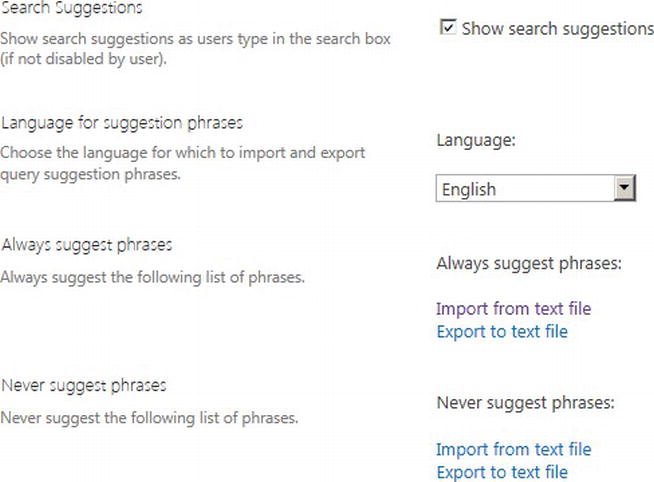
Figure 15-28. Query Suggestions Configuration
Search Dictionaries use the Managed Metadata Term Store to contain dictionaries for storage of company names, people, and spelling. A dictionary – just like a real world dictionary – contains a series of words for classification, only in the case of SharePoint, the dictionaries do not provide English meaning to words, but instead enhance search queries.
Anyone familiar with the Managed Metadata Term Store in SharePoint 2010/2013 will recognize the interface (shown in Figure 15-29) for search dictionaries.
- Open Search Service Application Administration
- Click the link for Search Dictionaries
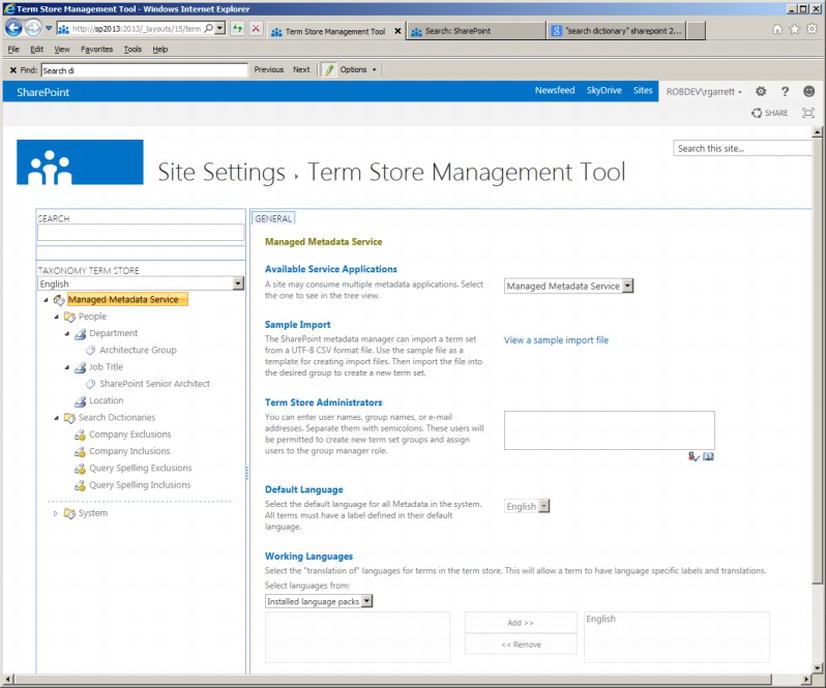
Figure 15-29. Search Dictionaries
The People Dictionary contains a structure for people, consisting of Department, Job Title, and Location. When the Crawler crawls over the people profile store it extracts these field values and populates the values of these fields in the term store under the People node. The terms values provide distinct values for searching people – for example, we can search or filter all people by a specific location and job title, using specific values in the term store.
Figure 15-30 shows an example of searching the People Result Source. The results provide include refiners (on the left) corresponding to the Department, Job Title, and Location (my profile does not happen to include a location). This example is a little thin because I have only one user in my farm, but if I had multiple users then the refiners would contain a selection of locations, departments, and job title values from which to choose.
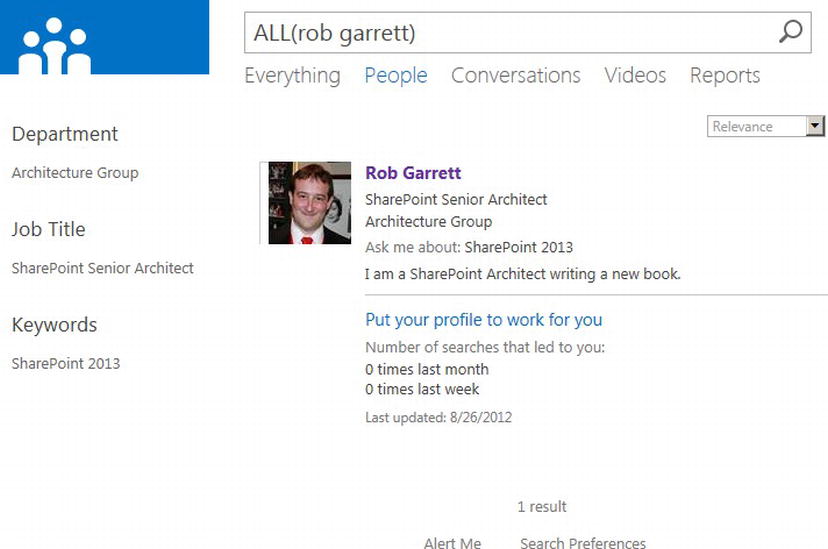
Figure 15-30. Filter by People refiners
In the section about searching managed properties, I briefly described company name extraction. The crawler extracts company names from content and associates this content with the companies’ managed property with the help of a Company dictionary.
Figure 15-31 shows the default search dictionaries provided by SharePoint. The Company Name dictionary consists of Enterprise keyword term sets for inclusions and exclusions. When crawling over content, if the crawler encounters words in the inclusion term set, it then adds the values to the company name managed property. If the crawler encounters words in the exclusion term set, SharePoint ensures no entry for the value in the company’s managed property. The following steps demonstrate adding a new company name to the inclusion and exclusion term sets:
- Open Search Service Application Administration.
- Click Search Dictionaries.
- Click the Managed Metadata Service node.
- Ensure the username of the current user is listed in the Term Store Administrators (if not, add name and click the Save button).
- Click the node Company Inclusions (under the Search Dictionaries group).
- Click the down arrow and add a new term.
- Repeat the last two steps for Company Exclusions.
- Ensure that one of your managed properties (see earlier section) has the check box checked for Company Name extraction.
- Run a full crawl.
- Issue a search, and you should start seeing company name refiners.
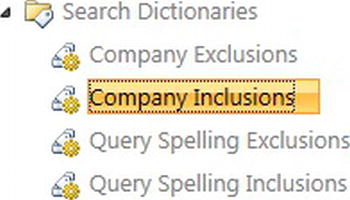
Figure 15-31. Search dictionaries
Similar to the Company Name dictionary, SharePoint provides a Query Spelling dictionary. This dictionary consists of a term set for inclusions and exclusive terms to match spelling. When users enter incorrectly spelled names in the search query box, SharePoint uses the terms in the Query Spelling Inclusion and Query Spelling Exclusion term sets to provide a “Did you mean?” message. I shall provide you an example in the following steps:
- Open Search Service Application Administration.
- Click Search Dictionaries.
- Click the Managed Metadata Service node.
- Ensure that the username of the current user is listed in the Term Store Administrators (if not, add name and click the Save button).
- Click the node Query Spelling Inclusions.
- Click the down arrow and type in the term “SharePoint.”
- Wait 10–15 minutes.
- Run a search for SHAREPINT (intentionally misspelled) in the Search Center.
In the last few subsections, you read how search dictionaries provide search query enhancement with people refiners, company name extraction, and query spelling. You probably thought that it sure would be wonderful if you could create your own custom dictionaries and extractors to match content and provide your own refiners. It turns out that SharePoint 2013 does provide this functionality, and I will show you how, in this section of this chapter.
Before getting into the specifics of custom entities and refiners, I’d like to recap the process by which SharePoint uses the out-of-the-box dictionaries to create refiners.
- SharePoint provides a dictionary, consisting of inclusion and exclusion term sets.
- The search crawler finds a word or term as part of the crawl process.
- The crawler matches the word/term against the inclusion term set.
- If the crawler matches the word/term with a term in the exclusion term set, the word/term is ignored.
- If not, the crawler applies to the word/term a crawl property and mapped managed property.
The process of custom term extraction is similar to the preceding process. The following steps demonstrate how to create a custom extractor for “product names” and how to create a refiner for search results:
- Ensure that you have a content source defined and have completed a full crawl.
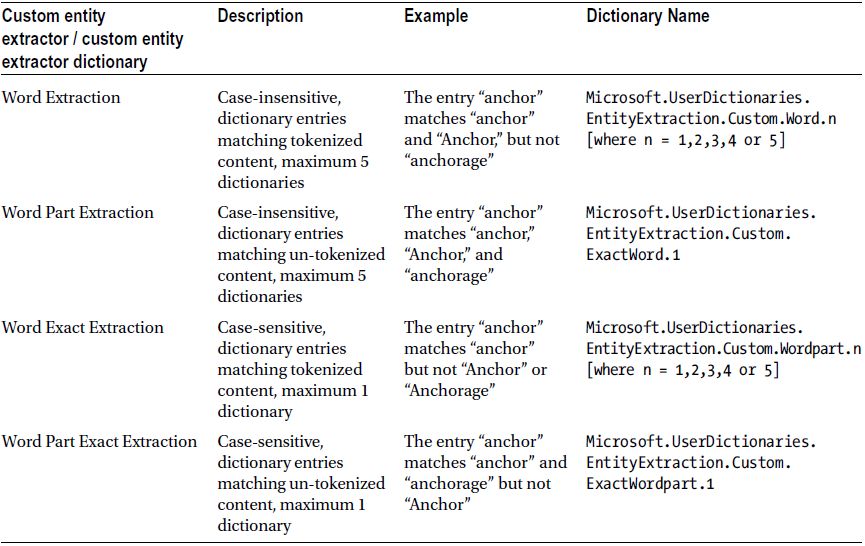
- Decide on the type of entity extraction, using Table 15-3. I shall use “Word Extraction” in my example.
Table 15-3. Entity Extraction Types
- Open PowerShell and execute the following script:
$searchApp = Get-SPEnterpriseSearchServiceApplication
Import-SPEnterpriseSearchCustomExtractionDictionary –SearchApplication $searchApp –Filename <Path> –DictionaryName <Dictionary name> - Provide the CSV file in the file path.
- The dictionary name corresponds to the last column in Table 15-3.
- Create a CSV file with two columns: Key and Display Form.
- Provide rows of keys to match terms and optional display form (display name) for the refiner—if not then the refiner value is the same as the key name.
- Return to Search Service Application Administration.
- Click the Search Schema link.
- Click the Managed Properties link.
- Search for the Managed Property to apply the custom extractor.
- Click the name of the Managed Property to edit the settings.
- Check the custom entity extractor to use (under Custom Entity Extraction), based on Table 15-3.
- Run a full crawl.
- Next, add a custom refiner Web Part to your Search Results page (or use an existing refiner Web Part if already on the page).
- Edit the refiner Web Part settings and add the custom refiner, for example: WordCustomRefiner1.
- Execute a search, and you should see your refiner values showing up.
Picture this scenario: SharePoint has crawled some content and this content is appearing in search results, only someone in the organization is unhappy about it. Someone has asked you to remove a search result from the SharePoint index. How do you go about it?
Lucky for you, SharePoint provides a mechanism for you to remove individual search results, without having to reset the index and re-crawling over all content, after adding exclusion crawl rules.
- Open Search Service Application Administration.
- Click the Search Removal Result link.
- In the page that appears, paste the offending URLs in the “URLs to Remove” box.
- Click the Remove Now link.
- That is all there is to it.
Diagnostics
SharePoint 2013 provides a number of diagnostic tools to assist with performance tuning and error diagnosis. In this section of the chapter, you will explore the tools available as part of the Search Service Application.
Crawling over data does not always go as planned, especially when crawling over data that is outside the SharePoint farm. Perhaps a line of business system is not operational, perhaps an external web site has a too restrictive robots.txt file, maybe SharePoint does not have permission to crawl all folders in a file share . . . the possibilities for failure are endless. Fortunately, SharePoint provides sophisticated crawl logging.
The crawl log is separate to that of the ULS log. The ULS log will certainly contain search-related events, but these tend to be infrastructure related, whereas the crawl log contains events relating to crawling of content sources.
Figure 15-32 shows a screenshot from the Search Service Application in my environment. I have two content sources: the default Local SharePoint sites and a content source to crawl the content of my external blog. Look a little closer at the log details on this page.
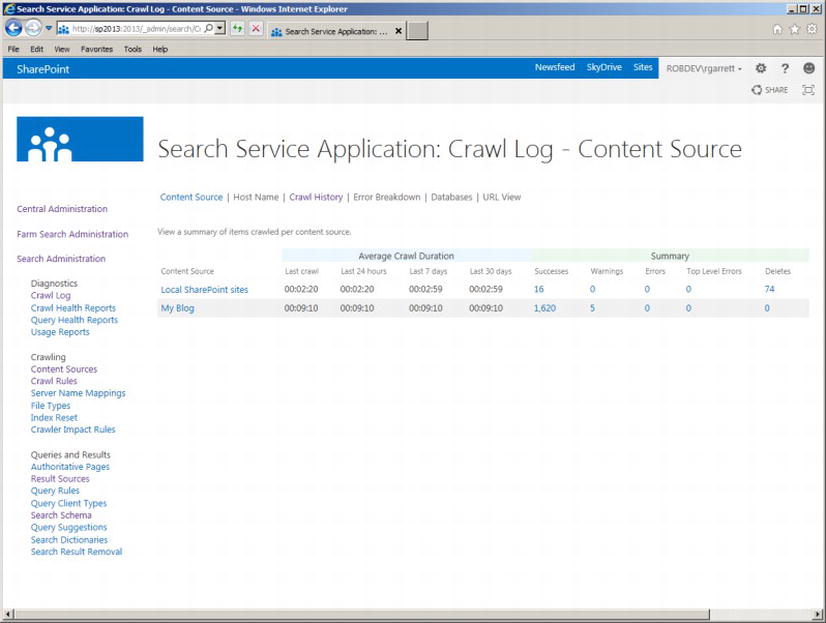
Figure 15-32. Crawl Log page
The summary grid (Figure 15-33) provides crawl durations and a summary count of successes, warnings, errors, and deletes.

Figure 15-33. Crawl log summary
The Average Crawl Duration summary (blue) speaks for itself. It is here you can see the average crawl times over the last 24 hours, 7 days, and 30 days and the duration of the current crawl. A crawl that takes longer than the average duration might suggest an issue with performance and ability to crawl the source. Of course, it could also mean a recent addition of a lot of content at source, and now the crawl takes longer.
The main summary (green) provides a cumulative count of successes, warnings, errors, top-level errors, and deletes. You might be wondering why the crawl processor keeps track of deletions. This is important because as content disappears from the source—perhaps because users delete it or move it elsewhere—you should understand why your search results do not contain the same results now compared to an earlier time. A high number of deletes might suggest that the crawler is unable to crawl parts of the content, and has therefore instructed the indexer to remove entries from the index. Table 15-4 lists the different log classification types and their meaning.
Table 15-4. Crawl Log Classification
| Classification | Meaning |
|---|---|
| Success | The crawler successfully crawled an item, the indexer created an entry in the index, or the index entry was already present. |
| Warning | The crawler found an issue with content, which the crawler crawled, partially crawled, or failed to crawl. In some cases the crawler might crawl some content but the content processor cannot extract content from the item to index the content, which would result in an error. |
| Error | The crawler encountered an error crawling content. These errors include top-level as well as items deeper in the source hierarchy, such as second-level pages in a web site. |
| Top-Level Error | The crawler encountered an issue crawling some content at the entry point of a content source. These errors suggest access issues to the content source, such as not having access to a web site, or a site collection is offline. Top-level errors are a subset of errors. |
| Delete | Deletions are items removed from the index because the content entry is no longer available, perhaps because a user deleted content or a crawl rule excludes the content entry from the index. |
![]() Note The crawl log summary contains cumulative values across multiple content source crawls.
Note The crawl log summary contains cumulative values across multiple content source crawls.
Looking at Figure 15-32, we see the crawler encountered five warnings when crawling my blog, found no errors (which is good!), and successfully crawled 1,620 entries, which the indexer added to the index. I shall click the value for the warning classification so we may view the warnings. After clicking the value, we see a page like that in Figure 15-34.
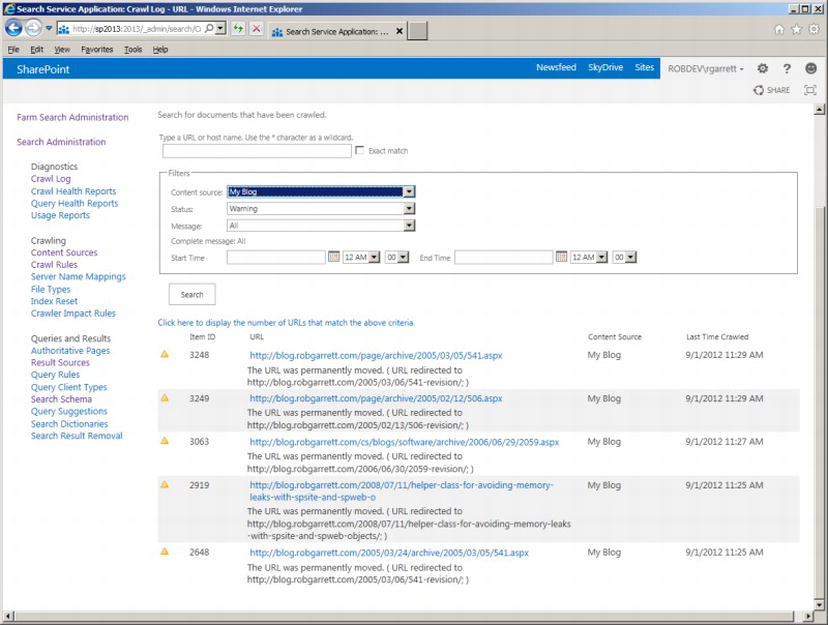
Figure 15-34. Crawl log warnings
The page shown in Figure 15-34 is the same as that for the other classifications. Had I clicked the 1,620 value in the previous page, I would have seen a similar page to that in Figure 15-34, only showing the successes instead of the warnings. The value links in the crawl summary (Figure 15-33) link to the same page with the status filter present. Try changing the status in the filter to another classification, followed by a click of the Search button, to see a different set of log results.
Back to my five warnings—here see that the crawler attempted to crawl some pages in my blog and encountered an HTTP 301, indicating that the content permanently moved to a new location. We see this a lot with public web sites—web site administrators preserve links to old content so that users with bookmarks may still access content at the new location with an HTTP 301 or 302 redirect. In this case, the crawler reported an error to help users understand that the content is available and indexed, but in a different location from that which might be expected.
As I previously mentioned, the crawl log can grow beyond a page with each scheduled crawl attempt. Finding warnings, errors, and successes requires use of the filter controls at the top of the Log page (Figure 15-34). The filter allows you to filter the log based on content source, classification (status), date/time range, and even message type (such as, “the content was permanently moved”). If you know the URL of the content, and are interested, you can provide it in the search box. This feature is especially useful when a user reports, “I searched for x and it did not show up in the search results.”
Returning to the Crawl Log Summary page (Figure 15-32), the Search Service Application provides other details about previous content crawls. See the following links at the top of the page:
- Content Source—shows logs by content source
- Host Name—shows logs by host domain name
- Crawl History—shows statistics on previous crawl attempts (Figure 15-35)
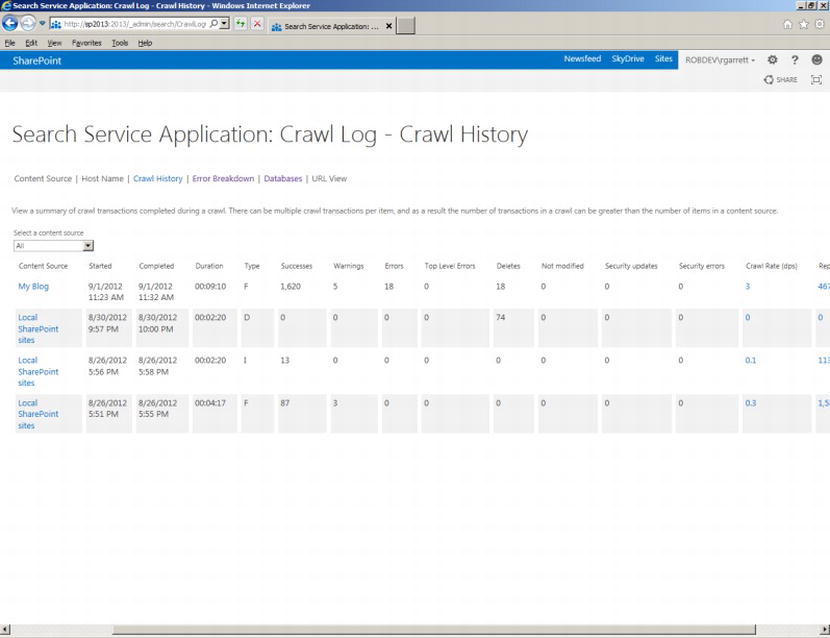
Figure 15-35. Crawl History
- Error Breakdown—provides a breakdown of errors in the crawl log
- Databases—shows the state of databases used by the Search Service Application
- URL View—shows the crawl log filtered by a specific URL
SharePoint provides information on the health of the crawling and content processes via crawl health reports. These reports offer a pictorial view of how search crawling affects system resources. Each of the reports provides the ability to filter by date/time range, and some of the reports provide filtering by content source, search component, and server.
SharePoint 2013 includes the following crawl health reports:
- Crawl Rate—rate of crawl based on item status types
- Crawl Latency—time spent in SQL, adding to repositories, crawl, etc.
- Crawl Queue—shows the historical chart of items in the queue for crawling
- Crawl Freshness—percentage of content that is new versus n days or weeks old
- Content Processing Activity—activity load managed by the content processor
- CPU and Memory Load—resource load taken by crawling
- Continuous Crawl—metrics of the crawler when continuously crawling new or changed content
Figure 15-36 shows a chart from my environment, depicting memory usage by process for the crawling. To access the various crawl health reports, follow these steps:
- Open Search Service Application Administration.
- Click the Crawl Health Reports link.
- Click each of the report type links at the top of the page to access each report type.
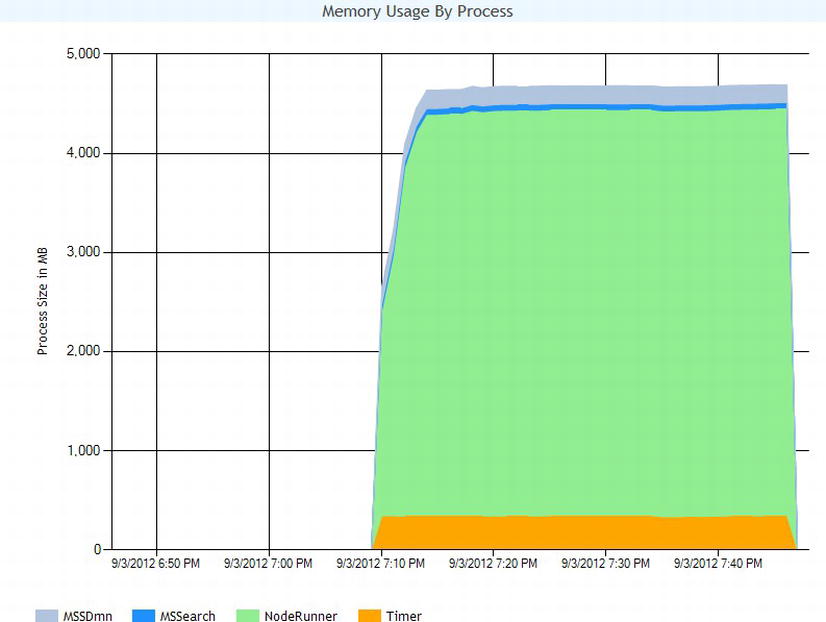
Figure 15-36. Crawl health report—Memory Usage by Process
The query health reports are to query what the crawl health reports are to crawling. SharePoint 2013 closely monitors active searches and results provided to users to provide you with reports on performance of the query components.
SharePoint 2013 includes the following query health reports:
- Trend—query latency over time for different percentile searches
- Overall—query latency over time for server rendering, object model, and back-end processes
- Main Flow—query latency over time based on flow through query processes
- Federation—query latency over time for various federated sources
- SharePoint Search Provider—query latency over time for SharePoint search processes
- People Search Provider—query latency over time for People search processes
- Index Engine—query latency over time for calls to the index
All query health reports provide filtering by date, and some provide filters for client type, server, etc. Figure 15-37 shows a screenshot of the index engine health report in my environment. To access the various query health reports, follow these steps:
- Open Search Service Application Administration.
- Click the Query Health Reports link.
- Click each of the report type links at the top of the page to access each report type.
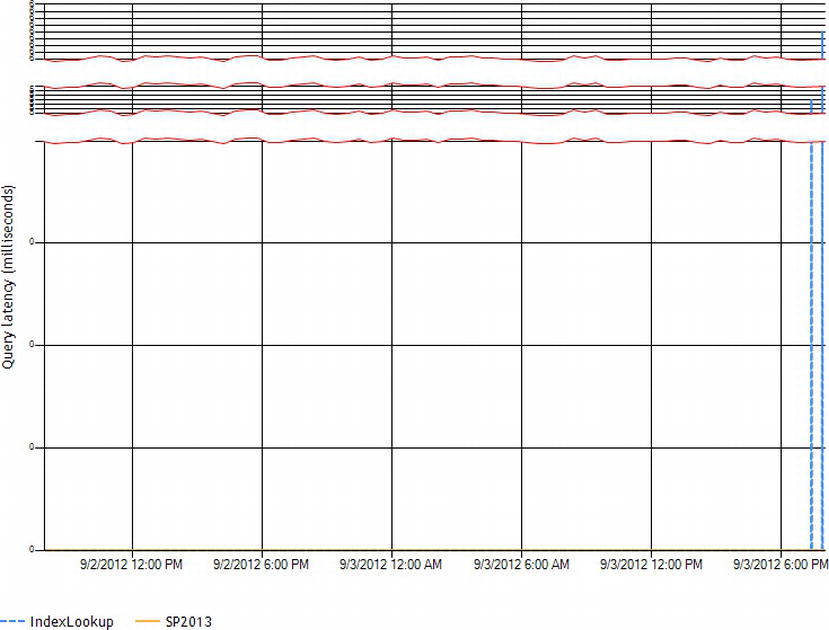
Figure 15-37. Query health report—Index Engine
Usage reports provide a series of Excel documents that detail historical data about how users are using SharePoint 2013 search. Examples include top queries by day and month and no result queries. You may download these reports and distribute them to content owners and marketing individuals in your organization, so they can gain an understanding of what users search and the results they look to obtain. The query analysis component is mainly responsible for the generation of data in these reports.
To access the various usage reports, follow these steps:
- Open Search Service Application Administration.
- Click the Usage Reports link.
- Click each of the report type links at the top of the page to access each report type. Figure 15-38 shows a screenshot of the various available usage reports.
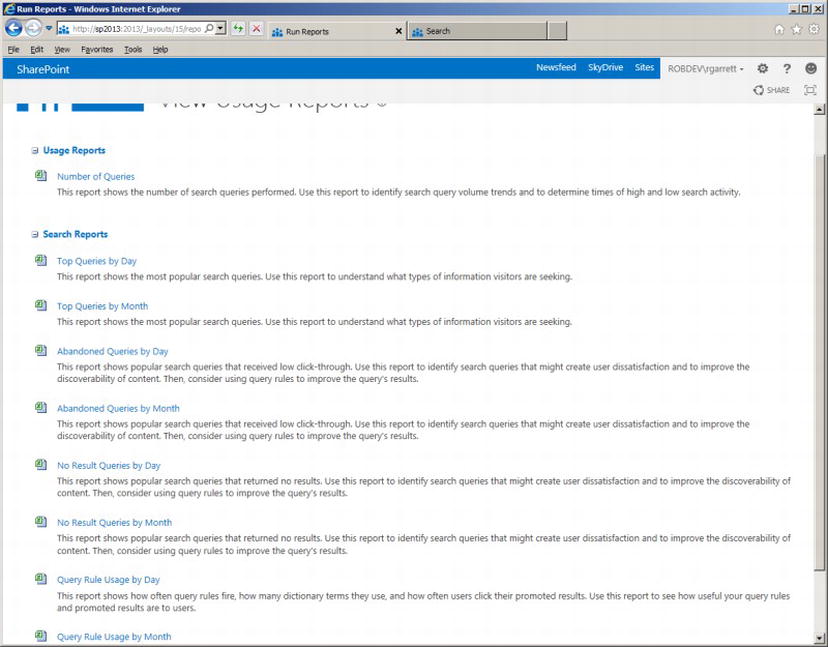
Figure 15-38. Usage reports
Summary
Search is a large SharePoint topic, and is very important to allow your users the ability to find content in your SharePoint farm. In this chapter, my aim was to break down the various parts of search—much of which we have inherited from FAST ESP.
To start with, I introduced the new SharePoint 2013 Search Architecture and how the various components come together to provide crawl, content processing, indexing, and query capabilities. I demonstrated how to create a new Search Service Application and access its configuration via the Search Service Application Administration pages. Using PowerShell, I demonstrated how to provide redundancy and load distribution of search components across various SharePoint servers as part of search topology design.
I dissected the crawling and querying aspects of a typical Search Service Application and introduced a number of new features and features brought over from SharePoint 2010.
Finally, I completed this chapter with an overview of the various reporting and diagnostic tools to triage issues with performance or search component errors.
I hope that this chapter gave you enough information to understand the major components of SharePoint 2013 search. In approximately 60 pages, I attempted to impart knowledge on all areas of the search platform, a subject about which others have written complete books.
In my next chapter, Chapter 16, you will read about SharePoint designer and branding.