![]()
Local Data Access I: JET API and Application Data
In the last chapter we learned to use IndexedDB as one of the local storage options. Continuing in this chapter, we learn few more local storage options, namely JET API and application storage by creating a Windows 8 Password Manager app using XAML/C#.
What Is ESENT/Jet API?
ESENT/JET API is an Indexed Sequential Access Method (ISAM) data storage technology from Microsoft. ESENT runtime has been a part of Windows since Windows 2000 and has been used in products like Microsoft Exchange, Active Directory, Windows Update, and Desktop Search. This application stores and retrieves data from tables using indexed or sequential cursor navigation.
Why to Use ESENT/Jet API
We can use ESENT for applications that need reliable, high-performance, low-overhead storage of structured or semistructured data. The ESENT engine can help with data needs ranging from something as simple as a hash table that is too large to store in memory to something more complex, such as an application with tables, columns, and indexes.
ESENT incorporates all the benefit on the ISAM data storage technique like the following:
- ACID transaction
- Snapshot isolation
- Concurrent access storage
- Cursor navigation
- Advanced indexing: Indexing over multivalued columns, sparse, and tuple
- Fixed, variable, and tagged columns
- Data integrity and consistency
- Column size ranging from 1 bit to 2 GB
Building Password Manager App
Password Manager App helps to store bank information, financial information, health information, website logins, online subscriptions, credit cards, insurance, and everything else one needs to keep private in a single location for easy access.
Setting Up the Development Environment
To start, we first create a new Windows Store Blank App (XAML) project and name it PasswordManager. This app will have two XAML pages. MainPage.xaml is the start page and will list all the stored password information in the database. PasswordDetail.xaml is used for either adding, deleting, or updating passwords.
We will create a database, _PasswordDB that contains two tables via Categories and Passwords. We will add two POCO classes, Category (see Listing 5-1) and Password, to the project’s Models folder that will represent the table and the structure of these two classes will mimic the columns of the tables.
Category is a lookup table that we use to categorize the passwords into Bank, Insurance, Website, Subscription, and other categories.
Listing 5-1. Category POCO Class Representing Category Table
public class Category
{
    public int CategoryId { get; set; }
    public string CategoryName { get; set; }
}
The Password table holds the password information (see Listing 5-2).
Listing 5-2. Password Class Stores the Password Details
public class Password
{
    public Guid PasswordId { get; set; }
    public string Title { get; set; }
    public string UserName { get; set; }
    public string Passcode { get; set; }
    public string WebSite { get; set; }
    public string Key { get; set; }
    public int CategoryId { get; set; }
    public string Note { get; set; }
}
To make things interesting we will use both the ESENT database and application data storage as storage options for this app. Application data storage is place where Windows 8 apps can store data into local, temp, and roaming folders using classes under the Windows.Storage namespace.We learn more about Windows 8 application data storage later in this chapter.
For using two different storage options within a single app we create an interface IDataRespository (see Listing 5-1) and two separate classes, JetDataRepository and ApplicationDataRepository, that explicitly implement the methods of the IDataRespository interface. The IDataRespository interface has various methods that allow us to create, instantiate a database, and put, get and delete data, as shown in Listing 5-3.
Listing 5-3. Defining the Interface to Create, Modify, Read, Get, and Delete Data
public interface IDataRepository
{
    void CreateInstance();
    void AddCategory(Category cat);
    void DeletePassword(Guid id);
    void SavePassword(Password pwd, bool isnew);
    List<Category> GetCategories();
    List<Password> GetAllPasswords();
}
To create, add, modify, and delete data with in ESENT and application data, we add the references of the following DLLs to the project under references.
- ManagedEsent
- WinRT Filebased Database
The ESENT database engine is native to Windows, so to use that within the managed enviroment we need to create a managed ESENT interop layer. Instead of writing one, we will be using an exisitng one, ManagedEsent. ManagedEsent provides managed access to ESENT, the embeddable database engine native to Windows. ManagedEsent uses the esent.dll that is part of Microsoft Windows so there are no extra unmanaged binaries to download and install.
Similarly, instead of building a database from scratch that serializes objects and stores them in application storage, we will use an existing one called WinRT File Based Database available in NuGet by referencing it within our project. WinRT File Based Database includes a simple, yet effective API that allows to create tables based on classes. Each database consists of any number of tables. All operations are asynchronous to support Windows 8 style operations on the file system. It also supports horizontal partitioning of tables to provide for smaller files and faster operations.
The references of these two DLLs are added from NuGet packages as shown in Figure 5-1.
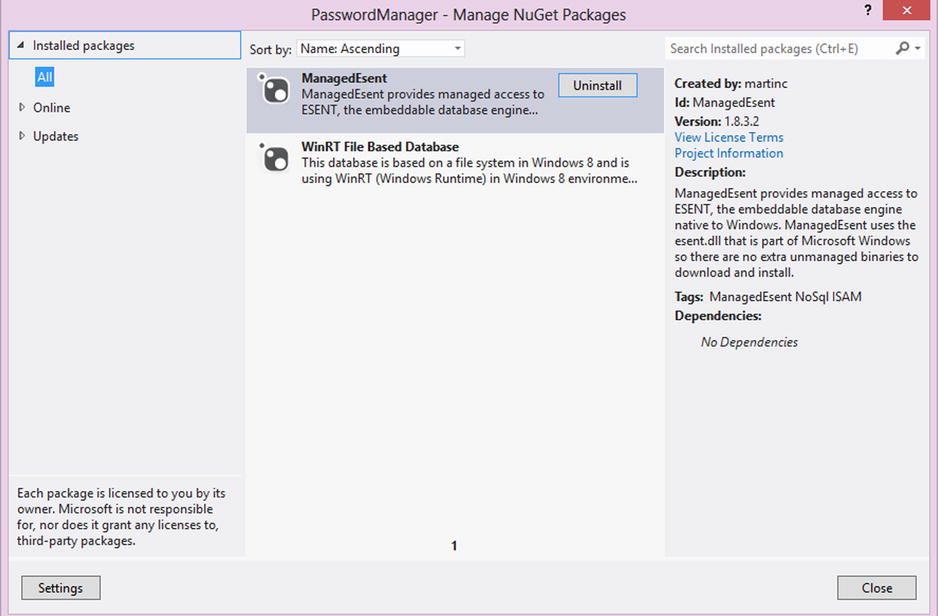
Figure 5-1. Using NuGet to add references to ManagedEsent and WinRT database
With all the files in place, our Password Manager App solution explorer will look like the one shown in Figure 5-2. Now we will look into the classes JetDataRepository and ApplicationDataRepository that implement the IDataRepository interface.
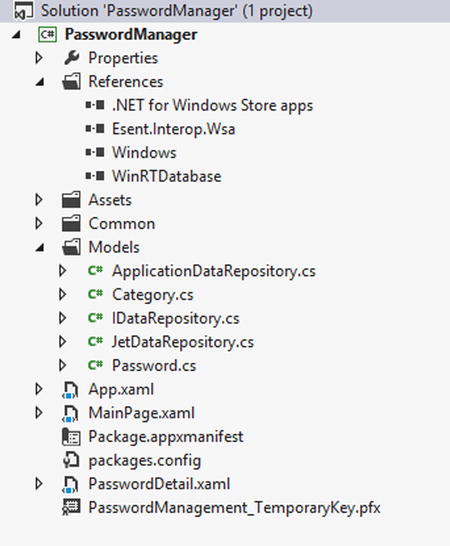
Figure 5-2. Password Manager Windows 8 App project structure
Creating ESENT Data Repository
JetDataRepository implements IDataRepository and is used to store data into the ESENT database. The CreateInstance method is used to create an instance of the ESENT database (see Listing 5-4). In this method we build the database file path and then pass the path to the Instance class which is part of the ManagedEsent API. The Instance class wraps a JET_INSTANCE along with JetInit and JetTerm. This class inherits from SafeHandle to make sure that ESENT instances are always terminated.
Listing 5-4. Using CreateInstance to Create an ESENT Instance
public void CreateInstance()
{
    _instancePath = Path.Combine(ApplicationData.Current.LocalFolder.Path, DatabaseName);
    _databasePath = Path.Combine(_instancePath, "_Password.edb");
    _instance = new Instance(_databasePath);
    _instance.Parameters.CreatePathIfNotExist = true;
    _instance.Parameters.TempDirectory = Path.Combine(_instancePath, "temp");
    _instance.Parameters.SystemDirectory = Path.Combine(_instancePath, "system");
    _instance.Parameters.LogFileDirectory = Path.Combine(_instancePath, "logs");
    _instance.Parameters.Recovery = true;
    _instance.Parameters.CircularLog = true;
    _instance.Init();
    CreateDatabase();
}
![]() Note A single ESENT instance can include up to six databases and provide a shared transaction log for all attached databases.
Note A single ESENT instance can include up to six databases and provide a shared transaction log for all attached databases.
Next we add another method, CreateDatabase, which is called inside the CreateInstance method, as shown in Listing 5-5.
Listing 5-5. Creating the ESENT Database and Tables
private async void CreateDatabase()
{
if (await IsFileExist(_databasePath))
return;
using (var session = new Session(_instance))
{
JET_DBID database;
Api.JetCreateDatabase(session
, _databasePath
, null
, out database
, CreateDatabaseGrbit.None);
// create database schema
using (var transaction = new Transaction(session))
{
//Schema for Category Table
JET_TABLEID categoryTableId;
Api.JetCreateTable(session
, database
, "Categories" //table name
, 1
, 100
, out categoryTableId);
JET_COLUMNID categoryColumnid;
//CategoryId column
Api.JetAddColumn(session
, categoryTableId
, "CategoryId" //column name
, new JET_COLUMNDEF
{
cbMax = 16,
coltyp = JET_coltyp.IEEESingle,
grbit = ColumndefGrbit.ColumnFixed | ColumndefGrbit.ColumnNotNULL
}
, null
, 0
, out categoryColumnid);
//CategoryName column
Api.JetAddColumn(session
, categoryTableId
, "CategoryName" //column name
, new JET_COLUMNDEF
{
coltyp = JET_coltyp.LongText,
cp = JET_CP.Unicode,
grbit = ColumndefGrbit.None
}, null, 0, out categoryColumnid);
//Creating Index
var categoryindexDef = "+CategoryId��";
Api.JetCreateIndex(session
, categoryTableId
, "CategoryId_index" //index name
, CreateIndexGrbit.IndexPrimary
, categoryindexDef
, categoryindexDef.Length
, 100);
//Schema for Password table
JET_TABLEID passwordTableid;
Api.JetCreateTable(session
, database
, "Passwords" //table name
, 1
, 100
, out passwordTableid);
//creating columns for Password tables
JET_COLUMNID passwordColumnid;
Api.JetAddColumn(session
, passwordTableid
, "PasswordId" //column name
, new JET_COLUMNDEF
{
cbMax = 16,
coltyp = JET_coltyp.Binary,
grbit = ColumndefGrbit.ColumnFixed | ColumndefGrbit.ColumnNotNULL
}
, null
, 0
, out passwordColumnid);
Api.JetAddColumn(session
, passwordTableid
, "Title" //column name
, new JET_COLUMNDEF
{
coltyp = JET_coltyp.LongText,
cp = JET_CP.Unicode,
grbit = ColumndefGrbit.None
}
, null
, 0
, out passwordColumnid);
Api.JetAddColumn(session
, passwordTableid
, "UserName" //column name
, new JET_COLUMNDEF
{
coltyp = JET_coltyp.LongText,
cp = JET_CP.Unicode,
grbit = ColumndefGrbit.None
}
, null
, 0
, out passwordColumnid);
Api.JetAddColumn(session
, passwordTableid
, "Passcode" //column name
, new JET_COLUMNDEF
{
coltyp = JET_coltyp.LongText,
cp = JET_CP.Unicode,
grbit = ColumndefGrbit.None
}
, null
, 0
, out passwordColumnid);
Api.JetAddColumn(session
, passwordTableid
, "WebSite" //column name
, new JET_COLUMNDEF
{
coltyp = JET_coltyp.LongText,
cp = JET_CP.Unicode,
grbit = ColumndefGrbit.None
}
, null
, 0
, out passwordColumnid);
Api.JetAddColumn(session
, passwordTableid
, "Key" //column name
, new JET_COLUMNDEF
{
coltyp = JET_coltyp.LongText,
cp = JET_CP.Unicode,
grbit = ColumndefGrbit.None
}
, null
, 0
, out passwordColumnid);
Api.JetAddColumn(session
, passwordTableid
, "CategoryId" //column name
, new JET_COLUMNDEF
{
coltyp = JET_coltyp.IEEESingle,
cp = JET_CP.Unicode,
grbit = ColumndefGrbit.None
}
, null
, 0
, out passwordColumnid);
Api.JetAddColumn(session
, passwordTableid
, "Note" //column name
, new JET_COLUMNDEF
{
coltyp = JET_coltyp.LongText,
cp = JET_CP.Unicode,
grbit = ColumndefGrbit.None
}
, null
, 0
, out passwordColumnid);
//creating index for Passwords table
var indexDef = "+PasswordId��";
Api.JetCreateIndex(session
, passwordTableid
, "PasswordId_index" //index name
, CreateIndexGrbit.IndexPrimary
, indexDef
, indexDef.Length
, 100);
transaction.Commit(CommitTransactionGrbit.None);
}
Api.JetCloseDatabase(session, database, CloseDatabaseGrbit.None);
Api.JetDetachDatabase(session, _databasePath);
}
//Add defult values to the database table
CreateDefaultData();
}
Once the database and the tables are created we can populate the tables with default categories and some test password data, after which we call the CreateDefaultData method within CreateDatabase as shown in Listing 5-6.
Listing 5-6. Inserting Default Values to the Categories and Passwords Table
private void CreateDefaultData()
{
    //Adding categories
    AddCategory(new Category {
        CategoryId = 1
        , CategoryName = "Bank"
    });
    AddCategory(new Category {
        CategoryId = 2
        , CategoryName = "Web Site"
    });

    //Adding password
    SavePassword(new Password {
        PasswordId = Guid.NewGuid()
        , Title = "Capital One"
        , UserName = "vinodh-kumar"
        , WebSite = " www.capitalone.com "
        , Passcode = "book8data"
        , CategoryId = 1
    }
    , true);
    SavePassword(new Password {
        PasswordId = Guid.NewGuid()
        , Title = "Bank of America"
        , UserName = "vinodh-kumar"
        , Passcode = "boa8data"
        , CategoryId = 1
        , Key = "3121"
        , WebSite = " www.bankofamerica.com "
    }
    , true);
}
CreateDefaultData calls the AddCategory and SavePassword methods to add new rows to the Categories and Passwords tables. We have to carry out the following activities to interact with ESENT data (see Listing 5-7).
- Create a new session using the Instance object.
- Attach the database to the session and open it.
- Start a new transaction for this session.
- Within the transaction, select the active table that we want to work with.
- Data manipulations like updating or deleting rows in the table can be carried out.
Listing 5-7. Adding Data to the Categories Table
public void AddCategory
(Category ev)
{
    using (var session = new Session(_instance))
    {
        JET_DBID dbid;
        Api.JetAttachDatabase(session
            , _databasePath
            , AttachDatabaseGrbit.None);
        //Opening database
        Api.JetOpenDatabase(session
            , _databasePath
            , String.Empty
            , out dbid
            , OpenDatabaseGrbit.None);
        //within a transaction
        using (var transaction = new Transaction(session))
        {
            //opening the table
            using (var table = new Table(session
                , dbid
                , "Categories"
                , OpenTableGrbit.None))
            {
                //inserting row
                using (var updater = new Update(session, table, JET_prep.Insert))
                {
                    var columnId = Api.GetTableColumnid(session
                        , table
                        , "CategoryId"); //to CategoryId column
                    Api.SetColumn(session
                        , table
                        , columnId
                        , ev.CategoryId);

                    var columnDesc = Api.GetTableColumnid(session
                        , table
                        , "CategoryName"); //to CategoryName column
                    Api.SetColumn(session
                        , table
                        , columnDesc
                        , ev.CategoryName
                        , Encoding.Unicode);

                    updater.Save();
                }
            }
            transaction.Commit(CommitTransactionGrbit.LazyFlush);
        }
    }
}
As mentioned earlier, whenever we interact with ESENT data, we have to create a session, attach and open the database, and start a transaction. Going forward, we encapsulate all the previously mentioned activities for the Passwords table within the ExecuteInTransaction method and will use this method for interaction (CRUD) with the Passwords table, as shown in Listing 5-8.
Listing 5-8. ExecuteInTransaction Encapsulates ESENT Activities
private IList<Password> ExecuteInTransaction(Func<Session, Table, IList<Password>> dataFunc)
{
    IList<Password> results;
    using (var session = new Session(_instance))
    {
        JET_DBID dbid;
        Api.JetAttachDatabase(session, _databasePath, AttachDatabaseGrbit.None);
        Api.JetOpenDatabase(session, _databasePath, String.Empty, out dbid, OpenDatabaseGrbit.None);
        using (var transaction = new Transaction(session))
        {
            using (var table = new Table(session, dbid, "Passwords", OpenTableGrbit.None))
            {
                results = dataFunc(session, table);
            }

            transaction.Commit(CommitTransactionGrbit.None);
        }
    }

    return results;
}
Next, we’ll add a method, SavePassword, that uses the ExecuteInTransaction (see Listing 5-8) method. This method takes the Password object as one of the parameters and sets the values to the corresponding columns in the Passwords table. When the Save method within the ESENT’s Update object is called, as shown in Listing 5-9, it will insert or update a row to the Passwords table.
Listing 5-9. Add or Update a Password to the Passwords Table
public void SavePassword(Password pwd, bool isnew)
{
    ExecuteInTransaction((session, table) =>
        {
            using (var updater = new Update(session, table, isnew ? JET_prep.Insert : JET_prep.Replace))
            {
                //set the password id depending on the isnew parameter
                if (isnew)
                {
                    var columnId = Api.GetTableColumnid(session, table, "PasswordId");
                    Api.SetColumn(session, table, columnId, pwd.PasswordId);
                }
                //Title
                var columnTitle = Api.GetTableColumnid(session, table, "Title");
                Api.SetColumn(session, table, columnTitle, pwd.Title, Encoding.Unicode);
                //UserName
                var columnUserName = Api.GetTableColumnid(session, table, "UserName");
                Api.SetColumn(session, table, columnUserName, pwd.UserName, Encoding.Unicode);
                //Passcode
                var columnPasscode = Api.GetTableColumnid(session, table, "Passcode");
                Api.SetColumn(session, table, columnPasscode, pwd.Passcode, Encoding.Unicode);
                //WebSite
                var columnWebSite = Api.GetTableColumnid(session, table, "WebSite");
                Api.SetColumn(session, table, columnWebSite, pwd.WebSite, Encoding.Unicode);
                //Key
                var columnKey = Api.GetTableColumnid(session, table, "Key");
                Api.SetColumn(session, table, columnKey, pwd.Key, Encoding.Unicode);
                //CategoryId
                var columnCategoryId = Api.GetTableColumnid(session, table, "CategoryId");
                Api.SetColumn(session, table, columnCategoryId, pwd.CategoryId);
                //Note
                var columnNote = Api.GetTableColumnid(session, table, "Note");
                Api.SetColumn(session, table, columnNote, pwd.Note, Encoding.Unicode);

                updater.Save();
            }
            return null;
        });
}
Similar to the SavePassword (see Listing 5-9) method, DeletePassword also calls the ExecuteInTransaction method (see Listing 5-8) to set up the ESENT for deleting a row from the Passwords table. In this method we take password ID as the parameter and seek a key that matches our password ID using JET API’s MakeKey method and then use JetDelete to delete the selected record, as shown in Listing 5-10.
Listing 5-10. Using DeletePassword to Delete Rows from Passwords Table
public void DeletePassword(Guid id)
{
    ExecuteInTransaction((session, table) =>
    {
        Api.JetSetCurrentIndex(session, table, null);
        Api.MakeKey(session, table, id, MakeKeyGrbit.NewKey);
        if (Api.TrySeek(session, table, SeekGrbit.SeekEQ))
        {
            Api.JetDelete(session, table);
        }
        return null;
    });
}
Similar to the previous two methods, first we’ll call ExecuteInTransaction and then will use JET API’s TryMoveFirst and TryMoveNext methods to loop through all the records with in the Passwords table and pass the record currently under construction to the GetPassword method. GetPassword uses JetRetrieveColumn to get the values for all the columns and assigns them to the corressponding Property of the Password object. Once retrieved, the Password object is added to the collections (see Listing 5-11).
Listing 5-11. Retrieving Passwords from Passwords Table
public List<Password> GetAllPasswords()
{
    List<Password> results = null;
    ExecuteInTransaction((session, table) =>
    {
        results = new List<Password>();
        if (Api.TryMoveFirst(session, table))
        {
            do
            {
                //Call GetPassword method to create password object
                //from the table row
                results.Add(GetPassword(session, table));
            }
            while (Api.TryMoveNext(session, table));
        }
        return results;
    });
    return results;
}

private Password GetPassword(Session session, Table table)
{
    var password = new Password();
    //retrieving PasswordId column
    var columnId = Api.GetTableColumnid(session, table, "PasswordId");
    //assigning it to the PasswordId property
    password.PasswordId = Api.RetrieveColumnAsGuid(session, table, columnId) ?? Guid.Empty;
    //retrieving Title
    var columnTitle = Api.GetTableColumnid(session, table, "Title");
    password.Title = Api.RetrieveColumnAsString(session, table, columnTitle, Encoding.Unicode);
    //retrieving UserName
    var columnUsername = Api.GetTableColumnid(session, table, "UserName");
    password.UserName = Api.RetrieveColumnAsString(session, table, columnUsername, Encoding.Unicode);
    //retrieving Passcode
    var columnPasscode = Api.GetTableColumnid(session, table, "Passcode");
    password.Passcode = Api.RetrieveColumnAsString(session, table, columnPasscode, Encoding.Unicode);
    //retrieving WebSite
    var columnWebSite = Api.GetTableColumnid(session, table, "WebSite");
    password.WebSite = Api.RetrieveColumnAsString(session, table, columnWebSite, Encoding.Unicode);
    //retrieving Key
    var columnKey = Api.GetTableColumnid(session, table, "Key");
    password.Key = Api.RetrieveColumnAsString(session, table, columnKey, Encoding.Unicode);
    //retrieving Note
    var columnNote = Api.GetTableColumnid(session, table, "Note");
    password.Note = Api.RetrieveColumnAsString(session, table, columnNote, Encoding.Unicode);
    //retrieving CategoryId
    var columnCategoryId = Api.GetTableColumnid(session, table, "CategoryId");
    password.CategoryId = Api.RetrieveColumnAsInt32(session, table, columnCategoryId) ?? -1;
    return password;
}
As all of the IDataRepository methods are implemented in JetDataRepository, we will do the same for ApplicationDataRepository, which is used for storing data in application storage. Before going further, a brief introduction to application data storage is in order.
Using Application Data Storage
Every app installed in Windows 8/RT will be allocated space for storing application data. This application storage can be used to store an app’s settings, preferences, context, app status, and files. It cannot be accessed by the other apps and will be accessed only using the APIs provided in WinRT.
For storing and retrieving application data we should use the ApplicationData class, which is a part of the Windows.Store namespace. This data can be stored in three different ways.
- Local application data : Stores the data locally. Use local storage only if you have good reason not to roam the setting to the cloud.
- Roaming application data : Data will be synced across all the devices on which the user has installed the app. If we use roaming and the user doesn’t have a Microsoft account, then it will be stored locally.
- Temporary application data : Data is stored temporarily during an application session and can be removed any time by a system maintenance task.
With this very brief introduction to application data storage, we now implement the IDataRepository methods in the ApplicationDataRepository class. All the methods in the ApplicationDataRepository class are straight forward and we briefly look at each one of them.
WinRT File Based Database
WinRT File Based Database is a file-system-based database written using the WinRT framework. This API allows us to create tables based on classes. Each database consists of many tables and these tables are serialized and stored in application data storage.
Like the ESANT database, the first thing we do within the CreateInstance method, shown in Listing 5-12, is to create the database and the tables if it doesn’t already exist. If it already exists, we open the database and retrieve and assign the table objects to the corresponding properties in the ApplicationDataRepository class.
Listing 5-12. Creating the Application Storage Database and Tables
public async void CreateInstance()
{
    var exists = await Database.DoesDatabaseExistsAsync(DatabaseName
        , StorageLocation.Local);
    if (!exists)
    {
        _database = await Database.CreateDatabaseAsync(DatabaseName
            , StorageLocation.Local);
        _database.CreateTable<Category>();
        _database.CreateTable<Password>();

        var categoriesTable  = await _database.Table<Category>();
        var passwordsTable  = await _database.Table<Password>();

        Categories = categoriesTable;
        Passwords = passwordsTable;
        CreateDefaultData();

        SaveResult result =  await _database.SaveAsync();
        if (result.Error == null)
        {
            Debug.WriteLine(result.Error == null ?
                "Database created with Defult data"
                : result.Error.Message);
        }
    }
    else
    {
        _database = await Database.OpenDatabaseAsync(DatabaseName
            , true
            , StorageLocation.Local);
        Categories = await _database.Table<Category>();
        Passwords = await _database.Table<Password>();
    }
}

public Table<Category> Categories
{ get; set; }

public Table<Password> Passwords
{ get; set; }
Next, we insert default values into the Categories tables and test data in the Passwords table using the CreateDefaultData method, shown in Listing 5-13, which is called inside the CreateInstance method in a way that is very similar to the one we had in JetDataRepository.
Listing 5-13. Using CreateDefaultData to Insert Default Values into the Table
private void CreateDefaultData()
{
    //Adding categories
    Categories.Add(new Category
    {
        CategoryId = 1
        , CategoryName = "Bank"
    });
    Categories.Add(new Category
    {
        CategoryId = 2
        , CategoryName = "Web Site"
    });

    //Adding password
    Passwords.Add(new Password
    {
        PasswordId = Guid.NewGuid()
        , Title = "Capital One"
        , UserName = "vinodh-kumar"
        , WebSite = " www.capitalone.com "
        , Passcode = "book8data"
        , CategoryId = 1
    });
    Passwords.Add(new Password
    {
        PasswordId = Guid.NewGuid()
        , Title = "Bank of America"
        , UserName = "vinodh-kumar"
        , Passcode = "boa8data"
        , CategoryId = 1
        , Key = "3121"
        , WebSite = " www.bankofamerica.com "
    });
}
The AddCategory method takes a Category object as a parameter and adds it to the Categories collection. It then makes an async call to the Save method of the database instance of the WinRT File Based Database as shown in Listing 5-14. This Save method serializes the Categories object and stores it in the application data storage.
Listing 5-14. Using AddCategory to Add a Row to the Category Table
public async void AddCategory(Category category)
{
    Categories.Add(category);
    SaveResult result = await _database.SaveAsync();
    if (result.Error == null)
    {
        Debug.WriteLine(result.Error == null
            ? "Saved Category"
            : result.Error.Message);
    }
}
Similar to the AddCategory method, the SavePassword method takes the Password object as a parameter and adds it to the Passwords collection if it is new, and then calls the database object Save method, as shown in Listing 5-15.
Listing 5-15. Using SavePassword to Add or Update Rows in the Password Table
public async void SavePassword(Password password, bool isnew=true)
{
    if (isnew)
    {
        Passwords.Add(password);
    }
    SaveResult result = await _database.SaveAsync();
    if (result.Error == null)
    {
        Debug.WriteLine(result.Error == null
            ? "Saved Password"
            : result.Error.Message);
    }
}
The DeletePassword method deletes the Password row from the Passwords table, as shown in Listing 5-16. This method takes the password ID as a parameter and uses it to get the Password object corresponding to that password ID. This Password object is then removed from the Passwords collection before calling the database object Save method to remove the row permanently from the Passwords table.
Listing 5-16. Using DeletePassword to Delete a Row from Passwords Table
public async void DeletePassword(Guid id)
{
    var password = Passwords.Where(p => p.PasswordId == id).FirstOrDefault();
    Passwords.Remove(password);
    SaveResult result = await _database.SaveAsync();
    if (result.Error == null)
    {
        Debug.WriteLine(result.Error == null
            ? "Delete Password"
            : result.Error.Message);
    }
}
The GetCategories and GetAllPasswords methods will list the Categories and Password data, as shown in Listing 5-17.
Listing 5-17. GetCategories and GetAllPasswords Are Used to Retrieve Data from Tables
public List<Category> GetCategories()
{
    if (Categories == null) return null;
    return Categories.ToList();
}

public List<Password> GetAllPasswords()
{
    if (Passwords == null) return null;
    return Passwords.ToList();
}
Now with all the CRUD methods in place we will integrate the database into our Password Manager app. The first thing we do is to create an instance of both of the Repository classes in the App.xaml Launch event and call the CreateInstance method. We also assign the instances to the PasswordDB property so that it can be used across the app. Even though we will be integrating two different storage methods, we will be able to use only one database at a time for the Password Manager app. The ideal place to add this database switch is in the app setting page, but for brevity, here we instead create a Boolean property that can be changed manually before running the application. See Listing 5-19.
Listing 5-19. OnLaunched Will Create an Instance of DataRepository Class
protected override void OnLaunched(LaunchActivatedEventArgs args)
{
    Frame rootFrame = Window.Current.Content as Frame;
    //app defualts to application data storage
    //change the  UseApplicationStorage = false for Jet Datastorage
    UseApplicationStorage = true;
    IDataRepository dr = null;
    if (UseApplicationStorage)
    {
        dr = new ApplicationDataRepository();
    }
    else
    {
        dr = new JetDataRepository();
    }
    dr.CreateInstance();
    App.PasswordDB = dr;
    // omitted for brevity
}

public static IDataRepository PasswordDB
{
    get;
    set;
}

public static bool  UseApplicationStorage
{
    get;
    set;
}
MainPage.xaml is the start page of this app (see Figure 5-3). This page contains a GridView control that lists all the passwords stored in the Passwords table. The layout out of each item in the GridView is driven by a PasswordDataTemplate. This template is very similar to the BookDataTemplate that we used to display the New York Times Best Sellers list in Chapter 1. MainPage.xaml also has three App Bar buttons (see Listing 5-20) and the functionality of each of these buttons is listed here.
- Refresh: Used to refresh the items displayed in the grid.
- Add: Navigate to PasswordDetail.xaml (see Figure 5-3).
- Edit: Navigate to PasswordDetail.xaml along with the selected password from the GridView as a page parameter.
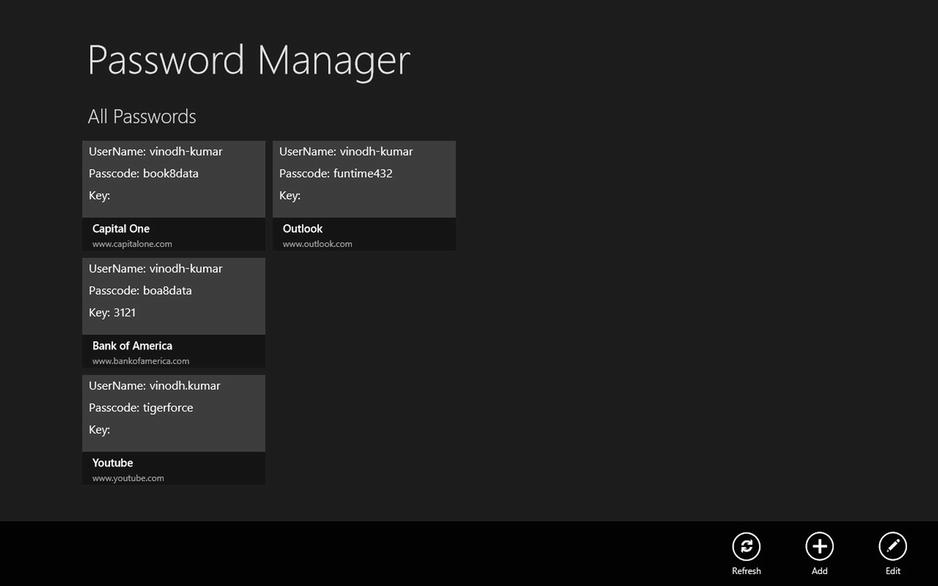
Figure 5-3. Password Manager app displaying the stored passwords
Listing 5-20. MainPage.xaml Includes a GridView with Item Template to Display Password Details
<common:LayoutAwarePage
    x:Name="pageRoot"
    x:Class="PasswordManager.MainPage"
    DataContext="{Binding DefaultViewModel, RelativeSource={RelativeSource Self}}"
    xmlns=" http://schemas.microsoft.com/winfx/2006/xaml/presentation "
    xmlns:x=" http://schemas.microsoft.com/winfx/2006/xaml "
    xmlns:local="using:PasswordManager"
    xmlns:common="using:PasswordManager.Common"
    xmlns:d=" http://schemas.microsoft.com/expression/blend/2008 "
    xmlns:mc=" http://schemas.openxmlformats.org/markup-compatibility/2006 "
    mc:Ignorable="d">
    <!--Reduced Markup for better readability-->
    <Page.Resources>
        <!--DataTemplae-->
        <DataTemplate x:Key="PasswordDataTemplate">
            <Grid Width="250" Height="150">
                <StackPanel>
                    <!--UserName-->
                <StackPanel Orientation="Horizontal">
                    <TextBlock Text="UserName:"/>
                    <TextBlock Text="{Binding UserName}"/>
                  </StackPanel>
                    <!--Password-->
                  <StackPanel Orientation="Horizontal">
                    <TextBlock Text="Passcode:"/>
                    <TextBlock Text="{Binding Passcode}"/>
                  </StackPanel>
                    <!--Key-->
                  <StackPanel Orientation="Horizontal">
                    <TextBlock Text="Key:"/>
                    <TextBlock Text="{Binding Key}"/>
                  </StackPanel>
              </StackPanel>

              <StackPanel VerticalAlignment="Bottom">
                    <!--Title-->
                    <TextBlock Text="{Binding Title}"/>
                    <!--WebSite-->
                    <TextBlock Text="{Binding WebSite}"/>
              </StackPanel>
            </Grid>
        </DataTemplate>
    </Page.Resources>
    <!--AppBar-->
  <common:LayoutAwarePage.BottomAppBar>
    <AppBar IsOpen="True">
      <Grid>
        <Grid.ColumnDefinitions>
          <ColumnDefinition/>
          <ColumnDefinition/>
        </Grid.ColumnDefinitions>
        <StackPanel
                    Orientation="Horizontal"/>
        <StackPanel
                    Grid.Column="1"
                    Orientation="Horizontal">
                   <!-- Refresh Button-->
        <Button
                    Style="{StaticResource RefreshAppBarButtonStyle}"
                    Click="Refresh_Click" />
                    <!--New Password Button-->
        <Button
                    Style="{StaticResource AddAppBarButtonStyle}"
                    Click="Add_Click" />
                    <!-- Edit Password Button-->
        <Button
                    Style="{StaticResource EditAppBarButtonStyle}"
                    Click="Edit_Click"/>
        </StackPanel>
      </Grid>
    </AppBar>
  </common:LayoutAwarePage.BottomAppBar>

    <!--Page Layout-->
    <Grid Style="{StaticResource LayoutRootStyle}" Margin="0">
        <Grid.RowDefinitions>
            <RowDefinition Height="140"/>
            <RowDefinition Height="48"/>
            <RowDefinition Height="275*"/>
        </Grid.RowDefinitions>

        <!-- GridView to display Password details -->
        <GridView
            Grid.Row="2"
            Name="gvPasswords"
            ItemTemplate="{StaticResource PasswordDataTemplate}"
            Grid.RowSpan="2"/>

        <!-- Back button and page title -->
        <Grid>
            <Grid.ColumnDefinitions>
                <ColumnDefinition Width="Auto"/>
                <ColumnDefinition Width="*"/>
            </Grid.ColumnDefinitions>
            <Button
                x:Name="backButton"
                Click="GoBack"
                IsEnabled="{Binding Frame.CanGoBack, ElementName=pageRoot}"
                Style="{StaticResource BackButtonStyle}"/>
            <TextBlock
                x:Name="pageTitle"
                Text="{StaticResource AppName}"
                Grid.Column="1"
                IsHitTestVisible="false"
                Style="{StaticResource PageHeaderTextStyle}"/>
        </Grid>
        <TextBlock
            x:Name="pageSubTitle"
            Text="All Passwords"
            IsHitTestVisible="false"
            Style="{StaticResource PageSubheaderTextStyle}"
            Margin="120,0,30,20"
            Grid.Row="1"/>
    </Grid>
</common:LayoutAwarePage>
The MainPage.xaml code behind the page has one method, LoadAllPasswords, and three click events for each of the App Bar buttons. LoadAllPasswords is called at the start of the page and also when the Refresh button is clicked. This method gets the Passwords collection object using the method GetAllPasswords (see Listing 5-17) from the DataRepository class and binds it to the GridView’s ItemsSource property. Add_Click and Edit_Click events navigate the users to the PasswordDetail.xaml page (see Listing 5-21).
Listing 5-21. MainPage.xaml Code Behind Binds Passwords Collection to GridView
public sealed partial class MainPage : PasswordManager.Common.LayoutAwarePage
{
    public MainPage()
    {
        this.InitializeComponent();
    }

    protected override void OnNavigatedTo(NavigationEventArgs e)
    {
        LoadAllPasswords();
    }

    private void Refresh_Click(object sender, Windows.UI.Xaml.RoutedEventArgs e)
    {
        LoadAllPasswords();
    }

    private void LoadAllPasswords()
    {
        gvPasswords.ItemsSource = App.PasswordDB.GetAllPasswords();
    }

    private void Add_Click(object sender, Windows.UI.Xaml.RoutedEventArgs e)
    {
        var rootFrame = new Frame();
        rootFrame.Navigate(typeof(PasswordDetail));
        Window.Current.Content = rootFrame;
        Window.Current.Activate();
    }

    private void Edit_Click(object sender, Windows.UI.Xaml.RoutedEventArgs e)
    {
        var rootFrame = new Frame();
        rootFrame.Navigate(typeof(PasswordDetail), gvPasswords.SelectedValue);
        Window.Current.Content = rootFrame;
        Window.Current.Activate();
    }
}
Adding and Updating a Password
PasswordDetail.xaml is a very simple page (see Figure 5-3) that is used to add a new password or update or delete an existing password (see Listing 5-22). This page has the necessary controls to input password information. Also on this page we have two App Bar buttons for saving and deleting the password.
Listing 5-22. PasswordDetail.xaml Has Controls to Input Password Information
<common:LayoutAwarePage
    x:Name="pageRoot"
    x:Class="PasswordManager.PasswordDetail"
    DataContext="{Binding DefaultViewModel, RelativeSource={RelativeSource Self}}"
    xmlns=" http://schemas.microsoft.com/winfx/2006/xaml/presentation "
    xmlns:x=" http://schemas.microsoft.com/winfx/2006/xaml "
    xmlns:local="using:PasswordManager"
    xmlns:common="using:PasswordManager.Common"
    xmlns:d=" http://schemas.microsoft.com/expression/blend/2008 "
    xmlns:mc=" http://schemas.openxmlformats.org/markup-compatibility/2006 "
    mc:Ignorable="d">
    <!--Reduced Markup for better readability-->
    <!--App Bar buttons-->
  <common:LayoutAwarePage.BottomAppBar>
    <AppBar IsOpen="True">
      <Grid>
        <Grid.ColumnDefinitions>
          <ColumnDefinition/>
          <ColumnDefinition/>
        </Grid.ColumnDefinitions>
        <StackPanel
                    Orientation="Horizontal"
                    Grid.Column="1" HorizontalAlignment="Right">
                    <!--Save button-->
          <Button
                        Style="{StaticResource SaveAppBarButtonStyle}"
                        Click="Save_Click"/>
                    <!--Delete button-->
          <Button
                        x:Name="btnDelete"
                        Style="{StaticResource DeleteAppBarButtonStyle}"
                        Click="Delete_Click"
                        IsEnabled="False"/>
        </StackPanel>

      </Grid>
    </AppBar>
  </common:LayoutAwarePage.BottomAppBar>

 <!--Page Layout-->
    <Grid Style="{StaticResource LayoutRootStyle}">
        <Grid.RowDefinitions>
            <RowDefinition Height="140"/>
            <RowDefinition Height="*"/>
        </Grid.RowDefinitions>

        <!-- Back button and page title -->
        <Grid>
            <Grid.ColumnDefinitions>
                <ColumnDefinition Width="Auto"/>
                <ColumnDefinition Width="*"/>
            </Grid.ColumnDefinitions>
            <Button
                x:Name="backButton"
                Click="GoBack"
                IsEnabled="{Binding Frame.CanGoBack, ElementName=pageRoot}"
                Style="{StaticResource BackButtonStyle}"/>
            <TextBlock
                x:Name="pageTitle"
                Grid.Column="1"
                Text="{StaticResource AppName}"
                Style="{StaticResource PageHeaderTextStyle}"/>
        </Grid>
        <!--Password Details-->
        <StackPanel Grid.Row="1">
          <TextBlock Text="Add Password"/>
            <!--Title-->
          <StackPanel>
            <TextBlock Text="Title"/>
            <TextBox x:Name="txtTitle"/>
          </StackPanel>
            <!--User Name-->
          <StackPanel>
            <TextBlock Text="User Name"/>
            <TextBox x:Name="txtUserName"/>
          </StackPanel>
            <!--Password-->
          <StackPanel>
            <TextBlock Text="Password"/>
                <TextBox x:Name="txtPassword"/>
          </StackPanel>
            <!--Category-->
          <StackPanel>
            <TextBlock Text="Category"/>
            <ComboBox x:Name="cboCategory"/>
          </StackPanel>
            <!--Web Site-->
          <StackPanel>
            <TextBlock Text="Web Site"/>
            <TextBox x:Name="txtWebSite"/>
          </StackPanel>
            <!--Key-->
          <StackPanel>
            <TextBlock Text="Key"/>
            <TextBox x:Name="txtKey"/>
          </StackPanel>
            <!--Note-->
          <StackPanel>
            <TextBlock Text="Note"/>
            <TextBox x:Name="txtNote"/>
          </StackPanel>
        </StackPanel>
    </Grid>
</common:LayoutAwarePage>
The PasswordDetail.xaml code behind the page has the necessary code to save and delete a password. First, when the page is invoked for editing an existing password object, the values will be assigned to the corresponding controls for editing as shown in Listing 5-23.
Listing 5-23. Assigning the Password Values to the Controls
 protected override void OnNavigatedTo(NavigationEventArgs e)
{
    cboCategory.DisplayMemberPath = "CategoryName";
    List<Category> categories = null;
    categories = App.PasswordDB.GetCategories();
    cboCategory.ItemsSource = categories;
    if (e.Parameter != null)
    {
        _password = (Password)e.Parameter;
        if (_password != null)
        {
            txtTitle.Text = _password.Title ?? "";
            txtUserName.Text = _password.UserName ?? "";
            txtPassword.Text = _password.Passcode ?? "";
            txtKey.Text = _password.Key ?? "";
            txtNote.Text = _password.Note??"";
            txtWebSite.Text = _password.WebSite ?? "";
            cboCategory.SelectedValue= categories.Where(c=>c.CategoryId == _password.CategoryId).First();
            btnDelete.IsEnabled = true;
        }
    }
}
The Save_Click event is called when the Save button is clicked. Within this event we create a Password object and pass it as a parameter to the SavePassword method in the DataRepository instance for saving the object to the database (see Listing 5-24).
Listing 5-24. Creating a Password Object for Saving
private void Save_Click(object sender, Windows.UI.Xaml.RoutedEventArgs e)
{
    Password pwd;
    pwd = _password == null ? new Password() : _password;
    pwd.PasswordId = _password == null ? Guid.NewGuid() : _password.PasswordId;
    pwd.Title = txtTitle.Text;
    pwd.UserName = txtUserName.Text;
    pwd.Passcode = txtPassword.Text;
    pwd.Key = txtKey.Text;
    pwd.WebSite = txtWebSite.Text;
    pwd.Note = txtNote.Text;
    Category category = (Category)cboCategory.SelectedValue;
    pwd.CategoryId = category.CategoryId;
    App.PasswordDB.SavePassword(pwd, _password == null ? true : false);
    NagivateToMainPage();
}
The DeletePassword method in the DataRepository class is called on a Delete button click event. This deletes the corresponding row in the Password table and navigates back to the MainPage.xaml, as shown in Listing 5-25.
Listing 5-25. Deleting the Password Using the DataRepository DeletePassword Method
private void Delete_Click(object sender, Windows.UI.Xaml.RoutedEventArgs e)
{
    App.PasswordDB.DeletePassword(_password.PasswordId);
    NagivateToMainPage();
}
Now with all the code in place, when we run the Password Manager app, it will display the default passwords that we added to the Passwords table as shown in Figure 5-4. From here on we will be able to add new password and update and delete existing passwords.
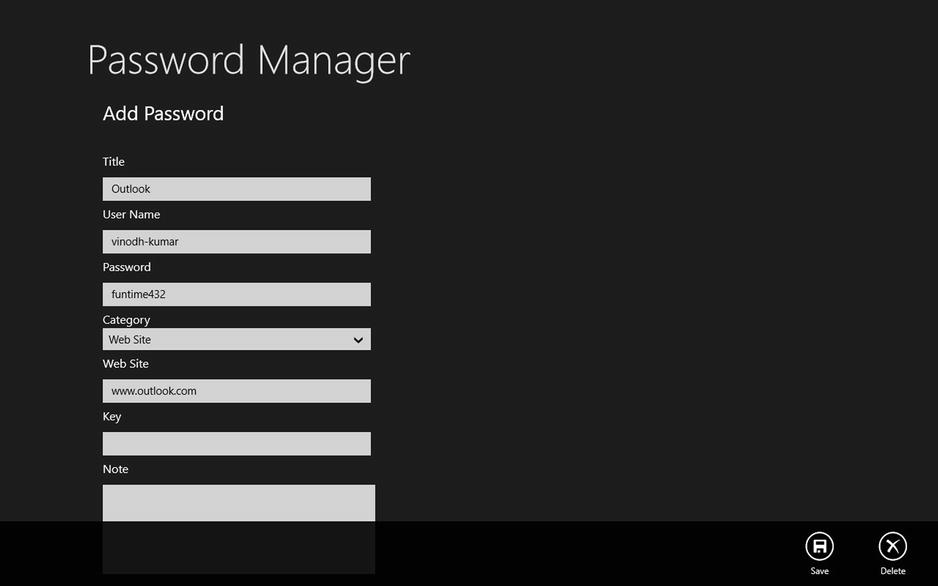
Figure 5-4. Password details page for adding or editing passwords
Ideas for Improvement
The Password Manager app can be worked on and improved to make it a fully functional password management application. The following are some of the features that can be added.
- As you can see, the intention of developing this app is to showcase the use of the ESENT database and application data storage, so we have not gone into writing code to encrypt the data. That should be the first improvement that we make.
- We store the password by categories but considering the length of this chapter we have not implemented it. This could be one enhancement we can make, along with the option to search using the Windows Search function.
- Backup and export capabilites would be helpful.
- Right now we store the app in application local storage. Instead, we can use roaming storage so that the data will syn across all the user’s computers and devices.
Conclusion
In this chapter we learned to use the ESENT database and application data storage as a local storage option by building a Password Manager app. The goal here was to provide an intermediate introduction to ESENT and application storage using existing libraries so that decisions in selecting a local data storage option can be made with ease.
In the next chapter we learn about yet another but more widely used local storage option, Sqlite. As always, we will be building an app that uses Sqlite as a local storage database.